Element Sport Ankle Brace Element Sport Ankle Brace - Mediroyal
Element Sport Ankle Brace Element Sport Ankle Brace - Mediroyal
Element Sport Ankle Brace Element Sport Ankle Brace - Mediroyal
- No tags were found...

You also want an ePaper? Increase the reach of your titles
YUMPU automatically turns print PDFs into web optimized ePapers that Google loves.
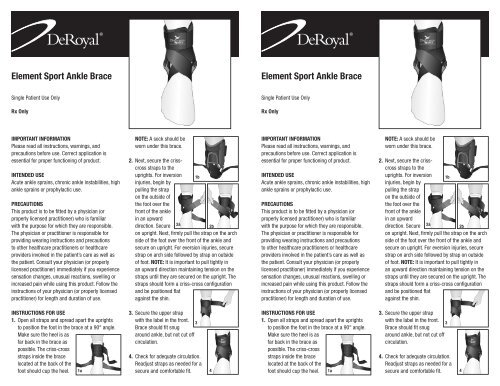
<strong>Element</strong> <strong>Sport</strong> <strong>Ankle</strong> <strong>Brace</strong><strong>Element</strong> <strong>Sport</strong> <strong>Ankle</strong> <strong>Brace</strong>Single Patient Use OnlySingle Patient Use OnlyRx OnlyRx OnlyIMPORTANT INFORMATIONPlease read all instructions, warnings, andprecautions before use. Correct application isessential for proper functioning of product.INTENDED USEAcute ankle sprains, chronic ankle instabilities, highankle sprains or prophylactic use.PRECAUTIONSThis product is to be fitted by a physician (orproperly licensed practitioner) who is familiarwith the purpose for which they are responsible.The physician or practitioner is responsible forproviding wearing instructions and precautionsto other healthcare practitioners or healthcareproviders involved in the patient’s care as well asthe patient. Consult your physician (or properlylicensed practitioner) immediately if you experiencesensation changes, unusual reactions, swelling orincreased pain while using this product. Follow theinstructions of your physician (or properly licensedpractitioner) for length and duration of use.NOTE: A sock should beworn under this brace.2. Next, secure the crisscrossstraps to theuprights. For inversion 1binjuries, begin bypulling the strapon the outside ofthe foot over thefront of the anklein an upwarddirection. Secure 2a2bon upright. Next, firmly pull the strap on the archside of the foot over the front of the ankle andsecure on upright. For eversion injuries, securestrap on arch side followed by strap on outsideof foot. NOTE: It is important to pull tightly inan upward direction maintaining tension on thestraps until they are secured on the upright. Thestraps should form a criss-cross configurationand be positioned flatagainst the shin.IMPORTANT INFORMATIONPlease read all instructions, warnings, andprecautions before use. Correct application isessential for proper functioning of product.INTENDED USEAcute ankle sprains, chronic ankle instabilities, highankle sprains or prophylactic use.PRECAUTIONSThis product is to be fitted by a physician (orproperly licensed practitioner) who is familiarwith the purpose for which they are responsible.The physician or practitioner is responsible forproviding wearing instructions and precautionsto other healthcare practitioners or healthcareproviders involved in the patient’s care as well asthe patient. Consult your physician (or properlylicensed practitioner) immediately if you experiencesensation changes, unusual reactions, swelling orincreased pain while using this product. Follow theinstructions of your physician (or properly licensedpractitioner) for length and duration of use.NOTE: A sock should beworn under this brace.2. Next, secure the crisscrossstraps to theuprights. For inversion 1binjuries, begin bypulling the strapon the outside ofthe foot over thefront of the anklein an upwarddirection. Secure 2a2bon upright. Next, firmly pull the strap on the archside of the foot over the front of the ankle andsecure on upright. For eversion injuries, securestrap on arch side followed by strap on outsideof foot. NOTE: It is important to pull tightly inan upward direction maintaining tension on thestraps until they are secured on the upright. Thestraps should form a criss-cross configurationand be positioned flatagainst the shin.INSTRUCTIONS FOR USE1. Open all straps and spread apart the uprightsto position the foot in the brace at a 90° angle.Make sure the heel is asfar back in the brace aspossible. The criss-crossstraps inside the bracelocated at the back of thefoot should cup the heel. 1a3. Secure the upper strapwith the label in the front.<strong>Brace</strong> should fit snugaround ankle, but not cut offcirculation.4. Check for adequate circulation.Readjust straps as needed for asecure and comfortable fit.INSTRUCTIONS FOR USE3. Secure the upper strap3 1. Open all straps and spread apart the uprights with the label in the front.to position the foot in the brace at a 90° angle. <strong>Brace</strong> should fit snug3Make sure the heel is asfar back in the brace asaround ankle, but not cut offcirculation.possible. The criss-cross4straps inside the bracelocated at the back of thefoot should cup the heel. 1a4. Check for adequate circulation.Readjust straps as needed for asecure and comfortable fit. 40-1841 Elemt<strong>Sport</strong>.indd 1 12/18/09 8:18:30 AM