
You also want an ePaper? Increase the reach of your titles
YUMPU automatically turns print PDFs into web optimized ePapers that Google loves.
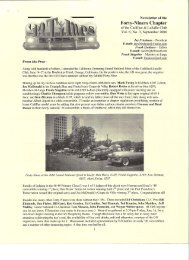
Newsletter Of The<br />
Forty-Niners Chapter Of<br />
The Cadillac & LaSalle Club<br />
Jay Friedman – President<br />
E-mail: jaysfriedman@yahoo.com<br />
Art Gardner – Editor<br />
E-mail: agardner@gardnergroff.com<br />
Frank Lindauer – Editor Emeritus<br />
Frank Stagnitto – Member-at-Large<br />
From the Prez— Vol. 9, No. 2, <strong>June</strong> <strong>2009</strong><br />
‘49ERS GETTING READY FOR LAS VEGAS GRAND NATIONAL…,<br />
which should be a great one. Unfortunately, I won’t be able to go myself due to various other<br />
commitments, but my absence will be more than made up for by the Forty-Niners Chapter Member-at-<br />
Large, Frank Stagnitto, who will be attending. Frank has promised a full report on the GN activities of ’49s<br />
and their owners, which will appear in the September issue of the Times.<br />
The Cadillac-Lasalle Club recently sent a flyer touting the virtues of the 2 nd edition of the ’48 and ’49<br />
Cadillac Authenticity Manual to all CLC members who are owners of such cars but who have not yet<br />
bought a copy. Get a copy of the 2 nd edition of the manual by sending a $65 check to CLC Director of<br />
Technical Services, Bill Anderson 2198, Johns Hopkins Road, Gambrills, Maryland 21054-1614.<br />
There are four Series 62 4-door sedans featured in this issue, which is only fitting as they were the most<br />
popular ’49 Cadillac mode, with 37,617 being sold or more than 40% of all ‘49s produced.<br />
Now that summer is upon us, take your ’49 out and drive it whatever the model. That’s what they’re for!<br />
Jay<br />
BIAS-PLY VS. RADIAL TIRES: A NEVER-ENDING DISCUSSION<br />
(The following resulted from an exchange of emails between Dennis Akerman and Jay Friedman.)<br />
Most radial tires change the "stance" of the car, as they are wider and of a smaller overall diameter than the<br />
original 8.20 X 15 bias ply tires. Besides the difference in appearance, the greater width of radial tires can<br />
cause two problems:<br />
1. Greater steering effort is required when parking or maneuvering at low speeds because "more rubber is<br />
on the road";<br />
2. Under certain conditions the rear tires could scrape the fender skirts; for example, when rounding a curve<br />
at higher speeds.<br />
According to one tire company official, another problem is that when going over a bump radials exert much<br />
more lateral pressure on the wheels than the original tires. Since '49 wheels are 2 halves welded together,<br />
in extreme circumstances the car could go over a harsh bump and, allegedly, the wheel will split in two.<br />
On the other hand, many knowledgeable people say this is an old husband’s tale and that, in general, '49<br />
owners have no problem at all with radials; they last longer, ride better and may be safer.
A good source of radials tires is Diamond Back in South Carolina, since one of their lines of tires (possibly<br />
called "SE") has dimensions that are closer to 8.20 X 15s than other radials; that is, they are narrower and<br />
taller. Diamond Back advertises in Hemmings, usually on or near the back cover.<br />
If you stay with the original-type 8.20 X 15 bias-ply tires, they have their virtues, too. For one thing, until<br />
they wear significantly, many owners find that they ride very well, even at high speeds, and require less<br />
effort when parking. Secondly, bias-ply tires cost less. In fact, some suppliers occasionally sell “seconds”<br />
or “blems”, with minor blemishes on the white sidewall but no structural damage, for not much more than<br />
$100 each. Thus, while bias-ply tires don't last as long as radials, if you don't drive your car much, in the<br />
long run they will provide an entirely satisfactory ride, will save you money and will look authentic. So,<br />
the question then becomes, “why bother with radials”? (Personally, I use bias-plies and drive my car a lot.)<br />
There is probably no hard and fast conclusion to this discussion, so whether you choose to use bias ply or<br />
radial tires is ultimately a matter of personal preference. If you have a an opinion one way or another that<br />
you would like to share with the rest of us Forty-Niners please email the Times at<br />
jaysfriedman@yahoo.com or snail mail to Jay Friedman’s address in the CLC Directory.<br />
MY COURTSHIP WITH THE BARONESS<br />
By Joe Cutler<br />
It all started innocently enough, as many “romances” do. In October, 2008 I decided to drive my ‘49 Club<br />
coupe, The Duchess, to the annual Cadillac Day held at Norwood Cadillac in Norwood, Mass. It was a<br />
picture-perfect New England fall day, resulting in a large turnout of vintage Cadillacs and LaSalles.<br />
As I sat by my car enjoying the festivities and the last vestiges of the old car season, an older gentleman<br />
approached and struck up a conversation. He obviously liked my car, mentioned how he had always loved<br />
the 1948-49 “fastback” coupes, and said he owned a 1949 Cadillac Series 62 4-door sedan that he was<br />
considering sending to the crusher. He further explained that while the car had lots of rust-out, it did have<br />
many new parts, including brand-new rear leaf springs and shackles as well as a new battery box, that the<br />
water pump, carb and generator had been rebuilt, and that it ran and shifted perfectly. The die was cast; I<br />
obtained his address and promised I’d take a “look” at it the next day.<br />
I arrived at the appointed time, and as I drove up his driveway I caught my first glimpse of “Her” sitting<br />
forlornly beside his garage. I was anxious to examine this derelict, and wasted no time doing the requisite<br />
“walk-around”, opening the hood, doors, trunk and peering underneath. She was indeed a rusty one: the<br />
“tin termites” had enjoyed an all-you-can-eat buffet, in the process devouring both inner and outer rocker<br />
panels and the bottom front and rear sections of the front fenders. The rest of the body had ample surface<br />
rust and peeling paint, but the intriguing aspect was that this appeared to be a totally original unmolested<br />
car, right down to its original paint, Avalon Grey. In addition, amazingly enough, the doors were rocksolid<br />
as was the trunk and, except for the front corners, the floors. He started her up and the engine<br />
sounded strong. A lot of accessories still worked, including all the interior lights, and the car was 100%<br />
complete, right down to the original washer bottle and perfect vacuum antenna sitting in the trunk.<br />
He wanted $1,000 for it, but when I waved $800 cash under his nose the deal was done. The next weekend<br />
a fellow Cadillac enthusiast and I brought her home on a trailer. I gave her an interim name, The Grey<br />
Ghost, and started her up every day after work. The more I ran her the better the engine sounded! I started<br />
feeling pity for the poor girl (a dangerous emotion) and before I knew it she was in the garage and up on<br />
jack stands. I rebuilt the brake system, reasoning, against everyone’s sound advice (including my own)<br />
that, perhaps, there was a glimmer of hope for this rusty relic, and doing most of the work myself I’d<br />
possibly transform this “diamond-in-the-rough” into a fun “driver”. Yeah, right! I further rationalized by<br />
telling myself I had many of the parts she needed and five other ’49 four-door sedan parts cars.<br />
I finished the brake system and commenced completely disassembling her. I found it utterly amazing that<br />
most everything came apart with relative ease, especially considering her rusty state of disrepair. When I
pulled up the original carpets, I even found an interesting assembly-line checklist glued to the rear<br />
passenger area floor! I had never seen one of these in the many ‘49s I had already restored or parted out.<br />
The disassembly progressed at a feverish pace. (Even as a kid I loved taking things apart. The hard part is<br />
putting it back together!) Before I knew it I had a bare shell on a chassis. All the stainless moldings even<br />
came off as though they had been installed last week; not one clip was rusty or broken.<br />
A few weeks later, pondering where I might locate better fenders, I remembered a ’49 sedan I had<br />
previously owned which ended up inside a trailer at a local salvage yard. On a whim, I called the yard,<br />
whose owner told me the car had not moved, was now disassembled and had lots of spare parts in it. We<br />
agreed upon $600 and this gem was hauled to my yard to join the others.<br />
After discussing it with The Duchess, I decided that, in keeping with the regal theme, her final name would<br />
be the Baroness. I contacted the guy whose name was on the title, and learned that he had driven her daily<br />
for 3 years, and it was not uncommon to have her up to 90 mph! He was thrilled to learn she finally had a<br />
good home and a prospect of salvation.<br />
My auto-body man and I have put in many long weekends already, and the Baroness is now rock-solid. I<br />
lost track of how many patch panels I fabricated to bring her to this point; my auto-body man even<br />
suggested I name her “Patches” instead.<br />
All the upholstery is being redone in grey Bedford Cord with blue Broadcloth and blue carpets, which is<br />
1949 Cadillac trim number 41. I’ve always been a stickler for authenticity, but this time I’ve decided to<br />
deviate and paint her a 2-tone color, Triumph Blue on the bottom with a French Grey roof. Instead of<br />
“sombreros”, I’ve decided to install the small “standard” hubcaps with trim rings. Finally, I’m going to do<br />
the dash like a convertible: Triumph Blue Metallic with a Beach Beige insert, which I think is going to be a<br />
striking color combination.<br />
The Duchess is really excited abut her new sister, and I plan to show them side-by-side at future shows.<br />
Projected date of completion is Spring 2010.<br />
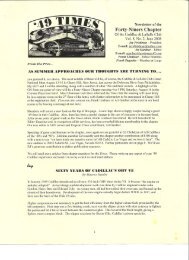
THE BARONNESS AS SHE NOW APPEARS<br />
(Fixing Those Flat Tires Is The Least Of The Tasks Ahead)
CONVERSION OF AIR CLEANER TO USE A PAPER ELEMENT<br />
Joe Foerster of N. Hollywood CA has converted the oil bath air cleaner on his Series 62 sedan to use a<br />
modern paper element. He did the job in such a way that it is not visible. Joe put together a series of<br />
photos and descriptive text regarding the air cleaner's conversion which can be found at the following web<br />
site: http://bobnjoe.com/car/1949/blog2/archives/2007/11/entry_125.html Below is a picture of Joe’s car,<br />
appropriately named “49er”, with its converted air cleaner ensconced under the hood.<br />
JOE FOERSTER’S SERIES 62 4-DOOR SEDAN<br />
HOW TO HOOK UP YOUR ‘49’s UNDER-HOOD HEATER HOSES<br />
(The following resulted from an exchange of emails between Herman Desser and Jay Friedman. After<br />
having done a frame-off restoration of a prize-winning ’48 convertible, Herman saw the light and is now<br />
doing the same to a superior ’49 convertible.)<br />
Before hooking up the hoses, observe that the defroster core and motor on the driver’s side firewall has<br />
three pipes pointing downwards. Two of these pipes are on the inboard side of the defroster, one of which<br />
is in front of the other. The third pipe is at the outboard side of the defroster.<br />
Directly under the defroster, sitting on the frame rail, is a T shaped pipe fitting (to which hoses will be<br />
connected). The T connection sits on the frame in an upside down position, something like this ┴, with the<br />
axis of its bottom facing longitudinally toward the front and back of the car.<br />
From the pipe connection at the back of the driver's side cylinder head, a short hose goes through an Lshaped<br />
elbow pipe (which looks like this: ┘) to the front pipe of the two inboard pipes on the defroster.<br />
From the back pipe of the two inboard pipes on the defroster, another hose runs under the car’s body to the<br />
driver's side under-seat heater. A third hose runs from the outboard pipe on the defroster straight down to<br />
the upward facing pipe on the ┴ (or T) connection. (See the photo on the next page.)<br />
From the second pipe on the driver's side under-seat heater, a hose runs across the top of the frame to the<br />
passenger's side under-seat heater. From the second pipe on the passenger's side under-seat heater, a hose<br />
runs back over the frame to the driver’s side of the car’s underside, and then all the way to the backward<br />
facing pipe on the ┴ (or T) connection. Another hose runs from the front facing pipe on the ┴ (or T)<br />
connection, up through a clip on the inner fender, to the pipe on the left side of the water pump.<br />
If you need further help making sense of all this, contact Jay or Herman.
HOSE CONNECTIONS ON THE DEFROSTER UNIT<br />
A ’49 IN SWEDEN<br />
Chapter member Lars Pettersson now lives in County Galway, Ireland but owns a ’49 back home in<br />
Sweden. Lars writes that it’s a “4-door, Series 62 Touring Sedan, black, with 42,363 original miles as of<br />
April 2008”. The photo below shows Lars’ car on a ferry crossing a Swedish fiord at Lysetil. The little<br />
boy, naturally, is much more interested in the water than the car. He’ll see the light when he’s older!<br />
….COME BLOW YOUR HORN<br />
By Art Gardner<br />
Installing my 6107’s horns was one of the last tasks to complete after getting her running. I hooked up the<br />
wires to the horns, relay, etc and tried out them out. They blew for a second or two and then quit. So I had<br />
to take the horns off and give them a "tune up" by taking them apart, filing the points (using an ignition<br />
points file), cleaning them up internally, adjusting the points to give a consistent tone, painting, etc.
The task of adjusting the points is a bit irksome, as it will annoy the neighbors! Basically, you turn the<br />
adjustment nut while energizing the horn with a couple of wires until a good sound comes out of the horn.<br />
After reinstalling the horns, all that was left was to install the horn button and horn ring. That job took a<br />
little bit of patience in order to make the system work reliably, as described next.<br />
To get the horn ring and button working right, I first had to adjust the longitudinal position of the steering<br />
shaft relative to the steering column. This was because I had changed this positioning inadvertently as part<br />
of the installation of a rack and pinion steering unit. This is not necessary on cars with stock steering.<br />
Next came the task of trying to find the right replacement for the fiber washer that originally was fitted<br />
under the little contact at the top of the steering shaft. As you can see in the schematic below of a generic<br />
Cadillac steering wheel, the horn button (7.3785) is held away from the steering shaft by a conical spring<br />
(7.3796) which rests at its small end against the nub of the contact (7.3820).<br />
The contact has a flange and a shank (not seen in this parts diagram). I thought that the horns were<br />
energized by the flange of the contact touching the top of the steering shaft. But that is not the usual<br />
manner of blowing the horn. Instead, the flange is held slightly away from the top of the steering shaft by<br />
the washer, even against the force of the horn button spring. When the horn ring is pushed, it causes the<br />
contact to tilt slightly in the same direction as the horn ring. The lower tip of the contact apparently then<br />
touches the inner wall of the steering shaft, completing the circuit. See my sketch (not to scale and a little<br />
rough, but you will get the idea). The trick then is to come up with a decent replacement for the washer<br />
that will be thick enough to keep the flange from contacting the top surface of the shaft and yet will allow<br />
the horn to blow when the horn ring is tilted. Jay Friedman told me that some folks take a small rubber<br />
band and wrap it around and around the shank to make a replacement. I tried that, with poor results. The<br />
car had an O-ring on there as some previous owner's attempt at a repair, but it wasn't doing the job.<br />
What I came up with is a bit of rubber grommet as shown in the drawing above. I cut the grommet with a<br />
scissors to make a suitable collar to wrap around the upper part of the shank of the contact. To slip it over<br />
the shank without removing the horn wire from the shaft, I simply sliced it lengthwise (split it) with the<br />
scissors. Since it is captured in the bore, the split in the rubber is of no consequence. I found that a<br />
grommet with a 3/16" ID worked well. Alternatively, a bit of rubber hose with a similar diameter would
work as well. It takes some careful trial and error to get the length of the rubber /grommet just right, but I<br />
managed in 4 attempts. The set up works well and my car has working horns for the 1st time in 2 decades!<br />
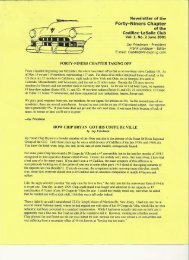
JIM AND DARA WARREN’S BEAUTIFUL 6269 4-DOOR, “MISS DAISY”,<br />
PARKED IN FRONT OF THE WHISTLE STOP CAFÉ IN DECATUR, TEXAS<br />
TWO WISCONSIN COUPES, OF WHICH ONE IS A DE VILLE<br />
Most of us Forty-Niners have only one ’49 Cadillac, but 28 chapter members, including Jack Hoffman of<br />
Horicon WI, are lucky enough to own two or more. On the left in the photo below is Jack’s dark green<br />
6207, whose motor is stock with Hydra-matic. To the right is Jack’s classy Coupe de Ville, about which he<br />
writes, “It’s almost finished. The car is now stick shift with the regular side shift box and the correct<br />
steering column. I have `55 heads and dual carbs along with a “hotter” cam. However, I may convert it<br />
back to stock, but am torn between the two possibilities. I have not yet built the exhaust system which will<br />
depend on the final engine status. This lack of exhaust confines the car to the shop.”<br />
Although the theme of this issue is Series 62 4-door cars, we couldn’t resist including Jack’s two beauties.<br />
On the other hand, one might say that between these two 2-door ‘49s is a total of four doors.
’49 Times<br />
Jay Friedman<br />
1530 September Chase<br />
Decatur, GA 30033<br />
FOR SALE<br />
1949 Parts For Sale: Vacuum antenna, complete & in excellent condition including mast and all<br />
necessary parts. $300 FIRM. Winged Dash Emblem, Excellent, $50. Speaker Grille, Nice, $75.<br />
Instrument Cluster, Very Nice, $125. Pair of “Standard” Parking Lamp Assemblies, Beautiful<br />
Condition, $150. Chrome Hood Center Moulding, Very Nice, $100. Complete, Original Oil Filter<br />
Assembly with lines, $75. Hood and Trunk Cloisonés, Very Nice, $100 each.<br />
Joe Cutler, phone: 508-476-3490, email: caddyjoe@att.net.<br />
1949 Cadillac Engine Clean block, never cut. Heads magna-fluxed, reground crankshaft, new camshaft,<br />
oil pan excellent, water and fuel pumps rebuilt. $800. Also have a 2 nd motor. Pair of Parking Lamp<br />
Assemblies, $100. Mike Gonzales, Napa CA, 707-815-9068