Olevia Firmware Updating Instructions
Olevia Firmware Updating Instructions
Olevia Firmware Updating Instructions

Create successful ePaper yourself
Turn your PDF publications into a flip-book with our unique Google optimized e-Paper software.
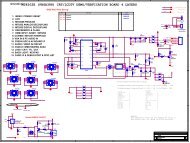
TITLE<br />
Service Manual<br />
LCD TV For 232-S12<br />
Doc No.<br />
Version 1.0<br />
Page 17/44<br />
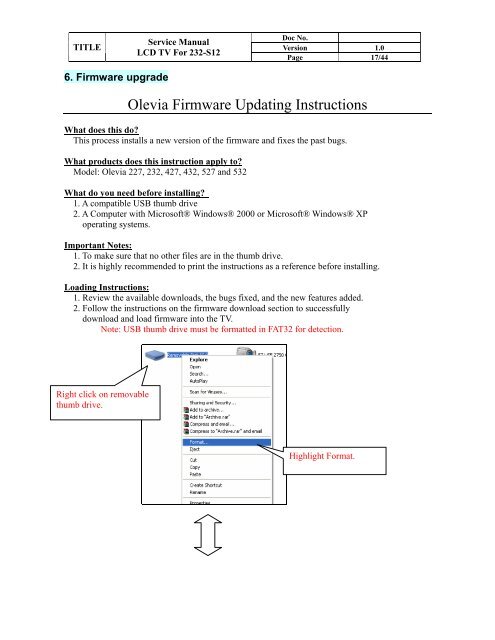
6. <strong>Firmware</strong> upgrade<br />
<strong>Olevia</strong> <strong>Firmware</strong> <strong>Updating</strong> <strong>Instructions</strong><br />
What does this do?<br />
This process installs a new version of the firmware and fixes the past bugs.<br />
What products does this instruction apply to?<br />
Model: <strong>Olevia</strong> 227, 232, 427, 432, 527 and 532<br />
What do you need before installing?<br />
1. A compatible USB thumb drive<br />
2. A Computer with Microsoft® Windows® 2000 or Microsoft® Windows® XP<br />
operating systems.<br />
Important Notes:<br />
1. To make sure that no other files are in the thumb drive.<br />
2. It is highly recommended to print the instructions as a reference before installing.<br />
Loading <strong>Instructions</strong>:<br />
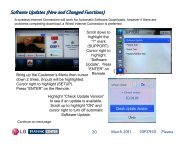
1. Review the available downloads, the bugs fixed, and the new features added.<br />
2. Follow the instructions on the firmware download section to successfully<br />
download and load firmware into the TV.<br />
Note: USB thumb drive must be formatted in FAT32 for detection.<br />
Right click on removable<br />
thumb drive.<br />
Highlight Format.
TITLE<br />
Service Manual<br />
LCD TV For 232-S12<br />
Doc No.<br />
Version 1.0<br />
Page 18/44<br />
Select FAT32<br />
Select Start to Initiate<br />
Format.<br />
Make sure all data in thumb drive has<br />
been backed up before you select OK.
TITLE<br />
Service Manual<br />
LCD TV For 232-S12<br />
Doc No.<br />
Version 1.0<br />
Page 19/44<br />
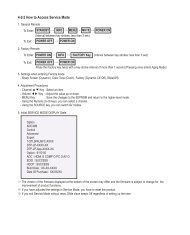
3. After you have located the firmware, download it to a thumb drive. There are<br />
five different files.<br />
4. Turn TV off and insert the USB thumb drive into the TVs USB input.<br />
5. Turn TV power on, OLEVIA screen will pop up and after a few seconds a blue<br />
bar and will appear on the lower part of the screen covering the whole image<br />
from left to right, then a red bar.<br />
6. Once the firmware loading is complete the TV will turn on and initial<br />
Home/Showroom option screen will appear.<br />
7. Check under OSD menu <strong>Firmware</strong> Version and make sure that it matches with<br />
that of thumb drive. (MenuSetup<strong>Firmware</strong> Version)<br />
8. Take off the thumb drive.<br />
9. For more help, please call our technical support at 1-866-9OLEVIA (965-3842)
TITLE<br />
Service Manual<br />
LCD TV For 232-S12<br />
Doc No.<br />
Version 1.0<br />
Page 20/44<br />
7. EDID write in and ADC correction and Parameter Adjustment<br />
7-1 EDID write in<br />
7-1.1 EDID tools<br />
1. PC(Notebook)<br />
2. Software(EDID Write EEprom20060816.exe)and confirm Personal computer hard disk<br />
Have 2 files (1. C:\EDID Editor(including Hex files) 2.C:\LCD TV\DATA(product and<br />
record had No.)<br />
3. EDID PCBA tool、USB cable、RS232 mini din、Print cable、VGA cable<br />
7-1.2 EDID write in<br />
Step 1<br />
Step 2<br />
Step 4<br />
Step 5<br />
Step 3<br />
Step 6<br />
Step 7<br />
1. Open Labview EDID Writ Eeprom20060816 file, and confirm software Keep Running.(Refer<br />
Step 1)<br />
2. choice RS-232 (PC System)Port No.(Refer Step 2),choice burn in type (Refer Step 3)<br />
3. press Set Model button(Refer Step 4), and key in 232-S12. and confirm Scalar solution (Refer<br />
Step 5)<br />
4. confirm EDID Jig PCBA (printer port and USB A-B Line connect to PC, HDMI line to TV first ,<br />
MinDim RS-232 to TV)<br />
5. and then press Button(Refer Step 6), then open a save file path in widow.<br />
operate Barcode scanner scan S/N stick No.<br />
6. First write HDMI EDID code , if finish OK you can find green light.(Refer Step 7)<br />
7. And have a message that change EDID Jip PCBA VGA Cable to TV.(HDMI line must leave<br />
PCBA Jig.) ,if write OK you can fine green light and show the
TITLE<br />
Service Manual<br />
LCD TV For 232-S12<br />
Doc No.<br />
Version 1.0<br />
Page 21/44<br />
message that change next set.<br />
7-2 ADC correction and Parameter adjustment<br />
ADC correction and Parameter adjustment tools:<br />
1. PC(Notebook)<br />
2. CHROMA 2325<br />
3. MINOLTA CA-210<br />
4. Software(Gamma Calculator6A_Jason.exe)<br />
Photo 1<br />
7-2.1 ADC correction<br />
1. Click the icon on the desk "Gamma Calculator" (please see<br />
Photo 1), and then Photo 2 would show up.<br />
2. Click the icon "Gamma Calculator" of Photo 2, and then<br />
Photo 3 would show up.<br />
3. Connect "RS232" &"VGA" with TV.<br />
4. click the "arrow mark" (which is circle by red) in Photo 3,<br />
and then click the icon "ADC" also in Photo 3 blue circle.<br />
5. The window will show up with the instruction about<br />
component, and then connecting component instead of<br />
VGA port.<br />
6. The ADC process is completed once the window with the<br />
message "OK" shows up.<br />
Photo 2<br />
Photo 3
TITLE<br />
Service Manual<br />
LCD TV For 232-S12<br />
Doc No.<br />
Version 1.0<br />
Page 22/44<br />
Attention:<br />
1. Please make sure it's under "VGA Source" before<br />
processing ADC.<br />
2. Please pay attention to different solution for<br />
ATI/MTK8202/PW106 as Photo 3 green circle.<br />
3. Please make sure the set-up for RS232 is correct.
TITLE<br />
Service Manual<br />
LCD TV For 232-S12<br />
Doc No.<br />
Version 1.0<br />
Page 23/44<br />
7-2.2 Parameter adjustment<br />
1. Click the icon on the desk "Gamma Calculator" (please<br />
see Photo 1), and then Photo 2 would show up.<br />
2. Click the icon "Gamma Calculator" of Photo 2, and<br />
then Photo 3 would show up.<br />
3. Please follow (as Photo 4 blue circle) to choose the<br />
solution & panel mode.<br />
4. Connect the" RS232, USB, VGA changeful wire, and<br />
audio wire" with TV. And then connect the other side<br />
of VGA changeful wire with the pattern generator, and<br />
set up the TV source under "VGA". And please locate<br />
the "CA-210" on center of TV screen.<br />
5. Click "BL" button, and the window with "Gamma<br />
adjustment" message would show up. Please click<br />
"OK" for next step. (as Photo 4 red circle)<br />
6. Adjust the GAMMA (R;G;B) and then click the button<br />
"Enter" after GAMMA adjustment is<br />
completed.(Please follow Photo 5, 6)<br />
7. Please check the result.<br />
Photo 4<br />
Photo 5<br />
Photo 6<br />
Attention:<br />
Check pattern points for adjustment<br />
(CHROMA PROGRAM:71 1360_FT_VGA ):<br />
1. Check if the frame is damaged and if the size is<br />
smaller than normal, or if those points in the 5<br />
squares correspond well. (Photo 7)<br />
2. Each gray bar should be identified with only pure<br />
color.(Photo 8)<br />
3. 256 Gray. L->R--->check if there is sync<br />
(influenced by high frequency). (Photo 9)<br />
Photo 7<br />
Photo 8<br />
Photo 9