Kit, Valve block upgrade for PCP - Webshop, Gas Analysis Technology
Kit, Valve block upgrade for PCP - Webshop, Gas Analysis Technology
Kit, Valve block upgrade for PCP - Webshop, Gas Analysis Technology

You also want an ePaper? Increase the reach of your titles
YUMPU automatically turns print PDFs into web optimized ePapers that Google loves.
<strong>Gas</strong> <strong>Analysis</strong> <strong>Technology</strong><br />
FLSmidth A/S<br />
Klostermarken 6<br />
DK-9550 Mariager · Denmark<br />
Tel.: +45 7010 2277 · Fax: +45 7010 2288<br />
Main e-mail: gas@flsmidth.com<br />
Service e-mail: gas-service@flsmidth.com<br />
CVR-No. DK 1502 8882<br />
www.flsmidth.com/gas<br />
1.1 Issue<br />
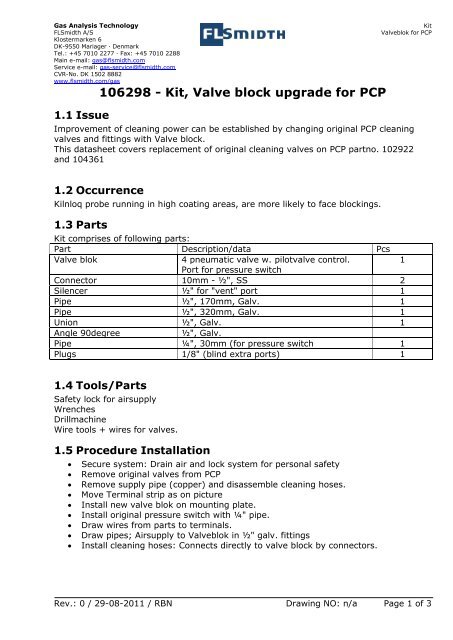
106298 - <strong>Kit</strong>, <strong>Valve</strong> <strong>block</strong> <strong>upgrade</strong> <strong>for</strong> <strong>PCP</strong><br />
<strong>Kit</strong><br />
<strong>Valve</strong>blok <strong>for</strong> <strong>PCP</strong><br />
Improvement of cleaning power can be established by changing original <strong>PCP</strong> cleaning<br />
valves and fittings with <strong>Valve</strong> <strong>block</strong>.<br />
This datasheet covers replacement of original cleaning valves on <strong>PCP</strong> partno. 102922<br />
and 104361<br />
1.2 Occurrence<br />
Kilnloq probe running in high coating areas, are more likely to face <strong>block</strong>ings.<br />
1.3 Parts<br />
<strong>Kit</strong> comprises of following parts:<br />
Part Description/data Pcs<br />
<strong>Valve</strong> blok<br />
4 pneumatic valve w. pilotvalve control.<br />
1<br />
Port <strong>for</strong> pressure switch<br />
Connector 10mm - ½", SS 2<br />
Silencer ½" <strong>for</strong> "vent" port 1<br />
Pipe ½", 170mm, Galv. 1<br />
Pipe ½", 320mm, Galv. 1<br />
Union ½", Galv. 1<br />
Angle 90degree<br />
½", Galv.<br />
Pipe ¼", 30mm (<strong>for</strong> pressure switch 1<br />
Plugs 1/8" (blind extra ports) 1<br />
1.4 Tools/Parts<br />
Safety lock <strong>for</strong> airsupply<br />
Wrenches<br />
Drillmachine<br />
Wire tools + wires <strong>for</strong> valves.<br />
1.5 Procedure Installation<br />
· Secure system: Drain air and lock system <strong>for</strong> personal safety<br />
· Remove original valves from <strong>PCP</strong><br />
· Remove supply pipe (copper) and disassemble cleaning hoses.<br />
· Move Terminal strip as on picture<br />
· Install new valve blok on mounting plate.<br />
· Install original pressure switch with ¼" pipe.<br />
· Draw wires from parts to terminals.<br />
· Draw pipes; Airsupply to <strong>Valve</strong>blok in ½" galv. fittings<br />
· Install cleaning hoses: Connects directly to valve <strong>block</strong> by connectors.<br />
Rev.: 0 / 29-08-2011 / RBN Drawing NO: n/a Page 1 of 3
<strong>Gas</strong> <strong>Analysis</strong> <strong>Technology</strong><br />
FLSmidth A/S<br />
Klostermarken 6<br />
DK-9550 Mariager · Denmark<br />
Tel.: +45 7010 2277 · Fax: +45 7010 2288<br />
Main e-mail: gas@flsmidth.com<br />
Service e-mail: gas-service@flsmidth.com<br />
CVR-No. DK 1502 8882<br />
www.flsmidth.com/gas<br />
<strong>Kit</strong><br />
<strong>Valve</strong>blok <strong>for</strong> <strong>PCP</strong><br />
Figur 1 Original <strong>PCP</strong> valves setup<br />
Use<br />
original<br />
Pressure<br />
switch<br />
<strong>Valve</strong><br />
<strong>block</strong><br />
Figur 2 New <strong>Valve</strong> <strong>block</strong> installed<br />
After the <strong>block</strong> is installed by customer<br />
Rev.: 0 / 29-08-2011 / RBN Drawing NO: n/a Page 2 of 3
<strong>Gas</strong> <strong>Analysis</strong> <strong>Technology</strong><br />
FLSmidth A/S<br />
Klostermarken 6<br />
DK-9550 Mariager · Denmark<br />
Tel.: +45 7010 2277 · Fax: +45 7010 2288<br />
Main e-mail: gas@flsmidth.com<br />
Service e-mail: gas-service@flsmidth.com<br />
CVR-No. DK 1502 8882<br />
www.flsmidth.com/gas<br />
<strong>Kit</strong><br />
<strong>Valve</strong>blok <strong>for</strong> <strong>PCP</strong><br />
1.6 Test and start-up<br />
· Pressurize system and check <strong>for</strong> leaks.<br />
· Check valve function according to manual.<br />
1.7 System adjustments<br />
1.7.1 PLC program<br />
There is NO need <strong>for</strong> PLC Program change. All functions are identical to original system function.<br />
1.7.2 Settings HMI<br />
Due to high cleaning air flow it is recommended to adjust alarm limits <strong>for</strong> E4<br />
Alarm Low temp. may be adjusted in range 30-50°C (below setpoint) to prevent alarms due to short term<br />
temperature drops on heated pipe during cleaning.<br />
Rev.: 0 / 29-08-2011 / RBN Drawing NO: n/a Page 3 of 3