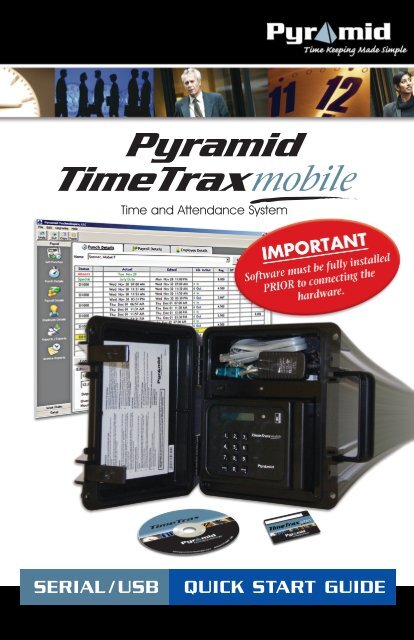
QUICK START GUIDE Pyramid TimeTrax Mobile SERIAL/USB MODEL
QUICK START GUIDE Pyramid TimeTrax Mobile SERIAL/USB MODEL
QUICK START GUIDE Pyramid TimeTrax Mobile SERIAL/USB MODEL

You also want an ePaper? Increase the reach of your titles
YUMPU automatically turns print PDFs into web optimized ePapers that Google loves.
Time and Attendance System<br />
<strong>SERIAL</strong> / <strong>USB</strong> <strong>QUICK</strong> <strong>START</strong> <strong>GUIDE</strong>
PYRAMID TIMETRAX MOBILE <strong>SERIAL</strong> <strong>QUICK</strong> <strong>START</strong> <strong>GUIDE</strong><br />
<strong>QUICK</strong> <strong>START</strong> <strong>GUIDE</strong><br />
<strong>Pyramid</strong> <strong>TimeTrax</strong> <strong>Mobile</strong><br />
WHAT’S IN THE BOX?<br />
• <strong>Pyramid</strong> <strong>TimeTrax</strong> time recorder<br />
• AC Power supply<br />
• <strong>TimeTrax</strong> Software CD<br />
• Quick Start Guide<br />
• 7’ communication cable with<br />
RJ45 connectors on both ends<br />
• Diagnostic (loop-back) plug –<br />
DO NOT DISCARD –<br />
Save for future use.<br />
• RJ45 to 9-pin (DB9) serial port<br />
adapter<br />
• <strong>USB</strong> interface with standard<br />
RS232 adapter<br />
• Employee Swipe Cards<br />
©2009 <strong>Pyramid</strong> Technologies, LLC. All rights reserved.<br />
<strong>SERIAL</strong> / <strong>USB</strong> <strong>MODEL</strong><br />
SOFTWARE MUST BE FULLY INSTALLED PRIOR<br />
TO CONNECTING ANY TERMINAL CABLES<br />
MINIMUM SYSTEM<br />
REQUIREMENTS<br />
• PC with a Pentium® class or<br />
faster processor<br />
• 128 megabytes of RAM<br />
• Either: 9-pin (DB9) serial port or<br />
<strong>USB</strong> port<br />
• 1 gigabyte of free space on the<br />
system’s hard drive<br />
• Windows® XP, 2000, NT or Vista<br />
• Printer (if hard copy reports are<br />
desired)<br />
CUSTOMER SERVICE PHONE NUMBER<br />
(888) 479-7264<br />
NEED TO PLACE AN ORDER?<br />
For cable extensions and other supplies,<br />
call <strong>Pyramid</strong> Technologies, LLC at:<br />
(888) 479-7264
PYRAMID TIMETRAX MOBILE <strong>SERIAL</strong> <strong>QUICK</strong> <strong>START</strong> <strong>GUIDE</strong><br />
INSTALLING THE SOFTWARE<br />
NOTE: Prior to installing the software, it is recommended that you disable<br />
all anti-virus and firewall software so it does not interfere with the<br />
installation. It can be turned back on immediately after the installation.<br />
1<br />
Place the <strong>Pyramid</strong> <strong>TimeTrax</strong> Software<br />
CD into your PC. The software will<br />
AUTORUN. You will then see the below<br />
setup screens. Follow the onscreen<br />
instructions.<br />
Click NEXT to continue<br />
Accept licensing<br />
agreement and click<br />
NEXT to continue<br />
Click NEXT to continue<br />
Enter a User Name and<br />
Organization (optional)<br />
and click NEXT to<br />
continue<br />
Click INSTALL to begin<br />
installation
PYRAMID TIMETRAX MOBILE <strong>SERIAL</strong> <strong>QUICK</strong> <strong>START</strong> <strong>GUIDE</strong><br />
CABLE INSTALLATION<br />
PARTS REFERENCE<br />
A Central PC<br />
E<br />
B RJ45 to 9-pin (DB9) Adapter (included) F<br />
C <strong>USB</strong> to RS232 Adapter (included)<br />
G<br />
D 7’ RJ45 Communication Cable (included)<br />
When installation is<br />
complete, click FINISH<br />
and Restart your<br />
computer.<br />
You are now finished installing the <strong>Pyramid</strong> <strong>TimeTrax</strong> software onto your<br />
PC. We highly recommend restarting your computer before you proceed.<br />
NOTE: Do not continue using the software until the terminal(s) is<br />
completely connected with all cables and power supply.<br />
A<br />
B<br />
C B<br />
OPTION 1<br />
OPTION 2<br />
TWO AVAILABLE OPTIONS FOR CONNECTING THE PYRAMID<br />
TIMETRAX <strong>SERIAL</strong>/<strong>USB</strong> TERMINAL TO YOUR CENTRAL PC<br />
OPTION 1: PC HAS an available open Serial 9-pin (COM)<br />
port. Connect the AC power supply (Fig. F) to a standard wall power<br />
outlet (Fig. G) and to the <strong>TimeTrax</strong> terminal (Fig. E). Connect the white<br />
RJ45 communication cable (Fig. D) to the RJ45/DB9 adapter (Fig. B).<br />
This will then connect to the back of your PC. (Fig. A)<br />
2<br />
D<br />
D<br />
F<br />
E<br />
1 2 3<br />
4 5 6<br />
7 8 9<br />
0<br />
CLEAR<br />
ENTER<br />
G<br />
<strong>TimeTrax</strong> Terminal (included)<br />
AC Power Supply (included)<br />
Wall Power Outlet
PYRAMID TIMETRAX MOBILE <strong>SERIAL</strong> <strong>QUICK</strong> <strong>START</strong> <strong>GUIDE</strong><br />
OPTION 2: PC DOES NOT HAVE an available open Serial 9-pin<br />
(COM) port -or- only equipped with a <strong>USB</strong> port. Connect the AC<br />
power supply (Fig. F) to a standard wall power outlet (Fig. G) and to the<br />
<strong>TimeTrax</strong> terminal (Fig. E). Connect the white RJ45 communication cable<br />
(Fig. D) to the RJ45/DB9 adapter (Fig. B) and then connect the RS232/<strong>USB</strong><br />
adapter (Fig. C) to the back of your PC. (Fig. A)<br />
Please restart/reboot your PC before continuing<br />
with the instructions.<br />
CHARGING THE BATTERY<br />
Note: The <strong>TimeTrax</strong> Battery must be charged for 4 hours before<br />
first time use.<br />
Connect the AC Power to a 115-volt electrical outlet and the other end to<br />
the <strong>TimeTrax</strong> <strong>Mobile</strong> charge port. During the charging process, the charge<br />
light displays a constant green. Fully charged, the <strong>TimeTrax</strong> <strong>Mobile</strong> battery<br />
life is 50 hours. The Sleep Mode offers battery conservation by automatically<br />
shutting off after 15-minutes of non-use allowing longer periods between<br />
recharges. <strong>Pyramid</strong> recommends frequent recharging.<br />
When the <strong>TimeTrax</strong> <strong>Mobile</strong> is in Sleep Mode and an employee needs to<br />
swipe, the On/Off switch needs to be turned off and then back on to bring<br />
the unit back into ready mode. Sleep Mode does not move the switch to the<br />
OFF position but it shuts down the power as if it did.<br />
If the battery runs low, the <strong>TimeTrax</strong> display will indicate LOW BATTERY.<br />
If operation of the time recorder continues and the battery continues to<br />
drain, the display will flash CHARGE BATTERY and will shut off after 10<br />
seconds of flashing. However, punches/data will not be lost.<br />
USING THE CAR CHARGER<br />
The <strong>Pyramid</strong> <strong>TimeTrax</strong> <strong>Mobile</strong> offers an Automotive Adapter/Car Charger<br />
(<strong>Pyramid</strong> Part Number 42180) as an optional accessory to charge your battery<br />
on the go. Simply plug one end of the car charger into the <strong>TimeTrax</strong><br />
<strong>Mobile</strong> charge port and the other end into the car’s 12-volt accessory power<br />
outlet/cigarette lighter for an instant charge. As with a 115-volt electrical<br />
outlet charge, <strong>Pyramid</strong> recommends frequent recharging.<br />
LOGGING INTO THE SOFTWARE FOR THE FIRST TIME<br />
Double click the<br />
<strong>Pyramid</strong> <strong>TimeTrax</strong><br />
ICON placed on your<br />
desktop to begin<br />
3
PYRAMID TIMETRAX MOBILE <strong>SERIAL</strong> <strong>QUICK</strong> <strong>START</strong> <strong>GUIDE</strong><br />
LOGGING INTO THE SOFTWARE FOR THE FIRST TIME<br />
If the recorder is connected correctly, the<br />
Initial Communication Form will appear<br />
with the message “Recorder Found”. If not,<br />
check your cable connections as per the<br />
installation diagram and click the<br />
ReConnect button.<br />
At this point, the Reference Guide and<br />
online software wizards will walk you<br />
through steps to get you up and running.<br />
They will also teach you how to set the<br />
time and date on the terminal, create<br />
your employee database, print reports<br />
and manage your time and attendance.<br />
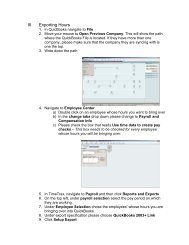
USING THE SOFTWARE AND REFERENCE <strong>GUIDE</strong><br />
The “Reference Guide” can be accessed and printed from the Log In<br />
screen as well as the software toolbar by selecting the ICON below.<br />
You may also locate the Reference Guide from the software by selecting<br />
Help and Reference Guide or by accessing our website<br />
http://pyramidtechnologies.com/ProductManuals/default.asp.<br />
Click the “Reference Guide” ICON to open the electronic PDF file of<br />
the Software Users Guide. You will see complete steps and full directions<br />
on how to use the <strong>Pyramid</strong> <strong>TimeTrax</strong> Software. The guide is always available<br />
on the software screen toolbar. In addition, you can print this file out or<br />
save it to your PCs hard drive. Note: Adobe PDF Reader is required to view<br />
the reference guide and can be downloaded from http://www.adobe.com.<br />
4<br />
When the program is launched, you are<br />
presented with the LOGIN screen shown.<br />
The temporary User Name is “Admin”<br />
The temporary Password is “PTI”.<br />
PTI is case sensitive and must be<br />
entered as directed.<br />
Enter this information and click the<br />
LOGIN button in the center of the screen.
PYRAMID TIMETRAX MOBILE <strong>SERIAL</strong> <strong>QUICK</strong> <strong>START</strong> <strong>GUIDE</strong><br />
USING THE TIME RECORDER<br />
The <strong>Pyramid</strong> <strong>TimeTrax</strong> <strong>Mobile</strong> Time Recorder is powered by battery<br />
and can easily be moved from job site to job site so your Time Recorder<br />
is where your employees are! For employees traveling between multiple<br />
job sites, employees can swipe in at one location and swipe out at an<br />
entirely different one using the same card! Punches from each clock can be<br />
downloaded into the software one at a time or simultaneously using the<br />
<strong>Pyramid</strong> Multiplexer (sold separately).<br />
USING EMPLOYEE SWIPE CARDS<br />
1. Insert the employee card at the top of the<br />
slot on the right side of the time recorder.<br />
The card must be held with the magnetic<br />
stripe to the right and the card firmly in<br />
the slot.<br />
2. Rapidly pull the card down through the<br />
slot. If the employee number is successfully<br />
read, the time recorder will beep and the<br />
card number will be displayed briefly on<br />
the screen.<br />
3. Keypad entry of employee numbers can be<br />
done in lieu of employee cards.<br />
DOWNLOADING PUNCHES<br />
Single <strong>TimeTrax</strong><br />
<strong>Mobile</strong> Unit:<br />
Connect the hardware<br />
as shown in the Cable<br />
Installation Instructions.<br />
Once connected, open<br />
software and from the<br />
Initial Communications<br />
Form, verify that the<br />
recorders are found and<br />
select the Download<br />
Punches box. If you have<br />
multiple terminals, each<br />
terminal will have to be<br />
connected, one-at-a-time<br />
to download the punches.<br />
5<br />
Successful<br />
Connection<br />
Select<br />
Download<br />
Punches
45 Gracey Ave., Meriden, CT 06451<br />
www.ptitime.com I2208