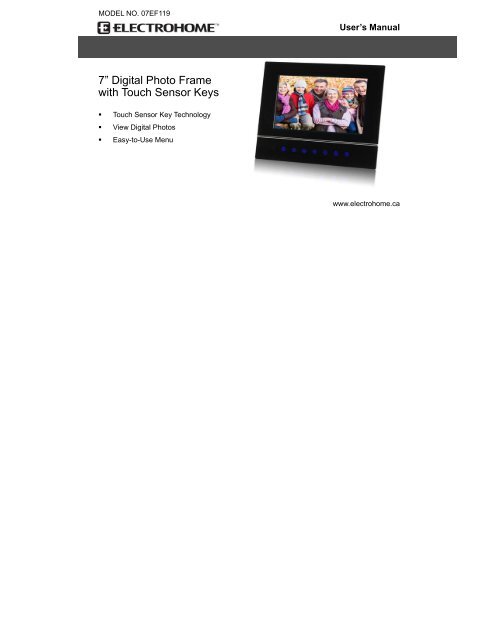
7” Digital Photo Frame with Touch Sensor Keys - Electrohome
7” Digital Photo Frame with Touch Sensor Keys - Electrohome
7” Digital Photo Frame with Touch Sensor Keys - Electrohome
Create successful ePaper yourself
Turn your PDF publications into a flip-book with our unique Google optimized e-Paper software.
MODEL NO. 07EF119<br />
<strong>7”</strong> <strong>Digital</strong> <strong>Photo</strong> <strong>Frame</strong><br />
<strong>with</strong> <strong>Touch</strong> <strong>Sensor</strong> <strong>Keys</strong><br />
� <strong>Touch</strong> <strong>Sensor</strong> Key Technology<br />
� View <strong>Digital</strong> <strong>Photo</strong>s<br />
� Easy-to-Use Menu<br />
User’s Manual<br />
www.electrohome.ca
TABLE OF CONTENTS<br />
Introduction .......................................................................................................................................................................................................................................1<br />
Important Safety Precautions...........................................................................................................................................................................................................1<br />
Important Safety Precautions...........................................................................................................................................................................................................2<br />
Features .............................................................................................................................................................................................................................................4<br />
Location of Controls .........................................................................................................................................................................................................................5<br />
Getting Started ..................................................................................................................................................................................................................................6<br />
Attaching the Stand ........................................................................................................................................................................................................................6<br />
Connecting Power ..........................................................................................................................................................................................................................6<br />
Inserting Media...............................................................................................................................................................................................................................7<br />
Main Screen ...................................................................................................................................................................................................................................7<br />
Main Screen ...................................................................................................................................................................................................................................8<br />
Viewing <strong>Photo</strong>s..................................................................................................................................................................................................................................9<br />
Viewing Thumbnails .......................................................................................................................................................................................................................9<br />
Browsing a Single Picture...............................................................................................................................................................................................................9<br />
Playing a Slideshow .....................................................................................................................................................................................................................10<br />
Changing <strong>Frame</strong> Settings ............................................................................................................................................................................................................... 11<br />
Settings menus............................................................................................................................................................................................................................. 11<br />
Frequently Asked Questions..........................................................................................................................................................................................................13<br />
Specification....................................................................................................................................................................................................................................15<br />
i
Introduction<br />
Congratulations on your purchase of this <strong>Electrohome</strong> <strong>Digital</strong> <strong>Photo</strong> <strong>Frame</strong> (DPF).<br />
Before operating your <strong>Digital</strong> <strong>Photo</strong> <strong>Frame</strong>, please read this manual thoroughly and keep it for future reference.<br />
This manual will help you to use and explore all of the exciting features of your new <strong>Digital</strong> <strong>Photo</strong> <strong>Frame</strong>.<br />
This <strong>Digital</strong> <strong>Photo</strong> <strong>Frame</strong> is compatible <strong>with</strong> SD, MMC and MS memory card formats, which enables you to view digital photos directly from your<br />
camera’s memory card.<br />
This manual contains important safety instructions and correct operation information. Please read and adhere to all information advised in the manual<br />
prior to operating this <strong>Digital</strong> <strong>Photo</strong> <strong>Frame</strong>.<br />
The instruction manual is subject to change for improvements <strong>with</strong>out notice.<br />
<strong>Electrohome</strong> assumes no responsibility for loss of data caused by improper use of this product.<br />
1
Important Safety Precautions<br />
Please follow the following safety precautions when using this <strong>Digital</strong> <strong>Photo</strong> <strong>Frame</strong>. This will reduce the risk of fire, electric shock, product damage and<br />
personal injury.<br />
� Warning: To reduce the risk of electric shock, do not remove the cover or back. There are no user-serviceable parts inside. Refer servicing to<br />
2<br />
qualified personnel.<br />
� Warning: To prevent fire or electric shock hazard, do not expose the unit to rain or moisture.<br />
� Do not expose the <strong>Digital</strong> <strong>Photo</strong> <strong>Frame</strong> to water (dripping or splashing) and no objects filled <strong>with</strong> liquids, such as vases, should be placed on<br />
the unit.<br />
� Keep this <strong>Digital</strong> <strong>Photo</strong> <strong>Frame</strong> away from direct sunlight and heat sources such as radiators or stoves.<br />
� Do not block the ventilation openings. Slots and openings on this unit are provided for ventilation. The openings should never be blocked by<br />
placing this <strong>Digital</strong> <strong>Photo</strong> <strong>Frame</strong> on a cushion, sofa or other similar surface<br />
� Do not place this <strong>Digital</strong> <strong>Photo</strong> <strong>Frame</strong> on an unstable cart, stand, tripod, bracket or table. The unit may fall, resulting in possible damage or<br />
injury.<br />
� Never place heavy or sharp objects on the LCD panel or frame.<br />
� Only use the AC adapter included <strong>with</strong> this <strong>Digital</strong> <strong>Photo</strong> <strong>Frame</strong>. Using any other adapter will void your warranty.<br />
� Protect the power cord from being walked on or pinched particularly at plugs, receptacles and the point where the cord attached to the <strong>Digital</strong><br />
<strong>Photo</strong> <strong>Frame</strong>.<br />
� Unplug the power from the outlet when the unit is not in use.
Cleaning<br />
� Before cleaning the product make sure it is turned off.<br />
� Never spray or pour liquid directly onto the screen or plastic casing.<br />
� To clean the LCD screen, wipe the screen <strong>with</strong> a clean, soft, lint-free cloth. This removes dust and other particles. If it still is not clean, apply a<br />
small amount of non-ammonia, non-alcohol based glass cleaner on a clean, soft, lint-free cloth to clean the screen.<br />
� To clean the plastic casing, use a soft, dry cloth. If it still is not clean, apply a small amount of non-ammonia, non-alcohol based, mildly<br />
non-abrasive detergent on a clean, soft, lint-free cloth to clean the surface.<br />
� To clean the frame, use a soft, dry cloth.<br />
Disclaimer: <strong>Electrohome</strong> does not recommend the use of any ammonia or alcohol-based cleaners on the LCD screen or plastic casing. Some<br />
chemical cleaners have been reported to damage the screen and/or display case. <strong>Electrohome</strong> will not be liable for damage resulting from the use of<br />
any ammonia or alcohol-based cleaners.<br />
3
Features<br />
� <strong>Touch</strong> buttons on the front panel of the frame for convenient operation<br />
� Displays digital pictures (JPEG) <strong>with</strong>out a computer<br />
� Automatic slide show <strong>with</strong> multiple transition effects and desired interval.<br />
� Compatible <strong>with</strong> SD/MMC/MS memory cards<br />
� USB Jack for connecting to a USB mass storage device<br />
4
Location of Controls<br />
1. SD/MMC/MS-card slot<br />
2. USB JACK for connecting the USB device directly.<br />
3. DC 5V 1A Port<br />
4. <strong>Frame</strong> base<br />
5. [�] <strong>Touch</strong> to start, pause slideshow or confirm the<br />
selection.<br />
6. [M] <strong>Touch</strong> to return to the main screen.<br />
7. [�] <strong>Touch</strong> to return to the previous screen.<br />
8. [�] <strong>Touch</strong> to move the cursor left or rotate the picture<br />
9. [�] <strong>Touch</strong> to move the cursor right or rotate the picture.<br />
10. [�] <strong>Touch</strong> to move the cursor up or select the previous picture<br />
11. [�] <strong>Touch</strong> to move the cursor down or select the next picture.<br />
5
Getting Started<br />
Attaching the Stand<br />
1. Match the stand to the slot on the back of the frame.<br />
2. Rotate anticlockwise until the stand clicks into a landscape position or portrait position.<br />
3. Push the stand up or down to set a comfortable viewing angle and place it on a flat surface.<br />
Connecting Power<br />
1. Use the supplied power adapter to connect the digital photo frame to an electrical<br />
6<br />
outlet.<br />
2. Slide the power switch on the back of the photo frame from OFF to ON.<br />
3. To turn off the power of the <strong>Digital</strong> <strong>Photo</strong> <strong>Frame</strong> completely, slide the power switch<br />
from ON to OFF.
Inserting Media<br />
Remove the rubber cover on 3-in-1 card slot and insert an SD, MMC or MS card <strong>with</strong> the metallic contacts facing towards the display.<br />
Insert a USB drive into the USB Jack slot as shown.<br />
Note:<br />
� Do not force the memory card into the memory card slot.<br />
� The 3-in-1 card slot only reads one memory card at a time. Do not insert more than one card into the memory card slot.<br />
� To remove the cards, pull out the card slowly.<br />
7
Main Screen<br />
Once you switch on the <strong>Digital</strong> <strong>Photo</strong> <strong>Frame</strong>, the main screen appears.<br />
When a memory device is inserted into the <strong>Digital</strong> <strong>Photo</strong> <strong>Frame</strong>, the corresponding icon appears on the main screen.<br />
8<br />
USB Appears when you inserted a USB device.<br />
SD CARD Appears when you insert a SD card.<br />
MS Card Appears when you insert a MS card.<br />
MMC CARD Appears when you insert a MMC card.<br />
SETUP To customize the settings of this <strong>Digital</strong> <strong>Photo</strong> <strong>Frame</strong>.<br />
Note: The main screen can also be accessed by touching [M] at any time.
Viewing <strong>Photo</strong>s<br />
Viewing Thumbnails<br />
The pictures on the selected memory source can be displayed on the screen as<br />
thumbnails. (Up to 12 pictures are displayed at a time).<br />
1. <strong>Touch</strong> [�] or [�] to select a memory source (e.g. USB or SD CARD) in the main<br />
screen and touch [�] to confirm. The pictures are displayed on the screen as<br />
thumbnails.<br />
2. To navigate through the thumbnails, touch [�], [�], [�] or [�].<br />
Note: You can also touch [�] from a slideshow or a single view to return to the thumbnails view.<br />
Browsing a Single Picture<br />
You can select a single picture to display on the screen, <strong>with</strong>out a slideshow.<br />
1. Select a picture in the thumbnail view, and touch [�]. The selected picture is displayed on the full screen.<br />
� To view the previous or next photo, touch [�] or [�].<br />
� To rotate a picture, touch [�] or [�].<br />
2. To return to the thumbnail view, touch [�].<br />
3. To start slide show from the current picture, touch [�].<br />
9
Playing a Slideshow<br />
While browsing a single picture, touch [�] to start the slideshow from the current picture.<br />
� To pause the slideshow and browse a single picture, touch [�] again.<br />
� To return to the main screen, touch [M].<br />
� To return to the thumbnail view, touch [�].<br />
Note: If you insert a memory card or a USB device, the <strong>Digital</strong> <strong>Photo</strong> <strong>Frame</strong> will go to slideshow directly.<br />
10
Changing <strong>Frame</strong> Settings<br />
The system settings let you customize and configure your <strong>Digital</strong> <strong>Photo</strong> <strong>Frame</strong>.<br />
1. Select the SETUP icon in the main screen and touch [�] to confirm. The Setup<br />
Menu and software version appear on the screen.<br />
2. To select a setting option, touch [�] or [�]<br />
3. To change the value, touch [�] or [�] and touch [�] to confirm.<br />
4. <strong>Touch</strong> [�] to exit.<br />
Settings menus<br />
Setting options Description<br />
LANGUAGE Choose the on-screen language.<br />
SLIDESHOW TIME<br />
TRANSITION EFFECT<br />
Specify how long each picture is displayed in the slideshow.<br />
The available options include: 3s, 5s, 15s, 1 min, 15mins, 1 hour.<br />
Specify the transition effect between pictures in the slideshow.<br />
The available options include: Random, Fading, Vexpand_Top, Vexpand_Bottom, Vexpand_Middle, Off,<br />
Bottom_To_Top, Top_To_Bottom, Left_To_Right, Right_To_Left, Door_Close, Door_Open, Hori_Cross, and<br />
Verti_Cross.<br />
11
TFT Brightness<br />
TFT Contrast<br />
TFT Saturation<br />
12<br />
Adjust the brightness of the TFT screen.<br />
The available options include: -3, -2, -1, 0, +1, +2, +3.<br />
Adjust the contrast of the TFT screen.<br />
The available options include: -3, -2, -1, 0, +1, +2, +3.<br />
Adjust the saturation of the TFT screen.<br />
The available options include: -3, -2, -1, 0, +1, +2, +3.<br />
DEFAULT Reset all settings to the default setting.
Frequently Asked Questions<br />
1. Why can’t the <strong>Digital</strong> <strong>Photo</strong> <strong>Frame</strong> display some files from my Flash card or USB device?<br />
• Some memory cards are not compatible <strong>with</strong> this <strong>Digital</strong> <strong>Photo</strong> <strong>Frame</strong>. Use a card that matches <strong>with</strong> the <strong>Digital</strong> <strong>Photo</strong> <strong>Frame</strong> features.<br />
• The file formats on your card or USB device might not be supported (only JPEG pictures are supported).<br />
2. There is a memory card inserted in the <strong>Digital</strong> <strong>Photo</strong> <strong>Frame</strong>, but the device is not able to read the card. What can I do?<br />
• First, make sure that you are using a memory card type that is supported by the <strong>Digital</strong> <strong>Photo</strong> <strong>Frame</strong>.<br />
• Secondly, make sure that the memory card is inserted correctly.<br />
• Thirdly, check if the USB device is inserted into the unit. This <strong>Digital</strong> <strong>Photo</strong> <strong>Frame</strong> always reads the files on the USB device if the USB device<br />
and a memory card are inserted simultaneously.<br />
• The file formats on your card might not be supported (only JPEG pictures are supported).<br />
Note: Some digital cameras save images into non-standard formats. Please consult the operating manual of your camera for assistance.<br />
3. Why do some pictures load faster than others?<br />
• Higher resolution pictures load slower. Use pictures <strong>with</strong> lower resolution to speed up loading times.<br />
Note: This <strong>Digital</strong> <strong>Photo</strong> <strong>Frame</strong> supports images up to 16 mega-pixels.<br />
13
4. Why does the screen not show anything?<br />
• The device might not have been turned ON or the adapter is not well connected.<br />
5. Can I rotate a picture on the screen?<br />
• YES. <strong>Touch</strong> [�] or [�] to rotate a picture.<br />
Note: The rotated picture will return to its original orientation after you power off the <strong>Digital</strong> <strong>Photo</strong> <strong>Frame</strong>.<br />
6. What is the best picture resolution displayed on the screen?<br />
• The best resolution is 480*234 pixels, however, this <strong>Digital</strong> <strong>Photo</strong> <strong>Frame</strong> supports images up to 16 mega-pixels.<br />
14
Specification<br />
Display<br />
Input DC in<br />
Power adaptor<br />
USB port<br />
<strong>Digital</strong> TFT LCD<br />
Panel size: 7 inches<br />
Screen aspect ratio: 16:9<br />
Resolution: 480*234 pixels<br />
Input: 100~240V AC, 50/60Hz<br />
Output: 5V 1A DC<br />
USB 2.0<br />
Supports USB flash media<br />
Supported peripheral devices SD (Secure <strong>Digital</strong> Card), MMC (MultiMedia Card), MS (Memory Stick)<br />
Supported photo format JPEG, Maximum resolution:16 mega-pixels<br />
Operating temperature 5℃ ~ 35℃<br />
Dimension 210*160*28.3mm<br />
Weight 448.8g<br />
15


