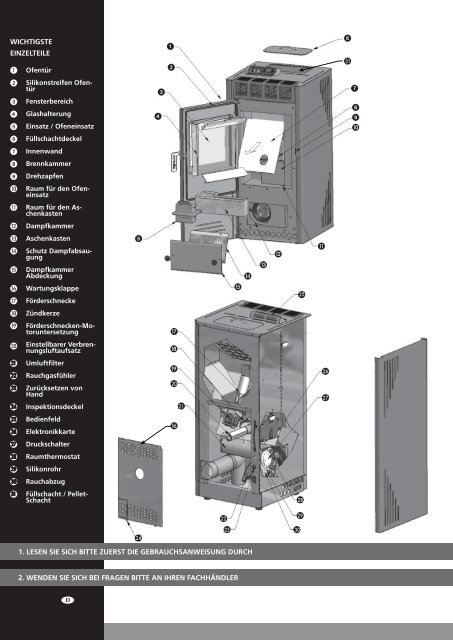
- Page 1: 2 6 3 4 > 1 = MirtiLLa Gebrauchsanw
- Page 5 and 6: L L 200 200 STOVE e e 200 800 r 200
- Page 7 and 8: G hinweise Durch Nichtbeachten der
- Page 9 and 10: d.1.1.1 normale inbetriebnahme und
- Page 11 and 12: Abb. 5: Drosselklappe. Die Drosselk
- Page 13 and 14: • UT07 zur Auswahl der Wochentage
- Page 15 and 16: zweites Mal drücken, wird das Prog
- Page 17 and 18: Erforderliche Schritte: 1. Schalten
- Page 19 and 20: Abb. F1: Reinigen des Fensters. Abb
- Page 21 and 22: a b c Abb. F 9: Korrekte Ausrichtun
- Page 23 and 24: Ofen lässt sich nicht einschalten
- Page 25 and 26: Der Ofen schaltet sich selbst aus u
- Page 27 and 28: i. GarantiebedinGunGen Der Ofen wir
- Page 29 and 30: K. KOnFOrMitätsbescheiniGunG Konfo
- Page 31 and 32: Kære kunde Tillykke med købet af
- Page 33 and 34: aldrig kan overstige 80 °C, uanset
- Page 35 and 36: stemmelser. Hvis det ikke er tilfæ
- Page 37 and 38: 9. Under normal drift viser display
- Page 39 and 40: Billede 5: butterfl yventilen. Bem
- Page 41 and 42: 3. Tryk på P3 igen. På display B
- Page 43 and 44: Anvendelse af brændsel af dårlig
- Page 45 and 46: F. VedLiGehOLdeLse Den varme, aske
- Page 47 and 48: a b Billede F5 Billede F6 Billede F
- Page 49 and 50: h. FeJLFindinG PrObLeM ÅrsaG LØsn
- Page 51 and 52: Blæseren til recirkulation af luft
- Page 53 and 54:
Ovnen slår fra. Fejlmeddelelsen "A
- Page 55 and 56:
J. teKnisKe data Model Mirtilla Ovn
- Page 57 and 58:
man_Mirtilla.indd 57 25-5-10 11:50
- Page 59 and 60:
Madame, Monsieur, Toutes nos félic
- Page 61 and 62:
L L 200 200 STOVE e e 200 800 r 200
- Page 63 and 64:
. instaLLatiOn du POêLe et du cOnd
- Page 65 and 66:
5. Après 2 minutes de pré-ventila
- Page 67 and 68:
Illustration 5 : vanne papillon. Re
- Page 69 and 70:
• UT03 pour régler les minutes
- Page 71 and 72:
Voici un exemple de cycle du progra
- Page 73 and 74:
2. Vérifi ez la cause possible du
- Page 75 and 76:
Illustration F1 Illustration F2 F.2
- Page 77 and 78:
a b c Illustration F9, positionneme
- Page 79 and 80:
Le poêle ne démarre pas L’alarm
- Page 81 and 82:
Le poêle s’éteint. L’alarme
- Page 83 and 84:
i. cOnditiOns de Garantie Votre po
- Page 85 and 86:
K. décLaratiOn de cOnFOrMité déc
- Page 87 and 88:
dear sir, Madam, Congratulations on
- Page 89 and 90:
at highest stoking rate the wall te
- Page 91 and 92:
The flue/chimney must be kept clean
- Page 93 and 94:
8. The room air recirculation fan w
- Page 95 and 96:
Picture 5: the butterfl y valve. No
- Page 97 and 98:
(*) No day means: no day is specifi
- Page 99 and 100:
In general bad quality fuel for thi
- Page 101 and 102:
2. Verify the possible cause for th
- Page 103 and 104:
Picture F1: Cleaning the window. Pi
- Page 105 and 106:
Picture F11: cleaning pellet hopper
- Page 107 and 108:
Wood pellets do not get to burning
- Page 109 and 110:
Stove switches off. Alarm displayed
- Page 111 and 112:
i. warranty PrOVisiOns Your stove c
- Page 113 and 114:
K. decLaratiOn OF cOnFOrMity declar
- Page 115 and 116:
Gentile cliente, Congratulazioni pe
- Page 117 and 118:
inoltre che anche a massima aliment
- Page 119 and 120:
autorizzato. Si prega di far riferi
- Page 121 and 122:
nella stufa dal retro e riscaldata
- Page 123 and 124:
Figura 5: Valvola a farfalla. Da no
- Page 125 and 126:
Giorno Lunedì Martedì Mercoledì
- Page 127 and 128:
- Umidità residua: < 10% - Contenu
- Page 129 and 130:
e.5 aLLarMe di interruziOne deLL’
- Page 131 and 132:
Figura F1 Figura F2 Figura F3 Figur
- Page 133 and 134:
Vedere la foto F11. Pulire la tramo
- Page 135 and 136:
Il pellet di legna non raggiunge il
- Page 137 and 138:
La stufa si spegne. Allarmevisualiz
- Page 139 and 140:
i. cLausOLe di Garanzia La vostra s
- Page 141 and 142:
K. dichiaraziOne di cOnFOrMità dic
- Page 143 and 144:
Geachte mevrouw/mijnheer, Gefelicit
- Page 145 and 146:
L L 200 200 KACHEL e e 200 800 r 20
- Page 147 and 148:
G GebruiKstiPs: • Zorg ervoor dat
- Page 149 and 150:
2. Zorg ervoor dat de branddeur ges
- Page 151 and 152:
Afbeelding 5: de vlinderklep. Merk
- Page 153 and 154:
d.11 tiMer en KLOK de kachel is voo
- Page 155 and 156:
7. Of programma 2 toegepast kan wor
- Page 157 and 158:
Te nemen acties: 1. Schakel de kach
- Page 159 and 160:
Afbeelding F1 Afbeelding F2 Afbeeld
- Page 161 and 162:
a b c Afbeelding F9, correcte plaat
- Page 163 and 164:
Kachel start niet, alarm getoond
- Page 165 and 166:
Kachel gaat uit. Weergegeven alarm
- Page 167 and 168:
i. GarantiebePaLinGen Voor uw kache
- Page 169 and 170:
K. cOnFOrMiteitsVerKLarinG conformi
- Page 171 and 172:
ästa kund, Grattis till ditt köp
- Page 173 and 174:
• Kaminens utsida kan bli mycket
- Page 175 and 176:
. instaLLatiOn aV KaMin Och KanaL K
- Page 177 and 178:
9. Under normal drift anger display
- Page 179 and 180:
Bild 5 på spjällventilen. Observe
- Page 181 and 182:
d.11.2 ställa in veckotimern När
- Page 183 and 184:
G G Även när standardpellets av g
- Page 185 and 186:
F.1 underhÅLL sOM sKa utFöras aV
- Page 187 and 188:
a b Bild F7 Bild F8 c Bild F9, korr
- Page 189 and 190:
h. FeLsöKninG PrObLeM OrsaK Lösni
- Page 191 and 192:
Kaminen stängs av. Larmet ”AlAr
- Page 193 and 194:
i. GarantiViLLKOr Garantitiden för
- Page 195 and 196:
K. eFterLeVnadsdeKLaratiOn efterlev
- Page 197 and 198:
man_Mirtilla.indd 197 25-5-10 11:50