Anleitung IC-Tech online.cdr - Silentmaxx
Anleitung IC-Tech online.cdr - Silentmaxx
Anleitung IC-Tech online.cdr - Silentmaxx

Sie wollen auch ein ePaper? Erhöhen Sie die Reichweite Ihrer Titel.
YUMPU macht aus Druck-PDFs automatisch weboptimierte ePaper, die Google liebt.
Netzteil<br />
silentmaxx<br />
TM<br />
<strong>IC</strong>-<strong>Tech</strong><br />
Independent Circuits<br />
<strong>Anleitung</strong><br />
®<br />
silentmaxx Netzteil <strong>IC</strong>-<strong>Tech</strong><br />
2<br />
Inhaltsverzeichnis<br />
Vorwort, Lieferumfang, Spezifikationen 3<br />
Sicherheitshinweise, Einbau 4<br />
Netzanschluss, Einschalten 5<br />
Abbildung 6<br />
Anschlüsse 7<br />
Prüfvorschriften, Hersteller 8<br />
silentmaxx <strong>IC</strong>-<strong>Tech</strong><br />
- 01/2006
®<br />
silentmaxx Netzteil <strong>IC</strong>-<strong>Tech</strong><br />
3<br />
Vorwort<br />
©<br />
Vielen Dank, dass Sie sich für ein hochwertiges silentmaxx Netzteil mit <strong>IC</strong>-<strong>Tech</strong><br />
(Independent-Circuits-<strong>Tech</strong>nology) entschieden haben.<br />
© ©<br />
Das silentmaxx <strong>IC</strong>-<strong>Tech</strong> Netzteil überzeugt durch die beiden leisen silentmaxx -<br />
Lüfter und die daraus resultierende geringe Geräuschentwicklung. Das Dual-Fan-<br />
System saugt die im Gehäuse entstehende Wärme nach außen und beugt so einer<br />
Überhitzung vor. Zusätzlich verfügt das Netzteil über drei Steuerleitungen für<br />
Gehäuselüfter, welche über einen separaten Thermosensor geregelt werden.<br />
Dieses Netzteil ist für alle bekannten Rechnersysteme, die dem ATX-Standard entsprechen,<br />
geeignet. Auch neueste Mainboards werden unterstützt.<br />
Diese <strong>Anleitung</strong> soll Sie beim Einbau Ihres neuen Netzteiles unterstützen. Bitte lesen<br />
Sie diese sorgfältig durch, bevor Sie mit dem Einbau beginnen. Sollten dennoch technische<br />
Fragen unbeantwortet bleiben, wenden Sie sich bitte an unseren technischen<br />
Support unter www.silentmaxx.de.<br />
Lieferumfang<br />
- Netzteil<br />
- Netzkabel<br />
- <strong>Anleitung</strong><br />
Spezifikationen<br />
<br />
Beim Betrieb des Netzteiles sind die maximalen Lasten zu beachten. Die Gesamtlast<br />
darf nicht überschreiten werden!<br />
Eine Absicherung findet bei Überlastung oder zu hoher Temperatur durch eine wechselbare<br />
Sicherung statt.<br />
Leistung / power + 3.3V + 5V + 12V - 5V - 12V + 5V Stb.<br />
silentmaxx 380W 28 A 35 A 22 A 0.5 A 0.8 A 2.3 A<br />
silentmaxx 430W 30 A 40 A 25 A 0.5 A 0.8 A 2.3 A<br />
silentmaxx 480W 32 A 42 A 30 A 0.5 A 0.8 A 2.5<br />
A<br />
silentmaxx 600W 35 A 53 A 30 A 1 A 1 A 3 A<br />
<br />
®<br />
silentmaxx Netzteil <strong>IC</strong>-<strong>Tech</strong><br />
4<br />
Sicherheitshinweise<br />
Die Trennung vom Netz findet nur durch Ziehen des Netzsteckers statt, nicht durch<br />
Ausschalten des Gerätes.<br />
Die Abdeckung darf nur von ausgebildetem Personal entfernt werden. Es sind keine<br />
vom Benutzer zu wartenden Teile vorhanden. Die Sicherung darf nur durch<br />
Fachpersonal getauscht werden.<br />
Achtung! Kinder erkennen die Gefahren nicht, die beim Umgang mit Elektrogeräten<br />
entstehen können, deshalb lassen Sie in Anwesenheit von Kindern besondere<br />
Vorsicht walten.<br />
Das Netzteil darf nicht bei einer Temperatur von über 50°C und nur in trockenen<br />
Innenräumen betrieben werden.<br />
Einbau<br />
Falls Sie dieses Netzteil in ein bereits vorhandenes Rechnersystem einbauen möchten,<br />
stellen Sie vorher bitte sicher, dass der Rechner ausgeschaltet ist. Ziehen Sie<br />
dann den Netzstecker. Öffnen Sie das PC-Gehäuse. Lösen Sie alle Stecker des<br />
Netzteiles von den verbundenen Komponenten (Laufwerke, Mainboard etc.). Lösen<br />
Sie die vier Befestigungsschrauben und nehmen Sie das alte Netzteil heraus.<br />
Dieses Netzteil ist ein Einbauteil. Beim Einbau ist darauf zu achten, dass die<br />
Niederspannungsrichtlinie 73/23/EWG nach EN60950 (IEC 950) eingehalten wird.<br />
Außerdem ist die EMV-Richtlinie 89/336/EWG zu beachten.<br />
Setzen Sie das Netzteil in das Rechnergehäuse und befestigen Sie es mit vier<br />
Schrauben. Für die Montage verwenden Sie bitte PC-Gehäuse-Schrauben mit maximal<br />
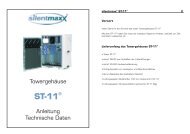
15mm Länge. Die Schraubpunkte sind in der Abb. 1 mit „(X)“ gekennzeichnet.<br />
Beim Einbau des Netzteiles in ein PC-Gehäuse ist sicherzustellen, dass die<br />
Lüftungsschlitze und Luftauslässe nicht verdeckt werden. Bitte achten Sie auf genügend<br />
Luftkonvektion im PC-Gehäuse, z.B. durch Gehäuselüfter. Dies ist besonders für<br />
die CPU und Festplatten wichtig.<br />
An das Netzteil können bis zu drei Gehäuselüfter über den 3-pin Molex oder den<br />
PSU-Stecker angeschlossen werden. Die Gesamtstromstärke der drei Gehäuselüfter<br />
darf 1 A (Ampere) nicht übersteigen. Den Thermosensor können Sie an geeigneter<br />
Stelle im Gehäuse befestigen. Die Drehzahl der Gehäuselüfter ändert sich mit der<br />
am externen Thermosensor gemessenen Temperatur.
®<br />
silentmaxx Netzteil <strong>IC</strong>-<strong>Tech</strong><br />
5<br />
©<br />
TIPP: Verwenden Sie als Gehäuselüfter einen leisen Lüfter von silentmaxx . Das verhindert<br />
unnötige Geräuschentwicklung und sorgt für genügend Luftkonvektion.<br />
Verbinden Sie alle Laufwerke und das Mainboard mit dem Netzteil. Achtung! Der<br />
ATX-Stecker muss sich leicht aufstecken lassen. Mit Gewalt lässt er sich auch falsch<br />
herum aufstecken - vermeiden Sie dies!<br />
Achten Sie darauf, dass der Power-Schalter am PC-Gehäuse mit dem Mainboard verbunden<br />
und alle Lüfter (Gehäuse und CPU) funktionsfähig sind.<br />
Schrauben Sie das Gehäuse Ihres PCs wieder zu.<br />
Netzanschluss<br />
Das Netzteil entspricht Schutzklasse 1. Der Schutzleiter ist direkt mit dem<br />
Metallgehäuse verbunden. Der Anschluss muss an eine Netzsteckdose mit<br />
Schutzkontakt über ein Netzkabel mit Schutzleiter erfolgen.<br />
Das Netzteil ist für den Betrieb unter folgenden Parametern geeignet:<br />
Parameter Minimum Nominal Maximum Einheit<br />
V in (230 VAC) 180 230 V 265 VAC<br />
V Frequency 47 < - > 63 Hz<br />
in<br />
Einschalten<br />
Jedes Netzteil ist mit einer sogenannten Remote ON/OFF Funktion ausgestattet.<br />
Das Netzteil wird erst durch Betätigen des Gehäusetasters in Betrieb gesetzt, wobei<br />
am Taster eine Kleinspannung von +5V anliegt.<br />
Sobald die Netzspannung anliegt und der Netzschalter (Abbildung 1/N) eingeschaltet<br />
ist, erzeugt das Netzteil eine +5V „Standby“ Spannung, die bestimmten<br />
Steckkarten das ferngesteuerte Einschalten des Rechners erlaubt.<br />
®<br />
silentmaxx Netzteil <strong>IC</strong>-<strong>Tech</strong><br />
6<br />
Abbildung 1<br />
X<br />
N<br />
X<br />
X<br />
kennzeichnet Bohrungen für Schrauben<br />
kennzeichnet den Netzschalter<br />
X<br />
X<br />
N
®<br />
silentmaxx Netzteil <strong>IC</strong>-<strong>Tech</strong><br />
7<br />
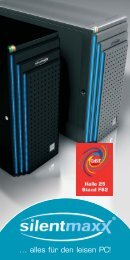
Das Netzteil verfügt über folgende Anschlüsse:<br />
Hauptanschluss<br />
24-pin<br />
Strom für<br />
Gehäuselüfter<br />
(3x)<br />
12V<br />
Laufwerks-<br />
Stecker<br />
(6x)<br />
Floppy<br />
(2x)<br />
S-ATA<br />
Stecker<br />
(2x)<br />
Adapter-<br />
Stecker<br />
24/20-pin<br />
Thermosensor<br />
für<br />
Gehäuselüfter<br />
Strom<br />
4-pin<br />
P4<br />
Strom<br />
6-pin<br />
PCI-Express<br />
Strom<br />
8-pin<br />
®<br />
silentmaxx Netzteil <strong>IC</strong>-<strong>Tech</strong><br />
8<br />
Prüfvorschriften<br />
Das Gerät erfüllt folgende Spezifikationen:<br />
EN 55022: 1998 + A1: 2000,<br />
EN 61000-3-2,<br />
EN 55024: 1998 Teile/Parts:<br />
EN 61000-4-2, EN 61000-4-3, EN 61000-4-4,<br />
EN 61000-4-5, EN 61000-4-6, EN 61000-4-11<br />
silentmaxx ®<br />
silent systems GmbH<br />
Heerstrassenbenden 4<br />
D - 53359 Rheinbach<br />
Germany<br />
fon: 0800.9990077<br />
www.silentmaxx.de<br />
info@silentmaxx.de<br />
®<br />
silentmaxx , silent systems und <strong>IC</strong>-<strong>Tech</strong><br />
sind Marken der silent systems GmbH.
power supply<br />
silentmaxx<br />
TM<br />
<strong>IC</strong>-<strong>Tech</strong><br />
Independent Circuits<br />
instructions<br />
®<br />
silentmaxx Netzteil <strong>IC</strong>-<strong>Tech</strong><br />
- 2 -<br />
Table of contents<br />
preface, scope of supply, specifications 3<br />
safety reference, installation 4<br />
mains connection, switching on 5<br />
illustration 6<br />
connections 7<br />
test specifications, manufacturer 8
®<br />
silentmaxx Netzteil <strong>IC</strong>-<strong>Tech</strong><br />
- 3 -<br />
Preface<br />
©<br />
Thank you that you decided for a high-quality silentmaxx power supply unit<br />
with <strong>IC</strong>-<strong>Tech</strong> (independent-circuits-technology) .<br />
<br />
The silentmaxx© <strong>IC</strong>-<strong>Tech</strong> power supply convinces by ist two silentmaxx© fans and<br />
the resulting noise reduction. The dual fan system exhausts emerging heat and<br />
thereby prevents from overheating. Additionally the power supply has three control<br />
lines for case fans which are regulated over a separate thermal sensor.<br />
This power supply is suitable for all computer systems, which correspond to the ATX<br />
standard. Also newest mainboards are supported.<br />
This manual shall help you with the installation of your new power supply. Please<br />
read this guidance carefully before you begin with the installation. If you still have<br />
technical questions, please refer to our technical support on www.silentmaxx.de.<br />
Scope of supply<br />
- power supply<br />
- power chord<br />
- instructions<br />
Specifications<br />
<br />
During operation the maximum loads and the maximum total DC output power may<br />
not be exceeded.<br />
There is a safeguarding of the power supply when overloaded or overheated by<br />
changeable fuse.<br />
Leistung / power + 3.3V + 5V + 12V - 5V - 12V + 5V Stb.<br />
silentmaxx 380W 28 A 35 A 22 A 0.5 A 0.8 A 2.3 A<br />
silentmaxx 430W 30 A 40 A 25 A 0.5 A 0.8 A 2.3 A<br />
silentmaxx 480W 32 A 42 A 30 A 0.5 A 0.8 A 2.5<br />
A<br />
silentmaxx 600W 35 A 53 A 30 A 1 A 1 A 3 A<br />
®<br />
silentmaxx Netzteil <strong>IC</strong>-<strong>Tech</strong><br />
- 4 -<br />
Safety reference<br />
Appliances should be disconnected from the mains supply by unplugging the mains<br />
power chord.<br />
The top cover of the power supply case may only be removed by authorized<br />
personnel. The power supply is not equipped with any parts to be checked by the<br />
user. The fuse is to be replaced by authorized personnel only.<br />
Caution! Children do not recognize the danger of electrical appliances, please be<br />
especially cautious in their presence.<br />
When in commercial use the rules for the prevention of accidents of the professional<br />
association are to be considered.<br />
The power supply must not be run at a temperature over 50°C/122°F and only in<br />
safe, dry places.<br />
Installation<br />
If you want to use the power supply with an already existing system, please make<br />
sure that the computer is switched off. Then remove the mains power chord. Open<br />
the housing and pull off all drive plugs and the mainboard plug. Remove the 4 fixing<br />
screws and take out the old power supply.<br />
This power supply is a mounting part. When installing it please make sure that you<br />
follow the low voltage directive 73/23/EWG / EN60950 (IEC 950). Also EMVdirective<br />
is to be considered.<br />
Place the new power supply in the housing and use the 4 screws to fix it. The screw<br />
drillings are marked with „(X)“. (figure 1)<br />
When installing it in your computer case it has to be guaranteed that the openings<br />
are not covered. Please make sure that there is enough air convection, e. g. by<br />
using one or two case fans. This is especially important for CPU and HD cooling.<br />
You can connect up to three case fans to the power supply over the 3-pin Molex or<br />
the PSU plug. The ampacity of the three case fans may not exceed 1 A (ampere).<br />
You can fix the thermal sensor to a suitable place in the case. The speed of the case<br />
fans changes with the temperature measured at the external thermal sensor.
®<br />
silentmaxx Netzteil <strong>IC</strong>-<strong>Tech</strong><br />
- 5 -<br />
©<br />
Advice: Use silentmaxx case fans. Thereby unnecessary noise is being omitted and<br />
there is enough air convection.<br />
Connect all drives and the mainboard to the power supply. Caution! The ATX-plug has<br />
to be connectable quite easily.<br />
Please take care that the housing's power switch is connected with the mainboard<br />
and all fans (case/CPU) are working.<br />
Close the housing.<br />
Mains connection<br />
This power supply has protection class 1. The safety earth is directly connected to<br />
the metal enclosure. Ensure that the earthing is properly attached to the equipment.<br />
The connection must be made to a convenience outlet with earthing contact by a<br />
mains cable with protective grounding.<br />
The power supply is usable under the following parameters:<br />
Parameter Minimum Nominal Maximum Unit<br />
V in (230 VAC) 180 230 V 265 VAC<br />
V Frequency 47 < - > 63 Hz<br />
in<br />
Switching on<br />
Every ATX power supply is equipped with a remote ON/OFF function, which means<br />
that the power supply only functions when the housing's power switch (figure 1/N) is<br />
being pressed.<br />
As soon as the mains voltage on and the power-switch (figure 1/P) is on the supply<br />
produces a +5V stand-by-voltage enabling certain plug-in cards to switch on the<br />
computer remotely.<br />
®<br />
silentmaxx Netzteil <strong>IC</strong>-<strong>Tech</strong><br />
- 6 -<br />
figure 1<br />
X<br />
N<br />
X<br />
X<br />
stands for the screw drillings<br />
stands for the power supply ON/OFF switch<br />
X<br />
X<br />
N
®<br />
silentmaxx Netzteil <strong>IC</strong>-<strong>Tech</strong><br />
- 7 -<br />
The power supply comes with these connections:<br />
main<br />
power<br />
connector<br />
24-pin<br />
power<br />
for<br />
case fan<br />
(3x)<br />
peripheral<br />
power<br />
connector<br />
(6x)<br />
floppy drive<br />
power<br />
connector<br />
(2x)<br />
S-ATA<br />
connector<br />
(2x)<br />
adaptor<br />
24/20-pin<br />
thermo<br />
sensor for<br />
case fan<br />
power<br />
4-pin<br />
P4<br />
power<br />
6-pin<br />
PCI-Express<br />
power<br />
8-pin<br />
®<br />
silentmaxx Netzteil <strong>IC</strong>-<strong>Tech</strong><br />
- 8 -<br />
Test specifications<br />
The equipment fulfills the following specifications:<br />
EN 55022: 1998 + A1: 2000,<br />
EN 61000-3-2,<br />
EN 55024: 1998 Teile/Parts:<br />
EN 61000-4-2, EN 61000-4-3, EN 61000-4-4,<br />
EN 61000-4-5, EN 61000-4-6, EN 61000-4-11<br />
silentmaxx ®<br />
silent systems GmbH<br />
Heerstrassenbenden 4<br />
D - 53359 Rheinbach<br />
Germany<br />
fon: +49.2226.8084.0<br />
www.silentmaxx.de<br />
info@silentmaxx.de<br />
silentmaxx®, silent systems and <strong>IC</strong>-<strong>Tech</strong><br />
are trademarks of silent systems GmbH.