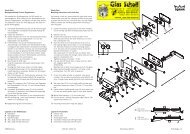
DORMA Rondo-Classic-ARCOS Schloss mit WC-Riegelschloss
DORMA Rondo-Classic-ARCOS Schloss mit WC-Riegelschloss
DORMA Rondo-Classic-ARCOS Schloss mit WC-Riegelschloss

Sie wollen auch ein ePaper? Erhöhen Sie die Reichweite Ihrer Titel.
YUMPU macht aus Druck-PDFs automatisch weboptimierte ePaper, die Google liebt.
Montageanleitung<br />
<strong>DORMA</strong> <strong>WC</strong> <strong>Schloss</strong><br />
Studio <strong>Rondo</strong><br />
Studio <strong>Classic</strong><br />
<strong>ARCOS</strong> Studio<br />
Installation instructions<br />
<strong>DORMA</strong> <strong>WC</strong> lock<br />
Studio <strong>Rondo</strong><br />
Studio <strong>Classic</strong><br />
<strong>ARCOS</strong> Studio<br />
<strong>DORMA</strong>-Glas Stand/Issue 12.07 800.52.326.6.32
3.5<br />
Wichtige Informationen:<br />
Important information:<br />
Glasbearbeitung:<br />
Glass preparation:<br />
45<br />
60<br />
4<br />
7<br />
Pflege allgemein:<br />
<strong>DORMA</strong>-Glas<br />
45<br />
61<br />
Die Oberflächen der Beschläge sind nicht wartungsfrei<br />
und sollten gemäß ihrer Ausführung gereinigt werden.<br />
- Für metallische Oberflächen (Eloxaltöne, Edelstahl)<br />
bitte nur geeignete Reiniger ohne Scheuer<strong>mit</strong>telanteil<br />
verwenden.<br />
- Für lackierte Oberflächen bitte nur entsprechende<br />
löse<strong>mit</strong>telfreie Reiniger verwenden.<br />
- Messing Oberflächen (ohne Oberflächenschutz)<br />
müssen von Zeit zu Zeit <strong>mit</strong> geeignetem Pflege<strong>mit</strong>tel<br />
behandelt werden, um Anlaufen zu vermeiden.<br />
3.5<br />
DIN rechts<br />
DIN RH<br />
DIN links<br />
DIN LH<br />
Wartung allgemein:<br />
Wir empfehlen die Funktion der Beschläge alle<br />
200.000 Bewegungen, durch Fachleute, zu prüfen.<br />
Bauteil/Baugruppe<br />
1 = Component<br />
1. ; 1.1 ; ... = Montagefolge<br />
Installation sequence<br />
Vor der Montage Glasflächen<br />
<strong>mit</strong> handelsüblichem Glasreiniger<br />
im Bereich der Klemmflächen reinigen.<br />
All glass clamping areas have to<br />
be cleaned with standard glass<br />
cleaning products prior to installation.<br />
keine Verdünnung verwenden<br />
Do not use thinners<br />
Montagewerkzeug:<br />
Requisite tools:<br />
1,5 mm 3 mm 4 mm<br />
General care instructions:<br />
The surface finishes of the fittings are not<br />
maintenance-free and should be cleaned according to<br />
their material and texture.<br />
- For metallic surfaces (anodised finishes,<br />
stainless steel) please only use appropriate cleaning<br />
agents without abrasive additives.<br />
- For varnished surfaces please only use appropriate<br />
solvent-free cleaning agents.<br />
- To avoid tarnishing, brass surfaces (without surface<br />
protection) occasionally have to<br />
be treated with an appropriate care product.<br />
Service and maintenance:<br />
We recommend that such fittings be checked by<br />
specialists after every approx. 200,000 operations to<br />
conform their ongoing funktion integrity.<br />
Seite/Page 2/7 Stand/Issue 12.07
Design Varianten :<br />
Design Options:<br />
Studio <strong>Rondo</strong> Studio <strong>Classic</strong> <strong>ARCOS</strong> Studio<br />
Lieferumfang:<br />
Scope of delivery:<br />
<strong>DORMA</strong>-Glas<br />
Verpackungseinheiten sind bei allen Design Varianten gleich!<br />
Pack contents identical for all listed lock types!<br />
1,5 mm 4 mm<br />
Seite/Page 3/7 Stand/Issue 12.07
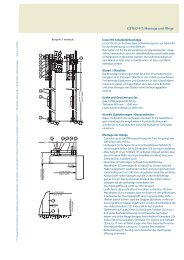
Montage für alle <strong>Schloss</strong> Varianten.<br />
Darstellung: Studio <strong>Rondo</strong><br />
Step-by-step installation instruction for all listed lock types.<br />
Pictured: Studio <strong>Rondo</strong><br />
1. Schritt:<br />
1. Step:<br />
<strong>DORMA</strong>-Glas<br />
4<br />
1.1<br />
3<br />
1.2<br />
1<br />
1.2<br />
Bei Verwendung von Knopfgarnituren,<br />
Federkraftreduzierung möglich.<br />
Bolzen <strong>mit</strong> Schraubendreher um 90° drehen.<br />
Spring-strength reduction when using knobs.<br />
Turn bolt with slotted screwdriver.<br />
1.2<br />
2<br />
1.1<br />
4<br />
1.4<br />
1.3<br />
1.1<br />
5<br />
1.3<br />
1.3<br />
1.5<br />
4 mm<br />
Seite/Page 4/7 Stand/Issue 12.07
2. Schritt:<br />
2. Step:<br />
<strong>DORMA</strong>-Glas<br />
1,5<br />
2.3<br />
2.1<br />
Doppelseitiges Klebeband:<br />
Folienstreifen abziehen<br />
Double-sided adhesive tape:<br />
Pull-off backing tape<br />
DETAIL X<br />
Doppelseitiges Klebeband:<br />
Folienstreifen abziehen<br />
Double-sided adhesive tape:<br />
Pull-off backing tape<br />
2.3<br />
2.2<br />
Bei DIN links, <strong>Schloss</strong> drehen, so das die<br />
gewünschte DIN Richtung lasbar ist.<br />
By using of DIN LH, turn the lock, so that<br />
the desired DIN direction is legible.<br />
Falle umdrehen. Die Schräge der Falle<br />
muss immer zum Glas zeigen!<br />
Turn the latch. Bevelled side of latch<br />
must always point to the glass!<br />
X<br />
2.4<br />
2.5<br />
2.5<br />
4 mm<br />
5 Nm<br />
4 mm<br />
4 mm<br />
5 Nm<br />
4 mm<br />
Seite/Page 5/7 Stand/Issue 12.07
4. Schritt:<br />
4. Step:<br />
5. Schritt:<br />
5. Step:<br />
4.1<br />
<strong>DORMA</strong>-Glas<br />
5.1<br />
4.1<br />
DETAIL X<br />
4.2<br />
4.2 Einschrauben<br />
4.2 screw in<br />
5.3<br />
5.3<br />
5.2<br />
4.2<br />
5.2<br />
Seite/Page 6/7 Stand/Issue 12.07<br />
5.3<br />
X<br />
4.2<br />
5.3
5. Schritt:<br />
5. Step:<br />
5.4<br />
6. Schritt:<br />
6. Step:<br />
DETAIL X<br />
6.5<br />
<strong>DORMA</strong>-Glas<br />
6.1<br />
5.4<br />
Drückergarnitur ist nicht im Lieferumfang enthalten!<br />
Lever handels not included in scope of delivery!<br />
Bei Verwendung sonstiger Drücker, siehe Montageanleitung Drückerhersteller!<br />
By use of other lever handles, please see installation instruction of manufacturer!<br />
3 mm<br />
6.1<br />
6.4<br />
DETAIL X<br />
6.3<br />
6.2<br />
Seite/Page 7/7 Stand/Issue 12.07