ULTRA DUO PLUS 50 Firmware upgrader - Graupner
ULTRA DUO PLUS 50 Firmware upgrader - Graupner
ULTRA DUO PLUS 50 Firmware upgrader - Graupner

Erfolgreiche ePaper selbst erstellen
Machen Sie aus Ihren PDF Publikationen ein blätterbares Flipbook mit unserer einzigartigen Google optimierten e-Paper Software.
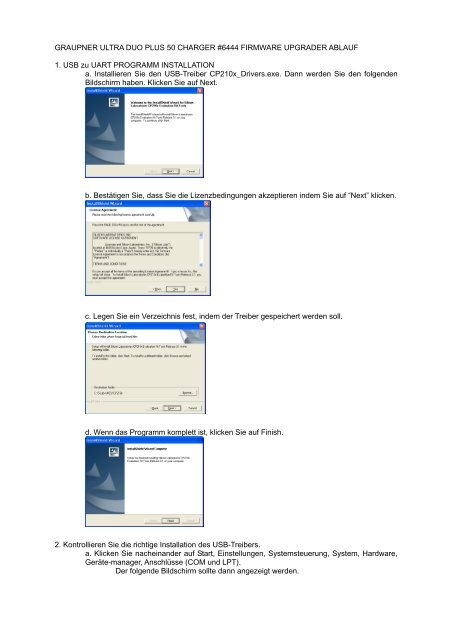
GRAUPNER <strong>ULTRA</strong> <strong>DUO</strong> <strong>PLUS</strong> <strong>50</strong> CHARGER #6444 FIRMWARE UPGRADER ABLAUF<br />
1. USB zu UART PROGRAMM INSTALLATION<br />
a. Installieren Sie den USB-Treiber CP210x_Drivers.exe. Dann werden Sie den folgenden<br />
Bildschirm haben. Klicken Sie auf Next.<br />
b. Bestätigen Sie, dass Sie die Lizenzbedingungen akzeptieren indem Sie auf “Next” klicken.<br />
c. Legen Sie ein Verzeichnis fest, indem der Treiber gespeichert werden soll.<br />
d. Wenn das Programm komplett ist, klicken Sie auf Finish.<br />
2. Kontrollieren Sie die richtige Installation des USB-Treibers.<br />
a. Klicken Sie nacheinander auf Start, Einstellungen, Systemsteuerung, System, Hardware,<br />
Geräte-manager, Anschlüsse (COM und LPT).<br />
Der folgende Bildschirm sollte dann angezeigt werden.
. Verbinden Sie nun das USB-Kabel mit dem PC und dem Ladegerät.<br />
Wenn der Adapter richtig verbunden und erkannt wurde, können Sie sehen, dass<br />
eine neue Schnittstelle hinzugefügt wurde. (COM&LPT).<br />
Sie können den CP210x USB zu UART Bridge Controller(COM2) sehen. (Möglicherweise auch eine<br />
andere Schnittstellennummer (COM-Port))<br />
3. Aktivieren des Ladegerät_Upgrader_WinApp Programms.<br />
a. verbinden Sie das USB Kabel mit dem PC und dem Ladegerät. Stecken Sie die<br />
Stromversorgung des Ladegerätes aus.<br />
b. Doppelklicken Sie auf Charger_Upgrader_WinApp.exe.
c. Wählen Sie den richtigen COM Port aus.<br />
Wenn er auf COM2 installiert wurde, wählen Sie COM2, ansonsten den installierten COM-<br />
Port.<br />
Die anderen Einstellung wurden vom Ladegerät bereits eingestellt und dürfen nicht verändert<br />
werden.<br />
d. Klicken Sie auf Open and Send HEX File und wählen Sie das Upgrade aus, dass Sie<br />
installieren wollen (hex file). (Das .zip File muss also schon entpackt sein.)
e. Die Wait Boot command form Target… Nachricht muss angezeigt werden.<br />
f. Wenn das Ladegerät dann an eine Versorgungsspannung angeschlossen wird, muss<br />
folgender Bildschirm erscheinen und das Programm wird aufgespielt.<br />
Wenn das Programm vollständig ist, erscheint die Anzeige “Successfully Done “. Es dauert<br />
mindestens 10 Sekunden.<br />
g. Das Ladegerät bekommt einen RESET und wird neu gestartet.<br />
*** Hinweis ***<br />
Wenn Sie das Hex file ausgewählt haben, aber das USB-Kabel nicht verbunden ist, oder das<br />
Ladegerät keinen richtigen RESET bekommt, dann hängt sich das Programm auf und<br />
reagiert nicht mehr.<br />
Stellen Sie also sicher, dass das USB-Kabel richtig verbunden wurde.<br />
h. Werkseinstellung: Initialisierung der Akkuspeicher: Wenn Sie die Akkuspeicher nicht<br />
löschen wollen, überspringen Sie diesen Punkt. Stecken Sie die Stromversorgung des<br />
Ladegerätes aus und nach frühestens 10 Sekunden wieder an, während Sie die Taste<br />
drücken um die Initialisierung des Ladegerätes zu starten. Die neue <strong>Firmware</strong><br />
Versionsnummer wird angezeigt. Drücken Sie nun die Taste erneut, um die<br />
Initialisierung zu starten.
GRAUPNER <strong>ULTRA</strong> <strong>DUO</strong> <strong>PLUS</strong> <strong>50</strong> CHARGER #6444 FIRMWARE UPGRADER FLOW<br />
1. USB to UART PROGRAM INSTALLATION<br />
a. Proceed the CP210x_Drivers.exe, then you can see the following screen.<br />
Press the Next button.<br />
b. Agree Licenses, then press Yes button.<br />
c. Find a folder where you would like to save the program then press Next button.<br />
d. When program is complete, then press Finish button.<br />
2. Confirmation on the installation of the program.<br />
a. Press the right button of the mouse in the My Computer icon at main pc screen, then<br />
press “Properties”. Select “Hardware tab”, then press “Device Manager”.<br />
Then, the following screen will be shown.<br />
If you have a look at the Port (COM & LPT ) list, you can see the status of
connected installation.<br />
b. Connect the USB cable to USB port.<br />
When the adapter is properly connected, you can see that installation is added into<br />
the Port (COM&LPT) list.<br />
You can see CP210x USB to UART Bridge Controller(COM2) installation.<br />
3. Charge_Upgrader_WinApp activation.<br />
a. connect the USB cable to the PC PORT of the charger. Unplug the main plug (power<br />
source) of the charger.<br />
b. Double click and activate the Charger_Upgrader_WinApp.exe.
c. Set the communication port.<br />
Select the connected communication port at 2-b above.<br />
All other items had been already set with the charger, so you do not need to touch them.<br />
d. Press the Open and Send HEX File button then select the hex file to be upgraded.
e. Wait Boot command form Target… message should be added.<br />
f. When a charger is connected to the power, program should be upgraded.<br />
When the program is complete, “Successfully Done “ message is added. It takes about 8~12<br />
seconds.<br />
g. The charger is reset then starts working.<br />
*** Note ***<br />
After choosing the Hex file, if adapter is not connected to the charger, or if the charger is not<br />
properly reset, the program does not response.<br />
Make sure to following above procedures and correctly connect the connectors.<br />
h. Memory initialization to factory setting: If you don’t want to initialize the memory, update is<br />
finished. Otherwise unplug the charger again. Press the button to initialize the update.<br />
The new firmware version will be displayed. Press the button again to start initialization.
CHARGEUR <strong>ULTRA</strong> <strong>DUO</strong> <strong>PLUS</strong> <strong>50</strong> N°6444 Mode d’emploi de la mise à jour<br />
1. USB pour l’installation du programme UART<br />
a. Installez l’USB CP210x_Drivers.exe. Vous obtenez ainsi l’écran suivant. Cliquez sur Next<br />
(Suivant).<br />
b. Confirmez que vous acceptez les conditions de licence en cliquant sur Next (Suivant).<br />
c. Sélectionnez un registre, dans lequel le document va être mémorisé.<br />
d. Si le programme est complet, cliquez sur Finish (Terminé).<br />
2. Contrôlez la bonne installation de l’USB.<br />
a. Cliquez l’un après l’autre sur Démarrer, Panneau de configuration, Système, Matériel,<br />
Assistant Ajout de matériel, Branchements (COM et LPT).<br />
L’écran suivant est alors affiché.
. Reliez le cordon USB avec le PC et le chargeur.<br />
Si l’adaptateur est bien branché et donc reconnu, vous pouvez voir qu’un nouvel<br />
interface a été rajouté (COM&LPT).<br />
Vous pouvez voir le CP210x USB pour le UART Bridge Controller(COM2). (Possible aussi d’un autre<br />
numéro d’interface (COM-Port))<br />
3. Activez le programme de mise à jour du chargeur (Charger Upgrader_WinApp Programm).<br />
a. Reliez le cordon USB Kabel avec le PC et le chargeur. Débranchez le chargeur de son<br />
courant d’alimentation.<br />
b. Cliquez deux fois sur Charger_Upgrader_WinApp.exe.
c. Sélectionnez le bon COM Port.<br />
S’il est installé sur COM2, choisissez COM2, sinon le COM-Port installé.<br />
Les autres réglages ont déjà été faits par le chargeur et ne doivent pas être changés.<br />
d. Cliquez sur Open and Send HEX File et choisissez le Upgrade (mise à jour), que vous<br />
voulez installez (hex file). (Le fichier .zip doit déjà être décompressé)
e. Die Wait Boot command form Target… Le message doit être affiché.<br />
f. Si le chargeur est branché à une tension d’alimentation, l’écran suivant s’affiche et le<br />
programme se réactualise automatiquement. Quand le programme est terminé, l’affichage<br />
« Succefully Done » apparaît. Cela dure environ 10 secondes.<br />
g. Le chargeur recoit un RESET et est redémarré à nouveau.<br />
*** Indication ***<br />
Si vous avez choisi le fichier Hex et la clé USB n’est pas connectée, ou le chargeur ne recoit pas le<br />
bon RESET, le programme bloque et ne réagit plus. Veillez absolument à ce que la clé USB soit bien<br />
connectée.<br />
Réglage d’usine : initialisation de la mémoire d’accu : si vous n’annulez pas la mémoire<br />
d’accu, passez alors ce paragraphe. Débranchez la source d’alimentation du chargeur et au<br />
bout de 10 secondes rebranchez-la en appuyant sur la touche , pour lancez<br />
l’initialisation du chargeur. Le nouveau numéro de la version du <strong>Firmware</strong> est affiché.<br />
Appuyez à nouveau sur la touche pour lancer l’initialisation.