USV5MN0001B (User Manual SV5 RIELLO GB ... - Riello UPS GmbH
USV5MN0001B (User Manual SV5 RIELLO GB ... - Riello UPS GmbH
USV5MN0001B (User Manual SV5 RIELLO GB ... - Riello UPS GmbH

Sie wollen auch ein ePaper? Erhöhen Sie die Reichweite Ihrer Titel.
YUMPU macht aus Druck-PDFs automatisch weboptimierte ePaper, die Google liebt.
Thank you for choosing our product.<br />
IMPORTANT SAFETY NOTES<br />
This device can be installed by anyone, provided that they READ THIS MANUAL CAREFULLY<br />
AND FOLLOW THE INSTRUCTIONS WITHIN IT.<br />
This manual contains detailed instructions for the use and installation of the <strong>UPS</strong>.<br />
This manual should be kept close to the <strong>UPS</strong> and READ BEFORE THE <strong>UPS</strong> IS INSTALLED<br />
AND USED<br />
© No part of this manual may be reproduced, even partially, without the manufacturer’s<br />
authorisation. For purposes of improvements the manufacturer reserves the right to change<br />
specifications at any time and without notice.<br />
Warning:<br />
Read the following instructions carefully and keep this manual handy for easy referral.<br />
The mains power supply socket used to power the <strong>UPS</strong> must have an earth connection.<br />
Potentially dangerous electrical voltages are generated inside this device, even when the <strong>UPS</strong> is<br />
switched off. All repairs must be carried out by authorised personnel only.<br />
Voltage may be present on the <strong>UPS</strong> output sockets even when the <strong>UPS</strong> is not connected to a mains<br />
power supply.<br />
In the event of a mains power supply failure (emergency <strong>UPS</strong> operation), do not unplug the power<br />
supply cable to the <strong>UPS</strong>, to ensure earth continuity to the connected loads.<br />
Do not allow liquids and/or other foreign bodies to enter the <strong>UPS</strong>.<br />
Since the mains power supply cable acts as a separation device, the mains power supply socket<br />
used that connects to the rear of the <strong>UPS</strong> must be accessible and easy to disconnect.<br />
In dangerous conditions and/or to disconnect the <strong>UPS</strong> from sources of energy, (whether mains or<br />
batteries), disconnect the power supply cable from the mains socket or from the back of the <strong>UPS</strong><br />
and shut down the <strong>UPS</strong> using the STAND-BY/ON switch (6).<br />
Risk of electric shock. Since internal components are connected to the batteries, they will remain<br />
powered, and therefore dangerous, even after the device has been disconnected from a mains power<br />
supply. Disconnect the batteries and ensure no voltage is present before carrying out any repair or<br />
maintenance operations.<br />
The <strong>UPS</strong> generates an earth leakage current. Ensure that the sum of the <strong>UPS</strong> and load earth leakage<br />
current is less than 3.5mA.<br />
Replaced batteries should be considered as TOXIC WASTE and treated as such.<br />
Do not throw the batteries into a fire.<br />
Do not try to open the batteries: they do not require any maintenance. Furthermore the electrolyte is<br />
dangerous if it comes into contact with skin or eyes and may be toxic.<br />
The batteries can cause electric shock and have a high short circuit current. Take the necessary<br />
safety measures and precautions when handling them:<br />
- do not wear watches, rings, necklaces or any other metallic material<br />
- only use tools with insulated handles<br />
Only use the <strong>UPS</strong> following the specific instructions in this user manual.<br />
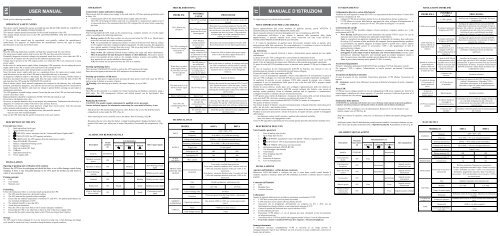
DESCRIPTION OF THE <strong>UPS</strong><br />
Front and rear views:<br />
1. Back-up sockets (local type)<br />
2. Surge sockets (local type)<br />
3. /RED LED: various messages (see the “Alarms and Report Signals table”)<br />
4. /YELLOW LED: the <strong>UPS</strong> operates on battery<br />
5. /GREEN LED: the <strong>UPS</strong> operates from the mains power supply<br />
6. Main STAND-BY/ON switch<br />
7. Battery compartment locking screws<br />
8. Battery compartment<br />
9. Back-up sockets (IEC type)<br />
10. USB port<br />
11. Input protection device<br />
12. Power supply cable<br />
INSTALLATION<br />
Opening of packing and verification of its contents<br />
Remove the <strong>UPS</strong> from its packaging and check that there is no visible damage caused during<br />
shipping. If there is any noticeable damage to the <strong>UPS</strong>, pack the product up and return to<br />
where it was purchased.<br />
Packing contents<br />
<strong>UPS</strong><br />
<strong>User</strong> manual<br />
Warranty card<br />
Positioning<br />
Follow the instructions below to correctly install and position the <strong>UPS</strong>:<br />
The <strong>UPS</strong> must be placed on a horizontal surface.<br />
The <strong>UPS</strong> must not be exposed to direct sunlight.<br />
Ensure that the ambient temperature is between 0°C and 40°C, for optimal performance use<br />
at a maximum temperature of 25°C.<br />
The ambient humidity is less than 90%.<br />
Avoid dusty environments.<br />
Place the <strong>UPS</strong> at least 5cm from a wall to ensure adequate ventilation.<br />
Ensure that the <strong>UPS</strong> or any other heavy object is clear of the power supply cable.<br />
Ensure that the cables connecting loads to the <strong>UPS</strong> are not longer than 10metres.<br />
Storage<br />
The <strong>UPS</strong> must be fully recharged if it is to be stored for a long time. A full discharge and charge<br />
cycle should be carried out every 6 months to keep the battery in good condition.<br />
OPERATION<br />
Connection to mains and battery charging<br />
Please ensure that the mains power supply to be used with this <strong>UPS</strong> has upstream protection rated<br />
at either 10A.<br />
Connecting the <strong>UPS</strong> to the mains with the power supply cable provided.<br />
The <strong>UPS</strong> will recharge its battery each time it is connected to a mains power supply (even if<br />
it is powered down). We recommend that the <strong>UPS</strong> is charged for 6-8 hours before connecting<br />
the loads.<br />
Connecting the loads<br />
After having loaded the <strong>UPS</strong>, loads can be connected (e.g.: computer, monitor, etc.) to the output<br />
sockets, according to the following indications:<br />
Back-up sockets (1) (9): these sockets are only powered when the <strong>UPS</strong> is on. Should mains<br />
power fail, the back-up sockets are battery-powered.<br />
N.B.: we recommend not running laser printers or laser print devices from back-up sockets<br />
(1) (9) together with other computer peripheral equipment. On odd occasions, this equipment<br />
uses a greater quantity of energy than when at rest. This set-up may lead to <strong>UPS</strong> overload and<br />
cause all equipment connected to be switched off.<br />
Surge sockets (2): additional filtered sockets limiting line surge and mains disturbances.<br />
They do not protect the load from power failures or short blackouts. They can be used to<br />
power non-essential devices such as, for example, printers, scanners and suchlike. Small<br />
laser printer devices can be installed on these sockets.<br />
N.B.: the sockets are also powered when the <strong>UPS</strong> is in stand-by.<br />
Starting up/Shutting down<br />
Press the main STAND-BY/ON switch to start-up the <strong>UPS</strong> and power the loads.<br />
Press the switch again to shut down the <strong>UPS</strong> and power down from the loads.<br />
Starting up on battery (Cold start)<br />
If there is no mains power supply present, pressing the main power switch will cause the <strong>UPS</strong> to<br />
start up using its battery as a source of power.<br />
Warning: when starting up on battery, the output frequency is set to 50Hz.<br />
USB port<br />
The <strong>UPS</strong> can be connected to a computer for remote monitoring and shutdown operations using a<br />
USB cable. The <strong>UPS</strong> management software and related manual can be downloaded from<br />
www.riello-ups.com.<br />
Replacing the batteries<br />
CAUTION: The models require replacement by qualified service personnel.<br />
Contact technical support for information concerning the exact model of battery to use.<br />
- Shut down the <strong>UPS</strong> and disconnect the power cable. Remove the screws that hold the battery<br />
compartment in place under the <strong>UPS</strong>. (Fig. A)<br />
- After removing the cover, carefully remove the battery from its housing. (Fig. B)<br />
- Disconnect the two wires from the battery (simply by pulling them). Replace the battery with<br />
another of the same type, taking care to respect the polarity. Re-assemble the compartment. (Fig.<br />
C)<br />
ALARMS AND REPORT SIGNALS<br />
Description<br />
Switch<br />
position<br />
(6)<br />
Green led<br />
Led functioning<br />
Yellow led<br />
Red led<br />
Stand-by STAND-BY Blinking<br />
Operation on mains<br />
power<br />
ON Steady<br />
Operation on battery ON Blinking<br />
End of discharge<br />
warning<br />
Other report signals<br />
Slow blinking acoustic<br />
signal<br />
ON Blinking Blinking acoustic signal<br />
Overload ON Blinking Blinking acoustic signal<br />
Battery fault ON Steady Steady Blinking acoustic signal<br />
Alarm or fault (other<br />
than overload)<br />
ON Steady<br />
Continuous acoustic<br />
signal<br />
TROUBLESHOOTING<br />
PROBLEM<br />
The <strong>UPS</strong> does not<br />
switch on<br />
The <strong>UPS</strong> is working on<br />
battery even though<br />
mains power is<br />
available<br />
When there is a mains<br />
power supply failure,<br />
the <strong>UPS</strong> does not work<br />
for the expected<br />
runtime<br />
The alarm icon (3) is lit<br />
and the acoustic signal<br />
sounds.<br />
POSSIBLE<br />
CAUSE<br />
The <strong>UPS</strong> is switched<br />
off<br />
The <strong>UPS</strong> input thermal<br />
protection device has<br />
been triggered<br />
The <strong>UPS</strong> input<br />
thermal protection<br />
device has been<br />
triggered<br />
The mains power<br />
supply socket the <strong>UPS</strong><br />
is connected to is not<br />
supplying power to the<br />
device<br />
The <strong>UPS</strong> battery is<br />
not sufficiently<br />
charged as there was<br />
not enough time for it<br />
to recharge after a<br />
recent power failure<br />
The battery needs to<br />
be replaced.<br />
The <strong>UPS</strong> has a fault.<br />
PROCEDURE<br />
Check that the STAND-BY/ON switch is in the ON<br />
position<br />
Disconnect non-essential equipment from the <strong>UPS</strong>.<br />
Reset the protection (11) by depressing the button. If<br />
the switch resets, start up the <strong>UPS</strong> and reconnect the<br />
equipment one device at a time. If the protection<br />
activates again, one of the connected devices is<br />
causing an overload condition.<br />
Disconnect non essential equipment from the <strong>UPS</strong>.<br />
Reset the protection (11) by depressing the button.<br />
Connect the <strong>UPS</strong> to another mains power supply<br />
socket or have the mains supply checked by a<br />
qualified electrician.<br />
Wait for the battery to recharge. It recharges each time<br />
the <strong>UPS</strong> is connected to a mains socket. It usually<br />
takes 8 hours for the battery to recharge fully. <strong>UPS</strong><br />
operation time is a function of how charged the<br />
battery is.<br />
Replace the battery.<br />
Remove the external devices from the <strong>UPS</strong>. Turn off<br />
the <strong>UPS</strong> and disconnect it from the mains. Connect<br />
the <strong>UPS</strong> to the mains and turn on again. If the <strong>UPS</strong><br />
message the anomaly again, contact your authorized<br />
service centre.<br />
Battery fault message. Battery fault. Replace the battery.<br />
The <strong>UPS</strong> is not<br />
communicating with a<br />
PC.<br />
TECHNICAL DATA<br />
INPUT<br />
OUTPUT<br />
SURGE<br />
SOCKETS<br />
PROTECTION<br />
DEVICES AND<br />
FILTERS<br />
BATTERY<br />
AMBIENT<br />
CONDITIONS<br />
VARIOUS<br />
The software sends a<br />
message that<br />
communication has<br />
been lost.<br />
The software is not<br />
installed<br />
Check that the USB cable is connected between the<br />
<strong>UPS</strong> and the PC and that ‘USB’ has been selected as<br />
the communication port in the software configuration.<br />
Install the specific software for your computer’s<br />
operating system.<br />
MODEL 600VA 800VA<br />
Voltage<br />
230V +20%/ -25%<br />
Frequency 50 or 60Hz +/-5% (with auto-sensing)<br />
Voltage (from battery) 230Vac +/-10% (Pseudo-sinusoidal wave)<br />
Frequency (from battery) 50 or 60Hz +/-1Hz (with auto-sensing)<br />
Trigger time 2-6 ms typical<br />
Rated power VA 600 800<br />
Rated power W 360 480<br />
Max. current 5A 8A<br />
Overload and shortcircuit<br />
protection<br />
From mains: overload input protection.<br />
From mains: automatic shutdown after 5 minutes with load<br />
>110% and immediate shutdown with load >120% or for<br />
shortcircuit.<br />
From battery: automatic shutdown after 5 seconds with load<br />
>110% and immediate shutdown with load >120% or for<br />
shortcircuit.<br />
Type Sealed lead batteries, maintenance-free<br />
Model 12V 7Ah 12V 9Ah<br />
Typical recharge time 6-8 hours<br />
Protection<br />
Operating conditions<br />
Protection against total discharge, battery replacement<br />
indicator<br />
Max altitude 6,000 m, 0-90% non condensing humidity,<br />
0-40°C<br />
Noise