USV5MN0001B (User Manual SV5 RIELLO GB ... - Riello UPS GmbH
USV5MN0001B (User Manual SV5 RIELLO GB ... - Riello UPS GmbH
USV5MN0001B (User Manual SV5 RIELLO GB ... - Riello UPS GmbH

Erfolgreiche ePaper selbst erstellen
Machen Sie aus Ihren PDF Publikationen ein blätterbares Flipbook mit unserer einzigartigen Google optimierten e-Paper Software.
Wir danken Ihnen, dass sie unser Produkt gewählt haben!<br />
WICHTIGE SICHERHEITSHINWEISE<br />
Nach vorheriger AUFMERKSAMER UND SORGFÄLTIGER LEKTÜRE DER VORLIEGENDEN<br />
BEDIENUNGSANLEITUNG kann dieses Gerät durch jede Person installiert werden.<br />
Diese Bedienungsanleitung enthält detaillierte Anweisungen zur Bedienung und Installation der USV.<br />
Für Informationen zur Bedienung, und um mit Ihrem Gerät die besten Leistungen zu erzielen, muss<br />
diese Bedienungsanleitung sorgfältig in der Nähe der USV aufbewahrt und VOR ARBEITEN AN<br />
DER USV ZU RATE GEZOGEN WERDEN.<br />
© Vorbehaltlich der Genehmigung durch die Herstellerfirma, ist die Wiedergabe jedweden Teils,<br />
auch auszugsweise, der vorliegenden Bedienungsanleitung verboten. Für Verbesserungen behält<br />
sich der Hersteller das Recht vor, das beschriebene Produkt jederzeit und ohne Vorankündigung<br />
abzuändern.<br />
Achtung:<br />
Die folgenden Anleitungen sorgfältig lesen und diese Bedienungsanleitung zum schnellen<br />
Nachschlagen aufbewahren.<br />
Der Netzanschluss der USV muss an einen Anschluss mit Erdung angeschlossen werden.<br />
Auch bei ausgeschalteter USV gibt es im Gerät potentiell gefährliche Spannungen. Alle<br />
Reparaturarbeiten dürfen ausschließlich von autorisiertem Personal ausgeführt werden.<br />
Auch wenn die USV nicht am Netz angeschlossen ist, können die Ausgänge unter Spannung<br />
stehen.<br />
Bei einem Netzausfall (USV-Batteriebetrieb) das Speisekabel nicht trennen, um die Erdung der<br />
angeschlossenen Abnehmer sicherzustellen.<br />
Vermeiden, dass Flüssigkeiten bzw. Fremdkörper in die USV gelangen.<br />
Da das Speisekabel als Trennvorrichtung angesehen wird, muss der USV-Anschluss bzw. die<br />
Rückseite der USV zugänglich und leicht trennbar sein.<br />
Bei Gefahr bzw. beim Trennen der USV von den Energiequellen, Stromnetz und Batterien, das<br />
Speisekabel vom Netzstecker oder an der Rückseite der USV trennen und die USV mit dem<br />
Schalter STAND-BY/ON (6) abschalten.<br />
Stromschlaggefahr. Auch nachdem das Gerät vom Netz getrennt worden ist, stehen Bauteile in der<br />
USV unter Spannung, weil sie an die Batterien angeschlossen sind, und sind daher gefährlich. Vor<br />
allen Reparatur- und Wartungsarbeiten die Batterien trennen und prüfen, dass keine Spannung<br />
anliegt.<br />
Die USV erzeugt einen Fehlerstrom. Sicherstellen, dass die Summe der Fehlerströme der USV und<br />
der an ihr angeschlossenen Lasten in Richtung Erde kleiner als der Grenzwert von 3,5mA ist.<br />
Ausgewechselte Batterien sind SONDERMÜLL und müssen entsprechend entsorgt werden.<br />
Batterien nicht ins Feuer werfen.<br />
Nicht versuchen die Batterie zu öffnen: Es sind wartungsfreie Batterien. Außerdem ist das<br />
Elektrolyt gefährlich für Haut und Augen und kann giftig sein.<br />
Die Batterien können Stromschläge verursachen und haben einen hohen Kurzschlussstrom. Beim<br />
Umgang mit Batterien die nachstehenden Vorsichts- und Schutzmaßnahmen treffen:<br />
- Keine Uhren, Ringe, Ketten oder andere Metallmaterialien tragen.<br />
- Nur Werkzeuge mit isoliertem Griff benutzen.<br />
Die USV entsprechend der in der Bedienungsanleitung vorgesehenen Spezifikationen und<br />
Anleitungen verwenden.<br />
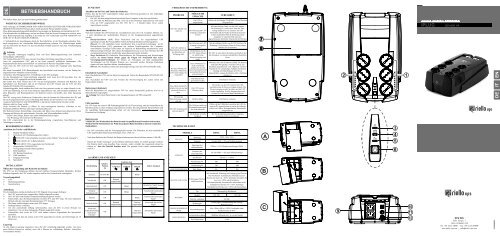
BESCHREIBUNG DER USV<br />
Ansichten der Vorder- und Rückseite<br />
1. Backup-Steckdosen (lokal)<br />
2. Steckdosen mit Überspannungsschutz (lokal)<br />
3. /LED ROT: Unterschiedliche Anzeigen (siehe Tabelle "Alarme und Anzeigen")<br />
4. /LED GELB: USV in Batteriebetrieb<br />
5. /LED GRÜN: USV eingeschaltet mit Netzbetrieb<br />
6. Hauptschalter STAND-BY/ON<br />
7. Verriegelungsschraube Batteriegehäuse<br />
8. Batteriegehäuse<br />
9. IEC Backup-Steckdosen<br />
10. USB-Anschluss<br />
11. Eingangs-Sicherung<br />
12. Speisekabel<br />
INSTALLATION<br />
Öffnen der Verpackung und Kontrolle des Inhalts<br />
Die USV aus der Verpackung nehmen und auf sichtbare Transportschäden überprüfen. Werden<br />
Schäden festgestellt, die USV wieder einpacken und bei der Verkaufsstelle zurückgeben.<br />
Verpackungsinhalt<br />
USV<br />
Bedienungsanleitung<br />
Garantieschein<br />
Aufstellung<br />
Für die Installation und das Aufstellen der USV folgende Anweisungen befolgen:<br />
Die USV muss auf einer waagerechten Fläche aufgestellt werden.<br />
Die USV darf nicht direkter Sonneneinstrahlung ausgesetzt werden.<br />
Sicherstellen, dass die Raumtemperatur zwischen 0°C und 40°C liegt. Für einen optimalen<br />
Betrieb sollte die maximale Raumtemperatur 25°C betragen.<br />
Die Raum-Luftfeuchtigkeit muss unter 90% liegen.<br />
Staubige Räume vermeiden.<br />
Um eine ausreichende Lüftung sicherzustellen, muss die USV in einem Abstand von<br />
mindestens 5 cm von den umliegenden Wänden aufgestellt werden.<br />
Sicherstellen, dass weder die USV noch andere schwere Gegenstände das Speisekabel<br />
quetschen.<br />
Das Kabel, mit dem die Lasten an die USV angeschlossen werden, darf nicht länger als 10<br />
Meter sein.<br />
Lagerung<br />
Ist eine längere Lagerung vorgesehen, muss die USV vollständig aufgeladen werden. Um einen<br />
guten Batterie-Zustand zu erhalten, muss alle 6 Monate ein vollständiger Entlade-/ Ladezyklus<br />
vorgenommen werden.<br />
FUNKTION<br />
Anschluss an das Netz und Laden der Batterien<br />
Prüfen, dass die der USV vorgeschaltete Anlage gegen Überstrom geschützt ist. Der empfohlene<br />
Schutzwert beträgt 10A.<br />
Die USV mit dem mitgelieferten Speisekabel ihres Computer an das Netz anschließen.<br />
Die USV lädt die Batterien jedes Mal, wenn sie an das Stromnetz angeschlossen wird (auch<br />
wenn die USV ausgeschaltet ist). Die USV für 6 – 8 Stunden laden, bevor Lasten<br />
angeschlossen werden.<br />
Anschließen der Lasten<br />
Nach dem Aufladen des <strong>UPS</strong> können die verschiedenen Lasten (wie z.B. Computer, Monitor, etc.<br />
…) unter Beachtung der nachstehenden Hinweise an die Ausgangssteckdosen angeschlossen<br />
werden:<br />
Backup-Steckdosen (1)(9): Diese Steckdosen sind nur bei eingeschaltetem <strong>UPS</strong><br />
spannungsversorgt. Bei Netzausfällen werden die Backup-Steckdosen batteriegespeist.<br />
Hinweis: Es wird empfohlen, keine Laserdrucker bzw. Laserdruckvorrichtungen an die<br />
Backup-Steckdosen (1)(9) gemeinsam mit anderen Peripheriegeräten des Computers<br />
anzuschließen. Derartige Geräte haben im Vergleich zur Ruhestellung normalerweise einen<br />
höheren Energieverbrauch. Bei solchen Konfigurationen kann es zu einer Überlast des <strong>UPS</strong><br />
und dementsprechend zum Ausfall aller angeschlossenen Geräte kommen.<br />
Surge Steckdosen (2): Zusätzliche Filtersteckdosen, die Überspannung und Netzstörungen<br />
senken; sie bieten keinen Schutz gegen die Folgen von Netzausfall oder kurze<br />
Versorgungsunterbrechungen. Sie können zur Versorgung von nicht grundlegenden<br />
Vorrichtungen wie z.B. Drucker, Scanner, usw. verwendet werden. Derartige Steckdosen<br />
eignen sich zum Anschluss kleiner Laserdruckgeräte.<br />
Hinweis: Die Steckdosen sehen auch spannungsversorgt, wenn das <strong>UPS</strong> auf Standby steht.<br />
Einschalten/ Ausschalten<br />
Zum Einschalten der USV und zur Stromversorgung der Lasten den Hauptschalter STAND-BY/ON<br />
drücken.<br />
Zum Ausschalten der USV und zum Trennen der Stromversorgung der Lasten erneut den<br />
Hauptschalter drücken.<br />
Batteriestart (Kaltstart)<br />
Wird der Hautschalter bei ausgeschalteter USV bei einem Stromausfall gedrückt, wird sie in<br />
Batteriebetrieb eingeschaltet.<br />
Achtung: Bei einem Batteriestart ist die Ausgangsfrequenz auf 50Hz eingestellt.<br />
USB-Anschluss<br />
Die USV kann mit einem USB-Verbindungskabel für die Überwachung und das Runterfahren des<br />
Betriebssystems an einen Computer angeschlossen werden. Die entsprechende Steuersoftware und<br />
die zugehörige Bedienungsanleitung stehen auf der Internetseite www.riello-ups.com zum<br />
Download zur Verfügung.<br />
Batterieersatz<br />
VORSICHT: Der Wiedereinbau der Batterien muß von qualifiziertem Personal bewirkt werden.<br />
Wenden Sich für Informationen zur Wahl des geeigneten Batteriemodells an unseren technischen<br />
Kundendienst.<br />
- Die USV ausschalten und das Versorgungskabel trennen. Die Schrauben, die den unterhalb der<br />
USV angebrachten Batterieraum befestigen, lösen. (Abb. A)<br />
- Nach dem Entfernen des Deckels die Batterie behutsam aus ihrem Gehäuse nehmen. (Abb. B)<br />
- Danach die beiden Leitungen von der Batterie abtrennen (indem sie einfach gezogen werden).<br />
Die Batterie durch eine desselben Typs ersetzen, wobei verstärkt das Augenmerk darauf zu<br />
richten ist, dass die Polarität beachtet wird. Das gesamte Gerät wieder zusammenbauen.<br />
(Abb. C)<br />
ALARME UND ANZEIGEN<br />
Beschreibung<br />
Schalter-<br />
Position<br />
(6)<br />
Grün led<br />
Funktion Led<br />
Gelb led<br />
Rot led<br />
Stand-by STAND-BY Blinkt<br />
Netzbetrieb ON<br />
Dauernd<br />
eingeschaltet<br />
Batteriebetrieb ON Blinkt<br />
Voralarm<br />
Entladungsende<br />
ON Blinkt<br />
Überlast ON Blinkt<br />
Batterie defekt ON<br />
Alarm oder<br />
Schutzabschaltung<br />
(nicht durch<br />
Überlast)<br />
ON<br />
Dauernd<br />
eingeschaltet<br />
Dauernd<br />
eingeschaltet<br />
Dauernd<br />
eingeschaltet<br />
Andere Anzeigen<br />
Akustisches Signal langsam<br />
aussetzend<br />
Aussetzendes akustisches<br />
Signal<br />
Aussetzendes akustisches<br />
Signal<br />
Aussetzend akustisches<br />
Signal<br />
Anhaltendes akustisches<br />
Signal<br />
FEHLERSUCHE UND BEHEBUNG<br />
PROBLEM<br />
Die USV schaltet sich<br />
nicht ein<br />
Die USV arbeitet in<br />
Batteriebetrieb, obwohl<br />
das Stromnetz zur<br />
Verfügung steht.<br />
Bei einer Störung am<br />
Stromnetz arbeitet die<br />
USV nicht solange wie<br />
vorgesehen.<br />
Das Alarm-Symbol (3)<br />
schaltet sich ein und das<br />
akustische Signal ist<br />
aktiv.<br />
Die Anzeige<br />
Batteriestörung schaltet<br />
sich ein.<br />
Die USV kommuniziert<br />
nicht mit dem PC.<br />
TECHNISCHE DATEN<br />
EINGANG<br />
AUSGANG<br />
MÖGLICHE<br />
URSACHE<br />
Die USV ist<br />
ausgeschaltet<br />
Der Sicherung am USV-<br />
Eingang ist ausgelöst<br />
worden.<br />
Der Sicherung am USV-<br />
Eingang ist ausgelöst<br />
worden.<br />
Die Steckdose, an die<br />
die USV angeschlossen<br />
ist, liefert keine<br />
Stromversorgung zum<br />
Gerät.<br />
Die USV-Batterie ist<br />
nicht ausreichend<br />
geladen, da sie nach<br />
einem Netzausfall nicht<br />
ausreichend Zeit hatte<br />
sich aufzuladen.<br />
Die Batterie muss<br />
gewechselt werden.<br />
Die USV hat eine<br />
Störung erfasst.<br />
VERFAHREN<br />
Prüfen, ob der Schalter STAND-BY/ON auf Position<br />
ON gestellt ist.<br />
Alle unwichtigen Geräte von der USV trennen.<br />
Die Sicherung (11) rücksetzen. Dazu die Taste<br />
solange drücken, bis sie einrastet. Die USV<br />
einschalten und die Geräte nach und nach einzeln<br />
wieder anschließen Wird die Sicherung erneut<br />
ausgelöst, ist wahrscheinlich eines der<br />
angeschlossenen Geräte die Ursache für die Überlast.<br />
Alle unwichtigen Geräte von der USV trennen. Die<br />
Sicherung (11) rücksetzen. Dazu die Taste solange<br />
drücken, bis sie einrastet.<br />
Die USV an eine andere Steckdose anschließen oder<br />
das Stromnetz von einem Fachelektriker überprüfen<br />
lassen.<br />
Abwarten, dass sich die Batterie entlädt. Die Batterie<br />
wird jedes Mal geladen, wenn die USV an eine<br />
Steckdose angeschlossen wird. Allgemein werden 8<br />
Stunden für ein vollständiges Aufladen der Batterie<br />
benötigt. Die Betriebsdauer der USV ist<br />
eingeschränkt, solange die Batterie nicht vollständig<br />
geladen ist.<br />
Die Batterie wechseln.<br />
Die Geräte von der USV trennen. Die USV<br />
ausschalten und die Stromversorgung trennen. Die<br />
Stromversorgung wieder herstellen und die USV<br />
wieder einschalten. Tritt die Anzeige erneut auf,<br />
wenden Sie sich bitte an Ihren Kundendienst.<br />
Batterie defekt. Die Batterie wechseln.<br />
Die Software sendet ein<br />
Kommunikationssignal,<br />
das nicht ankommt.<br />
Die Software ist nicht<br />
installiert.<br />
Prüfen, ob das USB-Kabel sowohl an der USV als<br />
auch am PC angeschlossen ist und in der Software<br />
prüfen, ob USB als Kommunikations-Schnittstelle<br />
ausgewählt ist.<br />
Die für das Betriebssystem Ihres Computers<br />
spezifische Software installieren.<br />
MODELL 600VA 800VA<br />
Spannung<br />
230V +20%/ -25%<br />
Frequenz 50 oder 60Hz +/-5% (mit Selbsterlernung)<br />
Spannung (bei<br />
Batteriebetrieb)<br />
Frequenz (bei<br />
Batteriebetrieb)<br />
230Vac +/-10% (Pseudo-sinusförmige Welle)<br />
50 oder 60Hz +/-1Hz (mit Selbsterlernung)<br />
Auslösezeit Typisch 2 – 6 mSek<br />
Nennleistung VA 600 800<br />
Nennleistung W 360 480<br />
SURGE STECKDOSEN Max. Strom 5A 8A<br />
SCHUTZ UND FILTER<br />
BATTERIE<br />
UMGEBUNGSBEDINGU<br />
NGEN<br />
VERSCHIEDENES<br />
Schutz gegen Überlast<br />
und Kurzschluss<br />
Bei Netzbetrieb: Sicherung am Eingang gegen Überlast.<br />
Bei Netzbetrieb: Automatisches Abschalten nach 5<br />
Minuten mit Last von >110%. Sofortiges Abschalten bei<br />
Last von >120% oder Kurzschluss.<br />
Bei Batteriebetrieb: Automatisches Abschalten nach 5<br />
Sekunden bei Überlast von >110%. Sofortiges<br />
Abschalten bei Überlast von >120% oder Kurzschluss.<br />
Typ Wartungsfreie Bleibatterie<br />
Modell 12V 7Ah 12V 9Ah<br />
Typische Ladedauer 6-8 Std.<br />
Sicherungen<br />
Arbeitsbedingungen<br />
Schutz gegen Tiefenentladung und Anzeige<br />
Batteriewechsel.<br />
Max. Höhe 6.000 m, 0-90% Feuchtigkeit ohne<br />
Kondenswasser, 0-40°C<br />
Geräuschentwicklung
Thank you for choosing our product.<br />
IMPORTANT SAFETY NOTES<br />
This device can be installed by anyone, provided that they READ THIS MANUAL CAREFULLY<br />
AND FOLLOW THE INSTRUCTIONS WITHIN IT.<br />
This manual contains detailed instructions for the use and installation of the <strong>UPS</strong>.<br />
This manual should be kept close to the <strong>UPS</strong> and READ BEFORE THE <strong>UPS</strong> IS INSTALLED<br />
AND USED<br />
© No part of this manual may be reproduced, even partially, without the manufacturer’s<br />
authorisation. For purposes of improvements the manufacturer reserves the right to change<br />
specifications at any time and without notice.<br />
Warning:<br />
Read the following instructions carefully and keep this manual handy for easy referral.<br />
The mains power supply socket used to power the <strong>UPS</strong> must have an earth connection.<br />
Potentially dangerous electrical voltages are generated inside this device, even when the <strong>UPS</strong> is<br />
switched off. All repairs must be carried out by authorised personnel only.<br />
Voltage may be present on the <strong>UPS</strong> output sockets even when the <strong>UPS</strong> is not connected to a mains<br />
power supply.<br />
In the event of a mains power supply failure (emergency <strong>UPS</strong> operation), do not unplug the power<br />
supply cable to the <strong>UPS</strong>, to ensure earth continuity to the connected loads.<br />
Do not allow liquids and/or other foreign bodies to enter the <strong>UPS</strong>.<br />
Since the mains power supply cable acts as a separation device, the mains power supply socket<br />
used that connects to the rear of the <strong>UPS</strong> must be accessible and easy to disconnect.<br />
In dangerous conditions and/or to disconnect the <strong>UPS</strong> from sources of energy, (whether mains or<br />
batteries), disconnect the power supply cable from the mains socket or from the back of the <strong>UPS</strong><br />
and shut down the <strong>UPS</strong> using the STAND-BY/ON switch (6).<br />
Risk of electric shock. Since internal components are connected to the batteries, they will remain<br />
powered, and therefore dangerous, even after the device has been disconnected from a mains power<br />
supply. Disconnect the batteries and ensure no voltage is present before carrying out any repair or<br />
maintenance operations.<br />
The <strong>UPS</strong> generates an earth leakage current. Ensure that the sum of the <strong>UPS</strong> and load earth leakage<br />
current is less than 3.5mA.<br />
Replaced batteries should be considered as TOXIC WASTE and treated as such.<br />
Do not throw the batteries into a fire.<br />
Do not try to open the batteries: they do not require any maintenance. Furthermore the electrolyte is<br />
dangerous if it comes into contact with skin or eyes and may be toxic.<br />
The batteries can cause electric shock and have a high short circuit current. Take the necessary<br />
safety measures and precautions when handling them:<br />
- do not wear watches, rings, necklaces or any other metallic material<br />
- only use tools with insulated handles<br />
Only use the <strong>UPS</strong> following the specific instructions in this user manual.<br />
DESCRIPTION OF THE <strong>UPS</strong><br />
Front and rear views:<br />
1. Back-up sockets (local type)<br />
2. Surge sockets (local type)<br />
3. /RED LED: various messages (see the “Alarms and Report Signals table”)<br />
4. /YELLOW LED: the <strong>UPS</strong> operates on battery<br />
5. /GREEN LED: the <strong>UPS</strong> operates from the mains power supply<br />
6. Main STAND-BY/ON switch<br />
7. Battery compartment locking screws<br />
8. Battery compartment<br />
9. Back-up sockets (IEC type)<br />
10. USB port<br />
11. Input protection device<br />
12. Power supply cable<br />
INSTALLATION<br />
Opening of packing and verification of its contents<br />
Remove the <strong>UPS</strong> from its packaging and check that there is no visible damage caused during<br />
shipping. If there is any noticeable damage to the <strong>UPS</strong>, pack the product up and return to<br />
where it was purchased.<br />
Packing contents<br />
<strong>UPS</strong><br />
<strong>User</strong> manual<br />
Warranty card<br />
Positioning<br />
Follow the instructions below to correctly install and position the <strong>UPS</strong>:<br />
The <strong>UPS</strong> must be placed on a horizontal surface.<br />
The <strong>UPS</strong> must not be exposed to direct sunlight.<br />
Ensure that the ambient temperature is between 0°C and 40°C, for optimal performance use<br />
at a maximum temperature of 25°C.<br />
The ambient humidity is less than 90%.<br />
Avoid dusty environments.<br />
Place the <strong>UPS</strong> at least 5cm from a wall to ensure adequate ventilation.<br />
Ensure that the <strong>UPS</strong> or any other heavy object is clear of the power supply cable.<br />
Ensure that the cables connecting loads to the <strong>UPS</strong> are not longer than 10metres.<br />
Storage<br />
The <strong>UPS</strong> must be fully recharged if it is to be stored for a long time. A full discharge and charge<br />
cycle should be carried out every 6 months to keep the battery in good condition.<br />
OPERATION<br />
Connection to mains and battery charging<br />
Please ensure that the mains power supply to be used with this <strong>UPS</strong> has upstream protection rated<br />
at either 10A.<br />
Connecting the <strong>UPS</strong> to the mains with the power supply cable provided.<br />
The <strong>UPS</strong> will recharge its battery each time it is connected to a mains power supply (even if<br />
it is powered down). We recommend that the <strong>UPS</strong> is charged for 6-8 hours before connecting<br />
the loads.<br />
Connecting the loads<br />
After having loaded the <strong>UPS</strong>, loads can be connected (e.g.: computer, monitor, etc.) to the output<br />
sockets, according to the following indications:<br />
Back-up sockets (1) (9): these sockets are only powered when the <strong>UPS</strong> is on. Should mains<br />
power fail, the back-up sockets are battery-powered.<br />
N.B.: we recommend not running laser printers or laser print devices from back-up sockets<br />
(1) (9) together with other computer peripheral equipment. On odd occasions, this equipment<br />
uses a greater quantity of energy than when at rest. This set-up may lead to <strong>UPS</strong> overload and<br />
cause all equipment connected to be switched off.<br />
Surge sockets (2): additional filtered sockets limiting line surge and mains disturbances.<br />
They do not protect the load from power failures or short blackouts. They can be used to<br />
power non-essential devices such as, for example, printers, scanners and suchlike. Small<br />
laser printer devices can be installed on these sockets.<br />
N.B.: the sockets are also powered when the <strong>UPS</strong> is in stand-by.<br />
Starting up/Shutting down<br />
Press the main STAND-BY/ON switch to start-up the <strong>UPS</strong> and power the loads.<br />
Press the switch again to shut down the <strong>UPS</strong> and power down from the loads.<br />
Starting up on battery (Cold start)<br />
If there is no mains power supply present, pressing the main power switch will cause the <strong>UPS</strong> to<br />
start up using its battery as a source of power.<br />
Warning: when starting up on battery, the output frequency is set to 50Hz.<br />
USB port<br />
The <strong>UPS</strong> can be connected to a computer for remote monitoring and shutdown operations using a<br />
USB cable. The <strong>UPS</strong> management software and related manual can be downloaded from<br />
www.riello-ups.com.<br />
Replacing the batteries<br />
CAUTION: The models require replacement by qualified service personnel.<br />
Contact technical support for information concerning the exact model of battery to use.<br />
- Shut down the <strong>UPS</strong> and disconnect the power cable. Remove the screws that hold the battery<br />
compartment in place under the <strong>UPS</strong>. (Fig. A)<br />
- After removing the cover, carefully remove the battery from its housing. (Fig. B)<br />
- Disconnect the two wires from the battery (simply by pulling them). Replace the battery with<br />
another of the same type, taking care to respect the polarity. Re-assemble the compartment. (Fig.<br />
C)<br />
ALARMS AND REPORT SIGNALS<br />
Description<br />
Switch<br />
position<br />
(6)<br />
Green led<br />
Led functioning<br />
Yellow led<br />
Red led<br />
Stand-by STAND-BY Blinking<br />
Operation on mains<br />
power<br />
ON Steady<br />
Operation on battery ON Blinking<br />
End of discharge<br />
warning<br />
Other report signals<br />
Slow blinking acoustic<br />
signal<br />
ON Blinking Blinking acoustic signal<br />
Overload ON Blinking Blinking acoustic signal<br />
Battery fault ON Steady Steady Blinking acoustic signal<br />
Alarm or fault (other<br />
than overload)<br />
ON Steady<br />
Continuous acoustic<br />
signal<br />
TROUBLESHOOTING<br />
PROBLEM<br />
The <strong>UPS</strong> does not<br />
switch on<br />
The <strong>UPS</strong> is working on<br />
battery even though<br />
mains power is<br />
available<br />
When there is a mains<br />
power supply failure,<br />
the <strong>UPS</strong> does not work<br />
for the expected<br />
runtime<br />
The alarm icon (3) is lit<br />
and the acoustic signal<br />
sounds.<br />
POSSIBLE<br />
CAUSE<br />
The <strong>UPS</strong> is switched<br />
off<br />
The <strong>UPS</strong> input thermal<br />
protection device has<br />
been triggered<br />
The <strong>UPS</strong> input<br />
thermal protection<br />
device has been<br />
triggered<br />
The mains power<br />
supply socket the <strong>UPS</strong><br />
is connected to is not<br />
supplying power to the<br />
device<br />
The <strong>UPS</strong> battery is<br />
not sufficiently<br />
charged as there was<br />
not enough time for it<br />
to recharge after a<br />
recent power failure<br />
The battery needs to<br />
be replaced.<br />
The <strong>UPS</strong> has a fault.<br />
PROCEDURE<br />
Check that the STAND-BY/ON switch is in the ON<br />
position<br />
Disconnect non-essential equipment from the <strong>UPS</strong>.<br />
Reset the protection (11) by depressing the button. If<br />
the switch resets, start up the <strong>UPS</strong> and reconnect the<br />
equipment one device at a time. If the protection<br />
activates again, one of the connected devices is<br />
causing an overload condition.<br />
Disconnect non essential equipment from the <strong>UPS</strong>.<br />
Reset the protection (11) by depressing the button.<br />
Connect the <strong>UPS</strong> to another mains power supply<br />
socket or have the mains supply checked by a<br />
qualified electrician.<br />
Wait for the battery to recharge. It recharges each time<br />
the <strong>UPS</strong> is connected to a mains socket. It usually<br />
takes 8 hours for the battery to recharge fully. <strong>UPS</strong><br />
operation time is a function of how charged the<br />
battery is.<br />
Replace the battery.<br />
Remove the external devices from the <strong>UPS</strong>. Turn off<br />
the <strong>UPS</strong> and disconnect it from the mains. Connect<br />
the <strong>UPS</strong> to the mains and turn on again. If the <strong>UPS</strong><br />
message the anomaly again, contact your authorized<br />
service centre.<br />
Battery fault message. Battery fault. Replace the battery.<br />
The <strong>UPS</strong> is not<br />
communicating with a<br />
PC.<br />
TECHNICAL DATA<br />
INPUT<br />
OUTPUT<br />
SURGE<br />
SOCKETS<br />
PROTECTION<br />
DEVICES AND<br />
FILTERS<br />
BATTERY<br />
AMBIENT<br />
CONDITIONS<br />
VARIOUS<br />
The software sends a<br />
message that<br />
communication has<br />
been lost.<br />
The software is not<br />
installed<br />
Check that the USB cable is connected between the<br />
<strong>UPS</strong> and the PC and that ‘USB’ has been selected as<br />
the communication port in the software configuration.<br />
Install the specific software for your computer’s<br />
operating system.<br />
MODEL 600VA 800VA<br />
Voltage<br />
230V +20%/ -25%<br />
Frequency 50 or 60Hz +/-5% (with auto-sensing)<br />
Voltage (from battery) 230Vac +/-10% (Pseudo-sinusoidal wave)<br />
Frequency (from battery) 50 or 60Hz +/-1Hz (with auto-sensing)<br />
Trigger time 2-6 ms typical<br />
Rated power VA 600 800<br />
Rated power W 360 480<br />
Max. current 5A 8A<br />
Overload and shortcircuit<br />
protection<br />
From mains: overload input protection.<br />
From mains: automatic shutdown after 5 minutes with load<br />
>110% and immediate shutdown with load >120% or for<br />
shortcircuit.<br />
From battery: automatic shutdown after 5 seconds with load<br />
>110% and immediate shutdown with load >120% or for<br />
shortcircuit.<br />
Type Sealed lead batteries, maintenance-free<br />
Model 12V 7Ah 12V 9Ah<br />
Typical recharge time 6-8 hours<br />
Protection<br />
Operating conditions<br />
Protection against total discharge, battery replacement<br />
indicator<br />
Max altitude 6,000 m, 0-90% non condensing humidity,<br />
0-40°C<br />
Noise