Bedienungsanleitung Rollmat G/S Art. - Simu Antriebe
Bedienungsanleitung Rollmat G/S Art. - Simu Antriebe
Bedienungsanleitung Rollmat G/S Art. - Simu Antriebe

Erfolgreiche ePaper selbst erstellen
Machen Sie aus Ihren PDF Publikationen ein blätterbares Flipbook mit unserer einzigartigen Google optimierten e-Paper Software.
83101311 F1.qxd 24.09.01 17:31 Seite 1<br />
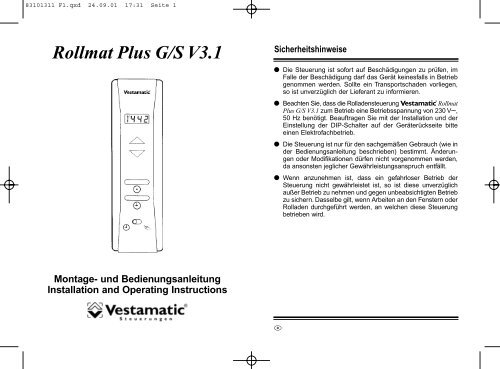
<strong>Rollmat</strong> Plus G/S V3.1<br />
Montage- und <strong>Bedienungsanleitung</strong><br />
Installation and Operating Instructions<br />
Sicherheitshinweise<br />
· Die Steuerung ist sofort auf Beschädigungen zu prüfen, im<br />
Falle der Beschädigung darf das Gerät keinesfalls in Betrieb<br />
genommen werden. Sollte ein Transportschaden vorliegen,<br />
so ist unverzüglich der Lieferant zu informieren.<br />
· Beachten Sie, dass die Rolladensteuerung Vestamatic <strong>Rollmat</strong><br />
Plus G/S V3.1 zum Betrieb eine Betriebsspannung von 230 VW,<br />
50 Hz benötigt. Beauftragen Sie mit der Installation und der<br />
Einstellung der DIP-Schalter auf der Geräterückseite bitte<br />
einen Elektrofachbetrieb.<br />
· Die Steuerung ist nur für den sachgemäßen Gebrauch (wie in<br />
der <strong>Bedienungsanleitung</strong> beschrieben) bestimmt. Änderungen<br />
oder Modifikationen dürfen nicht vorgenommen werden,<br />
da ansonsten jeglicher Gewährleistungsanspruch entfällt.<br />
· Wenn anzunehmen ist, dass ein gefahrloser Betrieb der<br />
Steuerung nicht gewährleistet ist, so ist diese unverzüglich<br />
außer Betrieb zu nehmen und gegen unbeabsichtigten Betrieb<br />
zu sichern. Dasselbe gilt, wenn Arbeiten an den Fenstern oder<br />
Rolladen durchgeführt werden, an welchen diese Steuerung<br />
betrieben wird.<br />
D
83101311 F1.qxd 24.09.01 17:31 Seite 3<br />
Kurzinformation / Short description<br />
Detaillierte Angaben und Programmierhinweise finden Sie auf den folgenden Seiten.<br />
Please find details and programming instructions on the following pages.<br />
A Reset-Taste B Sommer-/Winterzeit C Tageszeit D Auffahrzeit E Abfahrzeit<br />
Nach erfolgter Installation die Abdeckhaube<br />
durch leichtes Ziehen entfernen und Reset-<br />
Taste drücken. Dadurch werden die werksseitig<br />
voreingestellten Zeiten aktiviert.<br />
Entspricht die momentane Einstellung nicht<br />
der aktuellen Zeit, aktualisieren Sie diese<br />
durch Drücken der S/W-Taste. Die gewählte<br />
Einstellung erscheint im Display und die<br />
Tageszeit ändert sich um eine Stunde.<br />
1. Stell-Taste drücken (gedrückt halten)<br />
2. Uhr-Taste drücken R schneller Vorlauf<br />
Uhr-Taste tippen R langsamer Vorlauf<br />
oder<br />
1. Uhr-Taste drücken (gedrückt halten)<br />
2. Stell-Taste drücken L schneller Rücklauf<br />
Stell-Taste tippen L langsamer Rücklauf<br />
Wichtig: Wahlschalter auf (A) stellen<br />
1. Stell-Taste drücken (gedrückt halten)<br />
2. Auf-Taste drücken R schneller Vorlauf<br />
Auf-Taste tippen R langsamer Vorlauf<br />
oder<br />
1. Auf-Taste drücken (gedrückt halten)<br />
2. Stell-Taste drücken L schneller Rücklauf<br />
Stell-Taste tippen L langsamer Rücklauf<br />
A Reset button B Summer/winter time C Current time D Up time E Down time<br />
After having completed the installation, carefully<br />
pull to remove the cover cap and press the reset<br />
button. This will activate the times preset by the<br />
manufacturer.<br />
If the manufacturer setting does not correspond to<br />
the correct current time, update the setting to the<br />
current time by pressing the summer/winter button.<br />
The display will indicate the selected time and the<br />
time will be changed by one hour.<br />
1. Keep the set button pressed<br />
2. Press the time button R fast forward<br />
Tap the time button R slow forward<br />
or<br />
1. Keep the time button pressed<br />
2. Press the set button L fast reverse<br />
Tap the set button L slow reverse<br />
Important: Set the selector switch to (A)<br />
1. Keep the set button pressed<br />
2. Press the up button R fast forward<br />
Tap the up button R slow forward<br />
or<br />
1. Keep the up button pressed<br />
2. Press the set button L fast reverse<br />
Tap the set button L slow reverse<br />
Wichtig: Wahlschalter auf (A) stellen<br />
1. Stell-Taste drücken (gedrückt halten)<br />
2. Ab-Taste drücken R schneller Vorlauf<br />
Ab-Taste tippen R langsamer Vorlauf<br />
oder<br />
1. Ab-Taste drücken (gedrückt halten)<br />
2. Stell-Taste drücken L schneller Rücklauf<br />
Stell-Taste tippen L langsamer Rücklauf<br />
Important: Set the selector switch to (A)<br />
1. Keep the set button pressed<br />
2. Press the down button R fast forward<br />
Tap the down button R slow forward<br />
or<br />
1. Keep the down button pressed<br />
2. Press the set button L fast reverse<br />
Tap the set button L slow reverse
83101311 F1.qxd 24.09.01 17:31 Seite 5<br />
Einleitung Allgemeines Seite 5<br />
Hand-Steuerung Seite 6<br />
Automatik-Steuerung Seite 7<br />
Programmierung Allgemeines Seite 8<br />
der Grund- Sommer-/Winterzeit Seite 9<br />
funktionen Tageszeit (aktuelle Uhrzeit) Seite 10<br />
Hinweis Seite 11<br />
Auffahrzeit Seite 12<br />
Abfahrzeit Seite 13<br />
Zufallsgenerator Seite 14<br />
Inhalt<br />
Programmierung Wochen-Funktion Seite 15<br />
der Sonder- Astro-Funktion / Fahrzeitkorrektur Seite 16 – 19<br />
funktionen Astro-Funktion – Einstellung BRD Seite 20<br />
Astro-Funktion – Einstellung Europa Seite 21<br />
Wende-Funktion Seite 22<br />
Beispiel Einstellung DIP-Schalter Seite 23<br />
- 3 -<br />
D<br />
Inhalt<br />
G/S-Funktionen Allgemeines Seite 24<br />
Funktionsbeschreibung Glasbruchmelder Seite 25<br />
Funktionsbeschreibung Sonnenschutz Seite 26<br />
Einstellung Ansprechempfindlichkeit<br />
(Sonnenintensität) Seite 27<br />
Fehlersuchanleitung Seite 28<br />
Installation Hinweise für den Elektrofachbetrieb Seite 29 – 30<br />
Montageanleitung / Technische Daten Seite 31<br />
Anschlussplan Seite 32<br />
Installation Glasbruchmelder Seite 33 – 34<br />
Installation Sonnensensor Seite 35 – 36<br />
Anschlussbild Seite 37<br />
Übersicht Bedienungselemente Seite 38<br />
D<br />
- 4 -
83101311 F1.qxd 24.09.01 17:32 Seite 7<br />
Allgemeines Einleitung<br />
Der Kauf der Rolladensteuerung Vestamatic <strong>Rollmat</strong> Plus G/S V3.1<br />
war eine gute Entscheidung. Sie haben damit ein hochwertiges<br />
Produkt erworben. Es verfügt über eine Vielzahl sinnvoller Programmiermöglichkeiten<br />
und wird nach höchsten Qualitätsanforderungen<br />
hergestellt. Das garantiert Ihnen eine optimale Ausnutzung<br />
und hohe Zuverlässigkeit. Nehmen Sie sich bitte etwas<br />
Zeit und lesen diese <strong>Bedienungsanleitung</strong> vor der Inbetriebnahme.<br />
Wir haben uns bemüht, die Programmieranweisungen<br />
so verständlich wie möglich zu gestalten.<br />
Der Lieferumfang der Rolladensteuerung Vestamatic <strong>Rollmat</strong><br />
Plus G/S V3.1 besteht aus:<br />
1. Abdeckhaube<br />
2. Grundgehäuse<br />
3. Einstellwerkzeug<br />
Im Falle eines Stromausfalls beginnt das gesamte Display zu<br />
blinken. Die zuvor programmierten Zeiten bleiben dennoch mehrere<br />
Jahre gespeichert.<br />
Sie können die von Ihnen programmierten Zeiten oder andere<br />
Funktionen in einem Schnelllauf überprüfen (speziell den Test<br />
der Sonnenschutz-Funktion). Drücken Sie für die Aktivierung des<br />
Schnelllaufs die Uhr- und Tag-Taste für 3 Sekunden gemeinsam.<br />
Die Uhr-Funktion läuft dann um den Faktor 60 schneller.<br />
Um den Schnelllauf zu beenden drücken Sie kurz die Uhr- und<br />
Tag-Taste nochmals gemeinsam.<br />
- 5 -<br />
D<br />
Einleitung Hand-Steuerung<br />
Die Rolladensteuerung Vestamatic <strong>Rollmat</strong> Plus G/S V3.1 verfügt<br />
über einen Wahlschalter, der die Auswahl Hand-Steuerung (H)<br />
oder Automatik-Steuerung (A) regelt.<br />
Um die Hand-Steuerung zu aktivieren, Wahlschalter auf (H)<br />
stellen (ganz nach rechts schieben bis zum „Klick“).<br />
Alle Automatik-Funktionen sind somit außer Kraft gesetzt. Wird<br />
die Auf-Taste bzw. Ab-Taste gedrückt, fährt der Rolladen hoch<br />
bzw. runter.<br />
Um die Fahrt zu stoppen, drücken Sie einfach die Gegentaste,<br />
d.h.:<br />
· fährt der Rolladen gerade hoch, drücken Sie die Ab-Taste,<br />
· fährt der Rolladen gerade runter, drücken Sie die Auf-Taste.<br />
Ein weiteres Hoch- bzw. Runterfahren ist erst nach erneutem<br />
Drücken der Auf-Taste bzw. Ab-Taste möglich. Das garantiert<br />
eine exakte Positionierung des Rolladens.<br />
D<br />
- 6 -
83101311 F1.qxd 24.09.01 17:32 Seite 9<br />
Automatik-Steuerung Einleitung<br />
Um die Automatik-Steuerung zu aktivieren, Wahlschalter auf (A)<br />
stellen (ganz nach links schieben bis zum „Klick“).<br />
Die Automatik-Steuerung ist somit aktiviert. Der Rolladen fährt<br />
nun zu den jeweilig programmierten Zeiten hoch und runter. Es<br />
ist aber auch weiterhin möglich, den Rolladen außerhalb der<br />
programmierten Zeiten durch Drücken der Auf-Taste bzw. Ab-<br />
Taste hoch bzw. runter zu fahren (der Programmablauf wird<br />
dadurch nicht gestört).<br />
Wird die Auf-Taste bzw. Ab-Taste länger als 2 Sekunden<br />
gedrückt, fährt der Rolladen hoch bzw. runter.<br />
Um die Fahrt zu stoppen, drücken Sie einfach die Gegentaste,<br />
d.h.:<br />
· fährt der Rolladen gerade hoch, drücken Sie die Ab-Taste,<br />
· fährt der Rolladen gerade runter, drücken Sie die Auf-Taste.<br />
Ein weiteres Hoch- bzw. Runterfahren ist erst nach erneutem<br />
Drücken der Auf-Taste bzw. Ab-Taste möglich.<br />
Die Automatik kann auch für längere Zeit unterbrochen werden.<br />
Hierzu genügt es, den Wahlschalter auf Hand-Steuerung (H) zu<br />
stellen.<br />
Nach Rückstellung auf Automatik-Steuerung wird dann der letzte<br />
Befehl ausgeführt, den die Rolladensteuerung Vestamatic<br />
<strong>Rollmat</strong> Plus G/S V3.1 in Automatik-Stellung ausgeführt hätte.<br />
Das Gleiche geschieht bei Wiedereinschaltung des Stromes<br />
nach einem Netzausfall.<br />
- 7 -<br />
D<br />
Grundfunktionen Allgemeines<br />
Nachdem die fachgerechte Installation beendet ist (Hinweise dazu<br />
auf den Seiten 29 bis 36), können Sie mit der Programmierung<br />
beginnen.<br />
Wichtig: Beachten Sie bitte, dass sich die Rolladensteuerung<br />
Vestamatic <strong>Rollmat</strong> Plus G/S V3.1 bei Netzausfall<br />
nicht programmieren lässt.<br />
Entfernen Sie durch leichtes Ziehen die Abdeckhaube und<br />
drücken Sie die Reset-Taste. Nehmen Sie dazu das mitgelieferte<br />
Einstellwerkzeug oder etwas in ähnlicher Form.<br />
Das Drücken der Reset-Taste bewirkt, dass die werksseitig vorprogrammierten<br />
Zeiten aktiviert werden.<br />
· Aktuelle Tageszeit – 0ß8:0ß0 Uhr<br />
· Auffahrzeit – 0ß6:0ß0 Uhr<br />
· Abfahrzeit – 2ß0:0ß0 Uhr<br />
Auf den nächsten Seiten wird beschrieben, wie Sie diese Zeiten<br />
auf Ihre persönlichen Bedürfnisse einstellen können.<br />
D<br />
- 8 -
83101311 F1.qxd 24.09.01 17:32 Seite 11<br />
Sommer-/Winterzeit Grundfunktionen<br />
Im Display sehen Sie, welche Zeit eingestellt ist.<br />
Das (S) oben links im Display steht für Sommerzeit.<br />
(0S9:0ß0)<br />
Das (W) oben rechts im Display steht für Winterzeit.<br />
(0ß8:0W0)<br />
Entspricht die momentane Einstellung nicht der aktuellen Zeit,<br />
können Sie diese einfach durch Drücken der S/W-Taste aktualisieren.<br />
Die gewählte Einstellung erscheint dann sofort im Display<br />
und die Tageszeit ändert sich entsprechend um eine Stunde.<br />
- 9 -<br />
D<br />
Grundfunktionen Tageszeit<br />
Zur Einstellung der aktuellen Tageszeit bedienen Sie sich der<br />
Tastenkombination aus Stell-Taste und Uhr-Taste.<br />
Die Einstellung kann wie folgt durchgeführt werden:<br />
1. Zuerst die Stell-Taste drücken (gedrückt halten), danach:<br />
A. Uhr-Taste drücken (gedrückt halten) erzeugt einen<br />
schnellen Vorlauf der Tageszeit.<br />
B. Ein kurzes Tippen der Uhr-Taste erzeugt einen langsamen<br />
Vorlauf der Tageszeit.<br />
oder<br />
2. Zuerst die Uhr-Taste drücken (gedrückt halten), danach:<br />
A. Stell-Taste drücken (gedrückt halten) erzeugt einen<br />
schnellen Rücklauf der Tageszeit.<br />
B. Ein kurzes Tippen der Stell-Taste erzeugt einen langsamen<br />
Rücklauf der Tageszeit.<br />
D<br />
- 10 -
83101311 F1.qxd 24.09.01 17:32 Seite 13<br />
Hinweis Grundfunktionen<br />
Ausgeliefert wird die Rolladensteuerung Vestamatic <strong>Rollmat</strong><br />
Plus G/S V3.1 mit einer werksseitigen Einstellung folgender Aufbzw.<br />
Abfahrzeiten (Tag-Funktion ist aktiv):<br />
· Tägliche Auffahrzeit – 0ß6:0ß0 Uhr<br />
· Tägliche Abfahrzeit – 2ß0:0ß0 Uhr<br />
Die werksseitige DIP-Schaltereinstellung entnehmen Sie bitte<br />
den Tabellen auf Seite 20 und Seite 23.<br />
Wichtig: Für die nächsten Programmierschritte ist es wichtig,<br />
dass der Wahlschalter „Automatik-/Hand-Steuerung“<br />
auf Automatik-Steuerung (A) steht.<br />
Überprüfen Sie die momentane Einstellung. Steht der<br />
Wahlschalter nicht auf (A), korrigieren Sie die Einstellung.<br />
Dazu schieben Sie den Wahlschalter bis zum<br />
„Klick“ ganz nach links.<br />
Grundfunktionen Auffahrzeit<br />
Zur Einstellung der Auffahrzeit bedienen Sie sich der Tastenkombination<br />
aus Stell-Taste und Auf-Taste.<br />
Die Einstellung kann wie folgt durchgeführt werden:<br />
1. Zuerst die Stell-Taste drücken (gedrückt halten), danach:<br />
A. Auf-Taste drücken (gedrückt halten) erzeugt einen<br />
schnellen Vorlauf der Auffahrzeit.<br />
B. Ein kurzes Tippen der Auf-Taste erzeugt einen langsamen<br />
Vorlauf der Auffahrzeit.<br />
oder<br />
2. Zuerst die Auf-Taste drücken (gedrückt halten), danach:<br />
A. Stell-Taste drücken (gedrückt halten) erzeugt einen<br />
schnellen Rücklauf der Auffahrzeit.<br />
B. Ein kurzes Tippen der Stell-Taste erzeugt einen langsamen<br />
Rücklauf der Auffahrzeit.<br />
Im Display können Sie den eingestellten Wert ablesen. Wird die zur<br />
Programmierung notwendige Tastenkombination nicht mehr betätigt,<br />
schaltet das Display wieder auf die aktuelle Tageszeit um. Zur<br />
Überprüfung des eingestellten Wertes genügt ein kurzes Drücken<br />
der Auf-Taste. Im Display erscheint jetzt abermals die von Ihnen<br />
eingestellte Auffahrzeit. Nach ca. 2 Sekunden schaltet das Display<br />
wieder auf die aktuelle Tageszeit um.<br />
- 11 - D D<br />
- 12 -
83101311 F1.qxd 24.09.01 17:32 Seite 15<br />
Abfahrzeit Grundfunktionen<br />
Zur Einstellung der Abfahrzeit bedienen Sie sich der Tastenkombination<br />
aus Stell-Taste und Ab-Taste.<br />
Die Einstellung kann wie folgt durchgeführt werden:<br />
1. Zuerst die Stell-Taste drücken (gedrückt halten), danach:<br />
A. Ab-Taste drücken (gedrückt halten) erzeugt einen<br />
schnellen Vorlauf der Abfahrzeit.<br />
B. Ein kurzes Tippen der Ab-Taste erzeugt einen langsamen<br />
Vorlauf der Abfahrzeit.<br />
oder<br />
2. Zuerst die Ab-Taste drücken (gedrückt halten), danach:<br />
A. Stell-Taste drücken (gedrückt halten) erzeugt einen<br />
schnellen Rücklauf der Abfahrzeit.<br />
B. Ein kurzes Tippen der Stell-Taste erzeugt einen langsamen<br />
Rücklauf der Abfahrzeit.<br />
Im Display können Sie den eingestellten Wert ablesen. Wird die zur<br />
Programmierung notwendige Tastenkombination nicht mehr betätigt,<br />
schaltet das Display wieder auf die aktuelle Tageszeit um. Zur<br />
Überprüfung des eingestellten Wertes genügt ein kurzes Drücken<br />
der Ab-Taste. Im Display erscheint jetzt abermals die von Ihnen<br />
eingestellte Abfahrzeit. Nach ca. 2 Sekunden schaltet das Display<br />
wieder auf die aktuelle Tageszeit um.<br />
- 13 -<br />
D<br />
Grundfunktionen Zufallsgenerator<br />
Der Zufallsgenerator erzeugt eine sogenannte Zufallszeit. Sie<br />
bewirkt, dass der Rolladen mit einer Abweichung von bis zu<br />
+/-15 Minuten von den zuvor programmierten Zeiten(*) hochbzw.<br />
runterfährt.<br />
Das „unregelmäßige“ Hoch- und Runterfahren des Rolladens<br />
vermittelt den Eindruck eines bewohnten Hauses und bietet<br />
somit einen zusätzlichen Schutz bei längerer Abwesenheit.<br />
Um den Zufallsgenerator zu aktivieren, drücken Sie einfach die<br />
Zufall-Taste.<br />
Im Display erscheint jetzt<br />
oben rechts ein (Z). (0ß8:0ß0Z<br />
Hinweis: Der Zufallsgenerator setzt die ggf. eingestellte Wende-<br />
Funktion (siehe Seite 22) außer Kraft.<br />
Zum Deaktivieren des Zufallsgenerators drücken Sie bitte erneut<br />
die Zufall-Taste. Jetzt ist der Zufallsgenerator wieder ausgeschaltet,<br />
das (Z) im Display erlischt und der Rolladen fährt dann<br />
wieder exakt zu den von Ihnen programmierten Zeiten hoch und<br />
runter.<br />
(*)Anmerkung: Bei Aktivierung der Astro-Funktion +/-15 Minuten<br />
von der sich dort ergebenden Zeit.<br />
D<br />
- 14 -
83101311 F1.qxd 24.09.01 17:32 Seite 17<br />
Wochen-Funktion Sonderfunktionen<br />
Die Wochen-Funktion ermöglicht es Ihnen, für jeden Tag der<br />
Woche eine andere Auf- bzw. Abfahrzeit zu programmieren.<br />
Um die Wochen-Funktion zu aktivieren, müssen die DIP-Schalter<br />
auf dem Grundgehäuse gemäß Tabelle (siehe Seite 23) eingestellt<br />
werden.<br />
Folgende Zeiten sind in dieser Betriebsart werksseitig voreingestellt:<br />
· Auffahrzeit Montag bis Freitag – 0ß6:0ß0 Uhr<br />
· Abfahrzeit Montag bis Freitag – 2ß0:0ß0 Uhr<br />
· Samstag / Sonntag – keine Zeit voreingestellt.<br />
Sollten andere Auf- bzw. Abfahrzeiten<br />
gewünscht werden,<br />
gehen Sie wie folgt vor:<br />
(QS8:0ß0)<br />
Drücken Sie die Tag-Taste.<br />
Im Display erscheint nach jedem<br />
Drücken ein neuer Wochentag. (0w8:0ß0) … u.s.w.<br />
Um für den Tag, der gerade im Display angezeigt wird, die Aufund<br />
Abfahrzeit zu programmieren, verfahren Sie wie bereits auf<br />
den Seiten 12 und 13 beschrieben.<br />
- 15 -<br />
D<br />
Sonderfunktionen Astro-Funktion<br />
Die Astro-Funktion ist im Prinzip ein elektronischer Kalender. In<br />
Abhängigkeit aller gespeicherten Sonnenauf- und Sonnenuntergangszeiten<br />
wird so – unter Berücksichtigung der geographischen<br />
Lage Ihres Wohnortes – automatisch eine Fahrzeitkorrektur<br />
durchgeführt. Grundlage der Fahrzeitkorrektur sind die zuvor<br />
von Ihnen eingestellten Auf- und Abfahrzeiten.<br />
Erläuterungen zur Programmierung der Astro-Funktion finden<br />
Sie ab Seite 18.<br />
Beispiel:<br />
Sie haben die Astro-Funktion aktiviert und zuvor folgende Aufbzw.<br />
Abfahrzeiten gemäß Anleitung (Seiten 12 und 13) programmiert:<br />
Auffahrzeit – 0ß6:3ß0 Uhr (½ Std. vor Sonnenaufgangszeit,<br />
gemäß Diagramm Seite 19)<br />
Abfahrzeit – 1ß9:3ß0 Uhr (½ Std. vor Sonnenuntergangszeit,<br />
gemäß Diagramm Seite 19)<br />
Die aktuelle Kalenderwoche sei KW 14.<br />
In unserem Beispiel fährt der Rolladen nicht, wie programmiert,<br />
um 6§= Uhr hoch, sondern zum Sonnenaufgang um ca. 7== Uhr.<br />
Am Abend fährt der Rolladen zur programmierten Zeit um<br />
19§= Uhr runter.<br />
D<br />
- 16 -
83101311 F1.qxd 24.09.01 17:32 Seite 19<br />
Astro-Funktion Sonderfunktionen<br />
Merke:<br />
Liegt die programmierte Auffahrzeit vor der Sonnenaufgangszeit,<br />
fährt der Rolladen zur Sonnenaufgangszeit hoch.<br />
Liegt die programmierte Auffahrzeit nach der Sonnenaufgangszeit,<br />
fährt der Rolladen zur programmierten Auffahrzeit hoch.<br />
Liegt die programmierte Abfahrzeit nach der Sonnenuntergangszeit,<br />
fährt der Rolladen zur Sonnenuntergangszeit runter.<br />
Liegt die programmierte Abfahrzeit vor der Sonnenuntergangszeit,<br />
fährt der Rolladen zur programmierten Abfahrzeit runter.<br />
Wichtig: Die Aktivierung der Astro-Funktion setzt automatisch<br />
die Wochen-Funktion außer Kraft.<br />
- 17 -<br />
D<br />
Sonderfunktionen Astro-Funktion<br />
Aktivierung der Astro-Funktion und Einstellung der aktuellen<br />
Kalenderwoche erfolgen in einem Programmierschritt.<br />
Drücken Sie zuerst die Stell-Taste (gedrückt halten) und danach<br />
2 x die Tag-Taste.<br />
Im Display sollte jetzt<br />
folgendes erscheinen: (ßßßß0ß1A<br />
Stellen Sie jetzt die aktuelle Kalenderwoche ein.<br />
Drücken Sie dazu die Tag-Taste (Stell-Taste weiterhin gedrückt<br />
halten). Jedes weitere Drücken der Tag-Taste bewirkt ein Hochzählen<br />
um eine Woche.<br />
Haben Sie die aktuelle Kalenderwoche eingestellt und beide<br />
Tasten losgelassen, ist die Astro-Funktion aktiviert. Das Display<br />
schaltet wieder auf die aktuelle Uhrzeit um. Das (A) oben rechts<br />
bleibt weiterhin sichtbar.<br />
Zum Deaktivieren der Astro-Funktion drücken Sie die Tag-Taste<br />
(Stell-Taste weiterhin gedrückt halten) so oft, bis im Display „0ß0“<br />
erscheint.<br />
Hinweis: Um ein optimales Arbeiten der Astro-Funktion zu erzielen,<br />
muss über die DIP-Schalter die geographische<br />
Lage Ihres Wohnortes eingestellt werden (siehe<br />
Tabelle Seite 20 und Seite 21).<br />
D<br />
- 18 -
83101311 F1.qxd 24.09.01 17:32 Seite 21<br />
Astro-Funktion / Fahrzeitkorrektur Sonderfunktionen<br />
Schaltungsverlauf im Laufe eines Jahres, unter Berücksichtigung<br />
von Sommer-/Winterzeit, bei einer vorgewählten Auffahrzeit<br />
von 6§= Uhr und einer Abfahrzeit von 19§= Uhr. Diese Zeiten<br />
beziehen sich auf 10° östliche Länge und 50° nördliche Breite.<br />
Das entspricht etwa der geographischen Lage der Stadt Würzburg.<br />
Wird der DIP-Schalter 6 auf „ON“ gestellt, verzögert sich<br />
das Abfahren des Rolladens um 30 Minuten.<br />
Fahrzeitkorrektur:<br />
DIP 6 Korrektur<br />
OFF keine Verzögerung<br />
ON Ab-Befehl 30 Minuten später<br />
- 19 -<br />
D<br />
Sonderfunktionen Astro-Funktion – Einstellung BRD<br />
DIP 2 DIP 3 DIP 4 DIP 5 Gebiet<br />
OFF OFF OFF OFF Schleswig-Holstein, Nord-Niedersachsen<br />
OFF OFF OFF ON Mecklenburg-Vorpommern<br />
OFF OFF ON OFF Nordrhein-Westfalen, Süd-Niedersachsen<br />
OFF OFF ON ON Brandenburg, Sachsen-Anhalt<br />
OFF ON OFF OFF Rheinland-Pfalz, Saarland, Hessen<br />
OFF ON OFF ON Sachsen, Thüringen<br />
OFF ON ON OFF Baden-Württemberg<br />
OFF ON ON ON Bayern<br />
Y12345C<br />
D<br />
= Werkseinstellung: Schleswig-Holstein,<br />
Nord-Niedersachsen<br />
- 20 -
83101311 F1.qxd 24.09.01 17:32 Seite 23<br />
Astro-Funktion – Einstellung Europa Sonderfunktionen<br />
DIP 2 DIP 3 DIP 4 DIP 5 Gebiet<br />
ON OFF OFF OFF Skandinavien<br />
ON OFF OFF ON Großbritannien<br />
ON OFF ON OFF Nord-Frankreich, Benelux<br />
ON OFF ON ON Deutschland<br />
ON ON OFF OFF Süd-Frankreich<br />
ON ON OFF ON Schweiz, Österreich, Nord-Italien<br />
ON ON ON OFF Spanien<br />
ON ON ON ON Süd-Italien, Sizilien, Korsika, Sardinien<br />
- 21 -<br />
D<br />
Sonderfunktionen Wende-Funktion<br />
Die Wende-Funktion bewirkt, dass der Rolladen, nachdem er zur<br />
programmierten Zeit automatisch runtergefahren ist, für kurze<br />
Zeit wieder hochfährt (z.B. zur Belüftung oder als Öffnung für<br />
Haustiere).<br />
Die Wendezeit ist über die DIP-Schalter 7 und 8 einstellbar und<br />
wird nur im Automatikbetrieb zu den programmierten Tages-,<br />
Wochen- und Astro-Abfahrzeiten ausgeführt. Die Wendezeit wird<br />
ebenfalls durch Drücken der Ab-Taste im Automatikbetrieb ausgeführt.<br />
Wichtig: Erst nach Ablauf des Abfahr-Impulses von 2 Minuten<br />
wird die Wende-Funktion eingeleitet.<br />
D<br />
Einstellung Wendezeit:<br />
DIP 7 DIP 8 Wendezeit<br />
OFF OFF keine<br />
OFF ON 2 Sekunden<br />
ON OFF 4 Sekunden<br />
ON ON 10 Sekunden<br />
- 22 -<br />
Ist eine Wendezeit eingestellt,<br />
so wird dieses durch<br />
Anzeigen des Symbols (O)<br />
im Display angezeigt.<br />
Während Ausführung der<br />
Wendezeit blinkt dieses<br />
Zeichen im Display.
83101311 F1.qxd 24.09.01 17:32 Seite 25<br />
Beispiel Einstellung DIP-Schalter Sonderfunktionen<br />
Die nachfolgende Tabelle zeigt die verschiedenen Einstellmöglichkeiten.<br />
Die Stellung von S1 entscheidet, ob die Tages- oder die Wochen-<br />
Funktion gewählt wurde.<br />
Werksseitige Tag-Funktion (S1 = OFF)<br />
Voreinstellungen: keine Astro-Korrekturzeit (S6 = OFF)<br />
keine Wende-Funktion (S7 und S8 = OFF)<br />
Tag<br />
Y123$5678X<br />
Beispiel der DIP-Schalterstellung für Nordrhein-Westfalen.<br />
Andere Länder siehe Seiten 20 und 21.<br />
Woche<br />
Y!wert678X<br />
DIP-Schalter S2 – S5 sind bei dieser Einstellung ohne Funktion.<br />
DIP-Schalter S6 siehe Seite 19, S7 und S8 Seite 22.<br />
- 23 -<br />
D<br />
G/S-Funktionen Allgemeines<br />
Ihre Rolladensteuerung Vestamatic <strong>Rollmat</strong> Plus G/S V3.1 verfügt<br />
über zwei weitere, sehr nützliche Zusatzfunktionen:<br />
1. Glasbruchmelder (G)<br />
Die Funktion „Glasbruchmelder“ ist nur im Automatikbetrieb<br />
wirksam.<br />
2. Sonnenschutz (S)<br />
Die Funktion „Sonnenschutz“ arbeitet nur im Automatikbetrieb<br />
innerhalb der zuvor programmierten Auf- und Abfahrzeiten.<br />
Hinweis: Standardlänge der Sonnensensorleitung – 2,0 m<br />
Standardlänge der Glasbruchmelderleitung – 1,0 m<br />
Für beide Funktionen sind Leitungen von bis zu 10 Meter Länge<br />
lieferbar.<br />
D<br />
- 24 -
83101311 F1.qxd 24.09.01 17:32 Seite 27<br />
Funktionsbeschreibung Glasbruchmelder G/S-Funktionen<br />
Bei Glasbruch fährt der Rolladen verzögerungsfrei runter.<br />
Im Display erscheint dann<br />
das Glasbruch-Symbol (g): (0S8:0g0)<br />
Die zuvor programmierte Auffahrzeit wird jetzt nicht mehr berücksichtigt,<br />
d.h. der Rolladen würde bei Erreichen der programmierten<br />
Auffahrzeit aus Sicherheitsgründen nicht automatisch<br />
hochfahren. Um den normalen Funktionsablauf wieder aufzunehmen,<br />
drücken Sie einfach die Auf-Taste. Das Glasbruch-<br />
Symbol im Display erlischt und der Rolladen fährt jetzt wieder zu<br />
den programmierten Auf- und Abfahrzeiten hoch bzw. runter.<br />
Anmerkung: Ein Glasbruch-Signal wird ausgelöst, wenn im<br />
Erfassungsbereich des Glasbruchmelders eine<br />
heftige Erschütterung oder Glasbruch auftritt.<br />
Der Erfassungsbereich beträgt etwa einen Meter<br />
(siehe Abbildung Seite 33). Aus diesem Grunde<br />
sollten bei größeren Fensterflächen mehrere<br />
Glasbruchmelder auf dem Fenster installiert werden.<br />
Dazu wird der Glasbruchmelder-Verteiler<br />
benötigt.<br />
- 25 -<br />
D<br />
G/S-Funktionen Funktionsbeschreibung Sonnenschutz<br />
Ist der Sonnensensor einer Sonneneinstrahlung ausgesetzt,<br />
blinkt das Sonnen-Symbol im Display. Nach 1 Minute ununterbrochener<br />
Sonneneinstrahlung fährt der Rolladen soweit runter,<br />
bis er den Sonnensensor bedeckt. Um den Sonnensensor für die<br />
weitere Überwachung freizugeben, fährt der Rolladen anschließend<br />
wieder einige Zentimeter hoch. Diese Rolladenposition<br />
nennen wir „Schattenstellung“.<br />
Im Display wird die momentane<br />
Beleuchtungsstärke durch entsprechende<br />
Symbole angezeigt (S):<br />
(Beispiel: starke Sonneneinstrahlung)<br />
s0S8:0ß0)<br />
Wird über einen Zeitraum von 16 Minuten ohne Unterbrechung<br />
keine Sonneneinstrahlung vom Sonnensensor festgestellt (auch<br />
während dieser Verzögerungszeit blinkt das Sonnen-Symbol im<br />
Display), fährt der Rolladen automatisch wieder hoch. Die Sensor-<br />
Signale werden ständig überprüft und die Position des Rolladens<br />
im Laufe eines Sonnentages mehrfach korrigiert.<br />
Wichtig: Der Sonnensensor arbeitet nur im Automatikbetrieb<br />
innerhalb der programmierten Auf- und Abfahrzeiten.<br />
Wollen Sie die Sonnen-Funktion für einen längeren Zeitraum nicht<br />
benutzen, entfernen Sie den Sonnensensor.<br />
D<br />
- 26 -
83101311 F1.qxd 24.09.01 17:32 Seite 29<br />
Einstellung Ansprechempfindlichkeit (Sonnenintensität) G/S-Funktionen<br />
Die Einstellung der Ansprechempfindlichkeit auf die Sonnenintensität<br />
erfolgt über ein Potentiometer mit Hilfe des mitgelieferten<br />
Einstellwerkzeuges. Entfernen Sie hierzu die Haube der Rollladensteuerung<br />
Vestamatic <strong>Rollmat</strong> Plus G/S V3.1 durch leichtes<br />
Ziehen.<br />
r<br />
o<br />
l<br />
Bereits bei geringer<br />
Sonneneinstrahlung<br />
(ca. 12 kLux) fährt<br />
der Rolladen ab.<br />
Bei mittlerer<br />
Sonneneinstrahlung<br />
(ca. 17 kLux) fährt<br />
der Rolladen ab.<br />
Erst bei starker<br />
Sonneneinstrahlung<br />
(ca. 22 kLux) fährt<br />
der Rolladen ab.<br />
Sonnen-Ansprechverzögerung: 1 Minute<br />
Sonnen-Rückstellverzögerung: 16 Minuten<br />
- 27 -<br />
D<br />
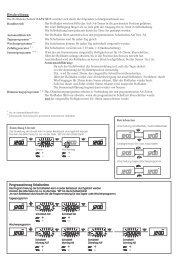
Fehlersuchanleitung<br />
Der Rolladen fährt nicht automatisch hoch und runter.<br />
· Ist die Spannungsversorgung gewährleistet?<br />
(Bei Stromausfall blinkt das Display)<br />
· Steht der Wahlschalter auf Automatik (A)?<br />
· Überprüfen Sie, ob die programmierten Auf- und Abfahrzeiten<br />
noch gespeichert sind (kurzes Antippen der Auf- bzw.<br />
Ab-Taste im Automatik-Modus).<br />
· Steht ein Glasbruch-Signal an?<br />
(Glasbruchmelder-Symbol wird im Display angezeigt)<br />
D<br />
- 28 -
83101311 F1.qxd 24.09.01 17:32 Seite 31<br />
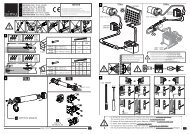
Hinweise für den Elektrofachbetrieb Installation<br />
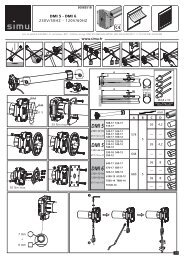
Einbau und Grundeinstellungen:<br />
1. Betriebsspannung abschalten.<br />
2. Gurtwickler aus dem Gurtwicklerkasten entfernen.<br />
3. DIP-Schalter auf die gewünschte Funktion einstellen (siehe<br />
Seiten 19 bis 23).<br />
4. Vestamatic <strong>Rollmat</strong> Plus G/S V3.1 gemäß Anschlussplan<br />
(siehe Seite 32) anschließen.<br />
Achtung: Beim Anschluss sind die geltenden VDE-Bestimmungen,<br />
insbesondere DIN VDE 0100/0700<br />
sowie die geltenden Vorschriften der örtlichen<br />
EVU und UVV zu beachten.<br />
5. Vestamatic <strong>Rollmat</strong> Plus G/S V3.1 in den Gurtwicklerkasten<br />
einbauen.<br />
6. Wahlschalter auf Hand-Steuerung (H) stellen, d.h. bis zum<br />
Anschlag nach rechts schieben.<br />
7. Betriebsspannung einschalten und Reset-Taste drücken.<br />
8. Überprüfen, ob die Motorlaufrichtung mit den Richtungstasten<br />
übereinstimmt. Liegt keine Übereinstimmung vor, Klemmen 6<br />
und 7 vertauschen.<br />
- 29 -<br />
D<br />
Installation Hinweise für den Elektrofachbetrieb<br />
Wichtig: Eine parallele Ansteuerung von mehreren Rolladen-<br />
Antriebsmotoren lässt sich nur über Trennrelais bzw.<br />
Gruppensteuergeräte realisieren.<br />
Bei einem Stromausfall ändert sich der Display-<br />
Kontrast. Der schwächere Display-Kontrast ist kein<br />
Anzeichen einer leeren Batterie.<br />
Für übergroße Gurtwickler-Mauerkästen verwenden Sie bitte<br />
unsere Zwischenplatte, <strong>Art</strong>ikel-Nr. 01201500.<br />
Für die Glasbrucherkennung und die Sonnenschutzfunktion<br />
können wir Ihnen u.a. folgendes Zubehör anbieten:<br />
Glasbruchmelder, Kabellänge 1 m, <strong>Art</strong>ikel-Nr. 01200100<br />
Glasbruchmelder, Kabellänge 2 m, <strong>Art</strong>ikel-Nr. 01200200<br />
Glasbruchmelder, Kabellänge 10 m, <strong>Art</strong>ikel-Nr. 01201000<br />
Glasbruchmelder-Verteiler, <strong>Art</strong>ikel-Nr. 01201100<br />
Sonnensensor, Kabellänge 1 m, <strong>Art</strong>ikel-Nr. 01100125<br />
Sonnensensor, Kabellänge 2 m, <strong>Art</strong>ikel-Nr. 01100130<br />
Sonnensensor, Kabellänge 10 m, <strong>Art</strong>ikel-Nr. 01100195<br />
Zur Ansteuerung von 2 <strong>Antriebe</strong>n empfehlen wir unsere<br />
Trennrelais:<br />
Trennrelais TR N2A, <strong>Art</strong>ikel-Nr. 01054120<br />
Trennrelais TR N2S, <strong>Art</strong>ikel-Nr. 01054220.<br />
D<br />
- 30 -
83101311 F1.qxd 24.09.01 17:32 Seite 33<br />
Montageanleitung / Technische Daten Installation<br />
Montageanleitung<br />
Technische Daten<br />
Betriebsspannung: 230 VW, 50 Hz<br />
Leistungsaufnahme: 2 W<br />
Ausgang: 230 VW, 50 Hz<br />
Schaltleistung: 8 A, 230 VW, cos f > 0,8<br />
Schaltzeit: 120 Sekunden<br />
Betriebstemperaturbereich: 0 – 40 °C<br />
Schutzart: IP 40<br />
Dieses Gerät enthält eine schadstoffhaltige Batterie.<br />
Der Endverbraucher ist zur ordnungsgemäßen Rückgabe verpflichtet<br />
(Richtlinie 91/157/EWG).<br />
Technische Änderungen vorbehalten!<br />
- 31 -<br />
D<br />
Installation Anschlussplan<br />
D<br />
- 32 -
83101311 F1.qxd 24.09.01 17:32 Seite 35<br />
Glasbruchmelder Installation<br />
Für die Zusatzfunktion „Glasbruchmelder“ wird zu jeder Rolladensteuerung<br />
Vestamatic <strong>Rollmat</strong> Plus G/S V3.1 ein (bei größeren<br />
oder geteilten Scheiben mehrere) Glasbruchmelder benötigt. Im<br />
nachfolgenden Text wird beschrieben, wie die Installation durchgeführt<br />
wird.<br />
1. Wahlschalter auf Hand-Steuerung (H) stellen (nach rechts<br />
schieben bis zum „Klick“).<br />
2. Binder und Härter des 2-Komponenten-Klebers im Verhältnis<br />
1 : 1 gründlich mischen.<br />
- 33 -<br />
D<br />
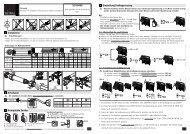
Installation Glasbruchmelder<br />
3. Den Kleber auf die durch einen schwarzen Balken gekennzeichnete<br />
Seite des Glasbruchmelders auftragen.<br />
Wichtig: Die Klebeflächen müssen sauber und fettfrei sein.<br />
4. Glasbruchmelder mindestens 5 cm vom Fensterrahmen entfernt<br />
leicht auf die Glasscheibe aufsetzen und mit Klebeband<br />
fixieren. Dabei ist darauf zu achten, dass der Glasbruchmelder<br />
senkrecht (mit dem Kabelabgang nach unten) angebracht wird<br />
(siehe Abbildung Seite 33).<br />
5. Klinkenstecker des Glasbruchmelders in die linke Buchse<br />
der Rolladensteuerung Vestamatic <strong>Rollmat</strong> Plus G/S V3.1<br />
stecken.<br />
6. Wahlschalter auf Automatik-Steuerung (A) stellen (nach links<br />
schieben bis zum „Klick“).<br />
7. Funktionstest:<br />
Nehmen Sie eine Münze und klopfen Sie damit auf den Glasbruchmelder.<br />
<strong>Simu</strong>lieren Sie so einen Glasbruch. Der Rollladen<br />
sollte jetzt runter fahren und im Display das Glasbruch-<br />
Symbol erscheinen. Drücken Sie die Auf-Taste, um den Rollladen<br />
zu stoppen bzw. um das Glasbruch-Signal zu löschen.<br />
Nach dem Aushärten des Klebers können Sie das Klebeband<br />
entfernen. Verarbeitungs- und Aushärtzeit des Klebers entnehmen<br />
Sie bitte der Anweisung auf der Kleberverpackung.<br />
D<br />
- 34 -
83101311 F1.qxd 24.09.01 17:34 Seite 37<br />
Sonnensensor Installation<br />
Für die Zusatzfunktion „Sonnenschutz“ wird zu jeder Rolladensteuerung<br />
Vestamatic <strong>Rollmat</strong> Plus G/S V3.1 ein Sonnensensor<br />
benötigt. Im nachfolgenden Text wird beschrieben, wie die<br />
Installation durchgeführt wird.<br />
1. Klinkenstecker des Sonnensensors in die rechte Buchse der<br />
Rolladensteuerung Vestamatic <strong>Rollmat</strong> Plus G/S V3.1 stecken.<br />
2. Sonnensensor an die gewünschte Stelle der Fensterscheibe<br />
anbringen.<br />
3. Wahlschalter auf Automatik-Steuerung (A) stellen (nach links<br />
schieben bis zum „Klick“).<br />
- 35 -<br />
D<br />
Installation Sonnensensor<br />
Um die Zusatzfunktion „Sonnenschutz“ nach erfolgter Installation<br />
zu überprüfen, aktivieren Sie die Schnelllauf-Funktion,<br />
indem Sie die Uhr- und Tag-Taste für 3 Sekunden gemeinsam<br />
drücken (dies bewirkt, dass die Uhrzeit sechzigmal schneller<br />
läuft). So können Sie den gesamten Funktionsablauf innerhalb<br />
kurzer Zeit überprüfen.<br />
Beispiel eines Testdurchlaufes:<br />
1. Prüfen Sie, ob Sie sich innerhalb der programmierten Auf- und<br />
Abfahrzeiten befinden.<br />
2. Uhr- und Tag-Taste für 3 Sekunden gemeinsam drücken.<br />
3. Soviel Licht an den Sonnensensor bringen bis das Sonnen-<br />
Symbol blinkt.<br />
Nach ca. 1 Sekunde fährt der Rolladen in Schattenstellung.<br />
Lichtquelle entfernen.<br />
Sonnen-Symbol im Display blinkt erneut.<br />
Nach 16 Sekunden fährt der Rolladen wieder hoch.<br />
4. Nach Beendigung des Testdurchlaufes Uhr- und Tag-Taste<br />
erneut kurz drücken.<br />
5. Aktuelle Uhrzeit einstellen wie auf Seite 10 beschrieben.<br />
D<br />
- 36 -
83101311 F1.qxd 24.09.01 17:34 Seite 39<br />
Vestamatic <strong>Rollmat</strong> Plus G/S V3.1<br />
- 37 -<br />
Anschlussbild<br />
D<br />
Übersicht Bedienungselemente<br />
D<br />
Auf-Taste<br />
S/W-Taste<br />
Stell-Taste<br />
Uhr-Taste<br />
Tag-Taste<br />
Einstellung<br />
Sonnenintensität<br />
Anschluss<br />
Glasbruchmelder<br />
Vestamatic <strong>Rollmat</strong> Plus G/S V3.1<br />
- 38 -<br />
Display<br />
Ab-Taste<br />
Reset-Taste<br />
Zufall-Taste<br />
Wahlschalter<br />
Automatik/Hand<br />
Anschluss<br />
Sonnensensor
83101311 F1.qxd 24.09.01 17:34 Seite 41<br />
<strong>Rollmat</strong> Plus G/S V3.1<br />
Installation and Operating Instructions<br />
Safety precautions<br />
· Check the control for any signs of damage immediately after<br />
unpacking. Do not start up the control in case there is any<br />
damage. If there is damage due to the shipping, please notify<br />
the supplier immediately.<br />
· Please note that the Vestamatic <strong>Rollmat</strong> Plus G/S V3.1 roller<br />
shutter control requires an operating voltage of 230 VW,<br />
50 Hz. Make sure to contact a professional electrician for the<br />
installation and setting of the DIP switches on the rear panel<br />
of the device.<br />
· The control was designed for correct use as described in the<br />
operating instructions. Any changes or modifications thereof<br />
are not permissible and will result in loss of all warranty claims.<br />
· If safe operation of control or roller shutter can not be guaranteed,<br />
the control must be turned off immediately and protected<br />
against unintentional operation. The same applies for<br />
work on windows or roller shutters that are operated by this<br />
control.<br />
G<br />
- 40 -
83101311 F1.qxd 24.09.01 17:34 Seite 43<br />
Contents<br />
Introduction General page 43<br />
Manual mode page 44<br />
Automatic mode page 45<br />
Programming General page 46<br />
the basic Summer/winter time page 47<br />
functions Current time page 48<br />
Note page 49<br />
Up time page 50<br />
Down time page 51<br />
Random generator page 52<br />
Programming Week function page 53<br />
the special Astro function / Run time correction page 54 – 57<br />
functions Astro function – Germany page 58<br />
Astro function – Europe page 59<br />
Reverse function page 60<br />
Example for DIP switch setting page 61<br />
- 41 -<br />
G<br />
Contents<br />
G/S functions General page 62<br />
Functional description<br />
broken glass indicator page 63<br />
Functional description sun protection page 64<br />
Setting the response (sun intensity) page 65<br />
Trouble shooting page 66<br />
Installation Notes for professional electricians page 67 – 68<br />
Installation instructions / Technical data page 69<br />
Wiring diagram page 70<br />
Installation broken glass indicator page 71 – 72<br />
Installation sun sensor page 73 – 74<br />
Overview operating elements Inside back cover<br />
Wiring diagram Back cover<br />
G<br />
- 42 -
83101311 F1.qxd 24.09.01 17:34 Seite 45<br />
General Introduction<br />
Congratulations for buying the Vestamatic <strong>Rollmat</strong> Plus G/S V3.1<br />
roller shutter control. You have purchased a high-quality product<br />
that features many practical programming options and has been<br />
manufactured according to the highest quality standards which<br />
will guarantee optimum efficiency and reliability. Please take the<br />
time to read these operating instructions carefully before starting<br />
up. We have tried to make sure that all programming instructions<br />
are easy to understand.<br />
The delivery extent of the Vestamatic <strong>Rollmat</strong> Plus G/S V3.1 roller<br />
shutter control includes the following items:<br />
1. Cover cap<br />
2. Basic housing<br />
3. Adjustment tool<br />
In case of power failure, the entire display starts flashing.Yet, the<br />
previously programmed times remain saved for several years.<br />
The times or functions, you have previously programmed, can<br />
be checked by performing a quick run. Press the time and day<br />
button simultaneously for 3 seconds to activate the quick run.<br />
The time function will now run 60 times faster. Shortly tap the<br />
time and day button simultaneously to stop the quick run.<br />
- 43 -<br />
G<br />
Introduction Manual mode<br />
The Vestamatic <strong>Rollmat</strong> Plus G/S V3.1 roller shutter control<br />
features a selector switch with which manual mode (H) or automatic<br />
mode (A) can be selected.<br />
Push the selector switch to (H), all the way to the right until you<br />
hear the “click” in order to activate the manual mode.<br />
All automatic functions are now disabled. Pressing the up or<br />
down button will move the roller shutters up or down.<br />
Simply press the opposite button to stop the motion, i.e.:<br />
· press the down button, if the roller shutter is moving up,<br />
· press the up button, if the roller shutter is moving down.<br />
Accurate positioning of the roller shutter is guaranteed because<br />
the roller shutter will only move up or down again after the up or<br />
down button has been pressed.<br />
G<br />
- 44 -
83101311 F1.qxd 24.09.01 17:34 Seite 47<br />
Automatic mode Introduction<br />
Push the selector switch to (A), all the way to the left until you<br />
hear the “click” in order to activate the automatic mode.<br />
The automatic mode is now activated and the roller shutter will<br />
move up and down at the programmed times. Regardless of the<br />
programmed times, it is still possible to move the roller shutter<br />
up and down by pressing the up or down button and the programming<br />
remains unaffected.<br />
If you press the up or down button longer than 2 seconds, the<br />
roller shutter moves up or down.<br />
Simply press the opposite button to stop the motion, i.e.:<br />
· press the down button, if the roller shutter is moving up,<br />
· press the up button, if the roller shutter is moving down.<br />
The roller shutter will only move up or down again after the up<br />
or down button has been pressed.<br />
By simply pushing the selector switch to manual mode (H), the<br />
automatic mode can be interrupted for an extended period of<br />
time.<br />
After selecting the automatic mode again, the Vestamatic <strong>Rollmat</strong><br />
Plus G/S V3.1 roller shutter control will execute the last pending<br />
command from the automatic mode. The last pending command<br />
will also be executed when resetting after power failure.<br />
- 45 -<br />
G<br />
Basic functions General<br />
After the installation has been completed correctly (for instructions<br />
please see pages 67 to 74), you can start programming.<br />
Important: Please note that the Vestamatic <strong>Rollmat</strong> Plus G/S<br />
V3.1 roller shutter control cannot be programmed in<br />
case of power failure.<br />
Carefully pull to remove the cover cap and press the reset button<br />
with the delivered adjustment tool or something else suitable.<br />
Pressing the reset button will activate the default times preprogrammed<br />
by the manufacturer.<br />
· Current time – 0ß8:0ß0<br />
· Up time – 0ß6:0ß0<br />
· Down time – 2ß0:0ß0<br />
On the following pages, you will find instructions how to customize<br />
these times to your personal requirements.<br />
G<br />
- 46 -
83101311 F1.qxd 24.09.01 17:34 Seite 49<br />
Summer/winter time Basic functions<br />
The display will indicate which time has been set.<br />
The (S) in the upper left hand corner of the display stands for<br />
summer time.<br />
(0S9:0ß0)<br />
The (W) in the upper right hand corner of the display stands for<br />
winter time.<br />
(0ß8:0W0)<br />
If the present setting is incorrect and does not correspond with<br />
the current time, you can simply update the time by pressing the<br />
summer/winter button. The selected setting will appear in the<br />
display and the time will be changed by one hour.<br />
- 47 -<br />
G<br />
Basic functions Current time<br />
By operating the combination of set and time button you can set<br />
the current time.<br />
Setting the time can be performed as follows:<br />
1. Press the set button first and keep it pressed, then:<br />
A. Press the time button and keep it pressed to fast forward<br />
the time.<br />
B. Shortly tap the time button to slow forward the time.<br />
or<br />
2. Press the time button first and keep it pressed, then:<br />
A. Press the set button and keep it pressed to fast reverse<br />
the time.<br />
B. Shortly tap the set button to slow reverse the time.<br />
G<br />
- 48 -
83101311 F1.qxd 24.09.01 17:34 Seite 51<br />
Note Basic functions<br />
The Vestamatic <strong>Rollmat</strong> Plus G/S V3.1 roller shutter control is<br />
delivered with the following manufacturer’s default up and down<br />
times (day function is activated):<br />
· Daily up time – 0ß6:0ß0 every morning<br />
· Daily down time – 2ß0:0ß0 every evening<br />
Please find the manufacturer’s default DIP switch settings<br />
in the tables on page 58 and page 61.<br />
Important: It is important to push the selector switch “automatic/manual<br />
mode” to automatic mode (A), in order<br />
to be able to perform the following programming<br />
steps.<br />
Check the current setting. If the selector switch is<br />
not set on (A), correct the setting by pushing it all<br />
the way to the left until you hear the “click”.<br />
- 49 -<br />
G<br />
Basic functions Up time<br />
By operating the combination of set and up button you can set<br />
the up time.<br />
Setting the up time can be performed as follows:<br />
1. Press the set button first and keep it pressed, then:<br />
A. Press the up button and keep it pressed to fast forward<br />
the up time.<br />
B. Shortly tap the up button to slow forward the up time.<br />
or<br />
2. Press the up button first and keep it pressed, then:<br />
A. Press the set button and keep it pressed to fast reverse<br />
the up time.<br />
B. Shortly tap the set button to slow reverse the up time.<br />
The display will now indicate the set value. Once the programming<br />
buttons are no longer operated, the display will indicate the current<br />
time again. Tapping the up button will check the set value<br />
and the display will again indicate the previously set up time.<br />
After approx. 2 seconds, the display will indicate the current time<br />
again.<br />
G<br />
- 50 -
83101311 F1.qxd 24.09.01 17:34 Seite 53<br />
Down time Basic functions<br />
By operating the combination of set and down button you can<br />
set the down time.<br />
Setting the down time can be performed as follows:<br />
1. Press the set button first and keep it pressed, then:<br />
A. Press the down button and keep it pressed to fast forward<br />
the down time.<br />
B. Shortly tap the down button to slow forward the down<br />
time.<br />
or<br />
2. Press the down button first and keep it pressed, then:<br />
A. Press the set button and keep it pressed to fast reverse<br />
the down time.<br />
B. Shortly tap the set button to slow reverse the down time.<br />
The display will now indicate the set value. Once the programming<br />
buttons are no longer operated, the display will indicate the current<br />
time again. Tapping the down button will check the set<br />
value and the display will again indicate the previously set down<br />
time. After approx. 2 seconds, the display will indicate the current<br />
time again.<br />
- 51 -<br />
G<br />
Basic functions Random generator<br />
The random generator generates the so-called random time<br />
which causes the roller shutters to move up or down with a deviation<br />
of +/-15 minutes to the previously programmed times(*).<br />
The “randomly” moving up and down roller shutters give the<br />
impression of an inhabited house and thus provide additional<br />
protection in case the house owner is absent for an extended<br />
period of time.<br />
Simply press the random button to activate the random generator.<br />
The display will now indicate<br />
a (Z) in the upper right hand<br />
corner.<br />
(0ß8:0ß0Z<br />
Note: The random generator will disable any previously set<br />
reverse function (please see page 60).<br />
Press the random button again to deactivate the random generator.<br />
The random generator is now turned off, the (Z) in the<br />
display will disappear and the roller shutter will move up and<br />
down accurately at the times you have previously programmed.<br />
(*)Annotation: If the Astro function is activated, the times will<br />
deviate by +/-15 minutes from the actual sunrise<br />
and sunset times.<br />
G<br />
- 52 -
83101311 F1.qxd 24.09.01 17:34 Seite 55<br />
Week function Special functions<br />
The week function enables you to program a particular up and<br />
down time for each individual day of the week.<br />
In order to activate the week function, all DIP switches in the rear<br />
of the housing must be set according to the table on page 61.<br />
The following times were preset for this operation mode by the<br />
manufacturer:<br />
· Up time Monday through Friday – 0ß6:0ß0<br />
· Down time Monday through Friday – 2ß0:0ß0<br />
· Saturday / Sunday – no preset time.<br />
If you wish different up or down<br />
times, perform the following<br />
steps:<br />
Press the day button. The display<br />
will show a new day of the week<br />
after every press.<br />
(QS8:0ß0)<br />
(0w8:0ß0) … etc.<br />
Perform the steps described on page 50 to 51 to program the<br />
up and down times for the currently displayed day.<br />
- 53 -<br />
G<br />
Special functions Astro function<br />
The Astro function is basically an electronical calendar. Depending<br />
on the stored sunrise and sunset times, the up or down times<br />
are automatically corrected under consideration of the geographical<br />
location of your residence. This correction is based on<br />
the up or down times you previously set.<br />
For more information on the programming of the Astro function<br />
please see page 56.<br />
Example:<br />
You have activated the Astro function and previously programmed<br />
the following up and down times according to the<br />
instructions on page 50 and page 51:<br />
Up time – 0ß6:3ß0 (½ an hour before sunrise according to<br />
the diagram on page 57)<br />
Down time – 1ß9:3ß0 (½ an hour before sunset according to<br />
the diagram on page 57)<br />
Given the current calendar week 14.<br />
In this example, the roller shutter does not move up at 6:30, as<br />
programmed but moves up at 7:00 when the sun rises.<br />
In the evening, it moves down at 19:30 at the programmed time.<br />
G<br />
- 54 -
83101311 F1.qxd 24.09.01 17:34 Seite 57<br />
Astro function Special functions<br />
Note:<br />
If the up time is programmed before sunrise, the roller shutter<br />
moves up at sunrise.<br />
If the up time is programmed after sunrise, the roller shutter<br />
moves up at the programmed up time.<br />
If the down time is programmed after sunset, the roller shutter<br />
moves down at sunset.<br />
If the down time is programmed before sunset, the roller shutter<br />
moves down at the programmed down time.<br />
Important: Activating the Astro function automatically disables<br />
the week function.<br />
- 55 -<br />
G<br />
Special functions Astro function<br />
Activating the Astro function and setting the current calendar<br />
week will be performed in one programming step.<br />
First press the set button and keep it pressed. Then press the<br />
day button twice.<br />
The display will indicate<br />
the following: (ßßßß0ß1A<br />
Now set the current calendar week by pressing the day button.<br />
Keep pressing the set button. Each additional pressing of the<br />
day button will move to the next calendar week.<br />
After you have set the current calendar week and released both<br />
buttons, the Astro function will be activated. The display will now<br />
switch to the current time. The display will continue to indicate<br />
the (A) in the upper right hand corner.<br />
Keep the set button pressed and press the day button until the<br />
display indicates “0ß0” in order to deactivate the Astro function.<br />
Note: In order to obtain optimum performance of the Astro function,<br />
the geographical location of your residence must be<br />
set by means of the DIP switches (see tables on page 58<br />
and 59).<br />
G<br />
- 56 -
83101311 F1.qxd 24.09.01 17:34 Seite 59<br />
Astro function / Run time correction Special functions<br />
Below the switching sequence is presented in the course of an<br />
entire year under consideration of summer/winter time, at an up<br />
time preset at 6:30 and a down time preset at 19:30. These<br />
times relate to 10° of eastern longitude and 50° of northern latitude<br />
which corresponds to the geographical location of the city<br />
of Würzburg. Setting DIP switch 6 to “ON” will delay the down<br />
time of the roller shutter by 30 minutes.<br />
Run time<br />
correction:<br />
DIP 6 Correction<br />
OFF no delay<br />
ON down command 30 minutes delayed<br />
- 57 -<br />
G<br />
Special functions Astro function – Germany<br />
DIP 2 DIP 3 DIP 4 DIP 5 Area<br />
OFF OFF OFF OFF Schleswig-Holstein, Northern Lower-Saxony<br />
OFF OFF OFF ON Mecklenburg-Vorpommern<br />
OFF OFF ON OFF North-Rhine Westphalia, Southern Lower-Saxony<br />
OFF OFF ON ON Brandenburg, Saxony-Anhalt<br />
OFF ON OFF OFF Rhineland-Palatinate, Saarland, Hesse<br />
OFF ON OFF ON Saxony, Thuringia<br />
OFF ON ON OFF Baden-Württemberg<br />
OFF ON ON ON Bavaria<br />
Y12345C<br />
G<br />
= Manufacturer’s default setting:<br />
Schleswig-Holstein,<br />
Northern Lower-Saxony<br />
- 58 -
83101311 F1.qxd 24.09.01 17:34 Seite 61<br />
Astro function – Europe Special functions<br />
DIP 2 DIP 3 DIP 4 DIP 5 Area<br />
ON OFF OFF OFF Scandinavia<br />
ON OFF OFF ON Great Britain<br />
ON OFF ON OFF Northern France, Benelux<br />
ON OFF ON ON Germany<br />
ON ON OFF OFF Southern France<br />
ON ON OFF ON Switzerland, Austria, Northern Italy<br />
ON ON ON OFF Spain<br />
ON ON ON ON Southern Italy, Sicily, Corsica, Sardinia<br />
- 59 -<br />
G<br />
Special functions Reverse function<br />
After the roller shutter has moved down automatically at the programmed<br />
time, the reverse function causes the roller shutter to<br />
shortly move up airing purposes or to let pets go outside.<br />
The reverse time can be set with DIP switches 7 and 8 and will<br />
only be executed at the programmed day, week and sunrise and<br />
sunset times during automatic operation.The reverse function can<br />
also be executed by pressing the down button during automatic<br />
operation.<br />
Important: The reverse function is only initiated 2 minutes after<br />
the down pulse has been transmitted.<br />
G<br />
Setting reverse time:<br />
DIP 7 DIP 8 Reverse time<br />
OFF OFF none<br />
OFF ON 2 seconds<br />
ON OFF 4 seconds<br />
ON ON 10 seconds<br />
- 60 -<br />
The display will indicate the<br />
set reverse time with the<br />
symbol (O).<br />
This symbol flashes on the<br />
display during execution of<br />
the reverse time.
83101311 F1.qxd 24.09.01 17:34 Seite 63<br />
Example for DIP switch setting Special functions<br />
The table below shows the various setting options.<br />
The position of S1 determines whether day or week function<br />
was selected.<br />
Preset default<br />
setting:<br />
Day<br />
Day function (S1 = OFF)<br />
No Astro correction time (S6 = OFF)<br />
No reverse function (S7 and S8 = OFF)<br />
Y123$5678X<br />
Example of the DIP switch position for North-Rhine Westphalia.<br />
For other states, please see pages 58 and 59.<br />
Week<br />
Y!wert678X<br />
DIP switches S2 – S5 do not have any function for this setting.<br />
For DIP switch S6, see page 57, for S7 and S8 see page 60.<br />
- 61 -<br />
G<br />
G/S functions General<br />
Your Vestamatic <strong>Rollmat</strong> Plus G/S V3.1 roller shutter control features<br />
two additional useful functions:<br />
1. Broken glass indicator (G)<br />
The function “broken glass indicator” is only activated in the<br />
automatic mode.<br />
2. Sun protection (S)<br />
The function “sun protection” can only be operated in the<br />
automatic mode within the previously programmed up and<br />
down times.<br />
Note: Standard length of the sun sensor cable – 2.0 m<br />
Standard length of the broken glass<br />
indicator cable – 1.0 m<br />
Cables of up to 10 m length can be delivered for both functions.<br />
G<br />
- 62 -
83101311 F1.qxd 24.09.01 17:34 Seite 65<br />
Functional description broken glass indicator G/S functions<br />
In case of broken glass, the roller shutter will move down without<br />
delay.<br />
The display will now indicate<br />
the broken glass symbol (g): (0S8:0g0)<br />
The previously programmed up time will no longer be considered,<br />
i.e. the roller shutter does not move up at the programmed up<br />
time because of safety reasons. Simply press the up button in<br />
order to resume the normal operation. The broken glass symbol<br />
in the display goes off and the roller shutter moves up or down<br />
at the programmed up and down times.<br />
Annotation: A broken glass signal is released as soon as the<br />
broken glass indicator detects a massive shock or<br />
broken glass within the sensing range. The sensing<br />
range amounts to approx. 1 square meter<br />
(please refer to the picture on page 71).Therefore,<br />
several broken glass indicators and a distributor<br />
box should be installed on larger windows.<br />
- 63 -<br />
G<br />
G/S functions Functional description sun protection<br />
When the sun sensor is exposed to sun rays, the sun symbol will<br />
flash in the display. After the sensor measures 1 minute of continuous<br />
sunshine, the roller shutter moves as far down to cover<br />
the sun sensor. In order to clear the sun sensor for further monitoring,<br />
the roller shutter then moves a few inches up. We call this<br />
roller shutter position “shade position”.<br />
The display indicates the current light<br />
intensity with the corresponding<br />
symbols (S):<br />
(Example: strong light intensity)<br />
s0S8:0ß0)<br />
If the sun sensor cannot detect any sun rays over a continuous<br />
period of 16 minutes, the roller shutter will move up again. During<br />
this delay time, the sun symbol will keep flashing in the display.<br />
The sensor signals are checked on a regular basis and the<br />
position of the roller shutter position will be corrected accordingly<br />
in the course of a sunny day.<br />
Important: The sun sensor is only activated in between the up<br />
and down times. If the present time does not lie<br />
within these times, the display will indicate a moon<br />
symbol.<br />
Remove the sun sensor, if you do not need to use the sun protection<br />
function for an extended period of time.<br />
G<br />
- 64 -
83101311 F1.qxd 24.09.01 17:34 Seite 67<br />
Setting the response (sun intensity) G/S functions<br />
Set the response to the sun intensity with the potentiometer and<br />
the delivered adjustment tool. Carefully pull to remove the cover<br />
cap of the Vestamatic <strong>Rollmat</strong> Plus G/S V3.1 roller shutter control.<br />
r<br />
o<br />
l<br />
The roller shutter<br />
moves down at a<br />
low sun intensity<br />
(approx. 12 kLux)<br />
The roller shutter<br />
moves down at a<br />
medium sun intensity<br />
(approx. 17 kLux)<br />
The roller shutter<br />
moves down at a<br />
high sun intensity<br />
(approx. 22 kLux)<br />
Sun down delay: 1 minute<br />
Sun up delay: 16 minutes<br />
- 65 -<br />
G<br />
Trouble shooting<br />
The roller shutter does not move up and down automatically.<br />
· Is the power supply connected?<br />
(The display flashes in case of power failure)<br />
· Is the selector switch set to automatic (A)?<br />
· Check, if the programmed up and down times are still stored<br />
in the memory by shortly tapping the up or down button in<br />
the automatic mode.<br />
· Is there a broken glass signal present?<br />
(The display will indicate the broken glass indicator symbol)<br />
G<br />
- 66 -
83101311 F1.qxd 24.09.01 17:34 Seite 69<br />
Notes for professional electricians Installation<br />
Installation and basic settings:<br />
1. Switch off the power supply.<br />
2. Remove the band winder from the band winder case.<br />
3. Set the DIP switches to the desired function (see pages 57<br />
to 61).<br />
4. Connect the Vestamatic <strong>Rollmat</strong> Plus G/S V3.1 according to<br />
the wiring diagram (see page 70).<br />
Attention: Currently valid VDE standards must be observed<br />
when connecting the device, in particular<br />
DIN VDE 0100/0700 as well as the currently<br />
valid regulations of your local power company<br />
and accident prevention regulations.<br />
5. Install the Vestamatic <strong>Rollmat</strong> Plus G/S V3.1 in the band<br />
winder case.<br />
6. Set the selector switch to manual mode (H), i.e. push it to the<br />
right all the way to the stop.<br />
7. Switch on the power supply and press the reset button.<br />
8. Check, if the direction of the motor rotation corresponds with<br />
the direction buttons. If not, exchange terminal 6 with terminal<br />
7.<br />
- 67 -<br />
G<br />
Installation Notes for professional electricians<br />
Important: Parallel control of several roller shutter drive motors<br />
can only be implemented by means of isolating<br />
relays or group control devices.<br />
In case of power failure, the display contrast will fade<br />
which does not indicate that the battery is empty.<br />
For extra large band winder cases, we<br />
recommend to use our intermediate plate, article-no. 01201500.<br />
For the broken glass indication and the sun sensor function, the<br />
following accessories are available:<br />
Broken glass indicator, cable length 1 m, article-no. 01200100<br />
Broken glass indicator, cable length 2 m, article-no. 01200200<br />
Broken glass indicator, cable length 10 m, article-no. 01201000<br />
Broken glass indicator and distributor box, article-no. 01201100<br />
Sun sensor, cable length 1 m, article-no. 01100125<br />
Sun sensor, cable length 2 m, article-no. 01100130<br />
Sun sensor, cable length 10 m, article-no. 01100195<br />
For control via two drives, we recommend our isolating relays:<br />
Isolating relays TR N2A, article-no. 01054120<br />
Isolating relays TR N2S, article-no. 01054220.<br />
G<br />
- 68 -
83101311 F1.qxd 24.09.01 17:34 Seite 71<br />
Installation instructions / Technical data Installation<br />
Installation instructions<br />
Technical data<br />
Operating voltage: 230 VW, 50 Hz<br />
Power input: 2 W<br />
Output: 230 VW, 50 Hz<br />
Switching capacity: 8 A, 230 VW, cos f > 0.8<br />
Switching time: 120 seconds<br />
Operating temperature range: 0 °C (32 °F) to 40 °C (104 °F)<br />
Protection class: IP 40<br />
This device comprises a battery containing toxic substances.<br />
The consumer is obliged to correctly recycle the battery<br />
(Guideline 91/157/EWG).<br />
All technical data is subject to change!<br />
- 69 -<br />
G<br />
Installation Wiring diagram<br />
G<br />
- 70 -
83101311 F1.qxd 24.09.01 17:35 Seite 73<br />
Broken glass indicator Installation<br />
The additional function “broken glass indicator” requires an extra<br />
broken glass indicator for each Vestamatic <strong>Rollmat</strong> Plus G/S V3.1<br />
roller shutter control (for larger or separated window panes). The<br />
installation of the sun sensor is described below.<br />
1. Push the selector switch all the way to the right until it clicks<br />
to set the manual control to (H).<br />
2. Mix binder and hardener of the two-component adhesive<br />
thoroughly in a 1 : 1 ratio.<br />
- 71 -<br />
G<br />
Installation Broken glass indicator<br />
3. Apply the adhesive to the side of the broken glass indicator<br />
that is marked with a black bar.<br />
Important: Make sure to keep the adhesive areas clean and<br />
oil-free.<br />
4. Place broken glass indicator carefully onto to the window<br />
pane and make sure to clear the window frame by minimum<br />
2 inches. Attach the broken glass indicator with adhesive<br />
tape and ensure that it is located perpendicular, with the<br />
cable going off to the bottom (please refer to the picture on<br />
page 71).<br />
5. Plug the jack of the broken glass indicator into the left-hand<br />
socket of the Vestamatic <strong>Rollmat</strong> Plus G/S V3.1 roller shutter<br />
control.<br />
6. Push the selector switch all the way to the left until it clicks to<br />
set the automatic control to (A).<br />
7. Functional test:<br />
Take a coin and tap the broken glass indicator with it in order<br />
to simulate breaking glass. The roller shutter will now move<br />
down and the display will indicate the broken glass symbol.<br />
Press the up button to stop the roller shutter and delete the<br />
broken glass signal.<br />
Remove the adhesive tape after the adhesive has hardened.<br />
Please check the instructions on the adhesive packaging for the<br />
processing and hardening times.<br />
G<br />
- 72 -
83101311 F1.qxd 24.09.01 17:36 Seite 75<br />
Sun sensor Installation<br />
The additional function “sun protection” requires an extra sun<br />
sensor for each Vestamatic <strong>Rollmat</strong> Plus G/S V3.1 roller shutter<br />
control. The installation of the sun sensor is described below.<br />
1. Plug the sun sensor jack into the right-hand socket of the<br />
Vestamatic <strong>Rollmat</strong> Plus G/S V3.1 roller shutter control.<br />
2. Attach the sun sensor on the desired area of the window.<br />
3. Push the selector switch all the way to the left until it clicks to<br />
set the automatic control to (A).<br />
- 73 -<br />
G<br />
Installation Sun sensor<br />
After completing the installation, activate the quick run function<br />
in order to check the additional function “sun protection” by<br />
pressing the time and day button simultaneously for 3 seconds<br />
(this will make the time run 60 times faster). That way you can<br />
check the entire functional sequence within a short amount of<br />
time.<br />
Example of a test run:<br />
1. Check whether you are within the range of the programmed<br />
up and down times.<br />
2. Press the time and day button simultaneously for 3 seconds.<br />
3. Expose the sun sensor to light until the sun symbol flashes.<br />
After approx. 1 second the shutter moves to the shade position.<br />
Remove the light source.<br />
The sun symbol in the display will flash again.<br />
After 16 seconds, the roller shutter will move up again.<br />
4. Press the time and day button shortly after the test run is<br />
completed.<br />
5. Set the current time as described on page 48.<br />
G<br />
- 74 -
83101311 F1.qxd 24.09.01 17:36 Seite 77<br />
Notizen / Notes<br />
D G<br />
Übersicht Bedienungselemente / Overview operating elements<br />
Auf-Taste<br />
Up button<br />
S/W-Taste<br />
Summer/winter button<br />
Stell-Taste<br />
Set button<br />
Uhr-Taste<br />
Time button<br />
Tag-Taste<br />
Day button<br />
Einstellung<br />
Sonnenintensität<br />
Setting the sun intensity<br />
Anschluss<br />
Glasbruchmelder<br />
Connection to<br />
broken glass indicator<br />
Vestamatic <strong>Rollmat</strong> Plus G/S V3.1<br />
Display<br />
Display<br />
Ab-Taste<br />
Down button<br />
Reset-Taste<br />
Reset button<br />
Zufall-Taste<br />
Random button<br />
Wahlschalter<br />
Automatik/Hand<br />
Selector switch<br />
automatic/manual<br />
Anschluss<br />
Sonnensensor<br />
Connection to<br />
sun sensor<br />
D G
83101311 F1.qxd 24.09.01 17:36 Seite 79<br />
Anschlussbild / Wiring diagram<br />
D G<br />
Vestamatic <strong>Rollmat</strong> Plus G/S V3.1<br />
<strong>Art</strong>.-Nr.: 83101311 F1