HANDBIKE - Hase Bikes
HANDBIKE - Hase Bikes
HANDBIKE - Hase Bikes

Erfolgreiche ePaper selbst erstellen
Machen Sie aus Ihren PDF Publikationen ein blätterbares Flipbook mit unserer einzigartigen Google optimierten e-Paper Software.
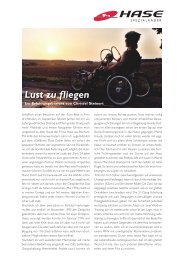
Handbike 1/09 D-ENG<br />
<strong>HANDBIKE</strong><br />
Kurzanleitung<br />
Short Manual<br />
D<br />
ENG
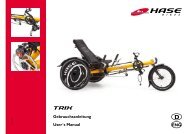
Lenkung/Handantriebsholm<br />
Steering/crank column<br />
Rahmen-Vorbau<br />
Front boom<br />
Fußstützen<br />
Footrests<br />
Mountain-Drive-Getriebe<br />
Mountain-Drive gear system<br />
Hauptrahmen<br />
Main frame<br />
Inhalt Content<br />
Sicherheitshinweise........................................ 1<br />
Gebrauchsanweisung beachten ...................................1<br />
Verwendungszweck .......................................................1<br />
Bevor Sie los fahren... ...................................................1<br />
Fahren mit Handantrieb ...............................................1<br />
Beine an Fußstützen anschnallen ................................1<br />
Anpassen an Körpergröße ............................ 2<br />
Sitzposition prüfen .........................................................2<br />
Rahmenlänge und Lenklager einstellen .....................3<br />
Fußstützen einstellen ...................................................4<br />
Sitzneigung einstellen ....................................................5<br />
Winkel des Handantriebsholms einstellen ...............5<br />
Länge des Handantriebsholms einstellen ..................5<br />
Lenkungsempfindlichkeit einstellen ............................6<br />
Rund ums Fahren ........................................... 7<br />
Ein- und aussteigen ........................................................7<br />
Fahren ...............................................................................7<br />
Schalten mit Drehgriff ...................................................8<br />
Schalten des Mountain-Drive Getriebes...................8<br />
Handbike als Tandem ....................................................8<br />
Ersatzteile ....................................................... 9<br />
Handantrieb, komplett ..................................................9<br />
Fußhalter ........................................................................10<br />
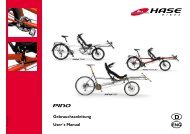
Handkurbeln<br />
Hand-crank arms<br />
Bremsgriffe<br />
Brake levers<br />
Sitzverstellung<br />
Seat adjustment<br />
Safety information ......................................... 1<br />
Read Instruction Manual ...............................................1<br />
Intended use ....................................................................1<br />
Before your first ride... .................................................1<br />
Operating the hand crank ............................................1<br />
Strapping your legs into the footrests ......................1<br />
Adjusting your Handbike ............................... 2<br />
Checking the seat position ..........................................2<br />
Adjusting the frame length and steering ...................3<br />
Adjusting the footrests ................................................4<br />
Adjusting the seat angle ................................................5<br />
Adjusting the angle of the steering/crank column ..5<br />
Adjusting the length of the steering/crank column 5<br />
Adjusting the steering sensitivity ................................6<br />
Riding your Handbike .................................... 7<br />
Mounting and dismounting ...........................................7<br />
Riding ................................................................................7<br />
Shifting gears with the twist shifter ...........................8<br />
Shifting gears with the Mountain Drive<br />
gear system ......................................................................8<br />
Using the Handbike as a tandem ................................8<br />
Replacement parts ......................................... 9<br />
Hand-crank assembly, complete .................................9<br />
Footrests ........................................................................10
<strong>HANDBIKE</strong><br />
Sicherheitshinweise<br />
Gebrauchsanweisung beachten<br />
Lesen Sie diese Gebrauchsanleitung sorgfältig und machen Sie<br />
sich mit dem Fahrzeug praktisch vertraut. Das Handbike ist<br />
auf der Basis eines Kettwiesels aufgebaut. Lesen Sie deshalb<br />
auch sorgfältig die Gebrauchsanleitung des Kettwiesels und<br />
vor allem die Sicherheitshinweise.<br />
Diese Gebrauchsanleitung ist eine Ergänzung der Gebrauchsanleitung<br />
des Kettwiesels und enthält nur die Besonderheiten<br />
des Handantriebs.<br />
Verwendungszweck<br />
Das Handbike ist ein dreiräderiges Liegefahrrad mit Handantrieb<br />
und zur Benutzung auf Straßen und befestigten Wegen<br />
gedacht. Das Fahren im Straßenverkehr ist nur mit Zubehör<br />
nach den jeweiligen Verkehrszulassungsvorschriften des<br />
Landes in dem es benutzt wird, erlaubt.<br />
Bevor Sie los fahren...<br />
Ihr Fachhändler hat das Handbike montiert und auf Ihre Körpergröße<br />
eingestellt. Wenn das Handbike für eine andere Person<br />
eingestellt werden soll, lesen Sie im Kapitel: „Anpassen an<br />
Körpergröße“, Seite 2-6. Bevor Sie die erste Fahrt unternehmen,<br />
machen Sie sich zuerst mit dem Handbike vertraut.<br />
Fahren mit Handantrieb<br />
Beachten Sie, dass das Fahren mit Handantrieb besondere<br />
Bewegungsabläufe und deren Koordination von Ihnen fordert.<br />
Fahren Sie deshalb so lange außerhalb des öffentlichen Verkehrs,<br />
bis Sie im Umgang mit dem Handbike sicher sind.<br />
Beine an Fußstützen anschnallen<br />
Schnallen Sie Ihre Beine mit den dafür vorgesehenen Gurten<br />
an die Fußstützen. Dadurch erreichen Sie eine sichere Sitzposition<br />
und es wird verhindert, dass Ihr Körper beim Bremsen<br />
oder Kurvenfahren rutscht.<br />
Safety information<br />
Read Instruction Manual<br />
Please read this Instruction Manual carefully and familiarize<br />
yourself with the construction and function of the vehicle in<br />
practice. The Handbike is built on the basis of the Kettwiesel.<br />
Therefore, we strongly recommend that all Handbike users<br />
read the Instruction Manual for the Kettwiesel, above all the<br />
section “Safety information”.<br />
This Instruction Manual is a supplement to the Kettwiesel<br />
Instruction Manual and only covers the special features associated<br />
with the hand-drive system.<br />
Intended use<br />
The Handbike is a hand-powered recumbent trike designed<br />
for use on paved roads and paths. The trike should not be operated<br />
in traffic until it has been equipped with the accessories<br />
required by the applicable traffic regulations of the country<br />
in which it is being used.<br />
Before your first ride...<br />
Your authorized retailer has assembled your Handbike and<br />
adjusted it to your specific size requirements. If you need to<br />
make adjustments for another rider, please read the section<br />
“Adjusting your Handbike” on pages 2 through 6 of this manual.<br />
Before your first ride, please take some time to familiarize<br />
yourself with the Handbike.<br />
Operating the hand crank<br />
Please be advised that the use of the hand-crank/steering assembly<br />
requires the mastery of special movement sequences.<br />
Therefore, you should not ride the Handbike in traffic until<br />
you feel confident with all aspects of its operation.<br />
Strapping your legs into the footrests<br />
Be sure to use the special straps to fasten your legs to the<br />
footrests. This provides you with a secure sitting position and<br />
prevents your body from slipping in the seat when braking<br />
and cornering.<br />
Handbike 1/09 D-ENG 1
Anpassen an Körpergröße<br />
Die richtige Einstellung des Handbikes ist wichtig für das<br />
Wohlbefinden und die Leistungsfähigkeit beim Fahren. Ihr<br />
<strong>Hase</strong>-Händler hat das Handbike optimal auf Ihre Körpergröße<br />
eingestellt. Sollten größere Veränderungen notwendig sein,<br />
wenden Sie sich an ihn oder passen Sie die Einstellungen wie<br />
folgt selbst an. Ziehen Sie dabei eventuell eine weitere Person<br />
zur Unterstützung hinzu. Das Handbike bietet eine Vielzahl<br />
von Einstellmöglichkeiten, die durch Kombination eine optimale<br />
Anpassung ermöglichen. Beachten Sie die folgenden<br />
Empfehlungen.<br />
2<br />
Achtung!<br />
Bei unsachgemäßer Ausführung der Einstellarbeiten<br />
besteht akute Unfallgefahr. Überlassen Sie diese Arbeiten<br />
einer Fachwerkstatt.<br />
Sitzposition prüfen<br />
Um eine ergonomische Sitzposition zu erreichen, sollten die<br />
Fußstützen so eingestellt sein, dass die Beine leicht angewinkelt<br />
sind und die Fußsohlen an den Rohrbügeln anliegen. Diese<br />
Haltung ist in der Regel die angenehmste. Zusätzlich hat man<br />
durch den leichten Druck der Füße gegen die Rohrbügel einen<br />
besseren Halt im Sitz.<br />
Das Kurbellager sollte möglichst tief liegen. Die tiefe Lage ist<br />
besonders ergonomisch. Das Sichtfeld wird dabei durch den<br />
Antrieb am wenigsten eingeschränkt. Es sollte jedoch nicht so<br />
tief liegen, dass beim Lenken die Beine nicht mit den Kurbeln<br />
kolidieren. Greift man in der entferntesten Position an die<br />
Kurbelgriffe, so sollten die Arme leicht gebeugt sein.<br />
Hinweis:<br />
Die Standardlänge der Handantriebskurbel beträgt<br />
174 mm und ist für eine Armlänge ab ca. 50 cm geeignet.<br />
Für kleinere Personen sind Kurbeln mit einer Länge<br />
von 150 mm (Zubehör) erhältlich.<br />
Wie Sie in das Handbike ein- und aus dem Handbike aussteigen,<br />
finden Sie auf Seite 7.<br />
Adjusting your Handbike<br />
The proper adjustment of the Handbike is important for<br />
riding comfort and performance. Your <strong>Hase</strong> retailer has adjusted<br />
your Handbike to optimally fit your specific size requirements.<br />
If major adjustments become necessary, consult<br />
your retailer or perform the adjustments according to the following<br />
instructions. An additional person may be required for<br />
certain procedures. The Handbike offers several adjustment<br />
features that can be used in combination to adjust the trike<br />
to your specific needs. Please read and observe the following<br />
recommendations.<br />
Caution!<br />
Improperly performed adjustments can result in accidents.<br />
We recommend all adjustments be performed by<br />
a professional bicycle mechanic.<br />
Checking the seat position<br />
In order to create an ergonomic sitting position, the footrests<br />
should be adjusted in such a way that the legs are slightly<br />
bent and the soles of the feet are resting against the curved<br />
section of tubing that forms the stirrup of the footrests. This<br />
position is generally the most comfortable. Furthermore, the<br />
slight pressure of the feet against the stirrups provides more<br />
stability in the seat.<br />
The crankset should be positioned as low as possible. A low<br />
position is especially ergonomic. This position also provides<br />
the rider with the best field of vision. Please ensure, however,<br />
that the crankset is not positioned so low that the handles<br />
and/or crank column come in contact with the legs when<br />
steering and pedaling. When the handles of the crank arms<br />
are positioned farthest from the body, the arms should be<br />
slightly bent.<br />
Note:<br />
The standard length for the hand crank arms is 174 mm<br />
(6¾ in). This length is suitable riders whose arms are at<br />
least 50 cm (19¾ in)in length. Special 150mm cranks (6<br />
in) are available for smaller riders (accessories).<br />
The recommended procedures for mounting and dismounting<br />
the Handbike are described on page 7.<br />
Handbike 1/09 D-ENG
<strong>HANDBIKE</strong><br />
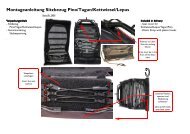
Rahmenlänge und Lenklager einstellen<br />
Durch Änderungen der Rahmenlänge verändert sich auch der<br />
Winkel des Handantriebsholms, da die Handantriebsholmbefestigung<br />
mit verschoben wird. Um den Winkel zu erhalten,<br />
muss die Befestigung des Handantriebsholms um die gleiche<br />
Länge in entgegen gesetzte Richtung wie die Rahmenänderung<br />
verschoben werden. Sonst ist eine Anpassung der Kettenlänge<br />
notwendig. Nach Änderung der Rahmenlänge muss auch die<br />
Lenkung neu eingestellt werden.<br />
Handbike 1/09 D-ENG<br />
Achtung!<br />
Diese Arbeiten dürfen nur sachkundige Personen durchführen.<br />
1. Lösen Sie die beiden Innensechskantschrauben zwischen<br />
Vorbau und Hauptrahmen (1) auf der linken Seite (in<br />
Fahrtrichtung gesehen) mit einem Innensechskantschlüssel<br />
6 mm.<br />
2. Lösen Sie die Schrauben (2) der Schellen des Handantriebsholms<br />
mit einem Innensechskantschlüssel 6 mm.<br />
. Verändern Sie die Länge des Rahmens, indem Sie den Vorbau<br />
aus dem Hauptrahmen herausziehen oder den Vorbau<br />
in den Hauptrahmen hineinschieben. Ziehen Sie anschließend<br />
die Schrauben (1) handfest an.<br />
Achtung!<br />
Der Vorbau darf nur bis zur Markierung, einer Bohrung<br />
auf der Oberseite des Vorbaus, herausgezogen werden.<br />
Diese Bohrung darf nicht sichtbar sein. Wenn sie sichtbar<br />
wird, ist der Vorbau zu weit herausgezogen. Es drohen<br />
Unfallgefahr und Rahmenschaden.<br />
4. Verschieben Sie die drei Schellen (4) und Gleitlager des<br />
Handantriebsholms in entgegengesetzte Richtung um<br />
die gleiche Länge wie die Rahmenänderung. Falls sich die<br />
vordere Schelle des Handantriebsholms nicht mitverschieben<br />
lässt, lösen Sie zusätzlich die Schraube ( ) mit einem<br />
Innensechskantschlüssel 6 mm.<br />
5. Positionieren Sie die hintere Schelle in einem Abstand<br />
von 0 mm zum Hauptrahmen. Sonst ist eine Änderung<br />
der Kettenlänge notwendig. Positionieren Sie die beiden<br />
vorderen Schellen so, dass sich die Schraube (5) bei einem<br />
nicht geneigtem Handantriebsholm und Vorderrad auf<br />
„geradeaus“ im hinteren Bereich des Langlochs befindet.<br />
5<br />
4<br />
2<br />
STOP<br />
0 mm<br />
1<br />
Adjusting the frame length and the steering<br />
Any change in the frame length will also affect the angle of<br />
the steering/crank column because the clamp on which the<br />
column is mounted slides into a new position when the front<br />
boom is adjusted. After the front boom has been repositioned,<br />
the clamp that holds the steering/crank column must<br />
be slid back to its original position (by the same distance the<br />
front boom was moved) in order to restore the desired angle.<br />
Otherwise the chain length must be adjusted. After the frame<br />
length has been adjusted, a readjustment of the steering assembly<br />
is required.<br />
Caution!<br />
This work should only be performed by a professional<br />
bicycle mechanic.<br />
1. Loosen the two Allen bolts (1) between the front boom<br />
and the main frame using a 6mm Allen key. These bolts<br />
are located on the left side of the frame (as seen when<br />
facing in the direction of travel).<br />
2. Loosen the bolt (2) on the rear clamp of the steering/<br />
crank column using a 6mm Allen key.<br />
. Adjust the length of the frame by sliding the front boom<br />
into or out of the main frame tube. Then tighten the bolts<br />
(1) lightly.<br />
Caution!<br />
The front boom must not be extended past the minimum<br />
insertion mark, which is a small hole located on the top<br />
of the boom. This hole should not be visible. If the hole<br />
is visible, the front boom has been extended past its<br />
minimum insertion length. Riding with an over-extended<br />
boom could cause accidents or damage to the frame.<br />
4. Slide the three clamps (4) of the steering/crank column<br />
back along the front boom by the same distance (in a<br />
direction opposite to that in which the front boom was<br />
moved). If the front clamp of the steering/crank column<br />
is too tight to be moved, loosen the bolt ( ) on the front<br />
clamp using a 6mm Allen key.<br />
5. Position the rear clamp at a distance of 0 mm (1 /16 in)<br />
to the main frame. Otherwise the chain length must be<br />
adjusted. Position the two front clamps in such a way that<br />
the bolt (5) that slides in the front slot of the steering rod
6. Ziehen Sie die Schraube ( ) mit einem Innensechskantschlüssel<br />
6 mm nur so fest, dass sich der Handantriebsholm<br />
leicht neigen lässt. Ziehen Sie die Schraube (2)<br />
mit einem Innensechskantschlüssel 6 mm fest.<br />
7. Ziehen Sie die beiden Innensechskantschrauben (1) zwischen<br />
Vorbau und Hauptrahmen mit einem Innensechskantschlüssel<br />
6 mm mit 12 Nm fest.<br />
Achtung!<br />
Diese Schrauben müssen unbedingt mit 12 Nm fest<br />
angezogen werden. Bei Fahrten mit losen oder nicht<br />
genügend angezogenen Schrauben droht Unfallgefahr<br />
und Beschädigung des Rahmens.<br />
8. Überprüfen Sie die Funktion der Lenkung. Bei einem nicht<br />
geneigtem Handantriebsholm, muss das Vorderrad auf<br />
„geradeaus“ stehen. Der Handantriebsholm muss sich<br />
leicht nach links und rechts neigen und das Vorderrad<br />
nach links und rechts bewegen lassen. Beachten Sie dass<br />
die Lenkung nicht blockiert wird.<br />
9. Prüfen Sie die Sitzposition. Eventuell muss noch die Fußstütze<br />
angepasst werden.<br />
Fußstützen einstellen<br />
1. Lösen Sie die Schraube (1) mit einem Innensechsakantschlüssel<br />
6 mm, um die Neigung und Höhe der Fußstütze<br />
zu verändern.<br />
2. Lösen Sie die beiden Schrauben (2) mit einem Innensechsakntschlüssel<br />
5 mm, um die Länge der Fußstütze zu<br />
verändern.<br />
4<br />
. Ziehen Sie alle Schrauben wieder fest.<br />
Achtung!<br />
Die Fußstütze darf die Lenkung nicht blockieren.<br />
Unfallgefahr!<br />
4<br />
2<br />
0 mm<br />
1<br />
2<br />
1<br />
bracket is located in the rear part of the slot when the<br />
steering/crank column is upright (not tilted) and the front<br />
wheel is aligned with the frame (facing straight ahead).<br />
6. Using a 6mm Allen key, tighten the bolt ( ) on the front<br />
clamp lightly, ensuring that the steering/crank column can<br />
still be easily tilted to the side. Tighten the bolt (2) on the<br />
rear clamp using a 6mm Allen key.<br />
7. Tighten the two Allen bolts (1) between the front boom<br />
and the main frame using a 6mm Allen key and a torque of<br />
12 Nm (8.9 ft-lbs).<br />
Caution!<br />
It is absolutely necessary to tighten these bolts with a<br />
torque of 12 Nm (8.9 ft-lbs). Riding with loose bolts<br />
poses a high risk of accident and frame damage.<br />
8. Check that the steering system is functioning properly.<br />
When the steering/crank column is upright (not tilted),<br />
the front wheel must be facing forward (straight ahead).<br />
The steering/crank column must move freely to the left<br />
and right, and the front wheel must respond by turning<br />
to the left and right, respectively. Ensure that the steering<br />
system is not blocked.<br />
9. Check the seat position. The footrests may need to be<br />
readjusted.<br />
Adjusting the footrests<br />
1. To change the angle and/or height of the footrest, loosen<br />
the bolt (1) on the footrest cylinder using a 6mm Allen<br />
key.<br />
2. To adjust the length of the footrests, loosen the two bolts<br />
(2) on the footrest tube using a 5mm Allen key.<br />
. Retighten all bolts.<br />
Caution!<br />
Check to make sure that the footrests are not blocking<br />
the steering assembly. Risk of accident!<br />
Handbike 1/09 D-ENG
<strong>HANDBIKE</strong><br />
Sitzneigung einstellen<br />
1. Lösen Sie die beiden Schnellspanner (4) der Sitzstreben.<br />
2. Neigen Sie den Sitz in die gewünschte Position.<br />
. Ziehen Sie die beiden Schnellspanner (4) wieder fest.<br />
Winkel des Handantriebsholms einstellen<br />
Mit dieser Einstellung können Sie die Entfernung und die Höhe<br />
des Handantriebsholms an die Länge Ihrer Arme und die<br />
Schulterhöhe anpassen.<br />
1. Drehen Sie die Kunststoffschraube (1) gegen den Uhrzeigersinn,<br />
um den Handantriebsholm zu senken oder<br />
drehen Sie die Schraube im Uhrzeigersinn, um den Handantriebsholm<br />
zu erhöhen.<br />
Hinweis:<br />
Eine weitere Möglichkeit den Winkel des Handantriebsholms<br />
zu ändern erfolgt durch Verschieben der<br />
Abstützung des Handantriebsholms (3).<br />
Länge des Handantriebsholms einstellen<br />
Sollte die oben beschriebene Einstellung nicht ausreichen,<br />
dann können Sie zusätzlich auch die Länge des Antriebsholms<br />
ändern. Eine Kombination der beiden Möglichkeiten führt in<br />
der Regel zur einer optimalen Einstellung.<br />
Größere Änderungen der Länge des Handantriebsholms sind<br />
nur bei Änderung der Kettenlänge möglich.<br />
1. Lösen Sie die Schraube (2) mit einem Innensechskantschlüssel<br />
6 mm. Verlängern oder verkürzen Sie den Vorbau<br />
des Handantriebsholms, in dem Sie ihn herausziehen<br />
oder hineinschieben.<br />
Achtung!<br />
Der Vorbau darf nur bis zur Markierung, einer Bohrung<br />
auf der Oberseite des Vorbaus, herausgezogen werden.<br />
Diese Bohrung darf nicht sichtbar sein. Wenn sie sichtbar<br />
wird, ist der Vorbau zu weit herausgezogen. Es drohen<br />
Unfallgefahr und Beschädigung des Rahmens.<br />
2. Ziehen Sie die Schraube (2) wieder fest.<br />
4<br />
STOP<br />
1<br />
2<br />
Adjusting the seat angle<br />
1. Loosen the two quick releases (4) of the seat stays.<br />
2. Adjust the seat to the desired angle.<br />
. Retighten the two quick releases (4).<br />
Adjusting the angle of the steering/crank column<br />
Follow these instructions to adjust the horizontal and vertical<br />
position of the crank assembly to your arm length and shoulder<br />
height.<br />
1. Turn the plastic bolt (1) counterclockwise to lower the<br />
steering/crank column or clockwise to raise the column.<br />
Note:<br />
It is also possible to change the angle of the steering/<br />
crank column by repositioning the support bar (3).<br />
Adjusting the length of the steering/crank column<br />
If, after adjusting the column angle, the position of the crank<br />
assembly is still not optimal, the length of the column can<br />
also be adjusted. An optimal position can usually be achieved<br />
through a combination of these two adjustments.<br />
Any larger adjustment to the length of the steering/crank column<br />
requires chain-length adjustment.<br />
1. Loosen the bolt (2) using a 6mm Allen key. Lengthen or<br />
shorten the steering/crank column by repositioning the<br />
front boom of the column.<br />
Caution!<br />
The front boom of the steering/crank column must not<br />
be extended past the minimum insertion mark, which<br />
is a small hole located on the top of the boom. This<br />
hole should not be visible. If the hole is visible, the front<br />
boom has been extended past its minimum insertion<br />
length. Riding with an over-extended boom could cause<br />
accidents or damage to the frame.<br />
2. Retighten the bolt (2).<br />
Handbike 1/09 D-ENG 5
Lenkungsempfindlichkeit einstellen<br />
Das Handbike wird durch seitliche Neigung des Handantriebsholms<br />
gelenkt. Diese Bewegung wird über ein Gestänge<br />
auf das Vorderrad übertragen. Je nach Einstellung ist es möglich<br />
bei gleicher Neigung des Handantriebsholms mehr oder<br />
weniger seitliche Drehung des Vorderrads zu erzielen. Durch<br />
Befestigung der Lenkübertragungsstange in einer der drei<br />
Bohrungen (1) lassen sich unterschiedliche Lenkeigenschaften<br />
erzielen:<br />
6<br />
obere Bohrung: erzielt kleine Vorderraddrehung,<br />
großen Wendekreis,<br />
ruhiges Lenkverhalten<br />
mittlere Bohrung: erzielt mittlere Vorderradrehung,<br />
mittleren Wendekreis,<br />
gemässigtes Lenkverhalten<br />
untere Bohrung: erzielt große Vorderradrehung,<br />
kleinen Wendekreis,<br />
sportliches Lenkverhalten<br />
Hinweis:<br />
Verwenden Sie die obere Bohrung, wenn Ihr Fahrverhalten<br />
noch ungeübt oder unsicher sein sollte.<br />
1. Lösen Sie die Schraube (1) mit einem Innensechskantschlüssel<br />
6 mm und entfernen Sie den Lenkstangenhalter<br />
aus der Bohrung.<br />
2. Stecken Sie den Lenkstangenhalter in die gewünschte Bohrung<br />
und ziehen Sie die Schraube (1) wieder fest.<br />
1<br />
Adjusting the steering sensitivity<br />
The Handbike is steered by tilting the steering/crank column<br />
to the side. This movement is conveyed to the front wheel by<br />
means of a steering rod. Depending on the adjustment, the<br />
same angle of tilt can produce a sharper or weaker angle of<br />
front-wheel turn. The steering sensitivity is adjusted by fastening<br />
the steering rod in one of the three holes (1) on the<br />
steering rod bracket:<br />
Upper hole: produces a small angle of turn,<br />
large turning radius,<br />
subtle steering response<br />
Middle hole: produces a medium angle of turn,<br />
medium turning radius,<br />
moderate steering response<br />
Lower hole: produces a large angle of turn,<br />
small turning radius,<br />
sportier steering response<br />
Note:<br />
Be sure to use the upper hole until you have gained<br />
some experience and confidence with the tilt-steering<br />
system.<br />
1. Unscrew the bolt (1) from the steering rod holder using a<br />
6mm Allen key and remove it from the hole.<br />
2. Insert the bolt (1) through the desired hole; then screw it<br />
tightly into the steering rod holder.<br />
Handbike 1/09 D-ENG
<strong>HANDBIKE</strong><br />
Rund ums Fahren<br />
Ein- und aussteigen<br />
Damit Sie einfacher in das Handbike ein- oder aus dem Handbike<br />
aussteigen können, lässt sich der Handantriebsholm nach<br />
vorne klappen.<br />
1. Ziehen Sie den linken Bremsgriff und legen Sie das Klettband<br />
um den Griff, damit das Handbike nicht wegrollen<br />
kann.<br />
2. Ziehen Sie die Arretierung (1) der Handantriebsholmabstützung<br />
nach oben und nehmen Sie sie aus dem Kugelkopf<br />
heraus. Heben Sie den Handantriebsholm nach oben,<br />
so dass der Ein- oder Ausstieg frei wird.<br />
. Nachdem Sie ein- oder ausgestiegen sind, senken Sie den<br />
Handantriebsholm und arretieren Sie ihn.<br />
Fahren<br />
Schnallen Sie Ihre Beine mit den dafür vorgesehenen Gurten<br />
an die Fußstützen. Dadurch erreichen Sie eine sichere Sitzposition<br />
und verhindern, dass Ihr Körper beim Bremsen oder<br />
Kurvenfahren vom Sitz rutscht.<br />
Beachten Sie, dass das Fahren mit Handantrieb besondere<br />
Bewegungsabläufe und deren Koordination von Ihnen fordert.<br />
Fahren Sie deshalb so lange außerhalb des öffentlichen Verkehrs,<br />
bis Sie im Umgang mit dem Handbike sicher sind.<br />
2<br />
1<br />
Riding your Handbike<br />
Mounting and dismounting<br />
The steering/crank column can be folded forward to allow for<br />
easy mounting and dismounting.<br />
1. Compress the left brake lever and wrap the Velcro strap<br />
around the handle to engage the parking brake and prevent<br />
the Handbike from rolling.<br />
2. Pull up the locking mechanism (1) of the support bar and<br />
disengage the bar from the ball-head mounting bracket.<br />
Raise the steering/crank column to make additional space<br />
for mounting or dismounting.<br />
. After you have mounted or dismounted the trike, lower<br />
the steering/crank column and lock it back into place<br />
(reengage locking mechanism onto ball-head bracket).<br />
Riding<br />
Be sure to use the special straps to fasten your legs to the<br />
footrests. This provides you with a secure sitting position and<br />
prevents your body from slipping in the seat when braking<br />
and cornering.<br />
Please be advised that the use of the hand-crank/steering assembly<br />
requires the mastery of special movement sequences.<br />
Therefore, you should not ride the Handbike in traffic until<br />
you feel confident with all aspects of its operation.<br />
Handbike 1/09 D-ENG 7
Schalten mit Drehgriff<br />
Drehen Sie den Drehgriff (1) an der rechten Handkurbel<br />
im Uhrzeigersinn, dann schalten Sie auf höhere Gänge für<br />
schnellere Fahrten um. Drehen Sie den Drehgriff gegen den<br />
Uhrzeigersinn, dann schalten Sie auf niedrigere Gänge für<br />
langsameres Fahren um.<br />
Auf Steigungen können Sie zusätzlich das Mountaindrive-Getriebe<br />
benutzen.<br />
Schalten des Mountain-Drive Getriebes<br />
Im Tretlager des Handbikes befindet sich ein Getriebe mit<br />
Untersetzung, das das Befahren von Steigungen erleichtert.<br />
Auf Knopfdruck können Sie in einen Berggang und wieder zurückschalten.<br />
Dieses ist auch im Stand möglich.<br />
1. Drücken Sie den Knopf auf der linken Seite des Tretlagers,<br />
um in den „Berg“-Gang (Untersetzung) zu schalten.<br />
2. Drücken Sie den Knopf auf der rechten Seite (2) des Tretlagers,<br />
um zurück in den „Normal“-Gang zu schalten.<br />
Mit dem Mountain-Drive-Getriebe wird die Anzahl der Gänge<br />
verdoppelt.<br />
Handbike als Tandem<br />
In Verbindung mit einer Universalkupplung (Zubehör) und<br />
einem Kettwiesel, lässt sich das Handbike zu einem Tandem<br />
erweitern. Das Handbike kann sowohl das gezogene Fahrzeug<br />
aber auch das Zugfahrzeug sein, je nachdem an welchem Fahrzeug<br />
die Universalkupplung montiert ist.<br />
Das Vorderrad wird bei dem gezogenem Fahrzeug ausgebaut<br />
und die Gabel in die Aufnahme der Universalkupplung am<br />
Zugfahrzeug gespannt.<br />
Wenn das Handbike das gezogene Fahrzeug ist, dann dürfen<br />
Sie auf keinen Fall gegenlenken, da sonst die Lenkung beschädigt<br />
wird.<br />
8<br />
1<br />
2<br />
Shifting gears with the twist shifter<br />
Turn the twist shifter (1) on the right crank handle clockwise<br />
to shift to a higher gear for faster riding or counterclockwise<br />
to shift to a lower gear for slower riding.<br />
When riding uphill, you can also engage the Mountain Drive<br />
gear system.<br />
Shifting gears with the Mountain Drive gear<br />
system<br />
A gear system with gear reduction is built into the crank<br />
assembly of the Handbike, making it easier to ride uphill.<br />
By pressing a button, you can switch to a lower gear ratio,<br />
“mountain gear”, and back again. This button can be pressed<br />
to engage the system at any time, even when the rider is not<br />
pedaling or the trike is stopped.<br />
1. Press the button on the left side of the crankset to shift<br />
into “mountain gear” (gear reduction).<br />
2. Press the button on the right side (2) of the crankset to<br />
shift back into “normal gear”.<br />
With the Mountain Drive system, the number of gears is<br />
doubled.<br />
Using the Handbike as a tandem<br />
For tandem cycling, the Handbike can be hitched to a Kettwiesel<br />
(or vice versa) using a universal coupling (accessory)<br />
for tandem cycling. The Handbike can be used either as the<br />
towed vehicle or the towing vehicle, depending on which vehicle<br />
has been equipped with the universal coupling.<br />
The front wheel of the towed vehicle is removed, and its fork<br />
mounted onto the holding fixture of the universal coupling on<br />
the towing vehicle.<br />
If the Handbike is being towed, the rider of the towed Handbike<br />
must never countersteer. Countersteering in this situation<br />
could damage the steering assembly.<br />
Handbike 1/09 D-ENG
<strong>Hase</strong> Spezialräder · Hiberniastraße 2 · 45731 Waltrop · Germany · Phone ++49 (0) 23 09 78 25 82 · Fax ++49 (0) 23 09 78 25 86 · info@hasebikes.com · www.hasebikes.com<br />
erstellt von:<br />
www.technik-transparent.de