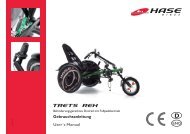
(Kettwiesel) deutsch-englisch (10/10) (PDF - Hase Bikes
(Kettwiesel) deutsch-englisch (10/10) (PDF - Hase Bikes
(Kettwiesel) deutsch-englisch (10/10) (PDF - Hase Bikes

Erfolgreiche ePaper selbst erstellen
Machen Sie aus Ihren PDF Publikationen ein blätterbares Flipbook mit unserer einzigartigen Google optimierten e-Paper Software.
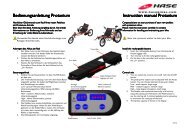
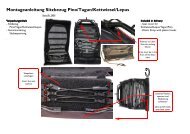
Zubehör montieren<br />
Universalkupplung montieren<br />
Achtung!<br />
Das <strong>Kettwiesel</strong> darf nur mit von uns empfohlenen und<br />
zugelassenen Ersatzteilen und Zubehör ausgestattet<br />
werden. Bei Verwendung anderer Teile, erlischt die<br />
Garantie. Für daraus folgende Schäden übernehmen wir<br />
keine Haftung. Wenden Sie sich im Zweifelsfall an ihre<br />
Fachwerkstatt.<br />
Mit der Universalkupplung kann das <strong>Kettwiesel</strong> in Verbindung<br />
mit einem zweiten <strong>Kettwiesel</strong> als Tandem genutzt werden. Sie<br />
können aber auch einen Anhänger mit einer geraden oder gebogenen<br />
Deichsel mit Weberkupplung, einen BOB-Nachläufer<br />
oder einen Monoporter anschließen. Im Bild rechts finden Sie<br />
alle Teile, die im Bausatz und als Bestandteile des Anhängers<br />
vorhanden sind. Je nach Anwendung werden jedoch nicht alle<br />
benötigt.<br />
Schrauben Sie die Wippe (2) mit der kürzeren M 8 Schraube<br />
(3), der großen Unterlegscheibe (5) und der selbstsichernden<br />
Mutter (7) an den Rahmen des <strong>Kettwiesel</strong>s, so dass das Langloch<br />
oben liegt. Setzen Sie die Aluminium Hülse (1) in die<br />
Wippe (2) und Stecken Sie die längere M 8 Schraube (4) mit<br />
der kleinen Unterlegscheibe (6) in die Bohrung und schrauben<br />
Sie sie mit der selbstsichernden Mutter (7) an den Rahmen<br />
des <strong>Kettwiesel</strong>s. Die Festigkeit der Verschraubung hängt von<br />
der Art der Nutzung ab.<br />
Weitere Teile werden in Abhängigkeit der Nutzung angebaut.<br />
3<br />
4<br />
6<br />
5<br />
2<br />
Installing accessories<br />
Installing the universal coupling<br />
Caution!<br />
Use only the replacement parts and accessories recommended<br />
by HASE for the <strong>Kettwiesel</strong>. If other parts are<br />
used, the warranty will lose its validity. HASE is not liable<br />
for any resulting damage. Consult your bike shop for<br />
more information.<br />
With the universal coupling, the <strong>Kettwiesel</strong> can be used in<br />
combination with a second <strong>Kettwiesel</strong> as a tandem trike. You<br />
can also attach a BOB trailer, a Weber Monoporter, or a<br />
trailer with a straight or curved drawbar and a Weber coupling.<br />
The picture on the right shows all parts included in the<br />
coupling assembly. However, depending on the application,<br />
not all parts will be required.<br />
Attach the hitch (2) to the <strong>Kettwiesel</strong> frame using the shorter<br />
M8 bolt (3) with the washer (5) and self-locking nut (7), positioning<br />
it with the slot beneath the two round holes. Put the<br />
aluminium spacer (1) in to the hitch (2). Put the longer M8<br />
bolt (4) with the small washer (6) to the hole and fix it with<br />
the self locking nut (7). The required tightness of the bolts<br />
(torque) depends on the intended use of the hitch.<br />
The additional fittings required will depend on the intended<br />
use.<br />
<strong>Kettwiesel</strong> 4/<strong>10</strong> QuickSTickNabeD-ENG 25<br />
<strong>10</strong>/<strong>10</strong><br />
1<br />
7<br />
7
Zubehör montieren<br />
Installing accessories<br />
Nutzung mit einem zweiten <strong>Kettwiesel</strong> als<br />
Tandem<br />
Soll ein zweites <strong>Kettwiesel</strong> als Tandem genutzt werden, dürfen<br />
die beiden M 8 Schrauben mit Muttern (1) und (4) nur<br />
soweit angezogen werden, dass eine spielfreie Verdrehung<br />
der Kupplung um die untere Schraube möglich ist.<br />
26<br />
Achtung!<br />
Die Wippe muss drehbar und die Gleitflächen gut<br />
gefettet sein, sonst könnte bei Kurvenfahrten die Gabel<br />
des zweiten <strong>Kettwiesel</strong>s aus der Kupplung herausgehebelt<br />
und beschädigt werden.<br />
1. Schieben Sie die Distanzstücke (2) mit der langen Seite in<br />
das Rohr der Kupplung.<br />
2. Bauen Sie das Vorderrad des zweiten <strong>Kettwiesel</strong>s aus<br />
und entfernen Sie den Schnellspanner (3).<br />
3. Stecken Sie die Gabel auf die Distanzstücke der Kupplung<br />
(2).<br />
4. Stecken Sie den Schnellspanner (3) des zweiten <strong>Kettwiesel</strong>s<br />
durch die Kupplung und ziehen Sie ihn fest.<br />
Nutzung mit BOB-Nachläufer<br />
1. Richten Sie die Kupplung waagerecht aus und schrauben<br />
Sie sie mit 30 Nm an das Anschlussstück des <strong>Kettwiesel</strong>s<br />
fest.<br />
Achtung!<br />
Die Wippe muss fest angeschraubt sein.<br />
2. Schieben Sie die Distanzstücke (2) mit der kurzen Seite<br />
in das Rohr der Kupplung.<br />
3. Entfernen Sie die beiden Zentrierfedern von der Schnellspannachse<br />
des BOB-Nachläufers.<br />
4. Stecken Sie den BOB-Schnellspanner mit einer M 6<br />
Unterlegscheibe (4) in die Kupplung. Stecken Sie eine<br />
zweite M 6 Unterlegscheibe (4) auf die andere Seite des<br />
Schnellspanners und schrauben Sie die Schnellspannmutter<br />
(5) auf.<br />
5. Setzen Sie den BOB-Nachläufer auf die Kupplung und<br />
ziehen Sie den Schnellspanner fest.<br />
Hinweis:<br />
Beachten Sie die Betriebsanleitung des BOB-Nachläufers.<br />
4<br />
3<br />
4<br />
2<br />
3<br />
3<br />
2<br />
4<br />
2<br />
1<br />
2<br />
4<br />
5<br />
4<br />
3<br />
5<br />
For use with a second <strong>Kettwiesel</strong> in tandem<br />
If you are using the hitch to attach a second <strong>Kettwiesel</strong> in<br />
tandem, the two M8 bolts with nuts (1) and (4) must be loose<br />
enough to allow the hitch to pivot freely from the upper bolt.<br />
Caution!<br />
The hitch must be able to pivot freely, and the contact<br />
surfaces, well greased; otherwise, when cornering, the fork<br />
of the second <strong>Kettwiesel</strong> could be wrenched out of the<br />
coupling and damaged.<br />
1. Insert the long ends of the spacers (2) into the barrel of<br />
the coupling.<br />
2. Detach the front wheel of the second <strong>Kettwiesel</strong> and<br />
remove the quick release (3).<br />
3. Slide the fork onto the spacers of the coupling (2).<br />
4. Insert the quick release (3) of the second <strong>Kettwiesel</strong><br />
through the coupling and secure it tightly.<br />
For use with a BOB trailer<br />
1. Position the hitch so that it is level and screw it to the<br />
attachment plate of the <strong>Kettwiesel</strong> frame with a torque of<br />
30 Nm (22 ft-lbs).<br />
Caution!<br />
The hitch must be screwed on tightly.<br />
2. Insert the short ends of the spacers (2) into the barrel of<br />
the coupling.<br />
3. Remove the two centering springs from the quick-release<br />
axle of the BOB trailer.<br />
4. Insert the BOB quick release in the coupling with an M6<br />
washer (4). Put a second M6 washer (4) onto the other<br />
side of the quick release and screw on the quick-release<br />
nut (5).<br />
5. Slide the BOB trailer onto the coupling and tighten the<br />
quick release.<br />
Note:<br />
Please note the information provided in the user’s manual<br />
for the BOB trailer.<br />
<strong>Kettwiesel</strong> 4/<strong>10</strong> QuickStickNabe D-ENG<br />
<strong>10</strong>/<strong>10</strong>
Nutzung mit Weber Monoporter<br />
1. Richten Sie die Kupplung waagerecht aus und schrauben<br />
Sie sie mit 30 Nm an das Anschlussstück des <strong>Kettwiesel</strong>s<br />
fest.<br />
Achtung!<br />
Die Wippe muss fest angeschraubt sein.<br />
2. Schieben Sie die Distanzstücke (2) mit der kurzen Seite in<br />
das Rohr der Kupplung.<br />
3. Stecken Sie die Gewindestange (3) in die Kupplung.<br />
4. Stecken Sie auf jeder Seite ein Messingrohr mit dem<br />
Kunststoffanschlussstück (5) von Weber auf. Diese Teile<br />
sind nicht Bestandteil dieses Bausatzes.<br />
5. Stecken Sie die beiden kleinen M 6 Unterlegscheiben (4)<br />
auf die Enden der Gewindestange und schrauben Sie sie<br />
mit je einer M 6 Mutter (6) fest.<br />
6. Setzen Sie die Monoporter auf die Kupplung.<br />
Hinweis:<br />
Beachten Sie die Betriebsanleitung des Herstellers des<br />
Monoporters.<br />
Nutzung mit Weber-Kupplung für gerade Deichseln<br />
1. Richten Sie die Kupplung waagerecht aus und schrauben<br />
Sie sie mit 30 Nm an das Anschlusstück des <strong>Kettwiesel</strong>s<br />
fest.<br />
Achtung!<br />
Die Wippe muss fest angeschraubt sein,.<br />
2. Schrauben Sie von der handelsüblichen Weberkupplung<br />
E oder EL (nicht im Lieferumfang der Universalkupplung<br />
enthalten) die Verbindungsplatte ab.<br />
3. Setzen Sie die Weberkupplung (1) in die mittlere Bohrung<br />
der Universalkupplung und schrauben Sie sie auf die gleiche<br />
Weise wie sie an der Verbindungsplatte angebracht<br />
war fest. Achten Sie darauf, dass sich die Erhebungen auf<br />
der Kunststoffscheibe in der Nut der Weberkupplung<br />
befinden.<br />
Achtung!<br />
Diese Kupplung eignet sich nur für Anhänger mit geraden<br />
Deichseln. Bei Anhängern mit gebogenen Deichseln ist<br />
das Fahren in Linkskurven stark eingeschränkt, da die<br />
gebogenen Deichseln an das linke Hinterrad des Kett-<br />
4<br />
1<br />
3<br />
2<br />
For use with a Weber Monoporter<br />
1. Position the hitch so that it is level and screw it to the<br />
attachment plate of the <strong>Kettwiesel</strong> frame with a torque of<br />
30 Nm (22 ft-lbs).<br />
Caution!<br />
The hitch must be screwed on tightly.<br />
2. Insert the short ends of the spacers (2) into the barrel of<br />
the coupling.<br />
3. Insert the threaded rod (3) through the coupling.<br />
4. Place a brass tube with the plastic adaptor (5) from<br />
the Weber trailer over each end. These parts are not<br />
included in this coupling assembly.<br />
5. Place the two small M6 washers (4) over the ends of the<br />
threaded rod and secure them with an M6 nut (6) on each<br />
end.<br />
6. Slide the Monoporter onto the coupling.<br />
Zubehör montieren<br />
Installing accessories<br />
Note:<br />
Please note the information provided in the user’s manual<br />
for the Monoporter.<br />
For use with a Weber coupling and straight<br />
drawbar<br />
1. Position the hitch so that it is level and screw it to the<br />
attachment plate of the <strong>Kettwiesel</strong> frame with a torque of<br />
30 Nm (22 ft-lbs).<br />
Caution!<br />
The hitch must be screwed on tightly.<br />
2. Remove the connecting plate of a commercially available<br />
Weber coupling type E or EL (not included in the universal<br />
coupling assembly).<br />
3. Insert the Weber coupling (1) into the middle hole of the<br />
universal coupling and attach it in the same way it was attached<br />
to the connecting plate. Make sure that the projections<br />
on the plastic washer are positioned in the groove<br />
of the Weber coupling.<br />
Caution!<br />
This coupling is only appropriate for trailers with straight<br />
drawbars. When pulling a trailer with a curved drawbar,<br />
the turning circle for left turns is severely limited because<br />
the curved drawbar bumps against the left rear wheel of<br />
<strong>Kettwiesel</strong> 4/<strong>10</strong> QuickSTickNabeD-ENG 27<br />
<strong>10</strong>/<strong>10</strong><br />
2<br />
5<br />
5<br />
4<br />
6<br />
6
Zubehör montieren<br />
Installing accessories<br />
28<br />
wiesels stößt. Unfallgefahr! Verwenden Sie für gebogene<br />
Deichseln nur den dafür vorgesehenen Adapter (2).<br />
Nutzung mit Weber-Kupplung für gebogene<br />
Deichseln<br />
Um den Wendekreis in Linkskurven gering zu halten, empfehlen<br />
wir Ihnen bei Nutzung der (üblichen) gebogenen Deichsel,<br />
diesen Adapter zu nutzen.<br />
Diesen Adapter können Sie separat oder in Verbindung mit<br />
der Universalkupplung verwenden.<br />
1. Setzen Sie den Adapter für die Weberkupplung auf das<br />
Anschlussstück am Rahmen des <strong>Kettwiesel</strong>s und schrauben<br />
Sie ihn mit 30 Nm mittels zwei Schrauben M 8 und<br />
zwei selbstsichernden Muttern fest.<br />
2. Setzen Sie die Weberkupplung (1) in die mittlere Bohrung<br />
des Adapters und schrauben Sie sie auf die gleiche Weise<br />
wie sie an der Verbindungsplatte angebracht war fest.<br />
Achten Sie darauf, dass sich die Erhebungen auf der<br />
Kunststoffscheibe in der Nut der Weberkupplung befinden.<br />
Hinweis:<br />
Sie können den Adapter auch in Verbindung mit der Universalkupplung<br />
nutzen. Dann müssen Sie längere M 8<br />
Schrauben verwenden.<br />
Achtung!<br />
Die Wippe muss fest angeschraubt sein.<br />
2<br />
1<br />
2<br />
1<br />
2<br />
1<br />
the <strong>Kettwiesel</strong>. Danger of accident! For curved drawbars,<br />
only use the adapter (2) that has been specially designed<br />
for this purpose.<br />
For use with a Weber coupling and curved<br />
drawbar<br />
In order to keep the turning circle for left turns small, we recommend<br />
using this adapter for the attachment of (standard)<br />
curved drawbars.<br />
This adapter can be used separately or in connection with the<br />
universal coupling.<br />
1. Place the Weber coupling adapter on the attachment<br />
plate of the <strong>Kettwiesel</strong> frame and attach it by means of<br />
the two M8 bolts and self-locking nuts with a torque of 30<br />
Nm (22 ft-lbs).<br />
2. Insert the Weber coupling (1) into the hole of the adapter<br />
(2) and attach it in the same way it was attached to the<br />
connecting plate. Make sure that the projections on the<br />
plastic washer are positioned in the groove of the Weber<br />
coupling.<br />
Note:<br />
The adapter can also be used together with the universal<br />
coupling. In this case, you must use longer M8 bolts.<br />
Caution!<br />
The hitch must be screwed on tightly.<br />
<strong>Kettwiesel</strong> 4/<strong>10</strong> QuickStickNabe D-ENG<br />
<strong>10</strong>/<strong>10</strong>