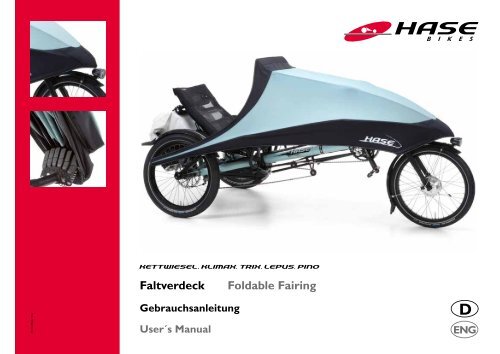
Faltverdeck Foldable Fairing - Hase Bikes
Faltverdeck Foldable Fairing - Hase Bikes
Faltverdeck Foldable Fairing - Hase Bikes

Sie wollen auch ein ePaper? Erhöhen Sie die Reichweite Ihrer Titel.
YUMPU macht aus Druck-PDFs automatisch weboptimierte ePaper, die Google liebt.
FV D-ENG 1/12<br />
KETTWIESEL, KLIMAX, TRIX, LEPUS, PINO<br />
<strong>Faltverdeck</strong> <strong>Foldable</strong> <strong>Fairing</strong><br />
Gebrauchsanleitung<br />
User´s Manual<br />
D<br />
ENG
Regenponcho (Zubehör)<br />
Rain Poncho (optional)<br />
Windabrisskante<br />
Wind deflector<br />
Seitliche Befestigung<br />
Side mount<br />
Aufgespanntes Verdeck<br />
Mounted fairing<br />
Gefaltetes Verdeck<br />
Folded fairing<br />
Rückspiegel<br />
Rearview mirror<br />
Gestänge<br />
Frame<br />
Stangengelenke<br />
Frame joints<br />
Vordere Befestigung<br />
Front mount<br />
Seitliche Befestigung<br />
Side mount
Inhalt Contents<br />
Lieferumfang und Zubehör .......................................................2<br />
Sicherheitshinweise....................................................................3<br />
Gebrauchsanweisung beachten ..................................................................... 3<br />
Verwendete Symbole und Warnungen ....................................................... 3<br />
Verwendungszweck ......................................................................................... 3<br />
Montage und Einstellung ................................................................................. 3<br />
Benutzung des Regenponchos ...................................................................... 3<br />
Fahren bei Wind............................................................................................... 4<br />
Parken bei Wind .............................................................................................. 4<br />
Sichtbar sein für andere .................................................................................. 4<br />
Öffnen des <strong>Faltverdeck</strong>s ................................................................................. 4<br />
Bevor Sie losfahren... ....................................................................................... 4<br />
Technischer Zustand ....................................................................................... 4<br />
Montage ......................................................................................5<br />
Montage am Kettwiesel, Klimax und Trix .................................................. 5<br />
Seitliche Befestigung montieren .........................................................................5<br />
Vordere Befestigung montieren .............................................................................6<br />
Langes Schutzblech für 20“ Rad montieren ............................................................7<br />
Zweites Schutzblech für 16“ Rad montieren (Trix und Lepus Comfort) ........8<br />
Spritzschutz montieren ................................................................................................9<br />
Tasche anbringen ........................................................................................................ 10<br />
Montage am Lepus .........................................................................................11<br />
Seitliche Befestigung montieren .............................................................................. 11<br />
Vordere Befestigung montieren .............................................................................. 11<br />
Langes Schutzblech für 20“ Rad montieren ......................................................... 11<br />
Langes Schutzblech für 16“ Rad montieren ......................................................... 11<br />
Montage am Pino ...........................................................................................12<br />
Seitliche Befestigung montieren .............................................................................. 12<br />
Vordere Befestigung montieren .............................................................................. 12<br />
Lampenhalterung an Pino montieren ..................................................................... 14<br />
Rund ums Fahren .....................................................................15<br />
<strong>Faltverdeck</strong> anbringen ...................................................................................15<br />
Ausrichten des <strong>Faltverdeck</strong>s........................................................................18<br />
Höhe der Windabrisskante einstellen .......................................................19<br />
Ein- und Ausstiegen. ......................................................................................21<br />
Regenponcho anbringen ...............................................................................22<br />
Regenponcho an kleine Personen anpassen ............................................24<br />
Reinigung und Lagerung des <strong>Faltverdeck</strong>s ................................................27<br />
Scope of delivery and optional Accessories ............................2<br />
Safety information .....................................................................3<br />
Read User’s Manual ......................................................................................... 3<br />
Symbols used for notes and warnings ......................................................... 3<br />
Intended use ...................................................................................................... 3<br />
Mounting and adjustment ............................................................................... 3<br />
Use of the Rain Poncho .................................................................................. 3<br />
Riding in windy conditions ............................................................................. 4<br />
Parking in windy conditions ........................................................................... 4<br />
Being visible for others ................................................................................... 4<br />
Caution when opening the <strong>Foldable</strong> <strong>Fairing</strong> .............................................. 4<br />
Before each ride ............................................................................................... 4<br />
Technical condition ......................................................................................... 4<br />
Mounting the fairing mounts ....................................................5<br />
Mounting the fairing mounts: Kettwiesel, Klimax, and Trix .................. 5<br />
Mounting the side mounts ...................................................................................5<br />
Mounting the front mount ..........................................................................................6<br />
Mounting the long fender to a 20” wheel ................................................................7<br />
Mounting a second fender for the 16” wheel (Trix and Lepus Comfort) .......8<br />
Mounting the splash guard ..........................................................................................9<br />
Mounting the <strong>Fairing</strong> Bag .......................................................................................... 10<br />
Mounting the fairing mount: Lepus ............................................................11<br />
Mounting the side mounts ........................................................................................ 11<br />
Mounting the front mount ....................................................................................... 11<br />
Mounting the long fender for a 20” wheel ........................................................... 11<br />
Mounting a second fender for a 16” wheel ......................................................... 11<br />
Mounting the fairing mount: Pino ...............................................................12<br />
Mounting the side mounts ........................................................................................ 12<br />
Mounting the front mount ....................................................................................... 12<br />
Mounting the headlight mount to the Pino ......................................................... 14<br />
Riding with the <strong>Foldable</strong> <strong>Fairing</strong> .............................................15<br />
Mounting the <strong>Foldable</strong> <strong>Fairing</strong> .....................................................................15<br />
Adjusting the <strong>Foldable</strong> <strong>Fairing</strong> .....................................................................18<br />
Adjusting wind deflector height ..................................................................19<br />
Mounting and dismounting .........................................................................21<br />
Attaching the Rain Poncho ..........................................................................22<br />
Adapting the Rain Poncho for smaller riders ..........................................24<br />
Removing the <strong>Foldable</strong> <strong>Fairing</strong> ....................................................................27<br />
Cleaning and storing the <strong>Foldable</strong> <strong>Fairing</strong> ................................................27<br />
FV-D-ENG 1/12 1
2<br />
Lieferumfang und Zubehör Scope of delivery and optional<br />
Accessories<br />
Spritzschutz<br />
Splash guard<br />
Vordere Befestigung<br />
Front mount<br />
Kettwiesel, Klimax, Trix<br />
Seitliche Befestigung<br />
Side mounts<br />
2 x<br />
Regenponcho<br />
(Zubehör)<br />
Rain Poncho<br />
(optional)<br />
Langes Schutzblech<br />
16 oder 20“<br />
Long fender, 16 or 20”<br />
Tasche<br />
(Zubehör)<br />
<strong>Fairing</strong> Bag (optional)<br />
<strong>Faltverdeck</strong><br />
<strong>Foldable</strong> <strong>Fairing</strong><br />
Vordere Befestigung<br />
Front mount<br />
Lampenhalter<br />
Headlight mount<br />
Pino<br />
2 x<br />
Seitliche Befestigung<br />
Side mounts<br />
2x<br />
Lepus<br />
Langes Schutzblech 16 oder 20“<br />
Long fender, 16 or 20”<br />
Vordere Befestigung<br />
Front mount<br />
Seitliche Befestigung<br />
Side mounts<br />
Regenponcho (Zubehör)<br />
Rain Poncho (optional)<br />
FV-D-ENG 1/12
Sicherheitshinweise<br />
Gebrauchsanweisung beachten<br />
Lesen Sie diese Gebrauchsanleitung sorgfältig und machen<br />
Sie sich mit dem <strong>Faltverdeck</strong> praktisch vertraut. Beachten Sie<br />
ebenfalls die Gebrauchsanleitung des jeweiligen Fahrzeugs.<br />
Verwendete Symbole und Warnungen<br />
Achtung!<br />
Dieses Symbol weist auf eine mögliche Gefahr für<br />
Leben und Gesundheit hin, falls entsprechende<br />
Handlungsaufforderungen nicht befolgt werden.<br />
Hinweis:<br />
Dieses Symbol gibt Informationen und Tipps zur<br />
Handhabung und Umgang mit dem Fahrzeug.<br />
Verwendungszweck<br />
Das <strong>Faltverdeck</strong> darf nur an den <strong>Hase</strong>-Trikes: Klimax, Kettwiesel,<br />
Trix und Lepus sowie an dem Stufentandem Pino verwendet<br />
werden. Die Benutzung in Verbindung mit anderen<br />
Fahrzeugen ist nicht erlaubt. Für eventuelle Schäden übernehmen<br />
wir keine Haftung.<br />
Montage und Einstellung<br />
Ihr Fachhändler hat das <strong>Faltverdeck</strong> montiert und auf Ihre<br />
Körpergröße eingestellt. Wie das <strong>Faltverdeck</strong> für einen anderen<br />
Fahrer angepasst werden soll, lesen Sie im Kapitel: „Höhe<br />
der Windabrisskante einstellen“, Seite 19.<br />
Sollten Sie das <strong>Faltverdeck</strong> selbst montieren, beachten Sie die<br />
Montageanleitung. Beim Fahren mit dem <strong>Faltverdeck</strong>, darf die<br />
Sicht und die Bewegungsfreiheit der Lenkung nicht eingeschränkt<br />
werden. Lenkung und Bremsen müssen frei zugänglich<br />
sein.<br />
Benutzung des Regenponchos<br />
Bei Benutzung des als Zubehör erhältlichen Regenponchos<br />
müssen die Bewegungsfreiheit des Oberkörpers und der Arme,<br />
vor allem bei Handzeichen für Richtungswechsel und für<br />
den „Schulterblick“ gewährleistet sein. Achten Sie darauf, dass<br />
das Rücklicht durch den Regenponcho nicht verdeckt wird.<br />
Bei einem sehr kurz eingestellten Kettwiesel, Trix oder Klimax<br />
ist es wahrscheinlich, dass der Regenponcho das Rücklicht<br />
verdeckt. So dürfen Sie auf keinen Fall fahren. Suchen Sie<br />
Ihre Fachwerkstatt auf, um den Regenponcho anzupassen.<br />
Safety information<br />
Read User’s Manual<br />
Read this User’s Manual carefully, and familiarize yourself with<br />
the construction and function of the <strong>Foldable</strong> <strong>Fairing</strong>. It’s also<br />
important to read and observe all safety, installation, and operating<br />
instructions in the User’s Manual for the bike or trike<br />
with which the fairing is being used.<br />
Symbols used for notes and warnings<br />
Caution!<br />
This symbol indicates that there is a risk to life and<br />
health if the respective instructions are not followed.<br />
Note:<br />
This symbol is used for information and tips on the<br />
handling and use of the vehicle.<br />
Intended use<br />
The <strong>Foldable</strong> <strong>Fairing</strong> can only be used with the <strong>Hase</strong> trikes Klimax,<br />
Kettwiesel, Trix, and Lepus and semi-recumbent tandem<br />
Pino. The use of the <strong>Foldable</strong> <strong>Fairing</strong> with other vehicles is prohibited.<br />
<strong>Hase</strong> assumes no liability for any consequential damage.<br />
Mounting and adjustment<br />
Your authorized <strong>Hase</strong> retailer has mounted the <strong>Foldable</strong> <strong>Fairing</strong><br />
and adjusted it to your height. See section “Adjusting wind<br />
deflector height” on page 19 for instructions on adjusting the<br />
fairing to another rider.<br />
If you are mounting the <strong>Foldable</strong> <strong>Fairing</strong> yourself, be sure to<br />
follow the mounting instructions in this manual. When mounted,<br />
the <strong>Foldable</strong> <strong>Fairing</strong> should in no way restrict the rider’s<br />
vision or the movement of the steering controls. The handlebar<br />
grips and brake levers must remain freely accessible.<br />
Use of the Rain Poncho<br />
When using the optional Rain Poncho, be sure that it does<br />
not in any way restrict movement of the torso and arms and,<br />
above all, that it is still possible to make the necessary hand<br />
signals and turn your head for looking over your shoulder.<br />
Check that the Rain Poncho is not covering the taillight.<br />
If a Kettwiesel, Trix, or Klimax is adjusted for very short riders,<br />
the Rain Poncho will probably hang in front of the taillight.<br />
In this case, do not, under any circumstances, ride the<br />
trike with the Rain Poncho. Ask a qualified bicycle mechanic<br />
to adjust the Rain Poncho accordingly.<br />
FV-D-ENG 1/12 3
Sicherheitshinweise<br />
Safety information<br />
Fahren bei Wind<br />
Ein Fahrrad mit einem <strong>Faltverdeck</strong> bietet dem Wind eine größere<br />
Angriffsfläche an. Deshalb kann sich das Fahrverhalten<br />
bei Wind verändern. Vor allem beim Pino könnte eine Windböe<br />
das Fahrrad anheben, versetzen oder sogar umstoßen.<br />
Fahren Sie daher nicht bei Sturm.<br />
Parken bei Wind<br />
Bei starkem Wind empfehlen wir das <strong>Faltverdeck</strong> zum<br />
Parken abzunehmen, damit das Fahrrad nicht umkippt oder<br />
wegrollt. Wenn Sie das <strong>Faltverdeck</strong> nicht abnehmen, müssen<br />
Sie sicherstellen, dass das Fahrrad nicht umkippen oder wegrollen<br />
kann.<br />
Bei einem sehr kurz eingestellten Kettwiesel, Trix oder Klimax<br />
lässt sich das Trike mit <strong>Faltverdeck</strong> nicht mehr aufrecht<br />
parken. Das <strong>Faltverdeck</strong> könnte sonst beschädigt werden.<br />
Sichtbar sein für andere<br />
Bei Regen sind die Sichtverhältnisse in der Regel geringer.<br />
Deshalb können Sie möglicherweise von anderen Verkehrsteilnehmern<br />
schlechter gesehen werden. Fahren Sie auch am<br />
Tage mit Licht, dieses erhöht die Aufmerksamkeit der anderen<br />
Verkehrsteilnehmer.<br />
Der Frontscheinwerfer darf andere Verkehrsteilnehmer nicht<br />
blenden. Unfallgefahr! Beachten Sie, dass vor allem hochwertige<br />
LED-Scheinwerfer sehr helle und weitreichende Lichtkegel<br />
erzeugen.<br />
Öffnen des <strong>Faltverdeck</strong>s<br />
Lösen Sie die seitliche Befestigung des <strong>Faltverdeck</strong>s nur vorsichtig.<br />
Das <strong>Faltverdeck</strong> könnte sich durch die Spannung des<br />
Gestänges plötzlich entfalten und möglicherweise Personen<br />
in der Nähe verletzen. Achten Sie darauf, dass sich keine Personen<br />
in unmittelbarer Nähe befinden.<br />
Bevor Sie losfahren...<br />
Kontrollieren Sie das <strong>Faltverdeck</strong> auf eine korrekte Befestigung.<br />
Ein nicht korrekt befestigtes <strong>Faltverdeck</strong> könnte sich<br />
während der Fahrt öffnen und Sie oder andere Verkehrsteilnehmer<br />
verletzen oder Unfälle verursachen.<br />
Technischer Zustand<br />
Fahren Sie stets nur mit einem technisch einwandfreien und<br />
korrekt befestigtem <strong>Faltverdeck</strong>. Führen Sie vor jeder Fahrt<br />
eine Sichtprüfung auf eventuelle Schäden durch.<br />
4<br />
Riding in windy conditions<br />
A bike or trike with a <strong>Foldable</strong> <strong>Fairing</strong> has a greater surface<br />
area, making it more susceptible to wind gusts. This can affect<br />
vehicle handling. A strong gust of wind could lift up the<br />
vehicle, push it into another lane, or even tip it over. The Pino<br />
with fairing is especially susceptible to high winds. For this<br />
reason, <strong>Hase</strong> strongly advises never to ride with the <strong>Foldable</strong><br />
<strong>Fairing</strong> in windy conditions.<br />
Parking in windy conditions<br />
In windy conditions, we recommend removing the <strong>Foldable</strong><br />
<strong>Fairing</strong> when parking your bike or trike outdoors. Otherwise,<br />
a gust of wind could tip over the vehicle or cause it to roll<br />
away. If you do not remove the <strong>Foldable</strong> <strong>Fairing</strong>, then be sure<br />
to secure the parked vehicle from tipping or rolling.<br />
A Kettwiesel, Trix, or Klimax that has been adjusted for a<br />
very short rider cannot be parked upright (on end) with a<br />
mounted <strong>Foldable</strong> <strong>Fairing</strong>, as this would damage the fairing.<br />
Being visible for others<br />
Visibility is generally poor in wet weather. Therefore, it may<br />
be more difficult for other road users to see you. <strong>Hase</strong> recommends<br />
riding with your lights on in wet weather to make it<br />
easier for other road users to see you.<br />
Be sure to adjust the headlight properly so that it does not<br />
blind other road users. Risk of accident! Keep in mind that<br />
high-quality LED headlights are especially bright and produce<br />
long beams of light.<br />
Caution when opening the <strong>Foldable</strong> <strong>Fairing</strong><br />
Use caution when releasing the catch on the side mount of<br />
the <strong>Foldable</strong> <strong>Fairing</strong>. The frame tension could cause the fairing<br />
to spring open, possibly injuring bystanders. Be sure that no<br />
one is standing near the fairing before you release the catch.<br />
Before each ride<br />
Check the <strong>Foldable</strong> <strong>Fairing</strong> to make sure it is mounted correctly.<br />
A fairing that has been improperly mounted could<br />
open during the ride and injure you or other road users or<br />
cause accidents.<br />
Technical condition<br />
The <strong>Foldable</strong> <strong>Fairing</strong> should only be used if it is in perfect<br />
technical condition and mounted properly. Before each trip,<br />
be sure to check the condition of the fairing and vehicle for<br />
possible faults or damage.<br />
FV-D-ENG 1/12
Montage<br />
Das <strong>Faltverdeck</strong> ist für die Trike-Modelle: Kettwiesel, Klimax,<br />
Trix und Lepus sowie für das Stufentandem Pino geeignet.<br />
Das Verdeck ist für alle Modelle gleich. Unterschiedlich ist die<br />
Befestigung am Fahrzeug. (Vergleiche Seite 2, Lieferumfang<br />
und Zubehör).<br />
Montage am Kettwiesel, Klimax und Trix<br />
Achtung!<br />
Die Montage erfordert je nach Fahrradmodell eventuell<br />
Spezialwerkzeug. Lassen Sie deshalb das <strong>Faltverdeck</strong> von<br />
einer Fachwerkstatt montieren und auf Ihre Körpergröße<br />
einstellen. Fehlerhafte Montage oder Einstellung können<br />
Unfälle verursachen.<br />
Seitliche Befestigung montieren<br />
1. Stecken Sie die Klemme (1) ca. 6 mm tief in die Nabe, so<br />
dass die Speichenköpfe im Inneren der Nabe sichtbar sind.<br />
Hinweis:<br />
Bei älteren Modellen mit Universalnaben benötigen Sie<br />
die Klemme mit dem Außendurchmesser 33,8 mm. Im<br />
Lieferumfang sind beide Klemmen enthalten (Seite 29).<br />
2. Ziehen Sie die Madenschraube (2) in der Klemme (1) mit<br />
einem Innensechskantschlüssel 3 mm fest.<br />
3. Stecken Sie den Lagerstab (3) mit den beiden Lagern und<br />
dem Sicherungsring (4) in die Klemme (1).<br />
4. Setzen Sie den Sicherungsring (4) mit Hilfe einer Sicherungsringzange<br />
in die Nut der Klemme (1).<br />
5. Stecken Sie die Kante des Schutzbleches in die Schutzblechklemme<br />
(5) und ziehen Sie die Schraube (7) leicht an.<br />
6. Setzen Sie die Strebe (6) auf den Lagerstab (3). Drehen<br />
Sie den Lagerstab (3) so, dass die Bohrungen mit dem<br />
Langloch in der Strebe übereinstimmen.<br />
7. Setzen Sie die Kappe (8) auf und schrauben Sie sie mit den<br />
mitgelieferten Senkschrauben mit einem Innensechskantschlüssel<br />
4 mm fest.<br />
8. Schrauben Sie die Schraube der Schutzblechklemme (7)<br />
mit einem Innensechskantschlüssel 4 mm fest.<br />
9. Gehen Sie bei der Montage der zweiten Befestigung<br />
genauso vor.<br />
5<br />
3<br />
7<br />
4<br />
4<br />
6<br />
FV-D-ENG 1/12 5<br />
3<br />
1<br />
2<br />
1<br />
8<br />
Mounting the fairing mounts<br />
The <strong>Foldable</strong> <strong>Fairing</strong> is intended for use with the trike models<br />
Kettwiesel, Klimax, Trix, and Lepus and the semi-recumbent<br />
tandem Pino. The fairing itself is identical for all models. The<br />
mounts with which the fairing is attached, however, differ for<br />
the various models. (See page 2, “Scope of delivery and optional<br />
accessories”.)<br />
Mounting the fairing mounts: Kettwiesel, Klimax,<br />
and Trix<br />
Caution!<br />
Special tools may be required, depending on the type of<br />
vehicle. Therefore, <strong>Hase</strong> recommends having a qualified<br />
bicycle mechanic mount the <strong>Foldable</strong> <strong>Fairing</strong> and adjust it<br />
to your height. An improperly mounted or adjusted fairing<br />
can cause accidents.<br />
Mounting the side mounts<br />
1. Insert the adapter (1) completely into the hub until the<br />
top edge of the adapter is approx. 6 mm from the surface<br />
of the hub. In this position, the spoke heads should be<br />
visible inside the hub.<br />
Note:<br />
For older models with universal hubs (instead of Quick<br />
Stick Hubs), you must use the adapter with an outer<br />
diameter of 33.8 mm. The <strong>Foldable</strong> <strong>Fairing</strong> comes with<br />
both adapters. (See page 29.)<br />
2. Tighten the set screw (2) in the adapter (1) using a 3mm<br />
Allen key.<br />
3. Insert the bearing pin (3) with the two bearings and circlip<br />
(4) into the adapter (1).<br />
4. Insert the circlip (4) into the groove of the adapter (1)<br />
using a pair of circlip pliers.<br />
5. Insert the edge of the fender into the fender clamp (5),<br />
and tighten the bolt (7) using light hand pressure.<br />
6. Position the end of the fender stay (6) over the bearing pin<br />
(3). Rotate the bearing pin (3) until the two holes in the<br />
bearing pin are lined up with the slot in the fender stay.<br />
7. Place the hubcap (8) over the end of the fender stay and<br />
attach it with the countersunk bolts using a 4mm Allen key.<br />
8. Tighten the bolt of the fender clamp (7) using a 4mm Allen<br />
key.<br />
9. Repeat this procedure for mounting the second side<br />
mount.
Montage<br />
Mounting<br />
Vordere Befestigung montieren<br />
Die vordere Befestigung für des <strong>Faltverdeck</strong> wird am Steuerrohr<br />
montiert. Dafür ist im Steuerrohr eine Bohrung (1) angebracht,<br />
die mit einem Aufkleber verdeckt ist. Sollten Sie eine<br />
Version des Rahmens ohne eine solche Bohrung besitzen, so<br />
lassen Sie das <strong>Faltverdeck</strong> von ihrer Fachwerkstatt fachgerecht<br />
anbringen.<br />
6<br />
Achtung!<br />
Zum Anbringen der vorderen Befestigung (2) ist eine<br />
Bohrung (1) im Steuerrohr notwendig. Diese Bohrung<br />
darf nur von einer Fachwerkstatt durchgeführt werden.<br />
Nicht fachgerecht durchgeführte Bohrung kann zur<br />
Beschädigung des Rahmens und damit zu schwerwiegenden<br />
Unfällen führen.<br />
1. Entfernen Sie die Schraube (3) aus der Ahead-Kappe (4)<br />
mit einem Innensechskanntschlüssel 4 mm.<br />
2. Entfernen Sie die Ahead-Kappe (4), das Lager (5) und<br />
ziehen Sie die Gabel (6) aus dem Steuerrohr nach unten.<br />
Gehen Sie dabei vorsichtig um, damit die Lenkanbindung<br />
(7) nicht beschädigt wird.<br />
3. Entfernen Sie den Aufkleber und setzen Sie die mitgelieferte<br />
Schraube (9) mit Unterlegscheibe (10) von Innen<br />
durch die Bohrung im Steuerrohr.<br />
4. Setzen Sie die vordere Befestigung (2) auf die Schraube<br />
und ziehen Sie die Schraube zunächst mit einem Innensechskantschlüssel<br />
mit Kugelkopf 4 mm handfest an.<br />
5. Richten Sie die vordere Befestigung (2) aus und ziehen Sie<br />
die Schraube (9) mit einem L-förmigen Innensechskantschlüssel<br />
4 mm fest.<br />
6. Bauen Sie die Gabel und den Steuersatz in umgekehrten<br />
Reihenfolge wieder ein. Ziehen Sie die Schraube (3) in der<br />
Ahead-Kappe so fest, dass die Lenkung frei beweglich, der<br />
Steuersatz jedoch spielfrei ist.<br />
2<br />
2<br />
1<br />
3<br />
4<br />
5<br />
9<br />
10<br />
6<br />
7<br />
Mounting the front mount<br />
The front mount (2) for the <strong>Foldable</strong> <strong>Fairing</strong> is mounted to<br />
the head tube. For this purpose, the head tube has a special<br />
hole (1), which is covered with a decal. If your head tube does<br />
not have this hole (e.g. earlier models), then the <strong>Foldable</strong><br />
<strong>Fairing</strong> must be professionally mounted by a qualified bicycle<br />
mechanic.<br />
Caution!<br />
A hole (1) in the head tube is required for mounting<br />
the front mount (2). This hole can only be drilled by a<br />
qualified bicycle mechanic. An improperly drilled hole<br />
can damage the frame, which can in turn lead to serious<br />
accidents.<br />
1. Remove the bolt (3) from the Aheadset cap (4) using a<br />
4mm Allen key.<br />
2. Remove the Aheadset cap (4), compression ring, and<br />
cartridge bearing (5), and pull the fork (6) out of the head<br />
tube from below. Take care not to damage the fork-steering<br />
rod connection (7).<br />
3. Remove the decal and insert the bolt (9) with washer (10)<br />
(included with the mounting hardware) through the hole<br />
from the inside of the head tube.<br />
4. Place the front mount (2) over the bolt, and tighten the<br />
bolt lightly using a 4mm ball-end Allen key.<br />
5. Adjust the front mount (2) to the correct position, and<br />
tighten the bolt (9) firmly using a 4mm L-shaped Allen key.<br />
6. Remount the fork and headset, following the instructions<br />
from steps 1 and 2 in the reverse order. Tighten the bolt<br />
(3) in the Aheadset cap until there is no play in the headset<br />
but the bearing can still move freely.<br />
FV-D-ENG 1/12
Langes Schutzblech für 20“ Rad montieren<br />
Damit Sie bei Regen trocken bleiben, sollte das vordere<br />
Schutzblech besonders lang und mit einem Spritzschutz ausgestattet<br />
sein. Außerdem kollidiert die Befestigung der vorderen<br />
Beleuchtung mit dem Regenverdeck. Deshalb sollte das vordere<br />
Schutzblech ersetzt werden. Auf dem langen Schutzblech<br />
ist die Lampenbefestigung weiter vorne angebracht, so dass<br />
genügend Platz zum Anbringen des Regenverdecks vorhanden<br />
ist.<br />
1. Lösen Sie die Schraube (1) in der A-Head-Kappe mit<br />
einem Innensechskantschlüssel 5 mm.<br />
2. Schrauben Sie die Schrauben (2) des vorhandenen Schutzbleches<br />
mit einem Innensechskantschlüssel 4 mm vom<br />
unteren Teil der Gabel ab.<br />
3. Schrauben Sie die Schraube (3) von der Mutter (4) mit<br />
einem Innensechskantschlüssel 5 mm und einem Gabelschlüssel<br />
10 mm am oberen Teil der Gabel ab.<br />
4. Nehmen Sie das Schutzblech (5) und auch die eventuell<br />
vorhandene Lampenbefestigung ab.<br />
5. Schrauben Sie das lange Schutzblech (6) mit der Schraube<br />
(3) und der Mutter (4) mit einem Innensechskantschlüssel<br />
5 mm und einem Gabelschlüssel 10 mm an das obere Teil<br />
der Gabel.<br />
6. Schrauben Sie die Schutzblechstreben (7) des langen<br />
Schutzbleches mit einem Innensechskantschlüssel 4 mm an<br />
das untere Teil der Gabel fest.<br />
7. Stecken Sie die mitgelieferten Schutzkappen (10) auf die<br />
Enden der Schutzbstreben (7).<br />
8. Stecken Sie die Schutzblechstreben (7) durch die Schrauben<br />
(8) und ziehen Sie die Muttern (9) mit einem Gabelschlüssel<br />
8 mm fest.<br />
9. Ziehen Sie die Schraube (1) in der A-Head-Kappe mit<br />
einem Innensechskantschlüssel 5 mm wieder fest.<br />
10<br />
8<br />
9<br />
7<br />
3<br />
3<br />
7<br />
FV-D-ENG 1/12 7<br />
1<br />
6<br />
4<br />
5<br />
1<br />
4<br />
2<br />
2<br />
Montage<br />
Mounting<br />
Mounting the long fender to a 20” wheel<br />
The headlight mount on the standard fender is too high for<br />
use with the front mount of the <strong>Foldable</strong> <strong>Fairing</strong>. Therefore,<br />
it must be replaced with the long fender that comes with the<br />
<strong>Foldable</strong> <strong>Fairing</strong>. This fender has a lower headlight mount and,<br />
when used in combination with the splash guard, ensures that<br />
the rider will stay dry in wet conditions.<br />
1. To remove the existing fender, unscrew the bolt (1) in<br />
the Ahead cap using a 5mm Allen key.<br />
2. Unscrew the bolts (2) of the fender stays from the fork<br />
ends using a 4mm Allen key.<br />
3. Unscrew the bolt (3) from the nut (4) on the upper fork<br />
using a 5mm Allen key and 10mm open-end wrench.<br />
4. Remove the fender (5) and any headlight mounting hardware.<br />
5. Attach the long fender (6) to the top of the fork with the<br />
bolt (3) and nut (4) using a 5mm Allen key and a 10mm<br />
open-end wrench.<br />
6. Screw the fender stays (7) of the long fender onto to the<br />
fork ends using a 4mm Allen key.<br />
7. Place the protective caps (10) over the top ends of the<br />
fender stays (7).<br />
8. Insert the ends of the fender stays (7) through the bolts<br />
(8), and tighten the nuts (9) using an 8mm open-end<br />
wrench.<br />
9. Tighten the bolt (1) in the Ahead cap using a 5mm Allen<br />
key.
Montage<br />
Mounting<br />
Zweites Schutzblech für 16“ Rad montieren (Trix und<br />
Lepus Comfort)<br />
Damit Sie bei Regen trocken bleiben, sollte das vordere<br />
Schutzblech besonders lang und mit einem Spritzschutz ausgestattet<br />
sein. Außerdem kollidiert die Befestigung der vorderen<br />
Beleuchtung mit dem Regenverdeck. Deshalb sollte das vordere<br />
Schutzblech mit einem zweiten ergänzt werden. Auf dem<br />
zweiten Schutzblech ist die Lampenbefestigung weiter vorne<br />
angebracht, so dass genügend Platz zum Anbringen des Regenverdecks<br />
vorhanden ist.<br />
1. Schrauben Sie die Schrauben (2) des vorhandenen Schutzbleches<br />
mit einem Innensechskantschlüssel 4 mm vom<br />
unteren Teil der Gabel ab.<br />
2. Schrauben Sie die Schraube (3) von der Mutter (4) mit<br />
einem Innensechskantschlüssel 5 mm und einem Gabelschlüssel<br />
10 mm am oberen Teil der Gabel ab.<br />
3. Nehmen Sie das Schutzblech (5) und auch die eventuell<br />
vorhandene Lampenbefestigung ab.<br />
4. Sägen Sie das vordere Teil des abgenommenen Schutzbleches<br />
(5) an der vorderen Gabelkante (8) ab.<br />
5. Schrauben Sie das zuvor abgesägte Schutzblech (5) zusammen<br />
mit dem zweiten Schutzblech (6) mit der Schraube<br />
(3) und der Mutter (4) mit einem Innensechskantschlüssel<br />
5 mm und einem Gabelschlüssel 10 mm an das obere Teil<br />
der Gabel.<br />
6. Schrauben Sie die Schutzblechstreben (7) beider Schutzbleche<br />
mit einem Innensechskantschlüssel 4 mm an das<br />
untere Teil der Gabel fest.<br />
8<br />
4<br />
4<br />
5<br />
8<br />
3<br />
7<br />
3<br />
2<br />
7<br />
6<br />
Mounting a second fender for the 16” wheel (Trix and<br />
Lepus Comfort)<br />
In order to keep the rider dry in rainy conditions, the front<br />
fender should be especially long and include a splashguard.<br />
Furthermore, the headlight mount collides with the fairing.<br />
Therefore, a second front fender should be mounted. The<br />
headlight mount is positioned further forward on the second<br />
fender, leaving sufficient space for the fairing mount.<br />
1. Using a 4mm Allen key, remove the bolts (2) that fasten<br />
the existing fender to the lower part of the fork.<br />
2. Using a 5mm Allen key and a 10mm open-end wrench,<br />
remove the bolt (3) from the nut (4) on the top part of<br />
the fork.<br />
3. Remove the fender (5) and the headlight mount, if applicable.<br />
4. Saw off the front section of the removed fender (5) at the<br />
front edge of the mount (8).<br />
5. Using a 5mm Allen key and a 10mm open-end wrench,<br />
fasten the rear section of the shortened fender (5), together<br />
with the second fender (6), to the top part of the<br />
fork with the bolt (3) and nut (4).<br />
6. Fasten the fender stays (7) of both fenders to the lower<br />
part of the fork, using a 4mm Allen key.<br />
FV-D-ENG 1/12
Spritzschutz montieren<br />
Der Spritzschutz ist für die Trike-Modelle Kettwiesel, Klimax<br />
und Trix geeignet und wird unter dem Sitz an fünf Punkten<br />
befestigt.<br />
Punkt A:<br />
1. Legen Sie den Spritzschutz (1) zwischen den Hauptrahmen<br />
(2) und das Kettenschutzrohr (3). Die Nähte des Spannbandes<br />
(4) müssen sich auf der Unterseite befinden.<br />
2. Legen Sie das Spannband (4) über das Kettenschutzrohr<br />
(3) und führen Sie das lose Ende in die Schnalle (5)<br />
ein.<br />
3. Ziehen Sie das Spannband fest, so dass der Spritzschutz<br />
(1) einen Bogen bildet.<br />
4. Heben Sie die Sitzbespannung (6) ab, legen Sie das Spannband<br />
(4) an die Sitzkante und klemmen Sie es mit der<br />
Sitzbespannung (6) fest.<br />
Achtung!<br />
Unfallgefahr. Der Spritzschutz muss so gespannt sein,<br />
dass die Bewegungsfreiheit der Lenkung nicht eingeschränkt<br />
wird.<br />
5. Kippen Sie das Trike nach hinten in Parkposition.<br />
Punkt B:<br />
6. Legen Sie das das Gummiband (7) um den Hauptrahmen<br />
(2) vor den Schrauben der Längenverstellung (8) und<br />
führen Sie die Schlaufe (9) über den Tanka (10).<br />
7. Ziehen Sie das lose Ende des Gummibandes, um den<br />
Spritzschutz zu spannen. Durch Drücken auf den Knopf<br />
(12) des Tankas lössen Sie die Spannung.<br />
Hinweis:<br />
Bei einer besonders kurzen Rahmenlänge, können Sie<br />
den Spritzschutz falten und das Gummiband an der<br />
dafür vorgesehenen Stange (13) befestigen.<br />
2<br />
1<br />
8<br />
7<br />
3<br />
D<br />
13<br />
6<br />
C<br />
A<br />
10 12<br />
9<br />
Montage<br />
Mounting<br />
FV-D-ENG 1/12 9<br />
B<br />
4<br />
A<br />
5<br />
Mounting the splash guard<br />
The splash guard can be used with the trike models Kettwiesel,<br />
Klimax, and Trix. It is mounted beneath the seat at five<br />
mounting points.<br />
Point A:<br />
1. Position the splash guard (1) between the main frame (2)<br />
and the chain tube (3), with the seams for the mounting<br />
strap (4) on the underside of the splash guard.<br />
2. Pull the mounting strap (4) over the chain tube (3), and<br />
thread the loose end through the buckle (5).<br />
3. Now tighten the mounting strap by pulling the loose end<br />
until the splash guard (1) arches downward.<br />
4. Lift the seat cover (6), lay the mounting strap (4) over<br />
the edge of the seat, and secure it by replacing the seat<br />
cover (6).<br />
Caution!<br />
Safety hazard: It is of upmost importance that the splash<br />
guard does not restrict the movement of the steering<br />
assembly.<br />
5. Tip the trike onto its rear wheels in the upright parking<br />
position.<br />
Point B:<br />
6. Stretch the elastic cord (7) around the main frame (2) in<br />
front of the bolts for frame-length adjustment (8), and pull<br />
the cordlock (10) through the loop (9).<br />
7. You can increase tension in the splash guard by pulling on<br />
the loose end of the elastic cord. By pressing the button<br />
(12) of the cordlock, you can reduce tension in the splash<br />
guard.<br />
Note:<br />
For frames that have been adjusted for especially short<br />
riders, you can fold the splash guard and attach the elastic<br />
cord to the special rod (13) intended for this purpose.
Montage<br />
Mounting<br />
Punkte C:<br />
8. Ziehen Sie den Spanngummi (14) um das Achsrohr und<br />
hängen Sie die Schlaufe um die Schraube (15) der Sitzstrebe.<br />
Achten Sie darauf, dass das Gummiband nicht an der<br />
Nabe oder der Antriebsschraube schleift.<br />
9. Wiederholen Sie den Vorgang auf der rechten Seite.<br />
Punkt D:<br />
10. Stecken Sie die beiden Teile der Steckschließe (16) unter<br />
dem Hauptrahmen zusammen.<br />
11. Ziehen Sie anschließend am Punkt B das Gummiband<br />
stramm.<br />
12. Vergewissern Sie sich, dass der Spritzschutz nirgendwo<br />
die Bewegungsfreiheit der Lenkung einschränkt. Ziehen<br />
Sie gegebenfalls die Schnalle (5) (Bild vorige Seite) unter<br />
der Sitzbespannung fester an.<br />
10<br />
Achtung!<br />
Unfallgefahr. Der Spritzschutz muss so gespannt sein,<br />
dass die Bewegungsfreiheit der Lenkung nicht eingeschränkt<br />
wird.<br />
Tasche anbringen<br />
In der als Zubehör erhältlichen Tasche können Sie bei Sonnenscheinfahrten<br />
das <strong>Faltverdeck</strong> unterbringen. Die Tasche<br />
selbst, wird an der Rückseite des Sitzgestells angebracht.<br />
1. Ziehen Sie die beiden Enden des Spanngurtes (1) durch<br />
das Gestell (2) und stecken Sie die beiden Teile der<br />
Schließe zusammen.<br />
2. Ziehen Sie den Spanngurt (1) stramm. Achten Sie darauf,<br />
dass das Ritzel nicht an der Tasche schleift.<br />
Hinweis:<br />
An der Rückseite des Sitzgestells lässt sich eine weitere<br />
Packtasche befestigen.<br />
14<br />
16<br />
1<br />
2<br />
15<br />
Points C:<br />
8. Pull the elastic band (14) around the axle tube, and hook<br />
the loop onto the screw (15) of the seat stay. Check to<br />
make sure that the elastic band cannot come in contact<br />
with the hub or the drive screw.<br />
9. Repeat Step 8 on the other side.<br />
Point D:<br />
10. Close the plastic buckle (16) beneath the main frame.<br />
11. Then tighten the elastic cord at Point B.<br />
12. Check to make sure that the mounted splash guard does<br />
not restrict steering. If necessary, tighten the strap (4,<br />
page 8) under the seat cover.<br />
Caution!<br />
Safety hazard: It is of upmost importance that the splash<br />
guard does not restrict the movement of the steering<br />
assembly.<br />
Mounting the <strong>Fairing</strong> Bag<br />
On sunny trips, the <strong>Foldable</strong> <strong>Fairing</strong> can be stowed in the optional<br />
<strong>Fairing</strong> Bag. The bag itself is mounted behind the seat to<br />
the seat frame.<br />
1. Pull both ends of the mounting strap (1) through the<br />
frame (2) as shown, and close the buckle.<br />
2. Tighten the mounting strap (1). Check to make sure that<br />
the bag cannot come in contact with the sprocket.<br />
Note:<br />
A pannier can be attached to the seat frame in addition<br />
to the <strong>Fairing</strong> Bag.<br />
FV-D-ENG 1/12
Montage am Lepus<br />
Achtung!<br />
Die Montage erfordert je nach Fahrradmodell eventuell<br />
Spezialwerkzeug. Lassen Sie deshalb das <strong>Faltverdeck</strong> von<br />
einer Fachwerkstatt montieren und auf Ihre Körpergröße<br />
einstellen. Fehlerhafte Montage oder Einstellung können<br />
zur gefährlichen Situationen führen.<br />
Seitliche Befestigung montieren<br />
Die Steckhülsen für die seitliche Befestigung des Regenverdecks<br />
werden an der Sitzstrebe angeschraubt.<br />
1. Halten Sie die Steckhülse (1) an die Sitzstrebe (2) oberhalb<br />
des Schnellspanners (5) der Sitzverstellung.<br />
2. Stecken Sie die mitgelieferte Unterlegscheibe (3) auf die<br />
Schraube (4) und schrauben Sie die Steckhülse (1) mit der<br />
Schraube (4) mit einem Innensechskantschlüssel 6 mm mit<br />
25 Nm an die Sitzstrebe (2) fest.<br />
Vordere Befestigung montieren<br />
Die Montage der vorderen Befestigung am Lepus gleicht der<br />
Montage der der vorderen Befestigung am Kettwiesel, Klimax<br />
und Trix auf Seite 6.<br />
Langes Schutzblech für 20“ Rad montieren<br />
Die Montage des langen Schutzbleches für das 20“ Vorderrad<br />
gleicht der Montage an Kettwiesel auf Seite 7.<br />
Langes Schutzblech für 16“ Rad montieren<br />
Die Montage des zweiten Schutzbleches für das 16“ Vorderrad<br />
gleicht der Montage an Trix und Lepus Comfort auf<br />
Seite 8.<br />
1<br />
5<br />
Montage<br />
Mounting<br />
FV-D-ENG 1/12 11<br />
2<br />
3<br />
4<br />
Mounting the fairing mount: Lepus<br />
Caution!<br />
Special tools may be required, depending on the type of<br />
vehicle. Therefore, <strong>Hase</strong> recommends having a qualified<br />
bicycle mechanic mount the <strong>Foldable</strong> <strong>Fairing</strong> and adjust it<br />
to your height. An improperly mounted or adjusted fairing<br />
can cause accidents.<br />
Mounting the side mounts<br />
The mounting sleeves for the attachment of the fairing are<br />
mounted to the seat stays.<br />
1. Hold the mounting sleeve (1) against the seat stay (2)<br />
above the quick-release (5) used for seat adjustment, as<br />
shown.<br />
2. Attach the mounting sleeve (1) to the seat stay (2) by inserting<br />
the bolt (4) with washer (3) through the seat stay,<br />
into the base of the sleeve and tightening with a 6mm<br />
Allen key using a torque of 25 Nm (18 ft-lbs).<br />
Mounting the front mount<br />
The front mount for the Lepus is mounted in the same way<br />
as the front mount for the Kettwiesel, Klimax, and Trix. See<br />
page 6 for instructions.<br />
Mounting the long fender for a 20” wheel<br />
For mounting the long fender to a 20” front wheel, follow the<br />
instructions on page 7 of the Kettwiesel User Manual.<br />
Mounting a second fender for a 16” wheel<br />
For mounting the second fender to a 16” wheel, follow the<br />
instructions on page 8.
Montage<br />
Mounting<br />
Montage am Pino<br />
12<br />
Achtung!<br />
Die Montage erfordert je nach Fahrradmodell eventuell<br />
Spezialwerkzeug. Lassen Sie deshalb das <strong>Faltverdeck</strong> von<br />
einer Fachwerkstatt montieren und auf Ihre Körpergröße<br />
einstellen. Fehlerhafte Montage oder Einstellung können<br />
zur gefährlichen Situationen führen.<br />
Seitliche Befestigung montieren<br />
Die Steckhülsen für die seitliche Befestigung des Regenverdecks<br />
werden an der Sitzstrebe angeschraubt.<br />
1. Halten Sie die Steckhülse (1) an die Sitzstrebe (2).<br />
2. Stecken Sie die mitgelieferte Unterlegscheibe (3) auf die<br />
Schraube (4) und schrauben Sie die Steckhülse (1) mit der<br />
Schraube (4) mit einem Innensechskantschlüssel 6 mm mit<br />
25 Nm an die Sitzstrebe (2) fest.<br />
Vordere Befestigung montieren<br />
Damit Sie die vordere Befestigung des <strong>Faltverdeck</strong>s montieren<br />
können, müssen Sie eine eventuell vorhandene Lampenhalterung<br />
und Beleuchtung entfernen. Montieren Sie stattdessen<br />
die dem <strong>Faltverdeck</strong> beiliegende Lampenhalterung (Seite 14).<br />
1. Führen Sie ein Stahlseil in einen der Seilspanner (7) ein.<br />
2. Positionieren Sie den Seilspanner oben auf dem Vorbau.<br />
Legen Sie das lose Ende des Stahlseils von oben um den<br />
Vorbau (8) und führen Sie es seitlich in den oberen Seilspanner<br />
(7) ein.<br />
3. Führen Sie das zweite Stahlseil in den zweiten Seil-<br />
spanner (9) ein.<br />
7<br />
3<br />
4<br />
7<br />
8<br />
2<br />
1<br />
Mounting the fairing mount: Pino<br />
Caution!<br />
Special tools may be required, depending on the type of<br />
vehicle. Therefore, <strong>Hase</strong> recommends having a qualified<br />
bicycle mechanic mount the <strong>Foldable</strong> <strong>Fairing</strong> and adjust it<br />
to your height. An improperly mounted or adjusted fairing<br />
can cause accidents.<br />
Mounting the side mounts<br />
The mounting assemblies for the attachment of the fairing are<br />
mounted to the seat stays.<br />
1. Hold the mounting sleeve (1) against the seat stay (2) as<br />
shown.<br />
2. Attach the mounting sleeve (1) to the seat stay (2) by<br />
inserting the bolt (4) with washer (3) through the seat<br />
stay into the base of the sleeve and tightening with a 6mm<br />
Allen key using a torque of 25 Nm (18 ft-lbs).<br />
Mounting the front mount<br />
Before the front fairing mount can be attached, all headlight<br />
mounts and lighting equipment must be removed. Replace the<br />
existing headlight mount with the headlight mounts included<br />
with the fairing. (See page 14).<br />
1. Insert one of the steel cables into one of the cable tensioners<br />
(7).<br />
2. Position the cable tensioner on top of the front boom<br />
(8) as shown. Then wrap the long end of the steel cable<br />
around the front boom (8), and insert the end of the<br />
cable into the opposite side of the cable tensioner (7) so<br />
that the ends overlap inside.<br />
3. Insert the other steel cable into the second cable tensioner<br />
(9).<br />
FV-D-ENG 1/12
4. Positionieren Sie den Seilspanner (9) auf der unteren Seite<br />
des Vorbaus. Legen Sie das lose Ende des Stahlseils von<br />
unten um den Vorbau (8) und führen Sie es seitlich in den<br />
unteren Seilspanner (9) ein. Achten Sie darauf, dass keine<br />
Leitungen am Vorbau eingeklemmt werden.<br />
5. Ziehen Sie alle Stahlseile stramm, so dass beide Seilspanner<br />
dicht am Vorbau anliegen. Ziehen Sie die Madenschrauben<br />
(13) an beiden Seilspannern fest.<br />
6. Führen Sie den Spannstab (10) in die Nase (11) ein. Achten<br />
Sie darauf, dass die Senkungen für die Schrauben (13)<br />
im Spannstab (10) in Fahrtrichtung zeigen und die seitliche<br />
Bohrung (12) der Nase (10) in Fahrtrichtung nach links<br />
zeigt.<br />
7. Führen Sie die beiden Schrauben (13) durch den Spannstab<br />
(10) und schrauben Sie sie abwechselnd in die Seilspanner<br />
(7 und 9) zunächst handfest ein. Durch Anziehen<br />
der oberen Schraube bewegt sich die Nase (11) nach<br />
oben, durch Anziehen der unteren Schraube nach unten.<br />
Richten Sie die Nase (11) bzw. die gesteckte Verlängerung<br />
horizontal zur Fahrbahn (Bild A) und mittig an den Vorbau<br />
aus. Ziehen Sie anschließend die beiden Schrauben (13)<br />
mit 15 Nm fest.<br />
Achtung!<br />
Um nachträglich den Winkel der Nase zu verstellen,<br />
lösen Sie erst die eine Schraube, bevor Sie die andere anziehen,<br />
da sonst das Stahlseil reißen oder die Schrauben<br />
aus dem Gewinde ausreißen könnten.<br />
A<br />
13<br />
11<br />
9<br />
10<br />
12<br />
Montage<br />
Mounting<br />
FV-D-ENG 1/12 13<br />
13<br />
8<br />
4. Position the cable tensioner underneath the front boom<br />
(8) as shown. Then wrap the long end of the steel cable<br />
around the front boom (8), and insert the end of the<br />
cable into the opposite side of the cable tensioner (9) so<br />
that the ends overlap inside. If there are any other cables<br />
on the front boom, be sure that these are not trapped<br />
between the steel cables and the front boom.<br />
5. Pull both steel cables tight, securing both cable tensioners<br />
firmly to the front boom. Tighten the set screws (13) in<br />
both cable tensioners.<br />
6. Insert the mounting pin (10) into the nose cone (11) as<br />
shown, positioning it so that the counterbored holes for<br />
the screws (13) are facing toward the front end of the<br />
nose cone. Then place the nose cone (11) with pin (10)<br />
against the front of the front boom with the hole (12)<br />
on the side of the nose cone facing left (from the rider’s<br />
perspective).<br />
7. Insert the two bolts (13) through the mounting pin (10),<br />
and screw them into the cable tensioners (7 and 9), alternating<br />
between the two bolts and tightening lightly. When<br />
the upper bolt is tightened, the nose cone (11) moves<br />
upward, and when the lower bolt is tightened, the nose<br />
cone moves downward. Position the nose cone (11) and/<br />
or the inserted extension rod horizontal to the ground<br />
(Fig. A) and centered on the front boom. Then tighten the<br />
two bolts (13) with a torque of 15 Nm (11 ft-lbs).<br />
Caution!<br />
When re-adjusting the angle of the nose cone after the<br />
bolts have been tightened, it is important to first loosen<br />
one of the bolts before tightening the other. Otherwise<br />
the steel cable could break, or the bolts could pull out of<br />
the threads.
Montage<br />
Mounting<br />
Lampenhalterung an Pino montieren<br />
Ersetzen Sie die Originalhalterung für den vorderen Scheinwerfer<br />
durch die beiliegende Lampenhalterung. Diese besteht<br />
aus zwei Haltern (1 und 2) mit Magnetverschlüssen, einem<br />
Bügel (3) und einem Befestigungsbinder (4). Der Bügel mit<br />
dem Scheinwerfer wird bei Fahrten ohne <strong>Faltverdeck</strong> auf den<br />
Halter an der Nase des Pinos (1), bei montiertem <strong>Faltverdeck</strong><br />
an den Halter (2) am Sechsachsengelenk gesteckt.<br />
1. Schrauben Sie den Halter (1) mit der Schraube (5) und der Mutter<br />
(6) an die Bohrung im Spannstab (7) so fest, dass der Halter<br />
leicht drehbar bleibt, damit später die Höhe des Lichtkegels<br />
einstellt werden kann. Schrauben Sie den zweiten Halter (2)<br />
entsprechend an die Bohrung im Sechsachsengelenk (8).<br />
2. Spannen Sie den Befestigungsbinder (4) um die Verlängerung.<br />
3. Entfernen Sie den Scheinwerfer von der Originalhalterung<br />
und schrauben Sie ihn auf die gleiche Weise an den Bügel (3).<br />
Je nach Baugröße muss der Scheinwerfer eventuell umgekehrt<br />
montiert werden (9).<br />
4. Ziehen Sie das Lichtkabel aus dem Pino Vorbau so weit<br />
heraus, dass es nicht unter Spannung steht, und stecken Sie<br />
den Bügel (3) mit dem Scheinwerfer an den Halter (2) am<br />
Sechsachsengelenk (8).<br />
5. Fahrten mit <strong>Faltverdeck</strong>: stecken Sie den Scheinwerfer an<br />
das Sechsachsengelenk und klippen Sie das Lichtkabel an den<br />
Befestigungsbinder (4). Fahrten ohne <strong>Faltverdeck</strong>: Stecken<br />
Sie den Scheinwerfer an die Nase des Pinos. Das zu lange<br />
Lichtkabel (10) wickeln Sie um den Bügel des Scheinwerfers.<br />
Scheinwerfer abnehmen: Ziehen Sie den Bügel (3) mit<br />
dem Scheinwerfer ein wenig nach vorne. Der Magnetverschluss<br />
gibt nach.<br />
Scheinwerfer anbringen: Klippen Sie den Bügel (3) mit dem<br />
Scheinwerfer von unten an den Halter mit Magnetverschluss.<br />
6. Richten Sie den Scheinwerfer so aus, dass der Lichtkegel die<br />
Fahrbahn ca. 5 -20 m vor dem Fahrrad ausleuchtet. Ziehen<br />
Sie alle Schrauben fest, damit sich diese Einstellung nicht<br />
selbsttätig verändern kann.<br />
14<br />
Achtung!<br />
Hochwertige LED-Scheinwerfer erzeugen sehr helle und<br />
weitreichende Lichtkegel. Der Scheinwerfer darf andere<br />
Verkehrsteilnehmer nicht blenden. Unfallgefahr!<br />
8<br />
3<br />
2<br />
3<br />
4<br />
1<br />
6<br />
7<br />
9<br />
5<br />
3<br />
10<br />
3<br />
Mounting the headlight mount to the Pino<br />
Replace the original headlight mount with the special mounts included<br />
with the <strong>Foldable</strong> <strong>Fairing</strong>. This mounting system consists of<br />
two mounts, (1) and (2), a bracket (3), and a cable strap (4). The<br />
bracket with the attached headlight is clipped to the mount on the<br />
nose of the Pino (1) when riding without the <strong>Foldable</strong> <strong>Fairing</strong> and<br />
to the six-axis joint when the <strong>Foldable</strong> <strong>Fairing</strong> is mounted.<br />
1. Attach the mount (1) to the lower hole of the mounting<br />
pin (7) with the bolt (5) and the nut (6), tightening the<br />
bolt just enough so that the mount remains slightly moveable<br />
for adjustment. Fasten the second mount (2) in the<br />
same way to the hole in the six-axis joint (8).<br />
2. Wrap the cable strap (4) around the extension rod as<br />
shown and tighten.<br />
3. Remove the headlight from the original mount and fasten it<br />
in the same way to the bracket (3). Depending on its size,<br />
the headlight may have to be mounted upside down (9).<br />
4. Pull a sufficient length of headlight cable out of the front<br />
boom of the Pino so that the cable is not under tension,<br />
and clip the bracket (3) with the attached headlight to the<br />
mount (2) on the six-axis joint (8).<br />
5. When riding with the fairing: snap the headlight into the<br />
mount on the six-axis joint, and clip the cable to the cable<br />
strap (4). When riding without the <strong>Foldable</strong> <strong>Fairing</strong>: snap the<br />
headlight into the mount on the nose of the Pino. Wrap the<br />
excess length of cable (10) around the headlight bracket.<br />
Removing the headlight: Pull the bracket (3) with headlight<br />
slightly forward until magnetic catch disengages.<br />
Attaching the headlight: Snap the bracket (3) with headlight<br />
from below onto the magnetic catch of the mount.<br />
6. Adjust the position of the headlight so that the beam of<br />
light illuminates the ground from approx. 5 to 20 meters<br />
(5-22 yards) in front of the bicycle. Tighten the bolt<br />
securely to ensure that the headlight remains in this position.<br />
Repeat for second mount.<br />
Caution!<br />
High-quality LED headlights are especially bright and produce<br />
long beams of light. Adjust the headlight properly so<br />
that it does not blind other road users. Risk of accident!<br />
FV-D-ENG 1/12
Rund ums Fahren<br />
<strong>Faltverdeck</strong> anbringen<br />
Das <strong>Faltverdeck</strong> ist für die Trike-Modelle: Kettwiesel, Klimax,<br />
Trix und Lepus sowie für das Stufentandem Pino geeignet.<br />
Das Verdeck ist für alle Modelle gleich. Unterschiedlich ist die<br />
seitliche Befestigung. Bei dem Stufentandem Pino ist zusätzlich<br />
vorne am Vorbau eine Verlängerung notwendig.<br />
1. Nur Lepus und Pino<br />
Drücken Sie den Knopf (3) am „Snap Button“ (4) und stecken<br />
Sie das Seitensteckrohr (1) in die Steckhülse (2) an<br />
der Sitzstrebe. Verdrehen Sie das Seitensteckrohr (1) so,<br />
dass der „Snap Button“ (4) in der Steckhülse (2) einrastet.<br />
2. Nur Pino<br />
Drücken Sie den Knopf (7) am „Snap Button“ (8) der<br />
Verlängerung (5) und stecken Sie die Verlängerung (5) in<br />
die montierte Nase (6) am vorderen Tretlager. Verdrehen<br />
Sie die Verlängerung (5) so, dass der „Snap Button“ (8) in<br />
der Nase (6) einrastet.<br />
Hinweis:<br />
Diese Verlängerung ist notwendig, damit beim Pino der<br />
vordere Mitfahrer genügend Beinfreiheit hat.<br />
5<br />
1<br />
3 4<br />
6<br />
7 8<br />
FV-D-ENG 1/12 15<br />
2<br />
Riding with the <strong>Foldable</strong> <strong>Fairing</strong><br />
Mounting the <strong>Foldable</strong> <strong>Fairing</strong><br />
The <strong>Foldable</strong> <strong>Fairing</strong> is intended for use with the trike models<br />
Kettwiesel, Klimax, Trix, and Lepus and the semi-recumbent<br />
tandem Pino. The fairing itself is identical for all models. The<br />
side mounts, however, differ for the various models. The<br />
front mount for the Pino requires an extension rod.<br />
1. Lepus and Pino only<br />
Compress the head (3) of the Snap Button (4); then insert<br />
the side-mount extension rod (1) into the mounting<br />
sleeve (2) on the seat stay. Rotate the extension rod (1)<br />
until the lower pin of the Snap Button (4) engages in the<br />
hole of the mounting sleeve (2).<br />
2. Pino only<br />
Compress the head (7) of the Snap Button (8) on the<br />
front-mount extension rod (5), and insert the extension<br />
rod (5) into the mounted nose cone (6) on the front bottom<br />
bracket. Rotate the extension rod (5) until the lower<br />
pin of the Snap Button (8) engages in the hole of the nose<br />
cone (6).<br />
Note:<br />
The extension rod is required for ensuring that the front<br />
rider has sufficient leg space.
Rund ums Fahren<br />
Riding with the <strong>Foldable</strong> <strong>Fairing</strong><br />
3. Alle Modelle<br />
Drücken Sie den Knopf am „Snap Button“ (9) des <strong>Faltverdeck</strong>s<br />
(10) und stecken Sie es in die montierte Nase (6)<br />
am Steuerlager des Trikes, bzw. beim Pino in die zuvor<br />
gesteckte Verlängerung (5). Verdrehen Sie die Stange des<br />
Regenverdecks (11) bis der „Snap Button“ (12) in der<br />
Nase (6) bzw. in der Verlängerung arretiert ist.<br />
4. Fächern Sie das <strong>Faltverdeck</strong> zu beiden Seiten auseinander<br />
(Bild A).<br />
5. Klappen Sie das <strong>Faltverdeck</strong> auf und setzen Sie sich anschließend<br />
auf das Fahrrad.<br />
16<br />
11 9<br />
6<br />
12<br />
10<br />
A<br />
3. All models<br />
Compress the head (9) of the Snap Button (12) in the<br />
mounting rod (11) of the <strong>Foldable</strong> <strong>Fairing</strong> (10), and insert<br />
the rod into the mounted nose cone (6) on the head tube<br />
of the trike or, for the Pino, into the end of the extension<br />
rod (5). Rotate the mounting rod (11) until the lower pin<br />
of the Snap Button (12) engages in the hole of the nose<br />
cone (6), or the extension rod (Pino).<br />
4. Hold the outer edges of the fairing frame, and spread the<br />
fairing apart as shown (Fig. A).<br />
5. Unfold the fairing, and sit down on the seat of the trike<br />
(or tandem).<br />
FV-D-ENG 1/12
6. Ziehen Sie das <strong>Faltverdeck</strong> zu sich hin.<br />
7. Schieben Sie auf beiden Seiten des <strong>Faltverdeck</strong>s die Rastbleche<br />
(13) auf die Befestigungsknöpfe (14) und rasten Sie<br />
sie ein.<br />
Hinweis:<br />
Bei Pino und Lepus befinden sich die Befestigungsknöpfe<br />
anders als im Bild dargestellt auf den Steckrohren unter<br />
dem Sitz.<br />
13<br />
14<br />
Rund ums Fahren<br />
Riding with the <strong>Foldable</strong> <strong>Fairing</strong><br />
6. Pull the fairing down over you.<br />
7. Guide the locking plate (13) on each side of the <strong>Foldable</strong><br />
<strong>Fairing</strong> over the respective mounting button (14) until the<br />
button engages in the locking plate.<br />
Note:<br />
The mounting buttons for the Pino and Lepus are located<br />
at the ends of the side-mount extension rods beneath the<br />
seat (not shown).<br />
FV-D-ENG 1/12 17
Rund ums Fahren<br />
Riding with the <strong>Foldable</strong> <strong>Fairing</strong><br />
Ausrichten des <strong>Faltverdeck</strong>s<br />
Nach dem Anbringen des <strong>Faltverdeck</strong>s werden wahrscheinlich<br />
noch Knitterfalten zu sehen sein. Das Material reagiert auf Umwelteinflüsse<br />
wie Hitze, Kälte und Feuchtigkeit. In feuchtem Zustand<br />
wird das <strong>Faltverdeck</strong> nicht so straff sitzen, wie im trockenen<br />
Zustand. Die Stoffhülle strafft sich jedoch, wenn sie einige Zeit aufgespannt<br />
ist. Sollte das <strong>Faltverdeck</strong> jedoch trotzdem nicht richtig<br />
gespannt sein, können Sie folgende Einstellungen vornehmen:<br />
Fehlende Spannung im oberen Stoffbereich lässt sich durch Verdrehen<br />
der gebogenen Stangen (Windabrisskante) ausgleichen.<br />
1. Lösen Sie mit einem Innensechskantschlüssel 4 mm die<br />
Klemmschrauben (1) an den Stangengelenken.<br />
2. Verdrehen Sie die Stangen (2) bis die Windabrisskante<br />
und das obere Stofffeld gleichmäßig gespannt sind.<br />
3. Ziehen Sie die Klemmschrauben (1) wieder fest.<br />
Sollte das Verdeck schief ausgerichtet sein, kontrollieren Sie,<br />
ob die vordere Befestigung sich in einer Linie mit dem Vorbau<br />
befindet.<br />
4. Lockern Sie gegebenenfalls die vordere Befestigung wie<br />
im Kapitel „Vordere Befestigung montieren“ Seite 6 oder<br />
Seite 10 (je nach Modell) beschrieben und richten Sie sie<br />
neu aus. Spannen Sie wieder das Stahlseil.<br />
Sollte die Windabrisskante nicht horizontal verlaufen, dann<br />
kontrollieren Sie die Lage der seitlichen Befestigungen.<br />
5. Stellen Sie gegebenfalls die seitlichen Befestigungen wie im<br />
Kapitel „Höhe der Windabrisskante einstellen“auf Seite<br />
17 neu ein.<br />
6. Kontrollieren Sie, ob die Rastbleche an beiden Seiten<br />
spannungsfrei einrasten und stellen Sie sie gegebenfalls<br />
neu ein. Siehe Kapitel „Höhe der Windabrisskante einstellen“<br />
auf Seite 18.<br />
Pino<br />
Sollte das Verdeck am Pino zu wenig Spannung haben, muss<br />
die vordere Befestigung nach unten gedreht werden.<br />
1. Lösen Sie die obere Schraube (3) mit einem Innensechskantschlüssel<br />
4 mm und merken Sie sich die Anzahl der<br />
Umdrehungen. Ziehen Sie untere Schraube (4) soweit<br />
an, wie Sie die obere gelöst haben. Wiederholen Sie den<br />
Vorgang so lange, bis das <strong>Faltverdeck</strong> gespannt ist.<br />
18<br />
3<br />
1<br />
4<br />
2<br />
Adjusting the <strong>Foldable</strong> <strong>Fairing</strong><br />
After you have mounted the <strong>Foldable</strong> <strong>Fairing</strong>, the fabric will<br />
probably still have wrinkles. The fabric reacts to environmental<br />
influences like heat, cold, and moisture. When wet, the<br />
fairing will not be stretched as taut as the dry fairing. However,<br />
the fabric will become more taut over time when mounted.<br />
The tension in the fabric can also be adjusted as follows:<br />
Inadequate tension in the upper fabric area can be corrected<br />
by rotating the ends of the bent frame rods (inside the wind<br />
deflector).<br />
1. Using a 4mm Allen key, loosen the clamp bolts (1) on the<br />
frame joints.<br />
2. Rotate the ends of the frame rods (2) outward until the<br />
wind deflector and upper fabric area are uniformly tensioned.<br />
3. Retighten the clamp bolts (1).<br />
If the fairing is not aligned correctly with the trike or tandem,<br />
check the alignment of the front mount.<br />
4. If necessary, loosen the front mount as described in the<br />
section “Mounting the front mount” on page 6 or page<br />
10 (depending on model), and correct the alignment. Retension<br />
the steel cable.<br />
If the upper edge of the wind deflector is not horizontal, then<br />
check the positioning of the side mounts.<br />
5. If necessary, reposition the side mounts as described in<br />
section “Adjusting wind deflector height” on page 17.<br />
6. Make sure that the locking plates on both sides of the<br />
fairing click easily onto the mounting buttons without<br />
jamming, and readjust if necessary. See section “Adjusting<br />
wind deflector height” on page 18.<br />
Pino<br />
If there is inadequate tension in a <strong>Foldable</strong> <strong>Fairing</strong> mounted to<br />
a Pino, the tip of the front mount must be lowered.<br />
1. Use a 4mm Allen key to loosen the upper bolt (3), keeping<br />
count of the number of rotations. Then tighten the<br />
lower bolt (4) by the same number of rotations. Repeat<br />
the process until there is adequate tension in the fairing<br />
fabric.<br />
FV-D-ENG 1/12
Höhe der Windabrisskante einstellen<br />
Das <strong>Faltverdeck</strong> ist so konstruiert, dass der Fahrtwind über<br />
den Kopf geführt wird. Je höher die Windabrisskante (1) eingestellt<br />
ist, desto weniger Wind hat man im Gesicht. Eine Einstellung<br />
für optimale Sicht ist, wenn die Windabrisskante (1)<br />
eine Linie mit den Gelenken (2) des <strong>Faltverdeck</strong>s bildet. Wird<br />
die Windabrisskante (1) um ca. 4 bis 5 cm höher eingestellt,<br />
so erhöht sich der Windschutz, die Sicht wird jedoch etwas<br />
eingeschränkt. Diese Einstellung sollten nur erfahrene Fahrer<br />
benutzen.<br />
Achtung!<br />
Die Windabrisskante darf nur so hoch eingestellt werden,<br />
dass noch gute Sicht gewährleistet ist. Einschränkungen<br />
der Sicht können zu Unfällen führen.<br />
Kettwiesel, Klimax, Trix<br />
1. Lösen Sie die beiden Schrauben (4) am Rastblech (3) auf<br />
beiden Seiten des Trikes mit einem Innensechskantschlüssel<br />
4 mm.<br />
2. Lösen Sie die Schraube der Schutzblechklemme (5) auf<br />
beiden Seiten des Trikes mit einem Innensechskantschlüssel<br />
4 mm.<br />
3. Verdrehen Sie die Schutzblechstreben (6), um die Höhe<br />
der Windabrisskante einzustellen. Verschieben Sie auch<br />
passend die Rastbleche (3) mit. Achten Sie darauf, dass<br />
die Windabrisskante horizontal verläuft und die Sicht<br />
ausreichend ist.<br />
4. Ziehen Sie die Schrauben der Schutzblechklemmen (5) mit<br />
einem Innensechskantschlüssel 4 mm wieder fest.<br />
5. Ziehen Sie die beiden Schrauben (4) am Rastblech mit<br />
einem Innensechskantschlüssel 4 mm wieder fest.<br />
5<br />
4<br />
3<br />
6<br />
2<br />
4<br />
Rund ums Fahren<br />
Riding with the <strong>Foldable</strong> <strong>Fairing</strong><br />
FV-D-ENG 1/12 19<br />
1<br />
Adjusting wind deflector height<br />
The <strong>Foldable</strong> <strong>Fairing</strong> is designed to direct the airstream over<br />
the rider’s head. The higher the top edge of the wind deflector<br />
(1), the less wind the rider will feel in his or her face. For<br />
optimal vision, the top edge of the wind deflector (1) should<br />
form a straight line with the rider’s eyes and the joints (2) of<br />
the <strong>Foldable</strong> <strong>Fairing</strong>. Raising the top edge of the wind deflector<br />
(1) by approx. 4 to 5 cm (1½-2”) increases wind protection<br />
but restricts the rider’s vision somewhat. This is not recommended<br />
for less experienced riders.<br />
Caution!<br />
The wind deflector should not obstruct the rider’s vision.<br />
Restricted vision can cause accidents.<br />
Kettwiesel, Klimax, and Trix<br />
1. Loosen the two bolts (4) on the locking plate (3) on each<br />
side of the trike using a 4mm Allen key.<br />
2. Loosen the bolt on the fender clamp (5) on each side of<br />
the trike using a 4mm Allen key.<br />
3. Adjust the height of the wind deflector by moving the<br />
fender stay (6) and sliding the fender clamp (5) to a higher<br />
or lower position on the fender. Slide the locking plate (3)<br />
into the appropriate position. Check to make sure that<br />
the upper edge of the wind deflector is horizontal and the<br />
rider’s vision is not obstructed.<br />
4. Retighten the bolts on the fender clamps (5) using a 4mm<br />
Allen key.<br />
5. Retighten the two bolts (4) on the locking plates using a<br />
4mm Allen key.
Rund ums Fahren<br />
Riding with the <strong>Foldable</strong> <strong>Fairing</strong><br />
Pino und Lepus<br />
1. Lösen Sie die Schrauben (4) im Rastblech (3) auf beiden<br />
Seiten des Pinos mit einem Innensechskantschlüssel 4 mm.<br />
2. Lösen Sie die Schrauben (5) der Steckhülse (6) auf beiden<br />
Seiten des Pinos mit einem Innensechskantschlüssel 6 mm.<br />
3. Verdrehen Sie die Steckhülsen (6), um die Höhe der<br />
Windabrisskante einzustellen. Verschieben Sie eventuell<br />
die Rastbleche mit. Achten Sie darauf, dass die Windabrisskante<br />
horizontal verläuft und die Sicht ausreichend<br />
ist.<br />
4. Ziehen Sie die Schrauben (5) der Steckhülsen (6) mit<br />
einem Innensechskantschlüssel 6 mm wieder fest.<br />
5. Ziehen Sie die beiden Schrauben (5) an den Rastblechen<br />
mit einem Innensechskantschlüssel 4 mm wieder fest.<br />
20<br />
3<br />
4<br />
6<br />
5<br />
Pino and Lepus<br />
1. Loosen the bolts (4) in the locking plate (3) on each side<br />
of the Pino using a 4mm Allen key.<br />
2. Loosen the bolts (5) in the mounting sleeve (6) on each<br />
side of the Pino using a 6mm Allen key.<br />
3. Rotate the mounting sleeves (6) in order to adjust the<br />
height of the wind deflector. If necessary, reposition the<br />
locking plates accordingly. Check to make sure that the<br />
upper edge of the wind deflector is horizontal and the<br />
rider’s vision is not obstructed.<br />
4. Retighten the bolts (5) in the mounting sleeves (6) using a<br />
6mm Allen key.<br />
5. Retighten the two bolts (4) on the locking plates using a<br />
4mm Allen key.<br />
FV-D-ENG 1/12
Ein- und Ausstiegen.<br />
1. Betätigen Sie beim Kettwiesel, Klimax, Trix und Lepus die<br />
Feststellbremse. Beim Pino sollte der hintere Fahrer das<br />
Fahrrad festhalten.<br />
2. Heben Sie leicht die Hülle des Stoffverdecks an, damit Sie<br />
das Rastblech (1) erreichen.<br />
Achtung!<br />
Lösen Sie vorsichtig die seitliche Befestigung des <strong>Faltverdeck</strong>s.<br />
Das <strong>Faltverdeck</strong> könnte sich durch die Spannung<br />
des Gestänges plötzlich entfalten und möglicherweise<br />
Personen in der Nähe verletzen. Achten Sie darauf, dass<br />
sich keine Personen in unmittelbarer Nähe befinden.<br />
3. Ziehen Sie den schwarzen Hebel (2) nach oben. Der<br />
Klemmmechanismus rastet aus. Heben Sie nun die gelöste<br />
Seite des Verdecks nach oben.<br />
4. Setzen Sie sich auf den Sitz.<br />
5. Führen Sie die gelöste Seite des <strong>Faltverdeck</strong>s nach unten<br />
und rasten Sie das Rastblech ein.<br />
Hinweis:<br />
Damit sich der Verschluss leicht einrasten lässt, muss<br />
das Rastblech möglichst parallel zum Messingknopf<br />
eingeführt werden. Tragen Sie bei Bedarf dünn Vaseline<br />
auf das Rastblech auf.<br />
6. Vergewissern Sie sich, dass die Befestigung des <strong>Faltverdeck</strong>s<br />
fest sitzt. Richten Sie eventuell den Rückspiegel neu<br />
aus.<br />
Achtung!<br />
Kontrollieren Sie das <strong>Faltverdeck</strong> auf eine korrekte<br />
Befestigung, damit es sich während der Fahrt nicht öffnen<br />
kann. Ein loses <strong>Faltverdeck</strong> kann zu Unfällen führen.<br />
Achtung!<br />
Die Windabrisskante darf nicht zu hoch eingestellt sein<br />
und die Sicht nicht einschränken.<br />
7. Jetzt können Sie losfahren.<br />
Zum Aussteigen gehen Sie umgekehrt vor.<br />
3<br />
1<br />
2<br />
Rund ums Fahren<br />
Riding with the <strong>Foldable</strong> <strong>Fairing</strong><br />
Mounting and dismounting<br />
1. With a Kettwiesel, Klimax, Trix, or Lepus, engage the<br />
parking brake before mounting. For a Pino, the rear rider<br />
should brace the tandem for the front rider to mount.<br />
2. Lift up the fairing fabric slightly in order to access the<br />
locking plate (1).<br />
Caution!<br />
Use caution when releasing the catch on the side mount<br />
of the <strong>Foldable</strong> <strong>Fairing</strong>. The frame tension could cause<br />
the fairing to spring open, possibly injuring bystanders. Be<br />
sure that no one is standing near the fairing before you<br />
release the catch.<br />
3. Pull up on the black release (2). The clamping mechanism<br />
will disengage. Then raise the free side of the fairing.<br />
4. Sit down on the seat.<br />
5. Pull down the free side of the fairing and re-engage the<br />
locking plate.<br />
Note:<br />
The locking plate must be guided onto the brass mounting<br />
button as directly as possible so that the catch does<br />
not jam. Apply a thin layer of Vaseline to the locking<br />
plate at regular intervals, as necessary.<br />
6. Check to make sure that the fairing is securely mounted.<br />
If necessary, adjust the rearview mirror.<br />
Caution!<br />
Check the <strong>Foldable</strong> <strong>Fairing</strong> to make sure it is mounted securely.<br />
A loose fairing can come open while you are riding<br />
and cause accidents.<br />
Caution!<br />
Check to make sure that the wind deflector is not too<br />
high and does not obstruct the rider’s vision.<br />
7. Now you are ready to ride.<br />
Follow these instructions in the reverse order for dismounting.<br />
FV-D-ENG 1/12 21
Rund ums Fahren<br />
Riding with the <strong>Foldable</strong> <strong>Fairing</strong><br />
Regenponcho anbringen<br />
Bevor Sie den Regenponcho anbringen können, müssen Sie<br />
noch die Köpfe der Tenax-Verschlüsse montieren. Diese werden<br />
am Gestänge in der Nähe der Windabrisskante montiert.<br />
1. Stecken Sie die mitgelieferten Schellen (1) auf das Gestänge.<br />
2. Schrauben Sie die „Tenax“-Köpfe (2) in das Gewinde in<br />
den Schellen mit einem Gabelschlüssel 8 mm ein.<br />
3. Lösen Sie eine der seitlichen Arretierungen des <strong>Faltverdeck</strong>s<br />
(siehe Kapitel „Ein- und aussteigen“, Seite 19).<br />
4. Ziehen Sie die Schlaufe (1) des Regenponchos über das<br />
Ende des Gestänges.<br />
5. Ziehen Sie die zweite Schlaufe des Regenponchos über<br />
das Ende des Gestänges auf der anderen Seite.<br />
4. Befestigen Sie die Gummibänder (2) mit den Haken (3) an<br />
dem Gestänge vor dem Gelenk.<br />
22<br />
3<br />
2<br />
1<br />
1<br />
2<br />
Attaching the Rain Poncho<br />
Before you can attach the Rain Poncho for the first time,<br />
you must mount the studs of the Tenax fasteners. These are<br />
mounted to the frame of the <strong>Foldable</strong> <strong>Fairing</strong>, near the wind<br />
deflector.<br />
1. Attach the mounting clips (1) to the frame rods.<br />
2. Screw the “Tenax” studs (2) into the threaded holes in<br />
the clips using an 8mm open-end wrench.<br />
3. Release the catch on one side of the <strong>Foldable</strong> <strong>Fairing</strong> (see<br />
section “Mounting and dismounting” om page 19).<br />
4. Pull the respective Rain Poncho tab (1) over the end of<br />
the longest frame rod.<br />
5. Pull the second tab of the Rain Poncho over the end of<br />
the longest frame rod on the other side of the fairing.<br />
4. Attach the hooks (3) of the elastic straps (2) to the longest<br />
frame rods, in front of the joints.<br />
FV-D-ENG 1/12
5. Drücken Sie die Druckknöpfe der „Tenax“-Verschlüsse (4),<br />
die am Regenponcho angebracht sind, auf die Köpfe der<br />
„Tenax“-Verschlüsse (5) am Gestänge des <strong>Faltverdeck</strong>s.<br />
Hinweis:<br />
Zum Schließen werden die Druckknöpfe einfach auf die<br />
Köpfe gedrückt (Bild A). Zum Öffnen werden die Druckknöpfe<br />
leicht angehoben (Bild B).<br />
6. Setzen Sie sich auf den Sitz.<br />
7. Schließen Sie das <strong>Faltverdeck</strong> (siehe Kapitel „Ein- und<br />
aussteigen“, Seite 19), während Sie Ihren Kopf durch den<br />
geöffneten Reißverschluss des Regenponchos stecken.<br />
Hinweis:<br />
Mit Hilfe eines Reißverschlusses lässt sich der Regenponcho<br />
hinter und vor dem Kopf an die Sitzposition anpassen.<br />
Je dichter der Reißverschluss an Hals und Nacken<br />
anschließt, um so weniger werden Sie nass.<br />
8. Lassen Sie eine andere Person den hinteren Reißverschluss<br />
(6) bis zu ihrem Nacken ziehen. Sie können den<br />
hinteren Reißverschluss auch alleine einstellen, in dem<br />
Sie den Reißverschluss über ihrem Kopf bei geöffnentem<br />
<strong>Faltverdeck</strong> bis an die gewünschte Position ziehen. Dieser<br />
Reißverschluss ist arretierbar, so dass er sich nicht von<br />
selbst verstellen kann. Schließen Sie anschließend wieder<br />
das <strong>Faltverdeck</strong>.<br />
9. Ziehen Sie von unten den vorderen Reißverschluss (7) bis<br />
zum Hals. Dieser lässt sich von Innen einfach bedienen.<br />
Achtung!<br />
Bei Benutzung des Regenponchos müssen die Bewegungsfreiheit<br />
des Oberkörpers und der Arme, vor allem<br />
bei Handzeichen für Richtungswechsel und für den<br />
„Schulterblick“ gewährleistet sein. Achten Sie darauf,<br />
dass das Rücklicht durch den Regenponcho nicht verdeckt<br />
wird. Stellen Sie auch den Rückspiegel gegebenfalls<br />
neu ein.<br />
Hinweis:<br />
Eventuelle Falten im Regenponcho oder in der Windabrisskante<br />
des <strong>Faltverdeck</strong>s können Sie durch Verdrehen<br />
des Schellen der „Tenax“-Verschlüsse beseitigen.<br />
5 4<br />
7<br />
Rund ums Fahren<br />
Riding with the <strong>Foldable</strong> <strong>Fairing</strong><br />
FV-D-ENG 1/12 23<br />
7<br />
A<br />
B<br />
6<br />
5. Press the Tenax buttons (4) of the Rain Poncho onto the<br />
Tenax studs (5) attached to the frame rods of the <strong>Foldable</strong><br />
<strong>Fairing</strong>.<br />
Note:<br />
Tenax fasteners can be fastened by simply pressing the<br />
button onto the stud (Fig. A). To release the fasteners,<br />
gently pull up on the button (Fig. B).<br />
6. Sit down on the seat.<br />
7. Close the <strong>Foldable</strong> <strong>Fairing</strong> (see section “Mounting and dismounting”<br />
on page 19) pulling the attached Rain Poncho<br />
over your head.<br />
Note:<br />
The Rain Poncho has a long zipper that lets you adjust<br />
the opening to your sitting position. The more snugly the<br />
poncho opening is adjusted to your neck and sitting position,<br />
the dryer you will stay.<br />
8. Have another person draw up the rear zipper (6) to just<br />
behind your neck. If there is no one available to help you<br />
adjust the rear zipper, simply open the <strong>Foldable</strong> <strong>Fairing</strong><br />
with the attached poncho and pull the zipper into the<br />
desired position. Then close the fairing again, and check<br />
whether the zipper is positioned appropriately, just<br />
behind your neck, repeating these steps until the correct<br />
position is reached. The zipper can be locked in place to<br />
prevent it from changing position.<br />
9. Now pull the front zipper (7) up to just in front of your<br />
neck. This zipper can be repositioned easily from inside<br />
the poncho.<br />
Caution!<br />
When using the optional Rain Poncho, be sure that it<br />
does not in any way restrict the movement of the torso<br />
and arms and, above all, that it is still possible to make<br />
the necessary hand signals and turn your head for looking<br />
over your shoulder. Check that the Rain Poncho is not<br />
covering the taillight. If necessary, readjust the rearview<br />
mirror.<br />
Note:<br />
Wrinkles in the Rain Poncho or wind deflector can be<br />
eliminated by rotating the mounting clips of the Tenax<br />
fasteners.
Rund ums Fahren<br />
Riding with the <strong>Foldable</strong> <strong>Fairing</strong><br />
24<br />
Hinweis:<br />
Bedenken Sie bei der Wahl Ihrer Kleidung, dass der<br />
Regenponcho nicht nur Regen, sondern auch Fahrtwind.<br />
abhält. Je nach Witterung können Sie den vorderen Reißverschluss<br />
auch etwas geöffnet lassen.<br />
Achtung!<br />
Bei einem Fahrzeug mit einer besonders kurz eingestellten<br />
Rahmenlänge, ist es wahrscheinlich, dass der<br />
Regenponcho das Rücklicht verdeckt. So dürfen Sie auf<br />
keinen Fall fahren. Suchen Sie Ihre Fachwerkstatt auf, um<br />
den Regenponcho anzupassen.<br />
Wenn Sie den Regenponcho abnehemen möchten, gehen Sie<br />
umgekehrt vor.<br />
Regenponcho an kleine Personen anpassen<br />
Wird der Regenponcho von besonders kleinen Personen<br />
benutzt, so ist es wahrscheinlich, dass aufgrund der kurz<br />
eingestellten Rahmenlänge, das Rücklicht verdeckt wird. So<br />
dürfen Sie auf keinen Fall fahren. Suchen Sie Ihre Fachwerkstatt<br />
auf, um den Regenponcho anzupassen, oder passen Sie<br />
den Regenponcho nach der folgenden Anleitung selbst an. Die<br />
Befestigung des Regenponchos wird an vier Stellen (A und B)<br />
verändert. Ziehen Sie eventuell eine zweite Person zur Hilfe.<br />
Voraussetzung: Das Fahrzeug und das <strong>Faltverdeck</strong> wurden auf<br />
Ihre Körpergröße eingestellt.<br />
Punkt A<br />
1. Setzen Sie sich mit dem Regenponcho auf den Sitz, und<br />
schließen Sie das <strong>Faltverdeck</strong>.<br />
Hinweis:<br />
Wenn Sie die „Tenax“-Druckknöpfe des Regenponchos<br />
an die vorgesehenen Köpfe der „Tenax“-Verschlüsse am<br />
Gestänge halten, werden Sie wahrscheinlich feststellen,<br />
dass der hintere Teil des Regenponchos das Rücklicht<br />
verdeckt.<br />
A<br />
B<br />
Note:<br />
When deciding what to wear under the Rain Poncho,<br />
keep in mind that the poncho not only keeps you dry but<br />
also blocks the wind. You can also leave the front zipper<br />
open somewhat, depending on the weather conditions.<br />
Caution!<br />
On trikes that have been adjusted for very short riders,<br />
the Rain Poncho will probably hang in front of the taillight.<br />
In this case, do not, under any circumstances, ride<br />
the trike with the Rain Poncho. Ask your qualified bicycle<br />
mechanic to adjust the Rain Poncho accordingly.<br />
To remove the Rain Poncho, follow the above steps in the<br />
reverse order.<br />
Adapting the Rain Poncho for smaller riders<br />
If the Rain Poncho is used by riders of especially short stature,<br />
it will probably hang in front of the taillight owing to the<br />
reduced frame length. In this case, do not, under any circumstances,<br />
ride the trike with the Rain Poncho attached. Ask<br />
your qualified bicycle mechanic to adjust the Rain Poncho<br />
fasteners accordingly, or adjust them yourself, following the<br />
instructions provided below. You may need someone to assist<br />
you.<br />
Requirements: the vehicle and <strong>Foldable</strong> <strong>Fairing</strong> have been adjusted<br />
to your height.<br />
Point A<br />
1. While wearing the Rain Poncho, sit on the seat, and close<br />
the <strong>Foldable</strong> <strong>Fairing</strong>. The poncho fasteners should not be<br />
attached.<br />
Note:<br />
To determine whether the poncho fasteners require<br />
adjustment, hold the Tenax buttons of the Rain Poncho<br />
up to the respective Tenax studs on the frame rods, and<br />
check whether the rear portion of the Rain Poncho covers<br />
the taillight.<br />
FV-D-ENG 1/12
2. Schieben Sie dann die „Tenax“-Druckknöpfe des Regenponchos<br />
soweit am Gestänge des <strong>Faltverdeck</strong>s entlang,<br />
bis das Rücklicht frei ist. Markieren Sie, z.B. mit einem<br />
Filzstift, die Stellen an der die Druckknöpfe der „Tenax“-<br />
Verschlüsse den Gestängetunnel berühren.<br />
3. Schneiden Sie vorsichtig den Tunnel in Größe der Schellen<br />
(1) aus.<br />
4. Stecken Sie die mitgelieferten Schellen (1) auf das Gestänge<br />
und schrauben Sie die „Tenax“-Köpfe (2) in das Gewinde<br />
in den Schellen mit einem Gabelschlüssel 8 mm ein.<br />
5. Drücken Sie (sitzend mit Poncho) die am Regenponcho<br />
angebrachten Druckknöpfe auf die zuvor montierten<br />
Köpfe der „Tenax“-Verschlüsse am Gestänge des <strong>Faltverdeck</strong>s.<br />
Hinweis:<br />
Sollte der Regenponcho etwas durchhängen, dann können<br />
Sie die Schellen (1) etwas nach Außen drehen. Reicht<br />
diese Maßnahme nicht aus, dann ist es notwendig die<br />
am Regenponcho angebrachten „Tenax“-Druckknöpfe,<br />
etwas nach Innen zu versetzen.<br />
Druckknöpfe versetzen<br />
6. Markieren Sie die Position, an der die Köpfe der<br />
„Tenax“-Verschlüsse den Regenponcho berühren, wenn<br />
er vollständig gespannt wäre.<br />
7. Stanzen Sie an diesen Stellen, mit einem Locheisen 10 mm<br />
große Löcher (1) ein.<br />
8. Stecken Sie das obere Teil des Druckknopfes (2) der<br />
„Tenax“-Verschlüsse mit dem Gewindestift durch das<br />
Loch (1) in der Stoffhülle des Regenponchos durch.<br />
9. Verschrauben Sie das untere Teil des Druckknopfes (3)<br />
der „Tenax“-Verschlüsse mit dem oberen Teil.<br />
3<br />
1<br />
2<br />
FV-D-ENG 1/12 25<br />
1<br />
2<br />
2. Then hold the Tenax buttons of the Rain Poncho against<br />
the respective frame rods of the <strong>Foldable</strong> <strong>Fairing</strong>, and slide<br />
the buttons forward until the poncho is no longer covering<br />
the taillight. Mark, e.g., using a marker, the positions<br />
where the push buttons of the Tenax fasteners contact<br />
the sleeves holding the frame rods.<br />
3. Carefully cut away just enough of the interior sleeve<br />
material to fit the clamps (1) around the underlying rod.<br />
4. Attach the enclosed clamps (1) to the frame rods, and<br />
screw the Tenax studs (2) into the threaded holes of the<br />
clamps using an 8mm open-end wrench.<br />
5. Sit in the seat while wearing the Rain Poncho, and press<br />
the buttons of the poncho onto the Tenax studs mounted<br />
on the frame rods of the <strong>Foldable</strong> <strong>Fairing</strong>.<br />
Note:<br />
If the Rain Poncho sags somewhat in the middle, you<br />
can tighten it by rotating the clamps (1) outwards. If this<br />
measure does not correct the situation, then the Tenax<br />
buttons on the Rain Poncho must be repositioned.<br />
Repositioning the Tenax buttons<br />
6. Mark the position at which the studs of the Tenax fasteners<br />
contact the Rain Poncho when the poncho is fully<br />
extended.<br />
7. Use a hole punch to make 10mm holes (1) in the poncho<br />
at the marked sites.<br />
8. Insert the threaded pins of the upper part of the Tenax<br />
buttons (2) through the holes (1) in the poncho.<br />
9. Screw the lower parts of the Tenax buttons (3) onto the<br />
threaded pins of the upper parts as shown.
Punkt B<br />
Normalerweise wird der Regenponcho mittels zwei Stofftaschen,<br />
die über die Enden des Gestänges gestülpt werden, am<br />
hinteren Teil des <strong>Faltverdeck</strong>s befestigt. Da der Regenponcho<br />
nun etwas weiter vorne angebracht ist, passt das Gestänge<br />
nicht mehr in die Taschen und es ist notwendig auch diese Befestigung<br />
zu ändern. Dafür werden die gleichen „Tenax“-Verschlüsse<br />
wie an der oberen Befestigung (A) angebracht.<br />
10. Stanzen Sie an den Ecken der Tasche, mit einem Locheisen<br />
10 mm große Löcher (4) ein.<br />
11. Stecken Sie das obere Teil des Druckknopfes (5) mit dem<br />
Gewindestift durch das Loch (4) in der Stoffhülle des<br />
Regenponchos.<br />
12. Verschrauben Sie das untere Teil des Druckknopfes (5)<br />
mit dem oberen Teil.<br />
13. Stecken Sie die mitgelieferten Schellen (7) auf das Gestänge.<br />
14. Schrauben Sie die „Tenax“-Köpfe (8) in das Gewinde in<br />
den Schellen handfest ein.<br />
15. Setzen Sie sich mit dem Regenponcho auf den Sitz, schließen<br />
Sie das <strong>Faltverdeck</strong> und befestigen Sie den Regenponcho<br />
an allen vier „Tenax“-Verschlüssen.<br />
16. Verschieben Sie die Schellen (7) entlang das Gestänges, bis<br />
der Poncho gleichmässig gespannt ist.<br />
17. Lösen Sie die hinteren „Tenax“-Verschlüsse und ziehen<br />
Sie die „Tenax“-Köpfe (8) mit einem Gabelschlüssel 8 mm<br />
fest an.<br />
26<br />
7<br />
6<br />
8<br />
8<br />
4<br />
7<br />
5<br />
Point B<br />
Normally, the Rain Poncho is fastened to the back of the<br />
<strong>Foldable</strong> <strong>Fairing</strong> by means of two fabric pockets that fit over<br />
the ends of the frame rods. Now that the Rain Poncho is fastened<br />
further forward, the frame rods no longer fit into the<br />
pockets, and new rear attachment points must be created.<br />
The new rear attachment sites are created using the same<br />
type of Tenax fasteners as the front attachments (A).<br />
10. Use a hole punch to make 10mm holes (4) in the corners<br />
of the pockets.<br />
11. Insert the threaded pins of the upper part of the Tenax<br />
buttons (5) through the holes (4) in the poncho.<br />
12. Screw the lower parts of the Tenax buttons (5) onto<br />
threaded pins of the upper parts as shown.<br />
13. Attach the enclosed clamps (7) to the frame rods.<br />
14. Screw the Tenax studs (8) into the threaded holes of the<br />
clamps, tightening lightly at first.<br />
15. Wearing the poncho, sit in the seat, close the <strong>Foldable</strong><br />
<strong>Fairing</strong>, and attach the Rain Poncho to all four Tenax<br />
fasteners.<br />
16. Slide the clamps (7) along the frame rods until the poncho<br />
is evenly extended.<br />
17. Open the rear Tenax fasteners, and tighten the Tenax<br />
studs (8) using an 8mm open-end wrench.<br />
FV-D-ENG 1/12
<strong>Faltverdeck</strong> abnehmen<br />
Wenn Sie das <strong>Faltverdeck</strong> abnehmen möchten, gehen Sie<br />
umgekehrt vor wie im Kapitel „<strong>Faltverdeck</strong> anbringen auf<br />
Seite 13.<br />
Hinweis:<br />
Am leichtesten geht es, wenn Sie auf dem Sitz sitzen<br />
und beide Rastbleche gleichzeitig. Lösen. Fächern Sie das<br />
<strong>Faltverdeck</strong> auf und legen Sie es dann zusammen.<br />
Für die Aufbewahrung empfehlen wir die als Zubehör erhältliche<br />
Tasche. Diese können Sie an der Rückenlehne von Kettwiesel,<br />
Klimax oder Trix anbringen. Legen Sie das zusammengefaltete<br />
<strong>Faltverdeck</strong> wie auf dem Bild zu sehen in die Tasche.<br />
Reinigung und Lagerung des <strong>Faltverdeck</strong>s<br />
Reinigen Sie das <strong>Faltverdeck</strong> nur mit reinem Wasser. Benutzen<br />
Sie am besten einen feuchten Lappen. Verwenden Sie keine<br />
Reinigungsmittel, da sich sonst die Imprägnierung des Materials<br />
lösen könnte. Obwohl sich die Stoffhülle vom Gestänge<br />
abnehmen lässt, dürfen Sie sie nicht in einer Waschmaschine<br />
waschen. Hier könnte ebenfalls die Imprägnierung beschädigt<br />
werden. Verwenden Sie keinen Hochdruckreiniger, sonst<br />
könnte das Gestänge beschädigt werden.<br />
Reinigen Sie den als Zubehör erhältlichen Regenponcho ebenfalls<br />
nur mit reinem Wasser.<br />
Lagern Sie das <strong>Faltverdeck</strong> nur trocken ein, um Schimmelbildung<br />
zu vermeiden. Falls das <strong>Faltverdeck</strong> nach einer Fahrt<br />
noch feucht sein sollte, lassen Sie es ausgebreitet an einem<br />
trocknen Ort trocknen.<br />
Rund ums Fahren<br />
Riding with the <strong>Foldable</strong> <strong>Fairing</strong><br />
Removing the <strong>Foldable</strong> <strong>Fairing</strong><br />
To remove the <strong>Foldable</strong> <strong>Fairing</strong>, refer to the section “Mounting<br />
the <strong>Foldable</strong> <strong>Fairing</strong>” on page 13, and follow the steps in<br />
the reverse order.<br />
Note:<br />
The easiest way to remove the fairing is to sit in the seat<br />
and release both locking plates at the same time. Fan out<br />
the fairing, and then fold it.<br />
For storing the <strong>Foldable</strong> <strong>Fairing</strong>, <strong>Hase</strong> recommends the optional<br />
<strong>Fairing</strong> Bag. This bag can be mounted behind the seat of<br />
the Kettwiesel, Klimax, or Trix. Insert the folded fairing into<br />
the bag as shown.<br />
Cleaning and storing the <strong>Foldable</strong> <strong>Fairing</strong><br />
Use only clean water for cleaning the <strong>Foldable</strong> <strong>Fairing</strong>, ideally<br />
with a damp cloth. Do not use cleaning agents, as these can<br />
damage the impregnation of the material. The fabric itself can<br />
be removed from the frame of the fairing. However, it cannot<br />
be washed in a washing machine. This could also damage<br />
the impregnation. Do not use a pressure washer, as this could<br />
damage the frame.<br />
The optional Rain Poncho should also only be cleaned with<br />
water.<br />
In order to avoid problems with mold and mildew, make<br />
sure the <strong>Foldable</strong> <strong>Fairing</strong> is completely dry before storing. If<br />
the <strong>Foldable</strong> <strong>Fairing</strong> is still when removed from the trike (or<br />
tandem), allow it to dry, spread out on a clean, dry surface<br />
before packing it away.<br />
FV-D-ENG 1/12 27
erstellt von:<br />
Technische Dokumentation<br />
www.technik-transparent.de<br />
<strong>Hase</strong> Spezialräder · Hiberniastraße 2 · 45731 Waltrop · Germany · Phone ++49 (0) 23 09 / 93 77-0 · Fax ++49 (0) 23 09 / 93 77-201 · info@hasebikes.com · www.hasebikes.com