PRO 170, PRO 140, PRO 110 - Eton Deutschland Electro Acoustic ...
PRO 170, PRO 140, PRO 110 - Eton Deutschland Electro Acoustic ...
PRO 170, PRO 140, PRO 110 - Eton Deutschland Electro Acoustic ...

Erfolgreiche ePaper selbst erstellen
Machen Sie aus Ihren PDF Publikationen ein blätterbares Flipbook mit unserer einzigartigen Google optimierten e-Paper Software.
GERMAN HIGH TECHNOLOGY<br />
<strong>PRO</strong> <strong>110</strong><br />
2-WEGE SYSTEM / 2-WAY SYSTEM<br />
<strong>PRO</strong> <strong>140</strong><br />
2-WEGE SYSTEM / 2-WAY SYSTEM<br />
<strong>PRO</strong> <strong>170</strong><br />
2-WEGE SYSTEM / 2-WAY SYSTEM<br />
EINBAU /BEDIENUNG<br />
INSTALLATION / OPERATION<br />
Achtung !<br />
Bitte lesen Sie alle Warnungen in dieser Anleitung. Diese<br />
Informationen sind eingerahmt hervorgehoben und eingefügt, um<br />
Sie über mögliche persönliche Schäden oder Beschädigungen von<br />
Sachwerten zu informieren.<br />
Hörschäden<br />
Anhaltendes, übermäßiges Ausgesetztsein von Lautstärken<br />
über 85 dB kann das Hörvermögen auf Dauer beeinträchtigen. ETON<br />
Lautsprechersysteme sind imstande, auch Lautstärken über 85 dB zu<br />
produzieren.<br />
Lautstärke und Fahrerbewußtsein<br />
Der Gebrauch von Musikanlagen kann das Hören von<br />
wichtigen Verkehrsgeräuschen behindern und dadurch während der<br />
Fahrt Gefahren auslösen.<br />
ETON übernimmt keine Verantwortung für Gehörschäden,<br />
körperliche Schäden oder Sachschäden, die aus dem Gebrauch oder<br />
Mißbrauch seiner Produkte entstehen.<br />
Attention !<br />
Please read all warnings found in this manual. This<br />
information is highlighted in frames and is included to inform you of<br />
the potential danger of personal injury or damage to property.<br />
Hearing Damage<br />
Continuous, excessive exposure to sound pressure levels in<br />
excess of 85 dB can cause a loss of hearing. ETON components are<br />
capable of producing sound pressure levels greater than 85 dB.<br />
Volume and Driver Awareness<br />
Use of sound components can impair your ability to hear<br />
necessary traffic sounds and may constitute a hazard while driving<br />
your automobile.<br />
ETON accepts no liability for hearing loss, bodily injury or<br />
property damage as a result of use or misuse of this product.
Nehmen Sie Ihr Fahrzeug nicht in Betrieb, bevor alle Komponenten<br />
des Lautsprechersystems fest und sicher eingebaut sind. Lose Teile<br />
können im Falle eines plötzlichen Bremsmanövers oder eines Unfalls<br />
zu gefährlichen, fliegenden Geschossen werden.<br />
Bohren oder schrauben Sie nicht in eine Fahrzeugverkleidung oder<br />
einen teppichbezogenen Boden, bevor Sie sich versichert haben daß<br />
darunter keine wichtigen Teile oder Kabel sind. Achten Sie auf Benzin-<br />
, Brems-, Ölleitungen und elektrische Kabel bei der Planung für die<br />
Montage.<br />
Trennen Sie vor Beginn der Montage den Massepol (-) von der Fahr-<br />
zeugbatterie, um eventuelle Kurzschlüsse zu verhindern.<br />
Einbauplätze wählen<br />
MONTAGE<br />
Für eine einfache Montage benutzen Sie die vorgesehenen Original-Ein-<br />
bauplätze. Diese Wahl bringt erheblich kürzere Montagedauer und beste<br />
optische Integration.<br />
Vermeiden Sie Plätze hinter dicken Stoffen. Dies kann, besonders bei<br />
Hochtönern, den Klang und die Lautstärke beeinträchtigen.<br />
Zu nahe Montage der Hochtöner an reflektierende Flächen kann den<br />
Stereoeffekt beeinträchtigen. Jedes Mittel/Tieftöner und Hochtöner-Paar sollte<br />
nicht weiter als 60 cm auseinander liegen.<br />
Wenn Sie zuerst den Mittel/Tieftöner montieren und die Anschlußkabel ver-<br />
legen, können Sie die optimale Position für die Hochtöner an verschiedenen<br />
Plätzen ausprobieren, bevor Sie diese fest einbauen.<br />
Einbau der Mittel/Tieftöner<br />
Können Sie den Lautsprecher nicht am Original-Einbauplatz montieren, ist der<br />
allgemein meistgenutzte Ort die Türverkleidung.<br />
1. Nach der Wahl des entsprechenden Platzes entfernen Sie vorsichtig<br />
die Verkleidung. Versichern Sie sich, daß genügend Einbautiefe vor-<br />
handen ist und keine beweglichen Teile (Fenster, Fensterkurbel) in<br />
ihrer Funktion behindert werden.<br />
Vorsicht beim Entfernen von Innenverkleidungen. Die Fahrzeugher-<br />
steller verwenden verschiedenste Befestigungsteile die bei der De-<br />
montage beschädigt werden können.<br />
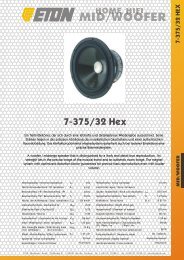
2. Schneiden Sie unter Zuhilfenahme der beiliegenden Bohrschablone<br />
ein entsprechendes Loch in die Verkleidung und eventuell in das dahinterliegende<br />
Karosserieblech und bohren die Löcher für die Befestigungsschrauben.<br />
Montieren Sie die Teile wie in Abbildung 1 dargestellt.<br />
Achtung: Sollen zur Montage der Lautsprecher Karosseriebleche<br />
ausgeschnitten oder entfernt werden, nehmen Sie Kontakt mit Ihrer<br />
Fahrzeug-Vertragswerkstatt auf. Bei Beschädigungen tragender Kar-<br />
osserieteile kann die Betriebserlaubnis erlöschen.<br />
3. Bei der Verwendung von Gittern oder Verkleidungen vor dem Laut-<br />
sprecher versichern Sie sich, daß genügend Raum für den Weg des<br />
Lautsprecher-Konus vorhanden ist. Sollte der Abstand nicht ausrei-<br />
chen, kann der Konus gegen die Verkleidung vibrieren und der<br />
Lautsprecher dadurch beschädigt werden.<br />
Einbau der Hochtöner<br />
Die Hochtöner können eingebaut oder aufgebaut werden. Bedenken Sie, daß<br />
sich bei Montage in der Türe die Halterungen der Hochtöner durch häufiges<br />
Türenschlagen lösen können.<br />
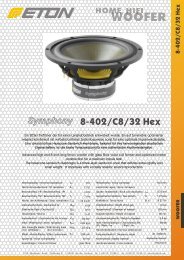
1. Einbau: Schneiden Sie unter Zuhilfenahme der beiliegenden Bohrschablone<br />
ein entsprechendes Loch. Verlegen Sie das zuführende<br />
Anschlußkabel und montieren die Teile wie in Abbildung 2 gezeigt.<br />
Vorsicht beim Entfernen von Innenverkleidungen. Die Fahrzeugher-<br />
steller verwenden verschiedenste Befestigungsteile, die bei der De-<br />
montage beschädigt werden können.<br />
Die Besonderheit des ETON Einbaugehäuses ist, daß Sie den Hochtönereinsatz<br />
schwenken und drehen können, um die optimale Abstrahlrichtung<br />
zu Ihrer Sitzposition zu erzielen. Siehe Abbildung 3.<br />
Demontage: Um den Hochtönereinsatz aus dem Einbaugehäuse zu<br />
entfernen, drehen Sie den Einsatz in mittlere Position, nehmen zwei<br />
metallene Rundstäbchen mit ø1,0 mm und stecken diese bis zum<br />
Anschlag in die beiden Öffnungen rechts und links des Einsatzes.<br />
Durch Schwenken des Hochtöners können Sie ihn nun nach oben<br />
entnehmen.<br />
2. Aufbau: Bohren Sie unter Zuhilfenahme des Aufbaugehäuses<br />
zwei Löcher für die Befestigungsschrauben und ein Loch für das zuführ-<br />
ende Anschlußkabel. Beachten Sie dabei die von Ihnen gewünschte<br />
Neigung des Aufbaugehäuses. Montieren Sie die Teile wie in Ab-<br />
bildung 4 gezeigt.
ELEKTRISCHER ANSCHLUSS<br />
Achten Sie immer darauf, wenn Sie Kabel durch ein Blech verlegen, daß das<br />
Kabel durch eine Kunststoffdurchführung geschützt ist und nicht von einer<br />
scharfen Blechkante beschädigt werden kann, um Kurzschlüsse und daraus<br />
resultierende Schäden am Verstärker oder der Lautsprecher zu vermeiden.<br />
1. Folgen Sie den Anschlußplänen der Abildungen 5 und 6, um das<br />
Lautsprechersystem mit Ihrem Autoradio und eventuell mit einem<br />
Verstärker zu verbinden.<br />
Die Hochtöner dürfen nur über eine Weiche angeschlossen sein.<br />
2. Nun können Sie die Fahrzeug-Batterie wieder anklemmen und das<br />
Lautsprecher-System testen.<br />
Achtung: Geben Sie keine Spannung auf die Hochtöner, bevor Sie sie<br />
an die passive Weiche angeschlossen haben.<br />
WICHTIG!<br />
Richtige Hochtonpolarität im KFZ<br />
Die richtige Polung von Hochtöner zu Tieftöner ist für die Klangqualität des<br />
gesamten Soundsystems ein entscheidendes Kriterium. Eine falsche Polarität<br />
kann auch den Klang des besten Lautsprechersystems "zerstören".<br />
In manchen Fällen kann eine Umpolung (Pluspol mit Minuspol vertauscht)<br />
der beiden Hochtöner zu einem besseren Klangergebnis führen. Dies kann<br />
sich auf Grund des Einbauortes bzw. aus der Entfernung der Lautsprecher<br />
zum Zuhörer, oder auch als Folge der Reflektionen im Fahrzeug ergeben. Da<br />
dies sehr individuell ist, kann die Entscheidung erst nach dem Einbau der<br />
Lautsprecher im Fahrzeug getroffen werden.<br />
Beurteilung der richtigen Hochtonpolarität<br />
Nach dem Einbau der Lautsprecher im Fahrzeug werden diese an die<br />
mitgelieferte Frequenzweiche angeschlossen. Die Frequenzweiche ist vorerst<br />
an einer leicht zugänglichen Stelle zu platzieren und am besten direkt vom<br />
Fahrersitz aus erreichbar. Um die richtige Polung zu erkennen reicht in der<br />
Regel der Betrieb eines Kanals (egal ob links oder rechts) völlig aus.<br />
Eine korrekte Polung des Hochtöners lässt sich am einfachsten anhand der<br />
Lautstärke beurteilen.<br />
Den Lautstärkeregler so einstellen, dass die Musik in ihrer vollen Bandbreite<br />
(Hochton-, Mittel- und Tieftonbereich) noch gut wahrnehmbar ist.<br />
Lassen Sie einen Musikabschnitt abspielen (ca. 20-30 Sekunden) und achten<br />
genau auf die Wiedergabe. Schalten Sie die Musik ab und verpolen Sie den<br />
Hochtöner an der Frequenzweiche, in dem Sie die Anschlusskabel (plus /<br />
minus) miteinander vertauschen. Hören Sie erneut das Musikstück und<br />
versuchen Sie die Frage zu beantworten, welche der beiden<br />
Anschlußmöglichkeiten die Lautere war. Wiederholen Sie den Versuch<br />
solange, bis Sie sich ganz sicher sind.<br />
Die lautere Wiedergabe zeigt die richtige Polung des Systems an!<br />
Nach Festlegung der Polarität sollte die Hochton - Pegelanpassung noch<br />
einmal überprüft werden.<br />
Tips:<br />
* Bei Dunkelheit oder mit geschlossen Augen lassen sich Hörunterschiede<br />
meist besser erkennen.<br />
* Bei der Auswahl, der für die Bewertung geeigneten Musik, sollte einer<br />
komplexeren instrumentalen Besetzung mit mehreren akustischen<br />
Instrumenten der Vorzug gegeben werden .<br />
Sollte im Ausnahmefall die auf der Frequenzweiche vorhandene<br />
Pegelanpassung dennoch nicht ausreichen (HT-Stellung auf -3dB, Hochtöner<br />
immer noch zu laut) kann in Reihe zum Hochtöner ein Zusatzwiderstand von<br />
2 - 6 Ohm vorgeschaltet werden.
Do not use your automobile until all components of the loudspeaker<br />
system have been secured to the interior framework. Failure to do so<br />
may turn a component into a dangerous, flying projectile during a<br />
sudden stop or accident.<br />
Do not drill or drive screws through any vehicle interior or carpeted<br />
floor before inspecting the underside for potential punctures to control<br />
lines or cables. Be sure to avoid all fuel lines, brake lines, electrical<br />
cables or oil lines when planning the installation.<br />
Before beginning installation of the loudspeaker system remove the<br />
minus connector from the automobile battery in order to avoid<br />
possible short circuits.<br />
Choosing a Location<br />
MECHANICAL INSTALLATION<br />
For ease of installation use original factory speaker locations. Using these<br />
positions will save considerable installation time and provide the best optical<br />
integration. Avoid installing speakers behind thick stock fabric or cloth. This<br />
could - especially in the case of tweeters - restrict output and reduce sound<br />
volume.<br />
Installation too close to reflective surfaces can negatively affect stereo imaging.<br />
The distance between each mid/woofer and tweeter pair should not exceed 60<br />
cm. We suggest first mounting the mid/woofer and attaching the cables. Then<br />
you can determine the optimum tweeter location by auditioning the tweeters at<br />
several positions in your automobile before permanent installation.<br />
Installation of Mid/Woofer<br />
If it is not possible to install the loudspeaker in the original factory speaker<br />
location, the most used position is the door panel.<br />
1. After choosing a location, carefully remove the trim panels. Be sure<br />
that sufficient mounting depth is available and that no moveable<br />
mechanical parts (window, window regulator handle) are restricted in<br />
their functionality.<br />
Caution: Use care when removing interior trim panels. Car manu-<br />
facturers use a variety of fastening devices that can be damaged in the<br />
disassembly process.<br />
2. Use the enclosed drilling template to cut a suitable hole in the trim<br />
panel and, if necessary, in the sheet metal behind. Drill holes for the<br />
fastening screws. Mount the parts as shown in figure 1.<br />
Attention: If sheet metal must be cut or removed contact your<br />
authorized car dealer for professional advice. By damage to sup-<br />
porting body structures the safety certificate may be withdrawn.<br />
3. If you plan to use grilles or panels in front of the loudspeaker, ensure<br />
that sufficient space is available for the path of the loudspeaker co ne .<br />
Should the distance not be sufficient, the cone could vibrate<br />
against the grille or panel thus damaging the loudspeaker.<br />
Installing the Tweeters<br />
The tweeters can be flush- and surface-mounted. Consider that repeated<br />
opening and closing of the car door can result in loosening of the tweeter<br />
fastening devices, when the loudspeaker is mounted in the door panel.<br />
1. Flush mounting: Use the enclosed drilling template to cut a suit-<br />
able hole. Lay the leading connector cable and mount the parts as<br />
Caution: Use care when removing interior trim panels. Car manu-<br />
facturers use a variety of fastening devices that can be damaged in the<br />
disassembly process.<br />
The specialty of the ETON mounting cabinet is that the tweeter ele-<br />
ment can be turned and swiveled to achieve the optimum hearing<br />
path to your sitting position. See figure 3.<br />
Disassambly: To remove the tweeter element from the mounting<br />
cabinet turn the element to its middle position and place two round<br />
metal rods with a diameter of 1,0 mm to the limit in both openings<br />
right and left of the tweeter element. By swiveling of the tweeter you<br />
can now move it upwards and remove it.<br />
2. Surface mounting: Drill two holes for the fastening screws and one<br />
hole for the leading connector cable using the mounting cabinet as<br />
a guide. Consider the preferred incline of the mounting cabinet.<br />
Mount the parts as shown in figure 4.
ELECTRICAL INSTALLATION<br />
Whenever you run wires through sheet metal, use tape or grommets to properly<br />
insulate the metal edges from cable jackets. This technique prevents chafing<br />
and possible short circuits that could damage an amplifier or the loudspeakers.<br />
1. Follow the wiring diagrams figures 5 and 6 to connect the loud-<br />
speaker system to your automobile radio and possibly to an ampli-<br />
fier. Be very careful of correct polarity of all connections.<br />
(+ to +, - to -)<br />
The tweeters should only be installed through a crossover.<br />
2. Replace the automobile battery connector and test the loudspeaker<br />
system.<br />
Caution: Do not apply power to the tweeters without first installing<br />
crossovers.<br />
Important!<br />
Correct high frequency polarity in the automobile<br />
The correct polarity of tweeter to woofer is a decisive factor for the sound<br />
quality of the entire sound system. A false polarity can even "destroy” the<br />
sound of the best loudspeaker system.<br />
In some cases a polarity reversal (exchanged positive and negative poles) of<br />
both tweeters can result in sound quality improvement. This can result from<br />
the mounting position, from the distance between loudspeaker and listener<br />
or also from the sound reflections in the automobile. Since this is very<br />
specific, it cannot be decided until the loudspeakers have been mounted in<br />
the automobile.<br />
Evaluation of the correct high frequency polarity<br />
After the loudspeakers have been mounted in the automobile, they are<br />
connected with the included crossover. At first the crossover should be<br />
placed in an easily accessible position, preferably directly reachable from the<br />
driver's seat. To recognize the correct polarity as a rule the operation of one<br />
channel (either left or right) is sufficient.<br />
The correct polarity of the tweeter can be evaluated most simply from the<br />
volume.<br />
Adjust the volume control so that the music can be clearly heard in its full<br />
band width (high, mid and deep range).<br />
Play a segment of music (about 20 30 seconds) and pay close attention to<br />
the reproduction. Stop the music and reverse the poles of the tweeter on<br />
the crossover by exchanging the connecting cables (plus / minus). Listen to<br />
the music segment again and try to answer the question which of both<br />
connections was louder. Repeat the experiment until you are completely<br />
sure.<br />
The louder reproduction shows the correct polarity of the system!<br />
After the polarity has been decided upon tweeter level adjustment should be<br />
reconsidered.<br />
Tips:<br />
* In the dark or with closed eyes the sound differences are usually more<br />
audible.<br />
* Use a complex instrumental music segment with several acoustic instruments<br />
for the evaluation.<br />
Should in an exceptional case the available crossover level adjustment still<br />
not be sufficient (high frequency position at -3dB, with the tweeter still too<br />
loud), it is permissible to switch in an additional resistor of 2 - 6 Ohm in<br />
sequence to the tweeter.<br />
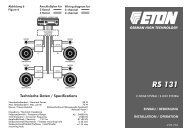
Abbildung 1<br />
Figure 1<br />
<strong>PRO</strong> <strong>110</strong><br />
Blechmutter<br />
Tinnerman Nut<br />
Einbau Mittel/Tieftöner<br />
Flush mount of Mid/Woofer<br />
Blechschraube<br />
Self-Threading Screw
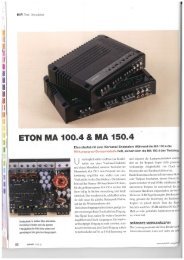
Abbildung 1<br />
Figure 1<br />
<strong>PRO</strong> <strong>140</strong><br />
Blechmutter<br />
Tinnerman Nut<br />
<strong>PRO</strong> <strong>170</strong><br />
Blechmutter<br />
Tinnerman Nut<br />
Blechschraube<br />
Self-Threading Screw<br />
Einbau Mittel/Tieftöner<br />
Flush mount of Mid/Woofer<br />
Ring und Gitter<br />
(Zubehör - nicht enthalten)<br />
Ring and grille<br />
(optional - not included)<br />
Blechschraube<br />
Self-Threading Screw<br />
Ring und Gitter<br />
(Zubehör - nicht enthalten)<br />
Ring and grille<br />
(optional - not included)<br />
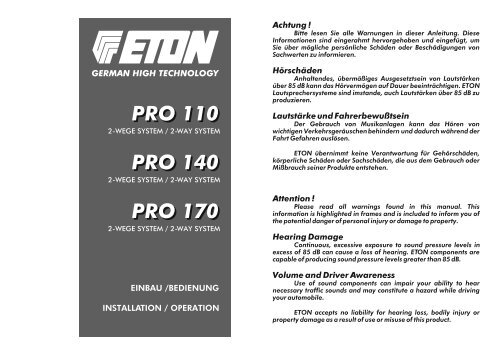
Abbildung 2<br />
Figure 2<br />
1<br />
Einbau Hochtöner<br />
Flush mount of Tweeter<br />
2<br />
3 4<br />
Cable:<br />
+ red<br />
_<br />
black
Abbildung 3<br />
Figure 3<br />
Schwenken und Drehen<br />
Swivel and turn<br />
Abbildung 4<br />
Figure 4<br />
Einbau Hochtöner<br />
Flush mount of Tweeter<br />
ø 1,0 mm<br />
Aufbau Hochtöner<br />
Surface mount of Tweeter<br />
1 2<br />
Demontage:<br />
Disassembly:<br />
Lautsprecher in mittlerer Position !<br />
Speaker in middle position !<br />
Cable:<br />
+ red<br />
_<br />
black<br />
Abbildung 5<br />
Figure 5<br />
Montage der Weiche<br />
Installing the crossover<br />
Anschlußplan<br />
für Weiche<br />
Wiring diagram<br />
crossover<br />
+3dB<br />
0dB<br />
_<br />
3dB<br />
GERMAN TECHNOLOGY<br />
Vom<br />
Verstärker<br />
From<br />
Amplifier<br />
Mittel-<br />
Tieft.<br />
To Mid/<br />
Woofer<br />
Hochtöner<br />
To Tweeter<br />
öffnen<br />
open<br />
drücken<br />
squeeze<br />
Anpassung der<br />
Hochtönerlautstärke<br />
adapting tweeter level
Abbildung 6<br />
Figure 6<br />
TWEETER<br />
MID/WOOFER<br />
TWEETER<br />
MID/WOOFER<br />
AUTORADIO / SOURCE UNIT<br />
WEICHE<br />
CROSSOVER<br />
LF<br />
WEICHE<br />
CROSSOVER<br />
LR<br />
Anschlußplan für<br />
2 Kanal<br />
4 Kanal<br />
VERSTÄRKER<br />
AMPLIFIER<br />
WEICHE<br />
CROSSOVER<br />
RF<br />
WEICHE<br />
CROSSOVER<br />
RR<br />
Wiring diagram for<br />
2-channel<br />
4-channel<br />
TWEETER<br />
MID/WOOFER<br />
TWEETER<br />
MID/WOOFER<br />
Technische Daten / Specifications<br />
<strong>PRO</strong> <strong>110</strong> 2-Wege System / 2-Way Component System<br />
Nennbelastbarbeit / Nominal Power<br />
Max. Belastbarkeit / Max. Power<br />
Konus / Cone Material<br />
Impedanz / Nominal Impedance<br />
Frequenzbereich / Frequency Response<br />
Frequenz Weiche / Crossover Frequency<br />
Empfindlichkeit / Sensivity<br />
Hochtönermaße / Tweeter Dimensions<br />
Mittel/Tieftönermaße / Mid/Woofer Dimensions<br />
60 W<br />
90 W<br />
Paper coated<br />
4 W<br />
52 - 22000 Hz<br />
3500 Hz<br />
88 dB<br />
40 mm ø<br />
21 mm (depth)<br />
100 mm ø<br />
51 mm (depth)<br />
<strong>PRO</strong> <strong>140</strong> 2-Wege System / 2-Way Component System<br />
Nennbelastbarbeit / Nominal Power<br />
Max. Belastbarkeit / Max. Power<br />
Konus / Cone Material<br />
Impedanz / Nominal Impedance<br />
Frequenzbereich / Frequency Response<br />
Frequenz Weiche / Crossover Frequency<br />
Empfindlichkeit / Sensivity<br />
Hochtönermaße / Tweeter Dimensions<br />
Mittel/Tieftönermaße / Mid/Woofer Dimensions<br />
60 W<br />
100 W<br />
Paper coated<br />
4 W<br />
48 - 22000 Hz<br />
3500 Hz<br />
88 dB<br />
40 mm ø<br />
2 1 mm (depth)<br />
134 mm ø<br />
60 mm (depth)<br />
<strong>PRO</strong> <strong>170</strong> 2-Wege System / 2-Way Component System<br />
70 W<br />
100 W<br />
Paper coated<br />
4 W<br />
43 - 22000 Hz<br />
3000 Hz<br />
88 dB<br />
40 mm ø<br />
21 mm (depth)<br />
165 mm ø<br />
65 mm (depth)<br />
V 21.858