DSR 5600 COV.qxd - Elektroda
DSR 5600 COV.qxd - Elektroda
DSR 5600 COV.qxd - Elektroda

Erfolgreiche ePaper selbst erstellen
Machen Sie aus Ihren PDF Publikationen ein blätterbares Flipbook mit unserer einzigartigen Google optimierten e-Paper Software.
<strong>DSR</strong> <strong>5600</strong>
Wilkommen beim digitalen Fernsehen<br />
Herzlichen Glückwunsch zu Ihrer Entscheidung für den digitalen Satelliten-Receiver <strong>DSR</strong> <strong>5600</strong> von Philips. Dieser Receiver<br />
wird Ihnen sowohl Zugang zu FTA- (kostenlosen) als auch zu verschlüsselten digitalen Satelliten-, Radioprogrammen und<br />
interaktiven Kanäle bieten. Dank der integrierten MHP-Funktion eignet sich Ihr Receiver für MHP interaktive TV<br />
Applikationen daß an manchen Kanälen ausgestrahlt werden.<br />
Wenn Sie verschlüsselte Programme empfangen möchten, benötigen Sie ein spezielles Zugangsmodul (CA Modul) und ein<br />
entsprechendes Abonnement. Das CA-Modul ist nicht im Lieferumfang Ihres Receivers enthalten. Nähere Informationen<br />
über CA-Modul Benutzung finden Sie weiter in diesem Benutzerhandbuch.<br />
Hinweis: die Bezeichnung „Dekoder" wird in allen Menü-Bildschirmen benutzt. Diese Bezeichnung bedeutet auch „STB (Set-Top Box)",<br />
„Receiver" „digitaler Receiver". Alle Beschreibungen in diesem Benutzerhandbuch beziehen sich auf „Receiver".<br />
Inhaltsverzeichnis<br />
1 Sicherheitsanweisungen ______________________3<br />
2 Auspacken __________________________________3<br />
3 Produktbeschreibung ________________________4<br />
3.1 Vorderansicht ______________________________4<br />
3.2 Rückseite __________________________________5<br />
3.3 CA (Conditional Access) Modul ________________5<br />
4 Vorbereiten, einstellen und verwenden Ihrer<br />
Fernbedienung ______________________________6<br />
4.1 Einlegen der Batterien ________________________6<br />
4.2 Einstellen der Fernbedienung. __________________6<br />
4.2.1 Modus einstellen _____________________________6<br />
4.2.2 Regelung der Lautstärke- und Stummschaltungsfunktion 6<br />
4.2.3 Änderung der Markeneinstellung Ihrer Fernbedienung<br />
auf veschiedene A/V Geräte (TV, VCR, DVD oder<br />
Verstärker/Tuner) _____________________________6<br />
4.3 Benutzen Ihrer Fernbedienung zur Steuerung des<br />
Satelliten-Receivers - die Fernbedienung ist auf den<br />
STB-Modus geschaltet. ________________________7<br />
5 Anschlüsse und Installation ___________________8<br />
5.1 Anschlüsse _________________________________8<br />
5.1.1 Anschliessen des Satelliten-Receivers an das<br />
Fernsehgerät und den Videorecorder. _____________8<br />
5.1.2 Anschliessen der HiFi-Anlage ____________________8<br />
5.1.3 Anschliessen des Satelliten-Receivers an die<br />
Telefonleitung (für zukünftige Nutzung) _____________8<br />
5.2 Kurzanleitung zur schnellen Inbetriebnahme _______9<br />
5.3 Umfassende Installation des Receivers ___________9<br />
5.3.1 Umfassende Installation des Receivers _____________9<br />
5.3.2 Ihre Installation umfasst einen DiSEqC Umschalter ___10<br />
6 Grundfunktionen ___________________________11<br />
6.1 Ein- und Ausschalten des Receivers _____________11<br />
6.2 Aktivieren oder schalten des Receivers auf Standby. 11<br />
6.3 Auswählen von Fernseh- oder RADIO-Betrieb ____11<br />
6.4 Umschalten zwischen den Kanallisten ___________11<br />
6.5 Verwenden des Kanalbanners _________________12<br />
6.5.1 Kanalbannerzeichen __________________________12<br />
6.5.2 Programmwahl _____________________________12<br />
6.5.3 Kanalwahl __________________________________13<br />
6.6 Änderung der Optionen des gerade angesehenen<br />
Programms _______________________________13<br />
6.7 Aufrufen weiterer Informationen zu dem gerade<br />
angeschauten Programm _____________________13<br />
6.8 Verwenden der Taste TV/STB ________________14<br />
6.9 Starten/stoppen/verbergen einer ausgestrahlten<br />
MHP-Anwendung ___________________________14<br />
6.10 Erinnerungsfunktion und Timers _______________14<br />
6.10.1 Unterschied zwischen Erinnerungs- und<br />
Timerfunktionen ____________________________14<br />
6.10.2 Aufnahme Erinnerungs-/Timerfunktionen _________15<br />
6.10.3 Erinnerung/Timer Kollision 15<br />
6.10.4 Timer _____________________________________16<br />
7 Hauptmenü _______________________________17<br />
7.1 Menüstruktur ______________________________17<br />
8 Ändern der Einstellungen des Receivers _______19<br />
8.1 Kanal-Manager _____________________________19<br />
8.1.1 Kanalliste organisieren ________________________19<br />
8.1.2 Kanalliste ändern ____________________________20<br />
8.2 Kindersicherung ____________________________21<br />
8.2.1 Ihr PIN-Code ______________________________21<br />
8.3 Benutzer (persönliche) -Einstellungen ___________22<br />
8.3.1 Anzeige-Option _____________________________22<br />
8.3.2 Sprachen-Optionen __________________________22<br />
8.4 Installation _________________________________22<br />
8.4.1 Einstellungen _______________________________23<br />
8.4.2 Installation / Antennenkonfiguration ______________24<br />
8.4.3 Installation / LNB-Konfiguration _________________25<br />
8.4.4 Installation / Kanalsuche _______________________26<br />
8.4.5 Installation / Receiver Status ____________________26<br />
9 Fortgeschrittene Einstellungen _______________28<br />
9.1 Easy recording _____________________________28<br />
9.2 Änderung der Fernbedienungs- und<br />
Receiverseinstellungen _______________________29<br />
9.3 Master PIN Code ___________________________29<br />
10 Upgrade der Receiver-Software ______________30<br />
INHALTSVERZEICHNIS 1<br />
Deutsch
Deutsch<br />
11 Programmieren der Fernbedienung für Ihr STB,<br />
Fernsehgerät, Ihren Videorekorder, DVD und<br />
Verstärker/Tuner. ___________________________31<br />
11.1 Einrichten der Fernbedienung _________________31<br />
11.2 Verwenden der Fernbedienung für das<br />
Fernsehgerät _______________________________32<br />
11.3 Verwenden der Fernbedienung für den<br />
Videorecorder _____________________________33<br />
11.4 Verwenden der Fernbedienung für den<br />
DVD-Spieler ______________________________34<br />
11.5 Verwenden der Fernbedienung für den Tuner-<br />
Verstärker _________________________________35<br />
12 Fehlersuche _______________________________36<br />
13 Technische Daten ___________________________37<br />
14 CODE LIST FÜR VERCHIEDEN MARKEN _____38<br />
2 INHALTSVERZEICHNIS
1 Sicherheitsanweisungen<br />
Alle Sicherheitsanweisungen und Anmerkungen zu dem<br />
Betrieb sind sorgfältig durchzulesen und verstanden<br />
bevor Sie den Receiver zum ersten Mal in Betrieb<br />
nehmen.<br />
Stellen Sie den Receiver weit von Wärmequelle oder<br />
dem Heizkörper. Lassen Sie mindestens 3 cm Abstand<br />
rund um den Receiver um Luftzirkulation zu versichern.<br />
Prüfen Sie dabei auch, ob die Entlüftungsschlitzen nicht<br />
gedeckt sind.<br />
Der Recorder ist ausschliesslich für Heimanwendung<br />
geeignet und muß gegen Überhitzung, übermäßige<br />
Feuchtigkeit und Dampf geschützt sein. Stellen Sie sicher,<br />
daß keine Gegenstände oder Flüssigkeiten durch die<br />
Entlüftungsschlitzen in das Gehäuse nicht gelangen. Sollte<br />
dies geschehen, so trennen Sie das Gerät von der<br />
Netzspannung und wenden Sie sich an Ihren Händler.<br />
Verwenden Sie zum Reinigen ein feuchtes Fensterleder.<br />
Benutzen Sie nie ein Scheuertuch, Scheuerschwamm<br />
oder scheuernde Reinigungsmittel.<br />
2 Auspacken<br />
Wenn Sie Ihren Receiver auspacken, prüfen Sie, ob<br />
folgende Kabel und Zubehörteile da sind:<br />
- Fernbedienung mit separat gepackten, alkalischen<br />
Philips Batterien<br />
- Netzkabel<br />
- SCART-Kabel<br />
- Telefonkabel<br />
- Benutzerhandbuch<br />
- Philips Garantiekarte<br />
Achtung: Plastiktüten können gefährlich sein. Um<br />
Erstickungsgefahr zu vermeiden, aufbewahren Sie die<br />
Plastiktüte außer Kinderreichweite.<br />
Achten Sie beim Herstellen und Trennen von<br />
Kabelverbindungen immer darauf, dass der Receiver von<br />
der Netzspannung getrennt ist.<br />
Bitte warten Sie noch mit dem Anschließen Ihres<br />
Receivers und lesen Sie weiter.<br />
Öffnen Sie nicht das Gerät, da gibt es keine Teile, die von<br />
dem Benutzer repariert werden können.<br />
Anschluss<br />
Bevor das Gerät an die Netzspannung angeschlossen<br />
wird, muss geprüft werden, ob die Netzspannung mit der<br />
auf auf der Rückseite des Receivers angegebenen<br />
Spannung übereinstimmt. Ist dies nicht der Fall, so<br />
wenden Sie sich an Ihren Händler.<br />
Bitte warten Sie noch mit dem Anschließen Ihres<br />
Receivers und lesen Sie weiter.<br />
SICHERHEITSANWEISUNGEN 3<br />
Deutsch
Deutsch<br />
3 Produktbeschreibung<br />
3.1 Vorderansicht<br />
1 Tür Verstecks CI Modulschlitze.<br />
2 Reset-Taste Diese Taste (Rückstelltaste) setzt die Einstellungen Ihres Receivers zurück (Ihr Receiver<br />
arbeitet so, als ob Sie ihn ausgeschaltet und wieder eingeschaltet haben).<br />
3 Standby-Taste Schaltet den Receiver aus dem digitalen TV Modus zu Standby-Modus.<br />
4 MENU Ruft Menü auf oder blendet es ein.<br />
5 OK ● Im Menü-System, wählt Menü-Optionen oder bestätigt Ihre Wahlen.<br />
● Im Kanalbanner diese Taste stellt das gewählte Programm ein oder stellt ein/lösches<br />
Erinnerungsfunktion für das nächste Programm.<br />
6 Links/rechts ● Im Schau-Modus, erhöht/verringert die Lautstärke.<br />
● Im Kanalbanner schaltet zwischen der aktuellen/nächsten Programme.<br />
● Im Menü, bewegt das Bildschirm-Ereignis links/rechts oder schaltet zwischen den<br />
gespeicherten Werten um.<br />
6 hoch/runter ● Im Standby-Modus schaltet den Receiver ein.<br />
● Im Schau-Modus oder im Kanalbanner stellt das Programm oben/unten auf fortlaufende<br />
Kanäle ein.<br />
● Im Menü-System bewegt das vorderfinierte Bildschirm-Ereignis hoch/runter.<br />
Vorderseite<br />
Die LED-Anzeige gibt Ihnen Informationen über den aktuellen Gerätestatus.<br />
Status indicator table<br />
4 PRODUKTBESCHREIBUNG<br />
1 2 3 4 5 6<br />
Aktuelle Zeit in 24-Stunden-Format wenn der Receiver in Standby-Modus ist.<br />
Der Receiver ist auf einen der TV-Kanäle eingestellt.<br />
Der Receiver ist auf einen der Radio-Kanäle eingestellt.<br />
Die Aufnahme ist im Gange.<br />
Der VCR ist an den VCR SCART Ihres Receivers angeschlossen und gibt gerade Cassette<br />
wieder. Stoppen Sie Ihren VCR um zurück zu Receiver-Fernsehmodus zu kehren.<br />
Der Receiver ist im TV-Betrieb. Durch drücken der TV/SAT-Fernbedienungstaste gelangen<br />
Sie wieder in den normalen SAT-Betrieb.<br />
Punkt in der Mitte blinkt wenn Sie Fernbedienungstasten betätigen.<br />
Receiver-upgrade ist im Gange.<br />
Auf dem gerade eingestellten Kanal eine der interaktiven Applikationen (MHP-Anwendung)<br />
ist verfügbar.
3.2 Rückseite<br />
1 ON/OFF-Taste Zum Ein- und Ausschalten des Receivers.<br />
2 Netzeingangsbuchse (HV) Verbindet den Netzkabel mit der Netzbuchse.<br />
3 RS232 (SELV) Benutzt für Datenübertragung beim Service.<br />
4 LNB IN (SELV) Zum Anschließen des Satellitenantennenkabels.<br />
5 Telefonleitung (TNV3) Zum Anschließen der Telefonleitung.<br />
6 Optisches Audio (SELV) Wenn Sie Fremdaudio-Receiver für digitales Signal- Entschlüsselung<br />
haben, anschließen Sie ihn hier.<br />
7 TV SCART (SELV) (1) (2) Hier verbinden Sie Ihr TV mit Hilfe von eingefügten SCART-Kabel.<br />
8 VCR SCART (SELV) (1) Zum Anschließen Ihr VCR.<br />
9 L/R Audio-Ausgang (SELV) Links/Rechts Audio-Ausgänge für HIFI/Audio- Receiver System.<br />
SELV: Safety Extra Low Voltage (Schutzkleinspannung)<br />
HV: Hazardous Voltage.<br />
TNV 3: Telekommunikations-Netzwerk 3.<br />
(1) SCART wird auch Eurokonnektor oder Peritel genannt.<br />
(2) Der SCART Anschlussdraht ist RGB Format anpassend, was die beste Bildqualität ermöglicht. Prüfen Sie Ihren TV<br />
Benutzerhandbuch für einen RGB fähigen SCART Buchseneingang.<br />
CA-Modul und seine Karte<br />
1 2 3 4 5 6 7 8 9<br />
Common Interface Bildschirm<br />
3.3 CA (Conditional Access) Modul<br />
Es ist auch möglich, ein separates CA (Conditional Access)- Modul an den<br />
Receiver anzuschließen. Sie müssen das Modul in die CI-Modulschlitze<br />
auf der linken Seite des Receivers-Vorderseite schieben (die CI-<br />
Modulschlitze befindet sich hinter der Tür). Das CA-Modul zusammen<br />
mit entsprechender Smart Card (Chipkarte) ermöglicht den Empfang von<br />
verschlüsselten Kanälen die Sie im Abonnement vorhanden haben.<br />
Das Modul hat eigene Smart Card und verfügt über Menüs, die in diesem<br />
Benutzerhandbuch nicht beschrieben werden können. Um Zugang zu<br />
Smart Card Informationen zu erhalten, drücken Sie MENU Taste und<br />
wählen Sie Installation aus dem Hauptmenü. Aus dem Installation-<br />
Untermenü, das angezeigt wird, wählen Sie Receiver-Status, und dann<br />
wählen Sie Common Interface. Das gibt Ihnen Zugang zu allen<br />
Informationen die auf der Smart Card gespeichert sind.<br />
Schutz der Smart Card<br />
Die Card ist brüchig, beachten Sie also folgende Hinweise:<br />
● Biegen und drehen Sie die Card nicht.<br />
● Setzen Sie die Card nicht direktem Sonnenlicht aus.<br />
● Lassen Sie die Card stets im Schlitz.<br />
● Reinigen Sie die Card mit einem trockenen und weichen Lappen.<br />
PRODUKTBESCHREIBUNG 5<br />
Deutsch
Deutsch<br />
4 Vorbereiten, einstellen und verwenden Ihrer<br />
Fernbedienung<br />
4.1 Einlegen der Batterien<br />
● Nehmen Sie die Abdeckung auf der Rückseite der<br />
Fernbedienung ab.<br />
● Legen Sie die beiden mitgelieferten Batterien (Typ R06 /<br />
AA - 1.5 V) ein.<br />
● Positionieren Sie die Batterien entsprechend der<br />
Abbildung im Batteriefach.<br />
● Bringen Sie die Abdeckung wieder an.<br />
Die mit der Fernbedienung des Receiver mitgelieferten<br />
Philips Batterien enthalten keine Schwermetale wie<br />
Quecksilber oder Nickel-Cadmium. Dennoch dürfen in<br />
vielen Ländern erschöpfte Batterien nicht im Hausmüll<br />
entsorgt werden. Bitte sorgen Sie dafür, daß die<br />
erschöpften Batterien entsprechend den lokalen<br />
Vorschriften entsorgt werden.<br />
4.2 Einstellen der<br />
Fernbedienung.<br />
4.2.1 Modus einstellen<br />
Mit Ihrer 5-in-1-Fernbedienung können Sie die meisten<br />
Ihrer A/V Geräte über verschiedene Betriebsarten<br />
steuern: Satelliten-Receiver, als STB (Set Top Box-das ist<br />
Ihr Receiver) bezeichnet, TV , VCR (Videorecorder) und<br />
Verstärker-Tuner.<br />
Wenn Sie die MODE-Taste einmal drücken, wird der<br />
active Modus durch blinkende Leuchtanzeigen angezeigt:<br />
links für STB, in der Mitte für TV, rechts für VCR<br />
(Videorecorder), links/Mitte für DVD und Mitte/rechts<br />
für Verstärker-Tuner.<br />
Zum Einstellen des Modus drücken Sie die MODE-Taste<br />
mehrmals, bis der gewünschte Modus durch die<br />
Leuchtanzeige(n) angezeigt wird. Die Reihenfolge dabei<br />
ist: STB ->TV->VCR-> DVD-> Verstärker -Tuner.<br />
4.2.2 Regelung der Lautstärke- und<br />
Stummschaltungsfunktion<br />
Wenn die Fernbedienung auf den STB-Modus eingestellt<br />
ist, können die Lautstärke + / Lautstärke - /<br />
Stummschalten- Tasten entweder die entsprechenden<br />
TV-Funktionen oder entsprechende Receiver-Funktionen<br />
steuern. Mehr dazu in Kapiteln: 4.2.2.1 or 4.2.2.2.<br />
6 VORBEREITEN, EINSTELLEN UND VERWENDEN IHRER FERNBEDIENUNG<br />
Hinweis: wir empfehlen Lautstärke- und<br />
Stummschaltensteuerung über den digitalen Receiver. Mehr zu<br />
Einstellungen in Kapitel 4.2.2.2.<br />
4.2.2.1 Wenn Sie Ihre Fernbedienung zur Regelung<br />
der Lautstärke- und<br />
Stummschaltungsfunktion über Ihren<br />
Fernseher benutzen wollen/Einstellen der<br />
Lautstärkeregelung zum Benutzen über den<br />
Fernseher.<br />
Werksseitig ist die Lautstärkesteuerung der<br />
Fernbedienung auf ein Fernsehgerät der Marke Philips<br />
eingestellt. Wenn Sie ein Fernsehgerät einen anderen<br />
Herstellers verwenden, prüfen Sie auf der TV Code-Liste<br />
für verschiedene Marken welche Coden Sie benutzen<br />
können, und dann ändern Sie die<br />
Fernbedienungseinstellungen der Methode entsprechend,<br />
die im Kapitel 10 beschrieben wurde.<br />
Hinweis: um Lautstärke/Stummschaltungsfunktion auf TV-<br />
Steuerung zurückzustellen.<br />
1 wählen Sie STB-Modus<br />
2 drücken Sie Zifferntasten 1 und 9 gleichzeitig bis LED<br />
zweimal blinkt, dann lassen Sie die Tasten los.<br />
3 Geben Sie 993 Code ein, LED blinkt einmal nach jeder<br />
Betätigung.<br />
4 Drücken Sie „gelb"-Taste, LED soll zweimal blinken um<br />
die neuen Einstellungen zu bestätigen.<br />
4.2.2.2 Wenn Sie Ihre Fernbedienung zum<br />
Lautstärkeregelung und<br />
Stummschaltungsfunktion über Ihren digitalen<br />
Receiver einstellen wollen (empfohlen).<br />
Um Lautstärke/Stummschaltungsfunktion auf STB-<br />
Steuerung einzustellen:<br />
1 Wählen Sie STB-Modus<br />
2 Drücken Sie Zifferntasten 1 und 9 bis LED zweimal<br />
blinkt, dann lassen Sie die Tasten los.<br />
3 Geben Sie 993 Code ein, LED blinkt einmal nach jeder<br />
Betätigung.<br />
4 Drücken Sie „grün"-Taste, LED soll zweimal blinken um<br />
die neuen Einstellungen zu bestätigen.<br />
4.2.3 Änderung der Markeneinstellung<br />
Ihrer Fernbedienung auf veschiedene<br />
A/V Geräte (TV, VCR, DVD oder<br />
Verstärker/Tuner)<br />
Gehen Sie zum Kapitel 11 für Markeneinstellung über.
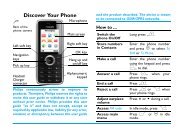
4.3 Benutzen Ihrer Fernbedienung zur Steuerung des Satelliten-<br />
Receivers - die Fernbedienung ist auf den STB-Modus geschaltet.<br />
MODE<br />
Wählt Fernbedienungsmodus.<br />
Rot, grün, gelb, blau, weiss<br />
Kontexttasten für MHP-<br />
Applikationen.<br />
FAV<br />
Ruft auf/blendet aktuelle Kanalliste<br />
ein.<br />
GUIDE<br />
Nicht verfügbar mit dieser Version<br />
der Applikation.<br />
RADIO<br />
Schaltet zwichen TV- und Radio-<br />
Modi.<br />
MENU<br />
Ruft auf/blendet das Menü ein.<br />
4<br />
Ruft das Optionen-Menü auf um<br />
augenblicklich übertragene:<br />
soundtrack/Untertitel/Teletext/<br />
Anzeige-Format Einstellungen zu<br />
ändern.<br />
VW<br />
- Schaltet den Kanalbanner in den<br />
erweiterten Modus um.<br />
- Verschiebt die Markierung<br />
hoch/runter im Menü oder in der<br />
Kanalliste.<br />
CB<br />
- Im Kanalbanner, schaltet<br />
zwischen aktuellem und nächstem<br />
Programm<br />
- In Menü-Bildschirmen, wählt<br />
zwischen gespeicherten<br />
Einstellungen.<br />
OK<br />
Bestätigt Ihre Wahlen.<br />
i<br />
Ruft das Optionen-Menü auf um<br />
augenblicklich übertragene:<br />
soundtrack/Untertitel/Teletext/<br />
Anzeige-Format Einstellungen zu<br />
ändern.<br />
A +/-<br />
Erhöht/verringert die Lautstärke.<br />
B<br />
Zurück zu Fernsehenmodus.<br />
EXIT<br />
Returns to normal viewing mode.<br />
P+ P-<br />
- Im Fernsehen-Modus: stellt sich<br />
auf höheren/unteren Kanal auf der<br />
selben Kanalliste.<br />
- blättert in der Kanalliste eine Seite<br />
hoch oder runter.<br />
- Im Standby-Modus schaltet den<br />
Receiver ein.<br />
BACK<br />
- Im Fernsehen-Modus: zurück zu<br />
dem zuletzt eingestellten Kanal.<br />
- Im Menü-Modus: zurück zu dem<br />
vorherigenBildschirm.<br />
- Im Standby-Modus schaltet den<br />
Receiver ein.<br />
H<br />
Schaltet den Ton auf dem TV oder<br />
Receiver aus.<br />
0-9<br />
- Im Fernsehen-Modus: wählt<br />
Kanäle.<br />
- Im Menü: Wählt einen Menüpunkt<br />
oder stellt neuen Parameterswert<br />
ein.<br />
- Im Standby-Modus schaltet den<br />
Receiver ein.<br />
m<br />
Schaltet zwischen Fernsehen-Modus,<br />
Kanalbanner, und Kanalbanner<br />
mit erweiterten Informationen um.<br />
TV/STB a<br />
TV/STB: schaltet zwischen digitalen<br />
Satellitenprogramme über den<br />
Receiver und standard analog<br />
Programme um.<br />
VORBEREITEN, EINSTELLEN UND VERWENDEN IHRER FERNBEDIENUNG 7<br />
Deutsch
Deutsch<br />
5 Anschlüsse und Installation<br />
5.1 Anschlüsse<br />
5.1.1 Anschliessen des Satelliten-Receivers an das Fernsehgerät und den Videorecorder.<br />
1 Trennen Sie vor dem Herstellen der Kabelverbindungen alle Geräte (Fernsehgerät ebenso wie Videorecorder und / oder<br />
DVD, falls vorhanden) von der Netzspannung.<br />
Hinweis : Prüfen Sie die derzeitige Verkabelung, bevor Sie mit dem Herstellen der Kabelverbindungen beginnen, denn Sie können die<br />
koaxiale Verbindung zwischen Ihrem Fernsehgerät und Ihrem Videorecorder beibehalten, wenn diese Geräte wie nachstehend dargestellt<br />
angeschlossen sind. Diese Verbindung gewährleistet, dass Sie bei Bedarf immer noch Ihre aktuellen terrestrischen Kanäle empfangen und<br />
aufnehmen können<br />
Satellite recever<br />
2 Verbinden Sie Ihren Receiver in Ihrer vorhandenen Anlage wie oben dargestellt.<br />
- Verbinden Sie das mitgelieferte Netzkabel mit der Netzeingangsbuchse (230 V – 50 Hz) Ihres Satelliten-Receivers<br />
- Verbinden Sie den “EXT1” Anschluss des Fernsehgeräts über das mitgelieferte SCART-Kabel mit dem Anschluss “TV”<br />
SCART” Ihres Satelliten-Receivers.<br />
- Wenn Sie über einen Videorecorder verfügen, verbinden Sie den Anschluss “EXT1” des Videorecorders über ein SCART-<br />
Kabel mit dem Anschluss “VCR” SCART Ihres Satelliten-Receivers.<br />
- Verbinden Sie den Stecker des Kabels von der Satellitenantenne mit der Buchse “LNB IN” an Ihrem Satelliten-Receiver..<br />
3 Verbinden Sie anschließend alle Ihre Geräte, auch den Satelliten-Receiver, mit der Netzspannung.<br />
5.1.2 Anschliessen der HiFi-Anlage<br />
Verbinden Sie die AUDIO-Ausgangsbuchsen L/R (Links / Rechts) Ihres Satelliten-Receivers über ein doppeltes CINCH-Kabel<br />
(nicht mitgeliefert) mit den betreffenden analogen L/R-Audio-Eingangsbuchsen der HiFi-Anlage.<br />
Verbinden Sie bei Bedarf die digitale AUDIO-Ausgangsbuchse Ihres Satelliten-Receivers über ein einzelnes CINCH-Kabel<br />
(nicht mitgeliefert) mit der “koaxialen” Digital-CINCH-Eingangsbuchse der Hifi-Anlage.<br />
5.1.3 Anschliessen des Satelliten-Receivers an die Telefonleitung (für zukünftige Nutzung)<br />
Verbinden Sie die RJ11/Telefonleitungsbuchse Ihres Satelliten-Receivers über das mitgelieferte Telefonkabel mit der Telefon-<br />
Wandsteckdose.<br />
Hinweis: Dieses Gerät wurde gemäß der Entscheidung 99/303/EG des Rates europaweit zur Anschaltung als einzelne Endeinrichtung an<br />
das öffentliche Fernsprechnetz zugelassen. Aufgrund der zwischen den öffentlichen Fernsprechnetzen verscheidener Staaten bestehenden<br />
Unterscheide stellt diese Zulassung an sich jedoch keine unbedingte Gewähr für einen erfolgreichen Betrieb des Geräts an jedem<br />
Netzabschlußpunkt dar.<br />
Falls beim Betrieb Probleme auftreten, sollten Sie sich zunächst an ihren Fachhändler wenden.<br />
8 ANSCHLÜSSE UND INSTALLATION
5.2 Kurzanleitung zur schnellen<br />
Inbetriebnahme<br />
● Sie besitzen bereits eine Satellitenantenne.<br />
● Ihre Antenne ist ordnungsgemäß auf den Satelliten Astra,<br />
Orbitalposition 19.2° Ost, ausgerichtet.<br />
● Sie möchten nur Programme von Astra, Orbitalposition<br />
19.2° Ost, empfangen.<br />
● Ihre bevorzugte Menüsprache ist Deutsch.<br />
● Sie haben die Verbindungen entsprechend Kapitel 5.1.1<br />
hergestellt.<br />
● Ihre Fernbedienung ist im STB-Modus und der<br />
Beschreibung im Kapitel 4.2 gemäß eingestellt.<br />
Wenn dies nicht der Fall ist, lesen Sie, bevor Sie mit der<br />
schnellen Inbetriebnahme fortfahren, das Kapitel 4.2.<br />
Hinweis : Ein Upgrade Ihres Satelliten-Receivers ist nur über<br />
das Herunterladen von Software über den Satelliten Astra,<br />
Orbitalposition 19.2° Ost, möglich. Wenn Sie also von weiteren<br />
Upgrades profitieren möchten, sollten Sie Ihren Receiver<br />
zumindest auf den Empfang von Astra, Orbitalposition 19.2°<br />
Ost, einrichten.<br />
Wenn die obigen Bedingungen erfüllt sind, können Sie mit<br />
der schnellen Inbetriebnahme Ihres Satelliten-Receivers<br />
fortfahren; also:<br />
Hinweis: Wenn Sie einen DiSEqC 1.0 Schalter in Ihrem<br />
Antennen-Setup haben, können Sie mit dieser schnellen<br />
Inbetriebnahme fortfahren, sofern Sie den Stecker des Kabels<br />
von der Antenne, die auf Astra 19.2° OST ausgerichtet ist,<br />
direkt mit der Buchse “LNB IN” des Satelliten-Receivers<br />
verbinden. Andernfalls lesen Sie bei Kapitel 5.3.1 weiter.<br />
Wenn die obigen Bedingungen erfüllt sind, fahren Sie<br />
folgendermaßen mit der schnellen Inbetriebnahme Ihres<br />
Satelliten-Receivers fort:<br />
1 Alle Ihre Geräte, auch Ihr digitaler Satelliten-Receiver,<br />
sind mit der Netzspannung verbunden.<br />
2 Stellen Sie ON/OFF-Taste auf der Rückseite Ihres<br />
Receivers in „ON" Position. Die LED-Anzeige and der<br />
Vorderseite wird leuchten, Nach einigen Sekunden wird<br />
„Willkommen" Bildschirm angezeigt und gleich danach die<br />
'Erstinstallation' -Bildschirm. Wählen Sie Ihre bevorzügten<br />
Land mit Hilfe von V / W Tasten und drücken Sie OK.<br />
Ihr Receiver ist auf Ihr Land inkl. entsprechende Menü-<br />
Sprache konfiguriert/eingestellt.<br />
Hinweis: Nach dem Einschalten des Gerätes über den<br />
Hauptschalter (auf der Rückseite) erlischt die Anzeige im<br />
Frontdisplay während des Boot-Vorgangs für wenige Sekunden<br />
und erscheint anschließend mit dem Hinweis "MHP".<br />
3 Um Satelliten-TV zu sehen, drücken Sie eine Zifferntaste<br />
oder die Taste P+ oder P- oder BACK; der Receiver<br />
wird auf ein Programm abgestimmt.<br />
4 Von jetzt an können Sie sich am Satellitenfernsehen<br />
erfreuen.<br />
Näheres über die BENUTZUNG DES SATELLITEN-<br />
RECEIVERS können Sie in Kapitel 6 finden.<br />
Anmerkung: Landessprachen-Auswahl siehe Kapitel 8.3.2.<br />
5.3 Umfassende Installation des<br />
Receivers<br />
Warum ist eine umfassende Installation des<br />
Satelliten-Receivers erforderlich?<br />
➤ Ihre Satellitenantenne ist ordnungsgemäß auf einen<br />
anderen Satelliten als auf Astra, Orbitalposition 19.2°<br />
Ost, ausgerichtet.<br />
➤ Ihre Antenne ist nicht installiert und nicht<br />
ordnungsgemäß auf Astra 19.2° Ost ausgerichtet.<br />
➤ Ihr Antennen-Setup umfasst einen DiSEqC 1.0 Schalter.<br />
➤ In diesem Kapitel wird erläutert, wie Sie Ihren Receiver<br />
entsprechend den Gegebenheiten Ihrer Anlage und<br />
Ihren Anforderungen einstellen können. Wenn Sie<br />
Probleme mit der in den Abschnitten 5.3.1 und 5.3.2<br />
beschriebenen Installation haben, wenden Sie sich bitte<br />
an Ihren Fachhändler.<br />
5.3.1 Umfassende Installation des Receivers<br />
1 Verbinden Sie das mitgelieferte Netzkabel mit der<br />
Netzeingangsbuchse Ihres Satelliten-Receivers. Schalten<br />
Sie das Fernsehgerät ein und wählen Sie ein Programm.<br />
Stellen Sie ON/OFF-Taste auf der Rückseite Ihres<br />
Receivers in „ON" Position um. Die LED-Anzeige and der<br />
Vorderseite wird leuchten.<br />
2 Jetzt soll "Willkommen" - Bildschirm auf Ihrem<br />
Fernsehgerätsbildschirm erscheinen. Nach einigen<br />
Sekunden wird dieser Bildschirm einblenden.<br />
3 Danach erscheint ein weiterer Bildschirm, an dem Sie<br />
Ihren Land wählen sollen. Wählen Sie Ihren Land indem<br />
Sie V / W drücken und dann drücken Sie OK. Weiter<br />
werden Sie gebeten, Ihre Wahl zu bestätigen. Drücken<br />
Sie OK um zu bestätigen, oder BACK um anderen Land<br />
zu wählen.<br />
4 Drücken Sie MENU Taste um Hauptmenü aufzurufen.<br />
Wählen Sie Installation und drücken Sie OK.<br />
5 Wählen Sie Antennen-Konfiguration aus dem<br />
Installation-Untermenü. Verändern Sie welche Werte der<br />
Antennenausrichtung nach Bedarf. Drücken Sie dann OK<br />
um die Änderungen zu speichern und kehren Sie zu dem<br />
Installation-Untermenü zurück.<br />
6 Wählen Sie LNB-Konfiguration aus dem Installation-<br />
Untermenü. Wählen Sie dann Ihren Satelliten indem Sie<br />
C/ B drücken. Wenn Sie Signalstärke und Signalqualität<br />
prüfen wollen, drücken Sie die rote Taste. Verändern Sie<br />
die LNB-Konfigurationswerte nach Bedarf.<br />
7 Wählen Sie Kanalsuche aus dem Installation-Untermenü.<br />
Auf dem aufgerufenen Bildschirm wählen Sie Neue<br />
Kanalsuche-Option. Drücken Sie OK. Dann wählen Sie<br />
Kanaltype und drücken Sie erneut OK Dies startet die<br />
Kanalsucheprozedur. Wenn die Prozedur zu Ende ist,<br />
folgen Sie entsprechende Anweisungen auf dem<br />
Bildschirm.<br />
8 Alle gefundenen Kanäle werden in Kanal Pool<br />
gespeichert. Sie müssen alle Kanäle auf Ihre Liste der<br />
Favoriten (bevorzugten) Kanallisten verschieben. Weitere<br />
Informationen dazu finden Sie im Kapitel 8.1 dieses<br />
Benutzerhandbuches.<br />
9 Jetzt können Sie Ihren digitalen Receiver benutzen.<br />
Gehen Sie zu Kapitel 6 über, um weitere Informationen<br />
über Ihren digitalen Receiver zu bekommen. .<br />
ANSCHLÜSSE UND INSTALLATION 9<br />
Deutsch
Deutsch<br />
5.3.2 Ihre Installation umfasst einen DiSEqC Umschalter<br />
Um Programme von anderen Satelliten empfangen zu können, muss Ihre Antennenanlage über einen DiSEqC-Schalter<br />
verfügen. Ein DiSEqC-Schalter hat 2 oder 4 Eingänge und einen Ausgang. Die Eingänge sind bei einem Schalter mit 2<br />
Eingängen mit “A” / “B” oder “1” / “2” bezeichnet. Bei einem Schalter mit 4 Eingängen sind die Eingänge mit “A” / “B” / “C” /<br />
“D” oder “1” / “2” / “3” / “4” bezeichnet.<br />
Jedes LNB muss über ein geeignetes Koaxialkabel mit Steckern des Types F mit einem Eingang des Schalters verbunden<br />
werden, während der Ausgang des Schalters über ein geeignetes Koaxialkabel mit Steckern des Types F mit dem “LNB-<br />
Eingang” des Satelliten-Receivers zu verbinden ist.<br />
In dem nachstehenden Anschlussdiagramm ist dargestellt, wie ein DiSEqC-Schalter in eine Antennenanlage eingefügt werden<br />
kann, die 2 LNBs umfasst. Die abgebildete gängige Konfiguration besteht aus einer Antenne, die mit 2 LNBs für den Empfang<br />
von den Satelliten Astra 19.2° Ost und Hot Bird 13° Ost ausgestattet ist. Achten Sie auf die jeweilige Position der Astra- und<br />
Hot Bird-LNBs in der Anlage – das System sollte auf Anhieb richtig in Betrieb genommen werden. .<br />
ASTRA<br />
DiSEqC switch<br />
(4 inputs)<br />
Satellite recever<br />
HOT BIRD<br />
TELECOM<br />
A B C D<br />
Gehen Sie zur Installationsprozedur beschrieben im Kapitel 5.3.1 über.<br />
Im 5 Schritt der Antennenkonfiguration stellen Sie "Antenne-Steuerung" Menü-Option ein:<br />
- entweder auf "Tone Burst" wenn Sie Tone Bursts Schalter und 2 LNBs zur Kontrolle haben,<br />
- oder auf "DiSEqC 1.0" wenn Sie DiSEqC -Schalter und mehr als 4 LNBs zur Kontrolle haben.<br />
Im 6 Schritt wählen Sie, welche LNB aktiv werden sollen. Wenn der Cursor auf aktivem LNB ist, drücken Sie OK was<br />
entsprechende "LNB-Konfiguration"-Menü öffnen wird, wo Sie die Einstellungen so ändern können, wie es Ihnen entspricht.<br />
Da können Sie auch gleich Signalqualität prüfen.<br />
Hinweis:<br />
- Weiteres über mögliche Optioneneinstellungen finden Sie in Kapiteln 8.4.2 "Installation / Antennenkonfiguration" und 8.4.3 "Installation /<br />
LNB-Konfiguration". Die korrekte Antenneninstallation erfordert:<br />
anpassen der LNB Nummer zu dem Satellitennamen (z.B. Astra 19.2 wird LNB1 zugeschrieben)<br />
eine richtige physische Verbindung zwischen LNB, der an den gewählten Satelliten gezielt ist, und entsprechendem Eingang von<br />
DiSEqC Schalter. Im „Installation/LNB Konfiguration" Menü (Kapitel 8.4.3): LNB1 bedeutet „der LNB, der an Eingang 1 von DiSEqC<br />
Schalter angeschlossen ist", LNB2 bedeutet: „der LNB, der an Eingang 2 von DiSEqC Schalter angeschlossen ist" usw.<br />
- Wenn Ihre Installation mit einer Zusammensetzung von 2 LNBs und einem DiSEqC in einem Block (sogenannter mono-block) verfügt,<br />
prüfen Sie das Benutzerhandbuch um jeden Satelliten korrekt an entsprechenden Eingang von DiSEqC Schalter zu zuordnen (z.B. Hot<br />
Bird beziehungsweise Astra 19.2 Ost Satellit kann zu dem Eingang 1 beziehungsweise Eingang 2 des DiSEqC Schalters zugeordnet<br />
werden). Stellen Sie sicher, ob der Satellitenname (z.B. Hot Bird) zu korrekter LNB Nummer (z.B. LNB1) zugeschrieben ist.<br />
10 ANSCHLÜSSE UND INSTALLATION
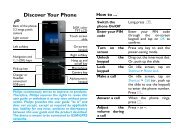
6 Grundfunktionen<br />
Radio Bildschirm<br />
Liste der TV Kanäle<br />
6.1 Ein- und Ausschalten des Receivers<br />
Ihr Receiver ist mit Netz und ON/OFF-Taste verbunden, die sich auf der<br />
Rückseite Ihres Receivers befindet und in „OFF"-Position ist.<br />
● Um Ihr Receiver einzuschalten, stellen Sie ON/OFF-Taste auf „ON"<br />
Position. Die LED-Anzeige and der Vorderseite wird leuchten, nach<br />
einigen Sekunden soll "Willkommen" - Bildschirm erscheinen. Dann wird<br />
sich Ihr Receiver entweder in Standby- oder Fernsenen-Modus<br />
umschalten.<br />
● Um Ihr Receiver auszuschalten, stellen Sie ON/OFF-Taste in „OFF"<br />
Position.<br />
Hinweis: Nach dem Einschalten des Gerätes über den Hauptschalter (auf der<br />
Rückseite) erlischt die Anzeige im Frontdisplay während des Boot-Vorgangs für<br />
wenige Sekunden und erscheint anschließend mit dem Hinweis "MHP".<br />
6.2 Aktivieren oder schalten des Receivers<br />
auf Standby.<br />
● Sie sehen fern oder hören Radio, drücken Sie Standby-Taste um den<br />
Receiver auf Standby zu schalten.<br />
● Ihr Receiver ist auf Standby geschaltet, um es zu aktivieren:<br />
- entweder drücken Sie P+ oder P- Taste<br />
- oder drücken Sie eine Zifferntaste<br />
6.3 Auswählen von Fernseh- oder RADIO-<br />
Betrieb<br />
Ihr Receiver kann entweder im Radio- oder im Fernsehbetrieb arbeiten.<br />
Um zwischen diese zwei Modi zu wählen, drücken Sie die RADIO Taste.<br />
Wenn Sie auf einem der TV-Kanälen fernsehen, drücken der RADIO<br />
Taste stellt den Receiver auf das zuvor gehörte Radiokanal ein, daß zu<br />
der vorher gewählten Kanalliste gehört. Erneutes Drücken der RADIO<br />
Taste schaltet den Receiver auf TV-Betrieb zurück - auf das zuvor<br />
eingestellte TV-Kanal. Wenn Modus-Umstellung, Kanalbanner erscheint<br />
zur Zeitüberschreitung. Im Radio-Betrieb, ein "Radio-Bildschirmschoner"<br />
erscheint/blendet ein in unterschiedlichen Positionen auf dem Bildschirm<br />
um Ihren TV-Bildschirm vor Schaden zu schützen<br />
6.4 Umschalten zwischen den Kanallisten<br />
Ihr Receiver gibt Ihnen Zugang zu über 6 TV-Kanallisten und zu über 6<br />
Radio-Kanallisten. Zum Anzeigen der gewählten Kanalliste, drücken Sie<br />
FAV Taste. Zum Umschalten zwischen allen verfügbaren nicht leeren<br />
Kanallisten im bestimmten Modus (TV oder Fernseh-Betrieb), drücken<br />
Sie C / B. Der Name der gewählten Liste wird oben auf dem<br />
Kanalliste-Bildschirm erscheinen. Wählen Sie dann den Kanal mit Hilfe<br />
von V / W oder Zifferntastendruck. Jedesmal wenn Sie nicht aktuelle<br />
Kanalliste markieren, im Kanalbanner wird das [OK] Zeichen<br />
erscheinen. Um den Kanal einzustellen, drücken Sie OK.<br />
Hinweis: Kanallisten ermöglichen Ihnen die Arbeit in dem sogenannten<br />
„Erweiterten Modus". In diesem Modus bleibt der Receiver auf dem selben Kanal<br />
eingestellt, wobei Sie erweiterte Programme und Kanäle „blättern" können.<br />
GRUNDFUNKTIONEN 11<br />
Deutsch
Deutsch<br />
Information zum laufenden Programm<br />
12 GRUNDFUNKTIONEN<br />
6.5 Verwenden des Kanalbanners<br />
Kanalbanner erscheint unten am Bildschirm wenn Sie einen Ihren<br />
Receiver auf einen neuen Kanal einstellen oder wenn Sie m Taste<br />
drücken. Es bietet Ihnen Informationen über einzelne Kanäle an und<br />
erleichtert das Verschieben in den Kanal- und Programmlisten. Wenn Sie<br />
im Kanalbanner sind, können Sie nur zwischen Kanälen „blättern", die<br />
zu der gerade gewählten Kanalliste gehören. Kanalbanner blendet<br />
automatisch nach einigen Sekunden aus, oder wenn Sie EXIT drücken.<br />
6.5.1 Kanalbannerzeichen<br />
Dieses Zeichen informiert, daß für den im Kanalbanner gezeigten<br />
Programm manche zusätzlichen Programminformationen verfügbar sind.<br />
Dieses Zeichen informiert, daß der Kanal gesperrt ist.<br />
Dieses Zeichen informiert, daß die Erinnerungsfunktion für bestimmtes<br />
Programm eingestellt wurde.<br />
Dieses Zeichen informiert, daß die Aufnahme Erinnerungsfunktion für<br />
bestimmtes Programm eingestellt wurde.<br />
Dieses Zeichen informiert, daß ein Programm mit mehr als einen<br />
Soundtrack übertragen wird.<br />
Dieses Zeichen informiert, daß OK Drücken stellt den Receiver zu dem<br />
Kanal, auf den sich Kanalbanner bezieht, oder stellt ein/löscht die<br />
Erinnerungsfunktion.<br />
Dieses Zeichen informiert, daß dieses Programm mit Surround-Klang<br />
übertragen wird.<br />
Dieses Zeichen informiert, daß das Programm Kindersicherungssperre<br />
hat.<br />
Dieses Zeichen informiert, daß Sie externe Applikationen starten<br />
können, wenn Sie OK drücken<br />
Dieses Zeichen informiert, daß Teletext auf dem gerade eingestellten<br />
Kanal verfügbar ist.<br />
Dieses Zeichen informiert, daß Sie Untertitelsprache für das Programm<br />
einschalten können.<br />
6.5.2 Programmwahl<br />
Das Kanalbanner ermöglicht Ihnen, Informationen über aktuelles oder<br />
nächstes Programm auf dem gewählten Kanal anzusehen. Drücken SieC<br />
/ Bum zu prüfen, was als Nächstes auf demselben Kanal übertragen<br />
wird.<br />
Wenn Sie einen der vorgehenden Programme wählen, OK drücken wird<br />
Ihnen helfen, die Erinnerungsfunktion einzustellen/löschen. Weiteres dazu<br />
finden Sie im Kapitel 6.10 Reminders und Timers weiter in diesem<br />
Benutzerhandbuch.
Kanalnummer Eingabe Bildschirm<br />
Optionen Menü<br />
Anzeige-Format (Letter-box)<br />
Program Info Bildschirm<br />
6.5.3 Kanalwahl<br />
Es gibt 3 Möglichkeiten, den Kanal umzuschalten.<br />
- Drücken Sie V oder W um in der Liste der empfangbaren Kanäle zu<br />
verschieben. Bitte beachten Sie, daß Ihr Receiver auf denselben Kanal<br />
eingestellt bleibt.<br />
- Wenn Sie P+ / P- drücken, wird Ihr Receiver im Bereich derselben<br />
Kanalliste den Kanal hoch-/runterschalten.<br />
- Sie können die Kanäle auch durch die Kanalnummereingabe direkt<br />
auswählen. Wenn Sie die Zifferntasten drücken, erscheint die<br />
Kanalnummer in der rechten Ecke oben auf dem Bildschirm.<br />
● Bitte beachten Sie, daß BACK drücken ermöglicht Ihnen das<br />
Umschalten zwischen dem gerade gesehenen und dem vorher<br />
eingestellten Kanal im Bereich derselben Kanalliste.<br />
6.6 Änderung der Optionen des gerade<br />
angesehenen Programms<br />
Durch drücken der 4 oder i Taste, lassen Sie sich die Menü-<br />
Optionen anzeigen. Dieses Menü ermöglicht Ihnen, die Audio-Sprache,<br />
die Untertitel-Sprache und das Bildschirmformat für das gerade<br />
gesehenes Programm und die Teletext-Sprache für den aktuellen Kanal<br />
einzustellen.<br />
Audio-Sprache<br />
Sie können verschiedene Audio-Sprachen wählen, wenn sie angeboten<br />
werden.<br />
Untertitel-Sprache<br />
Sie können verschiedene Untertitel-Sprachen wählen, wenn sie<br />
angeboten werden.<br />
Teletext-Sprache<br />
Sie können verschiedene Teletext-Sprachen wählen, wenn sie angeboten<br />
werden.<br />
Bildschirmformat<br />
Wenn Sie einen Fernseher mit dem 4:3 Format haben und die<br />
Übertragung im 16:9 Format erfolgt, können Sie das Bildschirmformat für<br />
das aktuelle Programm ändern. Zum Beispiel wenn Sie einen Fernseher<br />
mit dem 4:3 Format haben und die Übertragung im 16:9 Format erfolgt,<br />
können Sie Letter-box, Pan-Scan oder Vollbild wählen. Wenn Sie<br />
Letter-box wählen, wird das Bild formatfüllend angepaßt (vollständiges<br />
Bild wird mit schwarzen Flächen oben und unten geliefert.<br />
6.7 Aufrufen weiterer Informationen zu<br />
dem gerade angeschauten Programm<br />
Das [ i ] Zeichen wird im Kanalbanner gezeigt und informiert, daß m<br />
drücken manche zusätzlichen Programminformationen über das gerade<br />
gewählten Programm gezeigt werden können. Wenn mehrere Seiten der<br />
Programminformationen verfügbar sind, m drücken wird folgende<br />
Seiten zeigen. Um Program-Info Bildschirm zu einzublenden, drücken<br />
Sie EXIT, oder m wenn die letzte Programminfoseite gezeigt wird.<br />
GRUNDFUNKTIONE 13<br />
Deutsch
Deutsch<br />
6.8 Verwenden der Taste TV/STB<br />
Die Taste TV/STB (oder TV/SAT) dient zum Umschalten zwischen der Wiedergabe von digitalen Satellitenprogrammen über<br />
den digitalen Receiver und der Wiedergabe von normalen analogen Programmen auf dem Fernsehgerät. Die Funktion der<br />
Taste hängt davon ab, ob der digitale Receiver mit dem mitgelieferten Scart-Kabel angeschlossen wurde.<br />
Durch erneutes Drücken dieser Taste wird wieder auf die Wiedergabe eines digitalen Satellitenprogramms zurückgeschaltet.<br />
Wenn Sie Ihren digitalen Satelliten-Receiver über ein Scart-Kabel mit dem Fernsehgerät verbunden haben, werden Sie in den<br />
meisten Fällen das korrekte Programm nicht von Hand an Ihrem Fernsehgerät einstellen müssen, um digitale<br />
Satellitenprogramme zu sehen. Um sicherzustellen, dass das korrekte Programm automatisch gewählt wird, sollten Sie Ihr<br />
Fernsehgerät einschalten, bevor Sie den digitalen Satelliten-Receiver einschalten. Wird das Fernsehgerät nach dem digitalen<br />
Satelliten-Receiver eingeschaltet, müssen Sie eventuell die Taste TV/STB (oder TV/SAT) betätigen, um das korrekte<br />
Programm auf Ihrem Fernsehgerät zu wählen.<br />
Zeichenn der nteraktiven Applikationen<br />
Applikations Anzeige<br />
Erinnerung einstellen<br />
14 GRUNDFUNKTIONE<br />
6.9 Starten/stoppen/verbergen einer<br />
ausgestrahlten MHP-Anwendung<br />
Ihr Receiver ermöglicht Ihnen Herunterladung und Benutzung der<br />
interaktiven MHP-Applikationen. Manche von denen werden automatisch<br />
während Einstellung auf jeweiligen Kanäle gesendet, die anderen müssen<br />
manuell gestartet werden.<br />
Wenn Sie einen Kanal einstellen wollen wo interaktive Applikationen<br />
vermittelt werden, sehen Sie das [ mhp ] Logo im Kanalbanner. Dieses<br />
Logo wird wechselweise mit dem [ OK ] Zeichen gezeigt, das Ihnen<br />
anfordert, die OK Taste zu drücken. Wenn Sie OK drücken, der<br />
Applikations-Bildschirm aufgerufen wird, wo Sie wählen können, welche<br />
Applikation Sie starten wollen. Wenn Sie die Applikation schon wählen,<br />
drücken Sie erneut OK. Wenn Sie an Applikationenstart nicht<br />
interessiert sind, drücken Sie EXIT um Applikations-Anzeige aus dem<br />
Bildschirm zu löschen.<br />
Um interaktive Applikation aufzugeben, lesen Sie sie Bildschirm-<br />
Informationen, die von der Applikation erzeugt werden, oder schalten<br />
Sie zu anderem Kanal mit Hilfe von P+ / P- drücken.<br />
Bitte beachten Sie, daß falls Sie an keine automatisch gestarteten<br />
interaktiven Applikationen interessiert sind, stellen Sie Applikation<br />
AUTOSTART-Option in Display-Optionen Bildschirm auf NO ein.<br />
6.10 Erinnerungsfunktion und Timers<br />
6.10.1 Unterschied zwischen Erinnerungs- und<br />
Timerfunktionen<br />
Der Erinnerungs-/Timerfunktionszweck ist Ihnen davon zu erinnern, daß<br />
das Programm, daß Sie anzusehen geplannt haben, gleich anfangen wird.<br />
Der Hauptunterschied zwischen der Erinnerungs- und Timerfunktion<br />
besteht darin, daß die Erinnerungsfunktionen über den Kanalbanner<br />
eingestellt werden. Um die Erinnerungsfunktion einzustellen, wählen Sie<br />
aus dem Kanalbanner ein der zukünftigen Programme und drücken Sie<br />
OK. Dann werden Sie gefragt, ob Sie eine Schau- oder Aufnahme-<br />
Funktion einstellen wollen.
Timer Einstellen<br />
Schau Timer Pop-up<br />
Aufnahme Pop-up<br />
Erinnerungen Kollision Pop-up<br />
Timers sind von dem Übertragungsplan unabhängig. Timers werden über<br />
Timer eingestellt. Um Zugang zu Timer zu haben, wählen Sie Timer<br />
Option aus dem Hauptmenü. Timer enthält alle Timers- und<br />
Erinnerungsfunktionen, die definiert wurden. Es ermöglicht Ihnen nicht<br />
nur die Timers einzustellen, aber auch die eingestellten Timers und<br />
Erinnerungsfunktionen zu ändern/löschen. Sie werden auch gebeten,<br />
Timer zu öffnen jedesmal eine Kollision zwischen Erinnerungs-<br />
/Timerfunktionen erscheinen. Mehr dazu lesen Sie im Timer Kapitel in<br />
diesem Benutzerhandbuch.<br />
6.10.2 Aufnahme Erinnerungs-/Timerfunktionen<br />
Es gibt 2 Sorten von Erinnerungs-/Timerfunktionen: Erinnerungs-<br />
/Timerfunktion und Aufnahme Erinnerungs-/Timerfunktion. Wenn<br />
Sie Erinnerung/Timer eingestellt haben, ihre pop-up - Anzeige<br />
erscheint 1.5 Minuten bevor Programmstart. Wenn Sie auf die<br />
Erinnerung/Timer pop-up nicht reagieren, Erinnerung/Timer wird<br />
gelöscht, der Receiver stellt sich auf entsprechenden Kanal um die vorher<br />
gegebene Startzeit.<br />
Bitte beachten Sie, daß die Aufnahme- Erinnerung/Timer vor<br />
Unterbrechen geschützt wird. Wenn Sie die Aufnahme unterbrechen<br />
wollen, drücken Sie EXIT. Es wird pop-up Anzeige aufrufen, die Sie<br />
informiert, wie lange die Aufnahme noch dauern wird. Danach werden<br />
Sie gefragt, OK zu drücken, um die Aufnahme zu unterbrechen, oder<br />
EXIT um pop-up Anzeige aus dem Bildschirm einzublenden.<br />
6.10.3 Erinnerung/Timer Kollision<br />
Ihr Receiver ermöglicht Ihnen bis 8 Erinnerungs- und Timeroptionen<br />
einzustellen. Jede Erinnerung/Timer wird geprüft, ob es keine Kollision<br />
mit den vorher eingestellten Erinnerungen/Timers gibt. Wenn Sie eine<br />
Erinnerung oder Timer einstellen und solch eine Kollisn entsteht, eine<br />
Kollision pop-up Anzeige erscheint. Sie werden gebeten EXIT zu<br />
drücken um die aktuelle Erinnerung zu löschen, oder OK um zu Timer<br />
zu gelangen. Die neu eingestellte Erinnerung wird im Timer als<br />
ausgeschaltete Erinnerung (mit „?" markiert) gezeigt. Diese Erinnerung<br />
kann nur dann akzeptiert werden, wenn Sie welche der Kollision-<br />
Erinnerungen/Timers löschen oder manche ihren Angaben ändern.<br />
Weitere Informationen finden Sie in dem unteren Timer Kapitel.<br />
GRUNDFUNKTIONE 15<br />
Deutsch
Deutsch<br />
Timer<br />
Timer ändern<br />
16 GRUNDFUNKTIONE<br />
6.10.4 Timer<br />
Timer enthält die Liste von allen Erinnerungen und Timers definiert. Im<br />
Timer Menü können Sie folgende Funktionen einstellen.<br />
Timer-Einstellung<br />
Drücken Sie OK um neuen Timer einzustellen. Es wird Timer-<br />
Einstellung Bildschirm aufrufen. Geben Sie alle erforderlichen Angaben<br />
ein und drücken Sie OK für Bestätigung. Wenn die Angaben gültig sind<br />
und es gibt keine Kollision mit den vorher eingestellten<br />
Erinnerungen/Timers, dann können Sie zu Timer Bildschirm<br />
zurückkehren. Der neu eingestellter Timer erscheint auf der Timer Liste.<br />
Erinnerungen/Timers Änderung<br />
Auf dem Timer Bildschirm markieren Sie Timer/Erinnerung die Sie<br />
ändern wollen und drücken Sie B. Es wird entweder Timer-Änderung<br />
oder Erinnerung-Änderung Bildschirm aufrufen. Verändern Sie die<br />
Erinnerung/Timer Angaben und drücken Sie OK um zu bestätigen.<br />
Timers/Erinnerungen Löschen<br />
Markieren Sie Erinnerung/Timer die Sie löschen wollen, und drücken Sie<br />
C Sie werden gebeten, die Löschoperation zu bestätigen.
7 Hauptmenü<br />
7.1 Menüstruktur<br />
Ihr Receiver bietet Ihnen das Menü-System an, das Ihnen die Änderung von vielen seinen Funktionen ermöglicht. Um das<br />
Hauptmenü zu wählen, drücken Sie die MENU Taste. Das Hauptmenü besteht aus 7 Untermenüs. Um ein der Untermenüs<br />
aufzurufen, markieren Sie ihren Namen mit Hilfe von V oder W und drücken Sie dann OK. Sie können auch die<br />
Zifferntasten benutzen um entsprechenden Menüpunkt zu markieren. Um zum Hauptmenü zurückzukehren, drücken Sie<br />
BACK. Drücken Sie MENU oder EXIT wenn Sie Menü-System sofort verlassen wollen.<br />
Hier gibt es kurze Übersicht der Grundfunktionen von individuellen Untermenüs.<br />
Kanalmanager<br />
Ermöglicht Ihnen die Liste der bevorzugten Kanäle ändern, bearbeiten<br />
den Inhalt der individuellen Kanallisten und Zugang zu Kanal Pool. Mehr<br />
dazu finden Sie in 6.4 und 8.1 Kapiteln dieses Benutzerhandbuchs.<br />
Schalgen Sie auch in dem Kanal Manager Kapitel nach.<br />
Timer<br />
Hier finden Sie die Liste von allen Erinnerungen und Timers definiert. Es<br />
ermöglicht Ihnen die Timers- und Erinnerungen einzustellen und die<br />
schon eingestellten Timers und Erinnerungsfunktionen zu<br />
ändern/löschen. Mehr dazu lesen Sie im Time 6.10 Kapitel dieses<br />
Benutzerhandbuchs.<br />
Kindersicherung<br />
Dieses Untermenü wurde eingerichtet damit Ihre Kinder vor<br />
ungeeigneten TV Sendungen zu schützen. Hier können Sie auch Ihr<br />
aktuellen PIN-Code ändern. Mehr dazu finden Sie in 8.2 Kapitel dieses<br />
Benutzerhandbuchs.<br />
HAUPTMENÜ 17<br />
Deutsch
Deutsch<br />
18 HAUPTMENÜ<br />
Applikationen<br />
Ermöglicht Ihnen eine der verfügbaren "Off-the-Air" Applikationen zu<br />
starten. Gehen Sie zum Kapitel 6.9 über.<br />
Persönliche Einstellungen<br />
Ermöglicht Ihnen sowohl Ihre Bildschirm-Anzeige Einstellungen, als auch<br />
die Audio- und Untertitelsprache definieren. Mehr dazu finden Sie in<br />
Persönliche Einstellungen Kapitel 8.2 dieses Benutzerhandbuchs.<br />
Installation<br />
Ermöglicht Ihnen folgende Einstellungen: System-Konfiguration, Modem-<br />
Konfiguration, Suche nach existierende Kanäle, Status des Receivers<br />
prüfen, lokale Zeit einstellen, stellt Ihren Receiver zurück auf<br />
Werkseinstellungen. Mehr dazu finden Sie in Installation Kapitel 8.4 dieses<br />
Benutzerhandbuchs.<br />
Hilfe<br />
Gibt Ihnen Zugang zu "on-line Hilfe" Informationen, die Grundfunktionen<br />
Ihres Receivers betreffen.
8 Ändern der Einstellungen des Receivers<br />
Kanal Pool filtern<br />
Kanal Pool Inhalt<br />
Liste-Organisieren - neue Liste hinfügen<br />
Kanalliste Löschen<br />
8.1 Kanal-Manager<br />
Wenn Sie Kanal-Manager aus dem Hauptmenü wählen, kriegen Sie<br />
Zugang zu Kanal-Manager Untermenü. Dieses Untermenü ermöglicht<br />
Ihnen die Organization der Kanallisten zu ändern (Option der Liste-<br />
Organization) oder den Inhalt der individuellen Kanalliste zu ändern.<br />
(Option der Liste-Edition). Mehr dazu finden Sie in 8.11 und in 8.12<br />
Kapiteln dieses Benutzerhandbuchs.<br />
Die dritte Option Kanal Pool gibt Ihnen Zugang zu aller verfügbaren<br />
Kanälen. Aus Kanal Pool können Sie Kanäle zu individuellen Kanallisten<br />
zu übertragen. Sie können Kanal Pool auf bestimmte Satelliten, Modus<br />
und bestimmte Kanaltypen filtern. Sie können auch die Kanäle im<br />
alphabetischen Ordnung sortieren: von A bis Z oder von Z bis A.<br />
Über Kanal Pool können Sie auch Kanäle löschen wenn Sie OK drücken<br />
(nur für individuelle Kanäle) oder mit B drücken (löscht alle Kanäle).<br />
Wenn Sie alle Kanäle löschen, werden Sie gefragt, ob Sie alle löschen<br />
wollen, oder nur diese, die Sie noch nicht zu Ihrer Kanallisten übertragen<br />
haben.<br />
8.1.1 Kanalliste organisieren<br />
Wenn Sie Ihr Receiver eingestellt haben, kriegen Sie Zugang zu 6 TV-<br />
Kanallisten und 6 Radio-Kanallisten. Diese Kanallisten haben ihre Namen<br />
voreingestellt und erscheinen in gespeicherter Reihenfolge.<br />
Wenn Sie die Organisation Ihrer Kanallisten ändern wollen, drücken Sie<br />
MENU Taste und wählen Sie Liste-Organisieren Option aus dem<br />
Kanal-Manager Untermenü.<br />
Die Liste-Organisieren Bildschirm ermöglicht Ihnen folgendes:<br />
- Löschen die Listen, an die Sie nicht interessiert sind (Liste löschen).<br />
- Neue Liste einrichten (Liste einrichten).<br />
- Ändern den Namen der Kanalliste (Liste umbenennen).<br />
- Ändern die Reihenfolge in der zwischen der Listen umgeschaltet wird<br />
wenn angeschaut (Listen umstellen).<br />
ANDERN DER EINSTELLUNGEN DES RECEIVERS 19<br />
Deutsch
Deutsch<br />
Kanalliste Löschen-Bestätigen<br />
Bildschirm der Liste Editieren<br />
Wahl der Kanälenquelle<br />
Kanäle zu Liste A hinfügen<br />
20 ANDERN DER EINSTELLUNGEN DES RECEIVERS<br />
Wenn Sie Liste-Organisieren Option das erste Mal öffnen, auf dem<br />
Bilschirm werden Ihnen alle verfügbaren Kanallisten in dem gerade<br />
gewählten Modus (TV oder Radio) gezeigt. Um Modus umzuschalten,<br />
drücken Sie die RADIO Taste. Dann wählen Sie entsprechenden Befehl<br />
indem Sie Ändern Option markieren und C / B so lange betätigen, bis<br />
Sie den gewünschten Befehl sehen. Die Anzeigen, die in Hilfebalken<br />
unten auf dem Bildschirm gezeigt werden, werden dann auch<br />
entsprechend geändert. Bitte folgen Sie die Anzeigen, die auf dem<br />
Bildschirm gezeigt werden.<br />
8.1.2 Kanalliste ändern<br />
Wenn Sie Ihren Receiver einstellen, kriegen Sie Zugang zu 6 TV-<br />
Kanallisten und 6 Radio-Kanallisten. Wenn Sie Ihren Receiver auf einen<br />
anderen Satelliten als einen aus der gegebenen Liste einstellen, diese<br />
Kanallisten bleiben leer. Um sie zu editieren, drücken Sie MENU und<br />
wählen Sie Liste Editieren Option aus dem Kanal-Manager<br />
Unternenü.<br />
Es gibt Ihnen Zugang zu Liste Editieren Bildschirm. Wählen Sie Modus<br />
erst, dann Kanalliste die Sie ändern wollen. Als nächstes wählen Sie<br />
entsprechenden Änderung Befehl.<br />
Wenn Sie the Liste Editieren Bildschirm benutzen, können Sie folgendes<br />
tun:<br />
- Zu der gewählten Kanalliste können Sie aus der Kanal Pool Kanäle<br />
hinzufügen (Kanäle hinfügen). Mehreres dazu finden Sie unten im<br />
„Kanäle hinfügen".<br />
- Kanäle aus der gewählten Kanalliste löschen (Kanäle löschen). Bitte<br />
beachten Sie, daß die gelöschten Kanäle noch in dem Kanal Pool<br />
gespeichert sind und können umgespeichert werden.<br />
- Kanälenreihenfolge im Bereich der gewählten Kanalliste ändern.<br />
(Kanäle schieben).<br />
- sperren/entsperren individuelle Kanäle (Kanäle sperren).<br />
Neue Kanäle zu Kanallisten hinfügen<br />
Wenn Sie Kanäle hinfügen Befehl wählen, werden Sie nach<br />
Satellitennameneingabe und Kanälentypen, an den Sie interessiert sind,<br />
gefragt. Als Bestätigung erscheinen zwei Kanalspalten. Links gibt es eine<br />
Kanälenliste des gegebenen Typs und aus dem gewählten Satelliten.<br />
Rechts gibt es Inhalt der gewählten Kanalliste. Markieren Sie den Kanal,<br />
den Sie Ihrer Liste hinfügen wollen, und drücken Sie OK. Bitte beachten<br />
Sie, daß Sie Kanäle auch hinfügen können, indem Sie RADIO drücken<br />
und die Kanäle aus Ihrer bevorzügen Kanalliste löschen. Um zwischen<br />
diesen zwei Kanallisten umzuschalten, drücken Sie B / C.
Kindersicherung Untermenü<br />
Receiver Sperre<br />
Elterliche Ebene<br />
PIN-Code eingeben<br />
8.2 Kindersicherung<br />
Ihr Receiver gibt Ihnen Zugang zu manche Optionen, die Ihnen erlauben,<br />
Ihre Kinder vor ungeeigneten TV Sendungen zu schützen. Drücken Sie<br />
MENU und wählen Sie Kindersicherung Untermenü um die Liste der<br />
Sperrebenenen aufzurufen. Ihnen stehen folgende Sperrebenen zur<br />
Verfügung:<br />
- Receiver-Sperre Option ermöglicht denjenigen das Fernsehen, die<br />
vollen Zugang zum Receiver haben. Wenn Sie die Receiver-Sperre<br />
Option auf Nein umstellen, werden Sie nach PIN-Code Eingabe<br />
gefragt.<br />
- Sie können z.B 15 Jahre elterliche Ebene einstellen indem Sie<br />
Elterliche Ebene Option benutzen. Dann werden alle Sendungen, die<br />
für 15-jährigen ungeeignet sind, vom Fernsehen gesperrt.<br />
- Wenn Sie sich entscheiden, Ihren PIN-Code zu ändern, wählen Sie<br />
PIN-Code Änderung. Ändern Sie Ihren PIN-Code so, daß Sie sich an<br />
die neuen Angaben einfach erinnern können. Wenn Sie den PIN-Code<br />
doch vergessen, wenden Sie sich an Ihren Händler.<br />
- Sie können zusätzlich die ganzen Kanäle einsperren. Mehreres dazu<br />
finden Sie in Wie sperrt man die Kanäle weiter in diesem<br />
Benutzerhandbuch (Kapitel 8.1.2). Wenn Sie diese Kanäle dann sehen<br />
wollen, werden Sie nach PIN-Code Eingabe gefragt.<br />
8.2.1 Ihr PIN-Code<br />
Der PIN-Code ist Ihre persönliche 4-stellige Nummer, die den Zugang zu<br />
Ihrem Receiver beschränkt. Sie ist auf 1234 voreingestellt. Sie können<br />
mit dem PIN-Code Kinder vor Sehen der ungeeigneten TV Sendungen<br />
schützen, oder die Einstellungen des Receivers schützen. Immer wenn<br />
Sie versuchen, Zugang zum mit dem PIN-Code gesperrten Programm<br />
oder Funktion zu haben, werden Sie umgehend um die Eingabe von PIN-<br />
Code gebeten. Sie können Ihren PIN-Code ändern, wenn Sie das PIN-<br />
Code ändern in dem Kindersicherung Untermenü benutzen.<br />
ANDERN DER EINSTELLUNGEN DES RECEIVERS 21<br />
Deutsch
Deutsch<br />
Persönliche Einstellungen Untermenü<br />
Bildschirm der Anzeige-Optionen<br />
Bildschirm der Sprachen-Optionen<br />
Installation Untermenü<br />
22 ANDERN DER EINSTELLUNGEN DES RECEIVERS<br />
8.3 Benutzer (persönliche) -Einstellungen<br />
Persönliche Einstellungen Untermenü enthält zwei optionen:<br />
Anzeige- Option und Sprache-Option.<br />
8.3.1 Anzeige-Option<br />
Der Anzeige-Option Bildschirm ermöglicht Ihnen manche Optionen zu<br />
definieren, die auf dem Bildschirm gezeigt werden. .<br />
Zeit und Datum<br />
Blockiert die aktuellen Zeit und Datum Anzeige im Kanalbanner-<br />
Modus. .<br />
Kanalnummer<br />
Blockiert die Kanalnummer Anzeige oben in der rechten<br />
Bildschirmsecke.<br />
Kanalbanner Dauer<br />
Gibt an, wie lange Kanalbanner angezeigt bleibt.<br />
Lautstärkebalken<br />
Bocks the volume bar from being displayed.<br />
Hinweis:<br />
1-Tdie JA Option soll eingestellt werden, wenn Lautstärke und Stummschalten<br />
über den Receiver gesteuert sind.<br />
2-die NEIN Option soll eingestellt werden, wenn Lautstärke und<br />
Stummschalten über den Fernsehgerät gesteuert sind.<br />
Transparenz<br />
Zeigt die Transparenz der Bildschirmanzeige.<br />
AUTOSTART Applikation<br />
Definiert ob die MHP Applikationen automatisch gestartet werden sollen<br />
wenn Sie einen Kanal einstellen, auf dem externe Applikationen<br />
übertragen werden.<br />
System Info<br />
Entscheidet, ob einige technischen Daten wie Satellitenname oder<br />
Service-ID im Programm-Info Fenster gezeigt werden sollen.<br />
8.3.2 Sprachen-Optionen<br />
Der Sprachen-Optionen Bildschirm ermöglicht Ihnen manche<br />
Sprachen-Optionen definieren. Ändern Sie die gewünschten Sprachen<br />
persönlichen Einstellungen nach und bestätigen Sie Ihre Wahl mit OK<br />
Taste drücken.<br />
8.4 Installation<br />
Wenn Ihr Satelliten-Receiver richtig eingestellt und konfiguriert wurde,<br />
werden Sie kaum Installation Untermenü benutzen. Immerhin wird es<br />
benutzt, wenn Sie z.B. ein neues Fernsehgerät kaufen und Sie prüfen<br />
wollen, ob Ihr Receiver die Funktionen des Fernsehgeräts am besten<br />
nutzt, oder wenn Sie Ihre Antennenkonfiguration ändern wollen.<br />
Unten finden Sie manche Bildschirme der Installation Untermenü.
Einstellungen Untermenü<br />
Bildschirm der TV-Einstellungen<br />
Bildschirm der System-Einstellungen<br />
8.4.1 Einstellungen<br />
Die Einstellungen Untermenü ermöglicht Ihnen TV-/System-<br />
/Modemeinstellungen so zu ändern, daß Sie Land Einstellungen wählen<br />
können und lokale Zeit einstellen können.<br />
8.4.1.1 Installation / Einstellungen / TV-Einstellungen<br />
Der TV-Einstellungen Bildschirm enthält 2 Optionen: TV-Bildschirm-<br />
Format und Anzeige-Format. Ändern Sie die TV-Bildschirm Format<br />
Einstellungen, wenn nötig. Sie können auch default Anzeige-Format<br />
ändern (Letter-box), wenn Video Übertragungsbildseitenverhältnis dem<br />
Bildseitenverhältnis Ihres Fernsehgeräts nicht gleich wird und Sie es<br />
angepaßt haben wollen. Lesen Sie die Informationen die auf Ihrem TV-<br />
Einstellung Bildschirm erscheinen bevor Sie sich auf Änderung<br />
entscheiden.<br />
8.4.1.2 Installation / Einstellungen / System-Einstellungen<br />
Der System-Einstellungen Bildschirm enthält manche<br />
Konfigurationsangaben die Sie ändern können.<br />
TV SCART Ausgang, VCR SCART Ausgang<br />
Markieren Sie entsprechendes Format des Signalausgangs. Wir empfehlen<br />
Ihnen RGB Format für TV SCART, weil es die beste Bildqualität<br />
ermöglicht.<br />
Dolby Digital<br />
Wenn Sie einen Dolby Digital Receiver haben, ändern Sie die Dolby<br />
Digital Option auf Ja.<br />
Hinweis: Wenn Sie die Option auf JA während Sendung mit Dolby Digital<br />
einstellen:<br />
- kein Audio wird am TV & VCR SCART und L/R Audio-Ausgänge erreichbar. Nur<br />
Dolby Digital Bit Stream (AC3 - 5.1) wird am Digital Optical Ausgang verfügbar.<br />
- Während Timer wird sich der Receiver automatisch zu PCM (2 Kanal in digital)<br />
umschalten. Audio- und L/R Audio-Ausgänge werden dann am TV & VCR SCART<br />
des Receivers verfügbar um Audio-Aufnahme zu ermöglichen.<br />
Auto Upgrade<br />
Wenn Sie Ihren Receiver in Standby-Modus umschalten, die Applikation<br />
prüfen wird, ob neue Software-Version verfügbar ist. Wenn neue<br />
Software-Version entdeckt wird, werden Sie davon benachrichtigt gleich<br />
nachdem Sie Ihren Receiver zu EIN Modus umstellen. Sie können auch<br />
die Auto-Upgrade Option auf Ja einstellen. In diesem Fall wird die<br />
Receiver Software automatisch heruntergeladen während Ihr Receiver im<br />
Standby-Modus ist.<br />
Mehr zu: Easy Recording, Aufnahme-Typ und Gerät Einstellungen<br />
finden Sie in Kapiteln 9.1-9.2 Fortgeschrittene Einstellungen in diesem<br />
Benutzerhandbuch.<br />
ANDERN DER EINSTELLUNGEN DES RECEIVERS 23<br />
Deutsch
Deutsch<br />
Bildschirm der Modem-Einstellungen<br />
Land wählen<br />
Bildschirm der lokalen Zeit<br />
Antennen- Konfiguration<br />
24 ANDERN DER EINSTELLUNGEN DES RECEIVERS<br />
8.4.1.3 Installation / Einstellungen / Modem-Einstellungen<br />
Ihr Receiver ist mit einem internalen Modem ausgerüstet. Wenn Sie die<br />
Modem-Parameter konfigurieren wollen, benutzen Sie Ihre<br />
Fernbedienung - die Kontroltasten, die auf dem Hilfebalken gezeigt<br />
werden. Wenn Sie BLAU drücken, haben Sie Zugang zu Buchstaben,<br />
GRÜN schaltet zwischen großen und kleinen Buchstaben um, ROT gibt<br />
Ihnen Zugang zu einer Sonderzeichentabelle. Wenn Sie Zeichen in dem<br />
Eintrag löschen wollen, drücken Sie m Taste. Wenn Sie Ihr Modem<br />
konfiguriert haben, drücken Sie OK um die Einstellungen zu bestätigen.<br />
8.4.1.4 Installation / Einstellungen / Land<br />
Der Land wahlen Bildschirm ermöglicht Ihnen den Land, auf den Ihr<br />
Receiver konfiguriert werden soll. Drücken Sie V oder W um Land zu<br />
markieren und dann OK um ihn zu wählen. Sie mögen diese Option<br />
noch brauchen, wenn Sie Ihren Receiver mit in einen anderen Land<br />
nehmen oder wenn Sie bei der ersten Installation Ihres Receivers falsches<br />
Land gewählt haben.<br />
8.4.1.5 Installation / Einstellungen / lokale Zeit<br />
Sie mögen brauchen lokale Zeit einstellen. Verwenden Sie dazu C / B<br />
Tasten um die Zeitzone zu ändern. Drücken Sie die Tasten solange, bis<br />
Sie entsprechende lokale Zeit Angabe finden. Drücken Sie dann OK<br />
Taste um die Änderungen zu bestätigen.<br />
8.4.2 Installation / Antennenkonfiguration<br />
Antennen-Konfiguration Bildschirm ermöglicht Ihnen folgende<br />
Optionen einzustellen:<br />
LNB Power<br />
Dem LNB-Power können zwei Werten zugeschrieben werden: ON<br />
(werksseitige Einstellung) oder OFF. Es kann sein, LNB-Power für<br />
manche Antennensysteme deaktiviert werden muß.<br />
LNB Power (Standby)<br />
Der können zwei Werten zugeschrieben werden: OFF (werksseitige<br />
Einstellung) oder ON. Es kann sein, LNB-Power im Standby-Modus für<br />
manche Antennensysteme aktiviert werden muß.<br />
Signalkontrolle<br />
Der können drei Werten zugeschrieben werden: OFF (werksseitige<br />
Einstellung), Tone Burst, oder DiSEqC 1.0. Wählen Sie die<br />
Einstellungen die für Ihren Antennensystem erforderlich sind.
LNB-Konfiguration<br />
LNB1 Konfigurationsbildschirm<br />
Signalqualität/Stärke (Astra)<br />
Symbolrate Tabelle<br />
8.4.3 Installation / LNB-Konfiguration<br />
Hinweis: Wir empfehlen Ihnen, den Satelliten Astra 19.2° Ost stets als LNB1<br />
LNB/Antenna in Ihrer Anlage zu behalten, weil ein Upgrade der Software Ihres<br />
Satelliten-Receivers nur über den Satelliten Astra 19,2° Ost möglich ist. Auf diese<br />
Weise können Sie Ihren Receiver aktualisieren.<br />
Signalkontrolle = Tone Burst oder DiSEqC 1.0<br />
Wenn Sie auf Antennen-Konfiguration Bildschirm entweder Tone Burst<br />
oder DiSEqC 1.0 Schalter eingestellt haben, haben Sie Zugang zu LNB-<br />
Konfiguration Bildschirm. Markieren Sie den LNB, den Sie konfigurieren<br />
wollen und drücken Sie OK um die Liste der verfügbaren LNB<br />
Konfigurationsparameter zu sehen. Tun Sie dasselbe für irgendeinen<br />
aktiven LNB in Ihrer Antenneneinstellung. Bitte beachten Sie, daß jeder<br />
LNB einem Satelliten zugeschrieben ist.<br />
Hinweis: Mehr zu Signalkontrolle (Antenneneinstellung) inkl. DiSEqC Schalter<br />
finden Sie im Kapitel 5.3.2.<br />
Signalkontrolle = Off<br />
Wenn Sie auf dem Antennen Konfiguration Bildschirm keinen Tone<br />
Burst / DiSEqC 1.0 Schalter gewählt haben (Sie wollen Kanäle aus nur<br />
einem Satelliten sehen), wählen Sie LNB Konfiguration, was Ihnen zu<br />
LNB Konfiguration Bildschirm mitnimmt, wo Sie direkten Zugang zu<br />
der Liste aller LNB-Konfigurationsparameter, die in Ihrer<br />
Antenneneinstellung vorhanden sind, haben.<br />
LNB Typ Option ist werksseitig auf Universell eingestellt. Ändern Sie<br />
die Einstellung wenn nötig und geben Sie entsprechende Frequenz(-en)<br />
ein. Prüfen Sie Ihr LNB Benutzerhandbuch.<br />
Signalstärke/-qualität prüfen<br />
Um die Signalebene/-qualität aud Ihrer Antenne zu prüfen, drücken Sie<br />
ROT Taste auf dem LNB Konfiguration Bildschirm. Auf dem<br />
Signalstärke-Bildschirm können Sie Transpondercharakteristik ändern,<br />
die für Testen der Signalqualität für entsprechenden Satelliten und seinem<br />
LNB benutzt wird. Wenn die Signalstärke/-qualität gut ist, ist Ihre<br />
Antenne ordentlich auf entsprechenden Satelliten gezielt. Wenn die<br />
Signalstärke/-qualität schlecht ist, ändern Sie die Antennenorientierung.<br />
Wenn die Antenne ordentlich gezielt ist, vergessen Sie nicht, sie zu<br />
befestigen. Jetzt sind Sie bereit, die Kanalsuche anzufangen.<br />
Symbolrate hinfügen/löschen<br />
Um Symbol Rates, die während Kanalsuche gebraucht werden zu ändern,<br />
drücken Sie m. Die Symbolrate Werkseinstellungen enthalten die<br />
meisten Werte, die auf bestimmten Satelliten zu treffen sind.<br />
ANDERN DER EINSTELLUNGEN DES RECEIVERS 25<br />
Deutsch
Deutsch<br />
Methode der Kanalsuche<br />
Satellitenwahl<br />
Kanalsuche Im Gange<br />
Receiver Status Untermenü<br />
26 ANDERN DER EINSTELLUNGEN DES RECEIVERS<br />
8.4.4 Installation / Kanalsuche<br />
Wenn Sie Kanalsuche Option aus dem Installation Untermenü wählen,<br />
werden Sie gefragt, ob Sie neue Kanäle aussuchen wollen, oder ob Sie<br />
alle Kanallisten neu installieren wollen.<br />
Wenn Sie Neue Kanäle Suche wählen, Ihre Kanalliste bleibt intakt. Alle<br />
neu gefundenen Kanäle werden im Kanal Pool gespeichert. Wenn die<br />
Kanalsuche zu Ende ist, werden Sie gebeten, die neu gefundenen Kanäle<br />
zu Ihrer Kanallisten zu übertragen.<br />
Wenn Sie Alle Kanälenlisten neu installieren wählen, die<br />
gespeicherten Kanälenlisten, die für das gerade gewählten Land verfügbar<br />
sind, wiedererstellt werden. Bitte beachten Sie dabei, daß diese<br />
gespeicherten Kanäle aus Astra19.2° oder anderen Satelliten, die sich auf<br />
der Liste der Satellitenwahl Menü befinden, sind. Wenn Ihre Antenne auf<br />
anderen Satelliten gezielt ist, dann müssen Sie die Kanalliste manuell<br />
einrichten indem Sie die Kanälen aus der Kanal Pool zu individuelle<br />
Kanallisten übertragen.<br />
Wenn Ihre Antenneneinstellung Ihrem Receiver mehr als einen Satelliten<br />
scannen erlaubt, der Satellitenwahl Bildschirm erscheinen wird, daß<br />
Ihnen ermöglicht, einige Satelliten aus dem Kanalsucheverlauf<br />
auszuschließen. Wenn Sie OK drücken, wird der Kanalsucheverlauf<br />
angefangen. Sie können es unterbrechen, indem Sie BACK drücken.<br />
Folgen Sie die Bildschirmanzeigen.<br />
8.4.5 Installation / Receiver Status<br />
Receiver Status Untermenü gibt Ihnen Zugang zu manchen Systemund<br />
Loaderinformationen. Die Funktionalität der Signalstärke informiert<br />
Sie über die Stärke des Satellitensignals, die Ihnen hilft, die<br />
Parabolantenne am besten zu positionieren. Über Receiver Status können<br />
Sie auch Receiver Upgrade durchführen. Bitte beachten Sie, daß Receiver<br />
Upgrade auf Astra19.2° orbitale Position eingestellt ist. Wenn Ihre<br />
Antenneneinstellung nicht auf Astra19.2° konfiguriert ist, ziehen Sie<br />
keinen Vorteil von der Aktualisierung Ihres Receivers.
Zurück Zu Werkseinstellungen<br />
Benutzen Sie Zurück zu Werkseinstellungen Option wenn Sie die<br />
Werkseinstellungen zurücksetzen wollen. Wenn Sie Zugang zu Zurück<br />
zu Werkseinstellungen Bildschirm haben, drücken Sie C/B um<br />
Zurück zu Werkseinstellungen Option auf Ja umzustellen, und dann<br />
drücken Sie OK um die Werkseinstellungen zurückzusetzen.<br />
Benutzen Sie Common Interface wenn Sie den Conditional Access<br />
Modul im Common Interface Modulsteckplatz haben. So kriegen Sie<br />
Zugang zu alle Informationen, die auf der CA smart card gespeichert<br />
ANDERN DER EINSTELLUNGEN DES RECEIVERS 27<br />
Deutsch
Deutsch<br />
9 Fortgeschrittene Einstellungen<br />
9.1 Easy recording<br />
Easy recording Funktion ermöglicht Ihnen Aufnahme ohne VCR zu programmieren. Sie brauchen nur Aufnahme Timer<br />
oder Erinnerung im Kanalbanner oder Timer einzustellen, und Ihr VCR die Aufnahme um gegebene Zeit starten/enden<br />
wird. Sie können auch die Easy recording Funktion noch nutzbarer machen unter der Bedingung, daß Ihr Gerät es<br />
unterstützt.<br />
● Vor allem, prüfen Sie das Benutzerhandbuch für Ihr Gerät ob es Easy recording Option unterstützt Die meisten VCR/DVD<br />
Aufnahmegeräten von Philips unterstützen eine der zwei Easy recording Optionen: entweder Aufnahme-Vorbereitung<br />
(prüfen Sie als erste Option) oder Record Link.<br />
● Beide Ihren Geräte (TV und VCR) sollen auch mit zwei SCART Buchsen ausgestattet werden.<br />
Wenn Ihr Gerät die beiden obigen Voraussetzungen erfüllt, verbinden Sie Ihren Receiver wie auf dem Anschlußplan unten<br />
dargestellt.<br />
Satellite recever<br />
Wählen Sie dann System-Einstellungen Option aus dem Einstellungen Untermenü, aktivieren Sie Easy recording Funktion,<br />
und schreiben Sie dem Aufnahme-Typ entsprechende Wert zu: entweder Aufnahme-Vorbereiten oder Easy recording. Es<br />
kann sein, Sie müßten beide Einstellungen testen, bevor Sie die Ihrem Receiver entsprechende finden.<br />
Angenommen die Einstellungen Ihres Receivers und Ihres VCRs (prüfen Sie Ihren VCR oder DVD Benutzerhandbuch) schon<br />
durchgeführt wurden, tun Sie folgendes um aufzunehmen:<br />
- programmieren Sie Timer Ihres Receivers (Kapitel 6.10) ,<br />
- stellen Sie Ihren Rekorder in entsprechenden Modus um damit es von Ihrem Receiver gesteuert wird (prüfen Sie Ihren<br />
VCR oder DVD Benutzerhandbuch).<br />
- um gegebene Zeit soll Ihr Rekorder automatisch gestartet/gestoppt werden.<br />
Hinweis: Während die Aufnahme im Gange ist, wird Ihr Receiver vor unachtsamer Aktion, die zum Aufnahmeunterbrechen führen kann,<br />
geschützt. Bitte beachten Sie, daß während des Aufnahmeprozesses die "rEc" Anzeige im Vorderansicht des Receivers leuchtet. Wenn Sie<br />
die laufende Aufnahme unterbrechen wollen, drücken Sie EXIT. Das wird ein kleines Fenster aufrufen, wo Sie um Bestätigung gebeten<br />
werden. Um die Aufnahme volkommen zu unterbrechen, drücken Sie OK.<br />
28 FORTGESCHRITTENE EINSTELLUNGEN
9.2 Änderung der<br />
Fernbedienungs- und<br />
Receiverseinstellungen<br />
Wenn Sie andere als Philips A/V Geräte zu Hause haben<br />
und die Philips Fernbedienung Ihres Receivers mit ihnen<br />
nicht übereinstimmt, können Sie die Fernbedienungs- und<br />
Receiverseinstellungen ändern. Werksseitig ist Ihr<br />
Receiver als Gerät 1 und die Fernbedienung ist auf<br />
Gerät 1 Steuerung voreingestellt. Sie können diese<br />
Identifizierung auf Gerät 2 umstellen indem Sie System-<br />
Einstellungen Bildschirm aus Einstellungen Untermenü<br />
wählen und da entsprechende Änderungen machen. Bitte<br />
beachten Sie dabei, daß Sie Fernbedienungseinstellungen<br />
entsprechend ändern müssen (auf Gerät 2).<br />
Um die Einstellungen Ihrer Fernbedienung zu ändern, tun<br />
Sie folgendes:<br />
1 Stellen Sie sicher, daß die Fernbedienung in STB-Modus<br />
ist (drücken Sie Modus Taste und die STB LED soll<br />
blinken. Falls eine andere LED blinkt, drücken Sie Modus<br />
Taste so lange, bis die STB LED blinken wird)<br />
2 Drücken Sie gleichzeitig Zifferntasten 1 und 3 und halten<br />
Sie sie bis LED zweimal blinkt.<br />
3 Lassen Sie die zwei Zifferntasten frei, die STB LED soll<br />
einige Zeit blinken um zu bestätigen, daß die<br />
Fernbedienung jetzt in Programmierungsmodus ist..<br />
4 Geben Sie neue Einstellung in 60 Sekunden ein: entweder<br />
0039 für Gerät 2 oder 0038 für Gerät 1.<br />
Als Alternative können Sie Ihre Fernbedienung zurück auf<br />
voreingestellte Einstellung setzen (Gerät 1) indem Sie die<br />
Batterien entfernen und erst nach 3 Minuten wieder<br />
einlegen. .<br />
9.3 Master PIN Code<br />
Wenn Sie Ihren PIN-Code vergessen, immer noch haben<br />
Sie die Möglichkeit, ihn auf die Werkeinstellung (1234)<br />
zurückzusetzen. Auf Hauptmenüebene geben Sie den sogenannten<br />
Master PIN-Code (00799700) ein in kürzer<br />
Aufeinanderfolge. Bevor Sie den Master PIN-Code<br />
eingeben, drücken Sie m Taste. Bitte aufbewahren Sie<br />
den Code geheim um es vor Benutzen von Ihre Kinder<br />
zu schützen.<br />
FORTGESCHRITTENE EINSTELLUNGEN 29<br />
Deutsch
Deutsch<br />
10 Upgrade der Receiver-Software<br />
Upgrade Suche<br />
Upgrade Kann Angefangen Werden<br />
Upgrade Nachricht<br />
30 UPGRADE DER RECEIVER-SOFTWARE<br />
Ihr Receiver's software kann über Satelliten aktualisiert werden. Neue<br />
Software Versionen für Ihren Receiver werden auf Astra19.2° orbitale<br />
Position gesendet. Falls Ihre Antenneneinstellung über Astra19.2°<br />
Satelliten nicht verfügt, können Sie Ihren Receiver nicht aktualisieren.<br />
Um zu prüfen, ob neue Softwere Version verfügbar ist, wählen Sie<br />
Receiver Status aus Installation Untermenü. Danach wählen Sie<br />
Receiver Upgrade Option aus Receiver Status Untermenü. Jetzt wird<br />
es geprüft, ob neue Software Version aus Astra19.2° orbitaler Position<br />
gesendet wird. Wenn es neue Software gibt, werden Sie gebeten OK zu<br />
drücken um Herunterladen anzufangen.<br />
Wenn Sie Ihren Receiver in Standby-Modus umschalten, wird es geprüft,<br />
ob neue Software version verfügbar ist. Wenn neue Software-Version<br />
entdeckt wird, entweder wird die Aktualisierung gleich in Standby-Modus<br />
durchgeführt (die Auto-Upgrade Option ist auf Ja eingestellt), oder<br />
werden Sie von Upgrademöglichkeit benachrichtigt gleich nachdem Sie<br />
Ihren Receiver zu EIN Modus umstellen (die Auto-Upgrade Option ist<br />
auf Nein eingestellt). .<br />
Um die Auto-Upgrade Option zu ändern, drücken Sie MENU Taste.<br />
Aus Hauptmenü, wählen Sie die Installation Untermenü, dann wählen<br />
Sie Einstellungen Umtermenü. Markieren Sie System-<br />
Einstellungen Option um Zugang zu Auto-Upgrade Option zu<br />
kriegen.
11 Programmieren der Fernbedienung für Ihr STB,<br />
Fernsehgerät, Ihren Videorekorder, DVD und<br />
Verstärker/Tuner.<br />
11.1 Einrichten der Fernbedienung<br />
Beim Einschalten, zum Beispiel bei der ersten Inbetriebnahme oder nach einem Batteriewechsel, ist die Fernbedienung<br />
standardmäßig so eingestellt, dass hiermit der Satelliten-Receiver sowie die meisten Audio/Video-Geräte von Philips<br />
gesteuert werden können.<br />
Wenn Sie Geräte von anderen Herstellern haben oder wenn die Voreinstellung nicht zur Steuerung Ihres Philips Geräts<br />
geeignet ist, gehen Sie bitte wie folgt vor.<br />
Hinweis : Einige der auf den nächsten Seiten beschriebenen Funktionen stehen eventuell nicht zur Verfügung oder haben nicht bei allen<br />
Geräten das gleiche Verhalten zur Folge.<br />
1 Drücken Sie die MODE-Taste, um das einzurichtende Gerät zu wählen (TV, VCR (Videorecorder), DVD oder<br />
Verstärker/Tuner).<br />
Durch einmaliges Drücken der MODE-Taste wird durch Aufleuchten der entsprechenden grünen Leuchtanzeigen der<br />
aktuelle Modus angezeigt: links für SAT - STB, Mitte für TV, rechts für VCR (Videorecorder), links/Mitte für DVD,<br />
Mitte/rechts für Verstärker/Tuner.<br />
Zum Einstellen des Modus drücken Sie mehrmals die MODE-Taste, bis der gewünschte Modus durch die Leuchtanzeigen<br />
angezeigt wird. Die Reihenfolge ist: SAT/STB -> TV -> VCR -> DVD<br />
-> Verstärker/Tuner. Bei jedem Tastendruck blinken die Leuchtanzeigen, um den aktuellen Modus anzugeben.<br />
2 Drücken Sie die Zifferntasten 1 und 3 gleichzeitig und halten Sie sie 3 Sekunden lang gedrückt. Nach 3 Sekunden blinken die<br />
Leuchtanzeigen für den gewählten Modus zweimal und leuchten dann kontinuierlich.<br />
3 Geben Sie innerhalb von 60 Sekunden den 4-stelligen Code ein. Eine Code-Liste finden Sie hinten in diesem Handbuch.<br />
(Wenn mehrere Codes möglich sind, durchlaufen Sie diese Prozedur mit dem ersten Code und probieren Sie Ihre<br />
Fernbedienung aus. Wenn die Prozedur nicht erfolgreich war, wiederholen Sie sie mit dem zweiten Code, usw)<br />
4 Wenn ein gültiger 4-stelliger Code eingegeben wurde, erlöschen die Leuchtanzeigen und blinken dann zweimal. Ist dies nicht<br />
der Fall, kehren Sie zu Schritt 1 zurück.<br />
Durch Drücken einer beliebigen anderen Taste außer den Zifferntasten und der Standby-Taste verlassen Sie diese Prozedur<br />
automatisch.<br />
Wir empfehlen Ihnen, die nachstehende Tabelle auszufüllen, um sich die Einstellung Ihrer Fernbedienung besser merken zu<br />
können. Die Tabelle wird Ihnen von Nutzen sein, wenn Sie die Batterien der Fernbedienung wechseln müssen (siehe<br />
nachstehenden HINWEIS 2).<br />
Werkseitige Einstellung Marke / Typ Ihre Code<br />
für die Marke Philips Ihres Geräts Einstellung<br />
Fernsehgerät 0666<br />
Videorecorder (VCR) 1608<br />
DVD-Spieler / -Recorder 0566<br />
Verstärker / Tuner 1316 (Philips tuner)<br />
STB (Ihr Satelliten-Receiver)<br />
Regelung der Lautstärke siehe<br />
Kapitel 4.2.2.<br />
0038 (Device 1)<br />
PROGRAMMIEREN DER FERNBEDIENUNG 31<br />
Deutsch
Deutsch<br />
11.2 Verwenden der Fernbedienung für das Fernsehgerät<br />
TV-Modus (TV)<br />
Hinweis: Einige der nachstehend beschriebenen Funktionen stehen eventuell nicht zur Verfügung oder haben nicht bei allen Geräten das<br />
gleiche Verhalten zur Folge.<br />
ROT, GRÜN,GELB, BLAU, WEISS:<br />
- Kontext-Tasten im Videotext-<br />
Modus<br />
b<br />
- Zum Ein- und Ausschalten der<br />
Videotext-Funktion<br />
GUIDE<br />
- Zum Wählen zwischen dem ersten<br />
und dem zweiten Audio-Kanal<br />
¯<br />
- Zum Umschalten zwischen<br />
Videotext und TV/Videotext-<br />
Kombinationsmodi<br />
MENU<br />
- Zum Öffnen / Schließen eines<br />
Menüs<br />
4 / i<br />
- Blättern Sie eine Seite weiter in<br />
der Programmliste<br />
VWCB<br />
- Zum Bewegen des<br />
Auswahlbalkens nach oben und<br />
unten und zum Ändern der<br />
Einstellungen im Menü<br />
OK<br />
- Zum Bestätigen der Auswahl einer<br />
Menü-Option<br />
A +/-<br />
- Zum Einstellen der Lautstärke des<br />
Fernsehgeräts<br />
TV/STB a<br />
- Zum Umschalten zwischen den<br />
verschiedenen Modi des<br />
Fernsehgeräts (TV, AV1,AV2,<br />
Front,…)<br />
32 PROGRAMMIEREN DER FERNBEDIENUNG<br />
Standby B<br />
- Stromversorgung / Standby / Ein<br />
EXIT<br />
- Zum Verlassen des Menüs<br />
P+ P-<br />
- Zum Wählen des nächsten oder<br />
vorhergehenden<br />
Fernsehprogramms<br />
BACK<br />
- Zum Wählen des zuletzt<br />
betrachteten Fernsehprogramms<br />
MUTE H<br />
- Zum Stummschalten des<br />
Fernsehtons.<br />
0-9<br />
- Zum Wählen des entsprechenden<br />
Fernsehprogramms<br />
m (Wide screen)<br />
- Zum Wählen des TV-Bildformats<br />
(16:9, 4:3,…)
11.3 Verwenden der Fernbedienung für den Videorecorder<br />
VCR-Modus (VCR / Videorecorder)<br />
Hinweis: Einige der nachstehend beschriebenen Funktionen stehen eventuell nicht zur Verfügung oder haben nicht bei allen Geräten das<br />
gleiche Verhalten zur Folge.<br />
G<br />
- Schneller Rücklauf<br />
K<br />
- Pause<br />
L<br />
- Stopp<br />
B<br />
- Wiedergabe<br />
F<br />
- Schneller Vorlauf<br />
FAV<br />
- Zum Ein- und Ausschalten von<br />
Untertiteln<br />
MENU<br />
- Zum Öffnen / Schließen eines<br />
Menüs<br />
VWCB<br />
- Zum Verschieben des<br />
Auswahlbalkens nach oben und<br />
unten und zum Ändern der<br />
Einstellungen im Menü<br />
OK<br />
- Zum Bestätigen der Auswahl einer<br />
Menü-Option<br />
A +/-<br />
- Zum Einstellen der Lautstärke des<br />
Fernsehgeräts<br />
TV/STB a<br />
- Zum Umschalten zwischen den<br />
verschiedenen VCR-Modi (VCR,<br />
AUX1, AUX2, …)<br />
Standby B<br />
- Stromversorgung / Standby / Ein<br />
RADIO<br />
- Zum Wählen zwischen dem ersten<br />
und dem zweiten Audio-Kanal<br />
EXIT<br />
- Zum Verlassen eines Menüs<br />
P+ P-<br />
- Zum Wählen des nächsten oder<br />
vorhergehenden Programms für<br />
den Videorecorder<br />
MUTE H<br />
- Zum Stummschalten des<br />
Fernsehtons<br />
0-9<br />
- Zum Wählen des entsprechenden<br />
Fernsehprogramms<br />
m<br />
- Zum Anzeigen von On-Screen-<br />
Meldungen<br />
PROGRAMMIEREN DER FERNBEDIENUNG 33<br />
Deutsch
Deutsch<br />
11.4 Verwenden der Fernbedienung für den DVD-Spieler<br />
DVD-Modus (DVD)<br />
Hinweis: Einige der nachstehend beschriebenen Funktionen stehen eventuell nicht zur Verfügung oder haben nicht bei allen Geräten das<br />
gleiche Verhalten zur Folge.<br />
G<br />
- Suchlauf in Rückwärtsrichtung<br />
K<br />
- Stopp<br />
L<br />
- Stopp<br />
B<br />
- Wiedergabe<br />
F<br />
- Suchlauf in Vorwärtsrichtung<br />
b<br />
- Zum Ein- und Ausschalten der<br />
Videotext-Funktion<br />
GUIDE<br />
- Zum Wählen der<br />
Kameraperspektive, falls verfügbar<br />
RADIO<br />
- Zum Wählen einer anderen<br />
Tonspur, falls verfügbar<br />
MENU<br />
- Zum Öffnen / Schließen eines<br />
Menüs<br />
VWCB<br />
- Zum Verschieben des<br />
Auswahlbalkens nach oben und<br />
unten und zum Ändern der<br />
Einstellungen in einem Menü<br />
OK<br />
- Zum Bestätigen der Auswahl einer<br />
Menü-Option<br />
A +/-<br />
- Zum Einstellen der Lautstärke des<br />
Fernsehgeräts<br />
TV/STB a<br />
- Zum Umschalten zwischen DVDund<br />
TV-Wiedergabe<br />
34 PROGRAMMIEREN DER FERNBEDIENUNG<br />
Standby B<br />
- Stromversorgung / Standby / Ein<br />
EXIT<br />
- Zum Verlassen eines Menüs<br />
P+ P-<br />
- Zum Wählen des nächsten /<br />
vorhergehenden Kapitels oder<br />
Titels<br />
MUTE H<br />
- Zum Stummschalten des<br />
Fernsehtons<br />
0-9<br />
- Zum direkten Wählen von DVD-<br />
Stücken<br />
m<br />
- Zum Anzeigen von On-Screen-<br />
Meldungen
11.5 Verwenden der Fernbedienung für den Tuner-Verstärker<br />
TUNER-VERSTÄRKER-Modus (AMP)<br />
Hinweis: Einige der nachstehend beschriebenen Funktionen stehen eventuell nicht zur Verfügung oder haben nicht bei allen Geräten das<br />
gleiche Verhalten zur Folge.<br />
(*) Bezeichnet Befehle, die nur für Philips Tuner / Verstärker zur Verfügung stehen.<br />
G (*)<br />
- Zum Wählen der Signalquelle DVD<br />
K(*)<br />
- Zum Wählen der Signalquelle<br />
Satelliten-Receiver<br />
L<br />
- Zum Wählen der Signalquelle TV<br />
B (*)<br />
- Zum Wählen der Signalquelle VCR<br />
(Videorecorder)<br />
F (*)<br />
- Zum Wählen der Signalquelle<br />
Tuner.<br />
VW<br />
- Zum Wählen des nächsten /<br />
vorhergehenden Vorwahlsenders<br />
CB<br />
- Zum Suchen von<br />
Radioprogrammen mit höheren /<br />
niedrigeren Frequenzen<br />
A +/-<br />
- Zum Einstellen der Lautstärke des<br />
Verstärkers / Tuners<br />
m<br />
- Zum Wählen des TV-Bildformats<br />
(16:9, 4:3,…)<br />
Standby B<br />
- Stromversorgung / Standby / Ein<br />
P+ P- (*)<br />
- Zum Wählen des nächsten /<br />
vorhergehenden Vorwahlsenders<br />
MUTE H<br />
- Zum Stummschalten des Tons vom<br />
Verstärker / Tuner<br />
0-9 (*)<br />
- Zum direkten Wählen eines<br />
bestimmten Vorwahlsenders<br />
PROGRAMMIEREN DER FERNBEDIENUNG 35<br />
Deutsch
Deutsch<br />
12 Fehlersuche<br />
Wenn Sie Schwierigkeiten beim Betrieb Ihres Receivers haben, kontrollieren Sie zuerst die folgenden Punkte. Die meisten<br />
Probleme werden von Kabeln verursacht. Stellen Sie sicher, ob Ihr Receiver ordentlich angeschlossen ist.<br />
Keine Anzeige auf dem Display.<br />
Problem Mögliche Ursache/Abhilfe<br />
Die Fernbedienung funktioniert nicht<br />
ordnungsgemäß.<br />
Kein Bild, kein Ton; aber aktuelle Zeit-<br />
Angabe auf dem Display ist korrekt.<br />
Kein Bild, kein Ton; aber Anzeige auf dem<br />
Display ist korrekt.<br />
Nur das Hauptmenü steht zur Verfügung.<br />
Kanalauswahl ist nicht möglich.<br />
Hauptmenü und Kanalbanner werden<br />
gezeigt, aber es gibt keinen Empfang<br />
(dunkler Bildschirm).<br />
Intermittierender Empfang, "Mosaik"-<br />
Effekt oder "eingefrorenes" Bild..<br />
Das Bild ist nicht scharf und der Text ist<br />
kaum lesbar.<br />
Sie haben ein CAM-Modul und eine<br />
SmartCard in das Common Interface<br />
eingeführt: Während des ansonsten<br />
normalen Empfangs ergibt die Anwahl von<br />
Kanälen einen dunklen Bildschirm.<br />
36 FEHLERSUCHE<br />
Prüfen Sie die Verbindung des Netzkabels mit der Netzspannung. Trennen Sie den<br />
Kabel von der Netzverbindung und verbinden Sie ihn noch mal.<br />
Prüfen Sie ob es in der Wandsteckdose Spannung gibt.<br />
Prüfen Sie ob die ON/OFF Taste (auf der Rückseite des Receivers) in ON-Position<br />
ist.<br />
Prüfen Sie, ob Ihr Receiver in Ein-Modus ist.<br />
Prüfen Sie, ob Sie die Fernbedienung auf die Receivers Vorderseite zielen.<br />
Überprüfen Sie die Batterien<br />
Stellen Sie sicher, ob die Fernbedienung in STB Modus ist (Kapitel 4.2.1)<br />
Ihr Receiver ist im Standby-Modus. Drücken Sie P+/P- auf der Fernbedienung um<br />
ihn zu aktivieren. Oder drücken Sie hoch / runter Tasten auf der Vorderseite des<br />
Receivers.<br />
Sie sehen über Ihren UHF- Fernsehantennenanschluss. Drücken Sie zweimal<br />
TV/STB Taste auf der Fernbedienung .<br />
Prüfen Sie die SCART-Verbindungen<br />
Verbindungen sind korrekt - aber das Fernsehgerät ist NICHT auf eine externe AV-<br />
Signalquelle umgeschaltet. Drücken Sie zweimal TV/STB Taste Fernbedienungstaste,<br />
wenn das Problem nicht gelöst wird, prüfen Sie das Benutzerhandbuch Ihres<br />
Fernsehgeräts.<br />
Der Receiver ist nicht korrekt auf die Antenne eingestellt. Prüfen Sie Antennen-<br />
Konfiguration und LNB-Konfiguration. Durchführen Sie Kanalsuche Prozedur.<br />
(Wählen Sie Installation Untermenü aus Hauptmenü). Eventuell kehren Sie zu<br />
Werkseinstellungen zurück.<br />
Ihre Kanallisten sind leer. Schieben Sie Kanäle aus dem Kanal Pool. (Wählen Sie<br />
Kanal Manager aus Hauptmenü)<br />
Die Antenne empfängt kein Satellitensignal. Prüfen Sie die Installation und die<br />
Antennenpositionierung (prüfen Sie Signalqualität).<br />
Die Stromversorgung zum LNB ist unterbrochen. Prüfen Sie die Kabelverbindung<br />
zwischen LNB und Satelliten-Receiver.<br />
Das übertragene Signal ist zu schwach. Prüfen Sie die Installation und Positionierung<br />
der Antenne. Dieses Problem kann auch vom schlechten Wetterbedingungen<br />
verursacht werden. (z.B. große Wolken).<br />
Das übertragene Signal ist zu stark. Installieren Sie einen Abschwächer am<br />
Antenneneingang.<br />
Sie können defekte Kabelverbindungen haben. Prüfen Sie alle Verbindungen und<br />
Kabel.<br />
Schwaches Signal, weil die Antenne nicht korrekt positioniert oder instabil ist.<br />
Richten Sie die Antenne neu aus. Sorgen Sie für eine sichere Befestigung der<br />
Antenne.<br />
Das TV SCART Ausgang Video Format ist nicht auf RGB eingestellt. Ändern Sie die<br />
TV SCART Einstellungen auf RGB im System-Einstellungen Menü.<br />
Der TV SCART Anschlußdraht ist mit RGB fähigen SCART Buchseneingang Ihres<br />
Fernsehgeräts nicht verbunden (prüfen Sie Fernsehbenutzerhandbuch für korrekte<br />
Verbindungseinstellung)<br />
Der TV SCART Anschlußdraht für TV-Verbindung ist nicht RGB-fähig (nicht<br />
vollverdraht). Benutzen Sie den SCART Kabel, den Sie als Receiver-Zubehör<br />
geliefert wurde, um Ihren Fernseher zu verbinden.<br />
Ihr Abonnement-Rechte beziehen sich nicht auf den gewählten Dienst oder das<br />
gewählte Ereignis. Wählen Sie einen anderen Dienst.
13 Technische Daten<br />
Dieses Produkt wurde der 95/47/EC Norm gemäß entworfen.<br />
Video-Decodierung<br />
MPEG-2 DVB kompatibel bis MP@ML<br />
Video-Bitrate: bis zu 15 Mbit/s<br />
Bildformat: 4 :3 (letter- box wenn die<br />
Quelle 16:9) und 16 :9<br />
Auflösung: bis zu 720 x 576 Pixel<br />
Audio Dekodierung<br />
MPEG Layer I / II<br />
Operation/Features<br />
Automatische Programm-Installation beim Scannen<br />
TV- & Radio-Betrieb<br />
Empfang von kostenlosen und nicht verschlüsselten Programmen<br />
(free-to-air)<br />
6 favoriten (bevorzugten) TV Listen & 6 favoriten (bevorzugten)<br />
Radiolisten<br />
Programm-Editing zur individuellen Anpassung der Installation<br />
(löschen, hinzufügen, verschieben)<br />
Untertitel<br />
Kindersicherung mit PIN-Code<br />
Umfassende Fernsteuerung<br />
Menügesteuerte Installation und Bedienung mit On-Screen-Display<br />
VCR-Timer für 8 Ereignisse<br />
Automatische Aufnahme über: Erinnerungen- und<br />
Timersprogrammierung und Easy recording für Philips VCR und<br />
DVD- RW<br />
Automatische VCR-Wiedergabe: Audio L/R + CVBS oder RGB / Fast<br />
Blanking<br />
Receiver kompatibel mit interaktiven Diensten auf MHP-Basis<br />
Angabe der aktuellen und nachfolgenden Sendungen (Now & Next)<br />
im Kanalbanner<br />
Software-Upgrade per Satelliten-Download<br />
Video projector Anschlußmöglichkeit<br />
System-Ressourcen für Anwendungen<br />
Prozessor: 180 MHz<br />
SDRAM - CPU/Video-Graphik 32 MB<br />
Flash - Daten/Code: 8MB<br />
Satellitenantennen-Interface<br />
HF-Eingang: F-Typ-Konnektor<br />
HF-Ausgang (Bypass): F-Typ-Konnektor<br />
LNB-Versorgung (V): 0, 14, 18 Volt<br />
LNB-Strom (mA): 350 mA<br />
Ton-Umschaltung: 22 kHz (ein / aus)<br />
DiSEqc 1.0<br />
Empfangsdemodulation<br />
Demodulationstyp: QPSK<br />
Eingangsfrequenzbereich: 950-2150 MHz<br />
Durchschleif- Frequenzbereich: 950-2150 MHz<br />
Durch Applikation gesteuerte Symbolrate: 2 bis 45 Mbaud<br />
Empfangenes Satellitenband: Ku Band 10,7 bis 12,75 GHz<br />
Entschlüsselung<br />
TV SCART:<br />
Ausgang CVBS oder S-Video oder RGB/ Fast blanking gesteuert<br />
Audio L/R, Slow blanking<br />
VCR SCART:<br />
Eingang: CVBS oder RGB / Fast<br />
blanking, Slow blanking ,<br />
Audio L/R<br />
Ausgang: CVBS oder S-Video Audio<br />
L/R, Slow blanking während<br />
Timer wenn "Aufnahme<br />
Vorbereitung"-Modus aktiv<br />
ist<br />
Audio CINCH:<br />
Analog Audio Ausgang: L / R<br />
Digital Audio Ausgang: S/PDIF<br />
Serielles Interface: D-9 Buchse<br />
Zubehör<br />
- Fernbedienung: Typ RC2585108<br />
- Scart-Kabel<br />
- Benutzerhandbuch<br />
- Garantieheft für weltweite Garantie<br />
- Telefonkabel für Modem<br />
- Batterien: 2 x 1,5 V Typ AA/R06<br />
- Netzkabel<br />
Verschiedenes<br />
Temperaturbereich (°C)<br />
im Betrieb +5 bis 45<br />
bei Lagerung : -10 bis +70<br />
Stromversorgung: 230 V ~ +/-10%; 50Hz<br />
Leistungsaufnahme: max. 25 W ohne LNB<br />
Gewicht: 1,400 kg<br />
einschließlich Verpackung : 2.5 kg<br />
Abmessungen: 430mm x 50mm x 255<br />
einschließlich<br />
(Vorderansichtsfläche)<br />
Wegen ständige Produktverbesserungsarbeiten sind die<br />
Änderungen der oben gegebenen Informationen vorbehalten.<br />
TECHNISCHE DATEN 37<br />
Deutsch
14 CODE LIST FÜR VERCHIEDEN MARKEN<br />
TV<br />
A.R. Systems 0064 0583<br />
Accent 0064<br />
Accuphase 0583<br />
Acec 0039<br />
Adcom 0652<br />
Admiral 0120 0445 0114 0190 0291<br />
Adyson 0244 0243<br />
AEA 0064<br />
Agashi 0243 0291 0244<br />
AGB 0543<br />
Agef 0114<br />
Aiko 0036 0243<br />
Aim 0064 0099 0439<br />
Aiwa 0728<br />
Akai 0235 0398 0064 0460 0036 0099 0245<br />
0741 0190 0543 0742 0629 0583 0507<br />
0244 0658 0243 0291 0633<br />
Akiba 0245 0309 0482 0064 0321<br />
Alaron 0243<br />
Allorgan 0233 0321 0244<br />
Allstar 0064<br />
Amplivision 0244 0427 0397<br />
Amstrad 0036 0543 0291 0381 0398 0245 0064<br />
0460 0439 1064 0675<br />
Anam 0064 0036<br />
Anam National 0064 0677<br />
Anglo 0036 0291<br />
Anitech 0036 0291 0064 0309 0129<br />
Ansonic 0397 0064 0036 0695 0401 0190 0319<br />
0129 0438 0286 0274 0039 0131<br />
Apollo 0500<br />
Arc en Ciel 0136 0223<br />
Arcam 0243 0244<br />
Ardem 0513 0741 0064 0583<br />
Aristona 0583 0064 0039<br />
Arthur Martin 0190 0427<br />
ASA 0132 0373 0097 0131 0114<br />
Asberg0064 0129<br />
Asora 0036<br />
Astra 0064<br />
Asuka 0245 0244 0243 0291 0309<br />
Atlantic 0064 0243 0233 0286<br />
Atori 0036<br />
Auchan 0190 0427<br />
Audiosonic 0036 0064 0401 0136 0741 0742 0244<br />
0397 0291 0245 0513<br />
Audioton 0244 0513 0397 0291<br />
Autovox 0114 0233 0244 0274<br />
AWA 0038 0063 0036 0401 0439 0064 0243<br />
0633 0244 0135 0291<br />
Axxent 0036<br />
Bang & Olufsen 0592 0114<br />
Barco 0407 0190<br />
Basic Line 0401 0064 0190 0695 0583 0036 0245<br />
0309 0244 0482<br />
Bastide 0244<br />
Baur 0222 0539 0064<br />
Bazin 0244<br />
Beko 0513 0741 0397 0064 0633 0742<br />
38 CODE LIST FUR VERCHIEDEN MARKEN<br />
Beon 0064 0445<br />
Best 0397<br />
Bestar 0064 0397 0401<br />
Bestar-Daewoo 0401<br />
Black Diamond 1064 0583<br />
Black Panther 0129<br />
Black Star 0274<br />
Blacktron 0309<br />
Blackway 0309 0245<br />
Blaupunkt 0222 0227 0354 0482 0197<br />
Blue Sky 0064 0741 1064 0514 0695 0742 0651<br />
0583 0245 0309 0482<br />
Blue Star 0309<br />
Bondstec 0274<br />
Boots 0244 0036<br />
Bosch 0354<br />
BPL 0064 0309<br />
Brandt 0652 0136 0223 0362<br />
Brandt Electronique 0362<br />
Brinkmann 0064 0695 0445 0513<br />
Brionvega 0064 0114<br />
Brother 0291<br />
Bruns 0114<br />
BSR 0190 0321<br />
BTC 0245<br />
Canton 0245<br />
Capsonic 0291<br />
Carad 0637 0064<br />
Carena 0482 0064<br />
Carrefour 0063 0097 0064<br />
Carver 0197<br />
Cascade 0036 0064<br />
Casio 0064 0190<br />
Cathay 0064<br />
CCE 0064 0244<br />
Centrum 1064<br />
Centurion 0064<br />
Century 0114 0274 0265<br />
CGE 0101 0445 0274 0397 0190<br />
Cimline 0036 0245<br />
City 0036<br />
Clarivox 0445 0064 0097 0129<br />
Clatronic 0064 0397 0398 0741 0245 0291 0583<br />
0244 0274 0036 0129 0606 0675<br />
CMS 0243<br />
CMS hightec 0244<br />
Concorde 0036<br />
Condor 0064 0397 0243 0036 0309 0129 0274<br />
0445 0438 0190 0291<br />
Conrad 0064<br />
Contec 0243 0036 0038 0063 0291 0064<br />
Continental Edison 0136 0223 0514<br />
Cosmel 0036 0064<br />
Crosley 0114 0274 0101 0190<br />
Crown 0036 0397 0513 0064 0514 0741 0633<br />
0742 0445 0606 0235 0366<br />
CS Electronics 0243 0245 0274<br />
CTC 0274<br />
Curtis Mathes 0120<br />
Cybertron 0245<br />
D-Vision 0064<br />
Daewoo 0661 0651 0401 0064 0583 0036 0243
0245 0244<br />
Dainichi 0245 0243<br />
Dansai 0064 0291 0243 0036 0063 0244<br />
Dansette 0439<br />
Dantax 0397 0513 0741 0633 0742<br />
Daytron 0036 0401 0064<br />
de Graaf 0235 0190<br />
Deitron 0064 0401 0245<br />
Denko 0291<br />
Denver 0064 0633<br />
Desmet 0064 0036 0114<br />
Diamant 0064<br />
Diamond 0291<br />
Digiline 0064<br />
Dik 0064<br />
Dixi 0036 0064 0274 0244 0114<br />
Domeos 0695<br />
Domland 0421<br />
DTS 0036<br />
Dual 0244 0064 0286 0421 0190<br />
Dumont 0114 0131 0129 0244 0097 0099<br />
Dunai 0190<br />
Dux 0064 0039<br />
Dynatron 0064 0039<br />
E-Elite 0245<br />
Edison-Minerva 0514<br />
Elbe 0462 0265 0286 0319 0397 0190 0064<br />
0245 0438 0637 0244 0543<br />
Elbe-Sharp 0543<br />
Elcit 0114 0274 0543 0129 0190<br />
Elekta 0036 0064 0291 0309<br />
ELG 0064<br />
Elin 0243 0064 0132 0131 0190 0036<br />
Elite 0245 0064<br />
Elman 0129<br />
Elta 0036 0291 0243<br />
Emco 0274<br />
Emerson 0114 0274 0064 0398 0097 0309 0651<br />
0513 0397 0190<br />
Emperor 0309<br />
Erres 0064 0039<br />
ESC 0064 0244<br />
Estèle 0190<br />
Etron 0064 0036 0190<br />
Eurofeel 0291 0244<br />
Euroman 0243 0291 0064 0244 0397<br />
Europa 0064<br />
Europhon 0064 0543 0129 0190 0244 0583 0274<br />
0243<br />
Excel 0064 0583<br />
Expert 0233 0427 0286 0190<br />
Exquisit 0064 0274<br />
Family Life 0064<br />
Fenner 0401 0036<br />
Fidelity 0539<br />
Filsai 0244<br />
Finlux 0132 0131 0064 0741 0373 0244 0099<br />
0190 0543 0742 0097 0114 0129 0438<br />
0658 0519 0507 0500 0445 0633<br />
Firstline 0064 0401 0695 0741 0651 0190 0036<br />
0321 0243 0274 0129 0244 0438 0265<br />
0099 0235<br />
Fisher 0131 0244 0063 0235 0397 0072 0114<br />
Flint<br />
0190 0099<br />
0064 0637 0099 0245 0482 0291<br />
FNR 0129<br />
Formenti 0190 0064 0583 0513 0243 0114<br />
Formenti-Phoenix 0243<br />
Fortress 0120 0114<br />
Fraba 0064 0397<br />
Friac 0036 0064 0129 0397 0682<br />
Frontech 0274 0291 0244 0036 0190<br />
Fujitsu 0233 0099 0129 0244 0190 0036 0064<br />
0286<br />
Fujitsu General 0036 0244 0233 0190<br />
Funai 0695 0291 0321 0439<br />
Future 0064 0583<br />
Galaxi 0129 0064 0190<br />
Galaxis 0397 0445 0064 0129 0583<br />
Galeria 0036<br />
GBC 0190 0036 0401 0245<br />
GE 0309 0587 0136 0362<br />
Geant Casino 0190 0427<br />
GEC 0190 0064 0543 0583 0099 0244<br />
Geloso 0274 0036 0190 0401<br />
General 0136<br />
General Technic 0036<br />
Genesis 0036<br />
Genexxa 0245 0064 0439 0190 0036<br />
Goldfunk 0695<br />
Goldhand 0243<br />
GoldStar 0064 0036 0397 0317 0244 0274 0243<br />
0583 0190 0136 0633<br />
Gooding0514<br />
Gorenje 0397<br />
GPM 0245<br />
Gradiente 0197 0064<br />
Graetz 0398 0190 0064 0366 0583<br />
Gran Prix 0675<br />
Grandin 0064 0036 0190 0637 0741 0742 0695<br />
0401 0309 0245 0482 0427 0606<br />
Gronic 0129 0244 0190<br />
Grundig0222 0514 0097 0064 0583 0614 0036<br />
0063 0397<br />
Halifax 0291 0243 0244<br />
Hampton 0243 0244<br />
Hanseatic 0064 0583 0190 0319 0309 0421 0661<br />
0397 0036 0321 0244 0114<br />
Hantarex 0036 0064 0129 0543<br />
Hantor 0064<br />
Hauppauge 0064<br />
HCM 0036 0439 0064 0244 0245 0445 0309<br />
0291<br />
Hema 0244 0036<br />
Hifivox 0136 0223<br />
Highline 0291 0064<br />
Hisawa 0309 0245 0427 0482 0637<br />
Hit 0114<br />
Hitachi 0252 1252 0063 0135 0500 0190 0605<br />
0223 0244 0221 0543 0099 0064 0583<br />
0136 0661 0132 0519 0539 0507<br />
Hitachi Fujian 0135 0252<br />
Hitsu 0036 0482 0245 0637<br />
HMV 0114<br />
Hornyphone 0064 0039<br />
Hoshai 0245 0482<br />
CODE LIST FUR VERCHIEDEN MARKEN 39<br />
Deutsch
Deutsch<br />
Huanyu 0401 0243<br />
Hygashi 0244 0243<br />
Hyper 0036 0243 0244 0274<br />
Hypson 0064 0741 0291 0244 0309 0482 0427<br />
0265<br />
Iberia 0064 0583<br />
ICE 0291 0064 0398 0036 0583 0245 0244<br />
0243<br />
Ices 0245 0243<br />
Icos 0039<br />
Imperial 0064 0190 0397 0101 0583 0438 0445<br />
0274 0223<br />
Indiana 0064<br />
Ingelen 0514 0637 0741 0190<br />
Ingersoll 0036<br />
Inno Hit 0036 0099 0064 0245 0317 0244 0543<br />
0274 0129 0309<br />
Innovation 0064 0583<br />
Interactive 0064 0039 0114 0539 0354 0190 0397<br />
0136<br />
Interbuy 0036 0064 0291 0274 0539 0583<br />
Interfunk 0064 0039 0114 0539 0354 0190 0397<br />
0136 0274<br />
Internal 0064 0651 0401<br />
International 0243<br />
Intervision 0309 0244 0482 0064 0398 0513 0397<br />
0421 0514 0245 0129 0190 0291 0274<br />
0036 0583<br />
Irradio 0036 0064 0245 0274 0317 0398<br />
Isukai 0245 0064 0309 0482<br />
ITC 0244<br />
ITS 0064 0398 0245 0309 0291 0243 0036<br />
0583<br />
ITT 0190 0507 0500 0373 0366 0235 0637<br />
ITT Nokia 0190 0500 0507 0373 0235 0366 0633<br />
0637 0658<br />
ITV 0291 0064 0274 0401<br />
Jean 0063<br />
Jubilee 0583<br />
JVC 0680 0063 0398 0245 0633 0445<br />
Kaisui 0245 0309 0064 0243 0482 0244 0036<br />
Kamp 0243<br />
Kapsch 0190 0233 0286 0131<br />
Karcher 0064 0397 0637 0190 0309 0129 0291<br />
Kathrein 0583 0064<br />
Kawa 0398<br />
Kawasho 0243<br />
Kendo 0637 0064 0190 0539 0397 0438 0129<br />
0274<br />
Kennedy 0190 0233 0462<br />
Kenwood 0132<br />
Kingsley 0243<br />
Kiton 0583 0064<br />
Kneissel 0064 0397 0637 0438 0401 0583 0462<br />
0286 0319 0265<br />
Kolster 0064 0129<br />
Konka 0064 0398 0741 0445 0245<br />
Kontakt 0514<br />
Korpel 0064 0583<br />
Korting0114 0397<br />
Kotron 0439 0291<br />
Koyoda 0036<br />
Kraking0265<br />
40 CODE LIST FUR VERCHIEDEN MARKEN<br />
Kriesler 0039<br />
KTV 0244<br />
Kuba 0190<br />
Kuba Electronic 0190<br />
Kyoshu 0439 0445 0291<br />
Kyoto 0190 0243 0244<br />
LaSAT 0513 0397<br />
Leader 0036<br />
Lemair 0438<br />
Lenco 0064 0036 0190 0401 0583 0131<br />
Lenoir 0036<br />
Lesa 0274<br />
Levis Austria 0064 0583<br />
Leyco 0291 0099 0064 0321 0606<br />
LG 0064 0397 0036 0244 0583 0274 0243<br />
0317 0190 0633 0741 0136<br />
Liesenk & Tter 0354 0064 0583<br />
Liesenkotter 0064 0354 0039 0583<br />
Lifetec 0064 0036 0401 0695 0539 0682 1064<br />
0583 0245 0291<br />
Loewe 0539 0064 0682 0397 0114 0319<br />
Logik 0038 0398<br />
Logix 0695<br />
Luma 0064 0233 0190 0438 0583 0401 0036<br />
0286<br />
Lumatron 0233 0064 0190 0286 0244 0291<br />
Lux May 0064 0036 0583<br />
Luxman 0606<br />
Luxor 0221 0317 0507 0519 0235 0190 0373<br />
0500 0244 0658<br />
Madison 0064 0583<br />
Magnadyne 0114 0274 0543 0129 0190<br />
Magnafon 0543 0129 0243<br />
Magnavox 0064 0063<br />
Magnum 0675 0741 0064<br />
Mandor 0291<br />
Manesth 0064 0583 0244 0291 0321 0190<br />
Manhattan 0064 0695 1064 0190<br />
Marantz 0064 0583 0439<br />
Marelli 0114<br />
Mark 0064 0244 0243 0401 0036 0741 0742<br />
Masuda 0245 0398 0036 0291 0064 0244 0583<br />
Matsushita 0677<br />
Mediator 0064 0583 0039<br />
Medion 0064 0695 0539 0583<br />
Megas 0637<br />
Melectronic 0373 0064 0539 0136 0274 0132 0131<br />
0401 0036 0244 0507 0519 0243 0438<br />
0190 0583 0651 0661 0222<br />
Melvox 0427<br />
Memorex 0036<br />
Memphis 0099 0036<br />
Mercury 0064 0036 0583<br />
Metz 0222 0474 0394 0415 0064 0114 0583<br />
0614 0695<br />
MGA 0064 0583 0245 0131<br />
Micromaxx 0064 0695 1064<br />
Minato 0064 0583<br />
Minerva 0514 0222 0097 0543 0135<br />
Minoka 0439 0064<br />
Mitsubishi 0135 0120 0539 0064 0381 0114 0063<br />
0583 0235<br />
Mitsuri General 0190
Mivar 0319 0317 0318 0397 0243 0636 0543<br />
0244<br />
Monaco 0036<br />
Morgan's 0064 0583<br />
Motorola 0120<br />
MTC 0397 0539 0190 0243<br />
Multistandard 0129<br />
Multitec 0064 0695 0513<br />
Multitech 0036 0513 0064 0397 0583 0244 0243<br />
0274 0129 0291<br />
Murphy 0131 0243 0099 0190<br />
Musikland 0064 0245 0274 0583<br />
Myryad 0583 0064<br />
NAD 0190<br />
Naiko 0064 0633 0583<br />
Nakimura 0401 0064 0583<br />
Naonis 0190<br />
NAT 0253<br />
National 0253<br />
NEC 0197 0063 0482 0036 0401 0244 0064<br />
0038<br />
Neckermann 0064 0397 0227 0583 0190 0354 0445<br />
0114 0274 0244 0438 0539<br />
NEI 0064 0398 0190<br />
Nesco 0274<br />
Netsat 0064 0583<br />
Neufunk 0064 0036 0583 0637 0245 0309<br />
New Tech 0064 0036 0583 0244<br />
New World 0245<br />
Nicamagic 0243<br />
Nobliko 0129 0097 0243<br />
Nogamatic 0136 0223<br />
Nokia 0190 0507 0519 0500 0366 0235 0401<br />
0658 0633 0373 0637 0136<br />
Nordic 0244<br />
Nordmende 0136 0223 0587 0222 0064 0362 0190<br />
Norfolk 0190<br />
Normerel 0064 0583<br />
Novak 0039<br />
Novatronic 0064 0132 0401 0583<br />
Nurnberg0190<br />
Oceanic 0190 0427 0321 0235 0500 0507<br />
Odeon 0291<br />
Okano 0397 0064 0291 0099 0036<br />
Omega 0291<br />
Onwa 0398 0629 0245 0460 0129<br />
Opera 0064 0583<br />
Optimus 0677<br />
Optonica 0120<br />
Orbit 0064 0583<br />
Orion 0064 0583 0682 0321 0038 0036 0129<br />
0291 0439 0543<br />
Orline 0064 0245 0583<br />
Ormond 0695 1064 0064 0583<br />
Orsowe 0543<br />
Osaki 0099 0245 0244 0291 0064 0439 0401<br />
0583<br />
Osio 0064 0583 0317<br />
Oso 0245<br />
Osume 0099 0063 0245 0064<br />
Otto Versand 0063 0120 0539 0064 0583 0222 0136<br />
0321 0253 0274 0244 0036 0309 0543<br />
Pacific 0064 0583<br />
Pael 0243<br />
Palladium 0397 0064 0227 0445 0583 0274 0354<br />
0114 0190 0244 0438 0682<br />
Palsonic 0291 0439 0064 0244 0245 0583<br />
Panama 0036 0244 0291 0243 0064 0274<br />
Panasonic 0677 0253 0394 0543 0064 0190<br />
Panavision 0064 0438 0583<br />
Pathe Cinema 0190 0265 0243 0427 0319 0397<br />
Pathe Marconi 0136 0223<br />
Pausa 0036<br />
Perdio 0099 0190 0064 0243 0309 0583<br />
Perfekt 0064 0583<br />
Pershin 0427<br />
Philco 0114 0101 0445 0274 0190 0397 0064<br />
Philharmonic 0244<br />
Philips 0666 0064 0583 0039 0114 0401<br />
Phoenix 0064 0114 0513 0397 0243 0190 0099<br />
Phonola 0064 0583 0039 0114 0243<br />
Pilot 0064 0583<br />
Pioneer 0064 0397 0136 0190 0513<br />
Pionier 0397 0513<br />
Plantron 0064 0291 0036<br />
Playsonic 0244<br />
Policom 0129 0136 0223 0233 0265<br />
Poppy 0036<br />
Portland 0401 0651<br />
Powerpoint 0514<br />
Prandoni-Prince 0274 0543<br />
Precision 0244<br />
Prima 0036 0291<br />
Prinz 0099 0221<br />
Profex 0036 0190<br />
Profi 0036<br />
Profitronic 0064 0129<br />
Proline 0099 0064 0039 0652<br />
Prosonic 0064 0243 0397 0401 0606 0398 0695<br />
Protech 0064 0244 0036 0274 0129 0291 0445<br />
0695 0309<br />
Provision 0064 0583 1064<br />
Pye 0064 0401 0583 0039 0114<br />
Pymi 0036<br />
Quadra Vision 0427<br />
Quasar 0274<br />
Quelle 0064 0038 0136 0539 0063 0244 0274<br />
0101 0354 0097 0131 0132 0222 0227<br />
0291 0317 0695 0321 0373 0036<br />
Questa 0063<br />
R-Line 0064<br />
Radialva 0136 0245 0190 0064<br />
Radiola 0064 0583 0039 0244<br />
Radiomarelli 0114 0543 0274 0064<br />
RadioShack 0064<br />
Radiotone 0036 0064 0397 0606 0445 0291 0439<br />
0675<br />
Rank 0097<br />
Rank Arena 0063<br />
RBM 0097<br />
RCA 0652 0120 0587 0362<br />
Recor 0064<br />
Rectiligne 0064<br />
Rediffusion 0063<br />
Redstar 0064 0583<br />
CODE LIST FUR VERCHIEDEN MARKEN 41<br />
Deutsch
Deutsch<br />
Reflex 0064 0695<br />
Revox 0064 0397<br />
Rex 0233 0438 0274 0190 0286 0291<br />
RFT 0114 0319 0397 0099 0291<br />
Rhapsody 0243<br />
Ricoh 0064 0583<br />
Roadstar 0036 0291 0245 0445 0064 0309 1064<br />
Robotron 0114<br />
Rodex 0064 0583<br />
Rowa 0291 0244<br />
Royal Lux 0397 0439<br />
Saba 0652 0114 0190 0136 0543 0223 0362<br />
0587<br />
Saccs 0265<br />
Sagem 0482 0637 0309<br />
Saisho 0543 0036 0038 0244 0190 0291 0381<br />
Saivod 0064<br />
Salora 0317 0221 0190 0543 0366 0235<br />
Salsa 0362<br />
Sambers 0543 0129<br />
Samsung0064 0583 0614 0645 0036 0244 0397<br />
0291 0243 0317 0099 0235<br />
Sandra 0243 0244<br />
Sanela 0265<br />
Sansui 0064 0398 0682<br />
Santon 0036<br />
Sanyo 0235 0319 0063 0038 0397 0366 0099<br />
0243 0244 0131 0072 0036 0190 0064<br />
0135<br />
Save 0064<br />
SBR 0064 0583 0039<br />
Schaub Lorenz 0633<br />
Schneider 0064 0583 0039 0421 0286 0244 0274<br />
0398 0245 0190 0695 0675 1064<br />
Scotland 0190<br />
SEG 0244 0291 0036 0274 0063 0129 0190<br />
0064 0243 0695 0514 0661 1064<br />
SEI 0114 0129 0190 0543 0321 0233 0064<br />
Sei-Sinudyne 0129 0233 0321 0543 0064 0114<br />
Seleco 0398 0233 0286 0190 0438<br />
Sencora 0036<br />
Sentra 0245 0036<br />
Serino 0482 0637 0243<br />
Sharp 0120 1220 0063 0321 0680 0543<br />
Shintoshi 0064<br />
Shorai 0321<br />
Siarem 0190 0114 0129 0543<br />
Siemens 0227 0222 0354 0064<br />
Siera 0064 0583 0039<br />
Siesta 0397<br />
Silva 0243 0064<br />
Silver 0063 0064 0583 0742 0190<br />
Singer 0114 0129 0274 0427 0462 0036 0064<br />
Sinudyne 0114 0129 0321 0190 0543 0233 0064<br />
Sky 0064<br />
Skymaster 0132<br />
Smaragd 0514<br />
Solavox 0099 0190 0064<br />
Sonawa 0245<br />
Sonitron 0235 0397 0366 0244<br />
Sonneclair 0064<br />
Sonoko 0064 0036 0291 0309 0244<br />
Sonolor 0235 0190 0427 0309<br />
42 CODE LIST FUR VERCHIEDEN MARKEN<br />
Sontec 0064 0397 0321 0036<br />
Sony 1532 1678 1037 0038 0063 0129 0064<br />
Sound & Vision 0129 0245 0401<br />
Soundwave 0064 0445<br />
Spectra 0036<br />
Ssangyong 0036<br />
Standard 0245 0036 0244 0064 1064 0401<br />
Starlite 0036 0190 0064 0291<br />
Stenway 0309 0245<br />
Stern 0233 0286 0190 0291 0438<br />
Strato 0064 0291 0036<br />
Stylandia 0244<br />
Sunkai 0321 0482 0245 0064 0514 0637<br />
Sunstar 0398 0064 0036 0606<br />
Sunwood 0064 0036<br />
Superla 0543 0243<br />
SuperTech 0036 0064 0243 0583 0245<br />
Supra 0401 0036<br />
Susumu 0362 0245<br />
Sutron 0036<br />
Swissline 0274<br />
Sydney 0243 0244<br />
Sysline 0064<br />
Sytong0243<br />
T+A 0474<br />
Tandberg0394 0438 0136 0223<br />
Tandy 0120 0245 0099 0244 0274 0190<br />
Tashiko 0063 0244 0197 0243 0190<br />
Tatung0099 0543 0244 0064 0038<br />
Teac 0244 0539 0064 0482 0291 0036 0439<br />
0695<br />
TEC 0244 0036 0274 0362 0286<br />
Tech Line 0064 0695<br />
Techica 0245<br />
TechniSat 0682<br />
Tedelex 0244 0633<br />
Teiron 0036<br />
Teleavia 0136 0223<br />
Telecor 0064 0190 0245 0244 0286 0421<br />
Telefunken 0136 0101 0128 0362 0289 0223 0064<br />
0513 0652<br />
Telefusion 0064<br />
Telegazi 0064 0190 0286 0245 0291<br />
Telemeister 0064<br />
Telesonic 0064<br />
Telestar 0064 0606<br />
Teletech 0036 0274 0064 0695<br />
Teleton 0244 0233 0190 0286 0063<br />
Televideon 0190 0243<br />
Televiso 0427<br />
Temco 0321<br />
Tempest 0036 0064<br />
Tennessee 0064<br />
Tensai 0131 0245 0064 0244 0321 0036 0132<br />
0401 0398 0274<br />
Tenson 0036<br />
Tevion 0064 0675 0695<br />
Texet 0244 0401 0036 0243 0245<br />
Thomson 0652 0136 0362 0223 0064 0587<br />
Thorn 0265 0101 0064 0131 0362 0539 0401<br />
0135 0136 0252 0099<br />
Thorn-Ferguson 0131 0135 0136 0265 0362
Tokai 0099 0064 0190 0244 0401 0036<br />
Tokyo 0243<br />
Tomashi 0309 0245<br />
Toshiba 0535 0063 0097 0129 0244 0136<br />
Towada 0129 0244<br />
Toyoda 0036<br />
Trakton 0291<br />
Trans Continens 0695 0244 0064<br />
Transonic 0064 0482 0614 0539 0291<br />
Transtec 0243<br />
Trident 0543 0244<br />
Tristar 0245<br />
Triumph 0543 0373 0583 0064<br />
Tsoschi 0309<br />
TVTEXT 95 0583<br />
Uher 0064 0233 0401 0445 0513 0397 0286<br />
Ultravox 0114 0129 0401 0274 0243 0190 0064<br />
Unic Line 0064 0500 0482<br />
United 0064 0741 0742<br />
Universum 0373 0132 0222 0500 0274 0519 0507<br />
0397 0227 0445 0038 0539 0321 0063<br />
0097 0190 0291 0131 0064 0438 0317<br />
0101 0354 0695 0244 0136 0658 0036<br />
Univox 0114 0064 0190 0265<br />
Vestel 0064 0190 0244 0583 0695 1064<br />
Vexa 0036 0064<br />
Videologique 0243 0245 0244<br />
Videosat 0274<br />
VideoSystem 0064<br />
Videotechnic 0243 0244 0401<br />
Videoton 0190<br />
Vidikron 0129<br />
Vidtech 0063<br />
Visiola 0243<br />
Vision 0064 0244<br />
Vistar 0233<br />
Vortec 0064<br />
Voxson 0114 0064 0445 0190<br />
Waltham 0244 0695 0445 0064 0136<br />
Watson 0064 0190 0245 0606 0421 0036 0695<br />
1064<br />
Watt Radio 0129 0190 0243<br />
Wega 0063 0114 0064<br />
Wegavox 0036<br />
Weltblick 0064 0244<br />
White Westinghouse 0243 0064<br />
Windstar 0309<br />
Xrypton 0064<br />
Yamishi 0309 0482 0245 0064 0244<br />
Yokan 0064<br />
Yoko 0244 0064 0245 0291 0036 0397 0366<br />
0243 0274<br />
Yorx 0245<br />
Zanussi 0233 0244<br />
Zenor 0366<br />
VCR<br />
Adyson 0099<br />
Aiwa 0334 0027 0068 0375 0379 0064<br />
Akai 0133 0342 0068 0047 0379 0267<br />
Akiba 0099<br />
Akura 0099 0068<br />
Allorgan 0267<br />
Allstar 0108<br />
Ambassador 0047<br />
Amstrad 0027 0305 0099<br />
Anitech 0099<br />
Aristona 0108<br />
ASA 0064 0108<br />
Asuka 0099 0064 0108 0027 0065<br />
Audiosonic 0305<br />
Audioton 0047<br />
AVP 0379<br />
AWA 0064 0305 0070<br />
Baird 0133 0305 0131 0068 0027<br />
Bang & Olufsen 0526<br />
Basic Line 0305 0047 0099<br />
Bestar 0305 0047<br />
Black Panther 0305<br />
Blaupunkt 0253 0108 0222 0061<br />
Blue Sky 0064 0375 0099 0379 0305<br />
Bondstec 0047 0099<br />
Brandt 0068 0347 0348 0520<br />
Brandt Electronique 0068<br />
Brinkmann 0375<br />
Carena 0108<br />
Carrefour 0072<br />
Casio 0027<br />
Cathay 0305<br />
Catron 0047<br />
CGE 0068 0027<br />
Cimline 0099<br />
Clatronic 0047 0099<br />
Combitech 0379<br />
Condor 0047 0305<br />
Crown 0305 0099 0047<br />
Cyrus 0108<br />
Daewoo 0305 0047 0072 0379<br />
Dansai 0099 0305<br />
Daytron 0305<br />
de Graaf 0069 0108 0131 0075<br />
Decca 0027 0068 0108 0035 0094 0375<br />
Deitron 0305<br />
Denko 0099<br />
Diamant 0064<br />
Dual 0068 0108 0305 0027<br />
Dumont 0027 0108 0131<br />
Elbe 0305 0065<br />
Elcatech 0099<br />
Elin 0267<br />
Elsay 0099<br />
Elta 0099 0305<br />
Emerson 0099 0072<br />
ESC 0305 0267 0047<br />
Etzuko 0099<br />
Europhon 0047<br />
Fenner 0047<br />
Ferguson 0068 0347 0348 0520 0027 0305<br />
CODE LIST FUR VERCHIEDEN MARKEN 43<br />
Deutsch
Deutsch<br />
Fidelity 0027 0099 0267 0379<br />
Finlandia 0131 0108 0069 0027 0075 0411<br />
Finlux 0027 0108 0131 0069<br />
Firstline 0099 0375 0070 0064 0072 0069 0305<br />
Fisher 0074 0131 0065 0047<br />
Frontech 0047 0099<br />
Fujitsu 0027<br />
Funai 0027<br />
Galaxi 0027<br />
Galaxis 0305<br />
GBC 0047<br />
GEC 0108<br />
General 0047<br />
General Technic 0375<br />
Genexxa 0131<br />
Goldhand 0099<br />
GoldStar 0064 0027<br />
Graetz 0068 0131 0267<br />
Granada 0131 0075 0108 0267 0064 0253 0069<br />
0027<br />
Grandin 0099 0064 0047 0027 0305<br />
Grundig0222 0108 0374 0253 0347 0375 0099<br />
Hanimex 0379<br />
Hanseatic 0064 0305 0108 0065<br />
Hantor 0047<br />
Harwood 0099<br />
HCM 0099<br />
Hisawa 0379<br />
Hischito 0072<br />
Hitachi 0069 0068 0027 0267 0108 0131 0411<br />
Hornyphone 0108<br />
Hypson 0099 0305 0379<br />
Impego 0047<br />
Imperial 0027 0267<br />
Ingersoll 0267<br />
Inno Hit 0047 0267 0305 0099<br />
Interbuy 0064 0099<br />
Interfunk 0108 0131<br />
Internal 0305<br />
International 0305 0064<br />
Intervision 0027 0305 0064 0375<br />
Irradio 0099 0064 0108<br />
ITT 0133 0068 0411 0131 0267<br />
ITT Nokia 0075<br />
ITV 0305 0064 0047<br />
JVC 0068 0094 0035 0411<br />
Kaisui 0099<br />
Karcher 0305<br />
Kendo 0133 0342 0375 0099 0064<br />
Kenwood 0068 0065<br />
KIC 0027<br />
Kimari 0074<br />
Kneissel 0379 0375 0064<br />
Korpel 0099<br />
Kuba 0074<br />
Kuba Electronic 0074<br />
Kuwa 0253<br />
Kyoto 0099<br />
Lenco 0305<br />
Leyco 0099<br />
LG 0064 0027 0305<br />
Lifetec 0375<br />
Loewe 0108 0064 1189<br />
44 CODE LIST FUR VERCHIEDEN MARKEN<br />
Logik 0267 0099 0133<br />
Lumatron 0305<br />
Luxor 0133 0070 0099 0089 0131 0074 0075<br />
Magnavox 0108<br />
Manesth 0099 0072 0108<br />
Marantz 0108 0065 0089<br />
Mark 0305 0047<br />
Matsui 0375 0064 0267 0379 0027<br />
Mediator 0108<br />
Medion 0375 0379<br />
Melectronic 0027 0064 0065<br />
Memorex 0131 0027 0064 0075 0074<br />
Memphis 0099<br />
Metz 0222 0374 0108 1189 0253 0064<br />
Micormay 0375<br />
Migros 0027<br />
Minerva 0222<br />
Mitsubishi 0070 0094 0108<br />
Multitec 0064<br />
Multitech 0027 0099 0047 0131<br />
Murphy 0027<br />
Myryad 0108<br />
NAD 0131<br />
National 0253<br />
NEC 0068 0065 0094 0131 0064<br />
Neckermann 0068 0108<br />
Nesco 0099 0027 0379<br />
Nikkai 0047 0099 0305<br />
Nokia 0131 0133 0342 0068 0305 0267 0075<br />
0069 0108<br />
Nordmende 0068 0411 0347 0348 0521 0555 0094<br />
0520<br />
Oceanic 0027 0075 0133 0108 0131 0068<br />
Okano 0342 0375 0099 0305<br />
Orbit 0099<br />
Orion 0379 0375<br />
Orson 0027<br />
Osaki 0027 0064 0099<br />
Osume 0099<br />
Otto Versand 0108<br />
Palladium 0099 0342 0064 0068 0267<br />
Palsonic 0099 0027<br />
Panasonic 1189 0253<br />
Pathe Cinema 0070<br />
Pathe Marconi 0068<br />
Perdio 0027<br />
Philco 0065 0099<br />
Philips 1608 0108 0411<br />
Phonola 0108<br />
Pioneer 0094 0108 0069<br />
Portland 0047 0305<br />
Prinz 0027<br />
Profitronic 0108 0267<br />
Proline 0027 0347 0348<br />
Prosco 0305<br />
Prosonic 0305 0027<br />
Protech 0108<br />
Provision 0305<br />
Pye 0108<br />
Quasar 0305<br />
Quelle 0108<br />
Radialva 0064 0099 0108 0075<br />
Radiola 0108
Rank 0068<br />
Rex 0068 0411<br />
RFT 0047 0099<br />
Roadstar 0267 0099 0064 0305<br />
Royal 0099<br />
Saba 0068 0347 0348 0411 0521 0089 0607<br />
0305<br />
Saisho 0375<br />
Salora 0070 0133 0131<br />
Samsung0267 0459<br />
Samurai 0047<br />
Sansui 0068 0094 0133 0099 0375<br />
Sanyo 0131 0074 0075 0094<br />
Saville 0379 0305 0267<br />
SBR 0108<br />
Scan Sonic 0267<br />
Schaub Lorenz 0068 0131 0027 0133 0342<br />
Schneider 0099 0027 0064 0108 0305 0267 0069<br />
Seaway 0305<br />
SEG 0099 0267 0305 0108<br />
SEI 0108<br />
Sei-Sinudyne 0108<br />
Seleco 0068 0035 0411 0047 0064<br />
Sentra 0099 0047<br />
Setron 0099<br />
Sharp 0075 0089 0064<br />
Shintom 0099 0131<br />
Shivaki 0064<br />
Siemens 0222 0064 0131 0108 0347 0374<br />
Siera 0108<br />
Silva 0064<br />
Silver 0305<br />
Singer 0072<br />
Sinudyne 0108<br />
Smaragd 0375<br />
Solavox 0047<br />
Sonitron 0074<br />
Sonneclair 0099<br />
Sonoko 0305<br />
Sonolor 0075 0089<br />
Sontec 0064 0305<br />
Sony 0060 0061 0059 0133 1059<br />
Soundwave 0064<br />
Ssangyong 0099<br />
Standard 0305<br />
Starlite 0064 0131<br />
Stern 0305<br />
Sunkai 0375 0305<br />
Sunstar 0027<br />
Suntronic 0027<br />
Sunwood 0099<br />
Supra 0064 0267<br />
Symphonic 0027 0099<br />
Tandberg0305<br />
Tashiko 0027 0075 0267 0108 0064<br />
Tatung0027 0068 0108 0075 0070 0375 0379<br />
Teac 0099 0068 0027 0305 0064 0108 0334<br />
TEC 0047 0305 0099<br />
Tech Line 0099<br />
TechniSat 0375<br />
Teleavia 0068 0520<br />
Telefunken 0068 0347 0348 0411 0520 0521 0305<br />
0607<br />
Teletech 0099 0305 0027<br />
Tempest 0047<br />
Tenosal 0099<br />
Tensai 0027 0064 0099<br />
Tevion 0375<br />
Thomson 0347 0348 0068 0094 0411 0520 0521<br />
0555 0305<br />
Thorn 0068 0131 0064<br />
Thorn-Ferguson 0347<br />
Tokai 0099 0064 0068 0131<br />
Tokiwa 0099<br />
Topline 0375<br />
Toshiba 0072 0068 0411 0070 0108<br />
Towada 0099<br />
Tracton 0047<br />
Trakton 0047<br />
TVA 0047<br />
Uher 0064 0267<br />
Ultravox 0305<br />
Unitech 0267<br />
United Quick Star 0305<br />
Universum 0027 0108 0267 0064 0133 0375 0222<br />
0131<br />
Victor 0035 0094<br />
Watson 0108 0379<br />
Weltblick 0064<br />
Yamaha 0068<br />
Yamishi 0099 0305<br />
Yokan 0099<br />
Yoko 0064 0099 0047 0267<br />
CODE LIST FUR VERCHIEDEN MARKEN 45<br />
Deutsch
Deutsch<br />
SAT - STB<br />
Philips 0038<br />
AMP<br />
Arcam 0668<br />
Curtis Mathes 0327<br />
JBL 1030 0695<br />
Marantz 0348<br />
Mark 1030<br />
Optimus 0040<br />
Philips 0668<br />
Pioneer 0040 0327<br />
Sansui 0348<br />
Teac 0448<br />
Yamaha 0170 0381<br />
TUNER<br />
Aiwa 0148 1432<br />
Akai 0142<br />
Arcam 1116 1216<br />
Audiolab 1216<br />
Carver 0387<br />
Denon 1187 1131 1387<br />
Fisher 0387<br />
Grundig1216 1116<br />
Harman/Kardon 0137<br />
Inkel 0518<br />
JBL 0137<br />
JVC 0101<br />
Kenwood 1054 1340 1596<br />
Marantz 1216 1116 1316<br />
Micromega 1216<br />
Myryad 1216<br />
NAD 0347<br />
Onkyo 0162<br />
Panasonic 1335 1336 1790 1545<br />
Philips 1216 1116 1316<br />
Pioneer 1050 0316<br />
Sansui 1116<br />
Sanyo 0387<br />
Schneider 0137<br />
Sherwood 0518<br />
Sony 1085 1185 1285<br />
Teac 0137<br />
Technics 1335 1336 1790 1545<br />
Thorens 1216<br />
Victor 0101<br />
46 CODE LIST FUR VERCHIEDEN MARKEN<br />
DVD<br />
3DLAB 0566<br />
A-Trend 0741<br />
Acoustic Solutions 0757<br />
AEG 0815<br />
Afreey 0725<br />
Boman 0810<br />
Brandt 0678<br />
Clatronic 0815<br />
Cyber Home 0741<br />
Cytron 0678<br />
Daewoo 0797<br />
Dansai 0797<br />
Denon 0517<br />
Denver 0815<br />
Denzel 0692<br />
Diamond 0678<br />
Dual 0692 0678 0757<br />
Elta 0717<br />
Emerson 0618<br />
Encore 0725<br />
Enzer 0692<br />
Ferguson 0678<br />
Finlux 0768<br />
GoldStar 0618 0768<br />
Graetz 0692<br />
Grundig0566 0802<br />
Grunkel 0797<br />
Hanseatic 0768<br />
Hitachi 0692 0600<br />
JVC 0650 0585 0566 0530<br />
Karcher 0810<br />
Kenwood 0561 0517 0764<br />
Kiss 0692<br />
Lenco 0678 0797<br />
LG 0618 0768<br />
Lifetec 0678<br />
Loewe 0566<br />
Magnavox 0530<br />
Marantz 0566<br />
Matsui 0678<br />
MBO 0717<br />
Medion 0810 0678<br />
Metz 0598 0552<br />
Micromedia 0530 0566<br />
Micromega 0566<br />
Microsoft 0549<br />
Monyka 0692<br />
Mustek 0757<br />
Mx Onda 0678<br />
NAD 0768<br />
Naiko 0797<br />
Neufunk 0692<br />
Onkyo 0530<br />
Optimus 0598 0552<br />
Oritron 0678<br />
Palsonic 0716<br />
Panasonic 0517<br />
Philips 0566 0530<br />
Pioneer 0598 0552<br />
Proline 0678<br />
Proscan 0549
Radionette 0768<br />
Raite 0692<br />
RCA 0549<br />
REC 0716 0517<br />
Roadstar 0717 0716<br />
Rotel 0650 0585<br />
Saba 0678<br />
Salora 0768<br />
Sampo 0725<br />
Samsung0600<br />
Schaub Lorenz 0815<br />
Schneider 0678 0810<br />
Scott 0678<br />
SEG 0692<br />
Sharp 0657<br />
Sherwood 0768<br />
Silva 0815<br />
Singer 0717<br />
Skymaster 0757<br />
SM Electronic 0717 0757<br />
Sony 0560 0600<br />
Soundwave 0810<br />
Standard 0678<br />
Sunwood 0815<br />
Teac 0768 0598 0618<br />
Technics 0517<br />
Technika 0797<br />
Tensai 0717 0678<br />
Tevion 0678<br />
Theta Digital 0598<br />
Thomson 0578 0549<br />
Tokai 0692 0725<br />
Tokaido 0725<br />
Toshiba 0530<br />
United 0815<br />
Universum 0768 0618<br />
XMS 0815 0716<br />
Yamaha 0517 0566<br />
Yamakawa 0692<br />
Yukai 0757<br />
Zenith 0530 0618 0768<br />
CODE LIST FUR VERCHIEDEN MARKEN 47<br />
Deutsch
Welcome To Digital Television<br />
Congratulations on choosing the Philips’ <strong>DSR</strong> <strong>5600</strong> digital satellite receiver. This receiver will allow you to access free-toview<br />
as well as scrambled digital satellite television, radio and interactive channels. The embedded MHP feature makes your<br />
receiver compatible with the MHP interactive television applications that are carried on some of the channels.<br />
Please note, however, that to view scrambled channels, you will need to buy a conditional access module and take a<br />
subscription. The conditional access module is not supplied with your receiver. You will find more information on how to use<br />
the conditional access module later in this manual.<br />
Note: "Decoder" is used in all the menu screens. The term "decoder" also stands for "STB (Set Top Box)", "Receiver" or "Digital receiver". In<br />
the user manual all descriptions refer to "receiver".<br />
Contents<br />
1 Safety Instructions ___________________________3<br />
2 Unpacking __________________________________3<br />
3 Product description __________________________4<br />
3.1 Front view _________________________________4<br />
3.2 Rear view __________________________________5<br />
3.3 Conditional Access Module ____________________5<br />
4 Preparing, setting and using your<br />
Remote Control _____________________________6<br />
4.1 Installation of batteries ________________________6<br />
4.2 Setting of your remote control _________________6<br />
4.2.1 Mode setting ________________________________6<br />
4.2.2 Volume and mute control setting _________________6<br />
4.2.3 Changing the brand setting of your remote control<br />
for TV, VCR, DVD or Amplifier-Tuner ______________6<br />
4.3 Using the remote to control your digital receiver –<br />
The remote control is set to STB mode. _________7<br />
5 Connection and Installation ___________________8<br />
5.1 Connections ________________________________8<br />
5.1.1 Connect the satellite receiver to your TV and VCR. ___8<br />
5.1.2 Connect your HiFi appliance ____________________8<br />
5.1.3 Connect your receiver to the telephone line (for future<br />
use) _______________________________________8<br />
5.2 Quick start up guide for quick installation _________9<br />
5.3 Full receiver installation _______________________9<br />
5.3.1 Perform full installation _________________________9<br />
5.3.2 Your installation includes a DiSEqC switch _________10<br />
6Day to Day operation _______________________11<br />
6.1 Switch your receiver ON/OFF ________________11<br />
6.2 Wake up or Switch your receiver to standby _____11<br />
6.3 Select TV or Radio mode _____________________11<br />
6.4 How to switch between channel lists ___________11<br />
6.5 How to use the channel Banner _______________12<br />
6.5.1 Channel Banner Icons ________________________12<br />
6.5.2 How to Select Programs ______________________12<br />
6.5.3 How to Select Channels ______________________13<br />
6.6 How to Change momentarily the current Program<br />
Options __________________________________13<br />
6.7 How to Display More Program Info ____________13<br />
6.8 How to use TV/STB button ___________________14<br />
6.9 How to Run Interactive Applications ____________14<br />
6.10 Reminders and Timers _______________________14<br />
6.10.1 Difference Between Reminder and Timer _________14<br />
6.10.2 Viewing and Recording Reminders/Timers _________15<br />
6.10.3 Reminder/Timer Conflicts _____________________15<br />
6.10.4 Timer Manager _____________________________16<br />
7 Main Menu _________________________________17<br />
7.1 Menu Structure ____________________________17<br />
8 Change the setting of your receiver ___________19<br />
8.1 Channel Manager ___________________________19<br />
8.1.1 How to organize a channel list __________________19<br />
8.1.2 How to modify a channel list ___________________20<br />
8.2 Specially for parents _________________________21<br />
8.2.1 Your PIN code ______________________________21<br />
8.3 Your Preferences ___________________________22<br />
8.3.1 Display Options _____________________________22<br />
8.3.2 Language Options ___________________________22<br />
8.4 Installation _________________________________22<br />
8.4.1 Settings ___________________________________23<br />
8.4.2 Installation / Antenna Configuration ______________24<br />
8.4.3 Installation / LNB Configuration _________________25<br />
8.4.4 Installation / Channel Search ___________________26<br />
8.4.5 Installation / Decoder Status ____________________26<br />
9 Advanced Settings __________________________28<br />
9.1 Easy Recording _____________________________28<br />
9.2 Change the Remote Control and receiver Settings _29<br />
9.3 Master PIN Code ___________________________29<br />
10 Decoder Software Upgrade __________________30<br />
CONTENTS 1<br />
English
English<br />
11 Programming the Remote Control for your STB,<br />
TV, Video Recorder, DVD and<br />
Tuner – Amplifier. ___________________________31<br />
11.1 Setting up your remote control ________________31<br />
11.2 Using your remote control for your TV _________32<br />
11.3 Using your remote control for your VCR ________33<br />
11.4 Using Remote Control For Your DVD Player _____34<br />
11.5 Using Remote Control For Your Tuner / Amplifier _35<br />
12 Troubleshooting guide ______________________36<br />
13 Technical Specification ______________________37<br />
14 BRAND CODE LIST ________________________38<br />
2 CONTENTS
1 Safety Instructions<br />
All the safety and operating Instructions should be read<br />
and understood before the receiver is operated.<br />
For best results, position your receiver away from<br />
radiators or other heat sources. Leave a space of at least<br />
3 cm around the receiver for ventilation making sure that<br />
the ventilation holes are not obstructed.<br />
This receiver is intended for use in a domestic<br />
environment only and should never be operated or<br />
stored in excessively hot, humid or damp conditions.<br />
Make sure no objects or fluids enter the housing through<br />
the ventilation slots. Should this happen, disconnect your<br />
receiver from the mains and consult your retailer.<br />
For cleaning, use a damp chamois leather. Never use<br />
any abrasive cloth, sponge or cleaner.<br />
When connecting or disconnecting cables to the receiver<br />
always ensure the receiver is disconnected from the<br />
mains.<br />
Please wait before connecting your receiver - read on.<br />
2 Unpacking<br />
As you unpack your digital receiver, please make sure the<br />
following accessories are included:<br />
- Remote control with separately packed Philips alkaline<br />
batteries<br />
- Mains cord<br />
- SCART cable<br />
- Phone cord<br />
- User Manual<br />
- Philips guarantee card<br />
Warning: Plastic bags can be dangerous. To avoid suffocation<br />
keep the bag away from babies and children.<br />
Do not disassemble the equipment. There are no user<br />
serviceable parts.<br />
Mains connection<br />
Before connecting the receiver to the mains, check that<br />
the mains supply voltage corresponds to the voltage<br />
printed on the rear of the receiver. If the mains voltage is<br />
different, consult your dealer.<br />
Please wait before connecting your receiver - read<br />
on.<br />
SAFETY INSTRUCTIONS 3<br />
English
English<br />
3 Product description<br />
3.1 Front view<br />
1 Door Hide the CI module opening.<br />
2 Reset This button resets your receiver (the receiver behaves as if you powered itoff and<br />
powered it on again).<br />
3 Standby Switch your receiver from the digital TV mode into the standby mode.<br />
4 MENU Open / close the Menu.<br />
5 OK ● In the menu system, this button selects menu items or confirms your choices.<br />
● In Channel Banner, this key tunes to the selected program or sets/cancels a reminder for<br />
the next program.<br />
6Left/Right ● In normal viewing, changes the volume level.<br />
● In Channel Banner, switches between now/next programs.<br />
● In the Menu, moves the on-screen highlight left/right, or to switch between predefined<br />
values.<br />
6Up/Down ● In standby mode, wakes up the receiver.<br />
● In normal viewing or in Channel Banner, tunes program Up/Down to consecutive<br />
channels.<br />
● In the Menu system, moves the on-screen highlight up/down.<br />
Front Panel Display<br />
The front panel LED display gives you information about the current state of your receiver.<br />
Status indicator table<br />
4 PRODUCT DESCRIPTION<br />
1 2 3 4 5 6<br />
Current time displayed in 24-hour format when the box is in the standby mode.<br />
Receiver is tuned to one of the TV channels.<br />
Receiver is tuned to one of the radio channels.<br />
Recording is in progress.<br />
The VCR connected to the VCR SCART of your receiver is playing back a tape. Stop VCR<br />
play back to return to the receiver viewing mode.<br />
Your decoder is switched into the TV mode. Press the TV / STB remote control key to<br />
return to he STB mode.<br />
Dot in the middle blinks when you press remote control keys.<br />
Receiver upgrade is in progress.<br />
On the currently tuned channel, there is an interactive application available.
3.2 Rear view<br />
1 Power Switch Use this switch to power your receiver on/off.<br />
2 Power Plug (HV) Connect the power cable to the power socket.<br />
3 RS232 (SELV) Data interface used during servicing.<br />
4 LNB IN (SELV) Satellite signal input to connect the cable of your satellite antenna.<br />
5 Telephone Line (TNV3) Connect to the telephone line.<br />
6Optical Audio (SELV) If you have an external audio receiver to decode Digital signal, connect it<br />
here.<br />
7 TV SCART (SELV) (1) (2) Connect your TV set here using the SCART cable supplied.<br />
8 VCR SCART (SELV) (1) Connect your VCR here.<br />
9 L/R Audio Output (SELV) Left/Right audio outputs to connect your HIFI/ audio receiver system.<br />
SELV: Safety Extra Low Voltage.<br />
HV: Hazardous Voltage.<br />
TNV 3: Telecommunication Network 3.<br />
(1) SCART is also called Euroconnector or Peritel.<br />
(2) The supplied SCART lead is suited for RGB format which allows the best picture quality. Consult the user manual of your TV set to<br />
select its RGB capable SCART socket input.<br />
CA Module and Its Card<br />
Common Interface Screen<br />
1 2 3 4 5 6<br />
7 8 9<br />
3.3 Conditional Access Module<br />
It is also possible to insert a separate Conditional Access (CA) module<br />
into the Common Interface slot located on the left of the front panel of<br />
your receiver (The Common Interface slot is behind the door). The CA<br />
module together with an adequate Smart card allows viewing scrambled<br />
channels relevant for the subscription you have taken. This module shall<br />
be associated with a smart card and may bring up special menus not<br />
described in this manual. To get access to information available on the<br />
Smart card, press the MENU key, select the Installation item from the<br />
Main Menu. From the Installation submenu that appears, select the<br />
Receiver Status item, and finally select the Common Interface item. This<br />
will give you access to any info stored on the Smart Card.<br />
Looking After Your Smart Card<br />
The card is fragile, so keep in mind the following precautions.<br />
● Do not bend or twist the card.<br />
● Do not expose the card to heat or sunlight.<br />
● After inserting the card, leave it in the slot permanently.<br />
● Clean only with a soft dry tissu.<br />
PRODUCT DESCRIPTION 5<br />
English
English<br />
4 Preparing, setting and using your Remote Control<br />
4.1 Installation of batteries<br />
● Remove the remote control back cover.<br />
● Insert the two batteries (type R06 / AA – 1.5 V)<br />
supplied.<br />
● Position them as shown in the diagram in the battery<br />
compartment.<br />
● Replace the cover.<br />
The Philips batteries supplied with your receiver’s<br />
remote control do not contain heavy metals such as<br />
Mercury or Nikel Cadmium. Nevertheless in many<br />
countries exhausted batteries may not be disposed of<br />
with your household waste. Please ensure you dispose of<br />
exhausted batteries according to local regulations.<br />
4.2 Setting of your remote<br />
control<br />
4.2.1 Mode setting<br />
Your 5 in 1 Remote control allows the control of most of<br />
your Audio / Video equipment through various modes<br />
which are: Satellite receiver mode so called STB (Set Top<br />
Box - This is your receiver), TV , VCR and Amplifier-<br />
Tuner.<br />
Pressing the MODE button once will remind you the<br />
mode you are in through blinking lights: left for STB,<br />
middle for TV, right for VCR, left-middle for DVD and<br />
middle-right for Amplifier-Tuner.<br />
To set a given mode press the MODE button several<br />
times until the desired mode is signalled by the light(s).<br />
The setting sequence is STB ->TV->VCR-> DVD-<br />
>Amplifier-Tuner.<br />
6 PREPARING SETTING USING REMOTE CONTROL<br />
4.2.2 Volume and mute control setting<br />
When the remote control is set to STB mode the<br />
Volume + / Volume - / Mute buttons can either control<br />
the corresponding functions of your TV sets or the<br />
corresponding function of your digital receiver. Refer to<br />
chapters 4.2.2.1 or 4.2.2.2.<br />
Note: we recommend Volume and mute control via your digital<br />
receiver. Refer to chapter 4.2.2.2 for setting.<br />
4.2.2.1 You want the remote to control the volume<br />
and mute of your TV set / Set volume<br />
control to TV.<br />
The factory setting of your remote is set to allow the<br />
control of the volume of a Philips TV set. If your TV set<br />
has a different brand check in the TV brand list what<br />
code(s) might apply then change the setting of your<br />
remote control as according to the method described in<br />
chapter 10.<br />
Note: to reset the volume/mute control to TV.<br />
1 Select the STB mode<br />
2 Press simultaneously 1 and 9 buttons until the LED has<br />
blinked twice then release the buttons.<br />
3 Enter code 993, the LED is blinking once after each<br />
entry.<br />
4 Press the “yellow” button, the LED shall blink twice to<br />
acknowledge the new setting.<br />
4.2.2.2 You want the remote to control the volume<br />
and mute via your digital receiver (recommended).<br />
To set the volume/mute control to STB<br />
1 Select the STB mode<br />
2 Press simultaneously 1 and 9 buttons until the LED has<br />
blinked twice then release the buttons.<br />
3 Enter code 993, the LED is blinking once after each<br />
entry.<br />
4 Press the “green” button, the LED shall blink twice to<br />
acknowledge the new setting.<br />
4.2.3 Changing the brand setting of your<br />
remote control for TV, VCR, DVD or<br />
Amplifier-Tuner<br />
Refer to chapter 11 for brand setting procedure.
4.3 Using the remote to control your digital receiver – The remote<br />
control is set to STB mode.<br />
MODE<br />
Selects the remote control mode.<br />
RED, GREEN, YELLOW, BLUE,<br />
WHITE<br />
Contextual buttons used in MHP<br />
applications.<br />
FAV<br />
Open / close the current channel list.<br />
GUIDE<br />
Non active button in this application<br />
version.<br />
RADIO<br />
Toggles between TV and Radio<br />
modes.<br />
MENU<br />
Opens / Closes the Menu.<br />
4<br />
Open the Options menu to change<br />
momentarily soundtrack / subtitles<br />
/ teletext / display format setting.<br />
VW<br />
- Switches the Channel Banner in<br />
the browsing mode. - Scrolls<br />
selection up/down in a menu or<br />
channel list.<br />
CB<br />
- In Channel Banner, switch<br />
between the current and next<br />
program.<br />
- In the Menu screens, selects<br />
between predefined settings.<br />
OK key<br />
Confirms your choices.<br />
i<br />
Open the Options menu to change<br />
momentarily soundtrack / subtitles<br />
/ teletext / display format setting.<br />
A +/-<br />
Change the volume level.<br />
Standby B<br />
Switches your receiver into the<br />
standby mode.<br />
EXIT<br />
Returns to normal viewing mode.<br />
P+ P-<br />
- In viewing mode: Tunes to the<br />
higher/lower channel within the<br />
same channel list.<br />
- scrolls one page up or down in<br />
channel list<br />
- In standby: Wakes up the receiver.<br />
BACK<br />
- In viewing mode: Returns to the<br />
previously tuned channel<br />
- In menu mode returns to the<br />
previous screen.<br />
- In standby: Wakes up the receiver.<br />
MUTE H<br />
Mutes the sound on your TV or<br />
digital receiver.<br />
0-9<br />
- In viewing mode: Selects channels<br />
- In menu ; Selects directly menu<br />
item or Sets new parameter value<br />
- In standby: Wakes up the receiver.<br />
m<br />
Switches between viewing mode,<br />
Channel Banner, and Channel<br />
Banner with Extended Info.<br />
a TV/STB<br />
Toggles between watching satellite<br />
digital programs via your receiver<br />
and standard analogue programs.<br />
PREPARING SETTING USING REMOTE CONTROL 7<br />
English
English<br />
5 Connection and Installation<br />
5.1 Connections<br />
5.1.1 Connect the satellite receiver to your TV and VCR.<br />
1 Unplug all equipment (TV set as well as VCR and / or DVD if required) from the mains before making connections.<br />
Note: Before starting to connect, check your current wiring because you can keep the coaxial connection in between your TV and your<br />
video recorder provided they are connected as shown below. This connection ensures you can still watch and record your current<br />
terrestrial channels if necessary.<br />
Satellite recever<br />
2 Connect your receiver in your existing installation as shown above:<br />
- Connect the supplied mains cord to the mains (230V – 50 Hz) socket of your satellite receiver.<br />
- Connect the TV set “EXT1” to the “TV” SCART of your satellite receiver by means of the supplied SCART lead.<br />
- If you have a VCR, connect the VCR “EXT1” to the “VCR” SCART of your satellite receiver by means of a SCART lead.<br />
- Connect the plug of the cable coming from your satellite antenna to the “LNB IN” socket of your satellite receiver.<br />
3 Then plug all your appliances, including your satellite receiver, into the mains.<br />
5.1.2 Connect your HiFi appliance<br />
Connect the L/R (Left / Right) AUDIO OUT sockets of your satellite receiver to the relevant L/R audio analogue input<br />
sockets of your HiFi equipment by means of a double CINCH cable (not supplied).<br />
If applicable connect the Digital OPTICAL OUT socket of your satellite receiver to one of the “optical” Digital input socket<br />
of your HiFi equipment by means of an appropriate cable (not supplied).<br />
5.1.3 Connect your receiver to the telephone line (for future use)<br />
Connect the RJ11/TELEPHONE LINE socket of your satellite receiver to the wall outlet telephone socket by means of the<br />
supplied telephone cord.<br />
Note: The equipment has been approved pursuant to Commission Decision 99/303/EC for pan-European<br />
connection to the public switched telephone network (PSTN). However, due to differences between the<br />
individual PSTNs provided for in different countries, the approval does not, of itself, give an unconditional assurance of successful operation<br />
on every PSTN network termination point.<br />
In the event of problems, you should contact your equipment supplier in the first instance.<br />
8 CONNECTION AND INSTALLATION
5.2 Quick start up guide for<br />
quick installation<br />
● You have already a satellite antenna.<br />
● Your antenna is properly aiming at Astra 19.2° East<br />
satellite orbital position.<br />
● You want only programs from Astra 19.2° East satellite<br />
orbital position.<br />
● Your menu preferred language is German.<br />
● You have made the connections according to chapter<br />
5.1.1.<br />
● Your remote control is set to SBT mode and installed<br />
according to chapter 4.2 description.<br />
If not, prior proceeding with the quick installation go to<br />
chapter 4.2.<br />
Note: Your satellite receiver can only be updated via Astra<br />
19.2° East satellite. Therefore if you want to benefit from<br />
further upgrades you, at least, have to install your receiver for<br />
the reception of the Astra 19.2° East satellite.<br />
If you satisfy above conditions, then proceed with the<br />
quick installation of your satellite receiver, then:<br />
Note:If you have a DiSEqC 1.0 switch in your antenna set up<br />
you can proceed with this quick installation, provided you<br />
connect directly the plug of the cable coming from your<br />
antenna aiming at Astra 19.2° East to the “LNB IN” socket of<br />
your satellite receiver. Otherwise refer to chapter 5.3.1<br />
If you meet the above conditions, proceed with the quick<br />
installation of your satellite receiver:<br />
1 All your appliances, including your digital receiver, shall be<br />
plugged into the mains.<br />
2 Put the power switch, located on the rear panel of the<br />
receiver, in the ON position. The receiver front panel<br />
gets on, after a few seconds the Welcome screen is<br />
shortly shown then after few tenth of seconds the “First<br />
Installation” screen is shown. Select you preferred<br />
country with the V / W buttons and press OK. Your<br />
receiver is configured for your country including the<br />
relevant menu language.<br />
Note: During power up after putting the rear panel mains<br />
switch to on, it is normal for the front display to turn off for few<br />
seconds. It shall turn on later on by showing MHP.<br />
3 To start watching satellite TV press one digit key or P+<br />
or P- or BACK, your receiver shall tune one program.<br />
4 From now on you can enjoy watching satellite television.<br />
Refer to chapter 6 to learn more about USING YOUR<br />
RECEIVER.<br />
Note: To change Language Options, see the 8.3.2 section<br />
later in this manual.<br />
5.3 Full receiver installation<br />
Why do you need a full receiver installation?<br />
➤ Your satellite antenna is properly aiming at a satellite<br />
which is different from Astra 19.2° East satellite orbital<br />
position.<br />
➤ Your antenna is not installed and not properly aiming at<br />
Astra 19.2° East satellite.<br />
➤ Your antenna set up include a DiSEqC 1.0 switch.<br />
➤ This chapter explains how to set your receiver<br />
according to your installation and needs. If you do not<br />
feel comfortable with such an installation described in<br />
paragraphs 5.3.1 and 5.3.2 please contact your dealer.<br />
5.3.1 Perform full installation<br />
1 Plug the receiver’s power supply cord to the mains.<br />
Switch on the TV set and select a program. Put the<br />
power switch, located on the rear panel of the receiver,<br />
in the ON position. The receiver front panel display gets<br />
on.<br />
2 Now you should see the Welcome screen on your TV<br />
screen. After a few seconds, the Welcome screen<br />
disappears.<br />
3 Next, a screen appears that allows you to select your<br />
country. Highlight your country by pressing V / W and<br />
then press OK. Then you will be asked to confirm your<br />
choice. Press OK to confirm, or press BACK to select<br />
another country.<br />
4 Press the MENU key to bring up the Main Menu.<br />
Highlight the Installation item and press OK.<br />
5 From the Installation submenu, select the Antenna<br />
Configuration item. Change any values if necessary for<br />
your antenna setup. Then press OK to store changes<br />
and return to the Installation submenu.<br />
6 From the Installation submenu, select the LNB<br />
Configuration item. Then, select your satellite by<br />
pressing C / B. If you want to check the signal strength<br />
and quality, press the Red key. Change any LNB<br />
Configuration parameters, if required.<br />
7 Select the Channel Search item from the Installation<br />
submenu. In the screen that appears, select the Search<br />
for New Channels item. Press OK. Then select the<br />
type of channels and press OK again. This initiates the<br />
channel search procedure. Once it has been completed,<br />
follow the prompts displayed on the screen.<br />
8 All found channels are stored in the Channel Pool. You<br />
will have to transfer channels to your favourite channel<br />
lists. For more info, see the 8.1 section later in this<br />
manual.<br />
9 Now you are ready to enjoy viewing your satellite<br />
receiver. Refer to chapter 6 Day to Day operation to<br />
learn more about using your receiver.<br />
CONNECTION AND INSTALLATION 9<br />
English
English<br />
5.3.2 Your installation includes a DiSEqC switch<br />
To watch programs from different satellites you need to install a DiSEqC switch in your antenna set up. A DiSEqC switch has<br />
2 or 4 inputs and one output. The inputs are identified by “A” / “B” alternatively “1” / “2” for a 2 input switch. The inputs are<br />
identified by “A” / “B” / “C” / “D” alternatively “1” / “2” / “3” / “4” for a 4 input switch.<br />
Each LNB shall be connected to one input of the switch by means of an appropriate coaxial cable fitted with F type plugs<br />
while the switch output is connected to the “LNB Input” of the satellite receiver by means of an appropriate coaxial cable<br />
fitted with F type plugs.<br />
As example refer to the connection diagram below to insert a DiSEqC switch in an antenna set up which includes 2 LNB’s.<br />
The popular configuration shown is made of one antenna fitted with 2 LNB’s for the reception of Astra 19.2° East and Hot<br />
Bird 13° East satellites. Pay attention to the relative position of the Astra and Hot Bird LNB’s in the set up, it is necessary to<br />
get the system up and running the first time.<br />
ASTRA<br />
DiSEqC switch<br />
(4 inputs)<br />
Satellite recever<br />
HOT BIRD<br />
TELECOM<br />
A B C D<br />
Refer to the installation process described in paragraph 5.3.1<br />
At step 5 antenna configuration set "Antenna Control" menu item:<br />
- either to "Tone Burst" if you have a tone burst switch and two LNB to control,<br />
- or to "DiSEqC 1.0" if you have a DiSEqC switch and up to 4 LNB to control.<br />
At step 6 select which LNB's shall be active. Once the cursor is on an active LNB, pressing OK open the relevant "LNB<br />
configuration" menu allowing setting change to your convenience and check of the signal quality.<br />
Note:<br />
- For more details on possible option settings consult the paragraphs 8.4.2 "Installation / Antenna configuration" and 8.4.3 "Installation /<br />
LNB Configuration". The proper satellite installation requires:<br />
Matching LNB number with satellite name (for instance Astra 19.2 allocated to LNB1)<br />
Right physical connection in between the LNB aiming at a given satellite and the appropriate DiSEqC switch input. In the menu<br />
"Installation / LNB Configuration" (8.4.3 section): LNB1 means "the LNB which is connected to DiSEqC switch input 1, LNB2<br />
means "the LNB which is connected to DiSEqC switch input 2", etc…<br />
- If your installation includes an assembly incorporating 2 LNB's combined with a DiSEqC switch in one block (so called mono-block),<br />
consult its user manual to properly allocate each satellite to the relevant DiSEqC switch inputs (Hot Bird respectively Astra 19.2 East<br />
satellite might be allocated to input 1 respectively input 2 of the DiSEqC switch). Make sure Satellite name (Hot Bird for instance) is<br />
allocated to the right LNB number (LNB1 for instance).<br />
10 CONNECTION AND INSTALLATION
6Day to Day operation<br />
Radio Label<br />
TV Channel List<br />
6.1 Switch your receiver ON/OFF<br />
Your receiver is connected to mains and the power switch, located on<br />
the rear panel of your receiver is in the OFF position.<br />
● To switch on your receiver put the power switch in the ON position.<br />
The receiver front panel display gets on, after a few seconds the<br />
Welcome screen is shortly shown then after few tenth of seconds the<br />
receiver is either in standby or in viewing mode.<br />
● To switch off your receiver put the power switch in the OFF position.<br />
Note: During power up after putting the rear panel mains switch to on, it is<br />
normal for the front display to turn off for few seconds. It shall turn on later on<br />
by showing MHP.<br />
6.2 Wake up or Switch your receiver to<br />
standby<br />
● You watch TV or listen to radio, press the standby button to switch your<br />
receiver to standby.<br />
● Your receiver is in standby, to wake it up :<br />
- Either press the P+ or the P- button<br />
- Or press one digit button<br />
6.3 Select TV or Radio mode<br />
Your receiver may work in two modes: TV or radio. To switch between<br />
these two modes, press the RADIO key. If you are watching one of the<br />
TV channels, pressing RADIO tunes to the last tuned radio channel<br />
belonging to the previously selected channel list. Pressing RADIO again<br />
returns to the TV mode - to the last tuned TV channel.<br />
On switching the mode, the Channel Banner appears for its timeout. In<br />
the radio mode, the radio label appears/disappears at random positions<br />
on the screen to avoid damaging your TV screen..<br />
6.4 How to switch between channel lists<br />
Your receiver gives you access up to 6 TV Channel Lists and up to 6<br />
Radio Channel Lists.<br />
To display the currently selected channel list, press the FAV key. To<br />
switch between any available non-empty channel lists of a particular<br />
mode (TV or radio), press C / B. The name of the selected list<br />
appears at the top of the Channel List window. Then select the channel<br />
by pressing V or W, or number keys. Each time you highlight a noncurrent<br />
channel, the [OK] icon appears in the Channel Banner. To<br />
tune to this channel, press OK.<br />
Note: Channels lists allow you to work in so-called browsing mode. In this mode,<br />
the box remains tuned to the same channel, while you browse through channels<br />
and programs.<br />
DAY TO DAY OPERATION 11<br />
English
English<br />
Current Program Info<br />
12 DAY TO DAY OPERATION<br />
6.5 How to use the channel Banner<br />
Channel Banner appears at the bottom of the screen when you tune<br />
your receiver to a new channel or when you press the m key. It offers<br />
you basic information about individual programs and facilitates surfing<br />
through channels and programs. When you are in the Channel Banner,<br />
you can only browse through channels belonging to the currently<br />
selected channel list. The Channel Banner disappears automatically<br />
after a few seconds, or when you press EXIT.<br />
6.5.1 Channel Banner Icons<br />
This icon informs that some program information is available for the<br />
program displayed in Channel Banner.<br />
This icon informs that the current channel is locked.<br />
This icon informs that the viewing reminder has been set for a particular<br />
program.<br />
This icon informs that the recording reminder has been set for a<br />
particular program.<br />
This icon informs that a program with more than one soundtrack is<br />
broadcast.<br />
This icon informs you that pressing OK tunes to the channel that the<br />
Channel Banner refers to, or sets/cancels a reminder.<br />
This icon informs you that the program is broadcast with the surround<br />
sound.<br />
This icon informs you that the particular program is parentally locked.<br />
This symbol informs that you may launch external applications by<br />
pressing OK.<br />
This icon informs that teletext is broadcast on the currently tuned<br />
channel.<br />
This icon informs that you may select subtitles for the current program.<br />
6.5.2 How to Select Programs<br />
The Channel Banner allows you to display information concerning the<br />
current program and the next program broadcast on the selected<br />
channel. Press C / B to see what is broadcast next on the currently<br />
selected channel.<br />
If you select one of the future programs, pressing OK allows you to<br />
set/cancel a reminder. For more information on setting reminders, see<br />
the Reminders and Timers 6.10 section later in this manual.
Options Menu<br />
Display Format (Letter-box)<br />
Program Info Window<br />
6.5.3 How to Select Channels<br />
There are three different ways of changing channels:<br />
- Press V or W to scroll through the current channel list. Please note<br />
that your receiver remains tuned to the current channel.<br />
- When you press P+ / P-, your receiver tunes to the next<br />
higher/lower channel from the currently selected channel list.<br />
- You can also select channels by entering their numbers directly. Once<br />
you press a number key, the channel number entry box appears in the<br />
upper right corner of the screen.<br />
● Please note that pressing BACK allows you to switch between two<br />
channels: the current channel and the previously tuned channel within<br />
the selected channel list.<br />
Channel Number Entry Box<br />
6.6 How to Change momentarily the<br />
current Program Options<br />
Press the 4 or i key, to gain access to the Options menu. This menu<br />
allows you to change the Audio Language, Subtitle Language, or the<br />
Display Format for the currently broadcast program, and the Teletext<br />
Language for the currently tuned channel.<br />
Audio Language<br />
If available, you can select among different audio languages.<br />
Subtitle Language<br />
If available, you can select among different subtitle languages.<br />
Teletext Language<br />
If available, you can select among different teletext languages.<br />
Display Format<br />
If you have a TV set with 4:3 picture format, and the transmission is in<br />
16:9 format (or the other way round), you can change display format for<br />
the currently broadcast program.<br />
For example, if you have a TV set with the 4:3 picture format and the<br />
transmission is 16:9, you can select Letter-box, Pan-Scan or Full<br />
Screen. If you select Letter-box, you will get a complete picture with<br />
black areas at the top and bottom.<br />
6.7 How to Display More Program Info<br />
The [ i ] icon displayed in the Channel Banner informs that pressing<br />
the m key displays some additional information about the currently<br />
selected program. If there are more pages of program info, pressing m<br />
displays consecutive pages of program info. To remove the Program<br />
Info window from the screen, press EXIT, or m when the last page of<br />
program info is displayed.<br />
DAY TO DAY OPERATION 13<br />
English
English<br />
6.8 How to use TV/STB button<br />
The TV/STB (or TV/SAT) key is used to switch between watching satellite digital programs via your digital receiver and<br />
standard analogue programs on your TV. The function of the button depends on whether you have connected your digital<br />
receiver using the scart lead supplied.<br />
Pressing this key again will switch back to watching a satellite digital program.<br />
In most cases, having connected your satellite digital receiver and TV by a scart lead, you will not have to manually select the<br />
correct program on your TV for watching satellite digital programs. To ensure the correct program is selected automatically,<br />
your TV should be switched on before your satellite digital receiver. If your TV is switched on after your satellite digital<br />
receiver, you may need to use the TV/STB (or TV/SAT) key to select the correct program on your TV.<br />
Interactive Applications Icon<br />
Applications Window<br />
Setting a Reminder<br />
14 DAY TO DAY OPERATION<br />
6.9 How to Run Interactive Applications<br />
Your receiver supports downloading and running MHP interactive<br />
applications. Some applications are run automatically on tuning to a<br />
respective channel. Other applications will be launched manually.<br />
If you tune to a channel on which interactive applications are broadcast,<br />
you will see the [ mhp ] icon on the Channel Banner. This icon is<br />
displayed alternately with the [ OK ] icon prompting you to press the<br />
OK key. Pressing OK brings up the Applications window allowing you<br />
to select the application you want to run. Once you select the<br />
application, press OK again. However, if you are not interested in<br />
running interactive applications, press EXIT to remove the<br />
Applications window from the screen.<br />
To quit the interactive application, read the on-screen descriptions<br />
brought to you by the application itself or tune to a different channel by<br />
pressing P+ / P-.<br />
Please note that if you do not want any interactive applications to be run<br />
automatically, set the Application AutoSTART option in the Display<br />
Options screen to NO.<br />
6.10 Reminders and Timers<br />
6.10.1 Difference Between Reminder and Timer<br />
The aim of the reminder/timer is to remind you that the program you<br />
scheduled for viewing is about to start. The main difference between a<br />
reminder and a timer is that you set reminders from the Channel<br />
Banner. To set a reminder, select one of the future programs in the<br />
Channel Banner and press OK. Then you are prompted to decide<br />
whether you want to set a viewing or a recording reminder.
Setting a Timer<br />
Viewing Timer Pop-up<br />
Recording Pop-up<br />
Reminder Conflict Pop-up<br />
Timers are independent from the broadcast schedule. You will set timers<br />
from the Timer Manager. To get access to the Timer Manager, select<br />
the Timer Manager item from the Main Menu. Timer Manager<br />
contains all timers and reminders defined so far. It allows you not only to<br />
set timers but also to delete or modify selected timers/reminders. You<br />
will be asked to enter Timer Manager each time any conflicts between<br />
reminders/timers occur. You will find more information on Timer<br />
Manager later in this manual.<br />
6.10.2 Viewing and Recording Reminders/Timers<br />
There are two types of reminders/timers: a viewing reminder/timer<br />
and a recording reminder/timer. If you have set a reminder/timer, its<br />
pop-up appears 1.5 minute before the program starts. If you do not<br />
respond to the viewing reminder/timer pop-up, the reminder/timer is<br />
canceled. If you do not respond to the recording reminder/timer pop-up,<br />
the receiver tunes to the appropriate channel at specified start time.<br />
Please note that when you set a recording reminder/timer, the recording<br />
is protected from being interrupted. If you want to interrupt the<br />
recording, press EXIT. This brings up a pop-up informing you how long<br />
the recording will last. Then, you will be asked to press OK to interrupt<br />
the recording or press EXIT to dismiss the pop-up from the screen.<br />
6.10.3 Reminder/Timer Conflicts<br />
Your receiver allows you to set up to 8 reminders/timers. Each<br />
subsequent reminder/timer is checked against any conflicts with the<br />
previously set reminders/timers. If you set a reminder or timer and such<br />
a conflict occurs, a conflict pop-up appears. You will be prompted to<br />
press EXIT to cancel the current reminder, or to press OK to get<br />
access to Timer Manager. The currently set reminder will be listed in<br />
the Timer Manager as a disabled reminder (marked with the “?” sign).<br />
This reminder can only be accepted if you delete any conflicting<br />
timers/reminders or you change some of its data. For more info, see the<br />
Timer Manager section below.<br />
DAY TO DAY OPERATION 15<br />
English
English<br />
Timer Manager<br />
Modifying a Timer<br />
16 DAY TO DAY OPERATION<br />
6.10.4 Timer Manager<br />
Timer Manager contains a list of all reminders and timers defined so far.<br />
In the Timer Manager you can perform the following operations.<br />
Setting a Timer<br />
Press OK to set a new timer. This will bring up the Setting a Timer<br />
screen. Fill in any required data and press OK to confirm. If the data are<br />
valid and there are no conflicts with the previous reminders/timers, you<br />
return to the Timer Manager screen. The newly defined timer appears<br />
in the Timer Manager list.<br />
Modifying Reminders/Timers<br />
In the Timer Manager screen, highlight the timer/reminder you want to<br />
modify and then press B. This will bring up either Modifying a Timer<br />
or Modifying a Reminder screen. Change the reminder/timer data and<br />
then press OK to confirm.<br />
Deleting Timers/Reminders<br />
Highlight the reminder/timer you are not interested in and press C.<br />
Then you will be prompted to confirm the delete operation.
7 Main Menu<br />
7.1 Menu Structure<br />
Your receiver offers Menu System that allows you to change the way many of the features of your receiver operate. To gain<br />
access to the Menu, press the MENU key. The Main Menu consists of 7 submenus. To evoke one of the submenus,<br />
highlight its name using V or W keys and then press OK. You may also press the number key to highlight a respective<br />
menu item. To return to the Main Menu from one of its submenus, press BACK. To exit the Menu System immediately,<br />
press MENU or EXIT.<br />
Here is a short overview of basic functions performed by individual submenus.<br />
Channel Manager<br />
Allows you to change the organization of favorite channel lists, to edit the<br />
content of individual channel lists, and to get access to the Channel<br />
Pool. For more information, see the 6.4 and the 8.1 sections. Also see<br />
the Channel Manager section below.<br />
Timer Manager<br />
You will find here a list of any reminders and timers defined so far. You<br />
will mainly use Timer Manager to set timers and to delete/modify<br />
timers/reminders. For more information, see the Timer Manager 6.10<br />
section earlier in this manual.<br />
For Parents<br />
This submenu allows you to protect your children from viewing<br />
unsuitable material. Here, you can also change your current PIN code.<br />
You will find more info in the 8.2 section.<br />
MAIN MENU 17<br />
English
English<br />
18 MAIN MENU<br />
Applications<br />
Allows you to run one of the available Off-the-Air applications. Refer to<br />
6.9 section.<br />
Your Preferences<br />
Allows you to define your preferences concerning on-screen display as<br />
well as audio and subtitle languages. You will find more information in the<br />
Your Preferences 8.2 section.<br />
Installation<br />
Allows you to configure your system, to set up your modem, to search<br />
for existing channels, to check receiver’s status, to set up local time, and<br />
to restore factory settings of your receiver. For more information, see<br />
the Installation 8.4 section.<br />
Help<br />
Gives you access to the on-line help information concerning the basic<br />
functionality of your receiver.
8 Change the setting of your receiver<br />
Channel Pool Filtering<br />
Channel Pool Content<br />
List Organization – Adding a New List<br />
Deleting Channel List<br />
8.1 Channel Manager<br />
When you select the Channel Manager item from the Main Menu, you<br />
get access to Channel Manager submenu. This submenu allows you to<br />
change the way all your channel lists are organized (the List<br />
Organization item) or to change the content of individual channel lists<br />
(the List Editing item). For more information on these two items, see<br />
the 8.11. and the 8.12 sections.<br />
The third option Channel Pool gives you access to the list of all available<br />
channels. From the Channel Pool you may transfer channels to<br />
individual channel lists. You may filter the Channel Pool for a particular<br />
satellite, mode and a particular type of channels. You may also sort all<br />
channels alphabetically from A to Z or from Z to A.<br />
From the Channel Pool, you may delete channels by pressing OK<br />
(deleting individual channels) or by pressing B (deleting all channels). If<br />
you decide to delete all channels, you will be prompted to decide<br />
whether you want to delete all channels or only those channels you<br />
haven’t transferred to your channel lists yet.<br />
8.1.1 How to organize a channel list<br />
Once you have set up your receiver, you have access to 6 TV channel<br />
lists and 6 radio channel lists. These channels lists are assigned default<br />
names and they appear in a predefined order.<br />
To change the way your channels lists are organized, press the MENU<br />
key and then select the List Organization item from the Channel<br />
Manager submenu.<br />
The List Organization screen allows you to perform the following<br />
operations:<br />
- delete the list that you are not interested in (Delete List ).<br />
- create a new list (Add List).<br />
- change the name of the channel list (Rename List).<br />
- change the order in which the channels lists are switched while viewing<br />
(Reorder Lists).<br />
CHANGE THE SETTING OF YOUR RECEIVER 19<br />
English
English<br />
Confirm Deleting Channel List<br />
Channel Pool Filtering<br />
List Editing Screen<br />
Channels Source Selection<br />
Adding Channels to List A<br />
20 CHANGE THE SETTING OF YOUR RECEIVER<br />
On first entry to the List Organization screen, you will see all available<br />
channel lists of the currently selected mode: TV or radio. To change the<br />
mode, press the RADIO key. Then select an appropriate command by<br />
highlighting the Modify item and press C / B until you see the desired<br />
command. The prompts displayed in the help bar at the bottom of the<br />
screen are modified appropriately then. Please follow the prompts<br />
displayed on the screen.<br />
8.1.2 How to modify a channel list<br />
Once you set up your receiver, you have access to 6 TV and 6 radio<br />
channel lists. If you have set up your receiver for other satellite than one<br />
or several of those reported in the receiver satellite list, these channel<br />
lists are empty. To edit channel lists, press MENU and select the List<br />
Editing item from the Channel Manager submenu.<br />
This will give you access to the List Editing screen. First select the<br />
Mode and the Channel List you want to modify. Then select an<br />
appropriate Modify command.<br />
Using the List Editing screen, you may perform the following<br />
operations:<br />
- add channels to the selected channel list (Add Channels) from the<br />
Channel Pool. You will find more info on adding channels below.<br />
- delete channels from the selected channel list (Delete Channels).<br />
Please note that deleted channels are still available in the Channel<br />
Pool and can be inserted again.<br />
- change order of channels within the selected channel list (Move<br />
Channels)<br />
- lock/unlock individual channels (Lock Channels).<br />
Adding New Channels to Channel Lists<br />
If you select the Add Channels command, you will be prompted to<br />
select the name of the satellite and the type of channels you are<br />
interested in. On confirmation, two columns of channels appear. On the<br />
left, you will see a list of all channels of a particular type from the<br />
selected satellite. On the right, you will see the content of the selected<br />
channel list. Highlight the channel you want to add to your list and then<br />
press OK. Please note, that you may also add all channels by pressing<br />
RADIO and delete channels from your favorite channel list. To move<br />
highlight between these two channel lists, press B / C.
For Parents Submenu<br />
Decoder Lock<br />
Parental Level<br />
Enter PIN Code<br />
8.2 Specially for parents<br />
Your digital receiver gives you access to a few options allowing you to<br />
protect your children from viewing unsuitable material. Press the<br />
MENU key and then select the For Parents submenu to bring up a list<br />
of protection items. The following protection levels are available:<br />
- The Decoder Lock item may facilitate viewing for those viewers who<br />
have full access to the receiver. If you switch the Decoder Lock<br />
option to No, you will not be prompted to enter the PIN code.<br />
- You may set the current parental level, for example 15 Years using the<br />
Parental Level option. Then any programs unsuitable for the audience<br />
younger than 15 years will be blocked from viewing.<br />
- If you decide to change your PIN code, select the Change PIN Code<br />
item. Change your PIN code to a value you can easily remember. If you<br />
happen to forget your PIN, call your customer service center.<br />
- Additionally, you may protect whole channels. For more info on how<br />
to lock channels, see the How to Lock Channels later in 8.1.2. section.<br />
On tuning to such a channel, you will be prompted to type in the PIN<br />
code.<br />
8.2.1 Your PIN code<br />
PIN code is your personal 4-digit number that is used to restrict access<br />
to your receiver. Initially, it is assigned the 1234 value. You can use PIN<br />
to prevent children from viewing unsuitable programs. It is also used to<br />
protect receiver’s settings from being changed. Whenever an attempt to<br />
get access to a program or feature locked by PIN is detected, you will be<br />
prompted to type your PIN code. You can change your PIN code using<br />
the Change PIN Code item from the For Parents submenu.<br />
CHANGE THE SETTING OF YOUR RECEIVER 21<br />
English
English<br />
Your Preferences Submenu<br />
Display Options Screen<br />
Language Options Screen<br />
Installation Submenu<br />
22 CHANGE THE SETTING OF YOUR RECEIVER<br />
8.3 Your Preferences<br />
Your Preferences submenu contains two items: Display Options and<br />
Language Options.<br />
8.3.1 Display Options<br />
The Display Options screen allows you to define some options related<br />
to displaying information on the screen.<br />
Time and Date<br />
Blocks the current time and date from being displayed in the Channel<br />
Banner mode.<br />
Channel Number<br />
Blocks the channel number from being displayed in the top right corner<br />
of the screen.<br />
Channel Banner Duration<br />
Specifies how long the Channel Banner remains displayed.<br />
Volume Bar<br />
Bocks the volume bar from being displayed.<br />
Note:<br />
1- The YES option shall be set if Volume & Mute are controlled via the receiver<br />
(so called STB).<br />
2- The NO option shall be set if Volume & Mute are control by the TV set.<br />
Transparency<br />
Changes the transparency of the on-screen display.<br />
Application AutoSTART<br />
Defines whether MHP applications are to be launched automatically once<br />
you tune to a channel on which external applications are broadcast.<br />
Technical Info<br />
Decides whether some technical info such as satellite name and the<br />
service-id are to be displayed in the Program Info window.<br />
8.3.2 Language Options<br />
The Language Options screen allows you to define some options<br />
related to language preferences. Change any languages according to your<br />
preferences and then press OK to confirm them.<br />
8.4 Installation<br />
Once your satellite receiver has been properly installed and configured,<br />
you will rarely use the Installation submenu. However, the Installation<br />
submenu will be useful, if for example, you buy a new TV and you want<br />
to make sure your receiver makes the best use of the new TV’s features,<br />
or you change your antenna setup.<br />
Below, you will find description of some of the Installation submenu<br />
screens.
Settings Submenu<br />
TV Settings Screen<br />
System Settings Screen<br />
8.4.1 Settings<br />
The Settings submenu allows you to change TV/system/modem settings,<br />
to adapt the Country setting as well as to adjust the local time.<br />
8.4.1.1 Installation / Settings / TV Settings<br />
The TV Settings screen contains two options: TV Screen Format and<br />
Display Format. Change the TV Screen Format setting, if necessary.<br />
You may also change the default Display Format value (Letter-box) to<br />
change the way the video is transformed if the broadcast aspect ratio is<br />
different than the aspect ratio of your TV. Read the descriptions that<br />
appear in the TV Settings screen before you make a decision.<br />
8.4.1.2 Installation / Settings / System Settings<br />
The System Settings screen contains some of the configuration<br />
parameters you may change.<br />
TV SCART Output, VCR SCART Output<br />
Select the appropriate format of the output signals. We advise RGB<br />
format for TV SCART because it gives the best picture quality.<br />
Dolby Digital<br />
If you use the Dolby Digital receiver, change the value of the Dolby<br />
Digital option to Yes.<br />
Note: If you set this option to Yes, when the broadcast carries Dolby Digital:<br />
- No audio will be available at receiver's TV & VCR SCARTs as well as L/R audio<br />
outputs. Only Dolby Digital bit stream (AC3 - 5.1) will be available at Digital<br />
Optical Out.<br />
- During a timer, the receiver will automatically switch back to PCM (2 channel<br />
in digital) and audio will be available at receiver's TV & VCR SCARTs as well as<br />
L/R audio outputs to allow recording of audio.<br />
Auto Upgrade<br />
When you switch your receiver into the standby mode, the application<br />
checks whether a new software version is available. If the new software<br />
version is detected, you will be informed about the availability of the<br />
receiver’s upgrade once you have switched your receiver into the<br />
operate mode. However, you may switch the Auto Upgrade option to<br />
Yes. In this case the receiver’s software will be upgraded automatically<br />
when the receiver is in the standby mode.<br />
You will find detailed info concerning: the Easy Recording, Recording<br />
Type and Device settings in the Advanced Settings 9.1 - 9.2 sections.<br />
CHANGE THE SETTING OF YOUR RECEIVER 23<br />
English
English<br />
Modem Settings Screen<br />
Select Country<br />
Local Time Screen<br />
Antenna Configuration<br />
24 CHANGE THE SETTING OF YOUR RECEIVER<br />
8.4.1.3 Installation / Settings / Modem Settings<br />
Your receiver is equipped with an internal modem. To configure your<br />
modem parameters use the remote control keys presented in the help<br />
bar. Pressing BLUE allows you to enter letters, pressing YELLOW<br />
switches between lowercase characters and uppercase characters,<br />
pressing RED gives you access to a table of special characters. If you<br />
want to delete characters in the entry box, press the m key. Once you<br />
have configured your modem, press OK to confirm its configuration.<br />
8.4.1.4 Installation / Settings / Country<br />
The Select Country screen allows you to select the country for which<br />
your receiver shall be configured. Press V or W to highlight the<br />
country, and then press OK to make a selection. You may need this<br />
option if you take your receiver to another country or if you have<br />
selected the wrong country during the first-time installation of your<br />
receiver.<br />
8.4.1.5 Installation / Settings / Local Time<br />
You may need to adjust your local time. Use the C / B keys to change<br />
the Time Zone until the Local Time setting corresponds to your local<br />
time. Then press the OK key to confirm any changes.<br />
8.4.2 Installation / Antenna Configuration<br />
The Antenna Configuration screen allows you to set the following<br />
options.<br />
LNB Power<br />
It may be assigned two values: ON (default setting) or OFF. It may be<br />
necessary to deactivate LNB supply for some antenna systems.<br />
LNB Power (Standby)<br />
It may be assigned two values OFF (default setting) or ON. You may<br />
need to activate LNB supply in standby mode for some antenna systems.<br />
Antenna Control<br />
It may be assigned three values: OFF (default value), Tone Burst, or<br />
DiSEqC 1.0. Select the setting applicable to your antenna system.
8.4.3 Installation / LNB Configuration<br />
Note: We strongly advise you to keep the Astra 19.2° East satellite in your<br />
installation as LNB1 because your satellite receiver software may only be<br />
upgraded via the Astra 19.2° East satellite. In this way, you can enjoy new<br />
software versions of your receiver can be updated.<br />
Antenna Control = Tone Burst or DiSEqC 1.0<br />
If you have selected in the Antenna Configuration screen either a<br />
Tone Burst or a DiSEqC 1.0 switch, you will get access to the LNB<br />
Configuration screen. Highlight the LNB that you want to configure and<br />
then press OK to display a list of configuration parameters concerning<br />
the selected LNB. Do the same for any active LNB in your antenna<br />
setup. Please note that each LNB corresponds to one satellite.<br />
LNB Configuration Note: For more details about installation of antenna set up including a DiSEqC<br />
switch refer to 5.3.2 section.<br />
LNB1 Configuration Screen<br />
Signal Quality/Strength (Astra)<br />
Symbol Rates Table<br />
Antenna Control = Off<br />
If you have not selected Tone Burst / DiSEqC 1.0 switch in the<br />
Antenna Configuration screen (you want to watch channels from one<br />
satellite only), selecting the LNB Configuration gives you a direct<br />
access to the LNB Configuration screen listing any configuration<br />
parameters of the single LNB existing in your antenna setup.<br />
By default, the LNB Type option is set to Universal. Change this setting<br />
if necessary and type in appropriate frequency (-ies). Consult the User<br />
Manual of your LNB.<br />
Checking Signal Strength/Quality<br />
To check the signal level/quality coming from your antenna, press the<br />
RED key in the LNB Configuration screen. In the Signal Meter<br />
screen, you can change the characteristics of the transponder that will be<br />
used to test the signal quality from the satellite allocated to a respective<br />
LNB. If the signal strength/quality are good, your antenna is properly<br />
aimed at the respective satellite. If the signal strength/quality is poor,<br />
change the antenna orientation. Once the antenna is properly aimed, do<br />
not forget to fasten it. Now you are ready to initiate the Channel Search<br />
procedure.<br />
Adding/Removing Symbol Rates<br />
To modify symbol rates that will be used during the channel search<br />
procedure, press m. The factory settings of symbol rates include the<br />
most common values encountered on individual satellites.<br />
CHANGE THE SETTING OF YOUR RECEIVER 25<br />
English
English<br />
Channel Searching Method<br />
Sattellite Selection<br />
Channel Search in Progress<br />
Decoder Status Submenu<br />
26 CHANGE THE SETTING OF YOUR RECEIVER<br />
8.4.4 Installation / Channel Search<br />
Once you select the Channel Search item from the Installation submenu,<br />
you will be prompted to decide whether you want to search for new<br />
channels or whether you want to reinstall all channel lists.<br />
If you select the Search for New Channels item, your channel lists<br />
remain intact. All the newly found channels will be stored in the Channel<br />
Pool. Once the channel search procedure has been completed, you will<br />
be prompted to transfer any newly found channels to your channel lists.<br />
If you select the Reinstall All Channels Lists item, the predefined<br />
channels lists available for the currently selected country will be<br />
recreated. Remember, however, that these predefined channels are from<br />
Astra19.2° or other satellites belonging to the list reported in the Satellite<br />
Selection menu. If your antenna is aimed at a different satellite, then you<br />
will have to create your channel lists manually transferring channels from<br />
the Channel Pool to individual channel lists.<br />
If your antenna setup allows your receiver to scan more than one<br />
satellite, the Satellite Selection screen appears that allows you to<br />
exclude some of the satellites from the channel searching procedure. On<br />
pressing OK the channel searching procedure gets initiated. You may<br />
interrupt this procedure by pressing BACK. Follow the prompts<br />
displayed on the screen.<br />
8.4.5 Installation / Decoder Status<br />
The Decoder Status submenu gives you access to some system and<br />
loader information. The Signal Meter functionality shows the satellite<br />
signal strength helping you to set you antenna dish in the best<br />
position.Decoder Upgrade functionality allows you to perform the<br />
receiver upgrade procedure. Please note that the receiver upgrade is<br />
broadcast on Astra19.2° orbital position. Therefore, if your antenna setup<br />
is not configured for Astra19.2°, you cannot benefit from your receiver.
Use the Factory Reset item if you want to restore default parameters<br />
of your receiver. Once you get access to the Factory Reset screen, press<br />
C/Bto change the Restore Settings item to Yes and then press OK<br />
to restore factory settings of your receiver.<br />
Use the Common Interface item if you have inserted the Conditional<br />
Access Module to the Common Interface slot at the front of your<br />
receiver. Here you will get access to any information stored on the CA<br />
smart card.<br />
Factory Reset English<br />
CHANGE THE SETTING OF YOUR RECEIVER 27
English<br />
9 Advanced Settings<br />
9.1 Easy Recording<br />
The Easy Recording feature allows you to perform recordings without the necessity to program your VCR. You set a<br />
recording reminder or timer from the Channel Banner or Timer Manager, and the VCR starts/ends recording at the<br />
correct time. Please note, however, that you may utilize the Easy Recording feature provided that your equipment<br />
supports it.<br />
● First of all, consult User Manual of your equipment to check if it supports Easy Recording. Please note that most Philips<br />
VCR/DVD recorders support one of the two Easy Recording options: either Prepare Record (to be checked first) or<br />
Record Link.<br />
● Also, both your TV and VCR shall be equipped with two SCART sockets.<br />
If your equipment satisfies above two conditions, connect your receivers as shown in the Connection diagram below.<br />
Satellite recever<br />
Then, select the System Settings item from the Settings submenu, enable the Easy Recording feature, and assign to the<br />
Recording Type an appropriate value: either Prepare Record or Easy Recording. You might have to test both settings to<br />
find out the one applicable for your recorder.<br />
Assuming the settings of your receiver and recorder (refer to your VCR or DVD recorder user manual) are done , to<br />
perform a recording you shall:<br />
- Program a timer with your receiver (refer to 6.10 section),<br />
- Put your recorder in the appropriate status to be controlled by your receiver (refer to the VCR or DVD recorder user<br />
manual).<br />
At timer occurrence your recorder shall start and stop recording automatically.<br />
Note: While the recording is in progress, your receiver is protected from inadvertent action to disrupt the recording. Please note that<br />
during the recording the “rEc” label is displayed on the front panel display. To cancel the running recording, press EXIT. This brings up a<br />
small window prompting you for confirmation. To cancel the recording altogether, press OK.<br />
28 ADVANCED SETTINGS
9.2 Change the Remote Control<br />
and receiver Settings<br />
If you have other equipment in your home and the Philips<br />
remote control of your digital receiver interferes with<br />
them, you can change the setting of your remote control<br />
and the setting of your receiver as well. By default, your<br />
receiver is recognized as Device 1 and the remote<br />
control is set to control Device 1. You may change this<br />
identifier to Device 2 using the System Settings screen<br />
from the Settings submenu. Please note however, that<br />
you will also have to change the remote control setting in<br />
order to be able to control Device 2.<br />
To change the setting of your remote control, proceed as<br />
follows:<br />
1 Make sure that the remote control is in the STB mode<br />
(Press Mode button, the STB LED shall blink, if a<br />
different LED does, Press the Mode button as many<br />
time as necessary to get STB LED blinking).<br />
2 Press number keys 1 and 3 simultaneously and hold them<br />
until LED blinks twice.<br />
3 Release these two keys. The STB LED continues blinking<br />
to indicate that the remote control is in the programming<br />
mode.<br />
4 Enter the new setting within 60 seconds: Either 0039 for<br />
Device 2 or 0038 for Device 1.<br />
Alternatively you may reset your remote control to its<br />
default setting (Device 1) by removing and reinserting<br />
batteries after more than 3 minutes.<br />
9.3 Master PIN Code<br />
If you have forgotten your PIN code, you have the<br />
possibility to reset it to its default PIN code (1234). To<br />
reset the PIN code, type in the so-called Master PIN<br />
Code (00799700). Type in the Master PIN code in quick<br />
succession on the level of the Main Menu. Before you<br />
enter the Master PIN code, press the m key. Please<br />
keep this code secret to prevent your children from<br />
using it.<br />
ADVANCED SETTINGS 29<br />
English
English<br />
10 Decoder Software Upgrade<br />
Checking For Upgrade<br />
Upgrade Can Be Initiated<br />
Upgrade Notification (Auto Upgrade = No)<br />
30 DECODER SOFTWARE UPGRADE<br />
Your receiver’s software may be upgraded via the satellite transmission.<br />
New software versions for your receiver will be broadcast on Astra19.2°<br />
orbital position. Therefore, if your antenna setup does not include<br />
Astra19.2° satellite, you will not be able to get your receiver updated.<br />
To check whether a new software version is available for your receiver,<br />
select the Decoder Status from the Installation submenu. Then, select<br />
the Decoder Upgrade item from the Decoder Status submenu. Then<br />
a check is made whether a new software version is broadcast from<br />
Astra19.2° orbital position. If new software exists, you will be prompted<br />
to press OK to initiate the upgrading process.<br />
Also, when you switch your receiver into the standby mode, the check is<br />
made whether new software version is available. If new software is<br />
detected, either the upgrade is made in the standby mode (the Auto<br />
Upgrade option is set to Yes), or you are informed about upgrade<br />
availability when you switch your receiver into the operate mode (the<br />
Auto Upgrade option is set to No).<br />
To modify the Auto Upgrade option, press the MENU key. From the<br />
Main Menu, select the Installation submenu, then select the Settings<br />
submenu. Next, select System Settings item to get access to the Auto<br />
Upgrade item.
11 Programming the Remote Control for your STB,<br />
TV, Video Recorder, DVD and Tuner – Amplifier.<br />
11.1 Setting up your remote control<br />
By default at power up, for instance at first installation or at battery replacememt, your remote control is preset to control<br />
your satellite receiver as well as most of the Philips audio/video appliances.<br />
If you have other brands of appliances, or if the presets do not control your Philips appliance, please follow the procedure<br />
here below.<br />
Note: some of the functions described in the next pages may not be available or have the same behaviour for all brand of the same<br />
appliances.<br />
1 Press the MODE button to select the type of appliance you want to set up (TV, VCR, DVD or Amp/Tuner).<br />
Pressing the MODE button once will remind you of the MODE you are in through green light indicators: left for STB, middle<br />
for TV, right for VCR, left/middle for DVD, middle/right for Amp/Tuner.<br />
To set the MODE, press the MODE button several times until the desired mode is signaled by the light(s). The sequence is:<br />
STB->TV->VCR->DVD->Amp/Tuner. At every key press, lights blink to indicate in which MODE you are in.<br />
2 Press digits 1 and 3 simultaneously untill, the lights corresponding the selected mode blinks twice and remain on.<br />
3 Enter the 4 digit code .The lights couver ponding to the selected mode blinks once at each digit entry. You will find a list of<br />
codes at the end of this manual. (If several codes are possible, go through this procedure with the 1st code and try your<br />
remote control. If you are not successful, repeat the procedure with the second code, and so on).<br />
4 If a valid 4-digit code has been entered, the lights will switch off and blink twice. If not, go back to step 1.<br />
Pressing any key other than digit keys and standby button will automatically exit this procedure.<br />
We advice you to fill in the table below to remind your personal remote control settings, this will be helpful the day you have<br />
to replace the remote control batteries (see NOTE 2 below).<br />
Philips Brand Your appliance Your code<br />
factory setting brand / type setting<br />
TV set 0666<br />
Video Recorder 1608<br />
DVD player / Recorder 0566<br />
Amplifier / Tuner 1316 (Philips tuner)<br />
STB (Your Satellite Receiver)<br />
Volume Control refer to 4.2.2.1<br />
or 4.2.2.2 section)<br />
0038 (Device 1)<br />
Important Notes:<br />
1- You need to reset the STB mode to the factory mode.<br />
If you have made a mistake changing the default setting of the STB mode resulting in the impossibility to control your satellite receiver,<br />
then please refer to above description.<br />
2- Battery change.<br />
If the battery change takes more than 1 minute the remote control may return to the “Philips brand factory settings”. Therefore you<br />
shall proceed with a new setting of your remote control, with the help of the table above, for your non Philips branded appliances.<br />
3- All manufacturers are concerned about the constant improvement of their products. Although the RC2585108 is compatible with<br />
most of the equipment of the following list, Philips cannot guarantee its operation with the complete range of products on the market.<br />
PROGRAMMING THE REMOTE CONTROL 31<br />
English
English<br />
11.2 Using your remote control for your TV<br />
TV mode (TV)<br />
Note: Some of the functions described below may not be available or may not have the same behaviour for all appliances.<br />
RED, GREEN, YELLOW, BLUE,<br />
WHITE<br />
- Contextual keys in teletext mode.<br />
b<br />
- Teletext On/Off<br />
GUIDE<br />
- Selects between first and second<br />
audio channel.<br />
¯<br />
- Toggles between Teletext and<br />
TV/Teletext mix modes.<br />
MENU<br />
- Opens / Closes the Menu.<br />
4 / i<br />
- Scroll one page up / down in<br />
program list.<br />
VWCB<br />
- Move the selection up, down and<br />
change settings in menu.<br />
OK key<br />
- Acknowledges a menu item<br />
selection.<br />
A +/-<br />
- Adjusts TV volume.<br />
TV/STB a<br />
- Toggles between the different TV<br />
set mode (TV, AV1,AV2, Front,…).<br />
32 PROGRAMMING THE REMOTE CONTROL<br />
Standby B<br />
- Power / Standby / On.<br />
EXIT<br />
- Menu off.<br />
P+ P-<br />
- Selects the next or previous TV<br />
program.<br />
BACK<br />
- Selects the last watched TV<br />
program.<br />
MUTE H<br />
- Mutes the TV sound.<br />
0-9<br />
- Selects the relevant TV program.<br />
m (Wide screen)<br />
- Selects the TV picture format<br />
(16:9, 4:3,…).
11.3 Using your remote control for your VCR<br />
VCR mode (VCR)<br />
Note: Some of the functions described below may not be available or may not have the same behaviour for all appliances.<br />
G<br />
- Fast rewind.<br />
K<br />
- Pause.<br />
L<br />
- Stop.<br />
B<br />
- Play.<br />
F<br />
- Fast forward.<br />
FAV<br />
- Subtitle On/Off.<br />
MENU<br />
- Opens / Closes the Menu.<br />
VWCB<br />
- Move the selection up, down and<br />
change settings in menu.<br />
OK<br />
- Acknowledges a menu item<br />
selection.<br />
A +/-<br />
- Adjusts TV volume.<br />
TV/STB a<br />
- Toggles between the different VCR<br />
mode (VCR, AUX 1,<br />
AUX 2, ...).<br />
Standby B<br />
- Power / Standby / On.<br />
RADIO<br />
- Selects between first and second<br />
audio channels.<br />
EXIT<br />
- Menu off.<br />
P+ P-<br />
- Selects the next or previous<br />
program for the VCR.<br />
MUTE H<br />
- Mutes the TV sound.<br />
0-9<br />
- Selects the relevant TV program.<br />
m<br />
- Displays On Screen Messages.<br />
PROGRAMMING THE REMOTE CONTROL 33<br />
English
English<br />
11.4 Using Remote Control For Your DVD Player<br />
DVD mode (DVD)<br />
Note: Some of the functions described below may not be available or may not have the same behaviour for all appliances.<br />
G<br />
- Search reverse.<br />
K<br />
- Pause.<br />
L<br />
- Stop.<br />
B<br />
- Play.<br />
F<br />
- Search forward.<br />
b<br />
- Teletext On/Off.<br />
GUIDE<br />
- Selects, when available, the view<br />
angle.<br />
RADIO<br />
- Selects when available, an<br />
alternate audio track.<br />
MENU<br />
- Opens / Closes the Menu.<br />
VWCB<br />
- Move the selection up, down and<br />
change settings in menu.<br />
OK<br />
- Acknowledges a menu item<br />
selection.<br />
A +/-<br />
- Adjusts TV volume.<br />
TV/STB a<br />
- Toggles between DVD and TV<br />
watching .<br />
34 PROGRAMMING THE REMOTE CONTROL<br />
Standby B<br />
- Power / Standby / On.<br />
EXIT<br />
- Menu off.<br />
P+ P-<br />
- Selects next previous chapter or<br />
title.<br />
MUTE H<br />
- Mutes the TV sound.<br />
0-9<br />
- Selects directly DVD tracks.<br />
m<br />
- Displays On Screen Messages.
11.5 Using Remote Control For Your Tuner / Amplifier<br />
TUNER-AMPLIFIER mode (AMP)<br />
Note: Some of the functions described below may not be available or may not have the same behaviour for all appliances.<br />
(*) Indicates the commands which are only available for Philips Tuner / Amplifiers.<br />
G (*)<br />
- Selects DVD source.<br />
K(*)<br />
- Selects STB receiver source.<br />
L<br />
- Select TV source.<br />
B (*)<br />
- Selects VCR source.<br />
F (*)<br />
- Selects tuner source.<br />
VW<br />
- Selects next / previous radio<br />
preset.<br />
CB<br />
- Searches radio programs down /<br />
up.<br />
A +/-<br />
- Adjusts the Amplifier - Tuner<br />
volume.<br />
m<br />
- Displays On Screen Messages.<br />
Standby B<br />
- Power / Standby / On.<br />
P+ P- (*)<br />
- Selects the next or previous TV<br />
program.<br />
MUTE H<br />
- Mutes the Amplifier - Tuner sound.<br />
0-9 (*)<br />
- Selects the relevant TV program.<br />
PROGRAMMING THE REMOTE CONTROL 35<br />
English
English<br />
12 Troubleshooting guide<br />
Check the guide below for a possible cause of the problem you are experiencing. The most common problems that arise<br />
are related to cable connections. Make sure that your receiver is properly connected.<br />
Symptom Remedy<br />
Nothing lights up on your receiver’s front<br />
panel.<br />
Your remote control fails to operate your<br />
receiver.<br />
There is no sound/picture but the current<br />
time is displayed on the receiver’s front<br />
panel.<br />
There is no sound/picture. However, front<br />
panel display is correct.<br />
Main Menu can be displayed but you<br />
cannot select channels.<br />
Main Menu and Channel Banner can be<br />
displayed, but there is no reception (black<br />
screen).<br />
Intermittent reception (“mosaic” effect or<br />
“frozen” image).<br />
The picture is not sharp and text is difficult<br />
to read<br />
You have a CAM module with its card<br />
inserted in the common interface. During<br />
normal reception of channels, black screen<br />
appears.<br />
36 TROUBLESHOOTING GUIDE<br />
Check that the mains power cord is correctly connected. Disconnect this cord, and<br />
then reconnect it to ensure it is in place.<br />
Check that power is available at the wall socket.<br />
Check that the mains switch (on the rear panel) is in the ON position.<br />
Make sure your receiver is in the operate mode.<br />
Make sure that you are pointing your remote control at the receiver front panel.<br />
Make sure that the remote control is set to STB mode (see 4.2.1)<br />
Check the batteries in your remote control.<br />
Your receiver is in standby. Press P+ / P- button on your remote control to wake up<br />
your receiver. Alternatively, press Up / Down button on the receiver’s front panel.<br />
You are viewing TV via your UHF aerial TV connection. Press the TV / STB remote<br />
control button once or twice.<br />
Make sure that the SCART connections are correct.<br />
Connections are correct but the TV set is NOT switched to external AV source.<br />
Press twice the TV / STB remote control button, if the problem is not fixed refer<br />
to the user manual of your TV set.<br />
Your receiver has not been properly configured. Check Antenna Configuration<br />
and LNB Configuration. Perform the Channel Search procedure. (Select the<br />
Installation submenu from the Main Menu). Optionally return to factory setting.<br />
Your channel lists are empty. Transfer channels from the Channel Pool. (Select<br />
Channel Manager from the Main Menu).<br />
Antenna is not receiving the satellite signal. Check the installation and the antenna<br />
positioning (Check signal quality).<br />
There is no power supply fed to LNB. Check the cable link between LNB and the<br />
satellite receiver.<br />
Transmitted signal is too weak. Check the installation and the antenna positioning.<br />
This effect may also be produced by severe weather conditions (e.g. heavy clouds).<br />
Transmitted signal is too strong. Install an attenuator at the dish input.<br />
You may have defective cable links. Check all connections and cables.<br />
Poor signal due to the incorrect positioning of the antenna. Reorient the antenna and<br />
fasten it securely.<br />
The TV SCART output video format is not set to RGB. Change setting of the TV<br />
SCART item to RGB in the System Setting menu.<br />
The TV SCART lead is not connected to the RGB capable SCART socket of your TV<br />
set (refer to TV set user manual for proper connection).<br />
The SCART lead for TV connection is not RGB capable (not fully wired). Use the<br />
SCART cable supplied with your receiver for the connection to the TV set.<br />
Your subscription rights do not include all channels/programs. Select another channel.
13 Technical Specification<br />
This product is in conformity with the requirements of the 95/47/EC<br />
directive.<br />
Video Decoding<br />
MPEG-2 DVB compliant up to MP@ ML<br />
Video bit rate: up to 15 Mbit/sec<br />
Video format: 4:3 (letter- box if source in<br />
16:9) and 16:9<br />
Resolution: up to 720x576 pixels<br />
Audio Decoding<br />
MPEG layer I / II<br />
Operation/Features<br />
Automatic channel installation via scanning<br />
TV & Radio modes<br />
Free-to-air reception<br />
6 favorite TV lists & 6 favorite Radio lists<br />
channel editing for personalized installation (delete, add, move)<br />
Subtitles<br />
Parental lock with PIN code<br />
Full remote controlled<br />
Menu controlled installation and operation using On Screen Display<br />
8 VCR timers<br />
Automatic recording via: reminders, timer programming and Easy<br />
recording for Philips VCR and DVD- RW<br />
Automatic VCR playback: Audio L/R + CVBS or RGB/Fast blanking<br />
Receiver compatible with services based on MHP<br />
Now & next event in Channel Banner<br />
Software upgrade via over the air download<br />
Suited for feeding a Video projector<br />
Application System Resources<br />
Processor clock speed: 180 MHz<br />
SDRAM - CPU/Video-Graphics 32 MB<br />
Flash memor: 8MB<br />
Satellite antenna interface<br />
Signal input: F-type female<br />
RF output (bypass): F-type female connector<br />
LNB supply (V) 0, 14, 18<br />
LNB current (mA) 350 mA<br />
Tone switching 22 KHz ON/OFF<br />
DiSEqc 1.0<br />
Reception/Demodulation<br />
Demodulation: QPSK<br />
Input frequency range: 950-2150 MHz<br />
Bypass freq. Range: 950-2150 MHz<br />
Symbol Rate 2 - 45 MS/s<br />
Satellite band coverage 10.7-12.75 GHz<br />
Connections<br />
TV SCART:<br />
Output: CVBS or S-Video or RGB/<br />
Fast blanking Volume<br />
controlled audio L/R, Slow<br />
blanking<br />
VCR SCART:<br />
Input: CVBS or RGB / Fast<br />
blanking, Slow blanking ,<br />
Audio L/R<br />
Output: CVBS or S-Video Audio L/R,<br />
Slow blanking during timer if<br />
“Prepare Record” mode is<br />
activated<br />
Audio CINCH:<br />
Analog audio output: L / R<br />
Digital audio output: S/PDIF<br />
Serial interface: D-9 female<br />
Accessories<br />
- Remote control: Type RC2585108<br />
- Scart cable<br />
- User manual<br />
- Worldwide Guarantee booklet<br />
- Batteries: 2 x 1.5V type AA/R06<br />
- Telephone modem cable<br />
- Mains cord<br />
Miscellaneous<br />
Temperature range (°C)<br />
Operating +5 to 45<br />
Storage: -10 to +70<br />
Mains: 230 V ~ +/-10%; 50Hz<br />
Power consumption: 15W without LNB power<br />
Weight: 1.400 kg<br />
Including packaging 2.5 kg<br />
Dimensions: WxHxD 430mm x 50mm x<br />
255 mm.<br />
Due to continued product improvements, this<br />
information is subject to change without notice.<br />
TECHNICAL SPECIFICATION 37<br />
English
English<br />
14 BRAND CODE LIST<br />
TV<br />
A.R. Systems 0064 0583<br />
Accent 0064<br />
Accuphase 0583<br />
Acec 0039<br />
Adcom 0652<br />
Admiral 0120 0445 0114 0190 0291<br />
Adyson 0244 0243<br />
AEA 0064<br />
Agashi 0243 0291 0244<br />
AGB 0543<br />
Agef 0114<br />
Aiko 0036 0243<br />
Aim 0064 0099 0439<br />
Aiwa 0728<br />
Akai 0235 0398 0064 0460 0036 0099 0245<br />
0741 0190 0543 0742 0629 0583 0507<br />
0244 0658 0243 0291 0633<br />
Akiba 0245 0309 0482 0064 0321<br />
Alaron 0243<br />
Allorgan 0233 0321 0244<br />
Allstar 0064<br />
Amplivision 0244 0427 0397<br />
Amstrad 0036 0543 0291 0381 0398 0245 0064<br />
0460 0439 1064 0675<br />
Anam 0064 0036<br />
Anam National 0064 0677<br />
Anglo 0036 0291<br />
Anitech 0036 0291 0064 0309 0129<br />
Ansonic 0397 0064 0036 0695 0401 0190 0319<br />
0129 0438 0286 0274 0039 0131<br />
Apollo 0500<br />
Arc en Ciel 0136 0223<br />
Arcam 0243 0244<br />
Ardem 0513 0741 0064 0583<br />
Aristona 0583 0064 0039<br />
Arthur Martin 0190 0427<br />
ASA 0132 0373 0097 0131 0114<br />
Asberg 0064 0129<br />
Asora 0036<br />
Astra 0064<br />
Asuka 0245 0244 0243 0291 0309<br />
Atlantic 0064 0243 0233 0286<br />
Atori 0036<br />
Auchan 0190 0427<br />
Audiosonic 0036 0064 0401 0136 0741 0742 0244<br />
0397 0291 0245 0513<br />
Audioton 0244 0513 0397 0291<br />
Autovox 0114 0233 0244 0274<br />
AWA 0038 0063 0036 0401 0439 0064 0243<br />
0633 0244 0135 0291<br />
Axxent 0036<br />
Bang & Olufsen 0592 0114<br />
Barco 0407 0190<br />
Basic Line 0401 0064 0190 0695 0583 0036 0245<br />
0309 0244 0482<br />
Bastide 0244<br />
Baur 0222 0539 0064<br />
Bazin 0244<br />
Beko 0513 0741 0397 0064 0633 0742<br />
Beon 0064 0445<br />
38 BRAND CODE LIST<br />
Best 0397<br />
Bestar 0064 0397 0401<br />
Bestar-Daewoo 0401<br />
Black Diamond 1064 0583<br />
Black Panther 0129<br />
Black Star 0274<br />
Blacktron 0309<br />
Blackway 0309 0245<br />
Blaupunkt 0222 0227 0354 0482 0197<br />
Blue Sky 0064 0741 1064 0514 0695 0742 0651<br />
0583 0245 0309 0482<br />
Blue Star 0309<br />
Bondstec 0274<br />
Boots 0244 0036<br />
Bosch 0354<br />
BPL 0064 0309<br />
Brandt 0652 0136 0223 0362<br />
Brandt Electronique 0362<br />
Brinkmann 0064 0695 0445 0513<br />
Brionvega 0064 0114<br />
Brother 0291<br />
Bruns 0114<br />
BSR 0190 0321<br />
BTC 0245<br />
Canton 0245<br />
Capsonic 0291<br />
Carad 0637 0064<br />
Carena 0482 0064<br />
Carrefour 0063 0097 0064<br />
Carver 0197<br />
Cascade 0036 0064<br />
Casio 0064 0190<br />
Cathay 0064<br />
CCE 0064 0244<br />
Centrum 1064<br />
Centurion 0064<br />
Century 0114 0274 0265<br />
CGE 0101 0445 0274 0397 0190<br />
Cimline 0036 0245<br />
City 0036<br />
Clarivox 0445 0064 0097 0129<br />
Clatronic 0064 0397 0398 0741 0245 0291 0583<br />
0244 0274 0036 0129 0606 0675<br />
CMS0243<br />
CMS hightec 0244<br />
Concorde 0036<br />
Condor 0064 0397 0243 0036 0309 0129 0274<br />
0445 0438 0190 0291<br />
Conrad 0064<br />
Contec 0243 0036 0038 0063 0291 0064<br />
Continental Edison 0136 0223 0514<br />
Cosmel 0036 0064<br />
Crosley 0114 0274 0101 0190<br />
Crown 0036 0397 0513 0064 0514 0741 0633<br />
0742 0445 0606 0235 0366<br />
CS Electronics 0243 0245 0274<br />
CTC 0274<br />
Curtis Mathes 0120<br />
Cybertron 0245<br />
D-Vision 0064<br />
Daewoo 0661 0651 0401 0064 0583 0036 0243<br />
0245 0244
Dainichi 0245 0243<br />
Dansai 0064 0291 0243 0036 0063 0244<br />
Dansette 0439<br />
Dantax 0397 0513 0741 0633 0742<br />
Daytron 0036 0401 0064<br />
de Graaf 0235 0190<br />
Deitron 0064 0401 0245<br />
Denko 0291<br />
Denver 0064 0633<br />
Desmet 0064 0036 0114<br />
Diamant 0064<br />
Diamond 0291<br />
Digiline 0064<br />
Dik 0064<br />
Dixi 0036 0064 0274 0244 0114<br />
Domeos 0695<br />
Domland 0421<br />
DTS0036<br />
Dual 0244 0064 0286 0421 0190<br />
Dumont 0114 0131 0129 0244 0097 0099<br />
Dunai 0190<br />
Dux 0064 0039<br />
Dynatron 0064 0039<br />
E-Elite 0245<br />
Edison-Minerva 0514<br />
Elbe 0462 0265 0286 0319 0397 0190 0064<br />
0245 0438 0637 0244 0543<br />
Elbe-Sharp 0543<br />
Elcit 0114 0274 0543 0129 0190<br />
Elekta 0036 0064 0291 0309<br />
ELG 0064<br />
Elin 0243 0064 0132 0131 0190 0036<br />
Elite 0245 0064<br />
Elman 0129<br />
Elta 0036 0291 0243<br />
Emco 0274<br />
Emerson 0114 0274 0064 0398 0097 0309 0651<br />
0513 0397 0190<br />
Emperor 0309<br />
Erres 0064 0039<br />
ESC 0064 0244<br />
Estèle 0190<br />
Etron 0064 0036 0190<br />
Eurofeel 0291 0244<br />
Euroman 0243 0291 0064 0244 0397<br />
Europa 0064<br />
Europhon 0064 0543 0129 0190 0244 0583 0274<br />
0243<br />
Excel 0064 0583<br />
Expert 0233 0427 0286 0190<br />
Exquisit 0064 0274<br />
Family Life 0064<br />
Fenner 0401 0036<br />
Fidelity 0539<br />
Filsai 0244<br />
Finlux 0132 0131 0064 0741 0373 0244 0099<br />
0190 0543 0742 0097 0114 0129 0438<br />
0658 0519 0507 0500 0445 0633<br />
Firstline 0064 0401 0695 0741 0651 0190 0036<br />
0321 0243 0274 0129 0244 0438 0265<br />
0099 0235<br />
Fisher 0131 0244 0063 0235 0397 0072 0114<br />
0190 0099<br />
Flint 0064 0637 0099 0245 0482 0291<br />
FNR 0129<br />
Formenti 0190 0064 0583 0513 0243 0114<br />
Formenti-Phoenix 0243<br />
Fortress 0120 0114<br />
Fraba 0064 0397<br />
Friac 0036 0064 0129 0397 0682<br />
Frontech 0274 0291 0244 0036 0190<br />
Fujitsu 0233 0099 0129 0244 0190 0036 0064<br />
0286<br />
Fujitsu General 0036 0244 0233 0190<br />
Funai 0695 0291 0321 0439<br />
Future 0064 0583<br />
Galaxi 0129 0064 0190<br />
Galaxis 0397 0445 0064 0129 0583<br />
Galeria 0036<br />
GBC 0190 0036 0401 0245<br />
GE 0309 0587 0136 0362<br />
Geant Casino 0190 0427<br />
GEC 0190 0064 0543 0583 0099 0244<br />
Geloso 0274 0036 0190 0401<br />
General 0136<br />
General Technic 0036<br />
Genesis 0036<br />
Genexxa 0245 0064 0439 0190 0036<br />
Goldfunk 0695<br />
Goldhand 0243<br />
GoldStar 0064 0036 0397 0317 0244 0274 0243<br />
0583 0190 0136 0633<br />
Gooding 0514<br />
Gorenje 0397<br />
GPM 0245<br />
Gradiente 0197 0064<br />
Graetz 0398 0190 0064 0366 0583<br />
Gran Prix 0675<br />
Grandin 0064 0036 0190 0637 0741 0742 0695<br />
0401 0309 0245 0482 0427 0606<br />
Gronic 0129 0244 0190<br />
Grundig 0222 0514 0097 0064 0583 0614 0036<br />
0063 0397<br />
Halifax 0291 0243 0244<br />
Hampton 0243 0244<br />
Hanseatic 0064 0583 0190 0319 0309 0421 0661<br />
0397 0036 0321 0244 0114<br />
Hantarex 0036 0064 0129 0543<br />
Hantor 0064<br />
Hauppauge 0064<br />
HCM 0036 0439 0064 0244 0245 0445 0309<br />
0291<br />
Hema 0244 0036<br />
Hifivox 0136 0223<br />
Highline 0291 0064<br />
Hisawa 0309 0245 0427 0482 0637<br />
Hit 0114<br />
Hitachi 0252 1252 0063 0135 0500 0190 0605<br />
0223 0244 0221 0543 0099 0064 0583<br />
0136 0661 0132 0519 0539 0507<br />
Hitachi Fujian 0135 0252<br />
Hitsu 0036 0482 0245 0637<br />
HMV 0114<br />
Hornyphone 0064 0039<br />
Hoshai 0245 0482<br />
Huanyu 0401 0243<br />
BRAND CODE LIST 39<br />
English
English<br />
Hygashi 0244 0243<br />
Hyper 0036 0243 0244 0274<br />
Hypson 0064 0741 0291 0244 0309 0482 0427<br />
0265<br />
Iberia 0064 0583<br />
ICE 0291 0064 0398 0036 0583 0245 0244<br />
0243<br />
Ices 0245 0243<br />
Icos 0039<br />
Imperial 0064 0190 0397 0101 0583 0438 0445<br />
0274 0223<br />
Indiana 0064<br />
Ingelen 0514 0637 0741 0190<br />
Ingersoll 0036<br />
Inno Hit 0036 0099 0064 0245 0317 0244 0543<br />
0274 0129 0309<br />
Innovation 0064 0583<br />
Interactive 0064 0039 0114 0539 0354 0190 0397<br />
0136<br />
Interbuy 0036 0064 0291 0274 0539 0583<br />
Interfunk 0064 0039 0114 0539 0354 0190 0397<br />
0136 0274<br />
Internal 0064 0651 0401<br />
International 0243<br />
Intervision 0309 0244 0482 0064 0398 0513 0397<br />
0421 0514 0245 0129 0190 0291 0274<br />
0036 0583<br />
Irradio 0036 0064 0245 0274 0317 0398<br />
Isukai 0245 0064 0309 0482<br />
ITC 0244<br />
ITS0064 0398 0245 0309 0291 0243 0036<br />
0583<br />
ITT 0190 0507 0500 0373 0366 0235 0637<br />
ITT Nokia 0190 0500 0507 0373 0235 0366 0633<br />
0637 0658<br />
ITV 0291 0064 0274 0401<br />
Jean 0063<br />
Jubilee 0583<br />
JVC 0680 0063 0398 0245 0633 0445<br />
Kaisui 0245 0309 0064 0243 0482 0244 0036<br />
Kamp 0243<br />
Kapsch 0190 0233 0286 0131<br />
Karcher 0064 0397 0637 0190 0309 0129 0291<br />
Kathrein 0583 0064<br />
Kawa 0398<br />
Kawasho 0243<br />
Kendo 0637 0064 0190 0539 0397 0438 0129<br />
0274<br />
Kennedy 0190 0233 0462<br />
Kenwood 0132<br />
Kingsley 0243<br />
Kiton 0583 0064<br />
Kneissel 0064 0397 0637 0438 0401 0583 0462<br />
0286 0319 0265<br />
Kolster 0064 0129<br />
Konka 0064 0398 0741 0445 0245<br />
Kontakt 0514<br />
Korpel 0064 0583<br />
Korting 0114 0397<br />
Kotron 0439 0291<br />
Koyoda 0036<br />
Kraking 0265<br />
Kriesler 0039<br />
40 BRAND CODE LIST<br />
KTV 0244<br />
Kuba 0190<br />
Kuba Electronic 0190<br />
Kyoshu 0439 0445 0291<br />
Kyoto 0190 0243 0244<br />
LaSAT 0513 0397<br />
Leader 0036<br />
Lemair 0438<br />
Lenco 0064 0036 0190 0401 0583 0131<br />
Lenoir 0036<br />
Lesa 0274<br />
Levis Austria 0064 0583<br />
Leyco 0291 0099 0064 0321 0606<br />
LG 0064 0397 0036 0244 0583 0274 0243<br />
0317 0190 0633 0741 0136<br />
Liesenk & Tter 0354 0064 0583<br />
Liesenkotter 0064 0354 0039 0583<br />
Lifetec 0064 0036 0401 0695 0539 0682 1064<br />
0583 0245 0291<br />
Loewe 0539 0064 0682 0397 0114 0319<br />
Logik 0038 0398<br />
Logix 0695<br />
Luma 0064 0233 0190 0438 0583 0401 0036<br />
0286<br />
Lumatron 0233 0064 0190 0286 0244 0291<br />
Lux May 0064 0036 0583<br />
Luxman 0606<br />
Luxor 0221 0317 0507 0519 0235 0190 0373<br />
0500 0244 0658<br />
Madison 0064 0583<br />
Magnadyne 0114 0274 0543 0129 0190<br />
Magnafon 0543 0129 0243<br />
Magnavox 0064 0063<br />
Magnum 0675 0741 0064<br />
Mandor 0291<br />
Manesth 0064 0583 0244 0291 0321 0190<br />
Manhattan 0064 0695 1064 0190<br />
Marantz 0064 0583 0439<br />
Marelli 0114<br />
Mark 0064 0244 0243 0401 0036 0741 0742<br />
Masuda 0245 0398 0036 0291 0064 0244 0583<br />
Matsushita 0677<br />
Mediator 0064 0583 0039<br />
Medion 0064 0695 0539 0583<br />
Megas 0637<br />
Melectronic 0373 0064 0539 0136 0274 0132 0131<br />
0401 0036 0244 0507 0519 0243 0438<br />
0190 0583 0651 0661 0222<br />
Melvox 0427<br />
Memorex 0036<br />
Memphis 0099 0036<br />
Mercury 0064 0036 0583<br />
Metz 0222 0474 0394 0415 0064 0114 0583<br />
0614 0695<br />
MGA 0064 0583 0245 0131<br />
Micromaxx 0064 0695 1064<br />
Minato 0064 0583<br />
Minerva 0514 0222 0097 0543 0135<br />
Minoka 0439 0064<br />
Mitsubishi 0135 0120 0539 0064 0381 0114 0063<br />
0583 0235<br />
Mitsuri General 0190
Mivar 0319 0317 0318 0397 0243 0636 0543<br />
0244<br />
Monaco 0036<br />
Morgan's 0064 0583<br />
Motorola 0120<br />
MTC 0397 0539 0190 0243<br />
Multistandard 0129<br />
Multitec 0064 0695 0513<br />
Multitech 0036 0513 0064 0397 0583 0244 0243<br />
0274 0129 0291<br />
Murphy 0131 0243 0099 0190<br />
Musikland 0064 0245 0274 0583<br />
Myryad 0583 0064<br />
NAD 0190<br />
Naiko 0064 0633 0583<br />
Nakimura 0401 0064 0583<br />
Naonis 0190<br />
NAT 0253<br />
National 0253<br />
NEC 0197 0063 0482 0036 0401 0244 0064<br />
0038<br />
Neckermann 0064 0397 0227 0583 0190 0354 0445<br />
0114 0274 0244 0438 0539<br />
NEI 0064 0398 0190<br />
Nesco 0274<br />
Netsat 0064 0583<br />
Neufunk 0064 0036 0583 0637 0245 0309<br />
New Tech 0064 0036 0583 0244<br />
New World 0245<br />
Nicamagic 0243<br />
Nobliko 0129 0097 0243<br />
Nogamatic 0136 0223<br />
Nokia 0190 0507 0519 0500 0366 0235 0401<br />
0658 0633 0373 0637 0136<br />
Nordic 0244<br />
Nordmende 0136 0223 0587 0222 0064 0362 0190<br />
Norfolk 0190<br />
Normerel 0064 0583<br />
Novak 0039<br />
Novatronic 0064 0132 0401 0583<br />
Nurnberg 0190<br />
Oceanic 0190 0427 0321 0235 0500 0507<br />
Odeon 0291<br />
Okano 0397 0064 0291 0099 0036<br />
Omega 0291<br />
Onwa 0398 0629 0245 0460 0129<br />
Opera 0064 0583<br />
Optimus 0677<br />
Optonica 0120<br />
Orbit 0064 0583<br />
Orion 0064 0583 0682 0321 0038 0036 0129<br />
0291 0439 0543<br />
Orline 0064 0245 0583<br />
Ormond 0695 1064 0064 0583<br />
Orsowe 0543<br />
Osaki 0099 0245 0244 0291 0064 0439 0401<br />
0583<br />
Osio 0064 0583 0317<br />
Oso 0245<br />
Osume 0099 0063 0245 0064<br />
Otto Versand 0063 0120 0539 0064 0583 0222 0136<br />
0321 0253 0274 0244 0036 0309 0543<br />
Pacific 0064 0583<br />
Pael 0243<br />
Palladium 0397 0064 0227 0445 0583 0274 0354<br />
0114 0190 0244 0438 0682<br />
Palsonic 0291 0439 0064 0244 0245 0583<br />
Panama 0036 0244 0291 0243 0064 0274<br />
Panasonic 0677 0253 0394 0543 0064 0190<br />
Panavision 0064 0438 0583<br />
Pathe Cinema 0190 0265 0243 0427 0319 0397<br />
Pathe Marconi 0136 0223<br />
Pausa 0036<br />
Perdio 0099 0190 0064 0243 0309 0583<br />
Perfekt 0064 0583<br />
Pershin 0427<br />
Philco 0114 0101 0445 0274 0190 0397 0064<br />
Philharmonic 0244<br />
Philips 0666 0064 0583 0039 0114 0401<br />
Phoenix 0064 0114 0513 0397 0243 0190 0099<br />
Phonola 0064 0583 0039 0114 0243<br />
Pilot 0064 0583<br />
Pioneer 0064 0397 0136 0190 0513<br />
Pionier 0397 0513<br />
Plantron 0064 0291 0036<br />
Playsonic 0244<br />
Policom 0129 0136 0223 0233 0265<br />
Poppy 0036<br />
Portland 0401 0651<br />
Powerpoint 0514<br />
Prandoni-Prince 0274 0543<br />
Precision 0244<br />
Prima 0036 0291<br />
Prinz 0099 0221<br />
Profex 0036 0190<br />
Profi 0036<br />
Profitronic 0064 0129<br />
Proline 0099 0064 0039 0652<br />
Prosonic 0064 0243 0397 0401 0606 0398 0695<br />
Protech 0064 0244 0036 0274 0129 0291 0445<br />
0695 0309<br />
Provision 0064 0583 1064<br />
Pye 0064 0401 0583 0039 0114<br />
Pymi 0036<br />
Quadra Vision 0427<br />
Quasar 0274<br />
Quelle 0064 0038 0136 0539 0063 0244 0274<br />
0101 0354 0097 0131 0132 0222 0227<br />
0291 0317 0695 0321 0373 0036<br />
Questa 0063<br />
R-Line 0064<br />
Radialva 0136 0245 0190 0064<br />
Radiola 0064 0583 0039 0244<br />
Radiomarelli 0114 0543 0274 0064<br />
RadioShack 0064<br />
Radiotone 0036 0064 0397 0606 0445 0291 0439<br />
0675<br />
Rank 0097<br />
Rank Arena 0063<br />
RBM 0097<br />
RCA 0652 0120 0587 0362<br />
Recor 0064<br />
Rectiligne 0064<br />
Rediffusion 0063<br />
Redstar 0064 0583<br />
Reflex 0064 0695<br />
BRAND CODE LIST 41<br />
English
English<br />
Revox 0064 0397<br />
Rex 0233 0438 0274 0190 0286 0291<br />
RFT 0114 0319 0397 0099 0291<br />
Rhapsody 0243<br />
Ricoh 0064 0583<br />
Roadstar 0036 0291 0245 0445 0064 0309 1064<br />
Robotron 0114<br />
Rodex 0064 0583<br />
Rowa 0291 0244<br />
Royal Lux 0397 0439<br />
Saba 0652 0114 0190 0136 0543 0223 0362<br />
0587<br />
Saccs 0265<br />
Sagem 0482 0637 0309<br />
Saisho 0543 0036 0038 0244 0190 0291 0381<br />
Saivod 0064<br />
Salora 0317 0221 0190 0543 0366 0235<br />
Salsa 0362<br />
Sambers 0543 0129<br />
Samsung 0064 0583 0614 0645 0036 0244 0397<br />
0291 0243 0317 0099 0235<br />
Sandra 0243 0244<br />
Sanela 0265<br />
Sansui 0064 0398 0682<br />
Santon 0036<br />
Sanyo 0235 0319 0063 0038 0397 0366 0099<br />
0243 0244 0131 0072 0036 0190 0064<br />
0135<br />
Save 0064<br />
SBR 0064 0583 0039<br />
Schaub Lorenz 0633<br />
Schneider 0064 0583 0039 0421 0286 0244 0274<br />
0398 0245 0190 0695 0675 1064<br />
Scotland 0190<br />
SEG 0244 0291 0036 0274 0063 0129 0190<br />
0064 0243 0695 0514 0661 1064<br />
SEI 0114 0129 0190 0543 0321 0233 0064<br />
Sei-Sinudyne 0129 0233 0321 0543 0064 0114<br />
Seleco 0398 0233 0286 0190 0438<br />
Sencora 0036<br />
Sentra 0245 0036<br />
Serino 0482 0637 0243<br />
Sharp 0120 1220 0063 0321 0680 0543<br />
Shintoshi 0064<br />
Shorai 0321<br />
Siarem 0190 0114 0129 0543<br />
Siemens 0227 0222 0354 0064<br />
Siera 0064 0583 0039<br />
Siesta 0397<br />
Silva 0243 0064<br />
Silver 0063 0064 0583 0742 0190<br />
Singer 0114 0129 0274 0427 0462 0036 0064<br />
Sinudyne 0114 0129 0321 0190 0543 0233 0064<br />
Sky 0064<br />
Skymaster 0132<br />
Smaragd 0514<br />
Solavox 0099 0190 0064<br />
Sonawa 0245<br />
Sonitron 0235 0397 0366 0244<br />
Sonneclair 0064<br />
Sonoko 0064 0036 0291 0309 0244<br />
Sonolor 0235 0190 0427 0309<br />
Sontec 0064 0397 0321 0036<br />
42 BRAND CODE LIST<br />
Sony 1532 1678 1037 0038 0063 0129 0064<br />
Sound & Vision 0129 0245 0401<br />
Soundwave 0064 0445<br />
Spectra 0036<br />
Ssangyong 0036<br />
Standard 0245 0036 0244 0064 1064 0401<br />
Starlite 0036 0190 0064 0291<br />
Stenway 0309 0245<br />
Stern 0233 0286 0190 0291 0438<br />
Strato 0064 0291 0036<br />
Stylandia 0244<br />
Sunkai 0321 0482 0245 0064 0514 0637<br />
Sunstar 0398 0064 0036 0606<br />
Sunwood 0064 0036<br />
Superla 0543 0243<br />
SuperTech 0036 0064 0243 0583 0245<br />
Supra 0401 0036<br />
Susumu 0362 0245<br />
Sutron 0036<br />
Swissline 0274<br />
Sydney 0243 0244<br />
Sysline 0064<br />
Sytong 0243<br />
T+A 0474<br />
Tandberg 0394 0438 0136 0223<br />
Tandy 0120 0245 0099 0244 0274 0190<br />
Tashiko 0063 0244 0197 0243 0190<br />
Tatung 0099 0543 0244 0064 0038<br />
Teac 0244 0539 0064 0482 0291 0036 0439<br />
0695<br />
TEC 0244 0036 0274 0362 0286<br />
Tech Line 0064 0695<br />
Techica 0245<br />
TechniSat 0682<br />
Tedelex 0244 0633<br />
Teiron 0036<br />
Teleavia 0136 0223<br />
Telecor 0064 0190 0245 0244 0286 0421<br />
Telefunken 0136 0101 0128 0362 0289 0223 0064<br />
0513 0652<br />
Telefusion 0064<br />
Telegazi 0064 0190 0286 0245 0291<br />
Telemeister 0064<br />
Telesonic 0064<br />
Telestar 0064 0606<br />
Teletech 0036 0274 0064 0695<br />
Teleton 0244 0233 0190 0286 0063<br />
Televideon 0190 0243<br />
Televiso 0427<br />
Temco 0321<br />
Tempest 0036 0064<br />
Tennessee 0064<br />
Tensai 0131 0245 0064 0244 0321 0036 0132<br />
0401 0398 0274<br />
Tenson 0036<br />
Tevion 0064 0675 0695<br />
Texet 0244 0401 0036 0243 0245<br />
Thomson 0652 0136 0362 0223 0064 0587<br />
Thorn 0265 0101 0064 0131 0362 0539 0401<br />
0135 0136 0252 0099<br />
Thorn-Ferguson 0131 0135 0136 0265 0362<br />
Tokai 0099 0064 0190 0244 0401 0036
Tokyo 0243<br />
Tomashi 0309 0245<br />
Toshiba 0535 0063 0097 0129 0244 0136<br />
Towada 0129 0244<br />
Toyoda 0036<br />
Trakton 0291<br />
Trans Continens 0695 0244 0064<br />
Transonic 0064 0482 0614 0539 0291<br />
Transtec 0243<br />
Trident 0543 0244<br />
Tristar 0245<br />
Triumph 0543 0373 0583 0064<br />
Tsoschi 0309<br />
TVTEXT 95 0583<br />
Uher 0064 0233 0401 0445 0513 0397 0286<br />
Ultravox 0114 0129 0401 0274 0243 0190 0064<br />
Unic Line 0064 0500 0482<br />
United 0064 0741 0742<br />
Universum 0373 0132 0222 0500 0274 0519 0507<br />
0397 0227 0445 0038 0539 0321 0063<br />
0097 0190 0291 0131 0064 0438 0317<br />
0101 0354 0695 0244 0136 0658 0036<br />
Univox 0114 0064 0190 0265<br />
Vestel 0064 0190 0244 0583 0695 1064<br />
Vexa 0036 0064<br />
Videologique 0243 0245 0244<br />
Videosat 0274<br />
VideoSystem 0064<br />
Videotechnic 0243 0244 0401<br />
Videoton 0190<br />
Vidikron 0129<br />
Vidtech 0063<br />
Visiola 0243<br />
Vision 0064 0244<br />
Vistar 0233<br />
Vortec 0064<br />
Voxson 0114 0064 0445 0190<br />
Waltham 0244 0695 0445 0064 0136<br />
Watson 0064 0190 0245 0606 0421 0036 0695<br />
1064<br />
Watt Radio 0129 0190 0243<br />
Wega 0063 0114 0064<br />
Wegavox 0036<br />
Weltblick 0064 0244<br />
White Westinghouse 0243 0064<br />
Windstar 0309<br />
Xrypton 0064<br />
Yamishi 0309 0482 0245 0064 0244<br />
Yokan 0064<br />
Yoko 0244 0064 0245 0291 0036 0397 0366<br />
0243 0274<br />
Yorx 0245<br />
Zanussi 0233 0244<br />
Zenor 0366<br />
VCR<br />
Adyson 0099<br />
Aiwa 0334 0027 0068 0375 0379 0064<br />
Akai 0133 0342 0068 0047 0379 0267<br />
Akiba 0099<br />
Akura 0099 0068<br />
Allorgan 0267<br />
Allstar 0108<br />
Ambassador 0047<br />
Amstrad 0027 0305 0099<br />
Anitech 0099<br />
Aristona 0108<br />
ASA 0064 0108<br />
Asuka 0099 0064 0108 0027 0065<br />
Audiosonic 0305<br />
Audioton 0047<br />
AVP 0379<br />
AWA 0064 0305 0070<br />
Baird 0133 0305 0131 0068 0027<br />
Bang & Olufsen 0526<br />
Basic Line 0305 0047 0099<br />
Bestar 0305 0047<br />
Black Panther 0305<br />
Blaupunkt 0253 0108 0222 0061<br />
Blue Sky 0064 0375 0099 0379 0305<br />
Bondstec 0047 0099<br />
Brandt 0068 0347 0348 0520<br />
Brandt Electronique 0068<br />
Brinkmann 0375<br />
Carena 0108<br />
Carrefour 0072<br />
Casio 0027<br />
Cathay 0305<br />
Catron 0047<br />
CGE 0068 0027<br />
Cimline 0099<br />
Clatronic 0047 0099<br />
Combitech 0379<br />
Condor 0047 0305<br />
Crown 0305 0099 0047<br />
Cyrus 0108<br />
Daewoo 0305 0047 0072 0379<br />
Dansai 0099 0305<br />
Daytron 0305<br />
de Graaf 0069 0108 0131 0075<br />
Decca 0027 0068 0108 0035 0094 0375<br />
Deitron 0305<br />
Denko 0099<br />
Diamant 0064<br />
Dual 0068 0108 0305 0027<br />
Dumont 0027 0108 0131<br />
Elbe 0305 0065<br />
Elcatech 0099<br />
Elin 0267<br />
Elsay 0099<br />
Elta 0099 0305<br />
Emerson 0099 0072<br />
ESC 0305 0267 0047<br />
Etzuko 0099<br />
Europhon 0047<br />
Fenner 0047<br />
Ferguson 0068 0347 0348 0520 0027 0305<br />
BRAND CODE LIST 43<br />
English
English<br />
Fidelity 0027 0099 0267 0379<br />
Finlandia 0131 0108 0069 0027 0075 0411<br />
Finlux 0027 0108 0131 0069<br />
Firstline 0099 0375 0070 0064 0072 0069 0305<br />
Fisher 0074 0131 0065 0047<br />
Frontech 0047 0099<br />
Fujitsu 0027<br />
Funai 0027<br />
Galaxi 0027<br />
Galaxis 0305<br />
GBC 0047<br />
GEC 0108<br />
General 0047<br />
General Technic 0375<br />
Genexxa 0131<br />
Goldhand 0099<br />
GoldStar 0064 0027<br />
Graetz 0068 0131 0267<br />
Granada 0131 0075 0108 0267 0064 0253 0069<br />
0027<br />
Grandin 0099 0064 0047 0027 0305<br />
Grundig 0222 0108 0374 0253 0347 0375 0099<br />
Hanimex 0379<br />
Hanseatic 0064 0305 0108 0065<br />
Hantor 0047<br />
Harwood 0099<br />
HCM 0099<br />
Hisawa 0379<br />
Hischito 0072<br />
Hitachi 0069 0068 0027 0267 0108 0131 0411<br />
Hornyphone 0108<br />
Hypson 0099 0305 0379<br />
Impego 0047<br />
Imperial 0027 0267<br />
Ingersoll 0267<br />
Inno Hit 0047 0267 0305 0099<br />
Interbuy 0064 0099<br />
Interfunk 0108 0131<br />
Internal 0305<br />
International 0305 0064<br />
Intervision 0027 0305 0064 0375<br />
Irradio 0099 0064 0108<br />
ITT 0133 0068 0411 0131 0267<br />
ITT Nokia 0075<br />
ITV 0305 0064 0047<br />
JVC 0068 0094 0035 0411<br />
Kaisui 0099<br />
Karcher 0305<br />
Kendo 0133 0342 0375 0099 0064<br />
Kenwood 0068 0065<br />
KIC 0027<br />
Kimari 0074<br />
Kneissel 0379 0375 0064<br />
Korpel 0099<br />
Kuba 0074<br />
Kuba Electronic 0074<br />
Kuwa 0253<br />
Kyoto 0099<br />
Lenco 0305<br />
Leyco 0099<br />
LG 0064 0027 0305<br />
Lifetec 0375<br />
Loewe 0108 0064 1189<br />
44 BRAND CODE LIST<br />
Logik 0267 0099 0133<br />
Lumatron 0305<br />
Luxor 0133 0070 0099 0089 0131 0074 0075<br />
Magnavox 0108<br />
Manesth 0099 0072 0108<br />
Marantz 0108 0065 0089<br />
Mark 0305 0047<br />
Matsui 0375 0064 0267 0379 0027<br />
Mediator 0108<br />
Medion 0375 0379<br />
Melectronic 0027 0064 0065<br />
Memorex 0131 0027 0064 0075 0074<br />
Memphis 0099<br />
Metz 0222 0374 0108 1189 0253 0064<br />
Micormay 0375<br />
Migros 0027<br />
Minerva 0222<br />
Mitsubishi 0070 0094 0108<br />
Multitec 0064<br />
Multitech 0027 0099 0047 0131<br />
Murphy 0027<br />
Myryad 0108<br />
NAD 0131<br />
National 0253<br />
NEC 0068 0065 0094 0131 0064<br />
Neckermann 0068 0108<br />
Nesco 0099 0027 0379<br />
Nikkai 0047 0099 0305<br />
Nokia 0131 0133 0342 0068 0305 0267 0075<br />
0069 0108<br />
Nordmende 0068 0411 0347 0348 0521 0555 0094<br />
0520<br />
Oceanic 0027 0075 0133 0108 0131 0068<br />
Okano 0342 0375 0099 0305<br />
Orbit 0099<br />
Orion 0379 0375<br />
Orson 0027<br />
Osaki 0027 0064 0099<br />
Osume 0099<br />
Otto Versand 0108<br />
Palladium 0099 0342 0064 0068 0267<br />
Palsonic 0099 0027<br />
Panasonic 1189 0253<br />
Pathe Cinema 0070<br />
Pathe Marconi 0068<br />
Perdio 0027<br />
Philco 0065 0099<br />
Philips 1608 0108 0411<br />
Phonola 0108<br />
Pioneer 0094 0108 0069<br />
Portland 0047 0305<br />
Prinz 0027<br />
Profitronic 0108 0267<br />
Proline 0027 0347 0348<br />
Prosco 0305<br />
Prosonic 0305 0027<br />
Protech 0108<br />
Provision 0305<br />
Pye 0108<br />
Quasar 0305<br />
Quelle 0108<br />
Radialva 0064 0099 0108 0075<br />
Radiola 0108
Rank 0068<br />
Rex 0068 0411<br />
RFT 0047 0099<br />
Roadstar 0267 0099 0064 0305<br />
Royal 0099<br />
Saba 0068 0347 0348 0411 0521 0089 0607<br />
0305<br />
Saisho 0375<br />
Salora 0070 0133 0131<br />
Samsung 0267 0459<br />
Samurai 0047<br />
Sansui 0068 0094 0133 0099 0375<br />
Sanyo 0131 0074 0075 0094<br />
Saville 0379 0305 0267<br />
SBR 0108<br />
Scan Sonic 0267<br />
Schaub Lorenz 0068 0131 0027 0133 0342<br />
Schneider 0099 0027 0064 0108 0305 0267 0069<br />
Seaway 0305<br />
SEG 0099 0267 0305 0108<br />
SEI 0108<br />
Sei-Sinudyne 0108<br />
Seleco 0068 0035 0411 0047 0064<br />
Sentra 0099 0047<br />
Setron 0099<br />
Sharp 0075 0089 0064<br />
Shintom 0099 0131<br />
Shivaki 0064<br />
Siemens 0222 0064 0131 0108 0347 0374<br />
Siera 0108<br />
Silva 0064<br />
Silver 0305<br />
Singer 0072<br />
Sinudyne 0108<br />
Smaragd 0375<br />
Solavox 0047<br />
Sonitron 0074<br />
Sonneclair 0099<br />
Sonoko 0305<br />
Sonolor 0075 0089<br />
Sontec 0064 0305<br />
Sony 0060 0061 0059 0133 1059<br />
Soundwave 0064<br />
Ssangyong 0099<br />
Standard 0305<br />
Starlite 0064 0131<br />
Stern 0305<br />
Sunkai 0375 0305<br />
Sunstar 0027<br />
Suntronic 0027<br />
Sunwood 0099<br />
Supra 0064 0267<br />
Symphonic 0027 0099<br />
Tandberg 0305<br />
Tashiko 0027 0075 0267 0108 0064<br />
Tatung 0027 0068 0108 0075 0070 0375 0379<br />
Teac 0099 0068 0027 0305 0064 0108 0334<br />
TEC 0047 0305 0099<br />
Tech Line 0099<br />
TechniSat 0375<br />
Teleavia 0068 0520<br />
Telefunken 0068 0347 0348 0411 0520 0521 0305<br />
0607<br />
Teletech 0099 0305 0027<br />
Tempest 0047<br />
Tenosal 0099<br />
Tensai 0027 0064 0099<br />
Tevion 0375<br />
Thomson 0347 0348 0068 0094 0411 0520 0521<br />
0555 0305<br />
Thorn 0068 0131 0064<br />
Thorn-Ferguson 0347<br />
Tokai 0099 0064 0068 0131<br />
Tokiwa 0099<br />
Topline 0375<br />
Toshiba 0072 0068 0411 0070 0108<br />
Towada 0099<br />
Tracton 0047<br />
Trakton 0047<br />
TVA 0047<br />
Uher 0064 0267<br />
Ultravox 0305<br />
Unitech 0267<br />
United Quick Star 0305<br />
Universum 0027 0108 0267 0064 0133 0375 0222<br />
0131<br />
Victor 0035 0094<br />
Watson 0108 0379<br />
Weltblick 0064<br />
Yamaha 0068<br />
Yamishi 0099 0305<br />
Yokan 0099<br />
Yoko 0064 0099 0047 0267<br />
BRAND CODE LIST 45<br />
English
English<br />
SAT - STB<br />
Philips 0038<br />
AMP<br />
Arcam 0668<br />
Curtis Mathes 0327<br />
JBL 1030 0695<br />
Marantz 0348<br />
Mark 1030<br />
Optimus 0040<br />
Philips 0668<br />
Pioneer 0040 0327<br />
Sansui 0348<br />
Teac 0448<br />
Yamaha 0170 0381<br />
TUNER<br />
Aiwa 0148 1432<br />
Akai 0142<br />
Arcam 1116 1216<br />
Audiolab 1216<br />
Carver 0387<br />
Denon 1187 1131 1387<br />
Fisher 0387<br />
Grundig 1216 1116<br />
Harman/Kardon 0137<br />
Inkel 0518<br />
JBL 0137<br />
JVC 0101<br />
Kenwood 1054 1340 1596<br />
Marantz 1216 1116 1316<br />
Micromega 1216<br />
Myryad 1216<br />
NAD 0347<br />
Onkyo 0162<br />
Panasonic 1335 1336 1790 1545<br />
Philips 1216 1116 1316<br />
Pioneer 1050 0316<br />
Sansui 1116<br />
Sanyo 0387<br />
Schneider 0137<br />
Sherwood 0518<br />
Sony 1085 1185 1285<br />
Teac 0137<br />
Technics 1335 1336 1790 1545<br />
Thorens 1216<br />
Victor 0101<br />
46 BRAND CODE LIST<br />
DVD<br />
3DLAB 0566<br />
A-Trend 0741<br />
Acoustic Solutions 0757<br />
AEG 0815<br />
Afreey 0725<br />
Boman 0810<br />
Brandt 0678<br />
Clatronic 0815<br />
Cyber Home 0741<br />
Cytron 0678<br />
Daewoo 0797<br />
Dansai 0797<br />
Denon 0517<br />
Denver 0815<br />
Denzel 0692<br />
Diamond 0678<br />
Dual 0692 0678 0757<br />
Elta 0717<br />
Emerson 0618<br />
Encore 0725<br />
Enzer 0692<br />
Ferguson 0678<br />
Finlux 0768<br />
GoldStar 0618 0768<br />
Graetz 0692<br />
Grundig 0566 0802<br />
Grunkel 0797<br />
Hanseatic 0768<br />
Hitachi 0692 0600<br />
JVC 0650 0585 0566 0530<br />
Karcher 0810<br />
Kenwood 0561 0517 0764<br />
Kiss 0692<br />
Lenco 0678 0797<br />
LG 0618 0768<br />
Lifetec 0678<br />
Loewe 0566<br />
Magnavox 0530<br />
Marantz 0566<br />
Matsui 0678<br />
MBO 0717<br />
Medion 0810 0678<br />
Metz 0598 0552<br />
Micromedia 0530 0566<br />
Micromega 0566<br />
Microsoft 0549<br />
Monyka 0692<br />
Mustek 0757<br />
Mx Onda 0678<br />
NAD 0768<br />
Naiko 0797<br />
Neufunk 0692<br />
Onkyo 0530<br />
Optimus 0598 0552<br />
Oritron 0678<br />
Palsonic 0716<br />
Panasonic 0517<br />
Philips 0566 0530<br />
Pioneer 0598 0552<br />
Proline 0678<br />
Proscan 0549
Radionette 0768<br />
Raite 0692<br />
RCA 0549<br />
REC 0716 0517<br />
Roadstar 0717 0716<br />
Rotel 0650 0585<br />
Saba 0678<br />
Salora 0768<br />
Sampo 0725<br />
Samsung 0600<br />
Schaub Lorenz 0815<br />
Schneider 0678 0810<br />
Scott 0678<br />
SEG 0692<br />
Sharp 0657<br />
Sherwood 0768<br />
Silva 0815<br />
Singer 0717<br />
Skymaster 0757<br />
SM Electronic 0717 0757<br />
Sony 0560 0600<br />
Soundwave 0810<br />
Standard 0678<br />
Sunwood 0815<br />
Teac 0768 0598 0618<br />
Technics 0517<br />
Technika 0797<br />
Tensai 0717 0678<br />
Tevion 0678<br />
Theta Digital 0598<br />
Thomson 0578 0549<br />
Tokai 0692 0725<br />
Tokaido 0725<br />
Toshiba 0530<br />
United 0815<br />
Universum 0768 0618<br />
XMS0815 0716<br />
Yamaha 0517 0566<br />
Yamakawa 0692<br />
Yukai 0757<br />
Zenith 0530 0618 0768<br />
BRAND CODE LIST 47<br />
English
Philips France<br />
Digital Video Set Top Boxes<br />
DV-STB/QP 03130/PH<br />
(report No.)<br />
Wir, PHILIPS FRANCE<br />
(Name des Herstellers)<br />
KONFORMITÄTSERKLÄRUNG<br />
51, rue Carnot 92156 SURESNES Cedex, FRANCE<br />
(Adresse des Herstellers)<br />
erklären auf Grund unserer allgemeinen Verantwortung für das elektronische Produkt:<br />
PHILIPS <strong>DSR</strong><strong>5600</strong>/00<br />
(Name des Produktes) (Modell)<br />
DIGITALER SATELLITENEMPFÄNGER<br />
(Typ)<br />
auf das sich diese Konformitätserklärung bezieht, den folgenden Standards entspricht:<br />
EN 60065 : 1998,<br />
EN 55022 class B : 1998 + A1 : 2000, EN 55024 : 1998 + A1 : 2001<br />
EN 61000-3-2 : 2000, EN 61000-3-3 : 1995 + A1 : 2001,<br />
EN 55013 : 2001, EN 55020 : 2002,<br />
TBR 21 : 01/1998, TR103 000-1 v1.1.1 : 08/2001<br />
(Titel / Datum den Normen)<br />
gemäß den Vorschriften der R&TTE Richtlinie (1999/5/EG).<br />
Suresnes, den 1. August 2003 P. HAMELET, Product Quality Manager<br />
(Ort, Datum) (Unterschrift, Name und Titel)<br />
Philips France<br />
S.A.S. au Capital de 124 800 000<br />
402 805 527 R.C.S. Nanterre<br />
Siège social : 2, rue Benoît-Malon<br />
92150 Suresnes (Hauts-de-Seine) France
Deutsch<br />
English<br />
<strong>DSR</strong> <strong>5600</strong> -3111 176 51401 08 / 03


![03_[DE] - Philips](https://img.yumpu.com/25100096/1/184x260/03-de-philips.jpg?quality=85)