AZ2204 Corolla TNS300 LHD - Toyota-tech.eu
AZ2204 Corolla TNS300 LHD - Toyota-tech.eu
AZ2204 Corolla TNS300 LHD - Toyota-tech.eu

Erfolgreiche ePaper selbst erstellen
Machen Sie aus Ihren PDF Publikationen ein blätterbares Flipbook mit unserer einzigartigen Google optimierten e-Paper Software.
<strong>Corolla</strong> (E12-A + E12-D)<br />
<strong>TNS300</strong><br />
18P<br />
Erhöhung<br />
Tab<br />
Onglet<br />
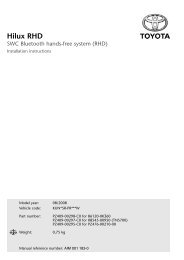
Abb. 22 - Fig. 22<br />
ANSICHT KABELSEITE<br />
WIRE SIDE VIEW<br />
VUE COTE FILS<br />
OHNE LENKUNGSSCHALTER<br />
WITHOUT STEERING SWITCH<br />
SANS COMMUTATEUR AU VOLANT<br />
6.<br />
a) Den Stecker so drehen, daß die Kabel<br />
auf Sie Weisen und die Erhöhung sich<br />
oben befindet.<br />
b) Das Geschwindigkeitssensorkabel<br />
(violett/weiß) der Kabelstrang an<br />
dem Kabel in der dritte Position von<br />
links in der unteren Reihe anschließen.<br />
6.<br />
a) Turn the connector so that the wire face<br />
you and the tab is on top.<br />
b) Connect the speed sensor wire (violet/white)<br />
of the wire harness to the<br />
wire of the third position from the left<br />
side of the bottom row.<br />
6.<br />
a) Tournez le connect<strong>eu</strong>r de façon à ce<br />
que les fils soient dirigés vers le haut.<br />
b) Raccordez le fil du détect<strong>eu</strong>r de vitesse<br />
(violet/blanc) du faisceau de câbles<br />
au connect<strong>eu</strong>r à 18 pôles, troisième<br />
alvéole de la rangée inféri<strong>eu</strong>re, à partir<br />
de la gauche.<br />
Abb. 23 - Fig. 23<br />
Anschlusskasten<br />
Junction box<br />
Boîtier de<br />
raccordement<br />
10P<br />
7.<br />
a) Den 10 Stift-Stecker lösen.<br />
b) Den Rückfahrsensorkabel (rot/blau)<br />
des Kabelstrangs verlegen wie gezeigt<br />
und mit Schaumstoff (5x) befestigen.<br />
7.<br />
a) Disconnect the 10P connector.<br />
b) Route the reverse sensor wire<br />
(red/blue) as shown in the illustration,<br />
and secure the reverse sensor<br />
wire using foam (5x).<br />
7.<br />
a) Débranchez le connect<strong>eu</strong>r à 10 pôles.<br />
b) Acheminez le fil du détect<strong>eu</strong>r de<br />
marche arrière (rouge/bl<strong>eu</strong>) de la<br />
manière illustrée et fixez-le à l’aide de<br />
la mousse (5x).<br />
04-04<br />
<strong>Corolla</strong> (<strong>LHD</strong>) - 26