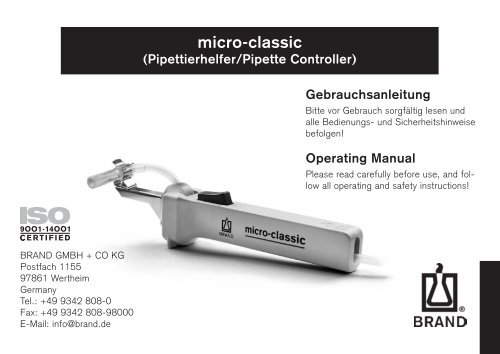
micro-classic - Brand
micro-classic - Brand
micro-classic - Brand

Erfolgreiche ePaper selbst erstellen
Machen Sie aus Ihren PDF Publikationen ein blätterbares Flipbook mit unserer einzigartigen Google optimierten e-Paper Software.
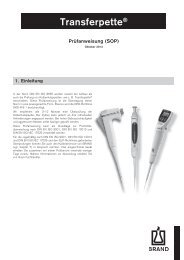
<strong>micro</strong>-<strong>classic</strong><br />
(Pipettierhelfer/Pipette Controller)<br />
Gebrauchsanleitung<br />
Bitte vor Gebrauch sorgfältig lesen und<br />
alle Bedienungs- und Sicherheitshinweise<br />
befolgen!<br />
Operating Manual<br />
Please read carefully before use, and follow<br />
all operating and safety instructions!<br />
BRAND GMBH + CO KG<br />
Postfach 1155<br />
97861 Wertheim<br />
Germany<br />
Tel.: +49 9342 808-0<br />
Fax: +49 9342 808-98000<br />
E-Mail: info@brand.de
Inhalt<br />
Seite<br />
Sicherheitsbestimmungen 4<br />
Einzelteile 6<br />
Funktion 7<br />
Einsatzbeschränkungen 7<br />
Vor dem Pipettieren 8<br />
Richtige Handhaltung 8<br />
Pipettieren 8<br />
Pipette aufstecken 8<br />
Flüssigkeit aufnehmen 9<br />
Flüssigkeit abgeben 11<br />
Nach dem Pipettieren 13<br />
Pipette entfernen 13<br />
Saugschlauch entspannen 13<br />
Reinigung/Autoklavieren 14<br />
Lagerung 15<br />
Adapter und Saugschlauch auswechseln 16<br />
Störung – was tun? 17<br />
Zur Reparatur einsenden 19<br />
Mängelhaftung 20<br />
Bestelldaten 21<br />
Contents<br />
Page<br />
Safety Instructions 4<br />
Components 6<br />
Application 7<br />
Operating Limitations 7<br />
Before Pipetting 8<br />
Correct Hand Position 8<br />
Pipetting 8<br />
Attaching the Pipette 8<br />
Drawing up Liquid 9<br />
Discharging Liquid 11<br />
After Pipetting 13<br />
Removing the Pipette 13<br />
Releasing the Suction Tube 13<br />
Cleaning/Autoclaving 14<br />
Storage 15<br />
Replacing Adapter and Suction Tube 16<br />
Trouble Shooting 17<br />
Return for Repair 19<br />
Warranty 20<br />
Ordering Data 21<br />
– 3 –
Sicherheitsbestimmungen<br />
Dieses Gerät kann in Kombination mit gefährlichen Materialien,<br />
Arbeitsvorgängen und Apparaturen verwendet<br />
werden. Die Gebrauchsanleitung kann jedoch nicht alle<br />
Sicherheitsprobleme aufzeigen, die hierbei eventuell<br />
auftreten. Es liegt in der Verantwortung des Anwenders,<br />
die Einhaltung der Sicherheits- und Gesundheitsvorschriften<br />
sicherzustellen und die entsprechenden<br />
Einschränkungen vor Gebrauch festzulegen.<br />
– 4 –<br />
Safety Instructions<br />
This instrument may sometimes be used with hazardous<br />
materials, operations, and equipment. It is beyond<br />
the scope of this manual to address all of the potential<br />
safety risks associated with its use in such applications.<br />
It is the responsibility of the user of this instrument to<br />
consult and establish appropriate safety and health<br />
practices and determine the applicability of regulatory<br />
limitations prior to use.<br />
! Bitte unbedingt sorgfältig durchlesen!<br />
! Please read the following carefully!<br />
1. Jeder Anwender muss diese Gebrauchsanleitung<br />
vor Gebrauch des Gerätes gelesen haben und<br />
beachten.<br />
2. Allgemeine Gefahrenhinweise und Sicherheitsvorschriften<br />
befolgen, z.B. Schutzkleidung, Augenschutz<br />
und Schutzhandschuhe tragen.<br />
3. Angaben der Reagenzienhersteller beachten.<br />
4. Gerät nur zum Pipettieren von Flüssigkeiten und<br />
nur im Rahmen der definierten Einsatzbeschränkungen<br />
einsetzen. Bei Zweifel unbedingt an den<br />
Hersteller oder Händler wenden.<br />
1. Every user must read and understand this operating<br />
manual before operation.<br />
2. Follow general instructions for hazard prevention<br />
and safety instructions; e.g., wear protective<br />
clothing, eye protection and gloves.<br />
3. Observe all specifications provided by reagent<br />
manufacturers.<br />
4. Use the instrument only for pipetting liquids, with<br />
strict regard to the defined operating limitations.<br />
If in doubt, contact the manufacturer or supplier.
5. Stets so arbeiten, dass weder der Anwender<br />
noch andere Personen gefährdet werden. Spritzer<br />
vermeiden. Nur geeignete Gefäße verwenden.<br />
6. Stets nur ungefüllte Pipetten aufschieben, um<br />
Kontaminations- und Infektionsgefahren zu vermeiden.<br />
7. Darauf achten, dass keine Flüssigkeit in das Gerät<br />
gelangt.<br />
8. Nie Gewalt anwenden.<br />
9. Nur Original-Zubehör und Original-Ersatzteile<br />
verwenden. Keine technischen Veränderungen<br />
vornehmen. Das Gerät nicht weiter zerlegen, als<br />
in der Gebrauchsanleitung beschrieben ist!<br />
10. Vor Verwendung stets den ordnungsgemäßen<br />
Zustand des Gerätes prüfen. Sollten sich Störungen<br />
des Gerätes ankündigen, sofort aufhören<br />
zu pipettieren und das Kapitel ‚Störung – was tun‘<br />
befolgen (s. Seite 17). Ggf. an den Hersteller<br />
wenden.<br />
5. Always use the instrument in such a way that neither<br />
the user nor any other person is endangered.<br />
Avoid splashes. Only use suitable vessels.<br />
6. Only fit empty pipettes to avoid the risk of contamination<br />
and infection.<br />
7. Take care that the liquid does not penetrate into<br />
the instrument.<br />
8. Never use force on the instrument!<br />
9. Only use original manufacturer’s accessories and<br />
spare parts. Do not attempt to make any technical<br />
alterations. Do not dismantle the instrument any<br />
further than is described in the operating manual!<br />
10. Always check the instrument for visible damage<br />
before use. If there is a sign of a potential<br />
malfunction, immediately stop pipetting. Consult<br />
the ‘Troubleshooting’ section of this manual<br />
(see page 18), and contact the manufacturer if<br />
needed.<br />
– 5 –
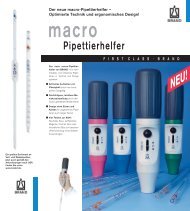
Einzelteile<br />
– 6 –<br />
Components<br />
Adapter<br />
adapter<br />
Federclip<br />
spring clip<br />
Saugschlauch<br />
suction tube<br />
Stellrad<br />
thumb wheel<br />
Belüftungsknopf<br />
venting button<br />
Adapterhalter<br />
adapter support<br />
Handgriff<br />
Handle
Funktion<br />
Das Gerät dient als Hilfe zum Pipettieren und verringert<br />
die Infektionsgefahr beim Pipettieren von<br />
Flüssigkeiten mit Einmal-Mikropipetten mit Ringmarke,<br />
Blutmischpipetten und anderen Pipetten<br />
mit einem Schaft-Durchmesser < 5,5 mm und<br />
einem Volumen bis 1 ml.<br />
Bei richtiger Handhabung des Geräts kommt die<br />
pipettierte Flüssigkeit nur mit der Pipette in Kontakt.<br />
Application<br />
This instrument provides for pipetting liquids, and<br />
reduces the risk of infection, when pipetting liquids<br />
with ring-mark disposable <strong>micro</strong>pipettes, blood<br />
diluting pipettes, and other pipettes of a shaft<br />
diameter < 5.5 mm and a volume of up to 1 ml.<br />
When the instrument is correctly used, the pipetted<br />
liquid comes only into contact with the pipette.<br />
Einsatzbeschränkungen<br />
Achtung!<br />
Gerät nicht mit End-to-End-Mikropipetten<br />
einsetzen.<br />
Flüssigkeitsdämpfe können in den Adapter (PVC)<br />
und in den Saugschlauch (SI) gelangen. Deshalb das<br />
Gerät nie für Flüssigkeiten einsetzen, die PVC oder<br />
Silikon angreifen.<br />
Operating Limitations<br />
Attention!<br />
This instrument must not be used with end-toend<br />
<strong>micro</strong>pipettes.<br />
Vapours of liquids may penetrate into the adapter<br />
(PVC) and into the suction tube (SI). Therefore never<br />
use the instrument with liquids that are incompatible<br />
with PVC or SI.<br />
– 7 –
Vor dem Pipettieren<br />
Richtige Handhaltung<br />
Gerät wie auf der Abb. dargestellt<br />
waagerecht in die Hand nehmen.<br />
O-Ring vom Belüftungsknopf nach<br />
hinten schieben.<br />
– 8 –<br />
Before Pipetting<br />
Correct Hand Position<br />
Hold the instrument horizontally as<br />
illustrated.<br />
Push back the O-Ring from the<br />
venting button.<br />
Pipettieren<br />
Pipette aufstecken<br />
Pipetting<br />
Attaching the Pipette<br />
Warnung!<br />
Nie gefüllte Pipetten aufstecken:<br />
Kontaminations- und Infektionsrisiko.<br />
Schutzhandschuhe tragen.<br />
Warning!<br />
Never insert filled pipettes:<br />
Risk of contamination and infection.<br />
Wear protective gloves.
– Pipette am Color-Code halten (kurzes<br />
Ende nach oben), um Glasbruch beim<br />
Aufschieben zu vermeiden.<br />
– Vorsichtig in den Adapter schieben,<br />
bis leichter Widerstand spürbar wird.<br />
Nie Gewalt anwenden: Gefahr der Beschädigung<br />
von Adapter und Pipette<br />
und damit Verletzungsgefahr.<br />
– Sollte die Pipette abbrechen:<br />
Glassplitter mit einer Pinzette entfernen.<br />
Adapter auf Beschädigung<br />
überprüfen, ggf. austauschen,<br />
(➤ Reparaturen durchführen, S. 16).<br />
<br />
– Hold the pipette at the colour code<br />
(short end up) to avoid glass breakage<br />
when fitting the pipette.<br />
– Carefully insert the pipette into the<br />
adapter until a slight resistance can<br />
be felt. Never use force: Risk of damaging<br />
the adapter and pipette, hence<br />
a risk of injury.<br />
– If the pipette breaks:<br />
Remove glass splinters by means<br />
of forceps. Check adapter for damages<br />
and, if necessary, replace adapter.<br />
(➤ Instructions for repair, page 16).<br />
Flüssigkeit aufnehmen<br />
Die Schlauchlänge zwischen Adapter<br />
und Stellrad soll ca. 100 mm betragen,<br />
um das Totvolumen klein zu halten.<br />
Drawing up Liquid<br />
Allow the tube a length of approx.<br />
100 mm between adapter and thumb<br />
wheel to keep the dead volume low.<br />
– 9 –
– Pipette in die Flüssigkeit eintauchen.<br />
– Stellrad langsam in Richtung Belüftungsknopf<br />
drehen, bis die Flüssigkeit<br />
exakt die gewünschte Marke erreicht.<br />
– 10 –<br />
<br />
– Immerse the pipette into the liquid.<br />
– Slowly turn the thumb wheel towards<br />
the ejector key until the liquid has<br />
exactly reached the appropriate mark.<br />
<br />
Achtung!<br />
Unbedingt darauf achten, dass die Flüssigkeit<br />
den Adapter und den Saugschlauch nicht<br />
kontaminiert. Andernfalls Adapter und Saugschlauch<br />
sofort reinigen bzw. desinfizieren und<br />
ggf. erneuern.<br />
Attention!<br />
Always ensure that the liquid does not contaminate<br />
adapter and suction tube. If they are<br />
contaminated, they must immediately be cleaned<br />
or disinfected or, if necessary, be replaced.<br />
– Pipette aus der Flüssigkeit herausziehen.<br />
– Mit fusselfreiem Tuch oder Tupfer vorsichtig<br />
außen abwischen. Dabei darf die Öffnung nicht<br />
berührt werden, da sonst Flüssigkeit herausgesaugt<br />
wird.<br />
– Take the pipette out of the liquid.<br />
– Carefully wipe the outside of the pipette with a<br />
lint-free cloth or swab. Take care not to touch<br />
the capillary orifice to avoid liquid being sucked<br />
out.
Flüssigkeit abgeben<br />
Discharging Liquid<br />
Auf "In" justierte Pipetten<br />
Pipettes calibrated to contain "In"<br />
– Pipette in das Verdünnungsmedium<br />
eintauchen.<br />
– Stellrad in Richtung Adapter drehen,<br />
bis die Flüssigkeit abgegeben ist.<br />
– Pipette ausspülen durch Aufziehen<br />
und Abgeben des Verdünnungsmediums.<br />
Dabei Verdünnungsmedium<br />
vorsichtig bis zur korrekten Füllhöhe<br />
aufziehen.<br />
Diesen Vorgang mindestens 3 mal<br />
wiederholen.<br />
– Pipette an der Gefäßwand leicht<br />
abstreifen.<br />
<br />
<br />
– Immerse the pipette into the diluting<br />
agent.<br />
– Turn the thumb wheel towards the<br />
adapter until the liquid has been discharged.<br />
– Rinse the pipette by drawing in and<br />
discharging the diluting agent: Carefully<br />
draw in the diluting agent up to<br />
the correct level of the liquid to be<br />
measured. Repeat this procedure at<br />
least three times.<br />
– Lightly wipe the pipette against the<br />
wall of the vessel.<br />
– 11 –
Auf "Ex" justierte Pipetten<br />
– Gerät senkrecht halten, Pipettenspitze<br />
an die Wand eines schräg<br />
gehaltenen Gefäßes anlegen.<br />
– Belüftungsknopf drücken, bis die<br />
Flüssigkeit abgelaufen ist.<br />
– Sobald der Meniskus in der Pipettenspitze<br />
zum Stillstand kommt,<br />
beginnt (sofern vorgesehen)<br />
die Wartezeit.<br />
– Danach Pipette an der Gefäßwand<br />
durch Hochziehen abstreifen. Dabei<br />
läuft ein Teil der Restflüssigkeit ab.<br />
– 12 –<br />
Pipettes calibrated to deliver "Ex"<br />
– Hold the instrument upright, and place<br />
the pipette tip against the wall of a<br />
vessel (inclined position of the vessel).<br />
– Press the venting button until the<br />
liquid has run out.<br />
– As soon as the meniscus comes to a<br />
standstill in the pipette tip, the waiting<br />
time (if applicable) starts.<br />
– Then take the pipette out of the<br />
vessel by wiping it against the wall of<br />
the vessel. During this procedure the<br />
residue of liquid partly runs out.
Nach dem Pipettieren<br />
Pipette entfernen<br />
Warnung!<br />
Den kontaminierten Bereich der Pipette nicht<br />
berühren. Schutzhandschuhe tragen.<br />
After Pipetting<br />
Removing the Pipette<br />
Warning!<br />
Do not touch the contaminated area of the<br />
pipette. Wear protective gloves.<br />
– Pipette dicht unterhalb des Adapters<br />
anfassen.<br />
– Vorsichtig aus dem Adapter ziehen.<br />
– Einmal-Mikropipetten vorschriftsmäßig<br />
entsorgen.<br />
<br />
– Grip the pipette just below the<br />
adapter.<br />
– Carefully pull it out of the adapter.<br />
– Dispose the <strong>micro</strong>pipettes according<br />
to the relevant provisions.<br />
Saugschlauch entspannen<br />
Nach dem Pipettieren Saugschlauch<br />
stets entspannen. Dazu O-Ring über den<br />
Belüftungsknopf schieben.<br />
Releasing the Suction Tube<br />
After pipetting always release the suction<br />
tube by pushing the O-ring on the<br />
venting button.<br />
– 13 –
Reinigung/Autoklavieren<br />
Gerät gelegentlich mit einem feuchten Tuch abwischen.<br />
Bei ordnungsgemäßer Handhabung ist<br />
das Gerät wartungsfrei.<br />
Hat Flüssigkeit den Adapter und den Saugschlauch<br />
kontaminiert, so müssen diese Teile sofort gereinigt<br />
bzw. desinfiziert und ggf. erneuert werden<br />
(➤ Reparaturen durchführen, Seite 16).<br />
– 14 –<br />
Cleaning/Autoclaving<br />
Occasionally wipe the instrument with a damp cloth.<br />
When properly used, the instrument is maintenancefree.<br />
If liquid has contaminated adapter and suction tube,<br />
these parts must immediately be cleaned or disinfected<br />
and, if necessary, be replaced<br />
(➤ Instructions for repair, page 16).<br />
Warnung!<br />
Kontaminations- und Infektionsrisiko. Schutzhandschuhe<br />
und Augenschutz tragen.<br />
Warning!<br />
Risk of contamination and infection. Wear protective<br />
gloves and eye protection.<br />
– Adapter und Schlauch aus dem Gerät herausziehen<br />
und in ein Reinigungs- oder Desinfektionsbad<br />
geben.<br />
– Danach trocknen lassen.<br />
– Ggf. Adapter und Saugschlauch autoklavieren.<br />
– Remove adapter and suction tube and put all<br />
parts in a cleansing or disinfection bath.<br />
– Allow for complete drying.<br />
– If necessary, autoclave adapter and suction tube.
Adapter und Saugschlauch sind autoklavierbar bei<br />
121 °C (2 bar) und einer Haltezeit von mindestens<br />
15 Minuten nach DIN EN 285. Die Wirksamkeit<br />
des Autoklavierens ist vom Anwender jeweils<br />
selbst zu prüfen.<br />
Adapter and suction tube are autoclavable at<br />
121 °C (250 °F), 2 bar absolute (30 psi) with<br />
a holding time of at least 15 minutes according<br />
to DIN EN 285. It is the user‘s responsibility to<br />
ensure effective autoclaving.<br />
– Gerät zusammenbauen (➤ Reparaturen durchführen,<br />
Seite 16).<br />
– Funktionsfähigkeit aller Bedienungselemente<br />
überprüfen.<br />
– Reassemble instrument (➤ Instructions for repair,<br />
page 16).<br />
– Check correct function of all operating elements.<br />
Lagerung<br />
Gerät nur mit vollständig entspanntem Saugschlauch<br />
lagern (➤ "Saugschlauch entspannen", Seite 13).<br />
Storage<br />
Only store instrument with completely released<br />
suction tube (➤ "Release suction tube", page 13).<br />
– 15 –
Adapter und Saugschlauch<br />
auswechseln<br />
– 16 –<br />
Replacing Adapter and<br />
Suction Tube<br />
– Adapter vom Adapterhalter lösen.<br />
– Nach Drücken des Belüftungsknopfes<br />
kann der Saugschlauch nach vorn<br />
herausgezogen werden.<br />
– Der neue Saugschlauch mit Adapter<br />
wird zwischen Stellrad und Laufrolle<br />
bei gedrücktem Belüftungsknopf<br />
eingeführt.<br />
– Dann Adapter in den Adapterhalter<br />
einclipsen.<br />
Dabei sollte mit dem Zeigefinger<br />
der einen Hand ein Gegendruck auf<br />
den Boden des Federclips ausgeübt<br />
werden, um eine Beschädigung des<br />
Adapterhalters zu vermeiden.<br />
<br />
– Pull off the adapter from the adapter<br />
support.<br />
– Upon pressing the venting button the<br />
suction tube can be pull out forward.<br />
– Insert the new suction tube with<br />
adapter between thumb wheel and<br />
roller while pressing the venting<br />
button.<br />
– Clip the adapter into the adapter<br />
support.<br />
Simultaneously exert counterpressure<br />
at the bottom of the spring clip to<br />
avoid damage of the adapter support.
Störung – was tun?<br />
Störung Mögliche Ursache Was tun?<br />
Abgebrochene Pipette<br />
im Adapter.<br />
Gerät saugt nicht an/<br />
Pipette tropft.<br />
Flüssigkeit im Adapter,<br />
bzw. Saugschlauch.<br />
Pipette hält nicht im<br />
Adapter.<br />
Pipette war beschädigt/<br />
zu kräftig in den Adapter<br />
gedrückt.<br />
Adapter oder Saugschlauch<br />
beschädigt.<br />
Stellrad zu schnell gedreht.<br />
Adapter ist feucht oder fettig.<br />
Glassplitter mit Pinzette entfernen, ggf.<br />
Adapter mit Saugschlauch austauschen,<br />
➤ Seite 16.<br />
Adapter mit Saugschlauch erneuern,<br />
➤ Seite 16.<br />
Adapter und Saugschlauch reinigen bzw.<br />
desinfizieren, ggf. erneuern,<br />
➤ Seite 14.<br />
Adapter reinigen bzw. desinfizieren und<br />
trocknen lassen, ggf. erneuern,<br />
➤ Seite 14.<br />
– 17 –
Trouble Shooting<br />
– 18 –<br />
Trouble Possible Cause Action to be taken<br />
Broken pipette in the<br />
adapter.<br />
The instrument does not<br />
not draw in liquid/pipette<br />
drips.<br />
Liquid in the adapter and<br />
the suction tube.<br />
Pipette not held properly<br />
in the adapter.<br />
The pipette was damaged/<br />
forced into the adapter.<br />
Adapter or suction tube<br />
damaged.<br />
The thumb wheel was<br />
turned too quickly.<br />
Adapter is wet or greasy.<br />
Remove the glass splinters by means of<br />
forceps, replace adapter and suction tube,<br />
if necessary, ➤ page 16.<br />
Replace adapter and suction tube,<br />
➤ page 16.<br />
Clean or disinfect adapter and/or suction tube,<br />
if necessary, replace,<br />
➤ page 14.<br />
Clean or disinfect adapter and suction tube, and<br />
allow to dry completely. If necessary, replace,<br />
➤ page 14.
Zur Reparatur einsenden<br />
Achtung:<br />
Aus Sicherheitsgründen können nur saubere/<br />
dekontaminierte Geräte geprüft/repariert<br />
werden.<br />
Return for Repair<br />
Attention!<br />
For safety reasons only cleaned/decontaminated<br />
instruments can be checked/repaired.<br />
– Daher: Gerät gründlich reinigen/dekontaminieren!<br />
– "Erklärung zur gesundheitlichen Unbedenklichkeit"<br />
ausfüllen (Vordrucke können beim Händler oder<br />
Hersteller angefordert werden, bzw. stehen unter<br />
www.brand.de zum Download bereit) und gemeinsam<br />
mit dem Gerät an Hersteller oder Händler<br />
senden unter Angaben von:<br />
➤ Art der Störung<br />
➤ dosiertem Medium<br />
– Therefore: Clean and decontaminate the instrument<br />
carefully!<br />
– Complete the "Declaration on Absence of Health<br />
Hazards" (ask your supplier or the manufacturer<br />
for the form. The form can also be downloaded on<br />
www.brand.de) and send the instrument to the<br />
manufacturer or supplier and describe:<br />
➤ the nature of the problem<br />
➤ the pipetted liquidsn<br />
Der Rücktransport geschieht auf Gefahr und Kosten<br />
des Einsenders.<br />
Return shipment has to be effected at the risk and<br />
cost of the sender.<br />
– 19 –
Mängelhaftung<br />
– 20 –<br />
Warranty<br />
Wir haften nicht für Folgen unsachgemäßer Behandlung,<br />
Verwendung, Wartung, Bedienung oder nicht<br />
autorisierter Reparatur des Geräts oder für Folgen<br />
normaler Abnutzung, insbesondere von Verschleißteilen<br />
wie z.B. Kolben, Dichtungen, Ventilen sowie bei<br />
Glasbruch. Gleiches gilt für die Nichtbeachtung der<br />
Gebrauchsanleitung. Insbesondere übernehmen wir<br />
keine Haftung für entstandene Schäden, wenn das<br />
Gerät weiter zerlegt wurde als in der Gebrauchsanleitung<br />
beschrieben oder wenn fremde Zubehör- bzw.<br />
Ersatzteile eingebaut wurden.<br />
We shall not be liable for the consequences of<br />
improper handling, use, servicing, operation or unauthorized<br />
repairs of the instrument or the consequences<br />
of normal wear and tear especially of wearing<br />
parts such as pistons, seals, valves and the breakage<br />
of glass as well as the failure to follow the instructions<br />
of the operating manual. We are not liable for<br />
damage resulting from any actions not described in<br />
the operating manual or if non-original spare parts or<br />
components have been used.<br />
Technische Änderungen, Irrtum und Druckfehler<br />
vorbehalten.<br />
Subject to technical modification without notice.<br />
Errors excepted.
Bestelldaten<br />
<strong>micro</strong>-<strong>classic</strong><br />
komplett mit Saugschlauch Best.-Nr. 259 00<br />
Ordering Data<br />
<strong>micro</strong>-<strong>classic</strong><br />
complete with suction tube Cat. No. 259 00<br />
Ersatz-Adapter mit Saugschlauch<br />
Verpackungseinheit 3 Stück Best.-Nr. 259 31<br />
Spare adapter with suction tube<br />
pack of 3 Cat. No. 259 31<br />
– 21 –