Charly Air-Tube SIL-V - Finsterwalder Gmbh
Charly Air-Tube SIL-V - Finsterwalder Gmbh
Charly Air-Tube SIL-V - Finsterwalder Gmbh

Sie wollen auch ein ePaper? Erhöhen Sie die Reichweite Ihrer Titel.
YUMPU macht aus Druck-PDFs automatisch weboptimierte ePaper, die Google liebt.
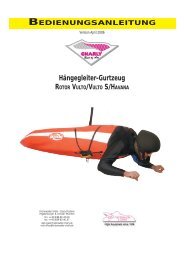
Owners Manual<br />
Version from March 2003<br />
Paragliding harness<br />
<strong>Air</strong>-<strong>Tube</strong> <strong>SIL</strong>-V / <strong>Air</strong>-<strong>Tube</strong> Karabiner
In general<br />
The <strong>Air</strong>-<strong>Tube</strong> has been developed for use by allround and performance oriented pilots. The harness is distinguished by<br />
essential innovations for safety and comfort.<br />
Das <strong>Air</strong>-<strong>Tube</strong> wurde für Allround- und Performance-Gleitschirmpiloten entwickelt. Der Gurt zeichnet sich durch wesentliche<br />
Innovationen für Sicherheit und Komfort aus.<br />
Simpler handling,<br />
weight saving and more<br />
safety due to the revolutionary,<br />
further developed<br />
Safe-In-Carabiner<br />
System <strong>SIL</strong>-V.<br />
Einfacheres Hand ling,<br />
Gewichtsersparnis, mehr<br />
Sicherheit durch d. re vo -<br />
lu ti o nä re, weiterentwikkelte<br />
Safe-In-Ka ra bi ner<br />
System <strong>SIL</strong>-V.<br />
Especially easy transition<br />
to the seated position<br />
after launch merely<br />
by weight shift due to the<br />
special <strong>SIL</strong>-harness geometry.<br />
Besonders ein fa cher<br />
Übergang in Flug po si ti on<br />
nach dem Start nur durch<br />
Gewichtsverlagerung<br />
durch die be son de re <strong>SIL</strong>-<br />
Gurtgeometrie.<br />
Plenty of storage<br />
space and super streamlined.<br />
Cleanly integrated<br />
bride channels.<br />
Viel Stauraum und<br />
gute Aerodynamik. Sauber<br />
integrierte Fangleinenkanäle.<br />
Light-weight and can be<br />
packed small. Thanks to the<br />
use of high strength Cordura<br />
material, the weight of this<br />
airbag harness was able to<br />
be reduced to an all time low<br />
with a 1,80 meter shock test<br />
certifi cation.<br />
Leicht und klein verpackbar.<br />
Durch die Verwendung<br />
hochfester Cordura<br />
Stoffe konnte das Gewicht<br />
dieses <strong>Air</strong>bag-Gurts mit<br />
1,80 m Schocktest Zulassung<br />
auf Rekordniveau<br />
gesenkt werden.<br />
More freedom of movement<br />
when laun-ching.<br />
Free running <strong>SIL</strong>-V legstraps<br />
do not constrict or<br />
slip downwards.<br />
Mehr Be we gungs -<br />
frei heit am Start. Durchlau<br />
fen de <strong>SIL</strong>-V Bein gur te<br />
be en gen nicht und rutschen<br />
nicht herunter.<br />
Adjustment of hipstrap,<br />
chest-strap and<br />
seat tilt in fl ight due to<br />
the easy running sliding<br />
bridge system.<br />
Leichtgängiges Gleitsteg-System.<br />
Ver stel lung<br />
von Hüftgurt, Brustgurt<br />
und Sitz nei gung während<br />
des Flu ges.<br />
Very comfortable<br />
seated and reclined position<br />
for accelerated<br />
flight due to va ri ab le<br />
seating board tilt.<br />
Sehr bequeme Sitz-<br />
und Liegeposition für<br />
be schleu nig tes Flie gen<br />
dank variabler Sitzbrettneigung.<br />
The airbag fi lls within<br />
seconds of launch via a<br />
large air valve. An additional<br />
8 cm soft-airbag<br />
provides for sufficient<br />
protection during launch.<br />
Über ein großes<br />
Luftventil füllt sich der<br />
<strong>Air</strong>bag nach dem Start<br />
in Sekundenschnelle.<br />
Ein zusätzlicher 8 cm<br />
Soft- <strong>Air</strong>bag sorgt für<br />
Schutz schon während<br />
des Startlaufs.<br />
All <strong>Charly</strong> harnesses are certifi ed for 120 kg load !<br />
Alle <strong>Charly</strong> Gurtzeuge sind auf 120 kg Zuladung zugelassen !
<strong>Charly</strong> <strong>Air</strong>-<strong>Tube</strong> <strong>SIL</strong>-V<br />
Also available with carabiners<br />
Auch mit Karabinern erhältlich<br />
Optimised position of the centre of gravity by placement of the rescue reserve under the front of the seating area.<br />
Optimierte Schwerpunktslage durch Platzierung des Rettungsschirms unter der Sitz- Vorderseite<br />
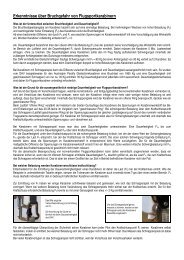
The special design of the <strong>Charly</strong>- tube<br />
container and its fastening fl ap avoids the deployment<br />
problems that arose with previous<br />
tube containers. Important however is the<br />
choice of a modern (none too large) rescue<br />
reserve with a deployment handle that can<br />
be attached to the side of the inner container.<br />
Constant retention strength of the release pins<br />
and simple insertion of the rescue reserve<br />
using the <strong>Charly</strong>- loop tensioner system.<br />
Die besondere Gestaltung des <strong>Charly</strong>-<br />
<strong>Tube</strong>containers und dessen Verschlußklappe<br />
vermeidet die früher bei <strong>Tube</strong>containern<br />
aufgetretenen Auslöseprobleme. Wichtig ist<br />
jedoch die Wahl eines modernen (nicht zu<br />
großen) Rettungsgeräts mit seitlich am Innencontainer<br />
anzubringendem Auslösegriff.<br />
Gleichmäßige Haltekräfte des Auslösesplints<br />
und einfacher Einbau des Rettungsgeräts mit<br />
<strong>Charly</strong>- Loopspanner System.<br />
Several advantages arise from the positioning<br />
of the rescue reserve in a tube container below the<br />
front side of the seating board.:<br />
• optimal position at the centre of gravity<br />
• Improved throwing possibilities due to a short<br />
connection between the deployement handle<br />
and the rescue reserve.<br />
• The closed lower harness side prevents soiling<br />
of the rescue reserve.<br />
• The reserve cannot become caught up in the<br />
accelerator.<br />
• An unintentional falling out of the rescue reserve<br />
is mor or less impossible.<br />
• The rescue reserve is very accessible and easily<br />
visible.<br />
Die Rettungsgeräte Unterbringung im <strong>Tube</strong>container<br />
unter der Sitzbrettvorderseite bietet eine<br />
Reihe von Vorteilen:<br />
• optimale Schwerpunktslage.<br />
• Bessere Wurfmöglichkeit durch kurze Verbindung<br />
Griff- Rettungsschirm.<br />
• Die geschlossene Gurt- Unterseite verhindert ein<br />
Verschmutzen des Rettungsgeräts.<br />
• Die Rettung kann sich nicht im Fußbeschleuniger<br />
verhängen.<br />
• Ein unbeabsichtigtes herausfallen des Rettungsgeräts<br />
ist weitgehend ausgeschlossen.<br />
• Der Rettungsgeräte Griff ist sehr gut erreichbar<br />
und leicht einsehbar.<br />
On the left hand and on the right hand side<br />
you will fi nd a spacious side pocket. A cockpit<br />
pocket ( order # HG148) with a side neoprene<br />
access slit can be attached to the chest strap.<br />
A transmitter pocket has been integrated into<br />
the rear storage compartment.<br />
Seitlich befinden sich zwei geräumige<br />
Seitentasche. Am Brustgurt kann eine Cockpit-<br />
Tasche (Best.Nr.HG148) mit seitlichem<br />
Neoprene Griffschlitz angebracht werden. Im<br />
Rückenstaufach fi ndet sich eine integrierte<br />
Funkgerätetasche.<br />
Frontbag Cockpit (Art.# HG 148)
All certifi cated protectors are bulky. However<br />
the volume of paraglider equipment is no longer a<br />
problem as long as one uses a modern compression<br />
backpack such as the <strong>Charly</strong> COM-PRESS-OR.<br />
Enquire by <strong>Charly</strong> or at your local dealers about<br />
special exchange conditions for your old paraglider<br />
backpack.<br />
Alle zugelassenen Protektoren sind voluminös.<br />
Jedoch ist das Volumen der Gleitschirmausrüstung<br />
kein Thema mehr, wenn man einen modernen Kompressions-Gleitschirmpacksack<br />
wie den <strong>Charly</strong><br />
COM-PRESS-OR verwendet. Erkundigen Sie sich<br />
bei <strong>Charly</strong> oder Ihrem Fachhändler über spezielle<br />
Ein-tauschkonditionen für Ihren alten Gleitschirm- Gleitschirmpack-sack.<br />
6<br />
7<br />
3<br />
5<br />
1<br />
4<br />
2<br />
Transport<br />
conventional paraglider<br />
back pack<br />
kon ven ti o nel ler<br />
Gleit schirm pack sack<br />
<strong>Charly</strong><br />
Com-Press-Or<br />
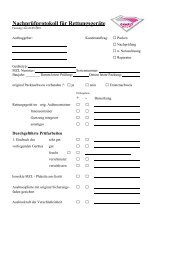
Packing<br />
1 The paraglider pads the back.<br />
2 The harness with the protector is packed on top, but upside down. After closing the<br />
zipper, the paraglider and the harness have to be compressed using the draw cord.<br />
The back pack thus is given a stable and stretched shape.<br />
3 The helmet compartment is easily accessible from the outside. Please remove the helmet,<br />
when transporting by car.<br />
4 Compartment for additional equipment, such as an anorak or instruments with large packopening.<br />
Extra map pocket with zipper on the outside.<br />
5 Pocket for provisions on the hip-strap is easily accessible whilst carrying. Mobile phone<br />
pocket attachable on the hip-strap is included in the specifi cation.<br />
6 Shoulder stabilizer straps combined with comfortable hand loops. Correctly adjusted the<br />
weight is predominantly on the hips.<br />
7 Robust and rugged, ergonomic hip-strap (removable). Fits closely thanks to the adjustable<br />
hip belt buckle.<br />
Packen<br />
1 Der Gleitschirm pol stert den Rücken.<br />
2 Das Gleitschirmgurtzeug mit Pro tek tor wird kopf über dar über ge packt. Nach dem Schlie ßen<br />
des Reiß ver schlus ses müs sen Gleit schirm und Gurt zeug mit tels der Schnü rung stark<br />
kom pri miert wer den. Der Ruck sack er hält da durch eine sta bi le, ge streck te Form.<br />
3 Das Helmfach ist nach träg lich von au ßen befüllbar. Beim Au to trans port Helm ex tra lagern.<br />
4 Fach für Zusatz-Aus rü stung wie Ano rak, In stru men te usw. mit gro ßer Füll öff nung. Au ßen<br />
extra Kar ten ta sche mit RV.<br />
5 Provianttasche am Hüft gurt un ter wegs gut er reich bar. Eine am Hüftgurt befestigbare<br />
Han dy ta sche ist im Lie fer um fang in be grif fen.<br />
6 Lastkontrollriemen kom bi niert mit bequemen Hand schlau fen. Rich tig ein ge stellt ruht das<br />
Ge wicht über wie gend auf der Hüf te.<br />
Fits anyone<br />
Left large pilot with little equipment, right small pilot with lots of equipment. The ComPressOr<br />
adjusts ideally to various packing volumes and pilot statures.<br />
Paßt jedem<br />
Links großer Pilot mit kleiner Aus rü stung, rechts umgekehrt. Der ComPressOr paßt sich unter<br />
schied li chen Füll vo lu men und Piloten ver schie de ner Statur per fekt an.<br />
Compressing<br />
Central cording: The volume of the paraglider equipment can be reduced by up to 50% by<br />
means of the highly effective cording system. Thanks to the contents being compressed, the<br />
ComPressOr maintains a stable carrying shape without the use of a backpackframe. It can be<br />
rolled up small for stowing away. Strong compression of the contents stabilizes the ComPressOr<br />
and considerably improves the carrying comfort.<br />
Komprimieren<br />
Zentralschnürung: Mittels der hoch ef fek ti ven Schnürung wird das Volumen der Gleit schirm<br />
aus rüs tung um bis zu 50% reduziert. Durch die ge schnür te Füllung erhält der ComPressOr<br />
eine stabile, trag fä hi ge Form ohne Tra ge ge stell. Zum Verstauen ist er klein zusammenrollbar.<br />
Starkes Verschnüren des Inhalts stabilisiert den ComPressOr und verbessert den Tra ge kom fort<br />
erheblich.<br />
The <strong>Charly</strong> compression backpack is available in different designs. Please see<br />
www.fi nsterwalder-charly.de!<br />
Der <strong>Charly</strong> Kompressions-Packsack ist in verschiedenen Ausführungen erhältlich.<br />
Nä he res unter www.fi nsterwalder-charly.de
<strong>SIL</strong>-locks are standard equipment with<br />
<strong>Charly</strong> harnesses instead of carabi-ners.<br />
The <strong>SIL</strong>-system is both safer and more<br />
practical than conventional carabi-ners. On<br />
request we can also supply ZIP II harnesses<br />
w. conventional carabiners.<br />
J The <strong>SIL</strong> avoids all previous safety problems<br />
arising with carabiners such as<br />
breaking and locking security. The load<br />
bearing parts are constructed from<br />
steel. The risk of breakage due to metal<br />
fatigue present with traditional carabiners<br />
due to gate play is eliminated.<br />
The DHV ascertained by the <strong>SIL</strong> the<br />
highest breaking load of all paragliding<br />
carabiners: 3114 kg.<br />
J The paraglider can only be launched<br />
with fastened leg-straps, as the plugs<br />
necessary for the attachment of the<br />
paraglider to the harness are to be<br />
found on the leg-straps.<br />
J The <strong>SIL</strong> simplifi es the harness apparatus<br />
and is practical to handle. Additional<br />
buckles on the leg-straps and the<br />
operation thereof are done away with.<br />
J One can move around freely before<br />
launch whilst wearing the harness, because<br />
the leg-straps do not slip down<br />
hindering the pilot when walking.<br />
Putting on the harness w. <strong>SIL</strong>-V<br />
Putting the harness on occurs as follows:<br />
1. Shoulder-straps<br />
2. Pass the leg-straps between the legs and<br />
insert in the <strong>SIL</strong>.<br />
3. Fasten chest-strap<br />
Should you prefer closely fi tting leg straps<br />
(recommended by backward launch) then<br />
feed them through the shortening loops (E)<br />
situated on the main harness suspension<br />
straps for this purpose (picture A, B).<br />
Generally you can dispense with the<br />
shortening loops and lead the leg-straps<br />
directly to the <strong>SIL</strong> behind the chest-strap.<br />
This course of straps is very comfortable<br />
and advantageous by immanent landing in<br />
water (picture C).<br />
Flaps have been attached to the main<br />
suspension straps of the harness, so that<br />
the leg-straps can be lead along them and<br />
prevent air resistance (D).<br />
The attachment of the paraglider before<br />
launch (picture F): In order to be<br />
able to insert the riser plug (G), you must<br />
first release the leg-strap plug (H) and<br />
reinsert it afterwards. Three safety steps<br />
prevent undesired opening/release of the<br />
<strong>SIL</strong>. When the risers are loaded (weigh-ted),<br />
the leg-strap plugs will not open even when<br />
not fully inserted.<br />
Mounting the riser insertions<br />
You will fi nd the riser insertions (G) in the<br />
side pocket of your harness. If you are<br />
the owner of more than one paraglider,<br />
we recommend that you order additional<br />
insertions (order nr. HSi35). Generally the<br />
insertions remain attached to the paraglider<br />
risers. Should the riser insertions be<br />
changed regularly, then we recom-mend<br />
that you tape the clips securely to prevent<br />
loss. The use of riser insertions without<br />
clips is not allowed.<br />
F<br />
<strong>SIL</strong>-V<br />
E ï<br />
B C<br />
H<br />
ï<br />
G<br />
ï<br />
E<br />
ï<br />
ï<br />
A<br />
1 2<br />
3 4<br />
D<br />
<strong>Charly</strong>-Gurte sind serienmäßig mit<br />
<strong>SIL</strong>-Schlössern anstelle von Karabinern<br />
ausgerüstet. Das <strong>SIL</strong>-System ist sowohl<br />
sicherer als auch praktischer als konventionelle<br />
Karabiner. Auf Wunsch können ZIP<br />
II-Gurte aber auch in konventioneller Karabinerausführung<br />
geliefert werden.<br />
J Das <strong>SIL</strong> vermeidet alle bisher bei Karabinern<br />
aufgetretenen Sicherheitsprobleme<br />
bezüglich der Verschlußsicherung<br />
und der Festigkeit. Tragende Teile<br />
bestehen aus Stahl. Das b. konventionellen<br />
Karabinern aufgrund d. Schnapperspiels<br />
vorhandene Ermüdungsbruchrisiko<br />
wird vermieden. Der DHV<br />
ermittelte beim <strong>SIL</strong> die höchste Bruchlast<br />
aller GS-Karabiner: 3114 kg.<br />
J Der Gleitschirm kann nur m. geschlossenen<br />
Beingurten gestartet werden,<br />
denn die Stecker, die zum Befestigen<br />
des Gleitschirms benötigt werden, befi<br />
nden sich an den Beingurten.<br />
J Das <strong>SIL</strong> vereinfacht den Gurtapparat<br />
und ist praktischer in der Handhabung.<br />
Zusätzliche Schlösser an den Beingurten<br />
u. deren Bedienaufwand entfallen.<br />
J Vor dem Start kann man sich mit angelegtem<br />
Gurtzeug frei bewegen, denn<br />
die Beingurte rutschen nicht herunter<br />
und behindern nicht.<br />
Anlegen des Gurtes mit <strong>SIL</strong>-V<br />
Der Einstieg erfolgt in der Reihenfolge:<br />
1. Schultergurte<br />
3. Beingurte zwischen den Beinen durchführen<br />
und am <strong>SIL</strong> einstecken.<br />
2. Brustgurt schließen<br />
Sofern Sie eng anliegende Beingurte bevorzugen<br />
(empfehlenswert b. Rückwärtsstarts),<br />
können Sie die Beingurte durch<br />
dafür vorgesehene Verkürzungsschlaufen<br />
(E) an den Tragegurten ziehen (Bild A, B).<br />
Üblicherweise können Sie auf die Verkür-<br />
zungsschlaufen verzichten und die Beingurte<br />
direkt seitlich hinter dem Brustgurt<br />
zum <strong>SIL</strong> führen. Dieser Gurtverlauf ist<br />
sehr bequem und bei drohenden Wasserlandungen<br />
vorteilhaft (Bild C).<br />
Um die Beingurte luftwiderstandsarm an<br />
den Haupttragegurten des Gurtzeugs entlangzuführen,<br />
können sie mit den dort angebrachten<br />
Laschen fi xiert werden (D).<br />
Die Befestigung des Gleitschirms vor<br />
dem Start (Bild F): Um den Tragegurtstecker<br />
(G) einführen und befestigen zu<br />
können, müssen Sie den Beingurtstecker<br />
(H) lösen und wieder einstecken. Drei<br />
Sicherheitsstufen verhindern ungewolltes<br />
Öffnen des <strong>SIL</strong>. Unter Last kann sich der<br />
Beingurtstecker nicht lösen, selbst wenn er<br />
nicht vollständig eingesteckt war.<br />
Anbringen der Tragegurtstecker<br />
Die Tragegurtstecker (G) fi nden Sie in der<br />
Seitentasche Ihres Gurtzeugs. Sollten Sie<br />
mehrere Gleitschirme besitzen, empfi ehlt<br />
es sich, zusätzliche Stecker nachzube-<br />
stellen (Bestellnr. HSi35). Üblicherweise<br />
verbleiben die Tragegurtstecker an den<br />
Tragegurten des Gleitschirms montiert.<br />
Sollten die Tragegurtstecker häufig gewechselt<br />
werden, empfehlen wir die Clips<br />
mit Klebeband gegen Verlust zu sichern.<br />
Die Verwendung von Tragegurtsteckern<br />
ohne Clips ist nicht zulässig.
Important tips<br />
Trial seating<br />
Prerequisite for a safe fl ight in comfort is the choice of the correct harness size, proper adjustment of legstraps,<br />
seating board tilt, shoulder-straps, hip-straps and speedsystem.<br />
Hang up your harness with the paraglider plugs so, that you can just touch the ground in the<br />
hanging position. Test the transition to the seated and landing positions and aquaint yourself<br />
with the various adjustment possibili-ties. For this trial sitting, make sure that the harness<br />
is equipped with a protector.<br />
Harness size<br />
Available are the sizes M (for 1,60-1,75 m) and L (for 1,75-2,00 m). Apart from<br />
pilot height, the body proportions (thigh length) and pilot weight are also decisive.<br />
On the one hand, the front edge of the seating surface should not dig into the<br />
hollow of the knee (in this case the harness is too large), on the other hand, a<br />
comfortable seated position must be adopted without problems arising, otherwise<br />
the harness is too small.<br />
Correct adjustment of the shoulder-straps<br />
When seated, the shoulder-straps must be adjusted so, that they are close to the<br />
shoulders but without tension (I). When standing, the shoulder-strap adjustment affects<br />
the chest-strap. An upright posture must be possible without the chest-strap becoming<br />
too tight. The shoulder-straps of the ZIP are constructed so, that the seating surface in no<br />
way hinders a good launch run. The tighter the shoulder-straps, the higher the seating surface will<br />
hang.<br />
Simple transition from launch to the seated position<br />
The length of the leg-straps is generally not of importance with the <strong>SIL</strong>-V, since the transition from launch<br />
position to seated position is relatively easy even with the leg-straps loose. The harnesses are delivered with<br />
straps adjusted to suit almost all pilots. The leg-straps need not be drawn as tightly as with conventional<br />
harnesses, since they cannot slip down when landing. The length adjustment is found under the protector<br />
compartment. The central adjustment makes it easier to ensure equal lengths for both leg-straps (picture<br />
K).<br />
The transition from launch (hanging) to seated position is infl uenced not only by leg-strap length, but<br />
also by the regulation of the seating board attachment (N). If you wish for an easier transition from the<br />
launch to the seated position, then you should make the seating board steeper or shorten the leg-straps. An<br />
easy transition is most important as prolonged constriction of the thighs due to a hanging position can lead to<br />
unconsciousness. With a loose seating board attachment, the tilt of the seating board is variable and corresponds<br />
to each respective position in fl ight.<br />
Tilt of the upper body<br />
The desired sitting position is adopted by adjusting the hip-straps. To do this, slip forwards a little and sit upright<br />
(picture L = release, M = tighten).<br />
ABS-effect<br />
The ABS-effect notes the sensitivity of the harness to one-sided paraglider collapse. The tighter the chest-strap<br />
is adjusted, the stronger is the absorption.<br />
Release from the paraglider after touch down<br />
If the risers are unloaded, pressing the release buttons of the <strong>SIL</strong> locks is suffi cient. Both leg-strap plugs can be<br />
removed simultaneously by shaking (picture O). In this way, the pilot is also disconnected from the paraglider. If the<br />
risers are still „loaded“ (tensioned), then the <strong>SIL</strong> locks must be released one after the other. Each respective riser<br />
Probesitzen<br />
Voraussetzung für einen sicheren Flug in angenehmer Sitzposition ist die Wahl der richtigen Gurtgröße und korrekte<br />
Einstellung von Beinschlaufen, Sitzbrettneigung, Schultergurten, Hüftgurten und Speedsystem.<br />
Hängen Sie Ihr Gurtzeug an den Gleitschirmsteckern so über dem Boden auf, daß Sie in hängender Flugstellung<br />
gerade den Boden berühren. Proben Sie den Übergang in Flug- und Landeposition u. machen Sie sich mit den<br />
versch. Verstellmöglichkeiten vertraut. Für die Versuche sollte das Gurtzeug mit Protektor ausgerüstet sein.<br />
Gurtgröße<br />
Lieferbar sind die Größen M (für 1,60-1,75 m) und L (für 1,75-2,00 m). Neben der Körpergröße sind auch die<br />
Körperproportionen (Länge der Oberschenkel) und das Gewicht des Piloten maßgeblich. Einerseits darf die<br />
Sitzfl ächen-Vorderkante nicht in die Kniekehlen drücken (sonst ist der Gurt zu groß), andererseits muß eine<br />
bequeme Sitzposition problemlos eingenommen werden können (sonst ist der Gurt zu klein).<br />
Größenanpassung durch den Schultergurt<br />
Der Schultergurt wird im Sitzen so eingestellt, daß er an den Schultern anliegt ohne zu spannen (I). Im Stehen<br />
beeinfl ußt die Schultergurteinstellung den Brustgurt. Es muß eine aufrechte Körperhaltung eingenommen werden<br />
können, ohne daß der Brustgurt zu stark spannt. Der Schultergurt ist beim ZIP so ausgeführt, daß das Sitzbrett<br />
bei aufrechter Körperhaltung senkrecht aufgestellt wird. Dadurch behindert es nicht beim Startlauf. Je enger<br />
der Schultergurt eingestellt ist, um so höher hängt das Sitzbrett.<br />
Einfacher Übergang Start-Flugposition<br />
Beim <strong>SIL</strong>-V ist die Beingurtlänge in der Regel kein Thema, denn der Übergang von hängender in sitzende Position<br />
ist auch bei lockeren Beingurten relativ einfach. Die Gurte werden so ausgeliefert, daß die eingestellte Länge für<br />
fast alle Piloten paßt. Die Beingurte brauchen nicht so straff wie bei konventionellen Gurten angezogen werden,<br />
da sie beim Start nicht herunterrutschen können. Die Längenverstellung befi ndet sich daher unter dem Sitzbrett<br />
und ist über das Protektorfach gut zugänglich. Die Zentralverstellung erleichtert das Einstellen gleicher Länge<br />
für beide Beingurte (Bild K).<br />
Der Übergang Start-Flugposition wird außer durch die Beingurtlänge auch durch die Einstellung der SitzbrettSitzbrett- fi xierung (N) beeinfl beeinfl ußt. ußt. Falls Falls ein ein leichterer leichterer Übergang Übergang von von Start-Flugposition Start-Flugposition gewünscht gewünscht wird, wird, sollten sollten Sie Sie die<br />
die<br />
Sitzbrettneigung steiler stellen oder die Beinschlaufen verkürzen. Ein einfacher Übergang ist jedenfalls wichtig,<br />
denn länger dauernde Einschnürung der Oberschenkel infolge hängender Flugstellung kann zu Bewußtlosigkeit<br />
führen. Mit lockerer Sitzbrettfi xierung ist die Sitzbrettneigung variabel und paßt sich der jew. Flugstellung an.<br />
Oberkörperneigung<br />
Mit dem Hüftgurt wird die gewünschte Sitzposition eingestellt. Zum Verstellen muß d. Hüftgurt entlastet sein.<br />
Rutschen Sie hierzu im Sitz etwas nach vorne u. richten Sie d. Oberkörper auf (Bild L = lockern, M = straffen).<br />
ABS-Wirkung<br />
Die ABS-Wirkung beschreibt die Empfi ndlichkeit des Gurtzeugs auf einseitige Einklapper. Je enger der Brustgurt<br />
eingestellt ist, umso stärker ist die Dämpfung.<br />
Lösen des Gleitschirms nach der Landung<br />
Sofern die Tragegurte locker sind, genügt ein Pressen der Tasten der <strong>SIL</strong>-Schlösser. Beide Beingurtstecker können<br />
dann durch Schütteln gleichzeitig entfernt werden (Bild O). Damit ist auch die Verbindung mit dem Gleitschirm<br />
gelöst. Sofern die Tragegurte gespannt sind, müssen die <strong>SIL</strong>-Schlösser nacheinander geöffnet werden. Mit<br />
der einen Hand wird der jeweilige Tragegurt entlastet, mit der anderen werden die Tasten gedrückt und der<br />
Beingurtstecker herausgeschüttelt.<br />
O<br />
O<br />
N<br />
ï<br />
ï<br />
I<br />
ï<br />
M<br />
K<br />
L
Side container rescue System<br />
Should you wish to equip your harness with an existing rescue reserve from a manufacturer other than <strong>Charly</strong>, then the fi tting should be carried<br />
out by specially trained persons ( in Germany licensed packers, eg. fl ight instructors and schooled personel ). Deployment of the rescue reserve<br />
in various directions must be tested after each fi tting.<br />
Sofern Sie Ihr Gurtzeug mit einem vorhandenen Rettungsgerät eines fremden Herstellers ausrüsten wollen, so ist der Einbau durch besonders<br />
geschulte Personen (in Deutschland lizenzierte Prüfer, z.B. Fluglehrer, die im Rahmen einer Weiterbildung diese Berechtigung erworben haben) durchzuführen.<br />
Die Ausbringung des Rettungsgeräts in verschiedenen Zugrichtungen muß jedenfalls nach jedem Einbau geprobt werden.<br />
Closing the container by <strong>Air</strong>-<strong>Tube</strong><br />
Containerverschluß beim <strong>Air</strong>-<strong>Tube</strong><br />
Step 1<br />
Loop the main bridle<br />
line of the rescue reserve<br />
through the shoulder strap<br />
hang in loop or connect using<br />
a harness-chute connector<br />
(order . No. Be31) . (tighten<br />
with a spanner)<br />
Verbindungsleine des<br />
Rettungsgerätes durch die<br />
Schultergurt Einhängeschlaufe<br />
einschlaufen bzw.<br />
mittels eines Schirm-Gurt<br />
Verbindungsgliedes 1.a (Best.<br />
Nr. Be 31) miteinander verbinden.<br />
(mit Schlüssel anziehen)<br />
Step 3<br />
The main bridle line is<br />
placed in the intended V-line<br />
channel and the inner container<br />
inserted.<br />
Die Verbindungsleine wird<br />
in dem dafür vorgesehenen V-<br />
Leinen Kanal plaziert und der<br />
Innecontainer eingelegt.<br />
Step 5<br />
Insert the retension pins<br />
through the loops.<br />
Remove the packing cords<br />
after use !<br />
Do not use security threed<br />
in combination with loop<br />
tensioner.<br />
Die Splinte durch die<br />
Loops stecken.<br />
Packschnüre nach der Verwendung<br />
entfernen !<br />
In Verbindung mit Loopspanner<br />
keinen Sollbruchfaden<br />
verwenden.<br />
Step 2<br />
Attach the deployment<br />
handle of the harness ( delivered<br />
standard ) to the side<br />
of the rescue reserve inner<br />
container using the attachment<br />
loop.<br />
den Serienmäßig mitgelieferten<br />
Auslösegriff des<br />
Gurtzeugs seitlich an der<br />
Befestigungsschlaufe des<br />
Rettungsschirm Innencontainers<br />
einschlaufen.<br />
Step 4<br />
The container is closed up<br />
with the help of two packing<br />
cords.<br />
Mit Hilfe zweier Packschnüre<br />
wird der Container<br />
geschlossen.<br />
Step 6<br />
Attach the deployment<br />
handle using velcro strip.<br />
Auslösegriff auf den<br />
Flauschstreifen kletten.<br />
Die Klettverschlüsse am Rettungsgeräte-Griff müssen alle 6 Monate geöffnet werden da sie sonst verfi lzen und eine zu hohe Auslösekraft entsteht.<br />
As Velcro straps in time become clogged with felt, and more diffi cult strength does not exeed the max of 10 kg.<br />
Ü<br />
A deployment test must be carried out after fi tting.<br />
The deployment strength must lie between 4 and 10 kp !<br />
Nach dem Einbau muss eine Probeauslösung durchgeführt werden. werden.Ü<br />
Die Öffnungskraft muss zwischen 4 und 10 kp liegen !<br />
2<br />
3<br />
1<br />
1<br />
3<br />
2
N<br />
<strong>Air</strong>-<strong>Tube</strong> carabiner version<br />
R<br />
adjustment of the leg straps by ZIP- Karabiner harness<br />
Einstellen des Beingurts beim Gurt ZIP- Karabiner<br />
HG 122<br />
Q<br />
P<br />
U<br />
T<br />
HG 123<br />
<strong>Charly</strong> speed system has a length adjustable hook.<br />
The <strong>Charly</strong> Double speed (HG123) with angled stirrup eases<br />
location.<br />
<strong>Charly</strong> Fußbeschleuniger verfügen über längeneinstellbare<br />
Haken. Der <strong>Charly</strong> Doublespeed (HG123) mit abgewinkeltem<br />
Bügel erleichtert das Einsteigen<br />
TheKarabiner version of the ZIP harnessdiffers from the <strong>SIL</strong>- version in the legstraps<br />
and their attachment. Due to the leg straps with extra leg loops, goodfreedom of movement<br />
is achieved when launching.<br />
Afterpulling on the shoulder straps and closing and tightening the leg loops(P)an additional<br />
safety connection (Q)must be established to the chest strap Brustgurt (security against falling<br />
outof the harness when the leg loops are not fastened). The security strap toprevent falling<br />
out of the harness must run between the pilot´slegs.<br />
Die Karabinerversion des ZIP Gurtzeugs unterscheidet sich von der <strong>SIL</strong>- Version durch<br />
die Beingurte und deren Befestigung. Durch die Beingurte mit extra Beinschlaufen wird eine<br />
gute Bewegungsfreiheit am Start erreicht.<br />
Nach dem Anlegen der Schultergurte und dem schließen und straffen der Beinschlaufen (P)<br />
muß zusätzlich noch eine Sicherheitsverbindung (Q) zum Brustgurt (Herausfallsicherung bei<br />
versehentlich nicht geschlossenen Beinschlaufen) hergestellt werden. Die Herausfallsicherung<br />
muß zwischen den Schenkeln des Piloten verlaufen.<br />
Thelength adjustment of the leg straps(R)infl uences the transition from the hanging to<br />
the seated position. Even when the seatingboard attachment(N)is looser, the transition must<br />
bepossible simplyby weight shift. Possibly the leg strap must be shortened.Attention must<br />
be paid to the course of the strap through the adjustable clasp(T)as shown in picture S ! The<br />
end of the leg strap must beknotted (U)to ensure that it cannot slip through the clasp!!<br />
Die Längeneinstellung des Beingurts (R) beeinfl ußt den Übergang von hängender zu<br />
sitzender Flugstellung. Auch bei lockerer Sitzbrettfi xierung (N) muß der Übergang nur durch<br />
Gewichtsverlagerung ohne weiteres möglich sein. Gegebenenfalls muß der Beingurt verkürzt<br />
werden. Der Gurtverlauf an der Verstellspange (T) gemäß Bild S ist zu beachten! Das Ende<br />
des Beingurts muß durch einen Knoten (U) gegen Durchrutschen gesichert werden.<br />
S<br />
Accessories
<strong>SIL</strong>- V with express loop (order Nr. HS 5)<br />
<strong>SIL</strong> V mit Expresschlinge (Art.# HS 5)<br />
ZIP Karabiner version with <strong>Charly</strong> towing adapter<br />
Karabinerversion mit <strong>Charly</strong> Schleppadapter (Art.# HS 50)<br />
Accessories<br />
Attachment of a towrelease<br />
We recommend attaching the towrelease to the <strong>SIL</strong> using <strong>Charly</strong> express loops (order.Nr. HS5 or by means of<br />
the <strong>Charly</strong> tow release adapters(order Nr. HS50) to the karabiners. This method of attachment at the heightof<br />
the risers minimises the risk of stall to the paraglider when launching incomparison to a lower attachment<br />
point..<br />
Towing with a front containeris only permitted with special tow releases such as the Frontcontainer tow<br />
release :SK1 .<br />
The minimal weight of textile towing releases such al SK1 or the <strong>Charly</strong> S2 reduces tge danger of injury when<br />
the tow release catapults backtowards the pilot in the case of the tow ropebraking.<br />
Anbringen einer Schleppklinke<br />
Es wird empfohlen die Schleppklinke mittels <strong>Charly</strong> Expreßschingen (Best.Nr. HS5) am <strong>SIL</strong> oder mittels <strong>Charly</strong><br />
Klinkenadaptern (Best.Nr. HS50) am Karabiner zu befestigen. Diese Befestigungsart im Höhe des Tragegurts<br />
verringert verringert gegenüber einem tieferen Befestigungspunkt die Sackfl ugneigung des Gleitschirms<br />
beim Start.<br />
Der Windenschlepp mit Frontcontainern ist nur mit speziellen Klinken wie der Frontcontainerschleppklinke<br />
SK1 zulässig. Das geringe Gewicht von Textilschleppklinken wie <strong>Charly</strong> S2 oder SK1 vermindert die Gefahr<br />
sich durch zurückschnellende Klinken zu verletzen wenn das Schleppseil reißt.<br />
<strong>Charly</strong> S 2<br />
(Art.# HS300)<br />
Koch 1<br />
(Art.# HS410)<br />
Plastic<br />
(Art.# HS400)<br />
Frontcontainer towing release<br />
(Art.# HS420)<br />
Frontcontainer (Art.# HFa 187) Frontcontainer Cockpit (Art.# HFa 189) Frontbag Cockpit (Art.# HG 148)<br />
textile Sidebag (Art.# HG 365)<br />
or fl at neoprene Sidebag (Art.# HG 3650)<br />
Hipbag (Art.# HFa 187) Water ballast map pocket (Art.# HG641)<br />
Map holder (Art.# Hi 98) SOS-knife for webbing (Art.# HKa) Water ballast bag 10l (Art.# Hi 142)
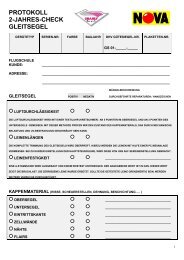
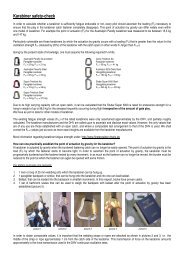
maintenance, security check - Kontrolle, Pfl ege<br />
Control, maintenance<br />
The load bearing parts of the harness should be inspected for abrasion prior to every launch. The hip straps and the leg straps in the area of the<br />
seating board are especially critical areas. Abrasive areas on the hip straps can be avoided by making adjustments only when the straps are not<br />
loaded, and by tightening only in the direction that the straps run.<br />
Karabiners and <strong>SIL</strong> will corrode after contact with aggressive substances such as salt water. If necessary, rinse in fresh water, lubricate or exchange.<br />
Karabiners should be renewed every 2 years due to damage resulting from metal fatigue. The <strong>SIL</strong> have a life expectancy of ten years. Aluminium<br />
karabiners with cross directional scratches in the surface material must be exchanged immediately.<br />
As Velcro straps in time become clogged with fl uff, and more diffi cult to open, periodic checks should be made to ensure that the deployment<br />
strength does not exceed the maximum 10 kg level ( we recommend every 6 months). Generally our reserve containers have been equipped with<br />
a loop tensioner system. In this case the splints must not be secured with safety threads !<br />
To prevent stains due to moisture, and corrosion, damp harnesses should be aired and dried. Never store harnesses compressed for long periods<br />
of time or in air-tight bags!<br />
Depending upon the amount of usage, the harness should be thoroughly checked after 2 or at the latest 5 years according to the check list featured<br />
below. Man made materials are sensitive to ultraviolet rays. Avoid unnecessary expose to sunlight. The certifi cation expires after 10 years after the<br />
date of purchase (invoice date) unless prolonged by a check from the manufacturer.<br />
Back part:<br />
¨ Visual check of the material for demage to seams,<br />
holes, tears<br />
¨ check zippers for damage & easy function<br />
¨ check velcro fastenings<br />
Webbing straps:<br />
for damage, wear and tear, aging<br />
¨ Main suspension straps<br />
¨ Chest strap<br />
¨ Hip straps<br />
¨ Leg straps<br />
¨ Shoulder straps & V-lines<br />
Hardware:<br />
¨ Visual check for damage, corrosion, derformation<br />
¨ Check that all screws sit tightly, use loctite (order#<br />
HCh1)<br />
¨ Functionality test<br />
Protector:<br />
¨ Check for damage<br />
¨ Carry out density check<br />
Rescue reserve:<br />
¨ Control the course of the main bridle<br />
¨ Visual check: deployment handle, splints, Loops<br />
¨ Deployment of rescue reserve, Functionality test<br />
¨ Safety threads (not necessary by loop tensioner)<br />
Kontrolle, Pfl ege<br />
Vor jedem Start ist der tragende Gurtapparat auf Scheuerstellen zu untersuchen. Besonders gefährdete Stellen sind der Hüftgurt und die Beingurte<br />
im Bereich des Sitzbretts. Vermeiden sie Scheuerstellen am Hüftgurt indem sie den Gurt beim Verstellen gut entlasten und nicht quer zur Gurtrichtung<br />
ziehen.<br />
Karabiner und <strong>SIL</strong> können bei Kontakt mit aggressiven Medien (Meerwasser) korrodieren. Gegebenenfalls abwaschen, ölen, notfalls austauschen.<br />
Karabiner müssen wegen der Ermüdungsbruchgefahr alle zwei Jahre ausgetauscht werden. Für das <strong>SIL</strong> gilt eine Gebrauchsdauer von 10 Jahren.<br />
Aluminiumkarabiner mit Querkratzern oder Rissen in der Oberfl äche müssen sofort ausgetauscht werden.<br />
Da Klettverschlüsse verfi lzen und dann schwer zu öffnen sind muß die Auslösekraft (maximal 10 Kg) zum Ausbringen des Rettungsgeräts halbjährlich<br />
überprüft werden. Unsere Rettungsgerätecontainer sind in der Regel mit Loopspannersystem ausgerüstet. Die Splinte bedürfen daher keiner<br />
Sicherung durch Sollbruchfäden!<br />
Zur Vermeidung von Stockfl ecken und Korrosion müssen feuchte Gurte ausgepackt gelüftet und getrocknet werden. Gurtzeuge niemals über längere<br />
Zeit komprimiert und/oder in luftdichten Säcken lagern!<br />
Je nach Beanspruchung nach 2, spätestens nach 5 Jahren muß das Gurtzeug nach untenstehender Checkliste gründlich geprüft werden. Kunststoffe<br />
sind empfi ndlich gegen UV- Strahlung. Vermeiden sie daher unnötige Lichteinwirkung. Die Musterzulassung erlischt nach 10 Jahre nach Auslieferung<br />
an den Kunden (Rechnungsdatum) sofern sie nicht durch einen Check im Herstellerbetrieb verlängert wird.<br />
Rückenteil:<br />
¨ Sichtüberprüfung des Stoffs auf Nahtschäden,<br />
Löcher, Risse<br />
¨ Überprüfung der Reißverschlüsse auf Leichtgängigkeit<br />
und Beschädigung<br />
¨ Überprüfung der Klettverschlüsse<br />
Gurtbänder:<br />
auf Beschädigung, Abnutzung, Alterung überprüft<br />
¨ Hauptaufhängung<br />
¨ Brustgurt<br />
¨ Hüftgurt<br />
¨ Beingurte<br />
¨ Schultergurte & V-Leine<br />
Beschlagteile:<br />
¨ Sichtüberprüfung auf Beschädigung, Verformung,<br />
Korrosion<br />
¨ Fester Sitz aller Schrauben kontrolliert - Loctite<br />
benutzen ( Bestell# HCh 1)<br />
¨ Funktionstest<br />
Protektor:<br />
¨ Auf Beschädigung überprüft<br />
¨ Dichtigkeitstest durchgeführt<br />
Rettungsgerät:<br />
¨ Kontrolle des Verlaufs der Verbindungsleine<br />
¨ Sichtüberprüfung Auslösegriff, Splinte, Loop<br />
¨ Ausbringung des Rettungsgerätes, Funktionsüberprüfung<br />
¨ Sollbruchfaden (entfällt bei Loopspanner)
<strong>Finsterwalder</strong> GmbH - <strong>Charly</strong> Produkte<br />
Am Osterösch 3, D-87637 Seeg<br />
Phone: ++49 (0)8364-1286<br />
Fax: ++49 (0)8364-8426<br />
Web: www.charly-produkte.de<br />
Mail: info@charly-produkte.de