æ îÌèµÌÖæŽKEL-KFR26GBP2N1Y-D(C2)-0302 ... - Electrolux-ui.com
æ îÌèµÌÖæŽKEL-KFR26GBP2N1Y-D(C2)-0302 ... - Electrolux-ui.com
æ îÌèµÌÖæŽKEL-KFR26GBP2N1Y-D(C2)-0302 ... - Electrolux-ui.com

Sie wollen auch ein ePaper? Erhöhen Sie die Reichweite Ihrer Titel.
YUMPU macht aus Druck-PDFs automatisch weboptimierte ePaper, die Google liebt.
2 The yellow-green wire in air conditioner is<br />
the earthing wire which can not be used for<br />
2 Das 2 other The gelb-grüne purposes. yellow-green Kabel Improper wire im Klimagerät in earthing air conditioner may ist das cause is<br />
Erdungskabel, electric the earthing shock. das wire nur which für diesen can not Zweck be used for<br />
verwendet other purposes. werden darf. Improper Eine unsachgemäße<br />
earthing may cause<br />
3 Erdung The<br />
electric<br />
earth kann resistance<br />
shock. zu einem should Stromschlag accord führen. to the<br />
national wiring regulation.<br />
3 Der 3 The Erdungswiderstand earth resistance muss should den accord to the<br />
4 landesspezifischen The<br />
national<br />
user’s power<br />
wiring<br />
must<br />
regulation. Verkabelungsvorschriften<br />
have reliable earthing<br />
entsprechen.<br />
terminal. Do not connect the earthing wire with<br />
4 the The following: user’s power must have reliable earthing<br />
4 Der terminal. Stromanschluss Do not connect des Benutzers the earthing muss wire über with<br />
• eine Water<br />
the sichere following:<br />
pipe Erdklemme verfügen. Schließen<br />
• Sie Gas das pipe Erdungskabel nicht an die folgenden<br />
• Water pipe<br />
• Bauteile Contamination an: pipe<br />
• Gas pipe<br />
• Wasserrohr<br />
• Contamination pipe<br />
• Gasrohr<br />
• Kontaminationsrohr<br />
Installation of Indoor<br />
Verkabelung<br />
Electric Wires<br />
Installation des of Indoor<br />
Innengeräts Electric Wires<br />
1 Open the front panel and remove the wiring<br />
cover by loosening the screw.<br />
1 Öffnen 1 Open Sie the die front Frontplatte, panel and lösen remove Sie the wiring<br />
die Schraube cover by loosening und entfernen the screw. Sie die<br />
Kabelabdeckung.<br />
Wiring cover<br />
Wiring cover<br />
Kabelabdeckung<br />
2 Route the power connection cable and signal<br />
control wire (for heap pump model only) from<br />
2 Verlegen<br />
2 back Route of the Sie<br />
the indoor das<br />
power<br />
Netzkabel unit connection and pull und it cable<br />
das toward and the signal<br />
Signalsteuerkabel front control through wire the (for wiring (nur<br />
heap<br />
für hole pump<br />
Modelle for model connection. mit<br />
only) from<br />
Wärmepumpe)<br />
back of the indoor<br />
von der<br />
unit<br />
Rückseite<br />
and pull<br />
des<br />
it toward the<br />
3 Connect<br />
Innengeräts<br />
front through<br />
and screw<br />
und ziehen<br />
the<br />
the<br />
wiring<br />
wires<br />
Sie<br />
hole<br />
onto<br />
es durch<br />
for<br />
the<br />
connection.<br />
terminal block as identified by their colors. die<br />
Kabelöffnung 3 Connect and für den screw Anschluss the wires nach onto vorne. the<br />
3 Schließen<br />
terminal<br />
Sie<br />
block<br />
die Drähte<br />
as identified<br />
nach<br />
by<br />
ihren<br />
their<br />
Farben<br />
colors.<br />
am Klemmenblock an und ziehen Sie sie mit<br />
Schrauben fest.<br />
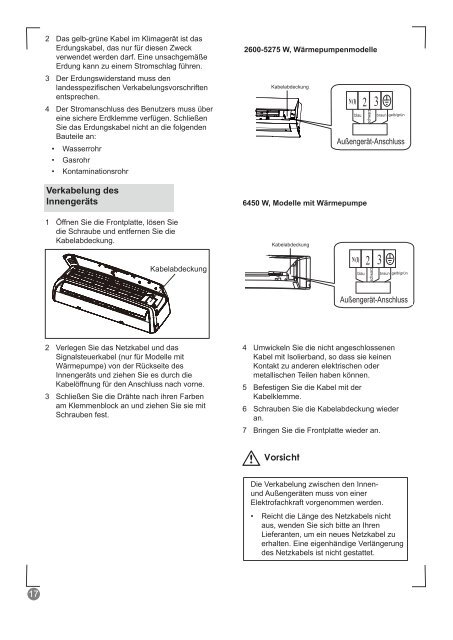
2640~5275W, Heat Pump models<br />
2600-5275<br />
2640~5275W,<br />
W, Wärmepumpenmodelle<br />
Heat Pump models<br />
Wiring Cover<br />
Kabelabdeckung<br />
Wiring Cover<br />
2<br />
blue N(1) black<br />
2 3<br />
N(1)<br />
3<br />
outdoor unit connection<br />
outdoor Außengerät-Anschluss<br />
unit connection<br />
6450W, Heat Pump models<br />
6450 W, 6450W, Modelle Heat mit Pump Wärmepumpe models<br />
Kabelabdeckung<br />
Wiring Cover<br />
Wiring Cover<br />
2<br />
blue N(1) blau black braun<br />
2 3<br />
N(1)<br />
3<br />
blue black brown yellow-<br />
green<br />
brown yellow-<br />
green<br />
brown gelb/grün yellow-<br />
green<br />
blue blau black braun brown gelb/grün yellow-<br />
green<br />
outdoor Außengerät-Anschluss<br />
unit connection<br />
outdoor unit connection<br />
4 Umwickeln Sie die nicht angeschlossenen<br />
Kabel mit Isolierband, so dass sie keinen<br />
4<br />
Kontakt<br />
Wrap wires<br />
zu anderen<br />
that are<br />
elektrischen<br />
not connected<br />
oder<br />
with<br />
metallischen<br />
insulating tape<br />
Teilen<br />
so that<br />
haben<br />
they<br />
können.<br />
do not touch any<br />
4 electrical Wrap wires or metal that parts. are not connected with<br />
5 Befestigen insulating Sie tape die Kabel so that mit they der do not touch any<br />
5<br />
Kabelklemme.<br />
Secure<br />
electrical<br />
the wires<br />
or metal<br />
firmly<br />
parts.<br />
with the cable<br />
clamp.<br />
6 Schrauben 5 Secure the Sie wires die Kabelabdeckung firmly with the cable wieder<br />
6<br />
an.<br />
Put<br />
clamp.<br />
the wiring cover back and screw it.<br />
7<br />
7<br />
Bringen 6<br />
Reinstall<br />
Put the Sie<br />
the<br />
wiring die<br />
front<br />
Frontplatte cover<br />
panel.<br />
back wieder and screw an. it.<br />
7 Reinstall the front panel.<br />
Vorsicht caution<br />
caution<br />
Die All wires Verkabelung between zwischen indoor and den outdoor Innen- units<br />
und must Außengeräten be connected muss by a von qualified einer electric<br />
Elektrofachkraft contractor. All wires between vorgenommen indoor and werden. outdoor units<br />
must be connected by a qualified electric<br />
•• Reicht<br />
contractor. If the length die Länge of the des power Netzkabels cord is not nicht<br />
aus, enough, wenden please Sie contact sich bitte your an supplier Ihren for<br />
Lieferanten, • new If power the length cord. um of ein Lengthen neues power Netzkabel the cord power is not zu cord<br />
erhalten. by enough, yourself Eine is please not eigenhändige allowed. contact your Verlängerung supplier for<br />
des new Netzkabels power cord. ist nicht Lengthen gestattet. the power cord<br />
by yourself is not allowed.<br />
schwarz<br />
schwarz<br />
17<br />
17 17