Bedienungsanleitung 82011 Code-Combi KL Seite 1 - 5 ... - Kaba
Bedienungsanleitung 82011 Code-Combi KL Seite 1 - 5 ... - Kaba
Bedienungsanleitung 82011 Code-Combi KL Seite 1 - 5 ... - Kaba

Sie wollen auch ein ePaper? Erhöhen Sie die Reichweite Ihrer Titel.
YUMPU macht aus Druck-PDFs automatisch weboptimierte ePaper, die Google liebt.
D<br />
GB<br />
<strong>Bedienungsanleitung</strong><br />
<strong>82011</strong> <strong>Code</strong>-<strong>Combi</strong> <strong>KL</strong> <strong>Seite</strong> 1 - 5<br />
Operational Instructions<br />
<strong>82011</strong> <strong>Code</strong>-<strong>Combi</strong> <strong>KL</strong> Page 6 - 10
D<br />
Inhaltsverzeichnis<br />
1 Bedienhinweise........................................................................................................... 1<br />
2 Signale und ihre Bedeutung....................................................................................... 2<br />
3 Schlossfunktionen...................................................................................................... 2<br />
3.1 Öffnen mit Mastercode<br />
3.2 Öffnen mit Benutzercode<br />
3.3 Öffnen nach 3 oder mehr fehlerhaften <strong>Code</strong>eingaben Sperrzeit<br />
3.4 Ändern des Mastercodes<br />
3.5 Schließen<br />
4 Stromversorgung........................................................................................................ 4<br />
4.1 Batteriewechsel<br />
4.2 Notversorgung<br />
1 Bedienhinweise<br />
Wichtige Hinweise<br />
• Vor Inbetriebnahme des Schlosses bitte die <strong>Bedienungsanleitung</strong> sorgfältig lesen.<br />
• Die <strong>Bedienungsanleitung</strong> bezieht sich ausschließlich auf das Schloss und nicht auf eventuelle<br />
Bedienelemente des Wertbehältnisses.<br />
• Programmiervorgänge nur bei geöffnetem Schloss und geöffnetem Wertbehältnis durchführen.<br />
• Jede korrekte und vom Schloss anerkannte Tastenbetätigung wird mit einem akustischen<br />
Signal bestätigt. Diese Bestätigungssignale werden in den folgenden Beschreibungen nicht<br />
berücksichtigt.<br />
• Für jede einzelne Tasteneingabe haben Sie max. 20 Sekunden Zeit. Wenn innerhalb dieser<br />
20 Sekunden keine Taste bedient wurde, schaltet sich die Elektronik automatisch ab. Nicht<br />
beendete Bedienungen müssen danach neu gestartet werden.<br />
• <strong>Code</strong>eingaben können durch Drücken der Taste P abgebrochen werden.<br />
• Das Schloss ist bei Auslieferung auf den Mastercode 1 2 3 4 5 6 7 8 eingestellt. Ändern Sie<br />
aus Sicherheitsgründen diesen <strong>Code</strong> sofort auf Ihren Mastercode. Verwenden Sie für Ihren<br />
Mastercode keine persönlichen oder ähnlich bekannten Daten.<br />
Allgemeine Hinweise<br />
• Das Schloss ist zur Nutzung im Temperaturbereich von +10 °C bis +50 °C und einer Luftfeuchtigkeit<br />
von 30 % bis 80 % nicht kondensierend ausgelegt.<br />
• Die Reinigung darf nur mit einem feuchten Tuch erfolgen (keine aggressiven Reinigungsmittel<br />
verwenden).<br />
• Das Schloss darf nur von Fachpersonal eingebaut werden.<br />
• Das Schloss darf nicht gefettet werden.<br />
• Öffnen Sie niemals das Schlossgehäuse. Falls Demontagen am Beschlag erforderlich sind,<br />
diese nur entsprechend den Vorgaben in dieser <strong>Bedienungsanleitung</strong> ausführen. Ansonsten<br />
gefährden Sie die Funktionen des Schlosses und verlieren den Gewährleistungsanspruch.<br />
<strong>Seite</strong> <strong>82011</strong> <strong>Code</strong>-<strong>Combi</strong> <strong>KL</strong> <strong>Kaba</strong> Mauer GmbH
2 Signale und ihre Bedeutung<br />
D<br />
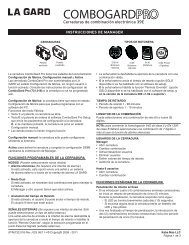
grüne LED<br />
rote LED<br />
Balkengriff<br />
Abb. 1: Bedieneinheit Kunststoff<br />
Symbol Signal Bedeutung<br />
1 x Grüne LED blinkt 1 mal Gültiger <strong>Code</strong> wurde eingegeben<br />
Grüne LED leuchtet konstant<br />
3 x Rote LED blinkt 3 mal<br />
10 x<br />
1, 2, 4, 8 oder<br />
16 Minuten<br />
Rote LED blinkt 10 mal<br />
nach Drücken der ON-Taste<br />
Rote LED blinkt im Sekundentakt<br />
1, 2, 4, 8 oder 16 Minuten nach 3<br />
maliger falscher <strong>Code</strong>eingabe<br />
2 x Akustisches Signal ertönt 2 mal<br />
Schloss ist programmierbereit<br />
Ungültiger <strong>Code</strong> wurde eingegeben<br />
oder<br />
Eingabe wurde mit P abgebrochen<br />
Unterspannung der Batterie<br />
Schloss befindet sich in der Sperrzeit<br />
Z.B. neuer 8-stelliger <strong>Code</strong> wurde<br />
eingegeben<br />
3 Schlossfunktionen<br />
Programmiervorgänge nur bei geöffnetem Schloss und geöffnetem Wertbehältnis durchführen.<br />
Das Schloss kann mit einem 4-stelligen Benutzercode oder einem übergeordneten<br />
8-stelligen Mastercode geöffnet werden. Das Schloss ist bei Auslieferung auf den Mastercode<br />
1 2 3 4 5 6 7 8 eingestellt. Ändern Sie aus Sicherheitsgründen diesen <strong>Code</strong> sofort auf<br />
Ihren Mastercode.<br />
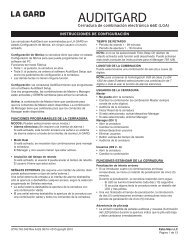
Abb. 2: Optionen Münz- und Aktivatorschlüsselaufsatz<br />
Bei der Option Münzaufsatz bzw. Aktivatorschlüsselaufsatz ist zunächst die Münze bzw. der<br />
Aktivatorschlüssel einzuführen. Erst dann kann das Schloss gemäß 3.1 – 3.5 bedient werden.<br />
<strong>Kaba</strong> Mauer GmbH <strong>82011</strong> <strong>Code</strong>-<strong>Combi</strong> <strong>KL</strong> <strong>Seite</strong>
D<br />
3.1 Öffnen mit Mastercode<br />
1) ON drücken und gedrückt halten<br />
2) Gültigen 8-stelligen Mastercode eingeben 1 x<br />
3)<br />
Balkengriff innerhalb von 4 Sekunden im Uhrzeigersinn bis zum Anschlag<br />
drehen<br />
3.2 Öffnen mit Benutzercode<br />
1) ON drücken<br />
2) Gültigen 4-stelligen Benutzercode eingeben 1 x<br />
3)<br />
Balkengriff innerhalb von 4 Sekunden im Uhrzeigersinn bis zum Anschlag<br />
drehen<br />
3.3 Öffnen nach 3 oder mehr fehlerhaften <strong>Code</strong>eingaben Sperrzeit<br />
Nach 3 fehlerhaften Eingaben schaltet das Schloss in eine 1-minütige Sperrzeit. Bei jeder<br />
weiteren fehlerhaften <strong>Code</strong>eingabe erfolgt eine Verlängerung der Sperrzeit auf 2, 4, 8 und<br />
max. 16 Minuten. Während der Sperrzeit blinkt die rote LED im Sekundentakt und es ist keine<br />
weitere <strong>Code</strong>eingabe möglich. Nach Ablauf der Sperrzeit zu einem beliebigen Zeitpunkt ON<br />
drücken.<br />
1) ON drücken, nachdem rote LED aufgehört hat, zu blinken<br />
2) Gültigen 4-stelligen Benutzercode oder 8-stelligen Mastercode eingeben 1 x<br />
3.4 Ändern des Mastercodes<br />
1) Schloss mit gültigem Mastercode öffnen (siehe 3.1)<br />
2) ON drücken und gedrückt halten<br />
3) P drücken<br />
4) Gültigen 8-stelligen Mastercode eingeben<br />
5) ON loslassen<br />
6) Neuen 8-stelligen Mastercode eingeben / 2 x<br />
7) Neuen 8-stelligen Mastercode nochmals eingeben 1 x<br />
Wurde der neue Zweitcode in 7) nicht korrekt bestätigt, erfolgt die Signalmeldung 3 x .<br />
Den Vorgang wiederholen.<br />
<strong>Seite</strong> <strong>82011</strong> <strong>Code</strong>-<strong>Combi</strong> <strong>KL</strong> <strong>Kaba</strong> Mauer GmbH
3.5 Schließen<br />
D<br />
1) ON drücken<br />
2) Gewünschten 4-stelligen Benutzercode eingeben 1 x<br />
3)<br />
Balkengriff innerhalb von 4 Sekunden gegen den Uhrzeigersinnbis zum<br />
Anschlag drehen<br />
4) Gewünschter 4-stelliger Benutzercode ist programmiert<br />
Es ist darauf zu achten, dass gleichzeitig auch das Wertbehältnis geschlossen wird.<br />
4 Stromversorgung<br />
Das Schloss wird durch eine 9 Volt Blockbatterie mit Strom versorgt. Wir empfehlen, eine<br />
Alkali/Mangan Batterie mit reduziertem Schwermetallgehalt einzusetzen.<br />
Bitte nach einem Batteriewechsel die Altbatterie über die Recycling-/Sammelboxen umweltgerecht<br />
entsorgen. Werfen Sie die leere Batterie niemals ins Feuer, ins Wasser oder in den<br />
Hausmüll.<br />
Unterspannungsanzeige<br />
1) ON drücken 10 x<br />
2) Unverzüglich Batterie tauschen<br />
Unterspannung wird angezeigt, indem nach dem Drücken der ON-Taste die rote LED 10 mal<br />
blinkt. Für ca. 25 Schließ-Öffnungszyklen ist nun noch ausreichend Energie vorhanden, es<br />
dürfen aber keine Programmierungsvorgänge mehr vorgenommen werden.<br />
Bei Unterspannungsanzeige unverzüglich einen Batteriewechsel vornehmen. Wird der Batteriewechsel<br />
über einen extrem langen Zeitraum missachtet, kann aufgrund der Selbstentladung<br />
der Batterie die Anzahl der möglichen Öffnungszyklen reduziert werden.<br />
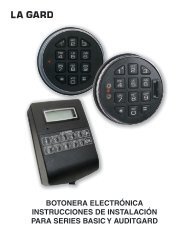
4.1 Batteriewechsel<br />
Raste an der Oberkante des Batteriedeckels mit einem Schraubenzieher herunterdrücken und<br />
den Batteriedeckel aushebeln. Batterie vorsichtig herausziehen bis der Batterieclip sichtbar<br />
ist. Batterie aus dem Clip lösen und austauschen. Den Deckel wieder einrasten. Bitte darauf<br />
achten, dass das Kabel nicht beschädigt wird.<br />
Abb. 3: Batteriefach<br />
<strong>Kaba</strong> Mauer GmbH <strong>82011</strong> <strong>Code</strong>-<strong>Combi</strong> <strong>KL</strong> <strong>Seite</strong>
D<br />
4.2 Notversorgung<br />
Bei entladener Batterie und verschlossener Tür besteht die Möglichkeit einer Notversorgung.<br />
Dazu muss eine 9 Volt Blockbatterie an den Versorgungsclip in der Bedieneinheit angeschlossen<br />
werden.<br />
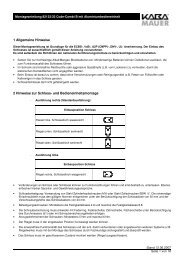
Blende<br />
Hilfswerkzeug<br />
Abb. 4: Anheben Blende<br />
Hier anheben<br />
Abb. 5: Abziehen Blende<br />
Hilfswerkzeug in das rechte bzw. obere (bei Einbaulage senkrecht) Loch an der Längsseite<br />
der Eingabeeinheit drücken, bis sich die Verrastung löst. Hilfswerkzeug gedrückt halten, während<br />
die Blende vorsichtig angehoben wird (siehe Abb. 4).<br />
Vorgang am linken bzw. unteren (bei Einbaulage senkrecht) Loch wiederholen. Blende nun<br />
vorsichtig abziehen (siehe Abb. 5).<br />
Abb. 6: Notversorgungsbatterieclip<br />
Abb. 7: Aufstecken Blende<br />
Den Notversorgungsbatterieclip ca. 1 cm herausziehen (siehe Abb. 6) und eine 9 Volt<br />
Blockbatterie anklemmen. Schlossöffnung mit entsprechender <strong>Code</strong>eingabe vornehmen, die<br />
Blockbatterie vom Notversorgungsbatterieclip lösen und die entladene Batterie im Schlossgehäuse<br />
auswechseln.<br />
Blende wieder aufstecken und andrücken bis alle vier Rastpunkte eingerastet sind (siehe Abb.<br />
7). Schlossfunktionen bei geöffnetem Behältnis überprüfen.<br />
<strong>Seite</strong> <strong>82011</strong> <strong>Code</strong>-<strong>Combi</strong> <strong>KL</strong> <strong>Kaba</strong> Mauer GmbH
Contents<br />
GB<br />
1 Working instructions.................................................................................................. 6<br />
2 Signals and what they mean...................................................................................... 7<br />
3 Lock functions............................................................................................................. 7<br />
3.1 Opening with master code<br />
3.2 Opening with user code<br />
3.3 Opening after 3 or more incorrect code entries penalty time<br />
3.4 Alteration of master code<br />
3.5 Locking<br />
4 Power supply............................................................................................................... 9<br />
4.1 Changing the battery<br />
4.2 Emergency power supply<br />
1 Working Instructions<br />
Important points<br />
• Before putting the lock into operation, please read the instructions carefully.<br />
• All instructions exclusively refer to the lock and not to possible control elements of the safe.<br />
• Carry out the programming sequences with the lock and the safe opened.<br />
• Every correct entry keyed in and recognised by the lock is confirmed by an acoustic signal.<br />
These confirmation signals are not taken into consideration in the following notes.<br />
• You have 20 seconds for each entry keyed in. If you have not pressed a key within this 20<br />
second period, the electronic system will close down automatically. Operations not fully<br />
completed have to be re-started.<br />
• <strong>Code</strong> entries can be interrupted by pressing the P button.<br />
• The lock is set at the master code 1 2 3 4 5 6 7 8 when supplied. Alter this code immediately<br />
to your own master code for security reasons. Do not use any personal or other similarly<br />
well known data in the selection of this master code.<br />
General instructions<br />
• The lock is designed for usage in the temperature range from +10 °C to +50 °C and humidity<br />
between 30 % to 80 % non-condensing.<br />
• The lock should be cleaned using a damp cloth only (do not use any aggressive cleaning<br />
agents).<br />
• The lock may only be fitted by qualified personnel.<br />
• The lock must not be lubricated.<br />
• Never open the lock casing. Should dismantling be required on the fittings, please carry<br />
this out in strict accordance with the operational instructions provided. Failure to comply<br />
with this will endanger the correct functioning of the lock and result in your losing warranty<br />
entitlements.<br />
<strong>Kaba</strong> Mauer GmbH <strong>82011</strong> <strong>Code</strong>-<strong>Combi</strong> <strong>KL</strong> Page
GB<br />
2 Signals and what they mean<br />
green LED<br />
red LED<br />
bar handle<br />
Diagram 1: Control unit plastic<br />
Symbol Signal Meaning<br />
1 x Green LED flashes once Valid code entered<br />
Green LED remains lit up<br />
3 x Red LED flashes 3 times<br />
10 x<br />
1, 2, 4, 8 oder<br />
16 Minuten<br />
Red LED flashes 10 times<br />
after ON button pressed<br />
Red LED flashes every second<br />
for 1, 2, 4, 8 or 16 minutes after 3<br />
incorrect code entries<br />
2 x Acoustic signal sounds twice<br />
Lock is ready for programming<br />
Invalid code entered or<br />
entry suspended by pressing P<br />
button<br />
Insufficient voltage of the battery<br />
Lock is in blocked status<br />
E.g. new 8-digit master code<br />
entered<br />
3 Lock functions<br />
Programming to be effected only with the lock and safe opened.<br />
The lock can be opened with a 4-digit user code or an overriding 8-digit master code.<br />
The lock is set at the master code 1 2 3 4 5 6 7 8 when it is supplied. Change this code<br />
immediately to your own master code for security reasons.<br />
Diagram 2: Options "Coin" and "Activator key"<br />
The coin has to be inserted first in the case of the option “coin” and the activator key in the<br />
case of the option “activator key”. The lock can then be used in accordance with 3.1 to 3.5.<br />
Page <strong>82011</strong> <strong>Code</strong>-<strong>Combi</strong> <strong>KL</strong> <strong>Kaba</strong> Mauer GmbH
3.1 Opening with master code<br />
GB<br />
1) Press ON and keep pressed<br />
2) Enter valid 8-digit master code 1 x<br />
3) Within 4 seconds turn bar handle clockwise until stop position reached<br />
3.2 Opening with user code<br />
1) Press ON<br />
2) Enter valid 4-digit user code 1 x<br />
3) Within 4 seconds turn bar handle clockwise until stop position reached<br />
3.3 Opening after 3 or more incorrect code entries penalty time<br />
After 3 incorrect entries the lock goes into a one minute blocked status. The period in which<br />
the lock is blocked is extended to 2, 4, 8 and a maximum of 16 minutes every time an incorrect<br />
code is entered. During this period the red LED flashes every second and it is not possible to<br />
enter any further codes. When the blocked period is over, ON may be pressed again at any<br />
time.<br />
1) Press ON after the red LED stopped flashing<br />
2) Enter 4-digit user code or 8-digit master code 1 x<br />
3.4 Alteration of the master code<br />
1) Open lock with valid 8-digit master code (see 3.1)<br />
2) Press ON and keep pressed<br />
3) Press P<br />
4) Enter valid 8-digit master code<br />
5) Don’t keep ON pressed<br />
6) Enter new 8-digit master code / 2 x<br />
7) Enter new 8-digit master code again 1 x<br />
appears. Re-<br />
If the new master code as per 7) was incorrectly confirmed, the signal 3 x<br />
peat the sequence.<br />
<strong>Kaba</strong> Mauer GmbH <strong>82011</strong> <strong>Code</strong>-<strong>Combi</strong> <strong>KL</strong> Page
GB<br />
3.5 Locking<br />
1) Press ON<br />
2) Enter 4-digit user code of choice 1 x<br />
3)<br />
Within 4 seconds turn bar handle counter clockwise until stop position<br />
reached<br />
4) 4-digit user code selected is programmed in<br />
Please pay attention that the safe will be closed at the same time.<br />
4 Power supply<br />
The lock powered by means of a 9-volt block battery. We recommend using an alkaline/manganese<br />
battery with reduced heavy metal content.<br />
When changing the battery, please dispose of old batteries in an environmentally friendly manner<br />
using recycling/collecting boxes. Batteries should never be thrown on the fire, into water or<br />
thrown away with normal household waste.<br />
Insufficient power supply<br />
1) Press ON 10 x<br />
2) Replace battery without delay<br />
Low voltage is shown to be in evidence if the red LED flashes 10 times after the ON button is<br />
pressed. There is still sufficient energy for closing/opening cycles approximately 25 times, but<br />
no further programming sequences should be carried out.<br />
When low voltage is indicated, please change the battery immediately. If the low battery signal<br />
is ignored for a long time the number of possible opening cycles may be reduced due to the<br />
battery’s automatic discharge.<br />
4.1 Changing the battery<br />
Press the catch on the top edge of the battery cover with a screwdriver and lever off the battery<br />
lid. Pull the battery out carefully until the battery clip is visible. Release the battery from<br />
the clip and replace. Re-engage the lid. Please ensure that the cable is not damaged.<br />
Diagram 3: Battery case<br />
Page <strong>82011</strong> <strong>Code</strong>-<strong>Combi</strong> <strong>KL</strong> <strong>Kaba</strong> Mauer GmbH
4.2 Emergency power supply<br />
GB<br />
If the battery is discharged with the door locked, the lock can be powered up using the emergency<br />
power supply connection. To do this, a 9-volt block battery must be connected to the<br />
supply clip beneath the cover of the control unit.<br />
Cover<br />
Tool<br />
Diagram 4: Raise cover<br />
Raise here<br />
Diagram 5: Lift off cover<br />
Press the tool into the right hand or upper (in case of vertical installation) hole on the bottom<br />
edge of the control unit until the catch is released. Keep the tool pressed down whilst the<br />
cover raising carefully (see diagram 4).<br />
Repeat this process on the left hand or down (in case of vertical installation) hole. Lift off the<br />
cover carefully (see diagram 5).<br />
Diagram 6: Battery clip for emergency supply<br />
Diagram 7: Replace cover<br />
Pull out the battery clip for the emergency supply by about 1 cm (see diagram 6) and clip in<br />
a 9-volt block battery. Open the lock with a valid code, remove the block battery from the clip<br />
and replace the discharged battery in the lock case.<br />
Replace the cover and press down until all four catches are engaged (see diagram 7). Check<br />
that the lock functions correctly whilst the safe is still open.<br />
<strong>Kaba</strong> Mauer GmbH <strong>82011</strong> <strong>Code</strong>-<strong>Combi</strong> <strong>KL</strong> Page 10
Überreicht durch:<br />
Distributed by:<br />
02/2009<br />
Technische Änderungen vorbehalten.<br />
Technical modifications excepted.