5. einbau der hochtöner tweeters installation ... - Toyota-tech.eu
5. einbau der hochtöner tweeters installation ... - Toyota-tech.eu
5. einbau der hochtöner tweeters installation ... - Toyota-tech.eu

Sie wollen auch ein ePaper? Erhöhen Sie die Reichweite Ihrer Titel.
YUMPU macht aus Druck-PDFs automatisch weboptimierte ePaper, die Google liebt.
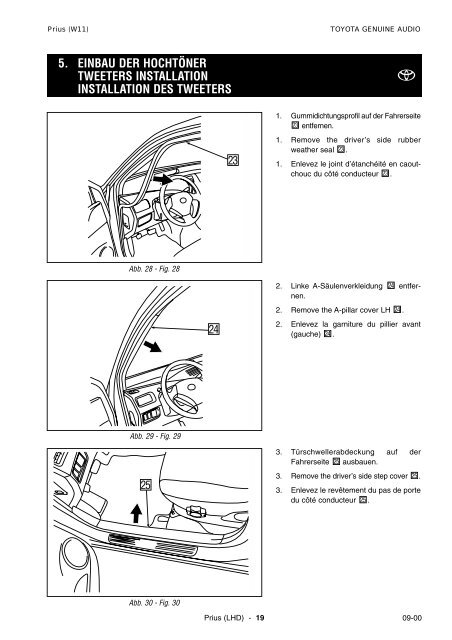
Prius (W11)<br />
TOYOTA GENUINE AUDIO<br />
<strong>5.</strong> EINBAU DER HOCHTÖNER<br />
TWEETERS INSTALLATION<br />
INSTALLATION DES TWEETERS<br />
23<br />
1. Gummidichtungsprofil auf <strong>der</strong> Fahrerseite<br />
23 entfernen.<br />
1. Remove the driver’s side rubber<br />
weather seal 23 .<br />
1. Enlevez le joint d’étanchéité en caoutchouc<br />
du côté conduct<strong>eu</strong>r 23 .<br />
Abb. 28 - Fig. 28<br />
24<br />
2. Linke A-Säulenverkleidung 24 entfernen.<br />
2. Remove the A-pillar cover LH 24 .<br />
2. Enlevez la garniture du pillier avant<br />
(gauche) 24 .<br />
Abb. 29 - Fig. 29<br />
25<br />
3. Türschwellerabdeckung auf <strong>der</strong><br />
Fahrerseite 25 ausbauen.<br />
3. Remove the driver’s side step cover 25 .<br />
3. Enlevez le revêtement du pas de porte<br />
du côté conduct<strong>eu</strong>r 25 .<br />
Abb. 30 - Fig. 30<br />
Prius (LHD) - 19 09-00
Prius (W11)<br />
TOYOTA GENUINE AUDIO<br />
100<br />
104<br />
PUSH<br />
ON OFF<br />
26<br />
4. Das Windlaufseitenverkleidung 26 ausbauen.<br />
100 : Clip (1x)<br />
104: Mutter (1x)<br />
4. Remove the driver’s side kick panel 26 .<br />
100 : Clip (1x)<br />
104: Nut (1x)<br />
4. Enlevez le panneau du carter de roue<br />
du côté conduct<strong>eu</strong>r 26 .<br />
100 : Clip (1x)<br />
104: Ecrou (1x)<br />
Abb. 31 - Fig. 31<br />
LH<br />
Abb. 32 - Fig. 32<br />
RH<br />
<strong>5.</strong> Die Schablone aus <strong>der</strong> Anleitung<br />
kopieren.<br />
Schablone ausschneiden und auf die<br />
Verkleidung <strong>der</strong> A-Säule legen.<br />
2 Löcher mit 7 mm Durchmesser bohren.<br />
Ein Loch mit 32 mm Durchmesser<br />
bohren.<br />
<strong>5.</strong> Copy the template from the manual.<br />
Cut out the template and put it on the<br />
A-pillar cover.<br />
Drill 2 holes of 7 mm.<br />
Drill a hole of 32 mm.<br />
<strong>5.</strong> Copiez le gabarit du manuel.<br />
Découpez le gabarit et placez-le sur la<br />
garniture du pilier A.<br />
Percez d<strong>eu</strong>x trous de 7 mm.<br />
Percez un trou de 32 mm.<br />
6. Die Bespannung im Bereich des<br />
Hochtöners entfernen.<br />
6. Remove the webbing in the area of the<br />
tweeter.<br />
6. Enlevez les sangles dans les environs<br />
du tweeter.<br />
09-00<br />
Abb. 33 - Fig. 33<br />
Prius (LHD) - 20
Prius (W11)<br />
TOYOTA GENUINE AUDIO<br />
24<br />
7. Den Hochtöner 11 in die Verkleidung<br />
<strong>der</strong> A-Säule 24 <strong>einbau</strong>en. Die<br />
Verkleidung <strong>der</strong> A-Säule 24 wie<strong>der</strong> im<br />
Fahrz<strong>eu</strong>g <strong>einbau</strong>en.<br />
7. Install the tweeter 11 on the A-pillar<br />
cover 24 .<br />
Mount the A-pillar cover 24 on the<br />
vehicle.<br />
7. Installez le tweeter 11 sur la garniture<br />
du pilier A 24 . Placez la garniture du<br />
pilier A 24 sur le véhicule.<br />
11<br />
Abb. 34 - Fig. 34<br />
12<br />
8. Den Hochtöner-Kabelstrang 12 entlang<br />
<strong>der</strong> Vor<strong>der</strong>karte 23 verlegen.<br />
8. Route the tweeter wire harness<br />
behind the rubber weather seal 23 .<br />
8. Acheminez le faisceau de câbles du<br />
tweeter 12 le long du bord avant de la<br />
garniture 23 .<br />
12<br />
Abb. 35 - Fig. 35<br />
DIE ANLEITUNG 1 - 8 (28 - 35) AUF DER RECHTEN SEITE DES FAHRZEUGS WIEDERHOLEN<br />
REPEAT THE INSTRUCTIONS 1 TO 8 FOR THE RH-SIDE PARTS (FIG. 28 - 35)<br />
REPETEZ LES INSTRUCTIONS 1 A 8 POUR LE COTE DROITE DU VEHICULE (FIG. 28 - 35)<br />
Prius (LHD) - 21 09-00
Prius (W11)<br />
TOYOTA GENUINE AUDIO<br />
12P<br />
12P<br />
12P<br />
LINKE SEITE<br />
LEFT HAND SIDE<br />
COTE GAUCHE<br />
9. Den 12-Stift-Stecker (dunkelgrau)<br />
lokalisieren und lösen.<br />
9. Locate and disconnect the 12P connector<br />
(dark grey).<br />
9. Repérez et débranchez le connect<strong>eu</strong>r à<br />
12 pôles (gris foncé).<br />
Abb. 36 - Fig. 36<br />
violett<br />
violet<br />
violet<br />
rot/schwarz<br />
red/black<br />
rouge/noir<br />
Ansicht von <strong>der</strong> Kabelseite<br />
Wire side view<br />
Vue côté fils<br />
Abb. 37 - Fig. 37<br />
Verbindungsstecker<br />
Splicing Connector<br />
Connect<strong>eu</strong>r de<br />
raccordement<br />
violett<br />
violet<br />
violet<br />
10. Den Stecker so drehen, daß die Kabel<br />
auf Sie weisen und die Erhöhung sich<br />
oben befindet.<br />
Das rot/schwarze Kabel des<br />
Hochtöners an das violette Kabel in<br />
<strong>der</strong> vierte Position von links in <strong>der</strong> mittelsten<br />
Reihe anschließen (Position 4).<br />
10. Turn the connector so that the wires<br />
face you and the tab is on top.<br />
Connect the red/black wire of the<br />
tweeter to the violet wire of the fourth<br />
position from the left side of the middle<br />
row (position 4).<br />
10. Tournez le connect<strong>eu</strong>r de façon à ce<br />
que les fils soient dirigés vers vous et<br />
l’onglet vers le haut.<br />
Raccordez le fil rouge/noir du tweeter au<br />
fil violet de la quatrième alvéole de la<br />
rangée du mili<strong>eu</strong> en partant de la<br />
gauche (alvéole 4).<br />
09-00<br />
Prius (LHD) - 22
Prius (W11)<br />
TOYOTA GENUINE AUDIO<br />
pink<br />
pink<br />
rose<br />
pink<br />
pink<br />
rose<br />
Ansicht von <strong>der</strong> Kabelseite<br />
Wire side view<br />
Vue côté fils<br />
Verbindungsstecker<br />
Splicing Connector<br />
Connect<strong>eu</strong>r de<br />
raccordement<br />
rot<br />
red<br />
rouge<br />
11. Das rote Kabel des Hochtöners an das<br />
pinkfarbene Kabel des Kabelstrangs in<br />
<strong>der</strong> fünfte Position von links in <strong>der</strong> mittelsten<br />
Reihe anschließen (Position 3).<br />
11. Connect the red wire of the tweeter to<br />
the pink wire of the wire harness of the<br />
fifth position from the left side of the<br />
middle row (position 3).<br />
11. Raccordez le fil rouge du tweeter au fil<br />
rose du faisceau de câbles qui occupe<br />
la cinquième alvéole de la rangée du<br />
mili<strong>eu</strong> en partant de la gauche (alvéole<br />
3).<br />
Abb. 38 - Fig. 38<br />
RECHTE SEITE<br />
RIGHT HAND SIDE<br />
COTE DROIT<br />
12. Den 12-Stift-Stecker (weiß) lokalisieren<br />
und lösen.<br />
12. Locate and disconnect the 12P connector<br />
(white).<br />
12P<br />
12P<br />
12P<br />
12. Repérez et débranchez le connect<strong>eu</strong>r à<br />
12 pôles (blanc).<br />
Abb. 39 - Fig. 39<br />
Prius (LHD) - 23 09-00
Prius (W11)<br />
TOYOTA GENUINE AUDIO<br />
blau<br />
blue<br />
bl<strong>eu</strong><br />
rot/schwarz<br />
red/black<br />
rouge/noir<br />
Ansicht von <strong>der</strong> Kabelseite<br />
Wire side view<br />
Vue côté fils<br />
Abb. 40 - Fig. 40<br />
Verbindungsstecker<br />
Splicing Connector<br />
Connect<strong>eu</strong>r de<br />
raccordement<br />
blau<br />
blue<br />
bl<strong>eu</strong><br />
13. Den Stecker so drehen, daß die Kabel<br />
auf Sie weisen und die Erhöhung sich<br />
oben befindet.<br />
Das rot/schwarze Kabel des Hochtöners<br />
an das blaue Kabel in <strong>der</strong> vierte Position<br />
von links in <strong>der</strong> mittelsten Reihe anschließen<br />
(Position 4).<br />
13. Turn the connector so that the wires<br />
face you and the tab is on top.<br />
Connect the red/black wire of the tweeter<br />
to the blue wire of the fourth position<br />
from the left side of the middle row (position<br />
4).<br />
13. Tournez le connect<strong>eu</strong>r de façon à ce<br />
que les fils soient dirigés vers vous et<br />
l’onglet vers le haut.<br />
Raccordez le fil rouge/noir du tweeter au<br />
fil bl<strong>eu</strong> de la quatrième alvéole de la rangée<br />
du mili<strong>eu</strong> en partant de la gauche<br />
(alvéole 4).<br />
hellgrün<br />
light green<br />
vert clair<br />
hellgrün<br />
light green<br />
vert clair<br />
Ansicht von <strong>der</strong> Kabelseite<br />
Wire side view<br />
Vue côté fils<br />
Verbindungsstecker<br />
Splicing Connector<br />
Connect<strong>eu</strong>r de<br />
raccordement<br />
rot<br />
red<br />
rouge<br />
14. Das rote Kabel des Hochtöners an das<br />
hellgrün Kabel des Kabelstrangs in <strong>der</strong><br />
fünfte Position von links in <strong>der</strong> mittelsten<br />
Reihe anschließen (Position 3).<br />
14. Connect the red wire of the tweeter to<br />
the light green wire of the wire harness<br />
of the fifth position from the left side of<br />
the middle row (position 3).<br />
14. Raccordez le fil rouge du tweeter au fil<br />
vert clair du faisceau de câbles qui occupe<br />
la cinquième alvéole de la rangée du<br />
mili<strong>eu</strong> en partant de la gauche (alvéole<br />
3).<br />
Abb. 41 - Fig. 41<br />
09-00<br />
Prius (LHD) - 24