English Deutsch Ð Ñ ÑÑ ÐºÐ¸Ð¹ Polski Type OTN2 with IR-floor sensor
English Deutsch Ð Ñ ÑÑ ÐºÐ¸Ð¹ Polski Type OTN2 with IR-floor sensor
English Deutsch Ð Ñ ÑÑ ÐºÐ¸Ð¹ Polski Type OTN2 with IR-floor sensor

Sie wollen auch ein ePaper? Erhöhen Sie die Reichweite Ihrer Titel.
YUMPU macht aus Druck-PDFs automatisch weboptimierte ePaper, die Google liebt.
Pollution class: 2 - Pollution class 2, representative of air circulation<br />
in typical homes.<br />
Overvoltage category: III - Pulse voltage 4 kV to IEC 60664-1.<br />
INSTALLATION<br />
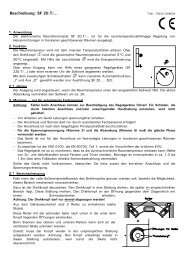
Installation of thermostat <strong>with</strong> built-in room <strong>sensor</strong> and <strong>IR</strong> <strong>sensor</strong><br />
The thermostat and external <strong>IR</strong> <strong>sensor</strong> should be mounted on a wall<br />
in such a way as to allow free air circulation around it.<br />
It must also be positioned so as to prevent it from being affected by<br />
direct heat sources (e.g. the sun), draughts from doors and windows,<br />
or outside temperature (i.e. do not mount on outer walls).<br />
<strong>English</strong><br />
<strong>IR</strong>-<strong>sensor</strong><br />
The external <strong>IR</strong> <strong>sensor</strong> can be installed in a standard wall box or<br />
mounted direct on the wall. The <strong>sensor</strong> should be installed <strong>with</strong> a free<br />
view of the <strong>floor</strong> at least 30 cm above <strong>floor</strong> level. The cable<br />
connecting the <strong>IR</strong> <strong>sensor</strong> to the thermostat must be either 2-core<br />
double insulated min. H05VV-F or HO3VV-F in separate tube. Cable<br />
length must not exceed 25 metres. The measuring area is height x<br />
0.5.<br />
• Carefully lift front cover using a screwdriver<br />
• Loosen cover by unscrewing screw<br />
• Remove cover and frame<br />
• Insert cable through hole and connect to terminals as shown in<br />
wiring diagram, + to + and - to -<br />
• Mount <strong>IR</strong> <strong>sensor</strong> on wall or in wall box<br />
• Fit frame, retighten cover screw and click cover into place<br />
5