sherpas Translift - Westfalia T25 / T3 / Vanagon Info Site
sherpas Translift - Westfalia T25 / T3 / Vanagon Info Site
sherpas Translift - Westfalia T25 / T3 / Vanagon Info Site

Erfolgreiche ePaper selbst erstellen
Machen Sie aus Ihren PDF Publikationen ein blätterbares Flipbook mit unserer einzigartigen Google optimierten e-Paper Software.
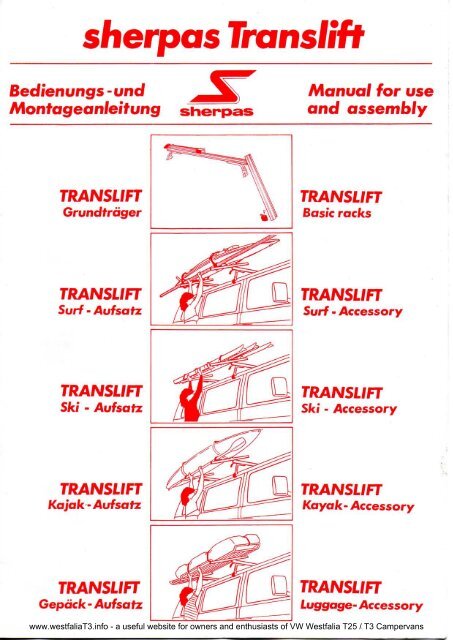
<strong>sherpas</strong> <strong>Translift</strong><br />
Bedienungs - und<br />
Montageanleitung<br />
<strong>sherpas</strong><br />
Manual for use<br />
and assembly<br />
TRANSLIFT<br />
Grundtrager<br />
TRANSLIFT<br />
Basic racks<br />
TRANSLIFT<br />
Surf - Aufsatz<br />
TRANSLIFT<br />
Surf - Accessory<br />
TRANSLIFT<br />
Ski - Aufsatz<br />
TRANSLIFT<br />
Ski - Accessory<br />
TRANSLIFT<br />
Kajak' Aufsatz<br />
TRANSLIFT<br />
Kayak- Accessory<br />
TRANSLIFT<br />
Gepack - Aufsatz<br />
TRANSLIFT<br />
Luggage- Accessory<br />
www.westfalia<strong>T3</strong>.info - a useful website for owners and enthusiasts of VW <strong>Westfalia</strong> <strong>T25</strong> / <strong>T3</strong> Campervans
[NHALT<br />
Seite 2<br />
TRANSLIFT<br />
Seite 3<br />
Grundtrager<br />
Direktmontage auf Kfz-Dachern<br />
Seite 4<br />
Montage auf Kfz mit Regenrinne<br />
Seite 5<br />
'•'outage auf Kfz mit Dachreling<br />
Seite 6/7<br />
Montage der Gleitschienenanschlage<br />
_--',5LI FT Bedienungshi nweise<br />
Seite 8<br />
TRANSLIFT Aufsa'tze<br />
Surfaufsatz<br />
Seoa'ckauf satz<br />
Seite 9<br />
TRANSLIFT Aufsa'tze<br />
Skiaufsatz<br />
Kajakaufsatz<br />
Seite 10<br />
CONTENTS<br />
Page 2<br />
TRANSLIFT Basic<br />
Page 3<br />
racks<br />
Mounting directly onto car-roofs<br />
Page 4<br />
Mounting onto cars with rain gutters<br />
Page 5<br />
Mounting onto cars with permanent rails<br />
Page 6/7<br />
Mounting of slide-stops<br />
TRANSLIFT Operation<br />
Page 8<br />
TRANSLIFT Accessories<br />
Surfboard accessory<br />
Luggage accessory<br />
Page 9<br />
TRANSLIFT Accessories<br />
Ski accessory<br />
Kayak accessory<br />
Page 10<br />
Stb'rungen -<br />
Wartungshinweise<br />
Defects<br />
- maintenance<br />
Seite 11<br />
TRANSLIFT Zubehb'r<br />
^ .__ ^tuckliste<br />
Page 11<br />
TRANSLIFT<br />
Page 12<br />
Accessories<br />
Seite 13<br />
Sicherheitsvorschriften und<br />
Hinweise<br />
TRANSLIFT<br />
Partiist<br />
Page 13<br />
Safety Directions and Precautions<br />
www.westfalia<strong>T3</strong>.info - a useful website for owners and enthusiasts of VW <strong>Westfalia</strong> <strong>T25</strong> / <strong>T3</strong> Campervans
TRANSUFT Grundtrager / Basic racks<br />
Das <strong>sherpas</strong>-Transl ift-"Leicht-Lade-System" ist die Problemlosung fur's Laden ohne Mlihe -<br />
flir's Transportieren von Sportgera't und Gepack. Transl ift Grundtrager gibt es fur Busse,<br />
Wohnmobile, Jeeps, Gelandefahrzeuge m i t Regenrinne oder Dachreling.<br />
The <strong>sherpas</strong>-<strong>Translift</strong> "easy loading system" is the answer to loading without a hassle -<br />
for transporting sporting accessoires and luggage. <strong>Translift</strong> racks are available for<br />
buses, RV's, jeeps, off-road vehicles with rain gutters or permanent rails.<br />
Grundtrager fur direkten Aufbau<br />
auf Fahrzeugdacher<br />
Direkte Montage des <strong>Translift</strong>-<br />
Grundtragers auf dem Fahrzeugdach<br />
mittels Befestigungsschienen.<br />
SHERPAS TRANSLIFT<br />
kompletter Trager mit be i d s s i t-c e£schwenkbaren<br />
Glei tschienen urn Fahrzeuge<br />
von der Seite zu beladen. Zum direkten<br />
Aufbau auf Fahrzeugda'cher einscK . Ee*estigungsschienen,<br />
Schrauben una Muttern.<br />
Tragerprofi1 150 cm lang.<br />
Standard rack for mounting<br />
directly onto roof<br />
Use the anchoring rails for<br />
mounting the <strong>Translift</strong> standard<br />
rack onto the vehicle.<br />
SHERPAS TRANSLIFT<br />
Complete carrier with sliding rails that<br />
swing down on both sides of vehicle to<br />
load vehicles from the side. Designed to<br />
mount directly to the roof including<br />
anchoring rails, screws and nuts. The<br />
carrier rail is 150 cm (59 in.) long.<br />
Grundtr'ager fur Kfz mit stabiler<br />
Regenrinne<br />
Befestigung des <strong>Translift</strong>-Grundtragers<br />
an den Regenrinnen des<br />
Kfz mittels StutzfuBen und Krallen.<br />
Standard rack for cars with<br />
sturdy rain gutters<br />
Mount the <strong>Translift</strong> rack cnto<br />
rain gutter using towers i"i<br />
jaws.<br />
SHERPAS TRANSLIFT<br />
kompletter Trager mit beidseitig abschwenkbaren<br />
Glei tschienen urn Fahrzeuge<br />
von der Seite zu beladen.<br />
Tra'gerprof i 1 150 cm Lange, lieferbar mit<br />
14, 22 oder 30 cm hohen StutzfuBen.<br />
SHERPAS TRANSLIFT<br />
Complete carrier with sliding rails that<br />
swing down on both sides of vehicle to<br />
load vehicles from the side.<br />
Carrier rails are 150 cm (59 in.) long<br />
with 14, 22 or 30 cm (5,5, 8,5 or 15,25<br />
in.) towers.<br />
Grundtrager fur Kfz mit Dachreling<br />
Befestigung des <strong>Translift</strong>-Grundtragers<br />
an der Dachreling des Kfz.<br />
SHERPAS TRANSLIFT<br />
kompletter Trager mit beidseitig gbscbserk<br />
baren Gleitschienen.<br />
Zur direkten Montage auf Dachreling.<br />
Tragerprofii 150 cm lang.<br />
Achtung!<br />
Spannschellen lieferbar fur Re' -; rzi-"C"r<br />
Durchmesser 15, 16, 18, 20, 22, IS mm.<br />
Standard rack for cars with<br />
permanent rails<br />
Mount the <strong>Translift</strong> rack onto<br />
the permanent rails of vehicle.<br />
SHERPAS TRANSLIFT<br />
complete carrier with sliding rs ;"s ~'iz<br />
swing down on both sides of vehicle.<br />
sion clamps available for rail di;~ete-s<br />
Of: 15, 16, 18, 20, 22, 25 rn.<br />
www.westfalia<strong>T3</strong>.info - a useful website for owners and enthusiasts of VW <strong>Westfalia</strong> <strong>T25</strong> / <strong>T3</strong> Campervans
TRANSUFT Grundtrager |j=3 TRANSLIFT Bask racks<br />
Direktmontage auf Kfz - Dachern ^ 1 Mounting directly onto car - roofs<br />
1. Direktmontage des Trans!ift-Grundtraqers<br />
mittels Befestiqungsschienen<br />
Gewicht 9,3 kg, Beladung max.30 kg pro Seite<br />
bei glei chmafiiger Lastvertei Lung.<br />
Grundsa'tzlich sind vom Dachherste!ler die<br />
idealen Befestigungspunkte zu erfragen.<br />
Ist das nicht noglich, kann wie folgt verfahren<br />
werden:<br />
1.1 Die Befestigungsschienen (3) werden<br />
in einem Abstand von ca. 80 cm (je<br />
nach Dachkontur) auf das Dach gema'B<br />
Abb. A aufmontiert.<br />
Je nach Dachtyp ist der Abstand (X)<br />
(Abb. B) des Versteifungsrahmens (25)<br />
im Dachinneren zu ermitteln, von<br />
auRen anzuzeichnen und das Lochbi Id<br />
durch die Befestigungsschiene (3) mit<br />
Durchmesser 6,1 mm abzubohren. Der Abstand<br />
der zwei gegeniiberliegenden Be-<br />
'estigungsschienen darf jedoch 134 cm<br />
nicht uberschreiten (Abb. A + B). Andernfalls<br />
sind die Befestigungsschienen<br />
nach den in Abb. C gezeigten Prinzip<br />
weiter innen zu montieren.<br />
Je nach Dachwolbung evt!. den Unterlegkeil<br />
(2) mitmontieren, damit die<br />
Befestigungsschiene mbglichst waagrecht<br />
liegt.<br />
Bei einem ausreichend stabilen<br />
Holzrahmen konnen auch Holzschrauben<br />
verwerdet werden.<br />
3ei Dachern ohne Rahmen kann durch<br />
das Dach gebohrt und die Befestigungsschienen<br />
verschraubt werden. (Abb. C).<br />
Bohrung mit Dichtmasse abdichten,<br />
Schrauben entsprechend ablangen und<br />
im Dachinneren mit Kappen o. a. abdecken!<br />
max. 134 cm<br />
max. 134 c-n<br />
1. Mounting the <strong>Translift</strong> Standard Rack<br />
directly to roof using anchoring<br />
rails<br />
m|x. weight 9.3 kg (20.5 Lbs), Load rating each<br />
Wcm side 30 kg (66 Lbs) if weight is distributed<br />
evenly.<br />
Find out the anchoring points suggested<br />
by your manufacturer first. If that is<br />
not possible you may proceed as follows:<br />
1.1 First mount the anchoring rails to<br />
the roof and (according to curve of<br />
roof) space the rails at about 80 cm<br />
(31 in.), see illus. A.<br />
Depending on the roof type the space<br />
(X) between the support member (25)<br />
of your roof (illus. B) should be<br />
determined from inside of car and<br />
then masked on outside of roof. Next<br />
bore the drill-holes using the rail<br />
(3) as a pattern. Bore dia. is 6.1 mm<br />
(a scant 1/4 in.).<br />
The distance between the two opposing anchoring<br />
rails may not measure more than<br />
134 cm (ILLus. A + B). Otherwise the anchoring<br />
rails are to be mounted closer<br />
together (see ILLus. C).<br />
Depending on curve of roof mount with<br />
the wedge so that the rails are<br />
1evel.<br />
I f you have a sufficiently sturdy<br />
wood frame you may also use wood<br />
screws.<br />
For reefs without a frame, drill<br />
holes into the roof and screw -<br />
fasten the rails (illus. E). Seal<br />
holes with sealer. Cut off screws on<br />
the inside and cover with caps.<br />
Die Ansch1agniete (1) wird in<br />
Fahrtrichtung nach vorne montiert!<br />
(Abb. D).<br />
The stop bolt (1) is to be mounted<br />
into driving direction (illus. D).<br />
1.2 Zur Befestigung des Trans!ift-Tragers<br />
an den montierten Befestigungsschier.en<br />
werden die Kulissensteine (4) in<br />
die untere Nut des Tragerprofils (11)<br />
r-'"eschoben und mit dem Tra'ger in<br />
;-V"-ichtung in die oberen Nuten<br />
ier Befestigungsschienen gesc"3-<br />
:e- 0).<br />
7' :es Tragerprofils mittels<br />
Schraube -= an Kul i ssenstein (4)<br />
(Abb. D).<br />
Auf Paral ~ e": ~ ragerprof i le<br />
achten!<br />
M: r:£:e e-enanschlage<br />
sie re Sere :.<br />
Nach kurzer Fa"-;:-;:'; e-s:~a'$ und dann<br />
weiter in rege" :e" ::::=-:en sind die<br />
Schraubenbe-'est -'.-:e: ;"gt zu kon-<br />
' ie-ei.<br />
Beitrcen $1« i-'.ii uftbedingt die .<br />
Stcherhettsvorschr'tftefi suf Seite 13'<br />
1.2 To fasten the <strong>Translift</strong> rack to the<br />
mounted rails slide the counterplates<br />
(4) into the lower slot of the rail<br />
(11) and slide the rack in the direction<br />
of arrow into the upper slot of<br />
anchoring rails (illus. D).<br />
Align and fasten down the rack<br />
using screw (4a) and matching<br />
counterplate (4) illus. D.<br />
Make sure that the rails are parallel!<br />
See page 6 for mounting slide stops<br />
to rails.<br />
Safety check the anchoring screws less<br />
than 1/2 a mile after beginning trip once<br />
and then as often as possible again.<br />
The safety precautions on pag-e 13 arieto<br />
be. .absolute!y followed!<br />
www.westfalia<strong>T3</strong>.info - a useful website for owners and enthusiasts of VW <strong>Westfalia</strong> <strong>T25</strong> / <strong>T3</strong> Campervans<br />
3
TRANSUFT Grundtrager jg<br />
Montage auf Kfz mit Regenrinne<br />
TRANSLIFT Bask racks<br />
Mounting onto cars with rain gutters<br />
2. Montage des <strong>Translift</strong> Grundtracsr-s air<br />
Fahrzeugen mit stabiler RegerrirrT<br />
Gewicht 8,5 kg, BeLadung max.30 kg pro Seite<br />
bei gLeichmafiiger LastverteiLung.<br />
<strong>Translift</strong> Grundtrager mit StlitzfuBen sind<br />
nur geeignet fur Autodacher mit stabiler<br />
Regenrinne, die eine sichere Montage der<br />
StUtzfUBe ermb'glicht!<br />
(Im Zweifelsfall beim Fachmann nachfragen<br />
Tragerprofile dUrfen nur in einer Hb'he<br />
Uber 2 m liber die Regenrinne hinausragen.<br />
Bei Wohnmobilen mit Hubdachern werden die<br />
beiden Tra'gerprofile so vor und hinter das<br />
Hubdach montiert, daB es sich ohne zu<br />
streifen bffnen laBt. (Abb. A).<br />
Bei Fahrzeugen mit normalen Da'chern<br />
sollten die beiden Tragerprofi le in<br />
einem Abstand von ca.100-120 cm montiert<br />
werden. FUr den Skitransport max. 80 cm<br />
(s. Abb. B und C).<br />
Bei der Montage auf Parallelitat der Tragerprofile<br />
achten!<br />
2. To mount <strong>Translift</strong> standard rack to<br />
vehicles with sturdy rain gutters"<br />
Weight 8.5 kg (18,7 Lbs), Load rating each<br />
side 30 kg (66 Lbs) if weight is distributed<br />
evenLy.<br />
~-a-s"i*t standard rack was intended<br />
only for cars with sturdy rain gutters<br />
a" lew the jaws to be anchored<br />
[In case of doubt contact your<br />
dealer)<br />
Carrier rails may only extend over car if<br />
tney are more than 2 meters (6 ft.) over<br />
the ground.<br />
With camper vehicles the two carrier<br />
rails should be mounted in front of and<br />
behind this rocf section so that it can<br />
be raised without »ny scraping (illus.<br />
A).<br />
For vehicles :-;: -ave standard roofs,<br />
mount the :-: ;pprox. 100 ciri (39<br />
in.) apart. Tc :arry skis, 80 cm (31<br />
in.) apart sufficient. (See illus. B and<br />
Nur bei Erstmontage:<br />
Abdeckung (18) vom Tragerprofil abziehen,<br />
Schrauben (12a) am Verstellprofil (12b)<br />
lockern und den gesamten StUtzfuB in die<br />
untere Nut des Tragerprofils (11) einschieben<br />
(Abb. D). Trager mit den noch<br />
nicht fixierten SttitzfliBen (12) in die<br />
Regenrinnen einsetzen.<br />
Der Dachrinnenschoner (12c) ist entsprechend<br />
der Abb. D anzuwenden.<br />
Nun zuerst die Kralle (13) festschrauber.<br />
Dann die Schrauben (12a) festzieher..<br />
Schraubenverbindungen von Zeit : - le-:<br />
b'len oder fetten.<br />
AbschlieBbare Kraller :13;<br />
Durch AbschlieBen des STRlcsses wird der<br />
Zugang zur Spannschraube verdeckt. Dadurch<br />
kdnnen die SttitzfuBe nicht r.ehr vo^i Autodach<br />
abmontiert werden.<br />
©<br />
100-120 cm<br />
Make sure that the rails are parallel!<br />
Zr.'y for first mounting:<br />
Remove cover (18) from rail, back off<br />
screws (12a) on adjustable rail (12b) a<br />
bit and slide entire end of tower into<br />
slot of carrier rail (11), see illus. D.<br />
Place the carrier into rain gutters<br />
before tightening towers (12).<br />
Use the gutter protectors (12c) as shown<br />
in illus. D. Now tighten down jaw (13)<br />
first, then tighten screws (12a).<br />
Lubricate the screwconnections from time<br />
to time.<br />
•'ey-lockable jaws (13)<br />
By closing lock access to tension screws<br />
is blocked. This feature prevents the<br />
n'rz reroved from car.<br />
Montage der Gleitschienenanschlage<br />
siehe Seite 6.<br />
See page 6 r:<br />
to rails.<br />
»g slide stops<br />
Nach kurzer Fahrstrecke erstmals und dann<br />
weiter in regelma'Bigen Abstanden sind die<br />
Schraubenbefestigungen unbedingt zu<br />
kontrollieren.<br />
ty check the anchoring screws less<br />
". 2 a mile after beginning trip once<br />
:-en as often as possible again.<br />
Achtungl<br />
Al le SchlSsser regelma'Big mit <strong>sherpas</strong>-<br />
SchloBpflegemittel pflegen und mit Schutzkappe<br />
(13a) abdecken.<br />
jbricate all locks with <strong>sherpas</strong> lock<br />
.b'-ication and keep covered with<br />
rotective shield at all times.<br />
Beicrten Sie bitte uobeaiftgt die<br />
SicherheitsvorsctM-iftefi atff $ : V .<br />
4<br />
www.westfalia<strong>T3</strong>.info - a useful website for owners and enthusiasts of VW <strong>Westfalia</strong> <strong>T25</strong> / <strong>T3</strong> Campervans
TRANSLIFT Grundtrager<br />
Montage auf Kfz mit Dachreling<br />
TRANSLIFT Bask rack<br />
Mounting onto cars with permanent rails<br />
3. Montage des <strong>Translift</strong>-Grundtra'gers auf<br />
Dachrel irig<br />
Gewicht 7,5 kg, Beladung max.30 kg pro Seite<br />
bei gleichmaftiger LastverteiLung.<br />
Die zur Befestigung des <strong>Translift</strong> auf die<br />
Dachreling notwendigen Spannschellen m'ussen<br />
passend zum Relingsdurchmesser gewahlt werden.<br />
Zuerst die Spannschellen gema'B Abb. A offnen<br />
und an die Dachreling klemmen, Kulissenstein<br />
(15a) etwas lockern. Abdeckung<br />
(18) vom Tragerprofil (11) abziehen und<br />
flache Profilnut in die Spannschelle einschieben.<br />
(Abb. B). Tragerprofil ausmitteln<br />
und mit Schraube (15b) beidseitig festziehen.<br />
3. To mount <strong>Translift</strong> standard rack to<br />
permanent railing<br />
Weight 7.5 kg (16.5 Lbs), Load rating each<br />
side 30 kg (66 Lbs) if weight is distributed<br />
evenLy.<br />
Select tension clamps that match to the<br />
rail diameter to mount <strong>Translift</strong> to<br />
permanent railing.<br />
Open the clamps according to illus. A and<br />
attach to railing. Loosen the counterplates<br />
(15a) a bit. Remove cover (18) from<br />
rail (11) and slide clamp into shallow<br />
slot, illus. B. Align and tighten down<br />
rail with screws (15b) on both sides.<br />
Attention!<br />
Make sure the rails are parallel.<br />
Achtung!<br />
Auf Parallelitat der Tragerprofile achten!<br />
Schraubenverbindungen nach kurzer Fahrstrecke<br />
erstmals und dann in regelma'Bi gen<br />
Abstanden kontrollieren.<br />
Montage der Gleitschienenanschlage<br />
siehe Seite 6.<br />
Becichten Sie bitte unbeciir^t die ©<br />
Sicherheit^orschriften Seite<br />
Shortly after beginning trip safety-check<br />
the screws for tension once and then<br />
again in regular intervals.<br />
See page 6 for mounting slide stops<br />
to ra i1s.<br />
rhe<br />
safety precautions an page 13 are<br />
2S0?t followed!<br />
www.westfalia<strong>T3</strong>.info - a useful website for owners and enthusiasts of VW <strong>Westfalia</strong> <strong>T25</strong> / <strong>T3</strong> Campervans
TRANSLIFT<br />
Montage der Gleitschienenanschldge<br />
TRANSLIFT<br />
Mounting of slide - stops<br />
4. 61 ei tschienenanschla'ge<br />
Nach erfolgter Montage des <strong>Translift</strong>-Grundtragers<br />
wie unter 1., 2., 3., beschrieber.,<br />
werden die Gleitschienenanschlage (10) in<br />
die untere, flache Nut des Tragerprof11 es<br />
eingeschoben (siehe Abb.) und die Gleitschienen<br />
vorsichtig in Beladestellung<br />
abgeschwenkt.<br />
Den Gleitschienenanschlag (10) so positionieren<br />
und mit Schraube (10a) festziehen,<br />
daB noch ein genugender Abstand (X) zwischen<br />
abgeschwenkter Gleitschiene und<br />
Fahrzeug bestehen bleibt.<br />
AbschluBkappe (18) am unteren Tragerprofil<br />
(11) aufstecken.<br />
4. SIide rai1 stops<br />
After the <strong>Translift</strong> standard rack has<br />
been sucessfully mounted as described in<br />
1., 2., 3. insert the slide rail stops<br />
(10) in lower shallow slot of rail (see<br />
illus.) and carefully swing the slide<br />
rail down into loading position.<br />
Position the slide rail stop (10) with<br />
screw (10a) so that there is sufficient<br />
so;:; .:•') between the lowered slide rail<br />
and the vehicle.<br />
Put end cap (19) onto rail end (11).<br />
Bei sehr breiten Fahrzeugen ist die Montage<br />
der Gleitschienenanschlage nicht moglich.<br />
Hier erfuLLt in der Regel der StiitzfuB die<br />
Funktion des Gleitschienenanschlages. In<br />
Sonderfallen muB am Fahrzeug im Gleitschienenbereich<br />
ein Schutzstreifen (Y) (z. B. ca.<br />
20 cm selbstklebende Zierleiste) angebracht<br />
werden.<br />
With very wide a_tc-cc.es, the mounting of<br />
the slide rail stops is not possible. In<br />
this case, the support leg generally takes<br />
over the function of the slide rail stops.<br />
In spec's. :=ses, a chafing patch must be<br />
mountec .-e re :-e slide rail stops normally<br />
are se:_-ec CY) (for example ca. 20 cm of<br />
self-sealing molding).<br />
TRANSLIFT Bedienung<br />
TRANSUFT Operation<br />
5.<br />
5.1<br />
5.2<br />
Ee::e-_-:5<br />
Die Verriegelur.g der >_r.s'ift-Gleits:";e-.e-<br />
-,i-c :.rr _--e:e" :.' rastfeder<br />
(Abb. A) (9) ge'cst. ladjrch<br />
lSBt sich die Glei tschier.e auf dem<br />
Tragerprofi1 (11) verschieber.<br />
Abschwenken der Gleitschienen in Beladestellung.<br />
Ein richtig eingestelIter<br />
Gleitschienenanschlag (10) verhindert<br />
eine Berlihrung der Gleitschienen mit<br />
dem Fahrzeug.<br />
5. Instructions for use<br />
5.1 The locking mechanism of the <strong>Translift</strong><br />
slide rails can be released by<br />
lifting catch spring 9 (illus. A).<br />
This will allow the slide rail to be<br />
~:ve- :: ' the rail slot (11).<br />
5.2 Swing slide -ail down into loading<br />
positi:-. I- slice rail stop (10) is<br />
correctly positioned it will prevent<br />
toe slide rail from touching the<br />
.e'-cle.<br />
5.3 Ladegut (z. B. Surfboard) auflegen<br />
und festzurren (Abb. B). Darauf<br />
achten, daB die Gleitschienen<br />
parallel bleiben, da durch evtl.<br />
Verkanten das Aufschwenken und<br />
Verschieben erschwert oder verhindert<br />
wird.<br />
Put load (e. g. surfboard) on and<br />
lash down {illus. B). Make sure that<br />
the slide rails remain parallel and<br />
do not pinch, which would restrict or<br />
even block free movement of the<br />
-ails.<br />
6<br />
www.westfalia<strong>T3</strong>.info - a useful website for owners and enthusiasts of VW <strong>Westfalia</strong> <strong>T25</strong> / <strong>T3</strong> Campervans
TRANSLIFT Bedienung<br />
TRANSUFT Operation<br />
5.4<br />
Zum Aufschwenken wird man zweckmaBigerweise<br />
am Ladegut (z. B. Surfmast)<br />
oder an der Verbindungsstange anfassen,<br />
diese den halben Weg unter ca.<br />
45 Grad hochdr'u'cken und anschlieBend<br />
bis zu~ Anschlag horizontal verschieben.<br />
(Abb. C).<br />
Last gef'u'hlvoll auf- und abschwenken!<br />
Achtuna1<br />
Kontrol1ieren Sie, ob die Gleitschienen<br />
im Mittenanschlag (Abb. D/8)<br />
eingerastet und die Rastfeder (9) der<br />
Verriege'ung eingerastet ist!(Abb. E)<br />
Die Anschlagniete (Abb. D/7a) an<br />
der Gleitschiene auf der Mittenanschlagseite<br />
in regelmaBiger Abstanden<br />
liberpru'fen.<br />
5.4 To swing the load up it is best to<br />
either grals hold of the load itself<br />
(e. g. surfmast) or the cross bar<br />
pushing it halfway up at 45 degree<br />
angle and then horizontally sheding<br />
it on the rest of the way (see illus.<br />
C).<br />
Caution!<br />
Check to see if slide rail has<br />
snapped into the center-stop (8)<br />
illus. D, and whether the catch<br />
spring (9) of the locking mechanism<br />
has snapped shut, (illus. £)<br />
Check the stop bolt (illus. D/7a)<br />
on the center stop side of the rail<br />
from time to time.<br />
5.5<br />
Zur zusa'tzlichen Sicherung der Gleitschienen-Verriegelung<br />
und gegen Zugriff<br />
durch Unbefugte mussen die abschlieBbaren<br />
Kappen Art. Nr. 629-T<br />
(14) unbedingt verwendet werden. Diese<br />
werden auf die Gleitschienen nur<br />
aufgesteckt und abgesperrt.<br />
(Abb. E und F).<br />
5.5 For additional locking security and<br />
to prevent access by unauthorized<br />
nersons the locking caps Art. Nr.<br />
629-T (14) must absolutely be used.<br />
Simply fit onto slide rails and lock<br />
:i"1 us. E and F).<br />
5.6 Das Abladen erfolgt in umgekehrter<br />
Reihenfolge.<br />
5.6 Unload in the reverse order.<br />
www.westfalia<strong>T3</strong>.info - a useful website for owners and enthusiasts of VW <strong>Westfalia</strong> <strong>T25</strong> / <strong>T3</strong> Campervans
TRANSLIFT Aufs6tze<br />
6. <strong>Translift</strong> Surfaufsatz<br />
6.1 Fur den Transport von Surfbrettern<br />
werden die Surfaufsatze Art. Nr.<br />
643-00 (Abb. A) in die Gleitschienen<br />
(7) geschoben, auf den gewunschten Abstand<br />
zueinander (X) gebracht und die<br />
Spannschrauben (26) festgezogen.<br />
Bei Bedarf kbnnen die Bilgel durch<br />
Nachbiegen dem Surfboard angepaBt werden.<br />
Zum Festzurren des Ladegutes nur<br />
<strong>sherpas</strong>-Spanngurte verwenden!<br />
6. Trar.slift board accessory<br />
6.1 To transport windboards slide board<br />
access:-..- (Art. Nr. 643-00) (illus.<br />
A) onto the slide rails (7), set the<br />
desired space (X) and tighten down<br />
with tension screws (26).<br />
If necessary the bars can be bent to<br />
- i t s'ace of board.<br />
To 'ash down use <strong>sherpas</strong> lashing<br />
:e"-.s only!<br />
Maximalbelastung: 2 Surfboards bzw.<br />
60 kg bei gleichma'Biger Lastverteilung<br />
auf den gesamten Tra'ger!<br />
"sac: 2 windboards or 60 kg<br />
12: = --a- equally distributed<br />
cn carrier.<br />
6.2 Fur den sicheren Masttransport und<br />
das bequeme Bedienen des <strong>Translift</strong> bedarf<br />
es der Masthalterung (Abb. B)<br />
Art. Nr. 614-01. Bei der Montage<br />
4 cm Abstand nach auBen lassen, daB<br />
die Rastfeder (9) in ihrer Funktion<br />
nicht behindert wird! (Siehe Abb. C).<br />
5.2 Safe transport of mast and easy<br />
handling c* <strong>Translift</strong> requires<br />
use the -n: holder (illus. B) Art.<br />
Nr. 614-01 when mounting allow 4 cm<br />
(1 1/2 in.) space from the center so<br />
that t _e function of catch spring (9)<br />
is not inhibited (see illus. C).<br />
7. <strong>Translift</strong> Gepackaufsatz<br />
Robuster, schnell aufmontierbarer Gepackkorb<br />
aus kunststoffbeschichtetetn Rohr 200<br />
cm lang, 68 cm breit.<br />
Befestigung des Gep'a'ckkorbes auf :e~<br />
Gleitschienen:<br />
Spannschelle (15) ge~a3 A:b. ; :'--"-eam<br />
Gepackkorb, Schra.be -a:" ..-ysend,<br />
befestigen.<br />
Spannschellen mit dem Kc-b .c ze~ ze- :as:-<br />
feder (Abb. E (16) gegenube-.-e;e-ce- Se-te<br />
in die Gleitschiene einschieben (Abb. G).<br />
Bei der Montage 4 cm Abstar.c -a:- a,ielassen,<br />
daB die Rastfeder (9) in ihrer<br />
Funktion nicht behindert wird. Schrauber<br />
(15b) der Spannschelle festziehen.<br />
Ladegut gleichmaBig verteiLen und mit<br />
Spanngurten festzurren. Diese dabei nur am<br />
AuBenrahmen (X) befestigen.<br />
Gepackspinnen oder Expander sind nur zur<br />
Befestigung von Gepackhullen, nicht jedoch<br />
zur Sicherung des Ladegutes geeignet.<br />
Be^adung max.30 kg pro Gepackaufsatz.<br />
7. <strong>Translift</strong> luggage accessory<br />
A sturdy quick mounting luggage rack made<br />
of plastic coated railing, 200 cm (78<br />
in.) long and 68 cm (26 3/4 in.) wide.<br />
Attaching the i-'ccage rack to the slide<br />
rails:<br />
Open tension clamp (15) and attach to<br />
luggage rack with the screw pointing to<br />
the inside, see illus. F.<br />
Slide the tension clamps with the luggage<br />
-ack from the adjusting spring (IUus. E)<br />
(16) into the opposing side of the slide<br />
rai Is.<br />
When mounting allow 4 cm (1 1/2 in.)<br />
space froi the center so that the<br />
functi:r ;-" : = t:-. spring (9) is not<br />
inhibited (see illus. C) tighten screws<br />
(15b) of tension clamps.<br />
"-e .zaz o- the luggage should be distribute:<br />
e.e-.. and fixed with belts. Anchoring<br />
t-e :e.:s on the outer frame (X) only.<br />
Lashing elements as elastic ties can only<br />
ze used for fixing of canvas and not for<br />
sa'e load.<br />
ua.--um<br />
•a :
TRANSLIFT Aufsatze<br />
TRANSLIFT Accessories<br />
8. Trans l i f t Sk'aufsatz<br />
AbschlieBbarer Komfortskiaufsatz Art.<br />
Nr. 676-02 zum Transport von bis zu 3<br />
Paar Ski.<br />
Skiaufsatz laut Abb. in die Gleitschiene<br />
einschieben und mit der Schraube (X)<br />
festklemmen. Eeachten Sie bitte, daft der<br />
Skiaufsatz von der der Rastfeder (16)<br />
gegen'u'berliegenden Seite aufgeschoben<br />
wird.<br />
Zur Verbindung der beiden Gleitschienen,<br />
Verbindungsstange Art. Nr. 690-01.5 mit<br />
mitgelieferten Kulissensteinen in Gleitschienen<br />
einschieben und festziehen.<br />
8. <strong>Translift</strong> ski accessory<br />
Lockable easy-to-use ski accessory (Art.<br />
No. 676-02) for transporting up to 3<br />
pair of skis.<br />
Slide the ski accessory into the slide<br />
rail according illus. and attach i t with<br />
screw (X).<br />
Make sure that the ski accessory is to<br />
be slid in from the opposite side of the<br />
catch spring.<br />
Connect the two slide rails with<br />
connection bar (Art. Nr. 690-01.5) slide<br />
the counterplates supplied into the slide<br />
rail and tighten<br />
Montage der Verbindungsstange siehe<br />
Seite 10 Abb. C.<br />
Mounting of the connection bar see page<br />
10 i l l us. C.<br />
Achtung!<br />
Auf Pat-all el i tat (XI) der Gleitschienen<br />
achten!<br />
Montageabstand (X2) max. 80 cm!<br />
Aus Sicherheitsgriinden muR der Skiaufsatz<br />
auch wahrend der Fahrt immer abgesperrt<br />
sein.<br />
Caution!<br />
Make sure the slide rails are parallel<br />
(XI)!<br />
Mounting distance of rails (X2) max. 80<br />
cm (31 1/2 in.).<br />
-s a safety precaution Lock ski attachement<br />
with key at aLL times. PuLL key !<br />
9. <strong>Translift</strong> Kajakaufsatz<br />
Die Kajakbligel sind geteilt und konnen somit<br />
auf jede beliebige Breite eingestellt<br />
werden.<br />
Die Kulissensteine mit den Spannschrauben<br />
(27) nur lockern und die Bugel seitlich in<br />
die Gleitschienen schieben (Abb. A).<br />
BUgel auf gewllnschte Breite einstellen<br />
(Abb. B), ausrichten und alle Spannschrauben<br />
(27) festziehen.<br />
9. <strong>Translift</strong> Kayak accessory<br />
The kayak bars are separate pieces and<br />
can therefore be adjusted to any width.<br />
Back off the tension screws (27) with<br />
counterplates only a l i t t l e and slide the<br />
bars sideways onto the slide rails<br />
(illus. A).<br />
Adjust the bars to desired width (illus.<br />
B), align and tighten down all tension<br />
screws (27).<br />
Zum Festzurren des Ladegutes nur <strong>sherpas</strong>-<br />
Spanngurte verwenden.<br />
To lash down the load use <strong>sherpas</strong> lashing<br />
belts only.<br />
Lange Transportgliter (z. B. Kajaks, Leitern<br />
o. a.) mussen zusa'tzlich an den StoBstangen<br />
befestigt werden.<br />
MaximaLbeLastung:<br />
60 kg bei gLeichmaRiger LastverteiLung auf<br />
den gesamten Trager<br />
Long transporting loads (e. g. Kayaks,<br />
ladders, etc.) must additionally be<br />
fastened to the bumpers.<br />
Max. Loading of carrier 60 kg (132 Lbs)<br />
Make sure weight is distributed evenLy.<br />
www.westfalia<strong>T3</strong>.info - a useful website for owners and enthusiasts of VW <strong>Westfalia</strong> <strong>T25</strong> / <strong>T3</strong> Campervans<br />
9
TRANSLIFT Aufsatze<br />
TRANSLIFT Accessories<br />
Achtunq!<br />
Bei Ski- und Kajaktransport muB eine Verbindung<br />
zwischen der vorderen und hinteren<br />
Gleitschiene (7) bestehen. Diese wird mit<br />
einer zusa'tzlichen 150 cm langen Verbindungsstange<br />
Art. Nr. 690-01.5 und den mitgelieferten<br />
Kulissensteinen (4) hergestellt:<br />
Bei der Montage 4 cm Abstand nach auBen<br />
lassen, daB die Rastfeder in ihrer Funktion<br />
nicht behindert wird. (Abb. C).<br />
Caution!<br />
When transporting skis and Kayaks there<br />
must be a connection between the front<br />
and rear slide rail (7). To make connection<br />
use an accessory connecting bar<br />
Sr. £93-31.5). length 150 cm (59<br />
, ="s: su-plied are counterplates<br />
- •<br />
----- -renting allow 4 cm (1 1/2 in.)<br />
s:a:e the center so that the<br />
function of catch spring is not inhibited<br />
(see illus. C).<br />
fceachten Sie bitte unbecHngt die<br />
S*cte>iiemvor$chrmefl tut SeUs 131<br />
Art. Nr. 690-01. The safety preoptions 00 paje 13 are:<br />
to be afcs 0 \y foil owed 1<br />
TRANSUFT<br />
Storungen - Wartungshinweise<br />
TRANSUFT<br />
Defects - maintenance<br />
13. Eventuelle Storungen<br />
Hat eine Gleitschiene zuviel Spiel in Verschieberichtung<br />
(normal ist ca. 1 r~), s:<br />
kann der Mittenanschlag (8) njchgsste"":<br />
werden.<br />
Rastet die *erriegelung (9) nicht mehr<br />
von selbst ein, so kb'nrte sich am<br />
Mi ttenanschlag (8) Schmutz oder dergleichen<br />
coge^ger: -
TRANSUFT Zubehor<br />
TRANSUFT Accessories<br />
10. Zur Diebstahlsicherung eines kompletten<br />
Surfboards (Abb. A) benbtigt man<br />
ein <strong>sherpas</strong>-MastschloB mit Stahlseil,<br />
Art. Nr. 615-01, und die Masthalterung<br />
614-01.<br />
10. To prevent theft of an entire windboard<br />
(illus. A) use the <strong>sherpas</strong> mast<br />
lock and cable (Art. Nr. 615-01) and<br />
mast holder 614-01.<br />
Die Gleitschienen konnen mit Oder<br />
ohne Ladegut vom Grundmodell leicht<br />
getrennt werden, indem man deren Mittenanschlagsseite<br />
(8) in Pfeilrichtung<br />
liber die Rastfeder (9) weiterschiebt<br />
(Abb. B).<br />
The slide rails can be removed from<br />
the standard rack with or without the<br />
load. Simply push the center stop<br />
side (8) past the catch spring (9) in<br />
the direction of arrow (illus. B).<br />
11. Zur platzsparenden Unterbringung von<br />
Trans!ift-Gleitschienen samt Ladegut<br />
z. B. an Garagenwanden gibt es den<br />
Wandbeschlag, Art. Nr. 690-01.1 (16).<br />
Die Wandbeschlage werden entsprechend<br />
des Abstandes der Gleitschienen an die<br />
Wand geschraubt. Daran kann nun der<br />
gesamte Aufbau fertig verzurrt bis zum<br />
nachsten Gebrauch eingehangt werden,<br />
(Siehe Abb. C).<br />
11. For a spacesaving way to hang the<br />
<strong>Translift</strong> slide rails including the<br />
load onto a garage wall for example<br />
use the wall mount (Art. Nr.<br />
690-01.1) (16).<br />
The wall mounts are anchored to the<br />
wall at a space corresponding to the<br />
space between the slide rails. You<br />
can now hang the <strong>Translift</strong> slide<br />
rails with the entire load onto the<br />
wall until you next use them (see<br />
illus C).<br />
12. Ski, zusatzlic~e Sjrfr.asten, Paddel<br />
o. a., konnen mit der, Universalgreifer,<br />
Art. Nr. 650.2 befestigt werden.<br />
(Abb. D).<br />
Kein Diebstahlsc'j::;<br />
® 12. Skis additional board masts and<br />
paddles etc. can be held down with<br />
universal grip-holder (Art. Nr.<br />
660.2) (illus. D).<br />
No protection against theft!<br />
Der Universa"<br />
<strong>Translift</strong> Tra<br />
und an der ge<br />
der S:;"s:--:<br />
•'=' wird in das<br />
•;fil eingeschoben<br />
:hten Position mit<br />
23) festgeklemmt.<br />
Slide the universal grip-holder into<br />
the rail slot, position and tighten<br />
down with tension screw (28).<br />
www.westfalia<strong>T3</strong>.info - a useful website for owners and enthusiasts of VW <strong>Westfalia</strong> <strong>T25</strong> / <strong>T3</strong> Campervans<br />
11
TRANSUFT stiickliste<br />
TRANSLIFT Partlis<br />
15. Stiickliste<br />
15. Partlist<br />
2 Unterlegkeil<br />
3 Befestigungsschiene<br />
2 Wedge<br />
3 Anchoring Rail<br />
3b<br />
Befestigungsschraube<br />
3b Mounting<br />
screw<br />
4 Kulissenstein<br />
- I: -~~.i'z' ate<br />
5 Fuhrungsleiste<br />
6 Rollenlager<br />
i F.c'.'e" : = Hring<br />
7 Gleitschiene<br />
8 Mittenanschlag<br />
9 Rastfeder<br />
10 Gleitschienenanschlag<br />
11 Tragerprofil<br />
12 StUtzfuB<br />
13 AbschlieBbare Kralle<br />
14 AbschlieBbare Profilkappe<br />
15 Spannschelle<br />
13 ProfilabschluBkappe<br />
8 Center Stop<br />
9 Catch Spring<br />
10 Slide Rail Stop<br />
11 Slot Rail<br />
12 Tower<br />
13 Locking Jaw<br />
14 Locking end cap<br />
15 Tension Clamp<br />
18 Remove cover<br />
12<br />
www.westfalia<strong>T3</strong>.info - a useful website for owners and enthusiasts of VW <strong>Westfalia</strong> <strong>T25</strong> / <strong>T3</strong> Campervans
Sicherheitsvorschriften<br />
und Hinweise<br />
Safety Directions<br />
and Precautions<br />
Achtung: Wichtige Hinweise<br />
Durch die Dachbelastung verschlechtert<br />
sich das Fahr-, Brems- und Seitenwindverhalten<br />
des Fahrzeugs!<br />
Aus Grunden cer Sicherheit gegenuber anderen<br />
Verkehrstei1nehmern und der Energieeinsparung<br />
soil der Trager bei Nichtbenutzung<br />
vom Fahrzeugdach abgenommen werden.<br />
Werden grofe, sperrige oder schwere GUter<br />
mit dem Trager transportiert, so ist bei<br />
der Verzurrung zu beachten, daB im Falle<br />
einer Vollbremsung beide Tragholme gleichma<br />
Big belastet werden.<br />
Zum Festzurren von Ladegut nur <strong>sherpas</strong>-<br />
Spanngurte verwenden. Bei Verwendung von<br />
Gurten anderen Fabrikates HaftungsausschluB.<br />
Auf moglichst niedrigen Schwerpunkt achten.<br />
Ladegut darf nicht Liber die Fahrzeugbreite<br />
hinausragen.<br />
Hinweise der StVo beachten!<br />
Fur gewaltsame Demontage oder Diebstahl<br />
von Ladegut durch Zerstb'ren von Tragerteilen<br />
oder Aufsa'tzen HaftungsausschluB.<br />
Bei vorsa'tzl ichem, fahrlassigem oder<br />
grobfahrla'ssigem MiBbrauch von <strong>sherpas</strong>-<br />
Tra'gern und Aufsa'tzen HaftungsausschluB.<br />
Schraubenbefestigungen erstmals nach einer<br />
Fahrstrecke von ca. 1 km und dann<br />
sooft wie moglich kontrol1ieren.<br />
Geschwindi gkei ts-Hi nwei s1<br />
Passen Sie Ihr Fahrverhalten und Ihre<br />
Fahrgeschwindigkeit Ihrer Dachlast an.<br />
Sie erhbhen Ihre Sicherheit und sparen<br />
zudem noch Treibstoff!<br />
Bewahren Sie diese Montageanleitung bei<br />
den Service-Unterlagen im Auto auf. So<br />
sind alle <strong>Info</strong>rmationen immer griffbereit.<br />
vorbe-<br />
Irrtum und technische Anderungen<br />
halten.<br />
Attention: Important Safety Precautions<br />
The load on your roof will effect the<br />
handling characteristics of your car in<br />
normal driving, braking and sidewind<br />
stability.<br />
For safety toward other drivers and<br />
conserve energy remove the carrier when<br />
not in use.<br />
When carrying large, bulky or heavy loads<br />
make sure that the weigth is equally<br />
distributed on both bars in case you must<br />
make an emergency stop.<br />
For lashing down load use <strong>sherpas</strong>-tension<br />
belts only. We accept no liability for<br />
damage or injury caused through use of<br />
non-<strong>sherpas</strong> belts.<br />
Try to keep the center of gravity as low<br />
as possible.<br />
Do not allow, under any circumstances the<br />
load to extend beyond the roof edge of<br />
car.<br />
No liability for forcable removal or theft<br />
trough forcable removal and damage of<br />
carrier parts.<br />
We accept no liability for deliberate,<br />
careless or grossly negligent misuse of<br />
s-.erpas carriers and attachments.<br />
Safety check the anchoring screws less<br />
than 1/2 mile a-'ter beginning trip once<br />
and then as often as possible again.<br />
Caution when driving!<br />
Adjust driving and speed to load on roof.<br />
This will increase safety and conserve<br />
fuel.<br />
Keep this instructions with your other<br />
car papers. This way you will have all<br />
important information handy.<br />
Technical specifications subject to<br />
change.<br />
13<br />
www.westfalia<strong>T3</strong>.info - a useful website for owners and enthusiasts of VW <strong>Westfalia</strong> <strong>T25</strong> / <strong>T3</strong> Campervans
<strong>sherpas</strong><br />
silvretta<strong>sherpas</strong> Sportartikel GmbH & Co. KG • Postfach 1480 • D-8047<br />
Karlsfeld-Rothschwaige<br />
1<br />
<strong>sherpas</strong><br />
Schliissel-Nummer<br />
Schlusselnummer unbedingt notieren, denn<br />
wenn die Schlussel verloren gehen, und die<br />
nicht bekannt is.t, muB ein neuer<br />
SchloBsatz eingebaut wer'den!<br />
Abtrennen und den Fahrzeugpapieren beilegen.<br />
-V.<br />
Serial<br />
number<br />
Write down the serial number of key here,<br />
cut out and keep with vehicle registration<br />
papers. Should you lose the key and are<br />
unable to provide the serial number a new<br />
lock would have to be fitted." f<br />
www.westfalia<strong>T3</strong>.info - a useful website for owners and enthusiasts of VW <strong>Westfalia</strong> <strong>T25</strong> / <strong>T3</strong> Campervans