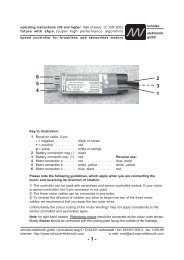
LiPoRx Bedienungsanleitung LiPoRx ... - Schulze Elektronik GmbH
LiPoRx Bedienungsanleitung LiPoRx ... - Schulze Elektronik GmbH
LiPoRx Bedienungsanleitung LiPoRx ... - Schulze Elektronik GmbH

Erfolgreiche ePaper selbst erstellen
Machen Sie aus Ihren PDF Publikationen ein blätterbares Flipbook mit unserer einzigartigen Google optimierten e-Paper Software.
Seite 7 Stand 11.06<br />
Bündige Montage des <strong>LiPoRx</strong>-<br />
Bedienteils im Rumpf<br />
Flush-mounting of the <strong>LiPoRx</strong><br />
control module in the fuselage<br />
e)<br />
a)<br />
c)<br />
b)<br />
a) “Stick the “drilling template” to the fuselage<br />
and<br />
b) remove the inner area of the template (different<br />
colour).<br />
c) Cut the opening in the fuselage side.<br />
(The picture shows a twin-wall fuselage, for<br />
which a smaller inner cut-out for the cable to<br />
the battery is sufficient)<br />
d) Glue the prepared control module to the fuselage<br />
or<br />
e) secure it using the two outer holes.<br />
„Aufputz“- Montage des <strong>LiPoRx</strong>-<br />
Bedienteils<br />
„Proud“- mounting of the <strong>LiPoRx</strong>control<br />
module<br />
10s-1p-3200<br />
<strong>Schulze</strong> LiPoPerfekt Akku<br />
<strong>Schulze</strong> LiPoPerfekt battery<br />
a) “Bohrschablone” auf den Rumpf aufkleben und<br />
b) farblich abgesetzten inneren Ausschnitt der<br />
Schablone entfernen.<br />
c) Ausbruch in die Rumpfwand schneiden.<br />
(Im Bild ist ein Doppelwand-Rumpf abgebildet<br />
der mit einem kleineren inneren Ausschnitt für<br />
das Verbindungskabel zum Akku auskommt )<br />
d) Vormontiertes Bedienteil auf den Rumpf kleben<br />
oder<br />
e) durch eventuell durch die äußeren beiden<br />
Löcher festschrauben.<br />
d)<br />
e)<br />
<strong>Schulze</strong><br />
alpha 8.35w<br />
<strong>Schulze</strong><br />
<strong>LiPoRx</strong>-2000.7<br />
mit / with<br />
Klettband über<br />
gesamte Unterseite<br />
Hook and loop tape<br />
on the whole underside<br />
Ladeanschluß<br />
charge connector<br />
<strong>LiPoRx</strong>-2000.7<br />
Platte schwarz lackiert<br />
plate<br />
black coloured<br />
Konfigurations-Löt-Pads<br />
Configuration solder pads<br />
Stückliste Bedienteil / parts list control module<br />
1 <strong>Elektronik</strong> / electronics<br />
2 Front-Klebefolien / Front covers (left & right)<br />
1 Klebefolie Bohrschablone / Drilling template<br />
1 GFK-Frontplatte / GRK front plate 0,5 mm<br />
1 GFK Frontplatte / GRK front plate 1,0 mm<br />
2 Schrauben / screws M2 * 18<br />
2 Schrauben / screws M2 * 10<br />
2 Stopp-Muttern / self-locking nuts M2<br />
2 Abstandshülsen / spacers 4,5 mm<br />
2 Abstandshülsen / spacers 7,0 mm<br />
Sonstiges - nicht enthalten<br />
Miscellaneous - not included<br />
Bohrer / Drill 2,0 ... 2,2 mm oder für / or for extra-<br />
Light-Version: M2 Gewindeschneider / tap<br />
Front 1,0 mm<br />
Standard Variante<br />
Standard version<br />
Anschluß von dem<br />
Connecting of the<br />
prog-adapt-alpha &<br />
prog-adapt-uni<br />
Steckverbinder zum Bedienteil<br />
Connector of control module<br />
Anschlußkabel (siehe unten)<br />
Connecting cables (see below)<br />
Front-Aufkleber / Front cover<br />
Typ “EIN rechts” / Type “ON right”<br />
Front-Aufkleber / front cover<br />
Typ “EIN links” / Type “ON left”<br />
Lade-Anschluß<br />
Charge connector<br />
Dieses Stiftpaar freilassen<br />
Do not connect these pins<br />
Operating Instructions<br />
Issue 11.06, Page 7<br />
Empfänger-Anschluß 1<br />
Receiver connector 1<br />
Empfänger-Anschluß 2<br />
Receiver connector 2<br />
Hochstrom-Anschluß*<br />
High current connector*<br />
* <strong>LiPoRx</strong>910.x<br />
Lücke<br />
Gap<br />
Extra-Light-Variante:<br />
Schrauben abflexen.<br />
Extra-Light-version:<br />
Flex screws and remove.<br />
Frontplatte 0,5 mm / Front plate 0,5 mm<br />
M2 Gewinde in<br />
Leiterplatte<br />
schneiden<br />
Cut M2 thread<br />
in circuit<br />
board