isl 6 chameleon: rapid charger series - Schulze Elektronik GmbH
isl 6 chameleon: rapid charger series - Schulze Elektronik GmbH
isl 6 chameleon: rapid charger series - Schulze Elektronik GmbH

Create successful ePaper yourself
Turn your PDF publications into a flip-book with our unique Google optimized e-Paper software.
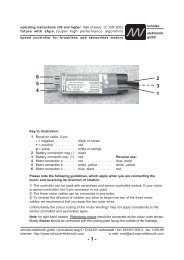
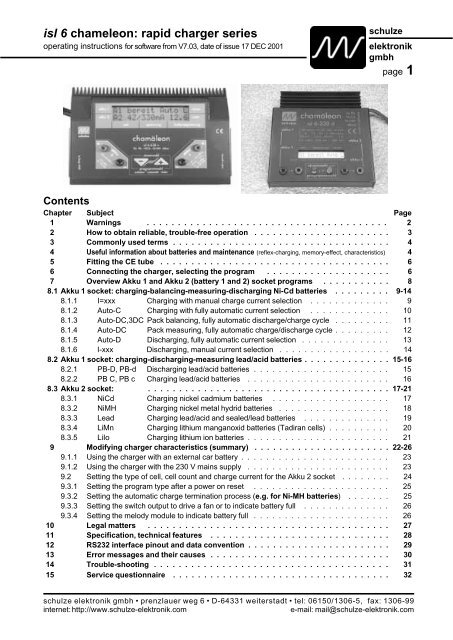
<strong>isl</strong> 6 <strong>chameleon</strong>: <strong>rapid</strong> <strong>charger</strong> <strong>series</strong><br />
operating instructions for software from V7.03, date of issue 17 DEC 2001<br />
schulze<br />
elektronik<br />
gmbh<br />
page 1<br />
Contents<br />
Chapter Subject Page<br />
1 Warnings . . . . . . . . . . . . . . . . . . . . . . . . . . . . . . . . . . . . . . . 2<br />
2 How to obtain reliable, trouble-free operation . . . . . . . . . . . . . . . . . . . . . . 3<br />
3 Commonly used terms . . . . . . . . . . . . . . . . . . . . . . . . . . . . . . . . . . . 4<br />
4 Useful information about batteries and maintenance (reflex-charging, memory-effect, characteristics) 4<br />
5 Fitting the CE tube . . . . . . . . . . . . . . . . . . . . . . . . . . . . . . . . . . . . . 6<br />
6 Connecting the <strong>charger</strong>, selecting the program . . . . . . . . . . . . . . . . . . . . 6<br />
7 Overview Akku 1 and Akku 2 (battery 1 and 2) socket programs . . . . . . . . . . . 8<br />
8.1 Akku 1 socket: charging-balancing-measuring-discharging Ni-Cd batteries . . . . . . . . . 9-14<br />
8.1.1 I=xxx Charging with manual charge current selection . . . . . . . . . . . . . 9<br />
8.1.2 Auto-C Charging with fully automatic current selection . . . . . . . . . . . . . 10<br />
8.1.3 Auto-DC,3DC Pack balancing, fully automatic discharge/charge cycle . . . . . . . . . 11<br />
8.1.4 Auto-DC Pack measuring, fully automatic charge/discharge cycle . . . . . . . . . 12<br />
8.1.5 Auto-D Discharging, fully automatic current selection . . . . . . . . . . . . . . 13<br />
8.1.6 I-xxx Discharging, manual current selection . . . . . . . . . . . . . . . . . . 14<br />
8.2 Akku 1 socket: charging-discharging-measuring lead/acid batteries . . . . . . . . . . . . . . 15-16<br />
8.2.1 PB-D, PB-d Discharging lead/acid batteries . . . . . . . . . . . . . . . . . . . . . . 15<br />
8.2.2 PB C, PB c Charging lead/acid batteries . . . . . . . . . . . . . . . . . . . . . . . 16<br />
8.3 Akku 2 socket: . . . . . . . . . . . . . . . . . . . . . . . . . . . . . . . . . . . . . . . 17-21<br />
8.3.1 NiCd Charging nickel cadmium batteries . . . . . . . . . . . . . . . . . . . 17<br />
8.3.2 NiMH Charging nickel metal hydrid batteries . . . . . . . . . . . . . . . . . . 18<br />
8.3.3 Lead Charging lead/acid and sealed/lead batteries . . . . . . . . . . . . . . 19<br />
8.3.4 LiMn Charging lithium manganoxid batteries (Tadiran cells) . . . . . . . . . . 20<br />
8.3.5 LiIo Charging lithium ion batteries . . . . . . . . . . . . . . . . . . . . . . . 21<br />
9 Modifying <strong>charger</strong> characteristics (summary) . . . . . . . . . . . . . . . . . . . . . . 22-26<br />
9.1.1 Using the <strong>charger</strong> with an external car battery . . . . . . . . . . . . . . . . . . . . . . . . 23<br />
9.1.2 Using the <strong>charger</strong> with the 230 V mains supply . . . . . . . . . . . . . . . . . . . . . . . 23<br />
9.2 Setting the type of cell, cell count and charge current for the Akku 2 socket . . . . . . . . 24<br />
9.3.1 Setting the program type after a power on reset . . . . . . . . . . . . . . . . . . . . . . 25<br />
9.3.2 Setting the automatic charge termination process (e.g. for Ni-MH batteries) . . . . . . . 25<br />
9.3.3 Setting the switch output to drive a fan or to indicate battery full . . . . . . . . . . . . . . 26<br />
9.3.4 Setting the melody module to indicate battery full . . . . . . . . . . . . . . . . . . . . . . 26<br />
10 Legal matters . . . . . . . . . . . . . . . . . . . . . . . . . . . . . . . . . . . . . . . 27<br />
11 Specification, technical features . . . . . . . . . . . . . . . . . . . . . . . . . . . . . 28<br />
12 RS232 interface pinout and data convention . . . . . . . . . . . . . . . . . . . . . . . 29<br />
13 Error messages and their causes . . . . . . . . . . . . . . . . . . . . . . . . . . . . . 30<br />
14 Trouble-shooting . . . . . . . . . . . . . . . . . . . . . . . . . . . . . . . . . . . . . . 31<br />
15 Service questionnaire . . . . . . . . . . . . . . . . . . . . . . . . . . . . . . . . . . . 32<br />
schulze elektronik gmbh • prenzlauer weg 6 D-64331 weiterstadt tel: 06150/1306-5, fax: 1306-99<br />
internet: http://www.schulze-elektronik.com e-mail: mail@schulze-elektronik.com
page 2<br />
1 Warnings<br />
Injury hazard! Beware of sharp-edged parts<br />
(heat-sink, terminal clips) when handling the<br />
<strong>charger</strong>.<br />
The CE symbol does not entitle you to be careless<br />
when using or handling the <strong>charger</strong>, the<br />
power supply and the batteries.<br />
Before you connect the <strong>charger</strong> to a 12 V car<br />
battery ensure that the vehicle's engine is<br />
stopped. The <strong>charger</strong> may only be operated<br />
with the vehicle stationary and the engine<br />
stopped.<br />
The <strong>charger</strong> must be used with the original cables<br />
in unmodified form. The only permissible<br />
change is to use 4 mm gold-contact connectors.<br />
Never use wander plugs!<br />
Avoid short-circuiting the charge outputs to the<br />
car bodywork, as the <strong>isl</strong> 6 is not protected<br />
against this. In the interests of safety always<br />
place the <strong>charger</strong> on the ground.<br />
The charge leads and/or charge outputs must<br />
not be inter-connected or short-circuited in<br />
any way, as the result would be damage to<br />
the <strong>charger</strong> and/or the battery. To avoid<br />
shorts between the banana plugs on the<br />
charge lead please be sure to connect the<br />
charge cable to the <strong>charger</strong> first, and only<br />
then to the battery to be charged. Reverse<br />
the sequence when disconnecting. We recommend<br />
our safety charge lead which features<br />
no exposed banana plug contacts, as<br />
they are protected by a spring-loaded insulating<br />
sleeve.<br />
To meet the CE standards the length of the<br />
charge leads must not exceed 20 cm.<br />
There is always a danger of explosion when<br />
handling <strong>rapid</strong>-charge Ni-Cd batteries. To<br />
avoid problems never leave the <strong>charger</strong> unsupervised<br />
whilst <strong>rapid</strong>-charging is in<br />
progress.<br />
Before using the <strong>charger</strong> place the unit and the<br />
batteries to be charged on a non-flammable,<br />
heat-resistant and electrically non-conductive<br />
surface.<br />
Keep inflammable objects and volatile materials<br />
well away from the charging station.<br />
<strong>isl</strong> 6 <strong>chameleon</strong>: <strong>rapid</strong> <strong>charger</strong> <strong>series</strong><br />
When you wish to charge batteries, remove<br />
them from the model or electrical device.<br />
When charging transmitter batteries it is essential<br />
to keep within the maximum charge current<br />
permitted for the transmitter circuit<br />
board by setting the charge current manually<br />
(0.5 - 2 A, see manufacturer's specification).<br />
If you set the <strong>charger</strong>'s automatic charge termination<br />
to "sensitive+delayed", note that topping-up<br />
full cells makes them very hot.<br />
Never connect the <strong>isl</strong> 6 to a car battery which is<br />
simultaneously being charged by a car battery<br />
<strong>charger</strong>.<br />
Protect the <strong>isl</strong> 6 from damp, water, shock and<br />
pressure.<br />
The unit must not be used if it exhibits any fault<br />
or is displaying an error message.<br />
Charging fewer than 4 cells at output 1: the<br />
special 16-bit A/D converter is outstanding<br />
accurate, but we cannot guarantee that the<br />
<strong>charger</strong> will work correctly in this situation.<br />
The charge termination may occur too early,<br />
too late, not at all, or even perfectly correctly,<br />
and the charge current will not approach<br />
the maximum rate. The reason for this is<br />
that the "kink" in the voltage curve of highcapacity<br />
cells is very slight.<br />
The following types of battery / pack / cell must<br />
not be connected to the <strong>charger</strong>:<br />
- packs consisting of different types of cell<br />
- mixtures of old and new cells, or cells of<br />
different make<br />
- non-rechargeable batteries (dry cells)<br />
- batteries which are not expressly stated by<br />
the manufacturer to be suitable for the high<br />
charge currents which this <strong>charger</strong> can supply.<br />
- individual faulty or damaged cells<br />
- batteries which are already fully charged or<br />
hot<br />
- batteries fitted with integral charge devices<br />
or charge termination circuits<br />
- batteries which are installed in a device, or<br />
are also connected electrically to other components.<br />
schulze elektronik gmbh prenzlauer weg 6 D-64331 weiterstadt tel: 06150/1306-5, fax: 1306-99<br />
internet: http://www.schulze-elektronik.com e-mail: mail@schulze-elektronik.com
<strong>isl</strong> 6 <strong>chameleon</strong>: <strong>rapid</strong> <strong>charger</strong> <strong>series</strong><br />
operating instructions for software from V7.03, date of issue 17 DEC 2001<br />
2 How to obtain reliable, trouble-free<br />
operation<br />
It is essential to protect the <strong>charger</strong> from direct<br />
sunshine, dust, damp and rain. If the unit<br />
gets wet, dry it out thoroughly and have it<br />
checked and cleaned before re-use.<br />
The openings in the case must never be covered<br />
or sealed.<br />
The unit produces considerable heat in use. Allow<br />
excess heat to dissipate, and let the<br />
<strong>charger</strong> cool down after each <strong>rapid</strong>-charge<br />
process.<br />
Check the unit regularly for damage to the case<br />
and screen, and poor contact between cables<br />
and connectors.<br />
Keep the charge cables as short as possible.<br />
Cables longer than 20 cm cannot be used if<br />
you wish to conform to CE regulations. The<br />
internal battery wiring must also be as short<br />
as possible. Cable cross-section should be<br />
2.5mm2 (even for a receiver battery!).<br />
The charge cable should be fitted with highquality<br />
gold-contact connectors at both<br />
ends, and fittted with one of the ferrite tubes<br />
(CE tubes) supplied. The tubes are required<br />
to satisfy CE requirements (see Chapter 3).<br />
Twist charge leads together to minimise interference<br />
radiation.<br />
Take care not to break the ferrite core in the<br />
power supply cable, as it prevents the cable<br />
acting as an aerial and radiating converter<br />
and processor pulse frequency signals.<br />
The information and charging currents stated<br />
by the battery manufacturer must be observed<br />
at all times. Charge up only such<br />
batteries which are expressly stated to be<br />
suitable for high charge currents.<br />
Using the <strong>charger</strong> with a stabilised mains power<br />
supply unit (PSU) is possible in theory, but<br />
in fact cannot be generally recommended.<br />
The high charge power of the unit, inadequate<br />
output capacitance, residual voltage<br />
and other factors relating to the PSU may<br />
cause long-term and even terminal damage<br />
to the <strong>charger</strong> and/or the power supply.<br />
schulze<br />
elektronik<br />
gmbh<br />
page 3<br />
If you insist on using the unit in this way you will<br />
have to carry out your own tests and checks<br />
to ensure that your combination of <strong>charger</strong> -<br />
power supply works correctly.<br />
In general terms we have to say that none<br />
of the laboratory mains PSUs currently<br />
available is suitable for use with the <strong>isl</strong> 6<br />
without modification.<br />
Many transmitters are fitted with a protective diode<br />
which has to be by-passed if the battery<br />
is to be <strong>rapid</strong>-charged. Read your RC system<br />
instructions before you attempt to do this.<br />
Make it part of your standard procedure to<br />
check that the charge quantity indicated<br />
by the <strong>charger</strong> corresponds to the expected<br />
charge quantity when the unit has<br />
switched off after detecting the "battery<br />
full" condition. This is the only reliable<br />
means of recognising when the <strong>charger</strong><br />
has terminated the charge prematurely.<br />
The most likely reason for premature<br />
charge termination is a deep-discharged<br />
pack and/or a pack with few cells (carry<br />
out test charges), or a particular type of<br />
cell. Caution: this can result in a crash if<br />
you fly a model with a part-charged battery.<br />
The sequence of letters "a", "b"... to indicate the<br />
probability of a full battery does not always<br />
prove that a pack is fully charged. Often the<br />
sequence of letters will appear at the start of<br />
the charge if the cells are deep-discharged.<br />
Individual cells to be charged must be soldered<br />
together, otherwise the fully automatic programs<br />
may not work properly. Do not use<br />
battery boxes with spring contacts.<br />
The <strong>isl</strong> 6 only sets the charge current calculated<br />
for a particular pack if that current does<br />
not cause any of the <strong>charger</strong>'s parameters<br />
to be exceeded.<br />
Good results are obtained with Ni-MH batteries<br />
if you use manual charge current setting<br />
and set a current of no more than 1C.<br />
If a pack is completely flat (approx.
page 4<br />
3 Commonly used terms<br />
Final charge voltage: the voltage at which the battery's<br />
charge limit (capacity limit) is reached. The<br />
charge process switches from a high current to a<br />
low maintenance rate (trickle charge) at this point.<br />
From this point on further high current charging<br />
would cause overheating and eventual terminal<br />
damage to the pack.<br />
Final discharge voltage: the voltage at which the<br />
battery's discharge limit is reached. The chemical<br />
composition of the batteries determines the level of<br />
this voltage. Below this voltage the battery enters<br />
the deep discharge zone. Individual cells within the<br />
pack may become reverse-polarised in this condition,<br />
and this can cause permanent damage.<br />
Memory effect: A genuine memory effect has been<br />
recorded by Nasa, caused by repeated charge /<br />
discharge cycles. Nasa has found that full capacity<br />
can be regained by overcharging the cells. In modelling<br />
applications different effects are responsible<br />
for the reduction in cell capacity. The problem can<br />
be cured by balancing the cells (see below), and<br />
prevented by the measures described in Chapter 4.1.3.<br />
Balancing: a method of regaining full (nominal) capacity<br />
by alternately charging and discharging the<br />
pack, sometimes several times. This process is<br />
especially useful after a long period of non-usage<br />
(e.g. after purchase, or after several weeks without<br />
flying), and is also used to disperse the memory effect<br />
(see below). The effect of balancing is to break<br />
down the coarse crystaline structure (low capacity)<br />
inside the cell and convert it into a fine crystaline<br />
one (high capacity).<br />
Power-On (- reset): the status of the <strong>isl</strong> 6 after it<br />
has been connected to the car battery.<br />
Ready message: <strong>charger</strong> ready to run the program<br />
you have just selected (batteries not connected).<br />
C: Coulomb or capacity: Unit of measurement relating<br />
to the quantity of charged energy. In conjunction<br />
with charge current data this unit is used to determine<br />
the recommended / prescribed charge current<br />
of a battery of a given capacity. Example: if the<br />
charge current or discharge current of a 500 mAh<br />
battery is 50 mA, we refer to this as a charge or<br />
discharge at one tenth C (C/10 or 1/10 C).<br />
A, mA: unit of measurement relating to charge or<br />
dis-charge current. 1000 mA = 1 A (A=Ampere,<br />
mA=Milliampere)<br />
Ah, mAh: unit of measurement for the capacity of a<br />
battery (Amperes x time unit; h = hour). If a pack is<br />
charged for one hour at a current of 2 A, it has<br />
been fed 2 Ah of energy. It receives the same<br />
quantity of charge (2 Ah) if it is charged for 4 hours<br />
at 0.5 A, or 15 minutes (=1/4 h) at 8 A.<br />
<strong>isl</strong> 6 <strong>chameleon</strong>: <strong>rapid</strong> <strong>charger</strong> <strong>series</strong><br />
4 Useful information about<br />
batteries and maintenance<br />
4.1.1 General information:<br />
Do not store or charge below 0°C, optimum is 10...30°C.<br />
A cold cell is not capable of accepting as much current as a<br />
warm one. For this reason you must expect differences in<br />
charge characteristics if you use fully automatic charge current<br />
calculation (in Winter the charging properties will be worse<br />
than in Summer).<br />
The lower the internal resistance of the battery, the higher the<br />
<strong>charger</strong> can increase the charge current for that battery. For a<br />
battery <strong>charger</strong> which sets the current automatically the<br />
resistance of the cable is added to the internal resistance.<br />
For this reason: use heavy cable (large cross-section), even<br />
for receiver batteries, and keep them short. Do not charge<br />
via a switch or switch harness!<br />
If you wish to measure battery capacity accurately a suitable discharge<br />
current is usually 1/10 C.<br />
4.1.2 Reflex charging:<br />
Charging processes which include a brief discharge pulse definitely<br />
have the effect that the battery is several degrees cooler<br />
at the end of the process. However, from the point of view of<br />
the competition operator this is an undesirable effect, as the<br />
cell chemistry can only supply high currents if its temperature<br />
is raised to a certain extent.<br />
All these effects, whether they actually occur or are simply<br />
hear-say, have no practical significance if batteries are<br />
correctly handled in the first place. When a battery is full,<br />
you can’t fill it any fuller!<br />
4.1.3 Memory effect of Ni-Cd and Ni-MH cells:<br />
If cells are repeatedly stored partially discharged, or are<br />
recharged from a half-discharged state, what is known as the<br />
memory effect sets in. The cells note that their full capacity is<br />
not required, and react by refusing to make it available.<br />
One aspect of this is that the crystalline chemical structure<br />
inside the cell changes; the cell‘s resistance rises and its<br />
voltage collapses under load, with the result that “full capacity”<br />
can no longer be exploited at normal discharge currents.<br />
Even if reflex charging were to eliminate the memory effect, there<br />
is no denying the necessity to store your cells in the discharged<br />
state; this applies to Ni-Cd cells and also, to some<br />
extent, to Ni-MH* cells.<br />
Otherwise, a characteristic feature of these cells is that they<br />
self-discharge - and the rate of discharge is different for each<br />
individual cell in a battery pack!<br />
If a fully charged pack is left for a considerable time, it will<br />
eventually consist of cells of widely varying states of charge.<br />
If at this point you ...<br />
a) ... give the pack a full charge: the cell with the most charge<br />
will be overcharged, heat up and be ruined, while the cell with<br />
the least charge will still not be full after the same period of<br />
charging.<br />
b) ... discharge the pack: the cell with the least charge will be<br />
completely flat first, then reverse polarity and often suffer an<br />
internal short-circuit. At the point when this happens, the cell<br />
with the most charge is still not yet completely discharged.<br />
This is a reliable method of wrecking your most valuable<br />
packs - and rest assured that reflex charging will make<br />
absolutely no difference. However, there is one method of<br />
avoiding the problem: discharge cells after use, and recharge<br />
them just before use!<br />
[*] about Ni-MH cells: see Section 4.3<br />
schulze elektronik gmbh prenzlauer weg 6 D-64331 weiterstadt tel: 06150/1306-5, fax: 1306-99<br />
internet: http://www.schulze-elektronik.com e-mail: mail@schulze-elektronik.com
<strong>isl</strong> 6 <strong>chameleon</strong>: <strong>rapid</strong> <strong>charger</strong> <strong>series</strong><br />
operating instructions for software from V7.03, date of issue 17 DEC 2001<br />
4.2 Nickel-Cadmium batteries (NiCd):<br />
Nominal voltage level: 1.2 V / cells.<br />
Selecting the fast charge current (manual setting):<br />
Charge current = 2 C (C = nominal battery capacity)<br />
Maximum continous discharge current:<br />
Currents of 10 C to 30 C are possible, depending on cell type.<br />
Maintenance of the Nickel-Cadmium batteries (Ni-Cd):<br />
If a battery is brand-new or used irregularly it is often only<br />
possible to balance it completely by carrying out several<br />
discharge - charge cycles (use auto-d program).<br />
The automatic current setting circuitry (patent applied for) provides<br />
optimum protection to your Ni-Cd batteries during charging.<br />
The reduced current towards the end of the charge ensures<br />
a completely full pack combined with only a slight temperature<br />
rise, as you will easily see in comparison with conventional<br />
constant current techniques.<br />
Do not use automatic charge current calculation when charging<br />
Ni-MH batteries!<br />
Amongst model car operators it is standard practice to erase any<br />
memory effect by completely discharging each cell individually<br />
via a resistor (approx. 68 Ohm).<br />
This deliberately ”unbalances” the pack, but it can cause the<br />
automatic charge termination circuitry to switch off the current<br />
prematurely during the charge process.<br />
For receiver batteries special types such as the Sanyo N-350-<br />
AAC (the C is the key!) are a good choice.<br />
Warning: The reduced charge current with 1-6 cells makes the<br />
voltage peak in the charge curve very slight, especially with<br />
batteries of high nominal capacity. In this situation the <strong>charger</strong><br />
is sometimes unable to detect the ”full” condition due to the illdefined<br />
peak.<br />
4.3 Nickel-Metal-Hydride batteries (NiMH):<br />
Voltage level: 1.2 V / cell.<br />
Selecting the fast charge current (no automatic program!):<br />
Charge current typical 1 C (set a fixed current of, for example,<br />
1 A with 1100 mAh batteries, or 3 A with 3 Ah cells). Some<br />
modern high-current Ni-MH cells made by particular<br />
manufacturers can safely be charged at a higher rate of up to<br />
1.6 C (This applies to:Panasonic 3000: 3.5...4A, Powers 3000:<br />
3 A, Saft 3000: 3 A (not if battery is charged inside a<br />
transmitter!), Sanyo 3000: 4...5A).<br />
Maximum continous discharge current:<br />
Currents of 5 C to 15 C are possible, depending on cell type.<br />
Typically for Sanyo Twicell and RC3000H cells:<br />
In our experience these cells can be treated in a similar way to<br />
Ni-Cd cells, i.e. they can safely be stored in the discharged<br />
state (use auto-d program). It is also possible to set the<br />
<strong>charger</strong>’s termination sensitivity to the same level as Ni-Cd<br />
cells (i.e. normal sensitivity); this eliminates the danger of<br />
premature charge termination.<br />
High maximum load capacity and voltage level.<br />
Typically for Panasonic P3000NIMH cells:<br />
These cells should never be stored completely discharged, i. e.<br />
use the auto -e program, not a bulb or resistors - even for 2 or<br />
3 days. For storage of more than 1 week: first discharge the<br />
pack , then charge about 10% of its capacity back into it.<br />
It is important that you take the trouble to give these cells a<br />
charge / discharge cycle around every four weeks, otherwise<br />
they become tired, and have to be pampered to restore them<br />
to full vigour. This involves going through the tiresome<br />
business of many repeated charge / discharge cycles. Of<br />
course, you should also give the cells one or more charge /<br />
discharge cycles before using them ”in anger”, as this<br />
refreshes the cell chemistry.<br />
High capacity and voltage level.<br />
schulze<br />
elektronik<br />
gmbh<br />
page 5<br />
Typical for Powers / GP GT3000R cells:<br />
Extremely high capacity, good voltage level.<br />
Other characteristics not yet determined in detail.<br />
4.3 Lead-acid batteries (Pb):<br />
Nominal voltage level: 2.0 V / cell.<br />
Selecting the fast charge current (pre-set for battery 2):<br />
Charge current = 1 C (C = nominal battery capacity)<br />
Maximum continous discharge current:<br />
Typically 0,2 C, short time load up to 1 C.<br />
Maintenance: In contrast to Ni-Cd/Ni-MH batteries, lead-acid<br />
batteries must be fully recharged after use in order to maintain<br />
full capacity.<br />
The nominal capacity can be reduced very quickly by incorrect<br />
handling (overloading, repeated 100% discharges, and<br />
especially deep-discharges). Please observe the battery<br />
manufacturer’s recommendations.<br />
Typical: The characteristics of lead-acid batteries are quite different<br />
to those of the Ni-Cd sintered cell packs which are used<br />
as the power source in model aircraft, cars and hydro-boats.<br />
They can only tolerate relatively low currents relative to their<br />
capacity if their full capacity is to be exploited, and/or the<br />
voltage is not to collapse too far.<br />
Used as single-cell glowplug energiser batteries and power<br />
source in some scale boats.<br />
Very low self-discharge rate.<br />
Hint: When charging lead-acid batteries on Battery 1 output note<br />
that the <strong>isl</strong> 6 can only detect the correct number of cells and<br />
set the correct current if the battery is intact and slightly<br />
charged.<br />
4.5 Lithium-Manganese-Oxide batteries: (LiMnO):<br />
Nominal voltage level: 3.0 V / cell.<br />
Selecting the fast charge current (pre-set for battery 2):<br />
We recommend currents up to 0.35 C, depending on the cell type.<br />
Maximum continous discharge current:<br />
We recommend currents up to 1.5 C.<br />
Maintenance: Always store these cells in the charged state.<br />
Typical: These cells are particularly recommended as receiver<br />
batteries (2 cells required), although correct charging and<br />
storage are very important. However, we do not recommend<br />
them as slow-fly flight packs (3 cells), since they have a limited<br />
ability to supply high currents, and their useful life varies<br />
greatly according to the discharge current and the extent to<br />
which they are discharged.<br />
Very good weight : energy ratio.<br />
Tip: Ideally all single cells in a pack should be charged<br />
separately; alternatively charge all cells in parallel.<br />
<strong>isl</strong> 6 uses a modified lead-acid charging program.<br />
The most common form of this cell type is the „Tadiran“ cell.<br />
4.6 Lithium-Ion batteries (LiIon):<br />
Nominal voltage level: 3.7 V / cell.<br />
Selecting the fast charge current (pre-set for battery 2):<br />
Charge current = 1 C or less (C = nominal battery capacity).<br />
Maximum continous discharge current:<br />
Up to 4 C, depending on cell type.<br />
Maintenance: Always store these cells in the discharged state<br />
(use auto-d program), if stored fully charged, the result can be<br />
a permanent reduction in capacity.<br />
Typical: They are very popular as power supplies for sail<br />
winches (2 cells).<br />
Their limited ability to supply high currents means that they are<br />
only suitable as flight packs for slow-fly models (2-3 cells), but<br />
they are popular for that application.<br />
Very good weight : energy ratio.<br />
<strong>isl</strong> 6 uses a modified lead-acid charging program.<br />
schulze elektronik gmbh prenzlauer weg 6 D-64331 weiterstadt tel: 06150/1306-5, fax: 1306-99<br />
internet: http://www.schulze-elektronik.com e-mail: mail@schulze-elektronik.com
page 6<br />
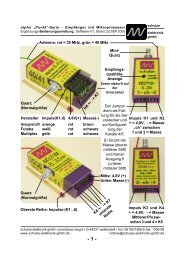
5 Fitting the CE tube<br />
Requirements:<br />
- The charge cable cross-section should be 2.5<br />
mm2 .<br />
- One wire should be coloured red (positive terminal<br />
+), the other black (negative -).<br />
- To meet CE requirements the charge lead<br />
should be no longer than 20 cm (minus the<br />
length of cable attached to the battery!).<br />
1. Solder a banana plug to each wire. To avoid<br />
short-circuits we recommend the use of safety<br />
banana plugs fitted with a sliding insulator.<br />
2. Wrap one of the cable ties (supplied) round<br />
the two wires about 4 cm from the banana<br />
plugs to hold the wires together.<br />
3. Slip the EMF tube onto the free end of the<br />
charge lead.<br />
4. Wrap a second cable tie round the two wires<br />
immediately adjacent to the tube (see illustration).<br />
Cable tie<br />
5. Twist the wires together and/or fit heat-shrink<br />
tubing to keep them tidy.<br />
6. Now solder the battery connector to the free<br />
ends of the charge lead. Don't forget to fit the<br />
pieces of heat-shrink sleeve required to insulate<br />
the soldered joints.<br />
A ready-made charge cable fitted with safety banana<br />
plugs and the CE tube is available from us<br />
under CE-kab-i6 (see illustration).<br />
<strong>isl</strong> 6 <strong>chameleon</strong>: <strong>rapid</strong> <strong>charger</strong> <strong>series</strong><br />
6 Connecting the <strong>charger</strong>,<br />
selecting the program<br />
Please read Chapter 1, "Warnings" and<br />
Chapter 2 "How to obtain reliable and<br />
trouble-free operation", as they contain<br />
important information which you must<br />
know before you connect and use the<br />
<strong>charger</strong>.<br />
6.1 Before you connect the <strong>charger</strong><br />
Remove the <strong>isl</strong> 6 from its carton for charging to<br />
ensure adequate air circulation.<br />
Do not yet connect the unit to the battery or batteries<br />
to be charged.<br />
Ensure that the power supply (12V car battery,<br />
mains PSU) is stable and is not producing or<br />
suffering from problems.<br />
Ensure that the connections between the power<br />
supply and the terminal clamps of the <strong>isl</strong> 6 are<br />
making perfect contact. This is the reason why<br />
we cannot recommend wander plugs and car cigar<br />
lighter connectors.<br />
6.2 Switch on the power supply<br />
If you are connecting the unit to a car battery installed<br />
in a car:<br />
- Switch off the car engine.<br />
If you are using a suitable mains PSU:<br />
- Switch on the mains PSU first.<br />
6.3 Connect the <strong>isl</strong> 6 to the power supply<br />
Connect the terminal clamps to the power supply<br />
contacts quickly and confidently, taking care<br />
to maintain correct polarity.<br />
Once connected correctly the <strong>charger</strong>'s screen<br />
shows the following "ready" message:<br />
(1) "(c) schulze gmbh" and<br />
(2) "<strong>isl</strong> 6-636+ V7.10"<br />
i. e. the manufacturers name is displayed in the<br />
first line, the second line shows the device type<br />
and version number of the software.<br />
On <strong>isl</strong> 6-330d, which includes a one line display<br />
only, the second line is displayed after a short<br />
wait time.<br />
schulze elektronik gmbh prenzlauer weg 6 D-64331 weiterstadt tel: 06150/1306-5, fax: 1306-99<br />
internet: http://www.schulze-elektronik.com e-mail: mail@schulze-elektronik.com
<strong>isl</strong> 6 <strong>chameleon</strong>: <strong>rapid</strong> <strong>charger</strong> <strong>series</strong><br />
operating instructions for software from V7.03, date of issue 17 DEC 2001<br />
If none of these messages appears:<br />
Immediately disconnect the terminal clamps, as<br />
damage may result from an undefined machine<br />
state. Wait 5 seconds, repeat Step 6.3.<br />
After that, display shows the selected cut off<br />
sensitivity for "battery 1" output (Akku 1):<br />
(1) "B1 cutoff mode " and<br />
(2) "normal " or<br />
(2) "sensitive " or<br />
(2) "sensitiv+delayed"<br />
Finally the <strong>charger</strong>'s screen shows the "ready"<br />
message, which can be different depending on<br />
the chosen program. "13.8" is the car battery<br />
voltage in volts.<br />
(1) "B1 ready auto. c" and<br />
(2) "B2 4NiCd.3A 0mAh" (<strong>isl</strong> 6-330d)<br />
(2) "B2 4NiCd.3A 13.8" other <strong>isl</strong>-s.<br />
On <strong>isl</strong> 6-330d, which includes a one line display<br />
only, the cursor is located completely left and<br />
shows "ready" of battery 2. Pressing both buttons<br />
at the same time, the "second line" (2) of<br />
the display is showed.<br />
Instead of the car battery voltage (two line display)<br />
the charged capacity of battery 2 is displayed<br />
- which is 0 mAh after power on.<br />
6.4 Displaying the currently set program<br />
at the Akku 1 output<br />
Press the "+" or "-" button briefly (beep):<br />
The screen shows a status message for the currently<br />
set program (e.g. "fullautomatic C"<br />
for fully automatic charging).<br />
After about two seconds the "Ready" message<br />
appears as already described.<br />
The current program after connecting the power<br />
supply is the one which was either last active<br />
(before you disconnected) or the fully automatic<br />
charge program ("FAUTO"), depending on the<br />
machine configuration: Chapter 9.<br />
6.5 Selecting your chosen charge or<br />
dis-charge program for Akku 1<br />
Selecting a program usually requires that no<br />
battery is connected to Output 1.<br />
To avoid selecting unexpected programs<br />
change programs only with the battery discon-<br />
schulze<br />
elektronik<br />
gmbh<br />
page 7<br />
nected (exception: charging less than 4 cells)!<br />
Any program can be selected by pressing the +<br />
or - button repeatedly or holding it pressed in.<br />
The programs are grouped as described below<br />
in section 7.<br />
A changing of battery 2 output programs is only<br />
practicable while connecting <strong>isl</strong> 6 to the car battery<br />
(see sectionl 9.2).<br />
6.6 Connecting the battery after selecting<br />
the program<br />
After choosing the program (see program descriptions<br />
in Chapter 7 and 8) connect the battery<br />
with correct polarity.<br />
A short tone confirms the start of the program.<br />
The display shows alternating in 1 sec. interval:<br />
(charge-)time, battery voltage, carbatt.voltage<br />
"00:01 5.63V 13.8" (<strong>isl</strong> 6-330d)<br />
resp.<br />
(Lade-)Zeit, Akkuspannung, Autobatt.spannung<br />
"00:01 5.63V 13.8" other <strong>isl</strong>-s<br />
and<br />
(charge-)quantity, batt.voltage, (charge-)current.<br />
"01mAh 5.63V0.30A"<br />
Charging battery 2 only on the <strong>isl</strong> 6-330d, the<br />
charging data are not displayed as a cursor but<br />
in the same way as showing battery 1 data. For<br />
differentiation from battery 1 display 1...2 black<br />
rectangular fields are shown in the line.<br />
6.7 Displaying the charge/discharge quantities<br />
of e. g. combination programs<br />
Hold both buttons (+ and -) pressed for a short<br />
time and release it.<br />
dc programs shows all discharge quantities<br />
(capacity) in line one. In line two all charge<br />
quantities are displayed.<br />
cd programms shows it in reverse order (charge<br />
capacity in line 1).<br />
(1) "-99mAh68mAh,...,"<br />
(2) "+.12Ah,...,,...,"<br />
The example shows the 3dc program. A fully<br />
charged 110 mAh battery was connected and<br />
was one time fully discharged (-99mAh) and one<br />
time fully charged (0.12Ah=120mAh). Now it is<br />
in the third phase - with a currently discharged<br />
quantity of 68mAh.<br />
schulze elektronik gmbh prenzlauer weg 6 D-64331 weiterstadt tel: 06150/1306-5, fax: 1306-99<br />
internet: http://www.schulze-elektronik.com e-mail: mail@schulze-elektronik.com
page 8<br />
<strong>isl</strong> 6 <strong>chameleon</strong>: <strong>rapid</strong> <strong>charger</strong> <strong>series</strong><br />
7 Overview Akku/battery 1 and Akku/battery 2 socket programs<br />
7.1 Akku 1/ battery 1 socket programs<br />
Type of program Hint Usage<br />
Group 1 Lead/acid charging programs<br />
Pb C Lead/acid charging high current Fast charge-/Refresh charge<br />
Pb c Lead/acid charging low current for batteries with few capacity<br />
Group2 Lead/acid discharging programs<br />
Pb-d Lead/acid discharging max. 200mA precise capacity measurement<br />
Pb-D Lead/acid discharging high current for batteries with high capacity<br />
Group 3 Fixed current discharging programs<br />
d-50mA Ni-.. discharging precise cap. measurement .. .. for 500mAh Akkus (I=1/10C)<br />
... or normal discharge ... ... for 50mAh Akkus (I=1C)<br />
d-0,2A Ni-.. discharging fast discharge ... ... for 50mAh Akkus (I=4C)<br />
... Ni-.. discharging measuring the last bits... e.g. for receiver battery with<br />
d-1,0A Ni-.. discharging ...of energy (capacity) real currents<br />
Group 4 Combination programs, Ni-Cd only<br />
auto -d Ni-Cd/Li-Io discharging discharging thoroughly for storage<br />
auto cd Ni-Cd charge/discharging battery capacity test<br />
auto3dc Ni-Cd discharing/charging, 3 times formatting new batteries, maintenance and...<br />
auto-dc Ni-Cd discharing/charging ...deleting memory effect<br />
auto c Ni-Cd charging, standard-programm optimized charging, 2.5mm2 charging leads essential<br />
Group 5 Fixed current discharging programs<br />
I=D.1A Ni-.. charging I=0,4A pulsed =0,1A averaged duration charge program,<br />
no time limit no cut off long duration formatting<br />
I=.25A Ni-.. charging no time limit... ...but peak voltage cut off active<br />
I=0.3A Ni-.. charging current I = 2*C... ...for 110-150 mAh Ni-Cd batt.<br />
I=0.3A<br />
...<br />
Ni-.. charging current I = 1*C... ...for 300 mAh Ni-MH batteries<br />
I=3.0A Ni-.. charging I = 1 C ... 1,5 C... ...for Ni-MH battery with 3 Ah,<br />
I=3.0A Ni-.. charging I = 2 C ... 3 C... ...for Ni-Cd batteries with 1...1,5 Ah<br />
... common charging of elder batteries, when automatic current calculation does not...<br />
...calculate normal currents. batteries are used-up.<br />
I=5.5A Ni-Cd charging charge current setting for cells which stand highest currents<br />
I=6.0A <strong>isl</strong> 6-636+ only charge current setting for cells which stand highest currents<br />
7.2 Akku 2/ battery 2 socket programs<br />
1) Charging of 1 - 6* Nickel Cadmium batteries 1,2 - 7,2 V Currents: 100, 200, 332, 500** mA<br />
2) Charging of 1 - 6* Nickel Metallhydrid batteries 1,2 - 7,2 V Currents: 100, 200, 332, 500** mA<br />
3) Charging of 1 - 4* Lead/Acid or Lead/Gel batt. 2,0 - 8,0 V Currents: 100, 200, 332, 500** mA<br />
4) Charging of 1 - 3* Lithium Mangan Oxid batt. 3,0 - 9,0 V Currents: 100, 200, 332, 500** mA<br />
5) Charging of 1 - 3* Lithium Ion batteries 3,7-11,1 V Currents: 100, 200, 332, 500** mA<br />
[*] maximum cell count with a supply voltage of 13,8 V only, available on soft- & hardware from V 7.03<br />
[**] 500 mA not available on <strong>isl</strong> 6-330d<br />
schulze elektronik gmbh prenzlauer weg 6 D-64331 weiterstadt tel: 06150/1306-5, fax: 1306-99<br />
internet: http://www.schulze-elektronik.com e-mail: mail@schulze-elektronik.com
<strong>isl</strong> 6 <strong>chameleon</strong>: <strong>rapid</strong> <strong>charger</strong> <strong>series</strong><br />
operating instructions for software from V7.03, date of issue 17 DEC 2001<br />
8.1.1 Battery output 1, Ni-Cd / Ni-MH charge program(s) fixed c<br />
with manual charge current selection (I=x.xx)<br />
schulze<br />
elektronik<br />
gmbh<br />
page 9<br />
Purpose If you know the permissible charge currents for your batteries, you can use a matching<br />
charge program with a fixed defined current. The current can be used for balance-charging,<br />
standard and <strong>rapid</strong> charging (low, medium and high currents) with the charge periods calculated<br />
according to the state of charge of the battery.<br />
Manual current selection (no more than 1C) and "sensitive" automatic charge termination<br />
are the preferred method if you are using Ni-MH batteries, and also if you have to use thin<br />
charge cables and small numbers of cells.<br />
Cell type / No. Ni-Cd, Ni-MH, 1-30 cells (-330d ... -530d), 1-36 cells (-636+ and -636e).<br />
Description The selected program starts charging immediately using the current you have selected.<br />
This current is maintained until the <strong>charger</strong> detects "battery full". The charge rate is only reduced<br />
if the selected current threatens to overheat / overload the <strong>charger</strong> as voltage rises.<br />
Selectable currents: 0.1, 0.25, 0.3, 0.4, 0.5, 0.6, 0.8, 1.0, 1.2, 1.5, ... in 0.5A increments<br />
Maximum currents: -330d = 5.5 A, -430d = 5.0 A, -530d = 6.0 A, -636_= 6.5 A<br />
Special features - charging 1-3 Ni-Cd cells: to suppress low-voltage messages first select the D.1A program<br />
and then connect the battery. Now set your chosen program using the + and - buttons.<br />
See also the warnings relating to this in Chapters 1 and 2.<br />
- a charge lasting longer than 3 hours without any "full" detection halts the charge<br />
process without showing the charge period except in the following programs:<br />
- C.1A and 0.25A programs have no time limit<br />
- C.1A program (= 0.1A continuous charge): no automatic charge termination<br />
- C.1A program uses pulsed current (pulse - pause ratio 1 : 3)<br />
Settings - Call up the Power-On reset program you wish to use (see Chapter 9.3.1)<br />
for Power-On - Sensitivity of the automatic charge termination (see Chapter 9.3.2)<br />
Program 1. Disconnect any battery from Output 1.<br />
selection 2. Press the "+" or "-" button repeatedly or constantly to select the program you wish to use<br />
(I=x.xA, x.x = time statement).<br />
- Display while button is pressed: "Ch. current I=x.xA"<br />
3. Release the button. The charge program on the screen is now selected.<br />
If you change to a discharge program (without disconnecting the battery - if 1. is ignored),<br />
the screen will show the resultant charge quantity from the charge previously fed in and removed,<br />
first as a positive and then as a negative value.<br />
Connect battery 4. Now connect the battery to be charged to the Akku 1 output, maintaining correct polarity.<br />
The unit beeps to indicate the start of the charging process.<br />
Displays while charging<br />
Line1 - Current charge time, current charge voltage, current charge current<br />
alternating with: Current charge quantity, voltage, current/car battery voltage (on <strong>isl</strong> 6-330d)<br />
- Probability of full charge by <strong>series</strong> of letters "a" -> "b"... (buttons inactive)<br />
- "!": measuring for charge current and automatic charge termination (buttons inactive)<br />
- "*": charge current automatically reduced to guard against overheating<br />
- Various warnings and error messages in plain text, with error number<br />
- Pressing +&-buttons simultaneously: current programm; after release: charge capacity<br />
(see chapter 6.7)<br />
Displays after program end<br />
Line1 - Total charge time, final charge voltage, "full" e.g. "38:47 31.8V full"<br />
alternating with: - Total charged capacity, final charge voltage, "full" e.g.<br />
- "battery full" display by: brief buzz, LCD shows inverted "f"<br />
"2.6Ah 31.8V full"<br />
- Inverted "t": short pulses of current, widely spaced, to maintain charged state<br />
- Various warnings and error messages in plain text, with error number<br />
- Pressing +&-buttons simultaneously: current program; after release: charged capacity<br />
schulze elektronik gmbh prenzlauer weg 6 D-64331 weiterstadt tel: 06150/1306-5, fax: 1306-99<br />
internet: http://www.schulze-elektronik.com e-mail: mail@schulze-elektronik.com
page 10<br />
<strong>isl</strong> 6 <strong>chameleon</strong>: <strong>rapid</strong> <strong>charger</strong> <strong>series</strong><br />
8.1.2 Battery output 1, Ni-Cd charge program auto c<br />
with automatic charge current selection<br />
Purpose In most cases the "Auto C" fully automatic charge program is the right choice, as it provides optimum<br />
<strong>rapid</strong>-charging of batteries, charging fully but gently. Within the permissible capacity range of<br />
100 mAh to 4 Ah you do not need to have accurate knowledge about the type of Ni-Cd sintered cell<br />
you are using. The only pre-condit-ions are: adequate cross-section of the charge cable (2.5 mm2 ),<br />
high-quality connectors and a pack consisting of soldered cells.<br />
Cell type / No. Ni-Cd, 1-30 cells (-330d ... -530d), 1-36 cells (-636+ und -636e).<br />
Description The <strong>isl</strong> 6 automatically calculates the charge current most appropriate to the battery to be charged.<br />
It does this by measuring the battery continuously, and adjusting the charge current repeatedly to<br />
match the pack's ability to absorb charge and/or to the maximum capacity of the <strong>isl</strong> 6. Initially the<br />
charge rate is 300 mA for a brief period, then the current rises before falling again towards the end<br />
of the charge process. The program continues charging until it detects "battery full". It then switches<br />
to a maintenance (trickle) charge.<br />
- The calculated charge current is reduced if there is any danger of the <strong>charger</strong> overheating or being<br />
overloaded.<br />
- Maximum current: -330d = 5.5 A, -430d = 5.0 A, -530d = 6.0 A, -636_= 8.0 A<br />
Special features - charging 1-3 Ni-Cd cells: to suppress low-voltage messages first select the D.1A program and<br />
then connect the battery. Now set your chosen program using the + and - buttons. See also the<br />
warnings relating to this in Chapters 1 and 2.<br />
- A charge lasting longer than 3 hours without any "full" detection halts the charge process without<br />
showing the charge period.<br />
Settings - Call up the Power-On reset program you wish to use (see Chapter 9.3.1)<br />
for Power-On - Sensitivity of the automatic charge termination (see Chapter 9.3.2)<br />
Program 1. Disconnect any battery from Output 1.<br />
selection 2. Press the "+" or "-" button repeatedly or constantly to select program (auto c).<br />
- Display while the button is pressed: "fullautomatic. c".<br />
3. Release the button. The fully aiutomatic charge program on the screen is now selected.<br />
If you change to a discharge program (without disconnecting the battery - if 1. is ignored), the screen<br />
will show the resultant charge quantity from the charge previously fed in and removed, first as a positive<br />
and then as a negative value.<br />
Connect battery 4. Now connect the battery to be charged to the Akku 1 output, maintaining correct polarity. The unit<br />
beeps to indicate the start of the charging process.<br />
Displays while charging<br />
Line1 - Current charge time, current charge voltage, current charge current<br />
alternating with: Current charge quantity, voltage, current/car battery voltage (on <strong>isl</strong> 6-330d)<br />
- Probability of full charge by <strong>series</strong> of letters "a" -> "b"... (buttons inactive)<br />
- "!": measuring for charge current and automatic charge termination (buttons inactive)<br />
- "*": charge current automatically reduced to guard against overheating<br />
- Various warnings and error messages in plain text, with error number<br />
- Pressing +&-buttons simultaneously: current programm; after release: charge capacity<br />
(see chapter 6.7)<br />
Displays after program end<br />
Line1 - Total charge time, final charge voltage, "full" e.g. "38:47 31.8V full"<br />
alternating with: - Total charged capacity, final charge voltage, "full" e.g.<br />
- "battery full" display by: brief buzz, LCD shows inverted "f"<br />
"2.6Ah 31.8V full"<br />
- Inverted "t": short pulses of current, widely spaced, to maintain charged state<br />
- Various warnings and error messages in plain text, with error number<br />
- Pressing +&-buttons simultaneously: current program; after release: charged capacity<br />
schulze elektronik gmbh prenzlauer weg 6 D-64331 weiterstadt tel: 06150/1306-5, fax: 1306-99<br />
internet: http://www.schulze-elektronik.com e-mail: mail@schulze-elektronik.com
<strong>isl</strong> 6 <strong>chameleon</strong>: <strong>rapid</strong> <strong>charger</strong> <strong>series</strong><br />
operating instructions for software from V7.03, date of issue 17 DEC 2001<br />
schulze<br />
elektronik<br />
gmbh<br />
page 11<br />
8.1.3 Battery output 1, Ni-Cd maintenance programs auto-dc and auto3dc<br />
(not <strong>isl</strong> 6-636e) with automatic discharge and charge current selection<br />
Purpose The two battery maintenance programs (1DC, 3DC) balance the state of your batteries in order to<br />
erase any existing memory effect. In particular, batteries which are only slightly discharged in use<br />
(e.g. transmitter and receiver packs) need to be dis-charged completely and recharged at regular intervals.<br />
Irregularly maintained and brand-new batteries often need this procedure to be carried out<br />
three times in a row.<br />
Cell type / No. Ni-Cd, 1-30 cells (-330d ... -530d), 1-36 cells (-636+).<br />
Description Using the auto-d program the battery is discharged down to the final discharge voltage and then recharged<br />
using the auto-c program (three times if you select the auto3dc program). The program<br />
charges until the <strong>charger</strong> detects "battery full", then switches to a maintenance (trickle) charge.<br />
- The initial value of the discharge current is calculated from the maximum discharge power dissipation<br />
and/or the <strong>charger</strong>'s maximum permissible discharge current.<br />
- Once the final discharge voltage is reached, the discharge current is reduced in stages to a low value.<br />
- Continuous charge current adjustment to suit the battery's ability to absorb charge.<br />
- The calculated charge current is reduced if there is a danger of the unit overheat-ing or being overloaded.<br />
- Exception: if cells up to the number set for the Akku 2 charge section are connected, the charge<br />
current value for Akku 2 is set as the discharge current.<br />
- Max. charge current: -330d = 5.5 A, -430d = 5.0 A, -530d = 6.0 A, -636_= 8.0 A<br />
- Max. discharge current: 2,0 A, <strong>isl</strong> 6-330d = 1,0 A<br />
- Max. discharge power: 16 W, <strong>isl</strong> 6-330d = 10 W<br />
Special features - The <strong>isl</strong> 6 hardware is not designed for discharging 1-2 Ni-Cd cells. Reverse polarity guard diodes<br />
and the types of transistor used only allow the unit to discharge below 2 Volts at reduced currents;<br />
discharging below about 1 Volt is virtually impossible.<br />
- a charge period longer than 3 hours without any "full" detection halts the charge process without<br />
showing the charge period except in the following programs:<br />
Settings - Call up the Power-On reset program you wish to use (see Chapter 9.3.1)<br />
for Power-On - Sensitivity of the automatic charge termination (see Chapter 9.3.2).<br />
Program 1. Disconnect any battery from Output 1<br />
selection 2. Press the "+" or "-" button repeatedly or constantly to select the program you wish to use (autodc<br />
oder auto3dc)<br />
- Display, button pressed: "fullautomatic-dc" or "fullautomatic3dc"<br />
3. Release the button. The combination program on the screen is now selected.<br />
If you change from the a discharge to a charge program (without disconnecting the battery - if 1. is<br />
ignored), the screen will show the resultant capacity from the previously discharge - at first as a negative<br />
and then as a positive value.<br />
Connect battery 4. Now connect the battery to be charged to the Akku 1 output, maintaining correct polarity. The unit<br />
beeps to indicate the start of the charging process.<br />
Displays while discharging/charging<br />
Line1 - Current discharge/charge time, current discharge/charge voltage, current discharge/charge current<br />
alternating with: Current discharge or charge capacity, voltage, current/car battery voltage (on <strong>isl</strong> 6-330d)<br />
- Probability of full charge by <strong>series</strong> of letters "a" -> "b"... (buttons inactive) - during charge phase<br />
- "!": measuring for charge current and auto. charge termination (buttons inactive) - while charging<br />
- "*": charge current automatically reduced to guard against overheating<br />
- Various warnings and error messages in plain text, with error number<br />
- Pressing +&-buttons simultaneously: current programm; after release: discharge and charge capacity/capacities<br />
(see chapter 6.7)<br />
Displays after program end<br />
Line1 - Total charge time, final charge voltage, "full" e.g. "33:12 15.9V full"<br />
alternating with: Total charged quantity, final charge voltage, "full" e.g. "2.6Ah 15.9V full"<br />
- "battery full" display by: brief buzz, LCD shows inverted "f"<br />
- Inverted "t": short pulses of current, widely spaced, to maintain charged state<br />
- Various warnings and error messages in plain text, with error number<br />
- Pressing +&-buttons simultaneously: current programm; after release: discharged and charged<br />
capacity/capacities (refer to section 6.7)<br />
schulze elektronik gmbh prenzlauer weg 6 D-64331 weiterstadt tel: 06150/1306-5, fax: 1306-99<br />
internet: http://www.schulze-elektronik.com e-mail: mail@schulze-elektronik.com
page 12<br />
<strong>isl</strong> 6 <strong>chameleon</strong>: <strong>rapid</strong> <strong>charger</strong> <strong>series</strong><br />
8.1.4 Battery output 1, Ni-Cd capacity measuring program auto cd<br />
(not <strong>isl</strong> 6-636e) with automatic charge / discharge current selection<br />
Purpose This program allows you to examine individual battery packs for changes, and helps you draw conclusions<br />
about their further usefulness based on variations in meas-ured capacity data.<br />
Cell type / No. Ni-Cd, 1-30 cells (-330d ... -530d), 1-36 cells (-636+).<br />
Description The battery connected to the <strong>charger</strong> is charged up using the auto c program and then discharged<br />
using the auto -d program.<br />
- The <strong>isl</strong> 6 automatically and repeatedly calculates the charge current to match the battery. The calculated<br />
charge current is reduced if there is a danger of the unit overheating or being overloaded.<br />
The program charges until it detects "battery full".<br />
- The battery is then discharged down to the final discharge voltage. The initial value of the discharge<br />
current is calculated according ot the maximum power dissipat-ion and/or the unit's maximum<br />
permissible discharge current.<br />
- Exception: if cells up to the number set for the Akku 2 charge section are connected, the charge<br />
current value for Akku 2 is set as the discharge current.<br />
- Max. charge current: -330d = 5.5 A, -430d = 5.0 A, -530d = 6.0 A, -636_= 8.0 A<br />
- Max. discharge current: 2,0 A, <strong>isl</strong> 6-330d = 1,0 A<br />
- Max. discharge power: 16 W, <strong>isl</strong> 6-330d = 10 W<br />
Special features - The <strong>isl</strong> 6 is not designed for discharging 1-2 Ni-Cd cells. Reverse polarity guard diodes and the<br />
types of transistor used allow the <strong>charger</strong> to discharge below 2 Volts only at reduced currents; discharging<br />
below about 1 Volt is virtually impossible.<br />
- a charge period longer than about 3 hours without any "full" detection halts the charge<br />
progress without showing the charge period.<br />
Settings - Call up the Power-On reset program you wish to use (see Chapter 9.3.1).<br />
for Power-On - Sensitivity of the automatic charge termination (see Chapter 9.3.2).<br />
Program 1. Disconnect any battery from Output 1.<br />
selection 2. Press the "+" or "-" button repeatedly or constantly to select the program you wish to use (auto<br />
cd).<br />
- Display, button pressed: "fullautomatic cd"<br />
3. Release the button. The combination program on the screen is now selected.<br />
If you change to a discharge program (without disconnecting the battery - if 1. is ignored), the screen<br />
will show the resultant charge quantity from the charge previously fed in and removed, first as a positive<br />
and then as a negative value.<br />
Connect battery 4. Now connect the battery to be charged to the Akku 1 output, maintaining correct polarity. The unit<br />
beeps to indicate the start of the charging process.<br />
Displays while charging/discharging<br />
Line1 - Current discharge/charge time, current discharge/charge voltage, current discharge/charge current<br />
alternating with: Current discharge or charge capacity, voltage, current/car battery voltage (on <strong>isl</strong> 6-330d)<br />
- Probability of full charge by <strong>series</strong> of letters "a" -> "b"... (buttons inactive) - during charge phase<br />
- "!": measuring for charge current and auto. charge termination (buttons inactive) - while charging<br />
- "*": charge current automatically reduced to guard against overheating<br />
- Various warnings and error messages in plain text, with error number<br />
- Pressing +&-buttons simultaneously: current programm; after release: charged and discharged<br />
capacity (chapter 6.7)<br />
Displays after program end<br />
Line1 - Total discharge time, final discharge voltage, "empty" e.g. "65:09 8.51Vempty"<br />
alternating with: - Total discharge capacity, final discharge voltage, "empty" e.g. "1.9Ah 8.51Vempty"<br />
- "battery empty" display by: brief buzz, LCD shows inverted "e"<br />
- Various warnings and error messages in plain text, with error number<br />
- Pressing +&-buttons simultaneously: current programm; after release: charged and discharged<br />
capacity (chapter 6.7)<br />
schulze elektronik gmbh prenzlauer weg 6 D-64331 weiterstadt tel: 06150/1306-5, fax: 1306-99<br />
internet: http://www.schulze-elektronik.com e-mail: mail@schulze-elektronik.com
<strong>isl</strong> 6 <strong>chameleon</strong>: <strong>rapid</strong> <strong>charger</strong> <strong>series</strong><br />
operating instructions for software from V7.03, date of issue 17 DEC 2001<br />
8.1.5 Battery output 1, Ni-Cd / Ni-MH discharge program auto -d<br />
(not <strong>isl</strong> 6-636e) with automatic discharge current selection<br />
schulze<br />
elektronik<br />
gmbh<br />
page 13<br />
Purpose This discharge program discharges the pack as quickly and thoroughly as possible, and is<br />
therefore ideal for preparing cells for storage, and also for balancing and refreshing cells.<br />
Cell type / No. Ni-Cd, Ni-MH, 1-30 cells (-330d ... -530d), 1-36 cells (-636+ and -636e).<br />
Description The battery connected to the unit is discharged down to the final discharge voltage.<br />
- The initial value of the discharge current is calculated from the maximum discharge power<br />
dissipation and/or the <strong>charger</strong>'s maximum permissible discharge current.<br />
- Exception: if cells up to the number set for the Akku 2 charge section are connected, the<br />
charge current value for Akku 2 is set as the discharge current.<br />
- When the final discharge voltage is reached, the discharge current is reduced in stages<br />
down to a low value, in order to remove from the pack the last usable residual energy before<br />
the program is switched off.<br />
- Final discharge voltage: approx. 0.85 V / cell<br />
- Max. discharge current: 2,0 A, <strong>isl</strong> 6-330d = 1,0 A<br />
- Max. discharge power: 16 W, <strong>isl</strong> 6-330d = 10 W<br />
Special features - The <strong>isl</strong> 6 hardware is not designed for discharging 1-2 Ni-Cd cells. Reverse polarity guard<br />
diodes and the types of transistor used allow the <strong>charger</strong> to discharge below 2 Volts only at<br />
reduced currents; discharging below about 1 Volt is virtually impossible.<br />
Settings - Call up the Power-On reset program you wish to use (see Chapter 9.3.1)<br />
for Power-On<br />
Program 1. Disconnect any battery from Output 1.<br />
selection 2. Press the "+" or "-" button repeatedly or constantly to select the program you wish to use<br />
(auto-d).<br />
- Display, buton pressed: "fullautomatic -d".<br />
3. Release the button. The discharge program on the screen is now selected.<br />
If you change to a charge program (without disconnecting the battery - if 1. is ignored), the<br />
screen will show the resultant capacity from the previously discharge - first as a negative<br />
and then as a positive value.<br />
Connect battery 4. Now connect the battery to be charged to the Akku 1 output, maintaining correct polarity.<br />
The unit beeps to indicate the start of the discharging process.<br />
Displays while discharging<br />
Line1 - Current discharge time, current discharge voltage, current discharge current<br />
alternating with: Current discharge capacity, voltage, current/car battery voltage (on <strong>isl</strong> 6-330d)<br />
- "*" alternating with "-": discharge current automatically reduced to guard against overload.<br />
- Various warnings and error messages in plain text, with error number<br />
- Pressing +&-buttons simultaneously: current programm; after release: discharge<br />
quantity (see chapter 6.7)<br />
Displays after program end<br />
Line1 - Total discharge time, final discharge voltage, "empty" e.g. "65:09 8.51Vempty"<br />
alternating with: Total discharge capacity, final discharge voltage, "empty" "1.9Ah 8.51Vempty"<br />
- "battery empty" display by: brief buzz, LCD shows inverted "e"<br />
- Various warnings and error messages in plain text, with error number<br />
- Pressing +&-buttons simultaneously: current programm; after release: discharged<br />
capacity (see chapter 6.7)<br />
schulze elektronik gmbh prenzlauer weg 6 D-64331 weiterstadt tel: 06150/1306-5, fax: 1306-99<br />
internet: http://www.schulze-elektronik.com e-mail: mail@schulze-elektronik.com
page 14<br />
<strong>isl</strong> 6 <strong>chameleon</strong>: <strong>rapid</strong> <strong>charger</strong> <strong>series</strong><br />
8.1.6 Battery output 1, Ni-Cd / Ni-MH discharge program(s) fixed-d<br />
(not <strong>isl</strong> 6-636e) with manual discharge current selection (I-x.xxA)<br />
Purpose After partially discharging a battery in use it can be interesting to know what an afternoon's<br />
flying, a particular driving style or a new power system has cost or saved you in terms of energy.<br />
This discharge program supplies that information.<br />
Cell type / No. Ni-Cd, Ni-MH, 1-30 cells (-330d ... -530d), 1-36 cells (-636+ and -636e).<br />
Description The selected program starts discharging immediately with the selected constant current.<br />
The discharge current is maintained down to the final discharge voltage.<br />
- The discharge current is automatically reduced if the current you have set threatens to<br />
overheat the <strong>charger</strong> (max. power dissipation 16W).<br />
- Selectable currents: 25 mA, 50 mA, 0.1, 0.2, 0.3, 0.5, 0.8, 1.0, 1.2, 1.5, 2.0 A<br />
- Exception: if cells up to the number set for the Akku 2 charge section are connected, the<br />
charge current value for Akku 2 is set as the discharge current.<br />
- The unit is able to detect the number of cells connected with sufficient accuracy.<br />
- A useful discharge current for an accurate measurement of battery capacity is usually one<br />
tenth of nominal capacity (1/10 C)<br />
- Final discharge voltage: approx. 0.85 V / cell<br />
- Max. discharge current: 2.0 A<br />
- Max. discharge power: 16 W<br />
Special features - The <strong>isl</strong> 6 hardware is not designed for discharging 1-2 Ni-Cd cells. Reverse polarity guard<br />
diodes and the types of transistor used allow the <strong>charger</strong> to discharge below 2 Volts only at<br />
reduced currents; discharging below about 1 Volt is virtually impossible.<br />
Settings - Call up the Power-On reset program you wish to use (see Chapter 8.3.1).<br />
for Power-On<br />
Program 1. Disconnect any battery from Output 1.<br />
selection 2. Press the "+" or "-" button repeatedly or constantly to select the program you wish to use<br />
(D-x.xA, x.x = No. of cells).<br />
- Display, button pressed: "disch.curr.-x.xA"<br />
3. Release the button. The discharge program on the screen is now selected.<br />
If you change to a charge program (without disconnecting the battery - if 1. is ignored), the<br />
screen will show the resultant capacity from the previously discharge - first as a negative<br />
and then as a positive value.<br />
Connect battery 4. Now connect the battery to be charged to the Akku 1 output, maintaining correct polarity.<br />
The unit beeps to indicate the start of the discharging process.<br />
Displays while discharging<br />
Line1 - Current discharge time, current discharge voltage, current discharge current<br />
alternating with: Current discharge capacity, voltage, current/car battery voltage (on <strong>isl</strong> 6-330d)<br />
- "*" alternating with "-": discharge current automatically reduced to guard against overload.<br />
- Various warnings and error messages in plain text, with error number<br />
- Pressing +&-buttons simultaneously: current programm; after release: discharge capacity<br />
(refer to section 6.7)<br />
Displays after program end<br />
Line1 - Total discharge time, final discharge voltage, "empty" e.g. "65:09 8.51Vempty"<br />
alternating with: Total discharge capacity, final discharge voltage, "empty" "1.9Ah 8.51Vempty"<br />
- "battery empty" display by: brief buzz, LCD shows inverted "e"<br />
- Various warnings and error messages in plain text, with error number<br />
- Pressing +&-buttons simultaneously: current programm; after release: discharge capacity<br />
(refer to section 6.7)<br />
schulze elektronik gmbh prenzlauer weg 6 D-64331 weiterstadt tel: 06150/1306-5, fax: 1306-99<br />
internet: http://www.schulze-elektronik.com e-mail: mail@schulze-elektronik.com
<strong>isl</strong> 6 <strong>chameleon</strong>: <strong>rapid</strong> <strong>charger</strong> <strong>series</strong><br />
operating instructions for software from V7.03, date of issue 17 DEC 2001<br />
7.2.1 Battery output 1, lead/acid discharge programs Pb-D, Pb-d<br />
(not <strong>isl</strong> 6-636e) with automatic/manual discharge current selection<br />
schulze<br />
elektronik<br />
gmbh<br />
page 15<br />
Purpose The Pb discharge programs are designed either for fast discharging (Pb-D) or for a reasonably<br />
accurate capacity measurement (Pb-d).<br />
Cell type / No. Lead-sulphuric acid and lead-gel, 2, 6, 12, 24 V (1, 3, 6, 12 cells)<br />
Description The battery connected is discharged down to the final discharge voltage.<br />
The "Pb-D" discharge program discharges at the highest possible current and then reduces<br />
in stages down to a relatively low current.<br />
The "Pb-d" program discharges at up to 200mA and is designed to allow reasonably accurate<br />
measurement of the battery's capacity.<br />
- The initial value of the "Pb-D" discharge current is calculated from the maximum discharge<br />
power dissipation and/or the unit's maximum permissible discharge current.<br />
- When the final discharge voltage is reached, the discharge current is reduced in stages<br />
down to a low value, in order to remove from the pack the last usable residual energy before<br />
the program is switched off.<br />
- Final discharge voltage approx. 1.73 V / cell<br />
- Max. discharge current 2.0 A, <strong>isl</strong> 6-330d = 1,0 A; less with 2V batteries (technical reasons)<br />
- Max. discharge power 16 W<br />
Settings - Call up the Power-On reset program you wish to use (see Chapter 8.3.1)<br />
for Power-On<br />
Program 1. Disconnect any battery from Output 1.<br />
selection If you do not do this it is impossible to change from a Ni-Cd to a Pb program.<br />
2. Press the "+" or "-" button repeatedly or constantly to select the program you wish to use<br />
(PB-D or PB-d).<br />
- Display, button pressed: "lead accu PB-D" or "lead accu PB-d"<br />
3. Release the button. The discharge program on the screen is now selected.<br />
If you change to a charge program (without disconnecting the battery - if point 1 is ignored),<br />
the screen will show the resultant charge quantity from the energy previously removed and<br />
then charged-in, first as a negative and then as a positive value.<br />
Connect battery 4. Now connect the battery to be discharged to the Akku 1 output with correct polarity.<br />
- The unit beeps to indicate the start of the discharge process.<br />
Displays while discharging<br />
Line1 - Current discharge time, current discharge voltage, current discharge current<br />
alternating with: Current discharge quantity, voltage, current/car battery voltage (on <strong>isl</strong> 6-330d)<br />
- Discharge time "mm:ss" changes after 99 minutes dicharge time to "HHhmm"<br />
(mm = minutes, ss = seconds, HH = hours, : = minutes display, h = hour)<br />
- "*" alternating with "-": discharge current automatically reduced to guard against overload.<br />
- Various warnings and error messages in plain text, with error number<br />
- Pressing +&-buttons simultaneously: current programm; after release: charge capacity<br />
(refer to section 6.7)<br />
Displays after program end<br />
Line1 - Total discharge time, final discharge voltage, "empty" e.g. "05h54 6.69Vempty"<br />
alternating with: Total discharge capacity, final discharge voltage, "empty" "4.3Ah 6.69Vempty"<br />
- "battery empty" display by: brief buzz, LCD shows inverted "e"<br />
- Various warnings and error messages in plain text, with error number<br />
- Pressing +&-buttons simultaneously: current programm; after release: charge capacity<br />
(refer to section 6.7)<br />
schulze elektronik gmbh prenzlauer weg 6 D-64331 weiterstadt tel: 06150/1306-5, fax: 1306-99<br />
internet: http://www.schulze-elektronik.com e-mail: mail@schulze-elektronik.com
page 16<br />
<strong>isl</strong> 6 <strong>chameleon</strong>: <strong>rapid</strong> <strong>charger</strong> <strong>series</strong><br />
7.2.2 Battery output 1, lead-acid charge programs Pb C, Pb c<br />
with automatic charge current selection<br />
Purpose The Pb charge programs charge lead-acid batteries virtually full within a few hours.<br />
Cell type / No. Lead-sulphuric acid, lead-gel, 2, 6, 12, 24 V (1, 3, 6, 12 cells)<br />
Description The Pb charge programs start charging at zero current when the battery is connected, then gradually<br />
increase the charge rate (at around one minute per Amp-hour capacity). When the battery's maximum<br />
voltage is reached the current is gradually reduced again.<br />
- The "Pb c" program charges at low currents (better filling, good for low-capacity batteries); while the<br />
"Pb C" charges at higher currents for high-capacity batteries.<br />
- When the battery first reaches the voltage limit for cyclic charging (approx. 2.45V/cell) the screen<br />
shows a letter "a". The battery is then about 75% fully charged, and further charging takes place<br />
much more slowly. Further rises in capacity are indicated in 5% increments with the letters "b", "c" ...;<br />
note that the period required to reach the "battery full" indication may take about as long as the appearance<br />
of "a" after initial connection. Note: these are not specific figures; they are just intended to<br />
give you a rough idea of how the lead-acid charge process is progressing.<br />
- The maintenance charge voltage and current are reduced to the permissible continuous limit values<br />
once "battery full" has been detected, but to ensure the battery is completely full and kept that way<br />
they are not switched off. The charged-in Amp-hours are added together and stated together with the<br />
current charge voltage.<br />
- Don't be surprised if the <strong>isl</strong> 6 shows "battery full" at around 70% of nominal capacity, especially with<br />
low-capacity batteries (up to about 3Ah).<br />
Settings - Call up the Power-On reset program you wish to use (Chapter 9.3.1)<br />
for Power-On<br />
Program 1. Disconnect any battery from Output 1.<br />
selection If you do not do this it is not possible to switch from a Ni-Cd to a Pb program.<br />
2. Press the "+" or "-" button repeatedly or constantly to select the program you wish to use (Pb C or<br />
Pb c).<br />
- Display, button pressed: "lead accu Pb C" or "lead accu Pb c"<br />
3. Release the button. The charge program on the screen is now selected.<br />
If you change to a discharge program (without disconnecting the battery - if point 1 is ignored), the<br />
screen will show the resultant charge quantity from the energy previously charged-in and then removed,<br />
first as positive and then as negative value.<br />
Connect battery 4. Now connect the battery to be charged to the Akku 1 output with correct polarity.<br />
- The unit beeps to indicate the start of the charging process.<br />
Displays while charging<br />
Line1 - Current charge time, current charge voltage, current charge current "19:16 6.13V 3.2A"<br />
alternating with: Current charge quantity, voltage, current charge current or e.g. ".11Ah 6.13V 3.2A"<br />
Current charge quantity, voltage, car battery voltage (<strong>isl</strong> 6-330d) ".11Ah 6.13V 13.8"<br />
- "+": automatic charge current adjustment in progress; current slowly rising<br />
- Probability of full charge by <strong>series</strong> of letters "a" -> "b"... (buttons inactive)<br />
- "*": charge current automatically reduced to guard against overheating<br />
- Charge period "mm:ss" changes after 99 minutes charge period to "HHhmm"<br />
(mm = minutes, ss = seconds, HH = hours, : = minutes display, h = hour display)<br />
- Various warnings and error messages in plain text, with error number<br />
- Pressing +&-buttons simultaneously: current programm; after release: charge capacity (refer to<br />
section 6.7)<br />
Displays after program end<br />
Line1 - Charge time, current battery voltage, "full" e.g. "18h12 6.90V full"<br />
alternating with: Charged capacity, current battery voltage, "full" e.g.<br />
- "battery full" display by: brief buzz, LCD shows inverted "f"<br />
"4.6Ah 6.90V full"<br />
- Various warnings and error messages in plain text, with error number<br />
- Pressing +&-buttons simultaneously: current programm; after release: charge capacity (refer to<br />
section 6.7)<br />
schulze elektronik gmbh prenzlauer weg 6 D-64331 weiterstadt tel: 06150/1306-5, fax: 1306-99<br />
internet: http://www.schulze-elektronik.com e-mail: mail@schulze-elektronik.com
<strong>isl</strong> 6 <strong>chameleon</strong>: <strong>rapid</strong> <strong>charger</strong> <strong>series</strong><br />
operating instructions for software from V7.03, date of issue 17 DEC 2001<br />
schulze<br />
elektronik<br />
gmbh<br />
page 17<br />
8.3.1 Battery output 2, charge program for 1 to 6*- cell Ni-Cd batteries<br />
Purpose e.g. for charging receiver batteries down to 50 mAh or e.g. 6 cell transmitter batteries of<br />
high capacity.<br />
Cell type Set the cell type to NiCd batteries as explained in Section 9.2.<br />
Cell count Set the number of cells as explained in Section 9.2.<br />
Charge current Set the charge current as explained in Section 9.2 (Current value: see Section 4.2).<br />
Description The charge program starts charging with the pre-selected current and the set number of<br />
cells. At fixed intervals and after reaching the prescribed charge voltage limit the <strong>isl</strong> 6<br />
switches to a pulsed charge process. The better the battery maintains its voltage in the<br />
pauses, the longer the pauses become and the shorter the charge pulses become.<br />
- The current and the number of cells are determined by a special initialisation process<br />
which runs when the <strong>charger</strong> is first connected to the car battery (Section 9.2)<br />
Please note If the voltage at the battery output is excessive, the <strong>charger</strong> may fail to detect the presence<br />
of a battery.<br />
Settings - cell type to be connected (see Section 9.2)<br />
at Power-On - number of cells to be connected (see Section 9.2)<br />
- charge current (see Section 9.2 and 4.2)<br />
Connect battery Connect the battery to be charged to the battery 2 output, taking care to maintain correct polarity.<br />
- The <strong>charger</strong> beeps once to indicate the start of the charge process.<br />
Displays if output 2 is "ready"<br />
Line 2 - setting of battery output 2, car battery voltage, e.g.<br />
- press both buttons simultaneously to display charged-in<br />
"b2 4NiCd.1A 13.6"<br />
dto. <strong>isl</strong> 6-330d<br />
capacity (charge quantity) during the last charge process e.g. "49mAh4NiCd.1A b2"<br />
If the cursor (under the battery 1 data) is at ”ready” (i.e. at the far left of the screen)<br />
and if you press both buttons simultaneously, the screen shows:<br />
- last capacity and setting of battery output 2, e.g. "49mAh4NiCd.1A b2"<br />
Displays while output 2 is charging<br />
Line 2 - current charge time, current charge voltage, car battery voltage "07:23 5.63V 13.6"<br />
alternating on line 2, with alternating with<br />
- current charge quantity, current voltage, current current e.g. "12mAh 5.63V0.10A"<br />
When both buttons are pressed simultaneously:<br />
- current charge quantity and setting of battery output 2 e.g. "12mAh4NiCd.1A b2".<br />
dto. <strong>isl</strong> 6-330d - if battery 1 is not in use, the screen display is as above<br />
- if battery 1 is in use, the cursor under the battery 1 data indicates the approximate state of<br />
charge.<br />
If you press both buttons simultaneously, the screen shows<br />
- current capacity, cell count, cell type, charge current, "b2" e.g. "12mAh4NiCd.1A b2"<br />
Displays after output 2 program end<br />
Line 2 - time of "full" termination, cut off voltage,, car battery voltage "29:12 5.79V 13.6"<br />
alternating on line 2, with alternating with<br />
- charged capacity, cut off voltage, "full" e.g.<br />
- "full" indication: brief buzz and inverted "f" on LCD screen<br />
"53mAh 5.79V full"<br />
dto. <strong>isl</strong> 6-330d - if battery 1 is not in use, the screen display is as shown above<br />
- if battery 1 is in use, the cursor under the battery 1 data indicates ”full”, i.e. the cursor is at<br />
the far right of the screen.<br />
If you press both buttons simultaneously, the screen shows<br />
- charged capacity and setting of battery output 2 e.g. "53mAh4NiCd.1A b2"<br />
[*] Maximum cell count only at supply voltage of 13,8 V; available from software & hardware V 7.03<br />
schulze elektronik gmbh prenzlauer weg 6 D-64331 weiterstadt tel: 06150/1306-5, fax: 1306-99<br />
internet: http://www.schulze-elektronik.com e-mail: mail@schulze-elektronik.com
page 18<br />
<strong>isl</strong> 6 <strong>chameleon</strong>: <strong>rapid</strong> <strong>charger</strong> <strong>series</strong><br />
8.3.2 Battery output 2, charge program for 1 to 6*- cell Ni-MH batteries<br />
Purpose For charging receiver batteries down to 100 mAh and 6 cell transmitter batteries.<br />
Cell type Set the cell type to NiMH batteries as explained in Section 9.2.<br />
Cell count Set the number of cells as explained in Section 9.2.<br />
Charge current Set the charge current as explained in Section 9.2 (Current value: see Section 4.3).<br />
Description The charge program starts charging with the pre-selected current and the set number of<br />
cells. At fixed intervals and after reaching the prescribed charge voltage limit the <strong>isl</strong> 6<br />
switches to a pulsed charge process. The better the battery maintains its voltage in the<br />
pauses, the longer the pauses become and the shorter the charge pulses become.<br />
- The current and the number of cells are determined by a special initialisation process<br />
which runs when the <strong>charger</strong> is first connected to the car battery (Section 9.2)<br />
Please note If the voltage at the battery output is excessive, the <strong>charger</strong> may fail to detect the presence<br />
of a battery.<br />
Settings - cell type to be connected (see Section 9.2)<br />
at Power-On - number of cells to be connected (see Section 9.2)<br />
- maximum charge current (see Section 9.2 and 4.3)<br />
Connect battery Connect the battery to be charged to the battery 2 output, taking care to maintain correct polarity.<br />
- The <strong>charger</strong> beeps once to indicate the start of the charge process.<br />
Displays if output 2 is "ready"<br />
Line 2 - setting of battery output 2, car battery voltage, e.g.<br />
- press both buttons simultaneously to display charged-in<br />
"b2 4NiMH.3A 13.6"<br />
dto. <strong>isl</strong> 6-330d<br />
capacity (charge quantity) during the last charge process e.g. ".73Ah4NiMH.3A b2"<br />
If the cursor (under the battery 1 data) is at ”ready” (i.e. at the far left of the screen)<br />
and if you press both buttons simultaneously, the screen shows:<br />
- last capacity and setting of battery output 2 e.g. ".73Ah4NiMH.3A b2"<br />
Displays while output 2 is charging<br />
Line 2 - current charge time, current charge voltage, car battery voltage "27:12 5.63V 13.6"<br />
alternating on line 2, with alternating with<br />
- current charge quantity, current voltage, current current e.g. "89mAh 5.63V0.33A"<br />
When both buttons are pressed simultaneously:<br />
- current charge quantity and setting of battery output 2 e.g. "89mAh4NiMH.3A b2".<br />
dto. <strong>isl</strong> 6-330d - if battery 1 is not in use, the screen display is as above<br />
- if battery 1 is in use, the cursor under the battery 1 data indicates the approximate state of<br />
charge.<br />
If you press both buttons simultaneously, the screen shows<br />
- current capacity, cell count, cell type, charge current, "b2" e.g. "89mAh4NiMH.3A b2"<br />
Displays after output 2 program end<br />
Line 2 - time of "full" termination, cut off voltage, car battery voltage "27:12 5.72V 13.6"<br />
alternating on line 2, with alternating with<br />
- charged capacity, cut off voltage, "full" e.g.<br />
- "full" indication: brief buzz and inverted "f" on LCD screen<br />
".74Ah 5.72V full"<br />
dto. <strong>isl</strong> 6-330d - if battery 1 is not in use, the screen display is as shown above<br />
- if battery 1 is in use, the cursor under the battery 1 data indicates ”full”, i.e. the cursor is at<br />
the far right of the screen.<br />
If you press both buttons simultaneously, the screen shows<br />
- charged capacity and setting of battery output 2 e.g. ".74Ah4NiMH.3A b2"<br />
[*] Maximum cell count only at supply voltage of 13,8 V; available from software & hardware V 7.03<br />
schulze elektronik gmbh prenzlauer weg 6 D-64331 weiterstadt tel: 06150/1306-5, fax: 1306-99<br />
internet: http://www.schulze-elektronik.com e-mail: mail@schulze-elektronik.com
<strong>isl</strong> 6 <strong>chameleon</strong>: <strong>rapid</strong> <strong>charger</strong> <strong>series</strong><br />
operating instructions for software from V7.03, date of issue 17 DEC 2001<br />
schulze<br />
elektronik<br />
gmbh<br />
page 19<br />
8.3.3 Battery output 2, charge program for 1 to 4*- cell Lead-Acid batteries<br />
Purpose Typically to charge single-cell glowplug energiser batteries and 2-cell lead-gel and lead-acid batteries,<br />
which cannot be charged at the battery 1 output.<br />
Cell type Set the cell type to Lead batteries as explained in Section 9.2.<br />
Cell count Set the number of cells as explained in Section 9.2.<br />
Charge current Set the charge current as explained in Section 9.2 (Current value: see Section 4.4).<br />
Description The charge program initially charges at a very low current, and slowly increases the rate until<br />
the pre-selected value is reached - unless the maximum voltage typical of these cells is<br />
reached before this. Towards the end of the process the charge current is again reduced<br />
significantly, and under certain circumstances it may even fall to zero.<br />
- The current and the number of cells are determined by a special initialisation process<br />
which runs when the <strong>charger</strong> is first connected to the car battery (Section 9.2)<br />
Please note If the voltage at the battery output is excessive, the <strong>charger</strong> may fail to detect the presence<br />
of a battery.<br />
Settings - cell type to be connected (see Section 9.2)<br />
at Power-On - number of cells to be connected (see Section 9.2)<br />
- maximum charge current (see Section 9.2 and 4.4)<br />
Connect battery Connect the battery to be charged to the battery 2 output, taking care to maintain correct polarity.<br />
- The <strong>charger</strong> beeps once to indicate the start of the charge process.<br />
Displays if output 2 is "ready"<br />
Line 2 - setting of battery output 2, car battery voltage, e.g. "b2 1Lead.5A 13.8"<br />
- press both buttons simultaneously to display charged-in capacity (charge quantity)<br />
during the last charge process (zero after "power-on") e.g. "00mAh1Lead.5A b2"<br />
dto. <strong>isl</strong> 6-330d If the cursor (under the battery 1 data) is at ”ready” (i.e. at the far left of the screen)<br />
and if you press both buttons simultaneously, the screen shows (332 mA max. with i6-330d):<br />
- last capacity and setting of battery output 2, e.g. "00mAh1Lead.3A b2"<br />
Displays while output 2 is charging<br />
Line 2 - current charge time, current charge voltage, car battery voltage "19:12 2.13V 13.8"<br />
alternating on line 2, with alternating with<br />
- current charge quantity, current voltage, current current e.g. ".11Ah 2.13V0.50A"<br />
When both buttons are pressed simultaneously:<br />
- current charge quantity and setting of battery output 2 e.g. ".11Ah1Lead.5A b2".<br />
dto. <strong>isl</strong> 6-330d - if battery 1 is not in use, the screen display is as above<br />
- if battery 1 is in use, the cursor under the battery 1 data indicates the approximate state of charge.<br />
If you press both buttons simultaneously, the screen shows (332 mA max. with i6-330d!):<br />
- current capacity, cell count, cell type, charge current, "b2" e.g. ".11Ah1Lead.3A b2"<br />
Displays after output 2 program end<br />
Line 2 - time of "full" termination, current voltage, car battery voltage "18h12 2.27V 13.8"<br />
(18 hours, 12 minutes) alternating on line 2, with alternating with<br />
dto. <strong>isl</strong> 6-330d<br />
- current charged capacity, current battery voltage, "full" e.g. "4.5Ah 2.27V full"<br />
- "full" indication: brief buzz and inverted "f" on LCD screen<br />
- if battery 1 is not in use, the screen display is as shown above<br />
- if battery 1 is in use, the cursor under the battery 1 data indicates ”full”, i.e. the cursor is at<br />
the far right of the screen.<br />
If you press both buttons simultaneously, the screen shows (332 mA max. with i6-330d!):<br />
- current capacity and setting of battery output 2 e.g. "4.5Ah1Lead.3A b2"<br />
[*] Maximum cell count only at supply voltage of 13,8 V; available from software & hardware V 7.03<br />
schulze elektronik gmbh prenzlauer weg 6 D-64331 weiterstadt tel: 06150/1306-5, fax: 1306-99<br />
internet: http://www.schulze-elektronik.com e-mail: mail@schulze-elektronik.com
page 20<br />
<strong>isl</strong> 6 <strong>chameleon</strong>: <strong>rapid</strong> <strong>charger</strong> <strong>series</strong><br />
8.3.4 Battery output 2, charge program for 1 to 3*- cell Lithium-Manganese-Oxide<br />
batteries (Tadiran)<br />
Purpose Typically to charge 2-cell lightweight high-capacity receiver batteries<br />
Cell type Set the cell type to LiMn batteries as explained in Section 9.2.<br />
Cell count Set the number of cells as explained in Section 9.2.<br />
Charge current Set the charge current as explained in Section 9.2 (Current value: see Section 4.5).<br />
Description The charge program initially charges at a very low current, and slowly increases the rate until<br />
the pre-selected value is reached - unless the maximum voltage typical of these cells is<br />
reached before this. Towards the end of the process the charge current is again reduced<br />
significantly, and under certain circumstances it may even fall to zero.<br />
- The current and the number of cells are determined by a special initialisation process<br />
which runs when the <strong>charger</strong> is first connected to the car battery (Section 9.2)<br />
Please note If the voltage at the battery output is excessive, the <strong>charger</strong> may fail to detect the presence<br />
of a battery.<br />
Settings - cell type to be connected (see Section 9.2)<br />
at Power-On - number of cells to be connected (see Section 9.2)<br />
- maximum charge current (see Section 9.2 and 4.5)<br />
Connect battery Connect the battery to be charged to the battery 2 output, taking care to maintain correct polarity.<br />
- The <strong>charger</strong> beeps once to indicate the start of the charge process.<br />
Displays if output 2 is "ready"<br />
Line 2 - setting of battery output 2, car battery voltage, e.g. "b2 2LiMn.2A 13.7"<br />
- press both buttons simultaneously to display charged-in capacity (charge quantity)<br />
during the last charge process (zero after "power-on") e.g. "00mAh2LiMn.2A b2"<br />
dto. <strong>isl</strong> 6-330d If the cursor (under the battery 1 data) is at ”ready” (i.e. at the far left of the screen)<br />
and if you press both buttons simultaneously, the screen shows:<br />
- last capacity and setting of battery output 2, e.g. "00mAh2LiMn.2A b2"<br />
Displays while output 2 is charging<br />
Line 2 - current charge time, current charge voltage, car battery voltage "19.13 5.43V 13.7"<br />
alternating on line 2, with alternating with<br />
- current charge quantity, current voltage, current current e.g. ".11Ah 5.43V0.20A"<br />
When both buttons are pressed simultaneously:<br />
- current charge quantity and setting of battery output 2 e.g. ".11Ah2LiMn.2A b2".<br />
dto. <strong>isl</strong> 6-330d - if battery 1 is not in use, the screen display is as above<br />
- if battery 1 is in use, the cursor under the battery 1 data indicates the approximate state of<br />
charge.<br />
If you press both buttons simultaneously, the screen shows:<br />
- current capacity, cell count, cell type, charge current, "b2" e.g. ".11Ah2LiMn.2A b2"<br />
Displays after output 2 program end<br />
Line 2 - time of "full" termination, current voltage, car battery voltage "03h38 6.70V 13.7"<br />
(3 hours, 38 minutes) alternating on line 2, with alternating with<br />
dto. <strong>isl</strong> 6-330d<br />
- current charged capacity, current battery voltage, "full" e.g. ".61Ah 6.70V full"<br />
- "full" indication: brief buzz and inverted "f" on LCD screen<br />
- if battery 1 is not in use, the screen display is as shown above<br />
- if battery 1 is in use, the cursor under the battery 1 data indicates ”full”, i.e. the cursor is at<br />
the far right of the screen.<br />
If you press both buttons simultaneously, the screen shows:<br />
- current capacity and setting of battery output 2 e.g. ".61Ah2LiMn.2A b2"<br />
[*] Maximum cell count only at supply voltage of 13,8 V; available from software & hardware V 7.03<br />
schulze elektronik gmbh prenzlauer weg 6 D-64331 weiterstadt tel: 06150/1306-5, fax: 1306-99<br />
internet: http://www.schulze-elektronik.com e-mail: mail@schulze-elektronik.com
<strong>isl</strong> 6 <strong>chameleon</strong>: <strong>rapid</strong> <strong>charger</strong> <strong>series</strong><br />
operating instructions for software from V7.03, date of issue 17 DEC 2001<br />
schulze<br />
elektronik<br />
gmbh<br />
page 21<br />
8.3.4 Battery output 2, charge program for 1 to 3*- cell Lithium-Ion batteries<br />
Purpose Typically to charge 2 or 3-cell lightweight high-capacity power batteries for slowflyer.<br />
Cell type Set the cell type to LiIo batteries as explained in Section 9.2.<br />
Cell count Set the number of cells as explained in Section 9.2.<br />
Charge current Set the charge current as explained in Section 9.2 (Current value: see Section 4.6).<br />
Description The charge program initially charges at a very low current, and slowly increases the rate until<br />
the pre-selected value is reached - unless the maximum voltage typical of these cells is<br />
reached before this. Towards the end of the process the charge current is again reduced<br />
significantly, and under certain circumstances it may even fall to zero.<br />
- The current and the number of cells are determined by a special initialisation process<br />
which runs when the <strong>charger</strong> is first connected to the car battery (Section 9.2)<br />
Please note If the voltage at the battery output is excessive, the <strong>charger</strong> may fail to detect the presence<br />
of a battery.<br />
Settings - cell type to be connected (see Section 9.2)<br />
at Power-On - number of cells to be connected (see Section 9.2)<br />
- maximum charge current (see Section 9.2 and 4.6)<br />
Connect battery Connect the battery to be charged to the battery 2 output, taking care to maintain correct polarity.<br />
- The <strong>charger</strong> beeps once to indicate the start of the charge process.<br />
Displays if output 2 is "ready"<br />
Line 2 - setting of battery output 2, car battery voltage, e.g. "b2 3LiIo.5A 13.8"<br />
- press both buttons simultaneously to display charged-in capacity (charge quantity)<br />
during the last charge process (zero after "power-on") e.g. "00mAh3LiIo.5A b2"<br />
dto. <strong>isl</strong> 6-330d If the cursor (under the battery 1 data) is at ”ready” (i.e. at the far left of the screen)<br />
and if you press both buttons simultaneously, the screen shows (332 mA max. with i6-330d):<br />
- last capacity and setting of battery output 2, e.g. "00mAh3LiIo.3A b2"<br />
Displays while output 2 is charging<br />
Line 2 - current charge time, current charge voltage, car battery voltage "17:12 10.3V 13.8"<br />
alternating on line 2, with alternating with<br />
- current charge quantity, current voltage, current current e.g. ".11Ah 10.3V0.50A"<br />
When both buttons are pressed simultaneously:<br />
- current charge quantity and setting of battery output 2 e.g. ".11Ah3LiIo.5A b2".<br />
dto. <strong>isl</strong> 6-330d - if battery 1 is not in use, the screen display is as above<br />
- if battery 1 is in use, the cursor under the battery 1 data indicates the approximate state of<br />
charge.<br />
If you press both buttons simultaneously, the screen shows (332 mA max. with i6-330d!):<br />
- current capacity, cell count, cell type, charge current, "b2" e.g. ".11Ah3LiIo.3A b2"<br />
Displays after output 2 program end<br />
Line 2 - time of "full" termination, current voltage, car battery voltage "03h07 12.4V 13.8"<br />
(3 hours, 7 minutes) alternating on line 2, with alternating with<br />
dto. <strong>isl</strong> 6-330d<br />
- current charged capacity, current battery voltage, "full" e.g. "1.3Ah 12.4V full"<br />
- "full" indication: brief buzz and inverted "f" on LCD screen<br />
- if battery 1 is not in use, the screen display is as shown above<br />
- if battery 1 is in use, the cursor under the battery 1 data indicates ”full”, i.e. the cursor is at<br />
the far right of the screen.<br />
If you press both buttons simultaneously, the screen shows (332 mA max. with i6-330d!):<br />
- current capacity and setting of battery output 2 e.g. "1.3Ah3LiIo.3A b2"<br />
[*] Maximum cell count only at supply voltage of 13,8 V; available from software & hardware V 7.03<br />
schulze elektronik gmbh prenzlauer weg 6 D-64331 weiterstadt tel: 06150/1306-5, fax: 1306-99<br />
internet: http://www.schulze-elektronik.com e-mail: mail@schulze-elektronik.com
page 22<br />
9 Modifying <strong>charger</strong> characteristics<br />
9.1 Tabular summary<br />
Message 1:<br />
(c) schulze gmbh<br />
<strong>isl</strong>6-xxxx V7.xx<br />
Message 2:<br />
Car battery=10V<br />
(power is reduced)<br />
Key:<br />
Release "-" button<br />
<strong>isl</strong> 6-330d<br />
<strong>isl</strong> 6 <strong>chameleon</strong>: <strong>rapid</strong> <strong>charger</strong> <strong>series</strong><br />
Press and hold button(s)<br />
&<br />
Connect <strong>isl</strong> 6 to car battery<br />
Message:<br />
(c) schulze gmbh<br />
<strong>isl</strong>6-xxxx V7.xx<br />
Select menu 1:<br />
b1-cur.aft.reset<br />
last - + FAUTO<br />
Select menu 2:<br />
b1 cutoff mode<br />
xxxxx - + next<br />
Select menu 3:<br />
Switching output<br />
xxxxx - + next<br />
Select menu 4 (option):<br />
Melody select #xx<br />
ok = - + =next<br />
Message:<br />
b1 cutoff mode<br />
e.g. "normal"<br />
Message:<br />
Ready display<br />
Message for "ready" state or settings<br />
Action to display or select a <strong>charger</strong> characteristic<br />
Display of selectable <strong>charger</strong> characteristics<br />
Message:<br />
(c) schulze gmbh<br />
<strong>isl</strong>6-xxxx V7.xx<br />
Select menu 1:<br />
???? TypeSel A2<br />
???? - + next<br />
Select menu 2:<br />
? CellCount A2<br />
? - + next<br />
Select menu 3:<br />
cur-???-rent A2<br />
???mA=- + next<br />
schulze elektronik gmbh prenzlauer weg 6 D-64331 weiterstadt tel: 06150/1306-5, fax: 1306-99<br />
internet: http://www.schulze-elektronik.com e-mail: mail@schulze-elektronik.com<br />
-<br />
-<br />
-
<strong>isl</strong> 6 <strong>chameleon</strong>: <strong>rapid</strong> <strong>charger</strong> <strong>series</strong><br />
operating instructions for software from V7.03, date of issue 17 DEC 2001<br />
9.1.1 Use with an external 12V car battery<br />
An external 12V battery can safely be discharged<br />
to a lower level with the <strong>isl</strong> 6 than a car<br />
battery which is required to start a car engine.<br />
The option of deeper discharge can be selected<br />
when you connect the <strong>isl</strong> 6 to the battery. At the<br />
same time you can limit the maximum charge<br />
power (see 9.1.2.2 "Use with a 22/25A mains<br />
PSU").<br />
If you wish to do this, hold the "-" button on the<br />
<strong>isl</strong> 6 pressed in while you connect it, until the<br />
<strong>charger</strong>'s screen shows the message<br />
"car battery =10V" in the first line.<br />
The low-voltage warning message range (# 5)<br />
then lies approximately between 9.75 und<br />
10.5V, and below 9.75V the unit switches itself<br />
off (error # 72).<br />
The <strong>charger</strong> does not store the "-" button<br />
press during initial connection, so<br />
the setting has to be repeated at the<br />
start of every session with the <strong>charger</strong>.<br />
The best way to exploit the full charge power of<br />
the unit is to delay making the change until the<br />
first message<br />
"car battery=MIN" or<br />
"car battery
page 24<br />
<strong>isl</strong> 6 <strong>chameleon</strong>: <strong>rapid</strong> <strong>charger</strong> <strong>series</strong><br />
9.2 Setting the number of cells and charge current for battery Output 2<br />
The Akku 2 (battery 2) output must be set to the type<br />
of cell, number of cells and charge current you wish<br />
to use.<br />
You can chose within 5 types of batteries and chose<br />
up to 4 (<strong>isl</strong> 6-330d 3) differnet charge currents.<br />
The values you select are stored permanently in the<br />
<strong>charger</strong>.<br />
1. Hold the "+" button pressed in while you connect<br />
the <strong>charger</strong> to the car battery and wait until the selection<br />
menu appears (about 2-3 seconds).<br />
2. Release the button again.<br />
" ???? TypeSel B2"<br />
"4NiCd.3A- +next" (example)<br />
In the <strong>isl</strong> 6-330d both lines follow in succession.<br />
The value to select is marked by a question mark, in<br />
the <strong>isl</strong> 6-330d the cursor marks the position to select.<br />
You can chose following types of batteries:<br />
Nickel Cadmium (NiCd),<br />
Nickel Metallhydrid (NiMH),<br />
Lead/acid and Lead/gel (Lead),<br />
Lithium Manganoxid (LiMn),<br />
better known as Tadiran cell,<br />
Lithium Ionen (LiIo).<br />
3. Press the "+" button (+next) repeatedly to display<br />
the different battery types until the desired type appears.<br />
4. Select the shown type of cell by pressing the "-"<br />
button (e. g. .LiMn...-).<br />
5. After that, the cell count menu appears.<br />
"? CellCount A2"<br />
"1LiMn.3A- +next" (example)<br />
Depending of the selected type of battery you can<br />
chose following cell counts:<br />
NiCd: 1 - 6* cells = 1,2 ... 7,2 V<br />
NiMH: 1 - 6* cells = 1,2 ... 7,2 V<br />
Lead: 1 - 4* cells = 2, 4, 6, 8 V<br />
LiMn: 1 - 3* cells = 3,0 ... 9,0 V<br />
LiIo: 1 - 3* cells = 3,7 ... 11,1 V<br />
[*] maximum cell count with a supply voltage of 13,8<br />
V only, available on soft- & hardware from V 7.03<br />
6. Press the "+" button (+next) repeatedly until the<br />
desired cell count appears.<br />
7. Select the shown cell count by pressing the "-" button<br />
(e. g. 2LiMn...-).<br />
8. After that, the charge current menu appears:<br />
" cur-???-rent B2"<br />
"1LiMn.3A- +next" (example)<br />
You can chose between following currents<br />
(<strong>isl</strong> 6-330d in () ):<br />
100 mA = ".1A", (100 mA = ".1A")<br />
200 mA = ".2A", (200 mA = ".2A")<br />
332 mA = ".3A", (332 mA = ".3A")<br />
500 mA = ".5A", (332 mA = "
<strong>isl</strong> 6 <strong>chameleon</strong>: <strong>rapid</strong> <strong>charger</strong> <strong>series</strong><br />
operating instructions for software from V7.03, date of issue 17 DEC 2001<br />
9.3 Program type after reset for A1 (9.3.1)<br />
Charge termination for A1 (9.3.2)<br />
Switch output (9.3.3)<br />
Melody select module (9.3.4)<br />
These 4 parameters can be adjusted in a single<br />
process.<br />
To do this hold the "+" and "-" buttons pressed<br />
in while you connect the <strong>isl</strong> 6 to the car battery,<br />
and wait until the menu<br />
"B1-cur.aft.reset" appears.<br />
9.3.1 Setting the program type after reset<br />
Here you select the program which is to appear<br />
as standard when you connect the <strong>isl</strong> 6 to the<br />
car battery.<br />
The program which appears after initial connection<br />
can be the:<br />
- last used program<br />
(more accurately: the program setting which<br />
applied when the battery was last connected;<br />
(Select "last" with the "-" button)<br />
or<br />
- the fully automatic charge program<br />
(Select "FAUTO" with the "+" Taste).<br />
When you have made your selection the menu<br />
"p1 cutoff mode" appears (description below).<br />
9.3.2 Setting charge termination sensitivity:<br />
Press the + button repeatedly to display the<br />
charge termination sensitivity.<br />
Press the - button to select the value on the<br />
screen. After you have made your selection<br />
your selected value is repeated again:<br />
"B1 cutoff mode"<br />
"--> xxxx "<br />
(xxxx = normal, sensitive [sensit.], sensitive +<br />
delay [sens+d])<br />
After this selection the screen shows the menu for<br />
setting the light indicator at the switched output -<br />
even if the switched output is not installed (9.3.3).<br />
9.3.2.1 Possible selections<br />
Explanation: You can now adjust the method<br />
of working of the automatic Delta-Peak charge<br />
termination circuit. Three stages of sensitivity<br />
are available:<br />
schulze<br />
elektronik<br />
gmbh<br />
page 25<br />
1. normal<br />
Delta-peak termination using proven termination<br />
criteria. This setting is the most straightforward<br />
for most applications.<br />
2. sensitive (sensit.)<br />
3. sensitive with delay (sens+d)<br />
Re. 2.+3.: Delta-peak termination with sensitive<br />
trip characteristics. This setting switches off the<br />
charge voltage as soon as the voltage curve<br />
flattens out. This often applies to hybrid cells<br />
and similar, such as 1700SCE, RED AMP and<br />
many transmitter batteries.<br />
Note re. sens+d:<br />
With the sensitive settings you may find that<br />
deep-discharged cells are switched off right at<br />
the start of the charge process. The "sens+v"<br />
mode prevents this happening, because it incorporates<br />
a delay time after the pack is connected,<br />
and the automatic charge termination<br />
circuit is only activated after 8 minutes.I<br />
This means: the charge voltage is not<br />
monitored during the first 8 minutes, so<br />
the cells are charged for at least about<br />
10 minutes.<br />
Warning: for the same reason, if you connect a<br />
large number of cells for a final "top-up", they<br />
are likely to get very hot if the charge is set to<br />
"sens+d".<br />
9.3.2.2 Ni-MH batteries<br />
Tests with charging Ni-MH batteries have produced<br />
good results using the two "sensitive"<br />
termination settings, provided that manual<br />
charge current setting is used, and charge currents<br />
of no more than 1 C are set (i.e. 1000 mA<br />
charge rate for 1100 batteries).<br />
In our experience, batteries which fail<br />
to reach anything like their stated nominal<br />
capacity when charged also<br />
present the most problems in detecting<br />
the "battery full" state, i.e. the <strong>charger</strong><br />
fails to switch off.<br />
Tests with modern high current Ni-MH batteries<br />
can be charged (depending on type) up to 1.6 C.<br />
schulze elektronik gmbh prenzlauer weg 6 D-64331 weiterstadt tel: 06150/1306-5, fax: 1306-99<br />
internet: http://www.schulze-elektronik.com e-mail: mail@schulze-elektronik.com
page 26<br />
9.3.3 Switched output setting<br />
(not for <strong>isl</strong> 6-330d)<br />
" switch output "<br />
"12V perma- +next" re. a)<br />
You can chose among 3 different settings:<br />
a) 12V permanent<br />
The switched output provides 12 V continously,<br />
ideal to to drive a battery cooling fan or similar.<br />
b) FullBlinking<br />
The switched output provides 12 V on / off to<br />
drive a car flasher bulb when battery is fully<br />
charged or discharged.<br />
c) FullContinous<br />
The switched output provides 12 V continously<br />
to drive a car flasher bulb when battery is fully<br />
charged or discharged.<br />
Press the "+" button (+next) repeatedly to display<br />
the switch output features.<br />
Press the "-" button to select desired feature<br />
(e.g. FullBlink).<br />
The selected setting is repeated once more.<br />
Note re. switched output:<br />
The <strong>charger</strong> features a Cinch (phono) socket as<br />
widely used in audio equipment, and it is protected<br />
by an internal T 2.5 A fuse. It is designed<br />
for connection to a car flasher bulb (12V / 25W)<br />
so that you have a visual indicator of the "battery<br />
full" and "battery empty" states.<br />
As an alternative to the flashing light output the<br />
Cinch socket can be set up at the factory to<br />
provide a fixed 12 V to drive a battery cooling<br />
fan or similar.<br />
Note: the cables connected to this socket must<br />
be fitted with a ferrite core in order to keep within<br />
the CE limits for interference radiation. Use<br />
the "CE-Ring-i8" for this, and wind at least 9<br />
turns of the cable through it at a point no more<br />
than 5 cm from the Cinch plug. The cable must<br />
not be more than 2 m long.<br />
<strong>isl</strong> 6 <strong>chameleon</strong>: <strong>rapid</strong> <strong>charger</strong> <strong>series</strong><br />
9.3.4 Melody selection setting<br />
Note: this option is only fitted to older <strong>charger</strong>s<br />
built before the end of 1995.<br />
If the module is present, you can press the "+"<br />
button to listen to all 12 melodies in turn.<br />
You select the melody you wish to hear when<br />
your batteries are "full" or "empty" by pressing<br />
the "-" button (melody 0 = buzzer).<br />
The selected melody (except melody 0) not only<br />
sounds when the program terminates, but also<br />
when you press the "+" and "-" buttons simultaneously<br />
to display the charged-in / discharged<br />
capacity of the active program.<br />
Note: you can cut short the melody or the buzzer<br />
at any time by pressing the "+" or "-" button.<br />
When you finish the setting-up procedure<br />
the screen will show the set charge termination<br />
sensitivity before the "ready" message<br />
appears, exactly as if you had just connected<br />
the <strong>charger</strong> to the car battery.<br />
schulze elektronik gmbh prenzlauer weg 6 D-64331 weiterstadt tel: 06150/1306-5, fax: 1306-99<br />
internet: http://www.schulze-elektronik.com e-mail: mail@schulze-elektronik.com
<strong>isl</strong> 6 <strong>chameleon</strong>: <strong>rapid</strong> <strong>charger</strong> <strong>series</strong><br />
operating instructions for software from V7.03, date of issue 17 DEC 2001<br />
10 Legal matters<br />
10.1 Warranty<br />
All <strong>isl</strong> 6 <strong>charger</strong>s are carefully checked and<br />
tested before dispatch.<br />
If you have a complaint, send the unit back to us<br />
with a clear description of the fault.<br />
A message such as "doesn't work properly" or<br />
"software error" doesn't help us much!<br />
Before you send your <strong>isl</strong> 6 back to us, please<br />
test the unit carefully, as it costs us money to<br />
test a <strong>charger</strong>, and if it turns out to be in working<br />
order we have to recover those costs from you.<br />
In this case it makes no difference whether the<br />
fully functional <strong>charger</strong> is returned within the<br />
warranty period or not. Approved warranty<br />
claims are processed in accordance with our<br />
currently valid General Conditions of Business,<br />
which are printed in our catalogue.<br />
One further note: if a problem arises with any<br />
schulze product, send it directly to us without interfering<br />
with it in any way.<br />
This ensures that we can repair the unit quickly,<br />
pick up warranty faults without any dispute, and<br />
keep costs to a minimum.<br />
You can also be sure that we will fit genuine replacement<br />
parts which will work properly in your<br />
unit. Unfortunately we have had bad experience<br />
with third-party Service Centres which claim<br />
technical competence. Note also that any outside<br />
interference with our products invalidates<br />
the warranty. Incompetent attempts at repair<br />
can cause further damage. We often find it impossible<br />
to estimate the repair cost of devices in<br />
such condition, and in certain circumstances we<br />
are then obliged to decline to repair it altogether.<br />
10.2 Limited liability / compensation<br />
We at <strong>Schulze</strong> <strong>Elektronik</strong> <strong>GmbH</strong> are unable to<br />
monitor the observance of our assembly and operation<br />
instructions, our prescribed conditions<br />
and methods for installation, connection, usage<br />
and maintenance of our battery <strong>charger</strong>s. For<br />
this reason we cannot accept liability for loss,<br />
damage or costs which arise through the inappropriate<br />
use of our products, or are connected<br />
in any way with such use.<br />
schulze<br />
elektronik<br />
gmbh<br />
page 27<br />
Within the normal legal limits, our obligation to<br />
provide compensation, for whatever legal reason,<br />
is limited to the invoice value of that quantity<br />
of product immediately involved in the event<br />
which caused the damage. This does not apply<br />
if we are obliged to accept unlimited liability in<br />
accordance with mandatory law due to our deliberate<br />
or serious negligence.<br />
10.3 CE approval<br />
All <strong>isl</strong> 6 units built after January 1996 satisfy all<br />
relevant and mandatory EC directives: these are<br />
the EMF directives<br />
- 89/336/EWG,<br />
- 91/263/EWG and<br />
- 92/31/EWG.<br />
The product has been tested to meet the following<br />
basic technical standards:<br />
Interference radiation: EN 50 081-1:1992,<br />
Interference susceptibility: EN 50 082-1:1992<br />
and/or EN 50 082-2:1995.<br />
You are the owner of a product whose design<br />
and construction fulfil the safety aims of the EC<br />
for the safe operation of devices.<br />
The approval procedure includes a test of interference<br />
radiation, i.e. of interference generated<br />
by the <strong>charger</strong>. This <strong>charger</strong> has been tested<br />
under practical conditions at maximum load current<br />
and with a large number of cells, and remains<br />
within the interference limits. A less stringent<br />
test would be, for example, to measure interference<br />
levels at a low charge current or with<br />
only 7 cells, in which mode the voltage converter<br />
would not be active. In such cases the <strong>charger</strong><br />
would not produce its maximum interfer-ence<br />
level.<br />
The procedure also includes a test of interference<br />
susceptibility, i.e. the extent to which the<br />
<strong>charger</strong> is vulnerable to interference from other<br />
devices. The test involves subjecting the <strong>charger</strong><br />
to RF signals similar to those produced by an<br />
RC transmitter or a radio telephone.<br />
Note:<br />
If you encounter problems in using this device,<br />
please carry out the measures described in Chapter<br />
13 and 14 before you decide that it is defective.<br />
schulze elektronik gmbh prenzlauer weg 6 D-64331 weiterstadt tel: 06150/1306-5, fax: 1306-99<br />
internet: http://www.schulze-elektronik.com e-mail: mail@schulze-elektronik.com
page 28<br />
11 Specifications, technical features<br />
<strong>isl</strong> 6 <strong>chameleon</strong>: <strong>rapid</strong> <strong>charger</strong> <strong>series</strong><br />
<strong>isl</strong> 6 Dims. Display Display No. of cells Capacity Charge currents Disch. currents<br />
approx. [kg][linexchar] [vis. area] [No. Ni-Cd] [Ah] [mA - A] [mA - A]<br />
-330d0,71<br />
-430d 1.1<br />
1 x 16<br />
2 x 16<br />
63x12mm<br />
61x15mm<br />
1 - 30<br />
1 - 30<br />
0.1 - 5<br />
0.1 - 4<br />
250 - 5,5<br />
250 - 5<br />
25 - 1<br />
25 - 2<br />
-530d 1.1 2 x 16 61x15mm 1 - 30 0.1 - 5 250 - 6 25 - 2<br />
-636+ 1.3 2 x 16 98x22mm 1 - 36 0.1 - 6 250 - 6.5 (8) 25 - 2<br />
-636e 1.3 2 x 16 61x15mm 1 - 36 0.1 - 6 250 - 6.5 (8) N.A.<br />
<strong>isl</strong> 6-... Lead-acid No. of cells Min. capacity Charge currents Disch. currents<br />
Model batteries [No. Pb] [Ah] [ca. A] [A]<br />
-330d 1, 3, 6, 12 1.0 0,25 - 4 0,1-1<br />
-430d 1, 3, 6, 12 1.0 0.25 - 4 0.1-2<br />
-530d 1, 3, 6, 12 1.0 0.25 - 4.5 0.1-2<br />
-636+ 1, 3, 6, 12 1.0 0.25 - 5 0.1-2<br />
-636e 1, 3, 6, 12 1.0 0.25 - 5 N.A.<br />
Summary of charge currents related to number of cells connected to Akku 1 output<br />
Voltage 6V 9V 11- 26V 34V 40V 45V 50V<br />
No. of cells ~4c ~6c ~8-16c ~20c ~24c ~27c ~30c<br />
-330d 2,1 A 4,0 A 5,5 A 3,7 A 2,9 A 2,4 A 2,0 A<br />
-430d 2.7 A 5.0 A 5.0 A 4.5 A 3.5 A 2.9 A 2.5 A<br />
-530d 2.7 A 5.3 A 6.0 A 6.0 A 4.8 A 4.0 A 3.5 A<br />
-636+,e 2.7 A 5.3 A 8.0 A 8.0 A 6.5 A 5.6 A 4.8 A<br />
Akku 2 output:<br />
Cell count: 1-6 Ni-Cd, 1-6 Ni-MH, 1-4 PB, 1-3 Li-Ion, 1-3 Li-MnO (Tadiran); 13,8V supply voltage...<br />
Charge current 100, 200, 330 mA or 500 mA (500 mA not for <strong>isl</strong> 6-330d), ...for max. cell count!<br />
Other features:<br />
- fully automatic charge current calculation for Akku 1 (patent application submitted)<br />
- Akku 1 und Akku 2 outputs can be used simultaneously<br />
- Akku 1 output suitable for use with Ni-Cd and Ni-MH batteries<br />
- Akku 1 output also suitable for lead-acid and lead-gel batteries (min. capacity 1Ah)<br />
- Safety charge termination after 3 hrs charge period at Akku 1 output<br />
(4h for 3dc program, 1st charge phase)<br />
- Tolerances at Akku 1, current: typically 5%; max. approx. 15% or 250 mA (higher value applies)<br />
- Tolerances at Akku 2, current: typically 5%; max. approx. 10% or 100 mA (higher value applies)<br />
- No-load current drain: approx. 200 mA<br />
- Continuous charge output at 100mA (mean value, pulsed 400mA supply)<br />
- Maximum discharge power dissipation 16 Watts (10 Watts <strong>isl</strong> 6-330d)<br />
- Power supply voltage: 11 - 15.2 V<br />
- Low voltage warning threshold: 11.25 V (10.5 V at reduced setting)<br />
- Low voltage power cut-off: 10.75 V (9.75V at reduced setting)<br />
- Cartridge fuse at Akku 1 output: 5 x 20 mm, rating M 16 A<br />
- All data refer to a car battery voltage of 12.5V DC<br />
- Recommended car battery: 12 V / greater than 63 Ah; minimum capacity: 12 V / 42 Ah<br />
Applicable to <strong>isl</strong> 6-636e only:<br />
- Small display; no discharge stage; melody module and switched output not available<br />
schulze elektronik gmbh prenzlauer weg 6 D-64331 weiterstadt tel: 06150/1306-5, fax: 1306-99<br />
internet: http://www.schulze-elektronik.com e-mail: mail@schulze-elektronik.com
<strong>isl</strong> 6 <strong>chameleon</strong>: <strong>rapid</strong> <strong>charger</strong> <strong>series</strong><br />
operating instructions for software from V7.03, date of issue 17 DEC 2001<br />
12 RS232 interface pinout and data convention<br />
12.1 Pinout of the jack connector of the the connecting cable<br />
schulze<br />
elektronik<br />
gmbh<br />
page 29<br />
RxD RS232 interface connector SUB D 9 pins (25 pins)<br />
TxD = transmiter of <strong>isl</strong> 6 connect with RXD Pin 2 (Pin 3)<br />
RxD = receiver of <strong>isl</strong> 6 connect with TXD Pin 3 (Pin 2)<br />
TxD Gnd Signal GND connect with GND Pin 5 (Pin 7)<br />
In the <strong>charger</strong> and in the sub d socket of our i6-RS-kab we mounted some resistors for safety reasons,<br />
which shall protect the interface against damage by short circuit during the connection of the<br />
plug into the socket.<br />
12.2 Data convention PC-connection<br />
Data transfer rate: 9600 Baud<br />
Datablock: A:sssss:uuuuu:iiiiiVSttt## (ASCII)<br />
Legend: A Output/Pack No.<br />
: Separation sign<br />
sssss time in seconds<br />
: Separation sign<br />
uuuuu Battery voltage in millivolts<br />
: Separation sign<br />
iiiii Current in milliamperes<br />
V[:,-] Charge/Discharge indicator<br />
S[l,L,E,P,v...] Charge-/Discharge-Status<br />
ttt[...] Battery temperature<br />
##[..] Device number<br />
Hint: Battery temperature and device number are transferred as "....." (points)<br />
schulze elektronik gmbh prenzlauer weg 6 D-64331 weiterstadt tel: 06150/1306-5, fax: 1306-99<br />
internet: http://www.schulze-elektronik.com e-mail: mail@schulze-elektronik.com
page 30<br />
13 Error messages and their<br />
causes<br />
When certain limit values (car battery voltage, <strong>charger</strong><br />
temperature, maximum charge power) are exceeded,<br />
the result may be to cut off the charge process<br />
(e.g. excess car battery voltage), or the screen<br />
may show an error message while the buzzer<br />
sounds; the buzzer is switched off automatically after<br />
a certain time.<br />
- If an error message appears, the screen only<br />
shows the charged quantity from then on; the charge<br />
period and charge voltage can no longer be read off.<br />
- At the Akku 2 output a battery voltage of less than<br />
about 0.5 V will cause the <strong>charger</strong> to assume incorrect<br />
polarity.<br />
- During charging at Akku 2 output with the maximum<br />
rated cell count (especially with 3 Li-Io cells)<br />
the warning/error "Vcar-Vbatt2
<strong>isl</strong> 6 <strong>chameleon</strong>: <strong>rapid</strong> <strong>charger</strong> <strong>series</strong><br />
operating instructions for software from V7.03, date of issue 17 DEC 2001<br />
14 Trouble-shooting<br />
Dear customer,<br />
schulze<br />
elektronik<br />
gmbh<br />
page 31<br />
If your <strong>charger</strong> appears not to work as you expect it to, please run through the measures outlined<br />
below step by step before assuming that it is faulty.<br />
Only if you have completed all these checks, and the problem is still present, ring on our hotline<br />
for technical advice. Even better, fill in the service questionnaire (next page) and send or fax it to<br />
us. We will then ring you back with advice.<br />
From long years of experience with our battery <strong>charger</strong>s we know that most problems do<br />
not arise if the points listed below are followed to the letter.<br />
If we receive your <strong>charger</strong> but can find no fault with it ("no fault found") - which usually<br />
means that the measures described below have been ignored - please note once again that<br />
we incur costs in checking the unit, and that those costs are payable by you even if the<br />
<strong>charger</strong> is within the warranty period.<br />
1. Connect the <strong>charger</strong> to a fully charged car battery with a capacity of at least 60 Ah. Do not<br />
use a mains-powered Power Supply Unit!<br />
2. For the power supply to the <strong>charger</strong> use only the original cables and terminal clips. Connectors<br />
such as wander plugs, car cigar lighter plugs etc. are not suitable! If you have made changes,<br />
kindly restore the original cables and clips. Take care to produce sound soldered joints - no "solder<br />
blobs" or dry joints, please!<br />
3. Charge cables for all batteries should have a conductor cross-section of 2.5 sq mm. The<br />
<strong>charger</strong>'s automatic current setting circuitry is only capable of setting a suitable (i.e. high) charge<br />
current for your battery if the cable is of this cross-section. Give the automatic circuit a fair chance!<br />
4. Just as important as the charge cables are the connectors attached to them. Use the proven 4<br />
mm gold-contact connectors at the <strong>charger</strong> end (don't use expensive wander plugs). Your flight<br />
packs should already be fitted with gold-contact connectors. Tin-plated connectors are completely<br />
unsuitable as their transfer resistance is high and they are prone to intermittent contact. Be sure that<br />
your cables are well soldered to the plugs and sockets. Do not fasten with screws.<br />
5. If you observe Points 3) and 4) and connect a discharged battery to the <strong>charger</strong>, the fully automatic<br />
charge mode should set a current of at least 1C, usually as much as 2C, after about 5 - 10<br />
min-utes. If this is not the case, then the internal resistance of the battery is probably excessive. In<br />
short, your battery has "had it", or is not suitable for <strong>rapid</strong>-charging.<br />
6. Ensure that there are no defective cells in the battery pack. Bad cells usually heat up early in<br />
the charge, and then cause the <strong>charger</strong> to switch off prematurely, and/or to set too low a charge<br />
current in automatic mode.<br />
7. If the 3-hour limit is exceeded when you are charging from the Akku 1 or Akku 2 output in automatic<br />
mode, then something is wrong with your charge cable, your connectors or your battery.<br />
Perhaps too small a cross-section in the charge cable? Connectors not good-quality gold-contact<br />
types? Dry solder joints? Battery ready for the bin, or not designed for <strong>rapid</strong>-charging?<br />
Establish the reason! Attempting to alter the 3-hour time limit is not the way forward, as in most cases<br />
a charge period of one hour already indicates that something is amiss. After 5 - 10 minutes the<br />
automatic circuitry should have set a charge current of at least 1C!<br />
8. Have you read the information in Chapter 1 (Warnings) and 2 (How to obtain reliable, troublefree<br />
operation) and observed the recommendations?<br />
schulze elektronik gmbh prenzlauer weg 6 D-64331 weiterstadt tel: 06150/1306-5, fax: 1306-99<br />
internet: http://www.schulze-elektronik.com e-mail: mail@schulze-elektronik.com
page 32<br />
15 Service questionnaire Your address:<br />
To: schulze elektronik gmbh and<br />
Fax-No. +49 / 6150 / 1306-99 Telephone No.:<br />
<strong>isl</strong> 6 <strong>chameleon</strong>: <strong>rapid</strong> <strong>charger</strong> <strong>series</strong><br />
Please complete every section.<br />
If a fault arises please return this form with the unit!<br />
Battery: Your information: Example:<br />
Purpose (Transmitter, receiver, flight pack) Transmitter<br />
Manufacturer Sanyo<br />
No. of cells / voltage 8-cell / 9,6 V<br />
Capacity 1700 mAh<br />
Type 1700SCE<br />
Cells soldered or clipped soldered<br />
Charge cable connector Barrel<br />
Charge cable: Original <br />
Length 1.5 m<br />
Cross-section 0.14 sq mm<br />
Charger connector<br />
Power supply:<br />
Wander plug<br />
Fault with mains PSU power: yes<br />
PSU type Power 150<br />
Output voltage 13 V<br />
Maximum output current 11 A<br />
Fault with car battery power: no<br />
Nominal capacity, car battery<br />
Charger:<br />
45 Ah<br />
Type <strong>isl</strong> 6-430d<br />
Charge output used Akku 1<br />
Charge program selected Auto C<br />
(Automatic mode:) max. charge current 0.83A<br />
(Automatic mode:) charge current at fault 0.25A<br />
Duration of charge 133 min<br />
Battery temperature at termination 30°C<br />
Error message<br />
Description of fault:<br />
# 52<br />
○ ○ ○ ○ ○ ○ ○ ○ ○ ○ ○ ○ ○ ○ ○ ○ ○ ○ ○ ○ ○ ○ ○ ○ ○ ○ ○ ○ ○ ○ ○ ○ ○ ○ ○ ○ ○ ○ ○ ○ ○ ○ ○ ○ ○ ○ ○ ○ ○ ○ ○ ○ ○ ○ ○ ○ ○ ○ ○ ○ ○ ○<br />
○ ○ ○ ○ ○ ○ ○ ○ ○ ○ ○ ○ ○ ○ ○ ○ ○ ○ ○ ○ ○ ○ ○ ○ ○ ○ ○ ○ ○ ○ ○ ○ ○ ○ ○ ○ ○ ○ ○ ○ ○ ○ ○ ○ ○ ○ ○ ○ ○ ○ ○ ○ ○ ○ ○ ○ ○ ○ ○ ○ ○ ○<br />
○ ○ ○ ○ ○ ○ ○ ○ ○ ○ ○ ○ ○ ○ ○ ○ ○ ○ ○ ○ ○ ○ ○ ○ ○ ○ ○ ○ ○ ○ ○ ○ ○ ○ ○ ○ ○ ○ ○ ○ ○ ○ ○ ○ ○ ○ ○ ○ ○ ○ ○ ○ ○ ○ ○ ○ ○ ○ ○ ○ ○ ○<br />
○ ○ ○ ○ ○ ○ ○ ○ ○ ○ ○ ○ ○ ○ ○ ○ ○ ○ ○ ○ ○ ○ ○ ○ ○ ○ ○ ○ ○ ○ ○ ○ ○ ○ ○ ○ ○ ○ ○ ○ ○ ○ ○ ○ ○ ○ ○ ○ ○ ○ ○ ○ ○ ○ ○ ○ ○ ○ ○ ○ ○ ○<br />
○ ○ ○ ○ ○ ○ ○ ○ ○ ○ ○ ○ ○ ○ ○ ○ ○ ○ ○ ○ ○ ○ ○ ○ ○ ○ ○ ○ ○ ○ ○ ○ ○ ○ ○ ○ ○ ○ ○ ○ ○ ○ ○ ○ ○ ○ ○ ○ ○ ○ ○ ○ ○ ○ ○ ○ ○ ○ ○ ○ ○ ○<br />
○ ○ ○ ○ ○ ○ ○ ○ ○ ○ ○ ○ ○ ○ ○ ○ ○ ○ ○ ○ ○ ○ ○ ○ ○ ○ ○ ○ ○ ○ ○ ○ ○ ○ ○ ○ ○ ○ ○ ○ ○ ○ ○ ○ ○ ○ ○ ○ ○ ○ ○ ○ ○ ○ ○ ○ ○ ○ ○ ○ ○ ○<br />
○ ○ ○ ○ ○ ○ ○ ○ ○ ○ ○ ○ ○ ○ ○ ○ ○ ○ ○ ○ ○ ○ ○ ○ ○ ○ ○ ○ ○ ○ ○ ○ ○ ○ ○ ○ ○ ○ ○ ○ ○ ○ ○ ○ ○ ○ ○ ○ ○ ○ ○ ○ ○ ○ ○ ○ ○ ○ ○ ○ ○ ○<br />
○ ○ ○ ○ ○ ○ ○ ○ ○ ○ ○ ○ ○ ○ ○ ○ ○ ○ ○ ○ ○ ○ ○ ○ ○ ○ ○ ○ ○ ○ ○ ○ ○ ○ ○ ○ ○ ○ ○ ○ ○ ○ ○ ○ ○ ○ ○ ○ ○ ○ ○ ○ ○ ○ ○ ○ ○ ○ ○ ○ ○ ○<br />
○ ○ ○ ○ ○ ○ ○ ○ ○ ○ ○ ○ ○ ○ ○ ○ ○ ○ ○ ○ ○ ○ ○ ○ ○ ○ ○ ○ ○ ○ ○ ○ ○ ○ ○ ○ ○ ○ ○ ○ ○ ○ ○ ○ ○ ○ ○ ○ ○ ○ ○ ○ ○ ○ ○ ○ ○ ○ ○ ○ ○ ○<br />
○ ○ ○ ○ ○ ○ ○ ○ ○ ○ ○ ○ ○ ○ ○ ○ ○ ○ ○ ○ ○ ○ ○ ○ ○ ○ ○ ○ ○ ○ ○ ○ ○ ○ ○ ○ ○ ○ ○ ○ ○ ○ ○ ○ ○ ○ ○ ○ ○ ○ ○ ○ ○ ○ ○ ○ ○ ○ ○ ○ ○ ○<br />
○ ○ ○ ○ ○ ○ ○ ○ ○ ○ ○ ○ ○ ○ ○ ○ ○ ○ ○ ○ ○ ○ ○ ○ ○ ○ ○ ○ ○ ○ ○ ○ ○ ○ ○ ○ ○ ○ ○ ○ ○ ○ ○ ○ ○ ○ ○ ○ ○ ○ ○ ○ ○ ○ ○ ○ ○ ○ ○ ○ ○ ○<br />
○ ○ ○ ○ ○ ○ ○ ○ ○ ○ ○ ○ ○ ○ ○ ○ ○ ○ ○ ○ ○ ○ ○ ○ ○ ○ ○ ○ ○ ○ ○ ○ ○ ○ ○ ○ ○ ○ ○ ○ ○ ○ ○ ○ ○ ○ ○ ○ ○ ○ ○ ○ ○ ○ ○ ○ ○ ○ ○ ○ ○ ○<br />
○ ○ ○ ○ ○ ○ ○ ○ ○ ○ ○ ○ ○ ○ ○ ○ ○ ○ ○ ○ ○ ○ ○ ○ ○ ○ ○ ○ ○ ○ ○ ○ ○ ○ ○ ○ ○ ○ ○ ○ ○ ○ ○ ○ ○ ○ ○ ○ ○ ○ ○ ○ ○ ○ ○ ○ ○ ○ ○ ○ ○ ○<br />
○ ○ ○ ○ ○ ○ ○ ○ ○ ○ ○ ○ ○ ○ ○ ○ ○ ○ ○ ○ ○ ○ ○ ○ ○ ○ ○ ○ ○ ○ ○ ○ ○ ○ ○ ○ ○ ○ ○ ○ ○ ○ ○ ○ ○ ○ ○ ○ ○ ○ ○ ○ ○ ○ ○ ○ ○ ○ ○ ○ ○ ○<br />
○ ○ ○ ○ ○ ○ ○ ○ ○ ○ ○ ○ ○ ○ ○ ○ ○ ○ ○ ○ ○ ○ ○ ○ ○ ○ ○ ○ ○ ○ ○ ○ ○ ○ ○ ○ ○ ○ ○ ○ ○ ○ ○ ○ ○ ○ ○ ○ ○ ○ ○ ○ ○ ○ ○ ○ ○ ○ ○ ○ ○ ○<br />
○ ○ ○ ○ ○ ○ ○ ○ ○ ○ ○ ○ ○ ○ ○ ○ ○ ○ ○ ○ ○ ○ ○ ○ ○ ○ ○ ○ ○ ○ ○ ○ ○ ○ ○ ○ ○ ○ ○ ○ ○ ○ ○ ○ ○ ○ ○ ○ ○ ○ ○ ○ ○ ○ ○ ○ ○ ○ ○ ○ ○ ○<br />
○ ○ ○ ○ ○ ○ ○ ○ ○ ○ ○ ○ ○ ○ ○ ○ ○ ○ ○ ○ ○ ○ ○ ○ ○ ○ ○ ○ ○ ○ ○ ○ ○ ○ ○ ○ ○ ○ ○ ○ ○ ○ ○ ○ ○ ○ ○ ○ ○ ○ ○ ○ ○ ○ ○ ○ ○ ○ ○ ○ ○ ○<br />
○ ○ ○ ○ ○ ○ ○ ○ ○ ○ ○ ○ ○ ○ ○ ○ ○ ○ ○ ○ ○ ○ ○ ○ ○ ○ ○ ○ ○ ○ ○ ○ ○ ○ ○ ○ ○ ○ ○ ○ ○ ○ ○ ○ ○ ○ ○ ○ ○ ○ ○ ○ ○ ○ ○ ○ ○ ○ ○ ○ ○ ○<br />
○ ○ ○ ○ ○ ○ ○ ○ ○ ○ ○ ○ ○ ○ ○ ○ ○ ○ ○ ○ ○ ○ ○ ○ ○ ○ ○ ○ ○ ○ ○ ○ ○ ○ ○ ○ ○ ○ ○ ○ ○ ○ ○ ○ ○ ○ ○ ○ ○ ○ ○ ○ ○ ○ ○ ○ ○ ○ ○ ○ ○ ○<br />
○ ○ ○ ○ ○ ○ ○ ○ ○ ○ ○ ○ ○ ○ ○ ○ ○ ○ ○ ○ ○ ○ ○ ○ ○ ○ ○ ○ ○ ○ ○ ○ ○ ○ ○ ○ ○ ○ ○ ○ ○ ○ ○ ○ ○ ○ ○ ○ ○ ○ ○ ○ ○ ○ ○ ○ ○ ○ ○ ○ ○ ○<br />
schulze elektronik gmbh prenzlauer weg 6 D-64331 weiterstadt tel: 06150/1306-5, fax: 1306-99<br />
internet: http://www.schulze-elektronik.com e-mail: mail@schulze-elektronik.com
<strong>isl</strong> 6 <strong>chameleon</strong>: <strong>rapid</strong> <strong>charger</strong> <strong>series</strong><br />
operating instructions for software from V7.03, date of issue 17 DEC 2001<br />
schulze<br />
elektronik<br />
gmbh<br />
page 33<br />
schulze elektronik gmbh prenzlauer weg 6 D-64331 weiterstadt tel: 06150/1306-5, fax: 1306-99<br />
internet: http://www.schulze-elektronik.com e-mail: mail@schulze-elektronik.com
page 34<br />
<strong>isl</strong> 6 <strong>chameleon</strong>: <strong>rapid</strong> <strong>charger</strong> <strong>series</strong><br />
schulze elektronik gmbh prenzlauer weg 6 D-64331 weiterstadt tel: 06150/1306-5, fax: 1306-99<br />
internet: http://www.schulze-elektronik.com e-mail: mail@schulze-elektronik.com