isl 6 chameleon: rapid charger series - Schulze Elektronik GmbH
isl 6 chameleon: rapid charger series - Schulze Elektronik GmbH
isl 6 chameleon: rapid charger series - Schulze Elektronik GmbH

You also want an ePaper? Increase the reach of your titles
YUMPU automatically turns print PDFs into web optimized ePapers that Google loves.
page 6<br />
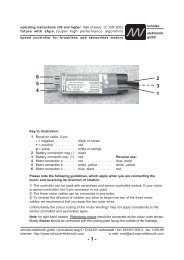
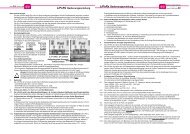
5 Fitting the CE tube<br />
Requirements:<br />
- The charge cable cross-section should be 2.5<br />
mm2 .<br />
- One wire should be coloured red (positive terminal<br />
+), the other black (negative -).<br />
- To meet CE requirements the charge lead<br />
should be no longer than 20 cm (minus the<br />
length of cable attached to the battery!).<br />
1. Solder a banana plug to each wire. To avoid<br />
short-circuits we recommend the use of safety<br />
banana plugs fitted with a sliding insulator.<br />
2. Wrap one of the cable ties (supplied) round<br />
the two wires about 4 cm from the banana<br />
plugs to hold the wires together.<br />
3. Slip the EMF tube onto the free end of the<br />
charge lead.<br />
4. Wrap a second cable tie round the two wires<br />
immediately adjacent to the tube (see illustration).<br />
Cable tie<br />
5. Twist the wires together and/or fit heat-shrink<br />
tubing to keep them tidy.<br />
6. Now solder the battery connector to the free<br />
ends of the charge lead. Don't forget to fit the<br />
pieces of heat-shrink sleeve required to insulate<br />
the soldered joints.<br />
A ready-made charge cable fitted with safety banana<br />
plugs and the CE tube is available from us<br />
under CE-kab-i6 (see illustration).<br />
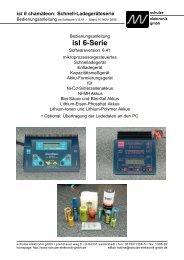
<strong>isl</strong> 6 <strong>chameleon</strong>: <strong>rapid</strong> <strong>charger</strong> <strong>series</strong><br />
6 Connecting the <strong>charger</strong>,<br />
selecting the program<br />
Please read Chapter 1, "Warnings" and<br />
Chapter 2 "How to obtain reliable and<br />
trouble-free operation", as they contain<br />
important information which you must<br />
know before you connect and use the<br />
<strong>charger</strong>.<br />
6.1 Before you connect the <strong>charger</strong><br />
Remove the <strong>isl</strong> 6 from its carton for charging to<br />
ensure adequate air circulation.<br />
Do not yet connect the unit to the battery or batteries<br />
to be charged.<br />
Ensure that the power supply (12V car battery,<br />
mains PSU) is stable and is not producing or<br />
suffering from problems.<br />
Ensure that the connections between the power<br />
supply and the terminal clamps of the <strong>isl</strong> 6 are<br />
making perfect contact. This is the reason why<br />
we cannot recommend wander plugs and car cigar<br />
lighter connectors.<br />
6.2 Switch on the power supply<br />
If you are connecting the unit to a car battery installed<br />
in a car:<br />
- Switch off the car engine.<br />
If you are using a suitable mains PSU:<br />
- Switch on the mains PSU first.<br />
6.3 Connect the <strong>isl</strong> 6 to the power supply<br />
Connect the terminal clamps to the power supply<br />
contacts quickly and confidently, taking care<br />
to maintain correct polarity.<br />
Once connected correctly the <strong>charger</strong>'s screen<br />
shows the following "ready" message:<br />
(1) "(c) schulze gmbh" and<br />
(2) "<strong>isl</strong> 6-636+ V7.10"<br />
i. e. the manufacturers name is displayed in the<br />
first line, the second line shows the device type<br />
and version number of the software.<br />
On <strong>isl</strong> 6-330d, which includes a one line display<br />
only, the second line is displayed after a short<br />
wait time.<br />
schulze elektronik gmbh prenzlauer weg 6 D-64331 weiterstadt tel: 06150/1306-5, fax: 1306-99<br />
internet: http://www.schulze-elektronik.com e-mail: mail@schulze-elektronik.com