LD 15z - Robitronic
LD 15z - Robitronic
LD 15z - Robitronic

Sie wollen auch ein ePaper? Erhöhen Sie die Reichweite Ihrer Titel.
YUMPU macht aus Druck-PDFs automatisch weboptimierte ePaper, die Google liebt.
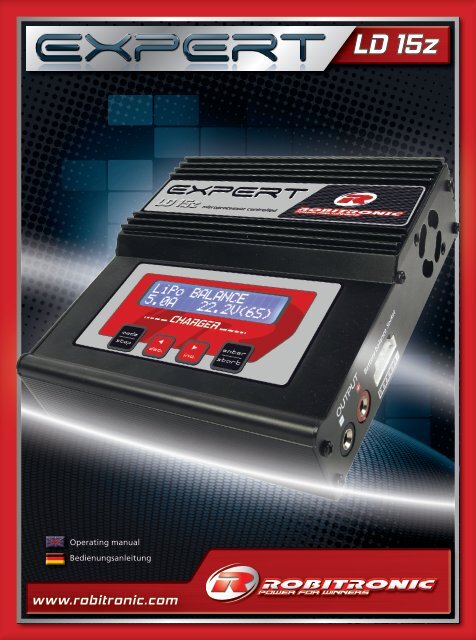
Operating manual<br />
Bedienungsanleitung<br />
www.robitronic.com<br />
<strong>LD</strong> <strong>15z</strong>
Expert <strong>LD</strong> <strong>15z</strong><br />
2
R01004 Expert <strong>LD</strong> <strong>15z</strong><br />
Operating Manual<br />
ExpErt <strong>LD</strong> <strong>15z</strong><br />
1. Intended use ............................................ 4<br />
2. Features .................................................... 4<br />
3. Disclaimer ................................................. 4<br />
4. Declaration of Conformity (DOC) ........... 4<br />
5. Technical data .......................................... 5<br />
6. Packaging content ................................... 5<br />
7. Overview and accessories ........................ 6<br />
8. Option accessories ................................... 6<br />
9. Function buttons ..................................... 6<br />
10. Operating the Expert <strong>LD</strong> <strong>15z</strong> .................. 7<br />
11. Warning and error messages ................ 15<br />
12. Safety instructions ................................. 16<br />
13. Service and Warranty ............................ 16<br />
14. Disposal of Electronic Waste ................. 16<br />
ENGLISH<br />
3
ExpErt <strong>LD</strong> <strong>15z</strong><br />
4<br />
1. Intended use<br />
The charger Expert <strong>LD</strong> <strong>15z</strong> is designed to charge and discharge NiCd, NiMH, LiPo / LiIon / LiFe and<br />
lead-acid batteries. Another use can damage the product. The product must not be changed or<br />
modified. Moreover, this may lead to dangers such as for example short circuit, fire, electric<br />
shock, etc. The product is only suitable for use in dry areas, it must be exposed to moisture.<br />
2. Features<br />
1.1. The Expert <strong>LD</strong> <strong>15z</strong> features an intelligent charging circuit enabling the unit to<br />
simultaneously detect even multiple errors (broken cell, user error…) and hence provide<br />
safe charging.<br />
1.2. The integrated switching power supply operates at a very high efficiency in excess of 90%<br />
1.3. The Expert <strong>LD</strong> <strong>15z</strong> is compatible with all common battery types currently on the<br />
market: LiPo, LiIon, LiFe, NiMH, NiCd, Pb.<br />
1.4. Its intuitive user interfaces provides several advanced settings like custom safety<br />
parameters and a real time display of a host of important charging parameters like<br />
individual cell voltages, capacity, temperature (with the optional temperature sensor,<br />
order no. R01011), charging time, input voltage and more.<br />
1.5 The Expert <strong>LD</strong> <strong>15z</strong>’s integrated balancer is precisely calibrated to a tolerance of +/- 0,01V,<br />
promoting safety and increased battery life.<br />
1.6. Using the high precision balancer, the Expert <strong>LD</strong> <strong>15z</strong> also features individual cell charging‚<br />
and discharging.<br />
1.7. Different charging programs are available to suit all different kinds of batteries.<br />
1.8. For even more ease of use, there are 5 completely user programmable charging modes<br />
available at the push of a button.<br />
1.9. 1 to 5 charge-discharge cycles to condition NiMH and NiCd batteries.<br />
1.10. With the optional high precision temperature sensor (order no. R01011), temperature<br />
controlled rapid-charging of NiXX packs is available.<br />
3. Disclaimer<br />
As compliance with the instructions, the operations and conditions when using the device at<br />
no time can be monitored by the manufacturer, the manufacturer assumes no liability for<br />
damages, costs and / or losses arising from incorrect use and / or incorrect operation or in any<br />
way connected.<br />
4. Declaration of Conformity (DOC)<br />
Hereby, the manufacturer declares that this product is in compliance with the essential<br />
requirements and other relevant provisions of Directives.<br />
The declaration of conformity may be consulted at www.robitronic.com.
5. Technical data<br />
6. Packaging content<br />
` R01004 Expert <strong>LD</strong> <strong>15z</strong><br />
` Owner’s manual<br />
R19039 Adapter cable<br />
High Amp -> Tamiya<br />
R19037 Adapter cable<br />
High Amp ->clips<br />
R19033 Balancer adapter<br />
2-6S (EH-type)<br />
R19038 Adapter cable<br />
High Amp -> Futaba/<br />
BEC/glow-stick<br />
ExpErt <strong>LD</strong> <strong>15z</strong><br />
` Input voltage .........................................................................DC 11-18.0V<br />
............................................................................AC 100-240V 50/60Hz<br />
` Charge current ........................................................................... 0.1-5.0A<br />
` Discharge current ........................................................................0.1-1.0A<br />
` Max. charging power ...................................................................... 50W<br />
` Max. discharge power ....................................................................... 5W<br />
` Max. balancer current ....................................................................300mA<br />
` Max. balancer error ..................................................................... ±0.01V<br />
` No. of supported cells (NiXX) ...................................................... 1-15cells<br />
` No. of supported cells (LiXX) ..................................................... 1-6 (series)<br />
` No. of supported cells (Pb) ..................................................... 1-10 (2-20V)<br />
` Weight without cables ...................................................................... 577g<br />
` Dimensions .................................................................. 138 x 147 x 47mm<br />
` AC cable set<br />
` DC cable set<br />
R19035 Adapter cable<br />
banana plugs -> High Amp<br />
5
ExpErt <strong>LD</strong> <strong>15z</strong><br />
6<br />
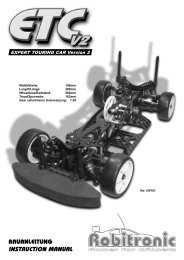
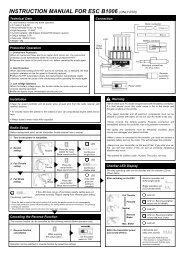
7. Overview and accessories<br />
AC Input<br />
DC Input<br />
Temperature<br />
sensor port<br />
(optional)<br />
8. Optional accessories<br />
9. Function buttons<br />
Function buttons LC-Display<br />
R19040 Y-Kabel (1x High Amp -> 2x High Amp) High Amp -> Traxxas<br />
R19030 Micro LiPo adapter (up to 4 cells)<br />
R19036 Adapter cable High Amp -> Traxxas<br />
R01011 Expert <strong>LD</strong> temperature sensor<br />
R19032 Multi-adapter 2x3S / 3x2S (XH-type)<br />
R19031 Multi-adapter 2x3S / 3x2S (EH-type)<br />
R19042 Balancer-adapter 2-6S (HP-type)<br />
R19041 Balancer-adapter 2-6S (TP-type)<br />
R19034 Balancer-adapter 2-6S (XH-type)<br />
R01010 Expert <strong>LD</strong> USB interface and software kit<br />
Balancer-port<br />
Charging-port<br />
Mode : to choose menu items in the main menu and to stop the charge/discharge<br />
Stop<br />
process and return to the main menu.<br />
Dec. Inc. : to increase or decrease parameter values and to scroll through the menus.<br />
Enter : to confirm settings. Press for more than 2 seconds to start charging/discharging<br />
Start<br />
the battery.
10. Operating the Expert <strong>LD</strong> <strong>15z</strong><br />
10.1 Main menu<br />
Dec.<br />
Dec.<br />
Dec.<br />
Dec.<br />
Dec.<br />
Dec.<br />
Dec.<br />
Dec.<br />
Mode<br />
Stop<br />
Mode<br />
Stop<br />
Mode<br />
Stop<br />
Mode<br />
Stop<br />
Mode<br />
Stop<br />
Mode<br />
Stop<br />
Mode<br />
Stop<br />
Mode<br />
Stop<br />
ExpErt <strong>LD</strong> <strong>15z</strong><br />
During power-on, the Expert <strong>LD</strong> <strong>15z</strong> shows the<br />
current firmware version while performing a<br />
system check. Please press Enter to enter the<br />
Start<br />
main menu.<br />
Custom Settings<br />
Now you’ll see different menu items that you<br />
can scroll through by pressing Mode<br />
Stop or Dec. and<br />
choose by pressing<br />
LiXX program<br />
NiMH program<br />
NiCd program<br />
Pb program<br />
Enter<br />
Start .<br />
Set and save custom parameters<br />
Select custom parameter<br />
7
ExpErt <strong>LD</strong> <strong>15z</strong><br />
8<br />
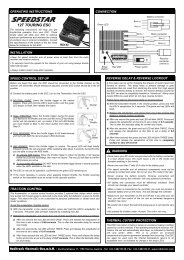
10.2 Custom settings<br />
Before you start using your Expert <strong>LD</strong> <strong>15z</strong>,<br />
you can use this menu to fully customize<br />
its charging and discharging parameters.<br />
To do so, press Enter<br />
Start to arrive at the display<br />
shown on the right. Now, press Mode<br />
Stop<br />
to enter the menu for custom settings.<br />
Dec. Inc.<br />
Using the buttons, you can now<br />
choose the various parameters according<br />
to the chart on the right.<br />
If you want to modify a parameter, simply<br />
press Enter<br />
Start again and the menu will start<br />
flashing. Using the Dec. Inc. buttons, you<br />
can alter the factory settings and save<br />
the new ones by pressing Enter<br />
Start once more.<br />
The Expert <strong>LD</strong> <strong>15z</strong> can charge LiPo-<br />
chemistry batteries as well as LiIon and<br />
LiFe-types. Please pay attention to the<br />
appropriate settings shown in table A, as<br />
the battery may otherwise take damage<br />
or explode!<br />
To avoid user error, the Expert <strong>LD</strong> <strong>15z</strong> can<br />
automatically detect the cell number of<br />
the connected battery. (see figure A0 )<br />
This detection may fail to recognize the<br />
correct cell count on deeply charged<br />
batteries, so the <strong>LD</strong> <strong>15z</strong> will perform a<br />
cell check again after charging for 10mins.<br />
This time frame is normally sufficient for<br />
reliable operation, but with batteries<br />
of overly small or large capacities, you<br />
may need to adjust the cell count for<br />
yourself.<br />
Dec.<br />
A3<br />
Dec.<br />
Dec.<br />
Dec.<br />
Dec.<br />
Dec.<br />
Dec.<br />
Dec.<br />
Dec.<br />
Dec.<br />
Mode<br />
Stop<br />
Inc.<br />
Inc.<br />
Inc.<br />
Inc.<br />
Inc.<br />
Inc.<br />
Inc.<br />
Inc.<br />
Inc.<br />
A0<br />
A1<br />
A2<br />
A5<br />
A6<br />
A7<br />
A8<br />
A9<br />
A4<br />
Inc.
ExpErt <strong>LD</strong> <strong>15z</strong><br />
The figures [ A1 ] and [ A2 ] show the delta-peak settings used for fast-charging NiXX batteries.<br />
These settings can be adjusted from 5 to 20mV per cell. Values too high can lead to overloading<br />
while a delta peak set too low can end the charging process too early. Recommended<br />
settings are 12mV for NiCd and 7mV for NiMH cells. Please consult the manufacturer of you<br />
battery packs for the best delta-peak values.<br />
Attention: Delta-peak does not work with pack voltages below 2,5V and may lead to overload.<br />
In this case, please use the optionally available temperature sensor or a charge current<br />
below 1C<br />
The Expert’s 3-Pin port can either be configured as a USB-connection or for using the temperature<br />
sensor with an adjustable temperature limit (see figure A3 )<br />
Using the optionally available USB-cable (order no. R01010), the charging process can be<br />
monitored on a computer. (see figure A4 )<br />
During cycle mode for conditioning NiXX packs, the batteries can get quite warm. Hence, there is<br />
a cool-down phase between cycles that can be set from 1 to 60 minutes. (figure A5 )<br />
As a good starting point, set the cool-down phase to at least 10 minutes.<br />
As soon as the charging process starts, a safety timer (programmable from 10 to 720 minutes)<br />
engages to stop the charger in case of a defect battery. (see figure A6 ) As a second security<br />
measure, you can also set a maximum on the capacity, the Expert <strong>LD</strong> <strong>15z</strong> tries to charge the<br />
connected battery to. (figure A7 )<br />
Figure [ A8 ] shows the menu for turning sounds on and off.<br />
When the Expert <strong>LD</strong> <strong>15z</strong> is powered from a battery, there’s a cut-off voltage-setting available<br />
so that the car battery doesn’t take damage. (figure A9 )<br />
When choosing custom charging parameters, please do not exceed the values proposed in<br />
the following table:<br />
terms<br />
types<br />
Nominal voltage<br />
(V/cell)<br />
Cutoff voltage/charge<br />
(V/cell)<br />
Maximum charging<br />
current<br />
Cutoff voltage/discharge<br />
(V/cell)<br />
LiPo Li-10 LiFe NiMH NiCD<br />
chart A<br />
Pb<br />
3.70 3.60 3.30 1.20 1.20 2.00<br />
4.20 4.10 3.60 1.60 1.60 2.45<br />
1.75<br />
9
ExpErt <strong>LD</strong> <strong>15z</strong><br />
10<br />
10.3 Li-battery program<br />
Dec.<br />
Mode<br />
Stop<br />
Dec.<br />
Dec.<br />
Dec.<br />
Dec.<br />
Enter<br />
Start<br />
Inc.<br />
Inc.<br />
Inc.<br />
Inc.<br />
Inc.<br />
Press the Mode<br />
Stop button until you arrive at the display shown on<br />
the left. Access the menu by pressing Enter<br />
Start and then change<br />
the parameters using the Dec. Inc. keys according to the chart<br />
shown on the left.<br />
If you want to modify a parameter, simply press Enter<br />
Start again<br />
and the menu will start flashing. Using the Dec. Inc. buttons,<br />
you can alter the factory settings and save the new ones by<br />
pressing Enter<br />
Start once more. To start charging the battery, press<br />
and Enter<br />
Start hold for more than 2 seconds.<br />
“CHARGE”: the fully automatic charging program is suitable<br />
for Li-batteries without a dedicated balancer cable.<br />
The type of Li-battery selected from the custom settings menu<br />
appears in the top left corner of the LC-display. On the right, the<br />
current charge or discharge status is displayed. The bottom row<br />
shows the preset charge current on the left and the detected<br />
number of cells on the right. (the figures B1 and B2 on the<br />
next page show the possible connection setups between the<br />
Li-battery and the Expert <strong>LD</strong> <strong>15z</strong>)<br />
The “BALANCE” mode is suitable for 2-6s Li-batteries that are<br />
fitted with individual cell wiring to use the Expert’s integrated<br />
balancer. During charging, the Expert <strong>LD</strong> <strong>15z</strong> monitors each<br />
cell of the pack individually and ensures that there’s no overload.<br />
The “BALANCE” mode is the recommended charging<br />
method for multi-cell packs with balancer wiring.<br />
“FAST-CHG”: As soon as the charge current drops below a fifth<br />
of its preset value, the Expert <strong>LD</strong> <strong>15z</strong> terminates the charging<br />
process. Using this method, you won’t get to use the full<br />
capacity of your battery, but on the other had, the charge<br />
time is shortened significantly.<br />
“STORAGE”: To ensure optimal storage conditions, the Expert<br />
<strong>LD</strong> <strong>15z</strong> keeps the battery at around 40% charge level, corresponding<br />
to a single cell voltage of 3,85V (LiPo), 3,75V (LiIon)<br />
and 3,3V (LiFe).<br />
In STORAGE mode, the <strong>LD</strong> <strong>15z</strong> automatically determines whether<br />
the connected battery has to be discharged or charged<br />
to 40% capacity. The balancer port should be used.<br />
“DISCHARGE”: Normally, Li batteries do not need conditioning<br />
through charge/discharge cycles, but the discharge function<br />
could come in handy for capacity checks and assessing<br />
the batteries health. The balancer port should be used and<br />
the maximum discharge current is limited to 1A.
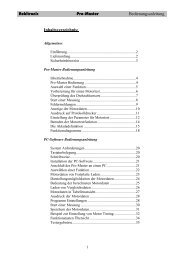
Figure B1:<br />
Connection using the<br />
auto-CHARGE mode.<br />
ExpErt <strong>LD</strong> <strong>15z</strong><br />
10.3.1 Starting the charge/discharge process: After you’ve checked your settings,<br />
press and hold Enter<br />
Start for more that 2 seconds.<br />
Enter<br />
Start<br />
Enter<br />
Start<br />
Mode<br />
Stop<br />
>2S<br />
Mode<br />
Stop<br />
>2S<br />
Figure B2:<br />
Connection using the<br />
BALANCE charge mode.<br />
Enter<br />
Start<br />
1 2 3 4 5 6<br />
Figure B3:<br />
Balancer wiring<br />
diagram<br />
The display now shows the number of cells<br />
– on the left, there’s the automatically recognized<br />
cell count (R), and on the left,<br />
there’s the cell count set by you. If both<br />
values match, you may start charging with<br />
pressing Enter<br />
Start .<br />
If the values displayed do not match, press<br />
Mode<br />
Stop to return to the previous menu and reset<br />
the cell count if necessary.<br />
You can directly skip this check during discharging<br />
and while using the BALANCE/<br />
CHARGE program.<br />
The display now shows various parameters.<br />
You can stop the process by pressing Mode<br />
Stop .<br />
The display explained:<br />
1) cell count<br />
2) charge/discharge mode (CHG = charging<br />
without balancer, BAL = charging with<br />
balancer, FAS = fast charge, STO = storage<br />
mode, DSC = discharging)<br />
3) elapsed time<br />
4) charge/discharge current<br />
5) battery voltage<br />
6) charged/discharged capacity<br />
11
ExpErt <strong>LD</strong> <strong>15z</strong><br />
12<br />
10.3.2 Pressing the Dec. Inc. keys, the Expert <strong>LD</strong> <strong>15z</strong> shows further details like individual<br />
cell voltages (with connected balancer) cutoff-voltage and other parameters.<br />
Inc.<br />
Dec.<br />
Dec.<br />
Dec.<br />
Dec.<br />
Dec.<br />
Pressing Inc. while the battery is connected to the balancer port,<br />
the individual cells’ voltages are displayed.<br />
The process ends as the preset cutoff-voltage is attained.<br />
As a safety measure, the preset capacity must not be exceeded.<br />
The timer acts as a second safety measure: As soon as it lapses, the<br />
process is ended.<br />
The 3-pin port can either be used for the temperature sensor or as<br />
a USB-connection.<br />
In case a temperature sensor is present, the temperature is<br />
displayed. Please make sure the sensor is attached securely to the<br />
battery.<br />
The current input voltage is displayed.
ExpErt <strong>LD</strong> <strong>15z</strong><br />
Press the Mode<br />
Stop button until you arrive at the display shown on<br />
the left. Access the menu with pressing Enter<br />
Start and then change<br />
the parameters using the Dec. Inc. shown on the left.<br />
keys according to the chart<br />
If you want to modify a parameter, simply press Enter<br />
Start again and<br />
the menu will start flashing. Using the Dec. Inc. buttons, you can<br />
alter the factory settings and save the new ones by pressing Enter<br />
Start<br />
once more. To start charging the battery, press and hold Enter<br />
Start for<br />
more than 2 seconds.<br />
Attention: As the NiCd and the NiMH program do not differ<br />
from each other, only the NiMH program is shown below.<br />
“CHARGE”-mode, factory setting: Automatic [AUT]. During AUT<br />
mode, you only have to set the maximum charge current as with<br />
batteries of exceptionally low RI or capacity, the current could<br />
be set too high when working fully automatic.<br />
During [MAN] mode, the Expert <strong>LD</strong> <strong>15z</strong> exactly uses the preset<br />
charge current. To change between the two modes, press Enter<br />
Start<br />
and then hold both the Dec. Inc. 10.4 NiMH/NiCd-battery program<br />
Mode<br />
Enter<br />
Stop<br />
Start<br />
Dec.<br />
Dec.<br />
Inc.<br />
Dec.<br />
Inc.<br />
Inc.<br />
keys for more than 1 second.<br />
“DISCHARGE”: The discharge current can be set between 0.1 and 1A with a cutoff voltage between<br />
0.1 and 25.0V. The recommended cutoff voltages are 1.00V per cell for NiMH batteries and<br />
0.85V per cell for NiCd batteries. Please make sure to check with the recommendations of you<br />
battery’s manufacturer!<br />
“CYCLE”: The Expert <strong>LD</strong> <strong>15z</strong> features a cycle mode with 1-5 charge/discharge or 1-5 discharge/<br />
charge cycles. This mode is especially suitable for forming new battery packs or storing them.<br />
During cycle mode, the charge and discharge settings are derived from the presets of the individual<br />
charge and discharge modes. Please check them before you use the cycle mode.<br />
10.4.1 Starting the charge/discharge<br />
process: After you’ve checked your<br />
settings, press and hold Enter<br />
Start for<br />
more that 2 seconds.<br />
Mode<br />
Stop<br />
Enter<br />
Start >2S<br />
10.5 Pb-battery program<br />
1 2 3 4 5 6<br />
The display now shows various parameters.<br />
You can stop the process by pressing Mode<br />
Stop .<br />
The display explained:<br />
1) battery type<br />
2) charge/discharge mode (CHG = charging,<br />
DSC = discharging, DCHG>CHG or<br />
CHG>DCHG = cycle mode)<br />
3) elapsed time<br />
4) charge/discharge current<br />
5) battery voltage<br />
6) charged/discharged capacity<br />
Using the Dec. Inc. keys, further information can<br />
be displayed. (Temperature when the temperature<br />
sensor is present and delta-peak settings)<br />
This mode is dedicated to charging PB-batteries ranging from 2 to 20V. As PB-batteries<br />
can not be fast-charged, you should select a charging current of 1/10C (one tenth of the<br />
battery’s capacity). Please refer to the manufacturer’s recommendations!<br />
13
ExpErt <strong>LD</strong> <strong>15z</strong><br />
14<br />
10.5.1 Charging PB-batteries<br />
The current mode is displayed in the first row. Below, you can set the charge<br />
current and nominal voltage for the Pb-battery. Press and hold the<br />
Enter<br />
Start button for more than 2 seconds to start charging.<br />
Mode<br />
Stop<br />
Enter >2S<br />
Start<br />
10.6 Setting and recalling parameter-sets<br />
The Expert <strong>LD</strong> <strong>15z</strong> can save up to 5 different sets of parameters that are available at the<br />
push of a button.<br />
10.6.1 Setting and saving parameters<br />
10.6.2 Recalling parameter-sets<br />
The display now shows the current status. To finish the process, press Mode<br />
Stop .<br />
10.5.2 Discharging PB-batteries<br />
The current mode is displayed in the first row. Below, you can set the<br />
charge current and nominal voltage for the Pb-battery. Press and hold<br />
the Enter<br />
Start button for more than 2 seconds to start charging.<br />
Mode<br />
Stop<br />
Mode<br />
Stop<br />
Enter >2S<br />
Start<br />
Enter<br />
Start<br />
Enter >2S<br />
Start<br />
Enter >2S<br />
Start<br />
Enter<br />
Start<br />
Enter >2S<br />
Start<br />
The display now shows the current status. To finish the process, press Mode<br />
Stop .<br />
Press the Mode<br />
Stop button until you arrive at the display shown on the left.<br />
Access the sub-menu with pressing Enter<br />
Start .<br />
As soon as the display (01) starts flashing, use the Dec. Inc. keys, to choose<br />
the slot you want to save your preset parameters to. You can now further<br />
select the battery type, cell count and capacity with the Dec. Inc. buttons<br />
and alter these settings by pressing Enter<br />
Start . When you’ve finished, press and<br />
hold Enter<br />
Start for more than 2 seconds to select the charge/discharge mode.<br />
Now you can choose the appropriate charge/discharge mode and current.<br />
To save your settings, again press and hold Enter<br />
Start for more than 2<br />
seconds to select the charge/discharge mode.<br />
Press the Mode<br />
Stop button until you arrive at the display shown on the left.<br />
Access the sub-menu with pressing Enter<br />
Start .<br />
As soon as the display (01) starts flashing, use the Dec. Inc. keys, to<br />
choose the slot you want to select.<br />
Press and hold Enter<br />
Start for more than 2 seconds to activate the selected<br />
set of parameters.
11. Warning and error messages<br />
ExpErt <strong>LD</strong> <strong>15z</strong><br />
The output is conne cted to a battery with incorrect polarity.<br />
This will be displayed in case of detecting an interruption of the<br />
connection between battery and output or voluntarily disconnecting the<br />
charge lead during the operation of charge or discharge on output.<br />
There was a short-circuit at output. please check the charging leads.<br />
The voltage of input power drops below the limit.<br />
The voltage of Lithium battery pack was selected incorrectly. Verify<br />
the voltage of battery pack carefully.<br />
There happens the malfunction at the charger circuit by any reason.<br />
The processor detects the voltage is lower than you set at Lithium<br />
program. Please check the cell count of the battery pack.<br />
The processor detects the voltage is higher than you set at Lithium<br />
program. Please check the cell count of the battery pack.<br />
The voltage of one of the cell in the Lithium battery pack is too low.<br />
Please check the voltage of the cell one by one.<br />
The voltage of one of the cell in the Lithium battery pack is too high.<br />
Please check the voltage of the cell one by one.<br />
There are bad connection at the individual connector. Please check<br />
the connector and cables carefully.<br />
The internal temperature of the unit goes too high. Cool down the<br />
unit.<br />
The processor can not continue to control the feeding current<br />
by any reason. The unit needs to be repaired.<br />
15
ExpErt <strong>LD</strong> <strong>15z</strong><br />
16<br />
12. Safety instructions<br />
Although the charger is designed to work in a stable environment to play a role, but in use,<br />
you still need careful maintenance, as long as these important tips to follow, that is easy and<br />
effective use of your charger!<br />
1) When you start the process, especially the discharge process,the unit will become warm,<br />
please keep clear of the heat area and do not cover it by anything when using.<br />
2) Do not keep it in a environment below 5 °C or above 50 °C.<br />
3) Use it carefully,do not use it in a wet or corrosive environment.<br />
4) Keep all the inflammable volatile materials well away from operating area.<br />
5) Please don‘t let the charger get hurt through falling, bumping, stiking, shaking, heavy press<br />
and so on.<br />
6) Do not attempt the voltage higher than the requirement by manufactures.<br />
7) Ensure the type of battery and the voltage of the battery pack is selected correctly. Do not use<br />
the different types or different capacities synchronously. Use when charging Lipobatteries<br />
a Lipo-bag.<br />
8) The standard accessories can only support one battery pack. When you are willing to use<br />
multi packs, please separately purchase the special accessories, never do a disassembly or<br />
alteration to the charger.<br />
9) Do not attempt to charge/discharge the non-recharged batteryor damaged battery.<br />
10) Keep the charger away from children and pet at all time! Never leave the charger<br />
unsupervised when it is connected to its power supply.<br />
13. Service and Warranty<br />
With the purchase of this product you purchased at the same time a two-year warranty from<br />
date of purchase. The guarantee applies only to the already existing material on the purchase<br />
of the product and / or functional defects.<br />
Excluded from the guarantee:<br />
` Damage caused by incorrect use<br />
` Damage caused by neglect of duty of care<br />
` Damage caused by im proper handling and maintenance errors<br />
` Liquid damage<br />
For warranty claims, please contact your local dealer.<br />
Should it be necessary to send the product, you must enclose a copy of the invoice and a repair<br />
order.You can download it at www.robitronic.com. With direct sending to the service department<br />
must be consulted beforehand (held by telephone or e-mail). The postage costs borne by<br />
the consignor. Paid packages are not accepted. Everyone sent in warranty case is first<br />
examined by our service department on admissibility. For reject warranty claims will be<br />
charged back to a control and processing fee before we return the product. Repairs not<br />
covered under warranty, before the start of the repair must be paid. <strong>Robitronic</strong> assumes no<br />
liability for damages and losses directly or indirectly, by the sequence of use or misuse of this<br />
product and its required accessories products needed for their operation, arise.<br />
14. Disposal of Electronic Waste<br />
Electronic waste is a commodity and must be disposed through special electronic<br />
waste sites. Please inform yourself about adequate facilities in your community area.<br />
Disposal of this product through domestic waste is illegal.
R01004 Expert <strong>LD</strong> <strong>15z</strong><br />
Bedienungsanleitung<br />
ExpErt <strong>LD</strong> <strong>15z</strong><br />
1. Bestimmungsgemäße Verwendung ..... 18<br />
2. Features .................................................. 18<br />
3. Haftungsausschluss ................................ 18<br />
4. Konformitätserklärung (DOC) .............. 18<br />
5. Technische Daten ................................... 19<br />
6. Lieferumfang ......................................... 19<br />
7. Übersicht und Zubehör ......................... 20<br />
8. Optionales Zubehör .............................. 20<br />
9. Funktionstasten ..................................... 20<br />
10. Bedienung des Expert <strong>LD</strong> <strong>15z</strong> ............... 21<br />
11. Warnungen und Fehlermeldungen ...... 29<br />
12. Sicherheitsmaßnahmen ......................... 30<br />
13. Service und Garantiebestimmungen .... 30<br />
14. Entsorgung ............................................ 30<br />
DEUTSCH<br />
17
ExpErt <strong>LD</strong> <strong>15z</strong><br />
18<br />
1. Bestimmungsgemäße Verwendung<br />
Das Ladegerät Expert <strong>LD</strong> <strong>15z</strong> dient zum Aufladen und zum Entladen von NiCd, NiMH, LiPo/<br />
LiIon/LiFe und Bleiakkus. Eine andere Verwendung führt zur Beschädigung dieses Produktes. Das<br />
gesamte Produkt darf nicht geändert bzw. umgebaut werden. Darüber hinaus ist dies mit Gefahren,<br />
wie z.B. Kurzschluss, Brand, elektrischer Schlag etc. verbunden. Das Produkt ist nur zum<br />
Betrieb in trockenen Innenräumen geeignet, es darf keiner Feuchtigkeit ausgesetzt werden.<br />
2. Features<br />
2.1. Der Expert <strong>LD</strong> <strong>15z</strong> ist mit einer intelligenten Ladeelektronik ausgestattet, um selbst<br />
mehrfache Fehlerquellen (defekte Akkus, Benutzerfehler etc.) simultan erkennen zu<br />
können, und somit für einen sicheren Ladevorgang zu sorgen.<br />
2.2. Durch das eingebaute Schaltnetzteil arbeitet der Expert <strong>LD</strong> <strong>15z</strong> mit einem sehr hohen<br />
Wirkungsgrad von über 90%.<br />
2.3. Kompatibel zu allen gängigen Akkutypen: LiPo, LiIon, LiFe, NiMH, NiCd, Pb<br />
2.4. Das intuitive User-Interface ermöglicht die komfortable Einstellung von Sicherheitsparametern<br />
und zeigt in Echtzeit alle relevanten Ladeparameter wie Spannung, Einzelzellenspannung,<br />
Kapazität, Temperatur (mit dem optionalen Temperaturfühler<br />
Artnr. R01011), Ladezeit, Eingangsspannung uvm. an.<br />
2.5. Der Expert <strong>LD</strong> <strong>15z</strong> verfügt über einen eingebauten Balancer mit einer Toleranz von<br />
+/- 0,01V. Damit wird beim Laden von Li-Akkus eine Einzelzellenüberwachung für eine<br />
höhere Sicherheit und längere Akkulebensdauer ermöglicht.<br />
2.6. Der Expert <strong>LD</strong> <strong>15z</strong> unterstützt Einzelzellenladung und Entladung.<br />
2.7. Verschiedene Lademodi um alle Akkutypen bestmöglich zu laden und zu pflegen.<br />
2.8. Für noch mehr Bedienkomfort stehen 5 verschiedene Speicherplätze zur Verfügung,<br />
in denen alle Lade- oder Entladeparameter für einen bestimmten Akku hinterlegt<br />
werden können. Der Parametersatz lässt sich dann auf Knopfdruck abrufen.<br />
2.9. 1-5 Lade/Entladezyklen für NiMH oder NiCd Akkus werden unterstützt.<br />
2.10. Der optional erhältliche, hoch präzise Temperaturfühler (Artnr. R01011) ermöglicht<br />
auch die NiMH/NiCd Schnellladung mit Temperaturabschaltung.<br />
3. Haftungsausschluss<br />
Da die Einhaltung der Bedienungsanleitung, sowie der Betrieb und die Bedingungen bei Verwendung<br />
des Gerätes zu keiner Zeit vom Hersteller überwacht werden können, übernimmt der Hersteller<br />
keinerlei Haftung für Schäden, Kosten und/oder Verluste, die sich aus falscher Verwendung<br />
und/oder fehlerhaftem Betrieb ergeben oder in irgendeiner Weise damit zusammenhängen.<br />
4. Konformitätserklärung (DOC)<br />
Hiermit erklärt der Hersteller, dass sich das Produkt in Übereinstimmung mit den grundlegenden<br />
Anforderungen und den übrigen einschlägigen Bestimmungen der Richtlinien befindet. Die<br />
Konformitätserklärung kann unter folgender Adresse gefunden werden: www.robitronic.com
5. Technische Daten<br />
` Eingangsspannung: .......................................... DC 11-18V<br />
` .................................................. AC 100-240V 50/60Hz<br />
` Ladestrom: ...................................................... 0,1 – 5,0A<br />
` Entladestrom: .................................................. 0,1 – 1,0A<br />
` Max. Ladeleistung: ..................................................50W<br />
` Max. Entladeleistung: .................................................5W<br />
` Max. Balancer-Ausgleichsstrom: ............................ 300mA<br />
` Max. Balancer Messtoleranz: ............................... ± 0,01V<br />
` Zellenzahl NiMH/NiCd: ........................................... 1-15<br />
` Zellenzahl LiXX: ............................................1-6 (in Serie)<br />
` Zellenzahl Pb: ...............................................1-10 (2-20V)<br />
` Gewicht ohne Kabel: ...............................................577g<br />
` Abmessungen: ....................................138 x 147 x 47 mm<br />
6. Lieferumfang<br />
` R01004 Expert <strong>LD</strong> <strong>15z</strong><br />
` Bedienungsanleitung<br />
R19039 Ladeadapter<br />
High Amp -> Tamiya<br />
R19037 Ladeadapter<br />
High Amp -> Kroko<br />
Klemmen<br />
` Netzkabel<br />
` DC-Anschlusskabel<br />
R19033 Balancer Adapter<br />
2-6S (EH-Type)<br />
R19038 Ladeadapter<br />
High Amp -><br />
Futaba/BEC/Glüher<br />
ExpErt <strong>LD</strong> <strong>15z</strong><br />
R19035 Ladekabel<br />
Banane -> High Amp<br />
19
ExpErt <strong>LD</strong> <strong>15z</strong><br />
20<br />
7. Übersicht und Zubehör<br />
AC Eingang<br />
DC Eingang<br />
Temperatur<br />
Sensor<br />
(optional)<br />
8. Optionales Zubehör<br />
Funktionstasten LCD<br />
R19040 Y-Kabel (1x High Amp -> 2x High Amp) High Amp -> Traxxas<br />
R19030 Micro Flug Lipo Adapter (bis 4 Zellen)<br />
R19036 Ladeadapter High Amp -> Traxxas<br />
R01011 Expert <strong>LD</strong> Temperatursensor<br />
R19032 Multiadapter 2x3S / 3x2S (XH-Type)<br />
R19031 Multiadapter 2x3S / 3x2S (EH-Type)<br />
R19042 Balancer Adapter 2-6S (HP-Type)<br />
R19041 Balancer Adapter 2-6S (TP-Type)<br />
R19034 Balancer Adapter 2-6S (XH-Type)<br />
R01010 Expert <strong>LD</strong> USB Interface und Software<br />
9. Funktionstasten<br />
Balancer Anschluß<br />
Ladeausgang<br />
Mode : Modus Auswahl, Stopp bzw. Zurück-Taste. Zum Auswählen von Menüpunkten<br />
Stop<br />
im Hauptmenü, zum Zurückkehren ins Hauptmenü und zum Anhalten eines<br />
laufenden Lade/Entladevorganges.<br />
Dec. Inc. : Zum Erhöhen oder Senken von Parameterwerten sowie zum Scrollen durch die<br />
Menüliste.<br />
Enter : Bestätigen, zum Starten des Lade- bzw. Entladevorganges länger als 2 Sekunden<br />
Start<br />
gedrückt halten.
10. Bedienung des Expert <strong>LD</strong> <strong>15z</strong><br />
10.1 Das Hauptmenü<br />
Dec.<br />
Dec.<br />
Dec.<br />
Dec.<br />
Dec.<br />
Dec.<br />
Dec.<br />
Dec.<br />
Mode<br />
Stop<br />
Mode<br />
Stop<br />
Mode<br />
Stop<br />
Mode<br />
Stop<br />
Mode<br />
Stop<br />
Mode<br />
Stop<br />
Mode<br />
Stop<br />
Mode<br />
Stop<br />
ExpErt <strong>LD</strong> <strong>15z</strong><br />
Der Expert <strong>LD</strong> <strong>15z</strong> zeigt beim Einschalten die<br />
aktuelle Version und führt einen Systemcheck<br />
durch. Drücken Sie Enter<br />
Start , um ins Hauptmenü zu<br />
gelangen.<br />
Benutzerdefinierte Einstellungen.<br />
Nun stehen verschiedene Menüpunkte zur Auswahl,<br />
die Sie mit der Mode<br />
Stop bzw. der Dec. Taste durchblättern<br />
und mit Enter<br />
Start aufrufen können.<br />
Li-Akku Programm<br />
NiMH Akku Programm<br />
NiCd Akku Programm<br />
Bleiakku-Programm<br />
Ladeparameter eingeben und abspeichern<br />
Ladeparameter aufrufen<br />
21
ExpErt <strong>LD</strong> <strong>15z</strong><br />
22<br />
10.2 Benutzerdefinierte Einstellungen<br />
Bevor Sie den Expert <strong>LD</strong> <strong>15z</strong> das erste<br />
Mal verwenden, können Sie hier sämtliche<br />
Lade und Entladeparameter des<br />
Expert <strong>LD</strong> <strong>15z</strong> bei Bedarf verändern.<br />
Drücken Sie die Enter<br />
Start Taste, um zur ersten<br />
Anzeige rechts zu gelangen. Mit der<br />
Mode<br />
Stop Taste gelangen Sie nun in das<br />
Menü für Benutzerdefinierte Einstellungen.<br />
Mit den Dec. Inc. Tasten können Sie nun<br />
gemäß dem Diagramm rechts die einzelnen<br />
Untermenüs aufrufen.<br />
Wollen Sie nun einen Parameter anpassen,<br />
so drücken Sie Enter<br />
Start und der gewählte<br />
Parameter beginnt zu blinken.<br />
Mit den Dec. Inc. Tasten können Sie nun<br />
die Werkseinstellung verändern und<br />
Enter<br />
mit erneutem Druck auf Start abspeichern.<br />
Der Expert <strong>LD</strong> <strong>15z</strong> kann sowohl LiPo als<br />
auch LiIon und LiFe Akkus laden. Achten<br />
Sie hier unbedingt auf korrekte<br />
Parameter (gemäß Tabelle A), da der<br />
Akku andernfalls explodieren kann!<br />
Der Expert <strong>LD</strong> <strong>15z</strong> kann die Zellenzahl<br />
eines angeschlossenen Li-Akkus automatisch<br />
erkennen um Bedienungsfehlern<br />
vorzubeugen, (s. Abbildung A0 )<br />
jedoch funktioniert diese Erkennung<br />
bei besonders tief entladenen Akkus<br />
nicht. Um dem vorzubeugen, wird die<br />
Zellenzahl nach 10min Ladezeit erneut<br />
kontrolliert. Diese Zeitverzögerung<br />
reicht im Normalfall völlig aus. Jedoch<br />
kann es bei Akkus mit besonders großer<br />
bzw. besonders kleiner Kapazität<br />
nötig sein, dass Sie diesen Wert erhöhen<br />
bzw. reduzieren.<br />
Dec.<br />
A3<br />
Dec.<br />
Dec.<br />
Dec.<br />
Dec.<br />
Dec.<br />
Dec.<br />
Dec.<br />
Dec.<br />
Dec.<br />
Mode<br />
Stop<br />
Inc.<br />
Inc.<br />
Inc.<br />
Inc.<br />
Inc.<br />
Inc.<br />
Inc.<br />
Inc.<br />
Inc.<br />
A0<br />
A1<br />
A2<br />
A5<br />
A6<br />
A7<br />
A8<br />
A9<br />
A4<br />
Inc.
ExpErt <strong>LD</strong> <strong>15z</strong><br />
Die Abbildungen A1 und A2 zeigen die Delta-Peak Werte für die Delta-Peak Abschaltung beim<br />
Laden von NiXX Akkus. Die Werte können im Bereich 5-20mV je Zelle eingestellt werden. Zu hohe<br />
Werte können zur Überladung führen während zu niedrige Werte den Ladevorgang vorzeitig<br />
beenden. Empfohlene Delta-Peakwerte für NiCd: 12mV; NiMH: 7mV. Halten Sie sich bei der<br />
Einstellung dieser Werte bitte an die Vorgaben des Akkuherstellers.<br />
Hinweis: Bei einer Akkuspannung unter 2,5V funktioniert die Delta-Peak Abschaltung nicht,<br />
was zur Überladung führen kann. Verwenden Sie in diesem Fall daher den optional erhältlichen<br />
Temperaturfühler oder einen Ladestrom kleiner als 1C.<br />
Der 3-Pin Port des Expert <strong>LD</strong> <strong>15z</strong> kann entweder als USB-Schnittstelle oder als Anschluss für<br />
den Temperaturfühler mit einstellbarer Maximaltemperatur konfiguriert werden. (s. Abbildung<br />
A3 ) Über ein separat erhältliches USB-Kabel (Artnr. R01010) kann der Ladevorgang mittels<br />
Software am PC überwacht werden. (s. Abbildung A4 )<br />
Im Cycle-Modus zur Pflege von NiMH oder NiCd Zellen können die Akkus sehr warm werden.<br />
Daher kann zwischen den Zyklen eine Abkühldauer von 1 bis 60 Minuten festgelegt werden.<br />
(s. Abbildung A5 ) Setzen Sie die Abkühldauer zur Sicherheit zunächst auf 10 Minuten.<br />
Sobald Sie den Ladeprozess starten, läuft ein Sicherheitstimer (10-720 Minuten einstellbar)<br />
mit, der die Ladung im Falle eines defekten Akkus beendet. (s. Abbildung A6 ) Gleiches gilt für<br />
die maximale Kapazität, die in einen Akku geladen werden kann. (s. Abbildung A7 )<br />
Abbildung A8 zeigt die Möglichkeit, akustische Signale entweder ein- oder auszuschalten.<br />
Wird der Expert <strong>LD</strong> <strong>15z</strong> an einer Autobatterie betrieben, so kann eine Schwellenspannung<br />
programmiert werden, unter welcher der Expert <strong>LD</strong> <strong>15z</strong> zum Schutz der Batterie sofort abschaltet.<br />
(s. Abbildung A9 )<br />
Beachten Sie bei der Wahl der Ladeparameter die folgende Tabelle, da falsche Einstellungen<br />
zu ernsthaften Schäden führen können!<br />
Tabelle A<br />
Bezeichnung<br />
Typ LiPo Li-10 LiFe NiMH NiCD Pb<br />
Nennspannung<br />
(V/Zelle)<br />
3.70 3.60 3.30 1.20 1.20 2.00<br />
Ladeschluss-Spannung<br />
(V/Zelle)<br />
4.20 4.10 3.60 1.60 1.60 2.45<br />
Maximaler<br />
Ladestrom<br />
1.75<br />
23
ExpErt <strong>LD</strong> <strong>15z</strong><br />
24<br />
10.3 Li-Akku Programm Drücken Sie die Mode<br />
Stop Taste bis Sie zur Anzeige links gelangen.<br />
Mit Enter<br />
Start rufen Sie das Menü auf und mit den Dec. Inc. Tasten<br />
können Sie zwischen den einzelnen Menüpunkten gemäß der<br />
Abbildung links wählen.<br />
Wollen Sie nun einen Parameter anpassen, so drücken Sie Enter<br />
Start<br />
und der Parameter beginnt zu blinken. Mit den Dec. Inc. Tasten<br />
Dec.<br />
Mode<br />
Stop<br />
Dec.<br />
Dec.<br />
Dec.<br />
Dec.<br />
Enter<br />
Start<br />
Inc.<br />
Inc.<br />
Inc.<br />
Inc.<br />
Inc.<br />
können Sie nun die Werkseinstellung verändern und mit erneutem<br />
Druck auf Enter<br />
Start abspeichern. Drücken Sie die Enter<br />
Start Taste daraufhin<br />
nochmals für 2 Sekunden, so startet der Ladevorgang.<br />
„CHARGE“: Der automatische Lademodus ist für einzelne Li-<br />
Zellen oder Li-Packs ohne eigenen Balancer-Anschluss geeignet.<br />
Links oben auf dem Display erscheint der Li-Typ, der in den<br />
Benutzer einstellungen gewählt wurde. Rechts davon erscheint<br />
der aktuelle Lade- bzw. Entlademodus. In der zweiten Zeile des<br />
Displays wird links der eingestellte Ladestrom und rechts davon<br />
die ermittelte Zellenzahl anzeigt. (Die Anschlussmöglichkeiten<br />
von Li-Packs werden in der Abbildung B1-B2 gezeigt)<br />
„BALANCE“: Geeignet für 2-6s Li-Packs mit Balanceranschluss.<br />
Dieser Lademodus setzt eine Verkabelung gemäß Abbildung<br />
B2 voraus. Der Expert <strong>LD</strong> <strong>15z</strong> überwacht dann während des<br />
Ladevorgangs die individuellen Zellenspannungen und kann<br />
über den integrierten Balancer ein Überladen einzelner Zellen<br />
verhindern. Dies ist der empfohlene Lademodus für mehrzellige<br />
Li-Packs. Die Genauigkeit der Einzelzellenüberwachung liegt<br />
bei +/- 0,01V.<br />
„FAST CHG“: Sobald der Ladestrom auf ein Fünftel des voreingestellten<br />
Wertes abgesunken ist, beendet der Expert <strong>LD</strong> <strong>15z</strong><br />
den Ladevorgang. Die nutzbare Kapazität ist mit diesem Lademodus<br />
zwar etwas geringer, doch verkürzt sich gleichzeitig<br />
auch die Ladedauer merklich.<br />
„STORAGE“: Zum schonenden Lagern von Li-Akkus bringt der<br />
Expert <strong>LD</strong> <strong>15z</strong> die Kapazität auf ca. 40% der maximalen Kapazität<br />
des Packs. Das entspricht einer jeweiligen Einzelzellenspannung<br />
von 3,85V (LiPo), 3,75V (LiIon) bzw. 3,3V (LiFe)<br />
Beim Storage-Programm handelt es sich um eine intelligente<br />
Funktion, die abhängig von der aktuellen Akkuspannung entweder<br />
einen Ladevorgang oder einen Entladevorgang startet, um<br />
die Zielspannungen zu erreichen. Dafür sollte der Li-Akku auch<br />
über den Balanceranschluss mit dem Ladegerät verbunden sein.<br />
„DISCHARGE“: Für gewöhnlich benötigen Li-Akkus keine Pflege<br />
in Form von Entladezyklen. Dennoch steht das Programm z.B.<br />
für Kapazitätschecks zur Verfügung. Zum Entladen sollte der<br />
Li-Akku auch über den Balanceranschluss mit dem Ladegerät<br />
verbunden sein. Der Entladestrom liegt bei max. 1A.
Abbildung B1 Abbildung B2<br />
ExpErt <strong>LD</strong> <strong>15z</strong><br />
10.3.1 Starten des Lade/Entladevorganges: Nachdem Sie alle Einstellungen überprüft<br />
haben, starten Sie den Vorgang, indem Sie Enter<br />
Start für 2 Sekunden gedrückt<br />
halten.<br />
Das Display zeigt nun die Anzahl der Zellen<br />
an: In der linken Spalte (R) die Anzahl der<br />
vom Expert <strong>LD</strong> <strong>15z</strong> erkannten Zellen, in der<br />
rechten Spalte (S) die von Ihnen angegebene<br />
Zellenzahl. Stimmen beide Werte überein, so<br />
starten Sie den Ladevorgang durch Drücken<br />
von<br />
Mode<br />
Stop<br />
Enter<br />
>2S<br />
Start<br />
Enter<br />
Start<br />
Mode<br />
Stop<br />
Enter<br />
>2S<br />
Start<br />
1 2 3 4 5 6<br />
Enter<br />
Start .<br />
Stimmen beide Werte nicht überein, so gelangen<br />
Sie mittels Mode<br />
Stop Taste zurück in das<br />
vorige Menü, wo sie die Zelleneinstellung<br />
überprüfen können. Im Automatik/Einzelzellen-Modus<br />
und beim Entladen können Sie<br />
diese Anzeige direkt überspringen.<br />
Die Anzeige blendet nun aktuelle Parameter<br />
zum Vorgang ein. Um den Vorgang abzubrechen,<br />
drücken Sie bitte Mode<br />
Anschluss für den Automatik- Anschluss für den Lade-, Diagramm der<br />
Modus<br />
Entlade- und Storage-Modus<br />
mit Balancer<br />
Balancer-Verkabelung<br />
Stop .<br />
Zusammenfassung der Anzeige:<br />
1) Zellenzahl<br />
2) Modus (CHG = Laden ohne Balancer,<br />
BAL = Laden mit Balancer,<br />
FAS = Schnellladen,<br />
STO = Storage Modus, DSC = Entladen)<br />
3) Verstrichene Zeit<br />
4) (Ent-)Ladestrom<br />
5) Akkuspannung<br />
6) Eingeladene bzw. entladene Kapazität<br />
25
ExpErt <strong>LD</strong> <strong>15z</strong><br />
26<br />
10.3.2 Durch Drücken der Dec. Inc. Tasten können Sie bei angeschlossenem Balancer<br />
die Spannungen der Einzelzellen, Abschaltspannung und weitere Details<br />
anzeigen lassen.<br />
Inc.<br />
Dec.<br />
Dec.<br />
Dec.<br />
Dec.<br />
Dec.<br />
Bei angeschlossenem Balancer werden durch Drücken der Inc. Taste die<br />
Spannungen der einzelnen Zellen angezeigt.<br />
Der Vorgang wird beendet, sobald die Abschaltspannung erreicht ist.<br />
Als Sicherheitsmaßnahme wird eine Maximalkapzität herangezogen,<br />
welche beim Laden nicht überschritten werden darf.<br />
Der Timer stellt eine weitere Sicherheitsmaßnahme dar, nach dessen<br />
Ablauf der Ladevorgang spätestens beendet wird.<br />
Der 3-Pin Port kann entweder als Temperaturfühler oder als USB-Verbindung<br />
genutzt werden.<br />
Falls ein Temperaturfühler vorhanden ist, wird hier die gemessene<br />
Temperatur angezeigt. Achten Sie auf die korrekte Montage des<br />
Temperaturfühlers!<br />
Anzeige der aktuellen Eingangsspannung.
10.4 NiMH/NiCd Akku Programm<br />
Dec.<br />
Mode<br />
Stop<br />
Dec.<br />
Dec.<br />
Enter<br />
Start<br />
Inc.<br />
Inc.<br />
Inc.<br />
ExpErt <strong>LD</strong> <strong>15z</strong><br />
Drücken Sie die Mode<br />
Stop Taste bis Sie zur Anzeige links gelangen. Mit<br />
Enter<br />
Start rufen Sie das Menü auf und mit den Dec. Inc. Tasten können Sie<br />
zwischen den einzelnen Menüpunkten gemäß der Abbildung links<br />
wählen. Wollen Sie nun einen Parameter anpassen, so drücken Sie<br />
Enter<br />
Start und der Parameter beginnt zu blinken. Mit den Dec. Inc. Tasten<br />
können Sie nun die Werkseinstellung verändern und mit erneutem<br />
Druck auf Enter<br />
Start abspeichern. Drücken Sie die Enter<br />
Start Taste daraufhin<br />
nochmals für 2 Sekunden, so startet der Ladevorgang. (Hinweis:<br />
Das NiMH und NiCd Programm unterscheidet sich nicht voneinander,<br />
sodass hier nur das NiMH Programm dargestellt wird)<br />
„CHARGE“ Modus – Standardeinstellung: Automatisch (Aut). Im<br />
Automatik-Modus müssen Sie den maximalen Ladestrom angeben,<br />
da bei Akkus mit besonderes geringem Innenwiderstand oder kleiner<br />
Kapazität u.U. ein zu hoher Ladestrom gewählt werden kann.<br />
Im manuellen (Man) Lademodus wird dagegen exakt mit dem eingestellten<br />
Ladestrom geladen. Zwischen den Modi kann mit der<br />
Enter<br />
Start Taste und durch anschließendes Drücken der Dec. Inc. und<br />
Tasten gleichzeitig für mehr als 1 Sekunde, gewechselt werden.<br />
„DISCHARGE“ Modus – im Entlademodus wird der Entladestrom<br />
zwischen 0,1 und 1,0A eingestellt. Die Entladeschlussspannung kann im Bereich 0,1 .. 25,0V gewählt<br />
werden. Die empfohlene Abschaltspannung liegt bei 1,0V/Zelle für NiMH und 0,85V/Zelle<br />
für NiCd. Beachten Sie dabei bitte die Empfehlungen des jeweiligen Akkuherstellers!<br />
„CYCLE“-Modus: Der Expert <strong>LD</strong> <strong>15z</strong> kann 1-5 Lade/Entlade oder Entlade/Ladezyklen durchführen.<br />
Dieser Modus empfiehlt sich vor allem für neue NiXX Akkus oder zur Lagerung der Akkus. Die<br />
Lade und Entlade-Parameter für den Cycle-Modus werden aus den jeweiligen Lade bzw. Entlademenüs<br />
angewendet – achten Sie daher unbedingt auf korrekte Einstellungen, bevor Sie den<br />
Cycle-Modus verwenden.<br />
10.4.1 Nachdem Sie alle Einstellungen überprüft haben, starten Sie den Vorgang,<br />
indem Sie Enter für 2 Sekunden gedrückt halten.<br />
Start<br />
Mode<br />
Stop<br />
Enter<br />
Start<br />
10.5 Bleiakku-Programm<br />
Dieser Lademodus ist zum Laden von Bleiakkus mit einer Spannung von 2 – 20V vorgesehen. Bleiakkus<br />
können nicht schnell geladen werden, der Ladestrom sollte maximal 1/10 der Kapazität des Akkus<br />
betragen. Beachten Sie bitte die Angaben des Herstellers zum Laden seiner Bleiakkus!<br />
>2S<br />
Die Anzeige blendet nun aktuelle Parameter<br />
zum Vorgang ein. Um den Vorgang abzubrechen,<br />
drücken Sie bitte<br />
1 2 3 4 5 6<br />
Mode<br />
Stop .<br />
Zusammenfassung der Anzeige:<br />
1) Akkutype<br />
2) Modus (CHG = Laden, DSC = Entladen,<br />
DCHG>CHG oder CHG>DCHG = Cycle Modus)<br />
3) Verstrichene Zeit<br />
4) (Ent-)Ladestrom<br />
5) Akkuspannung<br />
6) Eingeladene bzw. entladene Kapazität<br />
Mit den Dec. Inc. Tasten können weitere Infor mationen<br />
(Akkutemp. in Verbindung mit dem Temp.sensor<br />
bzw. Delta-Peak) aufgerufen werden.<br />
27
ExpErt <strong>LD</strong> <strong>15z</strong><br />
28<br />
10.5.1. Bleiakkus laden<br />
Das Ladeprogramm wird in der ersten Displayzeile angezeigt. Darunter<br />
können Sie den Ladestrom und die Nennspannung des Akkus einstellen.<br />
Um den Ladevorgang zu starten, drücken und halten Sie die Enter<br />
Start Taste<br />
für mehr als 2 Sekunden.<br />
Das Display zeigt nun den jeweils aktuellen Ladestatus an. Um den Ladevorgang<br />
zu unterbrechen, drücken Sie die Mode<br />
Mode<br />
Stop<br />
Enter >2S<br />
Start<br />
Stop Taste.<br />
10.5.2. Bleiakkus entladen<br />
Das Entladeprogramm wird in der ersten Displayzeile angezeigt. Darunter<br />
können Sie den Ladestrom und die Entladeschluss-Spannung einstel-<br />
Mode<br />
Stop<br />
Enter >2S<br />
Start<br />
10.6. Ladeparameter abspeichern und aufrufen<br />
Der Expert <strong>LD</strong> <strong>15z</strong> kann 5 verschiedene Sätze an Ladeparametern abspeichern und bei Bedarf<br />
direkt aufrufen.<br />
10.6.1. Ladeparameter abspeichern<br />
Mode<br />
Stop<br />
Enter<br />
Start<br />
Enter >2S<br />
Start<br />
Enter >2S<br />
Start<br />
10.6.2. Ladeparameter aufrufen<br />
Enter<br />
Start<br />
Enter >2S<br />
Start<br />
len. Um den Entladevorgang zu starten, drücken und halten Sie die Enter<br />
Start<br />
Taste für mehr als 2 Sekunden.<br />
Das Display zeigt nun den jeweils aktuellen Entladestatus an.<br />
Drücken Sie die Mode<br />
Stop Taste um zur Anzeige links zu gelangen. Mit Enter<br />
Start<br />
gelangen Sie in das Untermenü.<br />
Mit den Dec. Inc. Tasten können Sie den entsprechenden Parametersatz<br />
auswählen, sobald die Anzeige (01) zu blinken beginnt. Sie können<br />
nun mit den Dec. Inc. Tasten weiters die Akkutype, Zellenzahl und Kapazität<br />
auswählen und mit einem kurzen Druck auf Enter<br />
Start einstellen. Danach<br />
drücken Sie Enter<br />
Start für 2 Sekunden um den Lademodus zu auszuwählen.<br />
Hier wählen Sie nun den Lade bzw. Entladestrom sowie die Abschaltspannung.<br />
Zum Speichern der Einstellungen halten Sie nochmals die Enter<br />
Start Taste für<br />
2 Sekunden gedrückt.<br />
Drücken Sie die Mode<br />
Stop Taste um zur Anzeige links zu gelangen. Mit Enter<br />
Start<br />
gelangen Sie in das Untermenü.<br />
Mit den Dec. Inc. Tasten können Sie den entsprechenden Parametersatz<br />
auswählen, sobald die Anzeige (01) zu blinken beginnt.<br />
Drücken Sie die Taste für mehr als 2 Sekunden,<br />
und der Lader wird den gewählten Parametersatz aufrufen.
11. Warnungen und Fehlermeldungen<br />
ExpErt <strong>LD</strong> <strong>15z</strong><br />
Der Akku ist verpolt angeschlossen. Plus und Minus müssen vertauscht<br />
werden<br />
Diese Meldung erscheint, wenn die Verbindung zwischen Akku und<br />
Ladegerät während des Ladevorgangs absichtlich oder unbeabsichtigt<br />
getrennt wurde.<br />
Der Ladeausgang wurde kurzgeschlossen. Bitte überprüfen Sie sorgfältig<br />
die Verkablung und die Steckverbindungen.<br />
Die Eingangsspannung ist zu gering.<br />
Die Wahl der Zellenzahl beim Laden eines Li-Akkus stimmt nicht mit<br />
dem angeschlossenen Akku überein.<br />
Allgemeine Fehlermeldung<br />
Die Spannung ist geringer, als im Li-Ladeprogramm angegeben.<br />
Überprüfen Sie die Zellenzahl des Akkus.<br />
Die Spannung ist höher, als im Li-Ladeprogramm angegeben. Überprüfen<br />
Sie die Zellenzahl des Akkus.<br />
Die Spannung einer einzelnen Zelle ist geringer, als im Li-Ladeprogramm<br />
angegeben. Überprüfen Sie die Zellenspannungen des Akkus.<br />
Die Spannung einer einzelnen Zelle ist höher, als im Li-Ladeprogramm<br />
angegeben. Überprüfen Sie die Zellenspannungen des Akkus.<br />
Der Balancer ist nicht korrekt angeschlossen. Überprüfen Sie bitte<br />
sorg fältig die Verkabelung des Balancerports.<br />
Der Lader ist zu heiß. Lassen Sie das Gerät abkühlen.<br />
Der Ladestrom kann nicht kontrolliert werden. Das Gerät muss<br />
repariert werden.<br />
29
ExpErt <strong>LD</strong> <strong>15z</strong><br />
30<br />
12. Sicherheitshinweise<br />
Der Expert <strong>LD</strong> <strong>15z</strong> ist mit modernsten Sicherheitsfunktionen ausgestattet, um einen reibungslosen<br />
Betrieb zu gewährleisten müssen Sie bei Benutzung des Geräts einige Vorkehrungen treffen:<br />
1) Beim Laden und vor allem beim Entladen wird das Gerät sehr warm. Bedecken Sie das Gerät<br />
daher nicht und sorgen Sie für ausreichend Luftzirkulation.<br />
2) Verwenden oder lagern Sie das Gerät nicht unterhalb von 5°C oder jenseits von 50°C.<br />
3) Verwenden oder lagern Sie das Gerät nicht in feuchter oder nasser Umgebung.<br />
4) Halten Sie brennbare Materialen fern.<br />
5) Das Ladegerät kann durch Stürze oder grobe mechanische Einwirkungen beschädigt werden.<br />
6) Verwenden Sie das Gerät ausschließlich im angegebenen Spannungsbereich.<br />
7) Stellen Sie vor dem Ladevorgang immer sicher, dass der eingestellte Akkutyp mit dem<br />
tatsächlichen Akku übereinstimmt. Laden Sie niemals Akkus unterschiedlicher Spannung,<br />
Kapazität oder Type gleichzeitig. Verwenden sie beim Laden von Lipo-Akkus einen Lipo-Bag<br />
8) Mit dem beiliegenden Zubehör kann immer nur ein Akku geladen werden. Möchten Sie<br />
mehr ere Akkus parallel laden, verwenden Sie bitte ausschließlich optional erhältliches Zubehör.<br />
9) Versuchen Sie niemals, Primärzellen/Trockenbatterien mit diesem Gerät zu laden oder zu entladen.<br />
10) Halten Sie den Expert <strong>LD</strong> <strong>15z</strong> fern von Kindern und Tieren. Lassen Sie das Gerät niemals<br />
unbeaufsichtigt, wenn es eingeschaltet ist.<br />
13. Service und Garantiebestimmungen<br />
Mit dem Erwerb dieses Produktes haben Sie gleichzeitig eine zweijährige Garantie ab Kaufdatum<br />
erworben. Die Garantie gilt nur für die bereits beim Kauf des Produktes vorhandenen<br />
Material und/oder Funktionsmängel.<br />
Von der Garantie ausgeschlossen sind:<br />
` Schäden durch falsche Anwendung<br />
` Schäden durch Vernachlässigung der Sorgfaltspflicht<br />
` Schäden durch unsachgemäße Behandlung und Wartungsfehler<br />
` Flüssigkeitsschäden<br />
Bei Garantiefällen wenden Sie sich bitte an ihren Fachhändler.<br />
Sollte es notwendig sein das Produkt einzusenden, legen Sie bitte unbedingt eine Kopie<br />
der Rechnung und einen Reparaturauftrag bei. Diesen können Sie unter www.robitronic.<br />
com herunter laden. Bei direkter Zusendung an die Serviceabteilung muss vorher Rücksprache<br />
(telefonisch oder per E-Mail) gehalten werden. Die Portokosten trägt der Versender. Kostenpflichtige<br />
Pakete werden nicht angenommen. Jeder eingesendete Garantiefall wird zunächst<br />
durch unsere Serviceabteilung auf Zulässigkeit geprüft. Für abgelehnte Garantiefälle wird<br />
ggf. eine Kontroll- und Bearbeitungsgebühr verrechnet bevor wir das Produkt zurücksenden.<br />
Reparaturen die nicht unter die Garantieleistung fallen, müssen vor Beginn der Reparatur bezahlt<br />
werden. <strong>Robitronic</strong> übernimmt keinerlei Haftung für Beschädigungen und Ausfälle die<br />
direkt oder indirekt, durch die Folge von sach oder unsachgemäßen Gebrauch dieses Produktes<br />
und dessen benötigten Zubehörprodukten die zum Betrieb erforderlich sind, entstehen.<br />
14. Entsorgung<br />
Elektronische Altgeräte sind Rohstoffe und gehören nicht in den Hausmüll. Ist das<br />
Ladegerät am Ende seiner Lebensdauer, so entsorgen Sie das Ladegerät gemäß den<br />
geltenden gesetzlichen Vorschriften bei Ihren kommunalen Sammelstellen. Eine Ent<br />
sorgung über den Hausmüll ist verboten.
ExpErt <strong>LD</strong> <strong>15z</strong><br />
31
ExpErt <strong>LD</strong> <strong>15z</strong><br />
<strong>Robitronic</strong> Electronic Ges.m.b.H<br />
Brunhildengasse 1/1 | A -1150 Wien | Österreich<br />
Tel.: +43 1-982 09 20 | Fax: +43 1-982 09 21<br />
www.robitronic.com<br />
Technische Änderungen sowie Änderungen in Ausstattung und Design vorbehalten.