Anleitung für Mini LED Module RGB - 15.08.2006 - Lagotronics
Anleitung für Mini LED Module RGB - 15.08.2006 - Lagotronics
Anleitung für Mini LED Module RGB - 15.08.2006 - Lagotronics

Sie wollen auch ein ePaper? Erhöhen Sie die Reichweite Ihrer Titel.
YUMPU macht aus Druck-PDFs automatisch weboptimierte ePaper, die Google liebt.
D -- Gebrauchsanweisung<br />
ENG Instruction Manual<br />
F Mode d'emploi<br />
E Instrucciones de montaje<br />
NL Gebruiksaanwijzing<br />
für/for/pour/para/voor<br />
MINI <strong>LED</strong> MODULE <strong>RGB</strong><br />
550403<br />
D Gebrauchsanweisung MINI <strong>LED</strong> MODULE <strong>RGB</strong><br />
1. Bestimmungsgemäße Verwendung:<br />
Dieses Produkt dient nur Beleuchtungszwecken und darf:<br />
• nur mit einem geeigneten Steuergerät, Ausgangsspg.: 12V DC<br />
(Gleichspannung) betrieben werden.<br />
• keinen starken mechanischen Beanspruchungen oder starker<br />
Verschmutzung ausgesetzt werden.<br />
• nach einer feuchten oder verschmutzenden Lagerung erst nach einer<br />
Zustandsprüfung betrieben werden.<br />
• nicht verändert oder modifiziert werden.<br />
Sollten diese zuvor genannten Punkte nicht eingehalten werden,<br />
so kann es zum Kurzschluss oder elektrischen Schlag kommen!<br />
2. Technische Daten:<br />
Betriebsspannung:<br />
Schutzklasse:<br />
Schutzart:<br />
ta:<br />
Leistung 25 <strong>Module</strong>:<br />
Leuchtmittel 1 Modul:<br />
Maße 1 Modul (L/B/H):<br />
Gesamtlänge:<br />
Gewicht:<br />
Importeur:<br />
12V DC<br />
III<br />
IP 55<br />
40°C<br />
15W<br />
3x Super Flux 3in1 <strong>RGB</strong> <strong>LED</strong><br />
5/1,1/1,2 cm<br />
2,88 m<br />
0,35 kg<br />
SLV Elektronik GmbH<br />
IP 55: Schutz gegen störende Staubablagerungen – Schutz gegen<br />
Strahlwasser aus allen Richtungen.<br />
2. Montage<br />
Die komplette Installation darf nur durch einen Elektro-Fachmann<br />
durchgeführt werden, der mit den geltenden Richtlinien vertraut ist.<br />
Achtung: Schalten Sie die Anschlussleitung spannungsfrei, bevor<br />
Sie jegliche Arbeiten vornehmen!<br />
Verwenden Sie nur Teile, die mit dem Produkt mitgeliefert oder definitiv als<br />
Zubehör beschrieben werden! Andernfalls kann das Produkt nicht<br />
ausreichend sicher sein!<br />
Hinweis für den Installateur: Insofern Sie kein komplett geliefertes<br />
System (also mit Transformator) installieren, gelten Sie als “Hersteller” im<br />
Sinne der Niederspannungsrichtlinie. In diesem Fall obliegt es Ihnen, die<br />
Konformität des gesamten Systems herzustellen und durch Anbringung des<br />
CE-Zeichens zu erklären.<br />
Montageort<br />
Achten Sie darauf, dass das Produkt auf einem stabilen, ebenen,<br />
kippfesten Untergrund montiert wird.<br />
Einzelne Montageschritte<br />
• Vor jeglicher Installation ist die Anschlussleitung spannungsfrei zu<br />
schalten. Ein Anschluss unter Spannung zerstört die <strong>LED</strong>!<br />
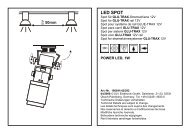
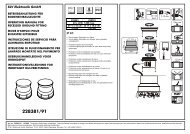
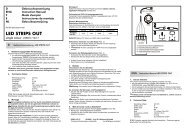
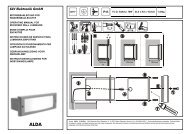
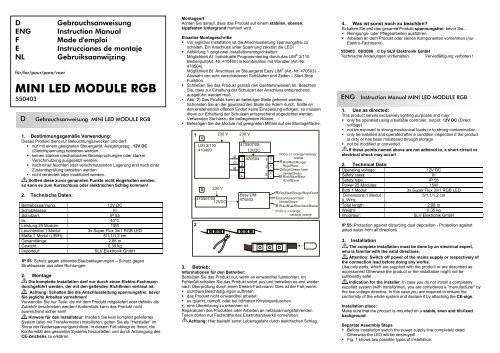
• Abbildung 1 zeigt zwei Installationsmöglichkeiten:<br />
Möglichkeit A): Individuelle Programmierung durch das LIM ® 3/110<br />
Bedienpult(Art.-Nr. 410400) in Kombination mit Wandler (Art.-Nr.<br />
470504).<br />
Möglichkeit B): Anschluss an Steuergerät Easy LIM ® (Art.-Nr. 470503) -<br />
Auswahl von acht verschiedenen Farbläufen und Zeiten – Start-Stop<br />
Funktion.<br />
• Schließen Sie das Produkt gemäß den Gerätehinweisen an. Beachten<br />
Sie, dass zur Erhaltung der Schutzart der Anschluss entsprechend<br />
ausgeführt werden muß.<br />
• Abb. 2) Das Produkt kann an beliebiger Stelle getrennt werden.<br />
Schneiden Sie an der gewünschten Stelle die Adern durch. Sollte an<br />
den enstehenden offenen Enden keine Einspeisung erfolgen, so müssen<br />
diese zur Erhaltung der Schutzart entsprechend abgedichtet werden.<br />
Verwenden Sie hierzu die beiliegenden Hülsen.<br />
• Befestigen Sie die <strong>Module</strong> mit geeigneten Mitteln auf der Montagefläche.<br />
1<br />
2<br />
A<br />
LIM 3/110<br />
410400<br />
B<br />
230 V<br />
230 V<br />
R<br />
G<br />
B<br />
230 V<br />
470507/08<br />
12VDC<br />
470507/08<br />
12VDC<br />
Easy LIM<br />
470503<br />
1 470504 1<br />
+<br />
-<br />
2<br />
2 +<br />
3<br />
-<br />
3 +<br />
-<br />
VCC(+) = orange/naranja/<br />
oranje<br />
RRot/Red/Rouge/<br />
Rojo/Rood<br />
GGrün/Green/Vert/<br />
Verde/Groen<br />
B Blau/Blue/Bleu/<br />
Azul/Blauw<br />
R Rot/Red/Rouge/Rojo/Rood<br />
GGrün/Green/Vert/<br />
Verde/Groen<br />
B Blau/Blue/Bleu/Azul/Blauw<br />
VCC(+) = orange,<br />
naranja, oranje<br />
3. Betrieb:<br />
Informationen für den Betreiber:<br />
Betreiben Sie das Produkt nur, wenn es einwandfrei funktioniert. Im<br />
Fehlerfall schalten Sie das Produkt sofort aus und betreiben es erst wieder<br />
nach Überprüfung durch einen Elektro-Fachmann. Dies ist der Fall, wenn:<br />
• sichtbare Beschädigungen auftreten.<br />
• das Produkt nicht einwandfrei arbeitet.<br />
• es qualmt, dampft, oder bei hörbaren Knistergeräuschen.<br />
• eine Überhitzung zu erkennen ist.<br />
Reparaturen des Produktes oder Arbeiten an netzspannungsführenden<br />
Teilen dürfen nur Fachkräfte des Elektrohandwerks vornehmen.<br />
Achtung: Hier besteht sonst Lebensgefahr durch elektrischen Schlag.<br />
4. Was ist sonst noch zu beachten?<br />
Schalten Sie erst das gesamte Produkt spannungsfrei, bevor Sie...<br />
• Reinigungs- oder Pflegearbeiten ausführen.<br />
• Arbeiten an dem Produkt oder seinen Komponenten vornehmen (nur<br />
Elektro-Fachmann).<br />
550403 08/2006 © by SLV Elektronik GmbH<br />
Technische Änderungen vorbehalten. Vervielfältigung verboten !<br />
ENG Instruction Manual MINI <strong>LED</strong> MODULE <strong>RGB</strong><br />
1. Use as directed:<br />
This product serves exclusively lighting purposes and may:<br />
• only be operated using a suitable controller, output: 12V DC (Direct<br />
voltage).<br />
• not be exposed to strong mechanical loads or to strong contamination.<br />
• only be installed and operated after a condition inspection if the product<br />
is dirty or has been moistened through storage.<br />
• not be modified or converted.<br />
If these points named above are not adhered to, a short circuit or<br />
electrical shock may occur!<br />
2. Technical Data:<br />
Operating voltage:<br />
12V DC<br />
Safety class:<br />
III<br />
Safety type: IP 55<br />
Power 25 <strong>Module</strong>s:<br />
15W<br />
Bulb 1 Modul:<br />
3x Super Flux 3in1 <strong>RGB</strong> <strong>LED</strong><br />
Dimensions 1 Modul<br />
5/1,1/1,2 cm<br />
(L/WH):<br />
Total length:<br />
2,88 m<br />
Weight:<br />
0,35 kg<br />
Importeur:<br />
SLV Elektronik GmbH<br />
IP 55: Protection against disturbing dust deposition - Protection against<br />
jetted water from all directions<br />
3. Installation<br />
The complete installation must be done by an electrical expert,<br />
who is familiar with the valid directives.<br />
Attention: Switch off power of the mains supply or respectively of<br />
the connection lead before doing any works.<br />
Use only parts, which are supplied with the product or are described as<br />
accessories! Otherwise the product or the installation might not be<br />
sufficiently safe!<br />
Indication for the installer: In case you do not install a completely<br />
supplied system (with transformer), you are considered a "manufacturer" by<br />
the low-voltage directive. In this case you are required to ensure the<br />
conformity of the whole system and declare it by attaching the CE-sign.<br />
Installation place:<br />
Make sure that the product is mounted on a stable, even and tilt-fixed<br />
background.<br />
Separate Assembly Steps<br />
• Before installation switch the power supply line completely dead.<br />
Otherwise the <strong>LED</strong> will be destroyed!<br />
• Fig. 1 shows two possible types of installation:
• Type A: Individual programming using the LIM ® 3/110 controller(art.-no.<br />
410400) in combination with the converter(art.-no. 470504)<br />
• Type B: Connection with the Easy LIM ® controller(art.-no. 470503) –<br />
choice of eight different color changes and times – start-stop function.<br />
• Connect the product to the controller according to the controllers<br />
instructions. Note that the connection must be established according to<br />
the safety type.<br />
• Fig. 2: The product may be divided anywhere along its length. Cut the<br />
wires at the desired length. When not applying a feed-in on the resulting<br />
open ends these need to be sealed to keep the safety type. Use the<br />
supplied shrinking caps.<br />
• Fix the module on the mounting surface using suitable fastening<br />
materials.<br />
4. Operation:<br />
Information for the user:<br />
Operate the product only if it is working correctly. Switch off the product<br />
with a malfunction immediately and operate it again only after examination<br />
by an electrical specialist. This is the case, when:<br />
• visible damages appear.<br />
• the product does not work.<br />
• smoke, steam or crackling sounds appear.<br />
• an overheating is recognisable.<br />
Repairs of the product or work on mains voltage-prominent sections may<br />
only be carried out by qualified electricians.<br />
Attention: Here exists mortal danger from an electric shock!<br />
5. What else has to be considered?<br />
Disconnect the product from power, before you…<br />
• clean or maintain the product.<br />
• do any works on the product or its components (electric expert).<br />
550403 08/2006 © by SLV Elektronik GmbH<br />
Technical Details are subject to change. Duplication prohibited !<br />
F Mode d'emploi MINI <strong>LED</strong> MODULE RVB<br />
1. A utiliser comme indiqué :<br />
Ce produit ne sert qu’à éclairer:<br />
• et ne doit être uniquement utilisé avec un contrôleur qui est fait pour ce<br />
produit tension de sortie : 12V DC (tension continue).<br />
• il ne doit être soumis ni aux efforts mécaniques importants ni à un<br />
encrassement important.<br />
• il ne doit être utilisé qu’après examen si le produit a été stocké dans un<br />
entrepôt humide ou sale.<br />
• il ne doit pas être modifié.<br />
Un non-respect de ces points peut causer un court-circuit ou une<br />
décharge électrique!<br />
2. Informations techniques:<br />
Tension d'alimentation:<br />
12V DC<br />
Classe de protection:<br />
III<br />
Degré de protection: IP 55<br />
Puissance 25 modules:<br />
15W<br />
Ampoule 1 module:<br />
3x Super Flux 3in1 <strong>RGB</strong> <strong>LED</strong><br />
Dimensions 1 module (L/L/H):<br />
5/1,1/1,1 cm<br />
Longueur:<br />
2,88m<br />
Poids:<br />
0,35 kg<br />
Importateur:<br />
SLV Elektronik GmbH<br />
IP 55: Protection contre les dépôts de poussière gênants – Protection<br />
contre jets d’eau provenant de toutes les directions<br />
3. Assemblage<br />
L’installation complète ne doit être faite que par du personnel<br />
qualifié en électrotechnique qui connaît les directives.<br />
Attention: Mettez l’alimentation électrique ou le raccordement au<br />
secteur hors tension avant de travailler!<br />
Utilisez seulement des pièces qui ont été livrées avec le produit ou qui<br />
sont uniquement décrites comme accessoires ! Sinon, l’installation ainsi<br />
que le produit ne peuvent pas être garantis.<br />
Indication pour l'installateur: même si vous n'installez pas<br />
l'installation complète du système (avec transformateur), vous êtes<br />
considéré comme fabricant en fonction de la directive basse tension. Dans<br />
ce cas, vous aurez à produire la preuve de conformit.<br />
Lieu d'installation<br />
Veillez à ce que le produit soit monté de manière stable et résistante au<br />
basculement.<br />
Etapes successives pour installer le luminaire<br />
• L’illustration 1 montre deux possibilités d’installation:<br />
• Possibilité A) : Programmation individuelle grâce à la console<br />
d’opérateur LIM ® 3/110 (numéro d’article 410400) avec le convertisseur<br />
(numéro d’article 470504).<br />
• Possibilité B) : Raccordement au poste de contrôle Easy LIM ® (numéro<br />
d’article 470503) – choix entre huit différents programmes de couleurs et<br />
temps – fonction démarrage - stop.<br />
• Raccordez le produit selon les indications. Respectez la classe de<br />
protection en raccordant le produit.<br />
• L’illustration 2 : On peut séparer le produit à n’importe quel endroit. Pour<br />
cela, découpez les fils à l’endroit désiré. Si les endroits ouverts ne sont<br />
pas alimentés, il faut les isoler pour garantir la classe de protection. Pour<br />
cela, utilisez les gousses ci-jointes.<br />
• Fixez les modules sur la surface de montage avec des moyens qui<br />
conviennent.<br />
1<br />
2<br />
A<br />
LIM 3/110<br />
410400<br />
B<br />
230 V<br />
230 V<br />
R<br />
G<br />
B<br />
230 V<br />
470507/08<br />
12VDC<br />
470507/08<br />
12VDC<br />
Easy LIM<br />
470503<br />
1 470504 1<br />
+<br />
-<br />
2<br />
2 +<br />
3<br />
-<br />
3 +<br />
-<br />
VCC(+) = orange/naranja/<br />
oranje<br />
RRot/Red/Rouge/<br />
Rojo/Rood<br />
GGrün/Green/Vert/<br />
Verde/Groen<br />
B Blau/Blue/Bleu/<br />
Azul/Blauw<br />
R Rot/Red/Rouge/Rojo/Rood<br />
GGrün/Green/Vert/<br />
Verde/Groen<br />
B Blau/Blue/Bleu/Azul/Blauw<br />
VCC(+) = orange,<br />
naranja, oranje<br />
4. Opération<br />
Informations pour l’exploitant<br />
Utilisez le luminaire uniquement dans le cas où il fonctionne correctement.<br />
Dans le cas contraire, éteignez tout de suite le luminaire et ne l’utilisez<br />
qu’après avoir fait appel à un professionnel. C’est à dire, dans les cas où :<br />
• des dommages sont visibles<br />
• le produit ne fonctionne pas<br />
• le produit dégage des fumées épaisses,<br />
• le produit surchauffe (la surchauffe est reconnaissable à son bruit de<br />
grésillement)<br />
Toute autre réparation sur l'installation ou sur son alimentation ne doit être<br />
effectuée que par un professionnel.<br />
Attention: Rappelons qu'un choc électrique peut être mortel!<br />
2. D’autres points à respecter:<br />
Eteignez le produit avant d’effectuer des travaux de nettoyage ou<br />
d’entretien, ou bien, d’autres travaux sur le luminaire ou sur les<br />
composants (à faire réaliser par un professionnel).<br />
550403 08/2006 © by SLV Elektronik GmbH<br />
Les détails techniques sont sujet à des changements. Reproduction interdite!<br />
E Instrucciones de montaje MINI <strong>LED</strong> MODULE RVB<br />
1. Empleo según normativas<br />
Este producto sirve únicamente para fines de iluminación y sólo puede:<br />
• utlizarse solamente con un unidad de mando apropiado, tensión de<br />
salida: 12V DC (corriente continua).<br />
• No debe exponerse a exigencias mecánicas excesivas o fuertes<br />
suciedades;<br />
• Después de un almacenamiento húmedo o contaminante, no utilizar sin<br />
previa verificación<br />
• No debe ser cambiado o modificado.<br />
En caso de no respetarse los puntos previamente señalados, podrá<br />
producirse un cortocircuito o una descarga eléctrica.<br />
2. Datos técnicos:<br />
Tensión de servicio:<br />
12V DC<br />
Clase de protección:<br />
III<br />
Modo de protección: IP 55<br />
Potenzia 25 módulo:<br />
15W<br />
Leuchtmittel1 módulo:<br />
3x Super Flux 3in1 <strong>RGB</strong> <strong>LED</strong><br />
Maße 1 módulo L/A/Al.):<br />
5/1,1/1,1cm<br />
Longitud:<br />
2,88 m<br />
Peso:<br />
0,35 kg<br />
Importador:<br />
SLV Elektronik GmbH<br />
IP 55: Protección contra los depósitos de polvo molestos - Protección<br />
contra chorros de agua procedentes de todas las direcciones.<br />
3. Montaje<br />
La instalación completa puede llevarse a cabo sólo por un<br />
electricista especializado que está bien enterado de las directivas<br />
vigentes.<br />
Atención: Desconecte la línea de alimentación antes de realizar<br />
cualquier trabajo.<br />
Utilice exclusivamente piezas que fueran suministradas con el producto o<br />
que son descritas definitivamente como accesorios. De lo contrario, el<br />
producto no puede ser suficientemente seguro.<br />
Advertencia para el electricista: Si no instala un sistema<br />
suministrado de forma completa (es decir con el transformador), actuará<br />
como el „fabricante“ en el sentido de las directivas de baja tensión. En<br />
este caso incumbe a Ud. establecer la conformidad del sistema completo y<br />
declararla mediante la aplicación de la marca CE.<br />
Lugar de montaje<br />
Preste atención a que el producto sea montado sobre una base firme,<br />
plana y estable.
Pasos de montaje<br />
• La figura 1 muestra dos posibilidades de instalación:<br />
Posibilidad A): Programación individual con el programador LIM ® 3/110<br />
(No. del artículo 410400) en combinación con el convertidor (No. de<br />
artículo 470504).<br />
Posibilidad B): Conexión al programador Easy LIM ® (No. del artículo<br />
470503) - Selección de ocho colores y tiempos distintos – función de<br />
arranque-parada.<br />
• Conecte el producto conforme a las indicaciones del aparato. Preste<br />
atención a que la conexión se realice de forma adecuada para<br />
conservar la clase de protección.<br />
• Figura 2) El producto se puede separar en cualquier posición. Corte los<br />
conductores en el lugar deseado. En caso de que en los extremos<br />
abiertos surgidos no tenga lugar una alimentación de corriente, estos se<br />
deban tapar de forma correspondiente para conservar la clase de<br />
protección. Utilice para ello los casquillos adjuntados.<br />
• Sujete los módulos con medios apropiados en la superficie de montaje.<br />
4. Funcionamiento:<br />
Información para el usuario:<br />
Utilice el producto únicamente si funciona de forma perfecta. En caso de<br />
fallo, desconecte inmediatamente el aparato y vuelva a utilizarlo sólo tras<br />
una revisión de parte de un electricista. Esto es el caso por ejemplo<br />
cuando:<br />
• aparecen daños visibles;<br />
• el producto no funciona perfectamente;<br />
• se desprende humo, vapor o en caso de chisporroteo;<br />
• es reconocible un sobrecalentamiento.<br />
Todas las reparaciones respectivamente trabajos en partes conectadas<br />
deben ser realizadas únicamente por electricistas especializados.<br />
Atención: De lo contrario, aquí puede haber peligro de muerte por<br />
descarga eléctrica.<br />
5. ¿Qué otra cosa debe tenerse en cuenta?<br />
Desconecte en primer lugar el producto antes de ...<br />
• llevar a cabo trabajos de limpieza y cuidado;<br />
• realizar trabajos en el producto o en sus componentes (sólo<br />
electricistas).<br />
550403 08/2006 © by SLV Elektronik GmbH<br />
Nos reservamos el derecho a modificaciones técnicas. ¡Reproducción prohibida!<br />
NL Gebruiksaanwijzing MINI <strong>LED</strong> MODULE <strong>RGB</strong><br />
1. Gebruik aangepast aan de doeleinden:<br />
Dit product dient alleen voor verlichting en mag slechts in de volgende<br />
situaties worden gebruikt:<br />
• alleen in verbinding met een geschikte sturing, uitgangsspanning.: 12V<br />
DC (Gelijkspanning).<br />
• Mag niet aan zware mechanische belasting of sterke vervuiling worden<br />
blootgesteld.<br />
• Mag, na weigering in een vochtige of vervuilende opslagplaats, pas<br />
worden gebruikt nadat het grondig werd nagekeken<br />
• Het product mag niet worden veranderd of gewijzigd.<br />
Indien de hiervoor genoemde punten niet in acht worden genomen, kan<br />
er een kortsluiting of een elektrische schok optreden!<br />
2. Technische Gegevens:<br />
Netspanning:<br />
12V DC<br />
Beschermingsklasse:<br />
III<br />
Soort bescherming: IP 55<br />
Capaciteit 25 modulen:<br />
15W<br />
Lichtbron 1 Modul:<br />
3x Super Flux 3in1 <strong>RGB</strong> <strong>LED</strong><br />
Afmetingen 1 Modul<br />
5/1,1/1,1cm<br />
(L/B/H):<br />
Lengte:<br />
2,88 m<br />
Gewicht:<br />
0,35 kg<br />
Importeur:<br />
SLV Elektronik GmbH<br />
IP 55: Bescherming tegen storende stofophopingen - Bescherming tegen<br />
straalwater uit alle richtingen.<br />
3. Montage<br />
De volledige installatie mag alleen door een erkend electricien<br />
gebeuren, die op de hoogte is van de geldende richtlijnen.<br />
Opgelet: Schakelt u de spanning op de aansluitleiding uit alvorens gelijk<br />
welk werk uit te voeren!<br />
Gebruikt u slechts onderdelen die met het product worden geleverd of die<br />
definitief als accessoire voor dit product worden beschreven. Zoniet is het<br />
product niet voldoende veilig voor gebruik!<br />
Opmerking voor de installateur: In zoverre u geen compleet geleverd<br />
systeem (dus met transformator) installeert, wordt u beschouwd als<br />
‚producent’ in de zin van de laagspanningsrichtlijn. In dit geval moet u<br />
ervoor zorgen dat het volledige systeem conform de richtlijnen van de CE is<br />
en moet u het dienovereenkomstig CE-teken aanbrengen.<br />
Montageplaats<br />
Let u erop dat het product op een stabiele, effen ondergrond (die niet<br />
kan omvallen) wordt gemonteerd.<br />
Afzonderlijke stappen in de montage<br />
• Afbeelding 1 toont twee installatiemogelijkheden aan.<br />
Mogelijkheid A): Individueel programmeren door de LIM® 3/110<br />
bedieningsconsole (artikelnummer 410400) in combinatie met een<br />
convertor (artikelnummer 470504).<br />
Mogelijkheid B): Aansluiting aan het stuurtoestel Easy LIM®<br />
(artikelnummer 470503) – keuze tussen acht verschillende kleuren en<br />
tijden – start-stop-functie.<br />
• De aansluiting gebeurt volgens de toestelverwijzingen. Erop letten dat<br />
de aansluiting overeenkomstig ermee gebeurt om de<br />
beschermingsklasse te behouden.<br />
• Afbeelding 2: Het product kan overal worden gescheiden. Snijdt u op het<br />
gewenste plek de stroomgeleiders door. Indien aan de ontstane open<br />
einden geen toevoering gebeurt, moeten deze, om de<br />
beschermingsklasse te behouden, af worden gedicht. Gebruikt u<br />
hiervoor de bijgaande hulzen.<br />
• Bevestigt u de modules d.m.v. hiervoor geschikte middelen op het<br />
montageplek.<br />
4. Gebruik:<br />
Informatie over het product:<br />
Het product slechts gebruiken wanneer het probleemloos functioneert.<br />
Wanneer er een probleem optreedt, het product onmiddellijk uitschakelen<br />
en het pas weer gebruiken nadat het grondig werd gecontroleerd door een<br />
erkend elektricien Dat moet gebeuren wanneer:<br />
• er zichtbare beschadigingen zijn.<br />
• het product niet naar behoren functioneert.<br />
• het rookt, walmt of wanneer er duidelijk knisperende geluiden worden<br />
waargenomen.<br />
• wanneer het product oververhit is.<br />
Reparatie van het product of werken aan de onderdelen die met de<br />
netspanning in verbinding staan, zijn voorbehouden voor de vakman.<br />
Opgelet: Er kan levensgevaar ten gevolge van een elektrische schok<br />
optreden.<br />
5. Waar moet u nog op letten?<br />
Het product uit het stopcontact halen, alvorens u...<br />
• reinigings- of onderhoudswerkzaamheden uitvoert.<br />
• arbeid verricht aan het product of onderdelen vervangt (alleen erkend<br />
elektricien).<br />
550403 08/2006 © by SLV Elektronik GmbH<br />
Behoudens technische wijzigingen. Dupliceren verboden !<br />
1<br />
2<br />
A<br />
LIM 3/110<br />
410400<br />
B<br />
230 V<br />
230 V<br />
R<br />
G<br />
B<br />
230 V<br />
470507/08<br />
12VDC<br />
470507/08<br />
12VDC<br />
Easy LIM<br />
470503<br />
1 470504 1<br />
+<br />
-<br />
2<br />
2 +<br />
3<br />
-<br />
3 +<br />
-<br />
VCC(+) = orange/naranja/<br />
oranje<br />
RRot/Red/Rouge/<br />
Rojo/Rood<br />
GGrün/Green/Vert/<br />
Verde/Groen<br />
B Blau/Blue/Bleu/<br />
Azul/Blauw<br />
R Rot/Red/Rouge/Rojo/Rood<br />
GGrün/Green/Vert/<br />
Verde/Groen<br />
B Blau/Blue/Bleu/Azul/Blauw<br />
VCC(+) = orange,<br />
naranja, oranje