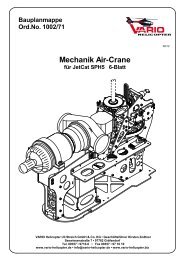
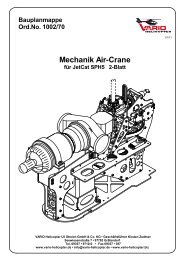
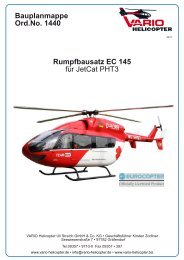
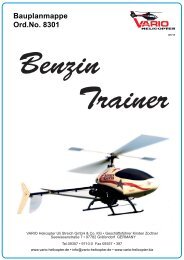
Bauanleitung Building instruction - Vario Helicopter
Bauanleitung Building instruction - Vario Helicopter
Bauanleitung Building instruction - Vario Helicopter

Sie wollen auch ein ePaper? Erhöhen Sie die Reichweite Ihrer Titel.
YUMPU macht aus Druck-PDFs automatisch weboptimierte ePaper, die Google liebt.
Operating a model helicopter for the first time<br />
Even if you already know „all there is to know“ about model helicopters please read the following notes carefully:<br />
Before operating the model check the following points:<br />
- The direction of servo rotation (including the throttle function) and travels.<br />
- The direction of effect of the gyro, and the transmitter mixer functions you have programmed.<br />
- Collective pitch travel (linear travel -2/-3° to +9/+10°); rotor diameter 2000 mm Ø plus: 0° to +10°<br />
- It is permissible to reduce servo travels, but not below 60% (in this case adjust the mechanical linkage);<br />
travels should be primarily symmetrical.<br />
- Apply collective pitch min. / collective pitch max. and full roll and pitch-axis commands simultaneously in<br />
all directions; rotate the rotor head at the same time, and check that at the extremes of travel no part of the rotor<br />
head is obstructed, and the collective pitch compensator guide pin does not foul the swashplate.<br />
- Check the safe connection of the ball link of the swashplate driver before each flight, if the rotor head is<br />
using one.<br />
- The auto-rotation switch must be assigned, and within easy reach!<br />
- When auto-rotation is selected: throttle position to off, all directions of control and travels as in normal<br />
flight, tail rotor to 0° = fixed value.<br />
- Do not set the tail rotor gyro to work in „heading-lock mode“ initially.<br />
- Contrary to the information supplied by many gyro manufacturers, the greater inertia of larger helicopters<br />
means that they do need the support of tail rotor mixer functions in normal mode.<br />
- Tail rotor position 0° at collective pitch min.; at collective pitch max. the tail rotor blade tips should be<br />
about 50 - 60 mm apart when the blades are folded together in the blade holders.<br />
- Set the motor distinctly „rich“, and set the throttle curve very low: the throttle curve should then be raised<br />
gradually in small increments, and the motor cautiously „leaned out“ until the correct rotor speed level is reached;<br />
i.e. work „upwards“ towards the correct speed!<br />
- The first few tankfuls should be flown with the model close to the ground, i.e. no more than about 1 m<br />
altitude, until you are confident that there are no defects or errors, and that everything is working faultlessly:<br />
- Use your ears critically (!), listening for unusual sounds and vibration, and seek out the problem if you are<br />
in any doubt at all!<br />
- Don’t listen to anyone standing close by if they try to hurry you into flying the model.<br />
- Avoid hovering outside ground effect (hover altitude with a model: approx. 1 m, or half the rotor disc diameter):<br />
- Hovering requires very high power, and you are completely dependent on the motor: in contrast to most<br />
full-size helicopters, model helicopters have only one (!) power plant.<br />
- If your rotor head features a swashplate driver, check that the ball-link is secured properly and functioning<br />
correctly before every (!) flight.<br />
For the first few circuits: starting from ground effect, accelerate to a moderate speed in level flight, and only then<br />
initiate a climb (this is the only way to ensure that you can land safely at any time if the motor fails); always keep<br />
the model flying at a brisk forward speed; on the landing approach always descend towards the landing area at a<br />
steady angle (around 45°) directly into wind, and don’t bring the model to a halt until it is in ground effect again.<br />
Even if everything is actually working properly, you may still find that the helicopter balloons up on the descent<br />
- especially if the system rotational speed is allowed to rise (idle-up set too high !). If this happens, there are two<br />
solutions available to you: immediately move collective pitch to the hover position, and resume the descent using<br />
the pitch-axis function only (i.e. reduce height by flying circles at a low rate of descent); the alternative is to carry<br />
out an auto-rotation landing immediately.<br />
Immediately means within the first second.<br />
Before flying you should deliberately practise mentally what you need to do in particular situations.<br />
If one particular technical fault keeps recurring in your model, replacing the component concerned will not solve<br />
the problem unless you change some other aspect of the operating conditions.<br />
And one final request:<br />
Please be realistic when assessing your piloting skills. Keep this comparison in mind: if you can’t swim<br />
and you dive into deep water, the chances are that you will drown.<br />
40 Technische Änderungen vorbehalten / Subject to technical changes