
Sie wollen auch ein ePaper? Erhöhen Sie die Reichweite Ihrer Titel.
YUMPU macht aus Druck-PDFs automatisch weboptimierte ePaper, die Google liebt.
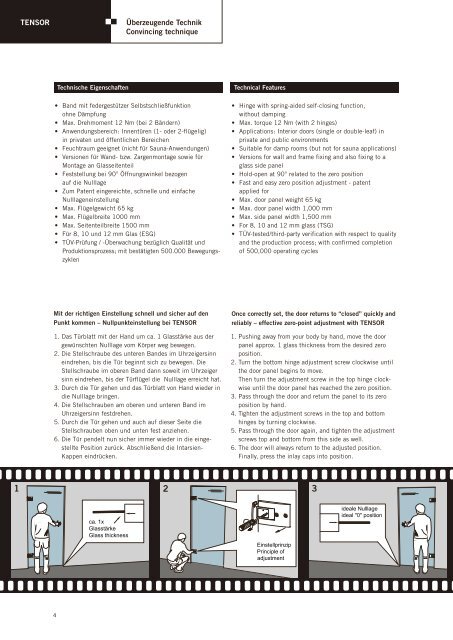
<strong>TENSOR</strong>Überzeugende TechnikConvincing techniqueTechnische Eigenschaften• Band mit federgestützer Selbstschließfunktionohne Dämpfung• Max. Drehmoment 12 Nm (bei 2 Bändern)• Anwendungsbereich: Innentüren (1- oder 2-flügelig)in privaten und öffentlichen Bereichen• Feuchtraum geeignet (nicht für Sauna-Anwendungen)• Versionen für Wand- bzw. Zargenmontage sowie fürMontage an Glasseitenteil• Feststellung bei 90° Öffnungswinkel bezogenauf die Nulllage• Zum Patent eingereichte, schnelle und einfacheNulllageneinstellung• Max. Flügelgewicht 65 kg• Max. Flügelbreite 1000 mm• Max. Seitenteilbreite 1500 mm• Für 8, 10 und 12 mm Glas (ESG)• TÜV-Prüfung / -Überwachung bezüglich Qualität undProduktionsprozess; mit bestätigten 500.000 BewegungszyklenTechnical Features• Hinge with spring-aided self-closing function,without damping• Max. torque 12 Nm (with 2 hinges)• Applications: Interior doors (single or double-leaf) inprivate and public environments• Suitable for damp rooms (but not for sauna applications)• Versions for wall and frame fixing and also fixing to aglass side panel• Hold-open at 90° related to the zero position• Fast and easy zero position adjustment - patentapplied for• Max. door panel weight 65 kg• Max. door panel width 1,000 mm• Max. side panel width 1,500 mm• For 8, 10 and 12 mm glass (TSG)• TÜV-tested/third-party verification with respect to qualityand the production process; with confirmed completionof 500,000 operating cyclesMit der richtigen Einstellung schnell und sicher auf denPunkt kommen – Nullpunkteinstellung bei <strong>TENSOR</strong>1. Das Türblatt mit der Hand um ca. 1 Glasstärke aus dergewünschten Nulllage vom Körper weg bewegen.2. Die Stellschraube des unteren Bandes im Uhrzeigersinneindrehen, bis die Tür beginnt sich zu bewegen. DieStellschraube im oberen Band dann soweit im Uhrzeigersinn eindrehen, bis der Türflügel die Nulllage erreicht hat.3. Durch die Tür gehen und das Türblatt von Hand wieder indie Nulllage bringen.4. Die Stellschrauben am oberen und unteren Band imUhrzeigersinn festdrehen.5. Durch die Tür gehen und auch auf dieser Seite dieStellschrauben oben und unten fest anziehen.6. Die Tür pendelt nun sicher immer wieder in die eingestelltePosition zurück. Abschließend die Intarsien-Kappen eindrücken.Once correctly set, the door returns to “closed” quickly andreliably – effective zero-point adjustment with <strong>TENSOR</strong>1. Pushing away from your body by hand, move the doorpanel approx. 1 glass thickness from the desired zeroposition.2. Turn the bottom hinge adjustment screw clockwise untilthe door panel begins to move.Then turn the adjustment screw in the top hinge clockwiseuntil the door panel has reached the zero position.3. Pass through the door and return the panel to its zeroposition by hand.4. Tighten the adjustment screws in the top and bottomhinges by turning clockwise.5. Pass through the door again, and tighten the adjustmentscrews top and bottom from this side as well.6. The door will always return to the adjusted position.Finally, press the inlay caps into position.1 2 3ca. 1xGlasstärkeGlass thicknessEinstellprinzipPrinciple ofadjustmentideale Nulllageideal "0" position4