BASICO_HOM_DE_IT_EN
- Keine Tags gefunden...

Sie wollen auch ein ePaper? Erhöhen Sie die Reichweite Ihrer Titel.
YUMPU macht aus Druck-PDFs automatisch weboptimierte ePaper, die Google liebt.
<strong>DE</strong><br />
<strong>IT</strong><br />
<strong>EN</strong><br />
Bedienungsanleitung<br />
Manuale utente / Owners manual
<strong>DE</strong><br />
Wir gratulieren Ihnen zum Kauf des innovativsten<br />
Bodenbelags auf dem Markt. <strong>BASICO</strong> stellt<br />
den ersten klebstofffrei und schwimmend zu<br />
verlegenden <strong>BASICO</strong>-Boden vor.<br />
Bitte lesen Sie diese Verlegeanleitung vor<br />
dem Einbau vollständig durch.<br />
Sie wurde konzipiert, um Ihr Erlebnis beim<br />
Verlegen und der Pflege des neuen,<br />
widerstandsfähigen <strong>BASICO</strong>-Bodenbelages<br />
zu erleichtern.<br />
1 2<br />
8-10 mm<br />
3 4<br />
2
<strong>DE</strong><br />
Einleitung<br />
Warum ist <strong>BASICO</strong> so einzigartig und revolutionär?<br />
<strong>BASICO</strong> ist <strong>DE</strong>R Boden zum selber Verlegen.<br />
Keine Klebstoffe oder Leim erforderlich.<br />
Dank der Flexibilität von <strong>BASICO</strong> können die Dielen auch über unebenen<br />
Unterböden oder auf vorhandenen Bodenbelägen wie Holz, Beton,<br />
<strong>BASICO</strong>, Linoleum und sogar auf Keramikfliesen verlegt werden. (Achtung:<br />
Fugen müssen ausgeglichen werden.) Siehe Abschnitt Vorbereitung<br />
des Unterbodens.<br />
Sie sparen Zeit und Geld!<br />
Die <strong>BASICO</strong>-Boden sind für Warmwasser-Bodenheizung geeignet, nicht<br />
aber für AC/DC elektrische Bodenheizung!<br />
<strong>BASICO</strong> sieht aus wie Holz und fühlt sich auch so an. <strong>BASICO</strong> ist<br />
WASSER-FEST, daher kann es in feuchten Bereichen verlegt werden, für<br />
die normalerweise traditionelle Holz- und Laminatbeläge nicht geeignet<br />
sind, so wie z.B. Kellerräume und Badezimmer.<br />
<strong>BASICO</strong> verfügt über eine UV-Beschichtung, für eine hohe Abnutzungsfestigkeit<br />
und Haltbarkeit. Damit wird die Bodenoberfläche sehr<br />
robust und widerstandsfähig.<br />
Jede <strong>BASICO</strong>-Diele wird mit dem Click-System an den anderen Dielen<br />
befestigt und nicht mit dem Unterboden verklebt. Schwimmende Verlegung.<br />
Zum Kürzen einer Diele diese einfach anritzen und abbrechen.<br />
<strong>BASICO</strong> ist geräuscharm und fühlt sich warm unter den Füssen an.<br />
Befolgen Sie die Verlegehinweise im nächsten Abschnitt und geniessen<br />
Sie Ihren schönen, neuen Boden schon nach wenigen Stunden.<br />
Verlegeanleitung<br />
1. Erforderliche Werkzeuge<br />
Profi Cuttermesser, Winkel, Bleistift, Hammer, Schlagklotz, Massband,<br />
und Abstandshalter 8-10 mm.<br />
2. Vorbereitung<br />
Kontrollieren Sie die Ware vor der Verarbeitung bei Tageslicht auf<br />
Material- oder Transportschäden. Sollten bei der Verlegung Mängel erkennbar<br />
sein, so ist die Weiterverarbeitung sofort einzustellen, damit die<br />
Ware begutachtet oder ggf. ausgetauscht werden kann.<br />
Spätere Beanstandungen von sichtbaren und haptischen Defekten werden<br />
nicht mehr anerkannt! Die entsprechende Garantieleistungspflicht<br />
des Herstellers entfällt.<br />
Unterschiede in Struktur und Farbe sind materialbedingt möglich. Farbgleichheit<br />
kann nur bei Lieferungen des gleichen Produktionslaufs<br />
(Charge) gewährleistet werden.<br />
3
<strong>DE</strong><br />
Um ein möglichst einheitliches Bild des Bodens zu erzielen, empfiehlt<br />
es sich, Paneelen aus verschiedenen Paketen gemischt zu verlegen. Bei<br />
jedem <strong>BASICO</strong>-Karton ist die Nummer des Produktionslaufs an den Enden<br />
des Kartons aufgedruckt. Beispiel für eine Produktionslaufnummer:<br />
30.07.2015. Wenn Sie mehr als eine Produktionslaufnummer haben,<br />
empfehlen wir, dass Sie Dielen aus 4 oder 5 verschiedenen Kartons mit<br />
unterschiedlichen Produktionslaufnummern verlegen und diese beim<br />
Verlegen willkürlich mischen. Dadurch wird ein natürlicheres Aussehen<br />
des Bodens gewährleistet.<br />
3. Menge der benötigten Dielen für Ihr Projekt<br />
Messen Sie Länge und Breite des Raums. Verfügt der Raum über Erker<br />
oder Vorsprünge, messen Sie diese separat aus. So erhalten Sie die Quadratmeterzahl<br />
des Raums. Kaufen Sie mindestens 10% mehr als benötigt,<br />
um Schnittfehler, Verschnitt, zukünftigen Bedarf oder Austauschteile<br />
abzudecken. Bei den meisten Verlegungen ist eine Übermenge von 10%<br />
erforderlich. Dies kann jedoch in Abhängigkeit von Raumgrösse und<br />
Anordnung variieren.<br />
4. Zustand von <strong>BASICO</strong> vor der Verlegung<br />
<strong>BASICO</strong> MUSS mindestens 48 Stunden vor der Verlegung in den<br />
Paketen waagrecht in dem Raum gelagert werden, in dem es verlegt<br />
werden soll. Stellen Sie sicher, dass die Raumtemperatur zwischen 18<br />
und 24°C liegt (möglichst nahe der späteren Nutzungstemperatur), aber<br />
lagern Sie diese nie unmittelbar neben Heizkörpern. Entfernen Sie die<br />
Dielen während dieses Akklimatisierungszeitraums nicht aus dem Karton.<br />
Behalten Sie diese Temperatur auch während des Verlegens bei.<br />
HINWEIS 1: Achten Sie beim Verlegen von <strong>BASICO</strong> darauf, dass die<br />
Verbindungsstellen frei von Staub, Schmutz und Fremdstoffen sind. Je<br />
sauberer das Clic-System, desto besser ist die Verbindung zwischen den<br />
Dielen. Die <strong>BASICO</strong>-Boden bewahren Sie am besten bis kurz vor dem<br />
Verlegen im Karton auf.<br />
HINWEIS 2: Bitte beachten Sie dass langfristige kontinuierliche Temperaturen<br />
von > 35°C, z.B. in Verbindung mit direkter Sonneneinstrahlung,<br />
sowie Temeperaturen < 10°C den Boden schädigen können.<br />
5. Vorbereiten des Unterbodens<br />
Die Unterbodenoberfläche muss glatt, flach, trocken, fest, sauber und<br />
hart sein. Teppichklammern oder Klebstoffreste müssen entfernt werden,<br />
um ein korrektes Verlegen zu gewährleisten. Für das Verlegen von BASI-<br />
CO-Boden gelten die einschlägigen nationalen Normen und Richtlinien,<br />
technischen Verweise sowie die anerkannten Regeln des Fachs.<br />
In Deutschland sind insbesondere folgende Richtlinien zu beachten:<br />
- VOB Teil C, DIN 18365 Bodenbelagsarbeiten<br />
- Mindestanforderungen an Estriche DIN 18560<br />
- BEB Merkblatt: «Beurteilen und Vorbereiten von Untergründen,<br />
Verlegen von elastischen und textilen Belägen»<br />
- DIN 18202 «Toleranzen im Hochbau»<br />
- Sanitär – Heizung – Klima ZV Merkblatt: «Schnittstellenkoordination<br />
bei beheizten Fußbodenkonstruktionen»<br />
Verlegen Sie <strong>BASICO</strong>-Boden NIE schwimmend auf einem schwimmend<br />
verlegten Unterboden! Dieser gilt nicht als fest und muss verschraubt,<br />
verklebt oder entfernt werden!<br />
4
<strong>DE</strong><br />
HINWEIS: Der Bodenleger hat vor der Verlegung des Bodenbelages bei<br />
seiner Prüfung Bedenken anzumelden. Insbesondere bei:<br />
- größeren Unebenheiten,<br />
- Rissen im Untergrund,<br />
- nicht genügend trockenem Untergrund,<br />
- nicht genügend fester, zu poröser und zu rauer<br />
Oberfläche des Untergrundes,<br />
- verunreinigter Oberfläche des Untergrundes, z.B. durch Öl,<br />
Wachs, Lacke, Farbreste,<br />
- unrichtiger Höhenlage der Oberfläche des Untergrundes im<br />
Verhältnis zur Höhenlage anschließender Bauteile,<br />
- ungeeigneter Temperatur des Untergrundes,<br />
- ungeeignetem Raumklima,<br />
- fehlendem Aufheizprotokoll bei beheizten<br />
Fußbodenkonstruktionen,<br />
- fehlendem Überstand des Randdämmstreifens,<br />
- fehlender Markierung von Messstellen bei beheizten<br />
Fußbodenkonstruktionen,<br />
- Fehlendem Fugenplan.<br />
(Quelle: Kommentar zur DIN 18365 Bodenbelagsarbeiten.)<br />
Der Unterboden muss flach sein, mit einer Toleranz von 3 mm über eine<br />
Spanne von 1,2 m. Alle Unebenheiten, die 3 mm überschreiten, müssen<br />
abgeschliffen oder mit Bodenausgleichsmasse verfüllt werden. Hohlräume<br />
oder Höcker im Unterboden verhindern das korrekte Einrasten der<br />
<strong>BASICO</strong>-Boden. Sollte eine Trittschallunterlage gewünscht oder erforderlich<br />
sein, müssen Matten verwendet werden, welche eine Druckfestigkeit<br />
von mindestens 400 kPa/m 2 aufweisen, nicht dicker als 1,5 mm und<br />
nicht klebend sind.<br />
Andern Trittschallunterlagen erteilen wir keine Freigabe!<br />
Die Unterböden müssen sorgfältig auf Feuchtigkeitsprobleme untersucht<br />
werden. <strong>BASICO</strong> ist wasserfest. Es dichtet jedoch NICHT gegen Wasser<br />
ab. Alle Feuchtigkeitsprobleme müssen vor der Verlegung beseitigt werden.<br />
Frische Betonböden müssen einen CM Wert von < 1,5% aufweisen.<br />
ACHTUNG:<br />
1 Verlegen Sie <strong>BASICO</strong> nie über einen weichen Unterboden z.B.<br />
über Teppich, Kork oder jeder Art von Schaumstoffunterlage.<br />
2 Das Produkt ist nicht für Verwendung im Freien, Wintergärten/Solarien,<br />
Saunen oder unbeheizte Räumen freigegeben.<br />
Ebenfalls nicht in Nassräumen bei denen die Gefahr<br />
von Überschwemmungen besteht.<br />
3 Wir raten ebenfalls dringend von der Verlegung in Räumen<br />
oder Häusern mit grossen Temperaturdifferenzen (> ± 10°C)<br />
ab! (z.B. unbeheizte Wochenendhäuser, Gartenhäuser etc.).<br />
4 Beim Verlegen auf Betonunterlagsböden ist zu beachten,<br />
dass diese über 10°C kälter sein können als die Raumtemperatur.<br />
5 Direkte Sonneneinstrahlung ist unbeding zu vermeiden, denn<br />
diese kann Ihren Boden verbleichen und beschädigen.<br />
6 Dauerhaft installierte statische Lasten (z.B. schwere Elemente)<br />
sind von der Restfläche zu entkoppeln.<br />
HINWEIS 3: Beachten Sie folgende wichtige Informationen beim<br />
schwimmenden Verlegen von <strong>BASICO</strong>-Boden auf einem der unten gelisteten<br />
Bodenmaterialien:<br />
5
<strong>DE</strong><br />
Holz, Parkett, OSB-, Sperrholz, MDF-, HDF-Platten<br />
Holz und <strong>BASICO</strong> haben gegenläufiges Dehnverhalten. Schwimmend<br />
verlegte Platten müssen befestigt werden. Zur Entkoppelung ist eine 0,2<br />
mm starke Polyethylen-Folie oder eine geeignete Unterlagsmatte erforderlich!<br />
Bei Holzdielen hat sich die Verlegung quer zur Längsrichtung der<br />
Dielen bewährt.<br />
Fliessestrich Anhydrid<br />
Bodentemperatur kontrollieren! Restfeuchtigkeit < 1,5%! Unterschicht<br />
entfernen. Eine Polyethylen-Folie oder geeignete Unterlagsmatte wird<br />
empfohlen.<br />
Zementestrich<br />
Bodentemperatur kontrollieren! Restfeuchtigkeit < 1,5%! Boden schleifen.<br />
Schwindfugen im Boden kraftschlüssig verharzen und im <strong>BASICO</strong>-Boden<br />
abbilden. Eine Polyethylen-Folie oder geeignete Unterlagsmatte empfohlen.<br />
Trockenestrichplatten<br />
Fest im UB verleimen oder verschrauben. Oberfläche gemäss Empfehlung<br />
von Herstellern grundieren und vollflächig mit einer mineralischen<br />
Fliess-Spachtelmasse versehen. Eine Polyethylen-Folie oder geeignete<br />
Unterlagsmatte ist empfohlen.<br />
<strong>BASICO</strong>, Linoleum<br />
0,2 mm starke Polyethylen-Folie oder geeignete Unterlagsmatte erforderlich!<br />
Fliesen<br />
Wenn Sie <strong>BASICO</strong> auf Fliesen verlegen, die eine Prägung oder Fugen<br />
aufweisen, die breiter als 3 mm sind, müssen Sie diese mit Bodenausgleichsmasse<br />
verfüllen. Eine Polyethylen-Folie oder geeignete Unterlagsmatte<br />
ist empfohlen.<br />
Kork<br />
Grundieren und vollflächig mit einer mineralischen Fliess-Spachtelmasse<br />
versehen. Eine Polyethylen-Folie oder geeignete Unterlagsmatte erforderlich!<br />
Laminat<br />
Fest im UB verleimen oder verschrauben. Eine Polyethylen-Folie oder<br />
geeignete Unterlagsmatte ist erforderlich!<br />
Teppiche<br />
Das Verlegen auf Teppiche ist verboten – dieser muss entfernt und Leimspuren<br />
vollständig abschliffen werden!<br />
6. <strong>BASICO</strong> verlegen<br />
HINWEIS 4: Bevor Sie den Boden auslegen, prüfen Sie die Wand, an der<br />
Sie beginnen und stellen Sie sicher, dass diese sich im rechten Winkel<br />
zur gegenüberliegenden Wand befindet. Messen Sie einfach den Raum<br />
von den entgegengesetzten Enden der Wand zur gegenüberliegenden<br />
Wand. Unterscheiden sich die Masse, können Sie Anpassungen an der<br />
ersten Reihe <strong>BASICO</strong> vornehmen. Legen Sie zunächst eine Reihe loser<br />
Dielen aus, ohne diese aneinander zu befestigen um festzustellen, ob Sie<br />
die Länge der ersten Diele anpassen müssen, um ein kurzes Stück von<br />
weniger als 30 cm an der dem Anfangspunkt gegenüberliegenden Wand<br />
zu vermeiden oder messen Sie die Länge des Raums und teilen Sie diese<br />
durch die Länge einer Diele. Ist das verbleibende Stück kleiner als 30<br />
cm, berechnen Sie die Hälfte des Reststücks und kürzen Sie die erste<br />
Diele um diese Länge.<br />
6
<strong>DE</strong><br />
Um eine Diele zu schneiden, nehmen Sie nun Mass und markieren Sie<br />
die Diele. Dann nehmen Sie das Richtscheit und das Mehrzweckmesser,<br />
reissen die Diele an und brechen sie ab.<br />
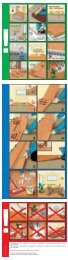
1 Mit dem Verlegen sollten Sie in einer Ecke (links) und von der Wand<br />
ausgehend beginnen, wobei die Nut von der Wand weg zeigt. (Abb.<br />
1). Setzen Sie die Abstandskeile an Wänden, Türzargen, feststehenden<br />
Wandschränken, Küchenkombinationen etc. damit Sie eine<br />
Dehnfuge von mindestens 8-10 mm für Unterbodenbewegung oder<br />
Ausdehnung des Produkts erhalten. Diese können danach mit einer<br />
formschönen Fussleiste abgedeckt werden.<br />
2 Wenn Sie die erste Reihe in einer geraden Linie ausgelegt haben, verbinden<br />
Sie die kurzen Enden, indem Sie die Feder in einem Winkel<br />
von ca. 15-20 Grad von schräg oben in die Nuten einführen. Verlegen<br />
Sie jede folgende Diele am kurzen Ende und stellen Sie sicher, dass<br />
die Reihe gerade ist. Das ist für ein gutes Verlegen der weiteren Bahnen<br />
wichtig.<br />
3 Stellen Sie sicher, dass die Verbindungsnuten fest verriegelt sind. Bei<br />
Clicknuten fühlen und hören sie das Klicken beim Verbinden der<br />
Dielen, wenn eine feste Verbindung entstanden ist. Zwischen den<br />
Dielen darf kein Zwischenraum zu sehen sein. Sollte dies trotzdem der<br />
Fall sein, ist ein nachklopfen mit dem Schlagklotz notwendig. Wenn<br />
die Verbindung nur scheinbar fest ist, können Sie die Dielen sofort<br />
wieder auseinander ziehen und neu verbinden. Achten Sie darauf, die<br />
Dielen nicht zu schnell auseinander zu ziehen – Sie können die Clicknuten<br />
zerreissen oder beschädigen.<br />
4 Beim Verlegen von <strong>BASICO</strong> empfehlen wir eine Staffelung der Reihen,<br />
so dass die Verbindungen am kurzen Ende nicht in einer geraden,<br />
gleichförmigen Linie liegen. Wir empfehlen die gestaffelte Zufallsmethode<br />
3 - 2 - 1 (Abb. 2). Sie können natürlich auch andere «Dielenmuster»<br />
ausprobieren, die Ihrem Geschmack entsprechen. Die<br />
Verlegemöglichkeiten für <strong>BASICO</strong> sind unbegrenzt – setzen Sie Ihre<br />
Vorstellungen um.<br />
5 Um mit der zweiten Dielenreihe zu beginnen, schneiden Sie die Diele<br />
auf ca. zwei Drittel der Länge ab. Messen und markieren Sie die Diele.<br />
Dann nehmen Sie den Winkel und das Mehrzweckmesser, reissen<br />
die Diele an und brechen sie einfach ab.<br />
6 Verbinden Sie die Diele fest mit der ersten Reihe (lange Seite), wiederum<br />
in einem Winkel von 15-20 Grad. Bei der nächsten Diele verbinden<br />
Sie zunächst die kurze Seite und halten sie ein Stück von der<br />
langen Seite weg, dann in die lange Seite einschieben.<br />
HINWEIS 5: Beim Ablängen von <strong>BASICO</strong> müssen Sie immer darauf achten,<br />
die kurze Seite der Diele mit der Nut abzuschneiden. Das Reststück<br />
kann dann an der gegenüberliegenden Seite des Raums am Ende dieser<br />
Reihe (Abb. 3) verwendet werden, wenn die Anordnung das zulässt.<br />
7 Beginnen Sie die dritte Dielenreihe mit einer Diele die auf ca. ein Drittel<br />
der Länge gekürzt wurde. Auch hier kann das Reststück am gegenüberliegenden<br />
Ende der Reihe verwendet werden, wenn der Zuschnitt<br />
des Raums das zulässt.<br />
8 Setzen Sie dieses Muster für die noch zu verlegenden Reihen fort.<br />
Platzieren Sie das abgeschnittene Ende der ersten Diele immer an der<br />
Wand (Abb. 4), vorausgesetzt dieses Stück ist mindestens 30 cm.<br />
7
<strong>DE</strong><br />
9 Die Anpassung an unregelmässige Objekte ist kein Problem. Schneiden<br />
Sie einfach ein Muster aus festem Papier, um eine Anpassung an<br />
Rohre oder unregelmäßige Objekte vorzunehmen. Legen Sie das Muster<br />
auf die Diele und malen Sie es ab. Scheiden Sie mit einem Mehrzweckmesser<br />
oder einer kräftigen Schere entlang der Linien, dann<br />
verlegen Sie die Diele. Achten Sie darauf, eine Dehnungsfuge von<br />
mindestens 8-10 mm um alle feststehenden Objekte, Bodenlüftungen<br />
und Türrahmen anzubringen.<br />
10 Schwindfugen des Unterbodens müssen 1:1 übernommen werden.<br />
11 Verlegen Sie ganze Wohnungen nicht flächendeckend, sonder trennen<br />
Sie die Räume mit einer Dehnfuge zwischen den Türzargen unter der<br />
Türe ab.<br />
12 Dielenbahnlängen und - breiten von mehr als 10 m müssen zwingend<br />
durch zusätzliche Dehnfugen unterbrochen werden. Bei häufigen<br />
Temperaturschwankungen von mehr als ± 10°C reduziert sich dieses<br />
Mass auf 5-6 m.<br />
HINWEIS 6: Achten Sie darauf, einige <strong>BASICO</strong>-Boden zusätzlich auf<br />
Vorrat zu haben, falls ein unvorhersehbarer Tausch vorgenommen werden<br />
muss. <strong>BASICO</strong>-Boden mit Clickverbindung können ausgebaut und<br />
durch neue ersetzt werden. Wenn eine <strong>BASICO</strong>-Diele ausgetauscht werden<br />
muss, nehmen Sie ein Mehrzweckmesser und schneiden einfach<br />
entlang der Längsseite der beschädigten Diele und heben Sie sie heraus.<br />
Dann nehmen Sie eine überzählige Diele und schneiden Sie nur an der<br />
Längsseite der Austauschdiele Feder und Nut ab. Feder und Nut am<br />
kurzen Ende der Diele belassen. Dann einfach einpassen und die beiden<br />
kurzen Enden einrasten lassen. Wenn Sie Probleme oder Fragen haben,<br />
setzen Sie sich mit Ihrem Vertriebspartner in Verbindung.<br />
WICHTIGER HINWEIS: Raumtemperatur beim Verlegen von <strong>BASICO</strong>.<br />
Bitte achten Sie darauf, dass Ihr Thermostat bei der Verlegung von BASI-<br />
CO auf mehr als 18 und weniger als 24°C eingestellt ist. Die Raumtemperatur<br />
ist wichtig!<br />
7. Nach Verlegung<br />
Schwindfugen<br />
Entfernen Sie die gesetzten Abstandskeile und beginnen Sie mit der<br />
Montage der Sockelleisten oder Hohlflachleisten.<br />
ACHTUNG: Sockelleisten oder Hohlflachschinen dürfen keinesfalls an<br />
den <strong>BASICO</strong>-Boden besfestigt werden! Füllen Sie die Dehnungsfugen<br />
nicht oder wenn nicht anders möglich ausschliesslich mit einem weichen,<br />
elastischen Fugenmasse. Vermeiden Sie Fugenfüllmassen auf<br />
Acrylbasis. Diese werden hart und verkleben die Dielen – damit werden<br />
die Schwindfugen wirkunglos. Acryldichtstoffe sind im Gegensatz zum<br />
Silikon nur plasto-elastisch. Ihre Elastizität ist wesentlich geringer als die<br />
silikonhaltigen Materialien. Bei Überlastung wird bei Acryl eine bleibende<br />
Verformung entstehen, während silikonhaltige Werkstoffe ihre ursprüngliche<br />
Form wiedergewinnen.<br />
Schwere Gegnstände / Möbel<br />
Schwere Gegenstände, Möbel, Theken, Küchenkombinationen auf dem<br />
Boden können diesen am Ausgleichen bei schnellen, heftigen Temperaturwechsel<br />
blockieren. Dies kann zu Wellungen der Dielen, Schüsselungen<br />
oder Öffnung der Clickverriegelungen führen insbesondere bei<br />
rauhem Unterboden. Achten Sie darauf, dass sich die Dielen bewegen<br />
8
<strong>DE</strong><br />
«schwimmen» können. Unverrückbare, fest installierte Möbel wie Einbauschränke,<br />
Theken, Küchenkombinationen sollen immer auf den Unterboden,<br />
nicht auf die <strong>BASICO</strong>-Boden montiert werden. Legen Sie die<br />
Dielen mit einer Schwindfuge an diese Möbel – nie darunter.<br />
Fussbodenmatten<br />
Bodenschutzmatten für z.B. Schmutzschleusen, Bürostuhlrollen etc. sind<br />
ausschliesslich Matten aus Vinyl (PVC) oder Baumwolle zu verwenden.<br />
Polypropylen, Polycarbonat, Kautschuk (Gummimatten) oder Kunststoffresp.<br />
Kautschukbeschichtete Matten sind ungeeignet und können zu einer<br />
chemischen Reaktion, Verfärbung und Nutzschichtablösung führen.<br />
Pflege<br />
Herzlichen Glückwunsch! Soeben haben Sie <strong>BASICO</strong> verlegt. Ihr neuer,<br />
widerstandsfähiger Boden wurde nach höchsten Qualitätsstandards<br />
gefertigt und wird Ihnen ein Leben lang Freude machen. Obwohl es sich<br />
bei <strong>BASICO</strong> um einen besonders robusten Boden handelt, braucht er<br />
regelmässige Pflege. Befolgen Sie bitte die Empfehlungen in diesem<br />
Handbuch, damit das frische Aussehen erhalten bleibt und die Werksversiegelung<br />
geschützt wird.<br />
Vorbeugende Pflege:<br />
1 Verwenden Sie vor Türen, die ins Freie führen, Schutzmatten, die<br />
NICHT AUS GUMMI bestehen. Dadurch vermeiden Sie, dass Sand<br />
und Schmutz auf Ihren Boden gelangen. Körniger Sand ist der<br />
schlimmste Feind aller Bodenbeläge.<br />
2 Bringen Sie an den Beinen aller Möbelstücke Bodengleiter (bevor zugt<br />
aus Filz) an, wie sie auf widerstandsfähigem Boden verwendet werden.<br />
Mit den Bodengleitern lassen sich Stühle leicht ohne Anstoßen<br />
oder Kratzern über den Boden bewegen. Reinigen Sie die Bodengleiter<br />
regelmäßig, um Schmutz zu entfernen, der sich unter dem Bein<br />
des Möbelstücks angesammelt haben kann. Bei Bürodrehstühlen<br />
oder anderen Rollmöbeln verwenden Sie breite, nicht abfärbende,<br />
weiche Doppellenkrollen gemäss DIN <strong>EN</strong> 12529. In stark strapazierten<br />
Bereichen (Schreibtische etc.) sind Bodenschutzmatten einzusetzen.<br />
Keine Gummirollen verwenden.<br />
3 Damit Ihr Boden immer gut aussieht, stauben Sie ihn mindestens<br />
zweimal wöchentlich mit einem Mopp ab oder saugen Sie ihn.<br />
Keine Mikrofasern verwenden! Diese können die Schutzschicht beschädigen.<br />
Keine Haushalts-Staubentferner verwenden, diese können<br />
den Boden rutschig machen oder die Oberfläche beschädigen. Den<br />
Boden einfach so oft wie nötig fegen.<br />
4 Haustiere, deren Krallen nicht gekürzt sind, können den <strong>BASICO</strong>-<br />
Boden beschädigen und können heftigen Kratzern auf der Oberfläche<br />
verursachen. Dasselbe gilt für Schuhe mit hohen, dünnen Absätzen,<br />
die nicht mit Absatzschonern ausgestattet sind, aber auch für alle<br />
spitzen oder scharfkantigen Möbel oder Gegenstände.<br />
5 Schützen Sie den Boden vor länger andauernder Sonneneinstrahlung.<br />
Verwenden Sie während der Zeit der stärksten Sonneneinstralung Vorhänge<br />
oder Jalousien, um direkte Sonneneinstrahlung auf den BASI-<br />
CO-Boden zu verhindern. Die meisten Bodenbeläge sind empfindlich<br />
gegenüber ständiger, starker Sonneneinstrahlung. Um ein ungleich-<br />
9
<strong>DE</strong><br />
mässiges Aussehen zu vermeiden, legen Sie eventuell vorhandene<br />
Teppichbrücken von Zeit zu Zeit an einen anderen Platz. Die Verwendung<br />
einer Klimaanlage sollte in leer stehenden Häusern in Betracht<br />
gezogen werden. Langfristige Raumtemperaturen von unter 10°C oder<br />
über 35°C in Verbindung mit starker, direkter Sonneneinstrahlung<br />
beschädigen Ihren <strong>BASICO</strong>-Boden und können zum Verbleichen des<br />
Decors, Schüsseln, Wellungen oder Lösen der Verbindungen, führen.<br />
HINWEIS 7: Bei Asphaltzufahrten oder asphaltierte Parkplätze vor Eingängen<br />
besteht die Gefahr, dass Asphaltrückständen auf die <strong>BASICO</strong>-<br />
Boden übertragen werden. Dadurch entsteht eine chemische Reaktion<br />
welche zur Verfärbung der Dielen im Eingangsbereich führt. Um dies zu<br />
vermeiden, verwenden Sie in den Eingängen immer Fussmatten. Beim<br />
Saugen Ihres <strong>BASICO</strong>-Bodens sollten Sie einen Düsenaufsatz für harte<br />
Böden verwenden.<br />
Regelmässige Pflege:<br />
1 Verschüttete Lebensmittel sollten so schnell wie möglich aufgenommen<br />
werden.<br />
2 Verwenden Sie zur Pflege und Reinigung ausschliesslich einen hochwertigen,<br />
flüssigen reiniger für PU-beschichtete Böden. Achten Sie<br />
auf eine vorschriftsmässige, auf dem Produktetikett angegebene Anwendung.<br />
Wischen von Hand kann erforderlich sein, um schwierige<br />
Stellen oder Flecken zu entfernen. Fegen oder saugen Sie den BASI-<br />
CO-Boden vor jeder Reinigung, so dass der lose Schmutz und Partikel<br />
entfernt werden.<br />
3 Wir raten von Allzweckreinigern ab, da diese oft scheuerndes Pulver<br />
oder Ölseifen enthalten.<br />
4 Verwenden Sie nie Mikrofasertüchern. Diese können die Schutzschicht<br />
beschädigen.<br />
5 Schuhabdrücke und Stossspuren können leicht entfernt werden. Sind<br />
die Kratzer nicht zu tief, reicht es die betroffenen Flächen sauber zu<br />
reinigen, nass zu waschen und abgetrocknet mit einem Reinigungsund<br />
Versiegelungsmittel für PU-vergütete Oberflächen zu behandeln.<br />
Dann glänzt die Oberfläche wieder wie neu.<br />
6 Sind die Kratzer tiefer, sollte der Boden mit einem grünen Scotch Brite<br />
oder mit einem feinen Schleif- resp. Sandpapier (z.B. 1729 sialac von<br />
SIA Abrasive) leicht angeschliffen werden, mit klarem kalten Wasser<br />
sauber gereinigt und anschließend mit einem PU-Siegel (erhältlich<br />
im Bodenbelags-Fachhandel oder übers Internet) versiegelt werden.<br />
Nachher die behandelten Stellen 24 Stunden nicht benützen, dann<br />
ist der Boden wieder wie neu. Funktioniert immer, ausser die Kratzer<br />
sind so tief, dass sie das Decor verletzt haben.<br />
7 Sind die Kratzer so tief, dass sie das Decor beschädigt haben, kann<br />
es erforderlich sein, beschädigte Dielen auszutauschen. Im Abschnitt<br />
Hinweis 6 finden Sie eine Anleitung zum Austauschen von <strong>BASICO</strong>-<br />
Boden.<br />
8 WACHS<strong>EN</strong> O<strong>DE</strong>R ÖL<strong>EN</strong> SIE IHR<strong>EN</strong> <strong>BASICO</strong>-BO<strong>DE</strong>N NICHT!<br />
Die Oberfläche des <strong>BASICO</strong>-Bodens ist sehr dicht und nicht porös.<br />
Das verhindert ein Eindringen von Wachs oder Öl, damit wird ein<br />
Nährboden für Vergilben und Schmutzansammlung geschaffen. Diese<br />
dichte Oberfläche ist für den Schutz vor Abnutzung, Schmutz und<br />
Flecken verantwortlich. Verwenden Sie bei starker Abnutzung<br />
10
<strong>DE</strong><br />
ausschliesslich eine hochwertige Vinylversiegelung zur Auffrischung.<br />
9 War Ihr Boden durch eine Überschwemmung übermässigen Wassermengen<br />
ausgesetzt, geraten Sie nicht in Panik – <strong>BASICO</strong>-Boden sind<br />
wasserfest! Entfernen Sie das Wasser so schnell wie möglich mit einem<br />
Wet-Vac oder einem Trocknungsgerät und lüften Sie den Raum.<br />
Ein Luftentfeuchter sollte im Raum sofort eingeschaltet werden, um<br />
das Feuchtigkeitsniveau auf einen Normalwert zu reduzieren.<br />
10 Setzen Sie sich mit Ihrem Vertriebspartner in Verbindung wenn das<br />
Problem weiterhin besteht.<br />
Pflege bei kommerziellen Anwendungen<br />
Werden die Dielen in kommerziell oder industriell genutzten Räumen eingesetzt,<br />
ist eine vorsorgliche, spezielle Oberflächenbehandlung nach dem<br />
Verlegen resp. regelmässige Pflege unerlässlich. Für Anwendungen in:<br />
- Büro & Verwaltungen<br />
- Arztpraxen & Krankenhäusern<br />
- Pflegeheimen<br />
- Schulen & Kindergarten<br />
- Kaufhäusern & Ladenlokalen<br />
- Hotel & Gastronomie<br />
- Friseursalons<br />
- Sportstätten<br />
Sollte vorher mit dem Vertriebspartner resp. Hersteller Kontakt aufgenommen<br />
werden.<br />
Erste Hilfe für Ihren <strong>BASICO</strong>-Boden<br />
1 Kaugummi, Klebstoff, Buntstift, Kerzenwachs und ähnliche<br />
Substanzen entfernen Sie, indem Sie Eis darauf legen, bis das<br />
Material brüchig wird und abblättert. Die Rückstände können mit<br />
Lackbenzin oder Vinylreiniger entfernt werden.<br />
2 Besonders tiefe Absatzspuren, Spuren von Laufrollen etc.:<br />
mit einem grünen Scotch Brite, welches mit Versiegelungsmittel<br />
für PU vergütete Oberflächen angefeuchtet wurde, abreiben.<br />
3 Für mittlere bis schwere Flecken, verursacht durch Wasser oder<br />
andere nicht färbende Flüssigkeiten: Mit Versiegelungsmittel für PU<br />
vergütete Oberflächen abreiben.<br />
4 Dunkle Flecken, verursacht durch Tinte oder andere Chemikalien, wie<br />
in 2 oben beschrieben reinigen. Zeigt dies keinen Erfolg, sollte die<br />
betroffene Diele wie in Hinweis 6 im Abschnitt «<strong>BASICO</strong> verlegen»<br />
beschrieben ausgetauscht werden.<br />
5 Bei nicht zu tiefen Brandlöchern ist Verfahren 2 oben Erfolg versprechend.<br />
Sind diese jedoch sehr tief, sollte die betroffene Diele wie in<br />
Hinweis 6 im Abschnitt beschrieben ausgetauscht werden.<br />
6 Der Boden riecht auch nach einer Woche noch! Keine Angst, der<br />
Boden entält keine schädlichen Stoffe. Die Geruchsbelästigung wird<br />
bei regelmässiger Lüftung abklingen. Leider kann man heute weder<br />
PVC noch Klebstoffe absolut geruchsfrei herstellen. Gemäss den DIN<br />
<strong>EN</strong> Richtlinien 16000 müssen die Gerüche nach 28 Tagen soweit<br />
abklingen, dass diese nicht mehr störend sind – wenn dies nicht der<br />
Fall ist, melden Sie sich beim Vertriebspartner.<br />
11
<strong>DE</strong><br />
HINWEIS 8: Der Ihre <strong>BASICO</strong>-Boden sind 100% recyclebar und können<br />
in einem Wertstoffhof entsorgt werden. (Abfallschlüsselnummer EU &<br />
CH: 17 02 03)! Die Dielen können aber auch im normalen Hausmüll<br />
entsorgt werden.<br />
Bei Fragen zur Pflege Ihres <strong>BASICO</strong>-Bodens setzen Sie sich bitte mit<br />
Ihrem Vertriebspartner in Verbindung.<br />
Wichtige Hinweise!<br />
1 Bewahren Sie Ihre Quittung auf.<br />
2 Notieren Sie sich den Typ und die Produktionslaufnummer<br />
Ihrer <strong>BASICO</strong>-Boden. Diese sind auf der Außenseite des<br />
Kartons neben dem Strich-Code angegeben.<br />
<strong>BASICO</strong>-TYP:<br />
Produktionslaufnummern:<br />
12
<strong>DE</strong><br />
Garantieleistungen<br />
Die Collectionen <strong>BASICO</strong> 0,3/0,5 bietet eine 5-JÄHRIGE,<br />
EINGESCHRÄNKTE GEWERBLICHE GARANTIE.<br />
FÜR <strong>DE</strong>N EINSATZ IM PRIVAT<strong>EN</strong> WOHNBEREICH GILT DIE<br />
HERSTELLERGARANTIE FÜR 25 JAHRE.<br />
1. Gültigkeitsbereich<br />
Vorausgesetzt der Boden wurde gemäss den Angaben im Benutzerhandbuch<br />
gepflegt und im Rahmen der angegebenen Nutzungsklasse<br />
genutzt und entsprechend der Verleganleitung installiert, umfasst die<br />
Garantie ausschliesslich folgend Bereiche:<br />
A Herstellungsdefekte<br />
B Delaminierung<br />
C Starke, unübliche Farbabweichungen und Verbleichung,<br />
vorausgesetzt die Dielen wurden keiner direkten<br />
Sonneneinstrahlung ausgesetzt.<br />
2. Von der Garantie ausgeschlossen sind:<br />
A Normale Abnutzung, absichtlich oder mutwillig verursachte<br />
Schäden: Schäden durch unsachgemäße Verlegung oder Pflege,<br />
chemische Zersetzung durch ungeeignete Putzmittel, alkalihaltige<br />
Unterböden oder Schäden aufgrund von hydrostatischem Druck,<br />
Verbrennungen, Rissen, Beulen, Flecken oder Glanzverlust aufgrund<br />
von normaler Alterung oder äußerer Einflüsse.<br />
B Arbeit oder die Arbeitskosten für die Entfernung des schadhaften<br />
und Verlegung des Austauschbodens.<br />
C Folgeschäden<br />
Nutzungeinschränkungen, verspätete Vermietungszeitpunkt etc.<br />
welche mit der Entfernung oder der Wiederverlegung des betroffenen<br />
Materials in Zusammenhang stehen. Jeder weitere Schadenersatz<br />
für Neben- oder Folgeschäden wird explizit ausgeschlossen.<br />
Können aufgrund lokaler gesetzlicher Bestimmungen Folgeschäden nicht<br />
wegbedungen werden, können die unter Punkt 2 gelisteten Einschränkungen<br />
möglicherweise nur teilweise angewendet werden.<br />
Durch diese Garantie werden spezifische Rechte verliehen, es können<br />
daraus keine weiteren Forderungen oder Rechte abgeleitet werden.<br />
Diese Garantieleistungen kann nur durch umgehende Benachrichtigung<br />
des Vertriebspartners/Händlers eingefordert werden. Der Benachrichtigung<br />
muss eine Kopie der Originalrechnung sowie ein vollständig ausgefüllter<br />
Beanstandungsbericht mit Bildern beiliegen, die Garantieforderung<br />
kann nur vom Vertriebspartner/Händler autorisiert werden.<br />
13
<strong>IT</strong><br />
Ci congratuliamo con voi per l’acquisto del<br />
rivestimento per pavimenti più innovativo sul<br />
mercato. <strong>BASICO</strong> presenta il primo pavimento a<br />
tavole <strong>BASICO</strong> senza incollanti e galleggiante.<br />
Si prega di leggere attentamente queste<br />
istruzioni di posa prima dell’installazione.<br />
Esse sono state progettato per semplificare la<br />
posa e la manutenzione del nuovo rivestimento<br />
per pavimenti <strong>BASICO</strong> resistente.<br />
1 2<br />
8-10 mm<br />
3 4<br />
14
<strong>IT</strong><br />
Introduzione<br />
Perché <strong>BASICO</strong> è così unico e rivoluzionario?<br />
<strong>BASICO</strong> è IL pavimento da posare da sé.<br />
Nessun adesivo o colla necessari.<br />
Grazie alla flessibilità di <strong>BASICO</strong>, le tavole possono anche essere posate<br />
sopra sottofondi irregolari o su rivestimenti per pavimenti esistenti come<br />
legno, cemento, <strong>BASICO</strong>, linoleum e addirittura su piastrelle in ceramica.<br />
(Attenzione: i giunti devono essere compensati). Vedi sezione della preparazione<br />
del sottofondo.<br />
Risparmiate tempo e denaro!<br />
Le tavole <strong>BASICO</strong> sono adatte per il riscaldamento a pavimento ad acqua<br />
calda, ma non per il riscaldamento a pavimento elettrico AC-DC!<br />
<strong>BASICO</strong> ha l’aspetto del legno e si sembra così anche al tatto. <strong>BASICO</strong><br />
è resistente all’acqua, pertanto può essere posato in zone umide, per le<br />
quali in genere i rivestimenti tradizionali in legno e laminato sono inadatti,<br />
come ad esempio in seminterrati e bagni.<br />
<strong>BASICO</strong> dispone di un rivestimento UV con un’alta resistenza<br />
all’abrasione e durata. Così la superficie del pavimento diventa molto<br />
robusta e resistente.<br />
Ogni tavola <strong>BASICO</strong> viene fissata alle altre tavole con il sistema a click e<br />
non incollata al pavimento sottostante. Posa galleggiante. Per accorciare<br />
una tavola, intagliarla semplicemente e spezzarla.<br />
<strong>BASICO</strong> è silenzioso ed è caldo sotto i piedi.<br />
Seguire le istruzioni di posa nella sezione successiva e godersi già dopo<br />
poche ore il vostro bel pavimento nuovo.<br />
Istruzioni per l‘installazione<br />
1. Strumenti necessari<br />
Taglierino professionale, angolo, matita, martello, battitore, metro a<br />
nastro e distanziale 8-10 mm.<br />
2. Preparazione<br />
Controllare la merce prima della lavorazione alla luce del giorno se sussistano<br />
danni materiale o di trasporto. Se durante la posa dovessero essere<br />
visibili dei difetti, l’elaborazione deve cessare immediatamente affinché la<br />
merce possa essere ispezionata o sostituita se necessario.<br />
Contestazioni successive di difetti visibili e tattili non verranno più<br />
accettate! Non sussiste il corrispondente obbligo di garanzia del<br />
produttore.<br />
Differenze nella struttura e nel colore sono possibili a seconda del materiale.<br />
L’uniformità di colore può essere garantita solo con consegne della<br />
stessa serie di produzione (partita).<br />
15
<strong>IT</strong><br />
Per ottenere un‘immagine più uniforme possibile del pavimento, si consiglia<br />
di posare i pannelli mischiati da diversi pacchetti. In ogni scatola<br />
<strong>BASICO</strong>, il numero della serie di produzione è stampato alle estremità<br />
della scatola. Esempio di un numero di serie: 30.07.2015. Se avete più di<br />
un numero di serie, si consiglia di posare le tavole di 4 o 5 scatole diverse<br />
con numeri di serie diversi, e mischiarli arbitrariamente nella posa.<br />
Questo garantisce un aspetto più naturale del pavimento.<br />
3. Quantità dei pannelli necessari per il progetto<br />
Misurare la lunghezza e la larghezza del locale. Se il locale dispone di<br />
bow-window o sporgenze, misurarli separatamente. In questo modo si<br />
ottiene la metratura quadrata del locale. Acquistarne almeno il 10% in<br />
più del necessario, per coprire errori di taglio, un bisogno futuro o per<br />
avere delle tavole di riserva. Nella maggior parte delle pose è necessaria<br />
una sovrabbondanza del 10%. Tuttavia, questo può variare a seconda<br />
della disposizione e delle dimensioni del locale.<br />
4. Stato di <strong>BASICO</strong> prima della posa<br />
<strong>BASICO</strong> <strong>DE</strong>VE essere depositato almeno 48 ore prima della posa in<br />
pacchi orizzontalmente nel locale nel quale deve essere posato. Assicurarsi<br />
che la temperatura ambientale sia tra i 18 e i 24° C (il più vicino<br />
possibile alla temperatura di utilizzo successiva), ma non conservateli<br />
mai direttamente accanto ai radiatori. Non rimuovere le tavole dal cartone<br />
durante questo periodo di acclimatazione. Mantenere questa temperatura<br />
anche durante la posa.<br />
INDICAZIONE 1: Durante la posa di <strong>BASICO</strong> fare attenzione che i punti<br />
di contatto siano liberi da polvere, sporcizia e corpi estranei. Più pulito è<br />
il collegamento a clic, migliore sarà la connessione tra le tavole. Le tavole<br />
<strong>BASICO</strong> si conservano al meglio nella scatola fino a poco prima della<br />
posa.<br />
INDICAZIONE 2: Prego fare attenzione che delle temperature continue<br />
a lungo termine di > 35°C, per es. in connessione con un irraggiamento<br />
solare diretto, e temperature < 10°C possono danneggiare il pavimento.<br />
5. Preparazione del sottofondo<br />
La superficie del sottofondo deve essere liscia, piana, asciutta, solida,<br />
pulita e dura. Fermi per tappeti o residui di colla devono essere rimossi<br />
al fine di garantire una corretta posa. Per la posa delle tavole <strong>BASICO</strong><br />
valgono le norme nazionali e le linee guida pertinenti, i riferimenti tecnici<br />
e le regole riconosciute del settore.<br />
In Germania bisogna rispettare le seguenti direttive:<br />
- VOB parte C, DIN 18365 lavori di rivestimento per pavimenti<br />
- Standard minimi di pavimenti DIN 18560<br />
- Foglio di istruzioni BEB: «Valutazione e preparazione di basi,<br />
Posa di rivestimenti elastici e tessili»<br />
- DIN 18202 «Tolleranze nelle costruzioni edilizie»<br />
- Foglio di istruzioni per impianti idraulici - riscaldamento - aria<br />
condizionata: «Coordinazione di interfaccia con le costruzioni del<br />
pavimento riscaldate».<br />
Non posare le tavole <strong>BASICO</strong> MAI in modo galleggiante ad un sottofondo<br />
posato galleggiante! Questo non è considerato fisso e deve essere avvitato,<br />
incollato o rimosso!<br />
16
<strong>IT</strong><br />
INDICAZIONE: Il pavimentista deve esternare eventuali pensieri prima<br />
della posa del rivestimento per pavimenti. In particolare in:<br />
- grandi dislivelli,<br />
- screpolature nel sottosuolo,<br />
- sottosuolo non abbastanza asciutto,<br />
- superficie del sottosuolo non sufficientemente rigida, troppo porosa<br />
e troppo ruvida Superficie del sottosuolo,<br />
- superficie del sottosuolo contaminata per es. da olio,<br />
cera, vernici, resti di colore,<br />
- altitudine non corretta della superficie del sottosuolo, in<br />
rapporto all‘altitudine di parti conseguenti,<br />
- temperatura inadeguata del sottosuolo,<br />
- clima interno non idoneo,<br />
- mancanza di verbale di collaudo nelle<br />
costruzioni del pavimento riscaldate,<br />
- mancanza di sporgenza del nastro isolante per bordi,<br />
- mancanza di marcatura di punti di misura nelle<br />
costruzioni del pavimento riscaldate,<br />
- mancanza di piano dei giunti.<br />
(fonte: Commento al DIN 18365 lavori di rivestimento per pavimenti.)<br />
Il sottofondo deve essere piatto, con una tolleranza di 3 mm su una lunghezza<br />
di 1,2 m. Tutti i dislivelli superiori a 3 mm, devono essere levigati o<br />
riempiti con una massa di compensazione per pavimenti. Degli incavi o<br />
gobbe nel sottofondo prevengono il corretto innesto delle tavole <strong>BASICO</strong>.<br />
Se si desidera o è necessario uno strato di materiale fonoassorbente, devono<br />
essere utilizzati tappeti che abbiano una resistenza alla compressione<br />
di almeno 400 kPa/m2, non siano più spessi di 1,5 mm, né adesivi.<br />
Altri strati di materiale fonoassorbente non sono consentiti!<br />
I sottofondi devono essere esaminati con attenzione se riscontrino dei<br />
problemi di umidità. <strong>BASICO</strong> è impermeabile. Ma NON sigilla contro<br />
l‘acqua. Tutti i problemi di umidità devono essere rimossi prima della<br />
posa. I pavimenti in calcestruzzo freschi devono indicare un valore di<br />
CM di < 1,5%.<br />
ATT<strong>EN</strong>ZIONE:<br />
1 Non posare mai <strong>BASICO</strong> su un sottofondo morbido, per es.<br />
su moquette, sughero o qualsiasi tipo di sostrato di gomma piuma.<br />
2 Il prodotto non è idoneo per l’utilizzo all‘aperto, in giardini d’inverno<br />
o solari, saune o non locali non riscaldati. Neanche in ambienti umidi<br />
dove sussiste il rischio di inondazioni.<br />
3 Sconsigliamo anche fortemente la posa in locali o case con grandi<br />
differenze di temperatura (> ± 10°C)! (per es. case di vacanza non<br />
riscaldate, casette da giardino, ecc.).<br />
4 Nella posa su massetti in cemento si deve osservare, che questi<br />
possono essere 10° C più freddi rispetto alla temperatura ambiente<br />
del locale.<br />
5 La luce diretta del sole dovrebbe essere evitata assolutamente, poiché<br />
questa può sbiadire il pavimento e danneggiarlo.<br />
6 Carichi statici installati permanentemente (per es. elementi pesanti)<br />
devono essere dissociati dal resto della superficie.<br />
INDICAZIONE 3: Notare le seguenti informazioni importanti in caso di<br />
posa galleggiante delle tavole <strong>BASICO</strong> su uno dei materiali di pavimento<br />
di seguito elencati:<br />
Pannelli in legno, parquet, OSB, legno compensato, MDF, HDF<br />
legno e <strong>BASICO</strong> hanno un comportamento di allungamento contrario. I<br />
pannelli posati galleggianti devono essere fissati. Per il disaccoppiamento<br />
17
<strong>IT</strong><br />
è necessaria una pellicola di polietilene o un sottofondo adatto di 0,2<br />
mm! Con le tavole di legno è migliore la posa trasversalmente alla direzione<br />
longitudinale delle tavole.<br />
Anidride di massetto fluido<br />
Controllare la temperatura del pavimento! Umidità residua < 1,5%! Rimuovere<br />
lo strato inferiore. È consigliata una pellicola di polietilene o un<br />
sottofondo adatto.<br />
Massetto cementizio<br />
Controllare la temperatura del pavimento! Umidità residua < 1,5%! Levigare<br />
il pavimento. Resinificare i giunti di contrazione ad accoppiamento<br />
di forza e riprodurre nel pavimento <strong>BASICO</strong>. È consigliata una pellicola di<br />
polietilene o un sottofondo adatto.<br />
Pannelli di massetto a secco<br />
Incollare o avvitare fortemente nel sottosuolo. Passare il fondo sulla<br />
superficie secondo la raccomandazione del produttore e dotare tutta la<br />
superficie con una massa di stucco per piastrelle. Si consiglia una pellicola<br />
di polietilene o un sottofondo adatto.<br />
<strong>BASICO</strong>, Linoleum<br />
Sono necessari una pellicola di polietilene o un sottofondo adatto di 0,2<br />
mm!<br />
Piastrelle<br />
Se si posa <strong>BASICO</strong> su piastrelle che hanno una timbratura o giunti di<br />
larghezza superiori a 3 mm, è necessario riempirli con una massa di<br />
compensazione per pavimenti. Si consiglia una pellicola di polietilene o<br />
un sottofondo adatto.<br />
Sughero<br />
Passare il fondo e dotare tutta la superficie con una massa di stucco<br />
per piastrelle. Sono necessari una pellicola di polietilene o un sottofondo<br />
adatto!<br />
Laminato<br />
Incollare o avvitare fortemente nel sottosuolo. Sono necessari una pellicola<br />
di polietilene o un sottofondo adatto!<br />
Moquette<br />
La posa sulla moquette è proibita – deve essere rimossa e le tracce di<br />
colla devono essere completamente eliminate!<br />
6. Posare <strong>BASICO</strong><br />
INDICAZIONE 4: Prima di posare il pavimento, controllare la parete dove<br />
si inizia e assicurarsi che sia posta ad angolo retto rispetto alla parete<br />
opposta. Misurate semplicemente il locale dalle estremità di una parete<br />
a quella opposta. Se le masse si differenziano, si possono apporre delle<br />
modifiche alla prima fila <strong>BASICO</strong>. Porre per primo una serie di tavole<br />
sciolte, senza fissarle l’una all’altra, per determinare se sia necessario<br />
regolare la lunghezza delle prime tavole, per evitare un breve pezzo di<br />
meno di 30 cm dalla parete posta di fronte al punto iniziale o misurare la<br />
lunghezza del locale e dividerla per la lunghezza di una tavola. Se la parte<br />
restante è inferiore a 30 cm, calcolare la metà della sezione rimanente<br />
e tagliare la prima tavola a questa lunghezza.<br />
Per tagliare una tavola, misurare e marcare la tavola. Poi prendere il livello<br />
e il taglierino, intagliare le tavole e spezzarle.<br />
18
<strong>IT</strong><br />
1 Con la posa si dovrebbe iniziare n un angolo (a sinistra) e dalla parete<br />
mentre che scanalatura è in direzione opposta alla parete. (fig. 1)<br />
Mettere i cunei distanziatori su pareti, telai di porte, armadi a muro<br />
fissi, combinazioni di cucina, ecc. per ottenere un giunto di dilatazione<br />
di almeno 8-10 mm per il movimento del sottofondo o l’estensione del<br />
prodotto. Questi possono essere poi coperti con un battiscopa sagomato.<br />
2 Se avete appena posato la prima fila in linea retta, collegate le estremità<br />
corte inserendo il maschio in un angolo di circa 15-20 gradi diagonalmente<br />
in alto nella scanalatura. Posare ogni tavola seguente al<br />
lato corto e assicurarsi che la linea sia diritta. Questo è importante per<br />
una buona posa degli altri strati.<br />
3 Assicurarsi che i collegamenti siano fissati fortemente. Sentire le<br />
scanalature e ascoltare il clic alla connessione delle tavole, quanto<br />
vi è una connessione fissa. Tra le tavole non possono esservi delle<br />
zone intermedie. Se tuttavia ciò dovesse verificarsi, è necessario<br />
battere con un battitore. Se la connessione è solo apparentemente<br />
bloccata, è possibile separare immediatamente le tavole e connetterle<br />
di nuovo. Fare attenzione a non separare le tavole troppo velocemente<br />
- il collegamento si può strapparle o danneggiarle.<br />
4 Nella posa di <strong>BASICO</strong> consigliamo una gradazione delle file, così che<br />
le connessioni all’estremità breve non siano in linea retta e uniforme.<br />
Si consiglia il metodo casuale sfalsato di 3 - 2 -1 (fig. 2). Naturalmente<br />
si possono anche provare altri «modelli di tavole», che soddisfano tutti<br />
i gusti. Le possibilità di posa per <strong>BASICO</strong> sono illimitate — realizzate<br />
le vostre idee.<br />
5 Per cominciare con la seconda fila di tavole, tagliare la tavola a circa<br />
due terzi della lunghezza. Misurare e marcare la tavola. Poi prendere<br />
l’angolo e il taglierino, intagliate le tavole e spezzatele semplicemente.<br />
6 Collegare fortemente la tavola con la prima fila (lato lungo), ad un<br />
angolo di 15-20 gradi. Alla prossima tavola, collegate prima il lato corto<br />
e tenete via un pezzo dal lato lungo e poi inseritelo nel lato lungo.<br />
INDICAZIONE 5: Nel tagliare in lunghezza le tavole <strong>BASICO</strong>, assicurarsi<br />
sempre di tagliare il lato corto della tavola con la scanalatura. Il pezzo<br />
restante può poi essere utilizzato sul lato opposto della stanza alla fine di<br />
questa fila (fig. 3) se la disposizione lo consente.<br />
7 Cominciare la terza fila con una tavola di circa un terzo della lunghezza<br />
che è stata abbreviata. Anche qui il pezzo restante può essere<br />
usato all‘estremità opposta della fila quando lo consente il taglio del<br />
locale.<br />
8 Continuate questa procedura per le file ancora da posare. Posizionare<br />
l‘estremità tagliata della prima tavola sempre alla parete (fig. 4), a<br />
condizione che questo pezzo sia di almeno 30 cm.<br />
9 L’adattamento ad oggetti irregolari non è un problema. Tagliare semplicemente<br />
un modello di carta pesante per effettuare un adattamento<br />
a tubi o a oggetti irregolari. Posizionare il modello sulle tavole e<br />
pitturarlo. Tagliare con un taglierino o delle forbici forti lungo le linee,<br />
quindi posare la tavola. Assicurarsi di installare un giunto di espansione<br />
di almeno 8-10 mm per apporre tutti gli oggetti fissi, gli sfiati e i<br />
telai delle porte.<br />
19
<strong>IT</strong><br />
10 I giunti di contrazione del sottofondo deve essere assunti 1:1.<br />
11 Non posare interi appartamenti in modo capillare ma separare i locali<br />
con un giunto di dilatazione tra i telai delle porte sotto la porta.<br />
12 Le lunghezze e le larghezze delle tavole di più di 10 m devono necessariamente<br />
essere interrotti da giunti di dilatazione supplementari.<br />
In caso di frequenti oscillazioni di temperatura di più di ± 10° C, questa<br />
misura diminuisce di 5-6 m.<br />
INDICAZIONE 6: Fare attenzione ad avere delle tavole <strong>BASICO</strong> di riserva,<br />
in caso si debba intraprendere una sostituzione imprevedibile.<br />
Le tavole <strong>BASICO</strong> con collegamento a clic possono essere ampliate e<br />
sostituite con delle nuove. Se deve essere sostituita una tavola <strong>BASICO</strong>,<br />
prendere un taglierino e semplicemente tagliare lungo il lato lungo della<br />
tavola danneggiata ed estrarla. Poi prendere una tavola supplementare e<br />
tagliare solo sul lato longitudinale della tavola di ricambio l’incastro maschio<br />
e femmina. Lasciare l’incastro maschio e femmina sul lato corto del<br />
pannello. Quindi regolare semplicemente e agganciare le due estremità<br />
corte. In caso di problemi o domande, mettersi in contatto con il proprio<br />
partner di distribuzione.<br />
INDICAZIONE IMPORTANTE: Temperatura ambiente durante la posa di<br />
<strong>BASICO</strong>. Si prega di assicurarsi che il termostato sia impostato durate la<br />
posa di <strong>BASICO</strong> a più di 18 e meno di 24° C. La temperatura ambiente è<br />
importante!<br />
7. Dopo la posa<br />
Giunti di contrazione<br />
Rimuovere i cunei distanziatori posti e cominciare il montaggio dei battiscopa<br />
o dei pannelli piani cavi.<br />
ATT<strong>EN</strong>ZIONE: I battiscopa o le soglie bombate non possono assolutamente<br />
essere fissate alle tavole <strong>BASICO</strong>! Non riempire i giunti di<br />
dilatazione o se non è altrimenti possibile, farlo solo con un composto<br />
congiunto morbido ed elastico. Evitare composti per riempire i giunti su<br />
base acrilica. Questi diventano duri e incollano le tavole – così i giunti<br />
di contrazione diventano inefficaci. I sigillanti acrilici sono, in contrapposizione<br />
con il silicone, solo plasto-elastici. La loro elasticità è molto<br />
inferiore rispetto ai materiali contenenti silicone. In caso di sovraccarico,<br />
con l’acrilico insorge una deformazione permanente, mentre i materiali<br />
contenenti silicone riacquistano la loro forma originale.<br />
Oggetti /mobili pesanti<br />
Oggetti pesanti, mobili, ripiani, combinazioni di cucina sul pavimento<br />
possono bloccarlo al livellamento in caso di forti cambiamenti di temperatura.<br />
Questo può portare a ondulazioni delle tavole, incavi o all’apertura<br />
delle connessioni a clic, soprattutto in caso di sottofondo ruvido. Assicurarsi<br />
che i pannelli si possano muovere, che «nuotino». I mobili non<br />
movibili o fissi come armadi, banchi e combinazioni di cucina devono<br />
essere installati sempre sul sottofondo e non sulle tavole <strong>BASICO</strong>. Posizionare<br />
le tavole con un giunto di contrazione a questi mobili, ma mai al<br />
di sotto.<br />
Stuoie del pavimento<br />
Le stuoie per la protezione del pavimento per chiusure di sporcizia, rotelle<br />
di sedie da ufficio, ecc. sono esclusivamente stuoie fatte di vinile<br />
(PVC) o di cotone. Le stuoie in polipropilene, policarbonato, gomma (stuoie<br />
di gomma) o rivestite di plastica o gomma non sono adatte e possono<br />
20
<strong>IT</strong><br />
suscitare una reazione chimica, uno scolorimento e il distacco dello strato<br />
di usura.<br />
Manutenzione<br />
Congratulazioni! Avete appena postato <strong>BASICO</strong>. Il vostro nuovo pavimento<br />
resistente è stato prodotto con i più alti standard di qualità e vi renderà<br />
gioia per tutta la vita. Nonostante con <strong>BASICO</strong> si tratti di un pavimento<br />
particolarmente robusto, ha bisogno di manutenzione regolare. Prego<br />
seguire le raccomandazioni in questo manuale, in modo che il nuovo<br />
aspetto venga mantenuto e venga protetto il sigillo di fabbrica.<br />
Trattamenti preventivi:<br />
1 Utilizzare davanti a porte che conducono all’esterno, a stuoie di protezione,<br />
che NON sono di GOMMA. In questo modo eviterete che la<br />
sabbia e la sporcizia arrivino sul vostro pavimento. La sabbia granulata<br />
è il peggior nemico di tutti i rivestimenti per pavimenti.<br />
2 Porre alle gambe di tutti i mobili dei sottopiedi (preferibilmente in<br />
feltro) come vengono utilizzati su un pavimento resistente all‘usura.<br />
Con i sottopiedi, le sedie si possono muovere facilmente senza urti o<br />
graffi sul pavimento. Pulire i sottopiedi regolarmente per rimuovere lo<br />
sporco che può essersi accumulato sotto le gambe dei mobili. In caso<br />
di sedie girevoli da ufficio o altri mobili con rotelle, utilizzare rotelle<br />
doppie orientabili larghe e non coloranti secondo DIN <strong>EN</strong> 12529. In<br />
zone fortemente sollecitate (scrivanie, ecc.), devono essere apposti<br />
dei tappetini di protezione. Non utilizzare rotelle di gomma.<br />
3 Perché il vostro pavimento abbia un bell’aspetto, spolveratelo almeno<br />
due volte alla settimana con un mop o passatevi l’aspirapolvere. Non<br />
utilizzare nessuna microfibra! Questa potrebbe danneggiare lo strato<br />
di protezione. Non utilizzare nessun prodotto per la rimozione della<br />
polvere, poiché possono rendere il pavimento scivoloso o danneggiare<br />
la superficie. Spazzare il pavimento semplicemente per quanto sia<br />
necessario.<br />
4 Gli animali domestici a cui non vengono accorciate le unghie, possono<br />
danneggiare il pavimento <strong>BASICO</strong> e possono causare dei gravi graffi<br />
sulla superficie. Lo stesso vale per le scarpe con i tacchi sottili, che<br />
non hanno dei supporti, ma anche per tutti i mobili o gli oggetti appuntiti<br />
o taglienti.<br />
5 Proteggere il pavimento da una prolungata esposizione alla luce solare.<br />
Utilizzare durante il periodo dell’irraggiamento solare delle tende<br />
o persiane, per evitare il contatto diretto del sole con il pavimento<br />
<strong>BASICO</strong>. La maggior parte dei rivestimenti per pavimenti sono sensibili<br />
alla luce del sole costante e forte. Per evitare un aspetto irregolare,<br />
posare delle eventuali passatoie di volta in volta in un luogo diverso.<br />
Deve essere considerato l’utilizzo di una climatizzazione in case vuote.<br />
Temperature ambientali a lungo termine inferiori a 10° C o superiori a<br />
35° C in combinazione con una forte luce solare diretta, danneggiano<br />
il vostro pavimento <strong>BASICO</strong> e possono portare allo sbiadimento dei<br />
decori, incavi, ondulazioni o allentamento delle connessioni.<br />
INDICAZIONE 7: In entrate asfaltate o parcheggi asfaltati davanti a<br />
ingressi, vi è il pericolo che vengano trasferiti dei residui di asfalto sulle<br />
tavole <strong>BASICO</strong>. Questo crea una reazione chimica che porta alla deco-<br />
21
<strong>IT</strong><br />
lorazione delle tavole all’ingresso. Per evitare questo problema, utilizzare<br />
sempre dei tappetini alle entrate. Quando si passa l’aspirapolvere sul<br />
vostro pavimento <strong>BASICO</strong>, deve essere utilizzato un ugello a getto per<br />
pavimenti duri.<br />
Regolare manutenzione:<br />
1 Gli alimenti versati dovrebbero essere rimossi il prima possibile.<br />
2 Utilizzare per la manutenzione e la pulizia solamente un detergente<br />
<strong>BASICO</strong> di alta qualità e un liquido per pavimenti rivestiti di PU. Prestare<br />
attenzione ad un corretto utilizzo indicato sull’etichetta di produzione.<br />
Pulire a mano può essere necessario per rimuovere macchie<br />
o punti difficili. Spazzare o aspirare il pavimento <strong>BASICO</strong> prima della<br />
pulizia, in modo che le particelle e lo sporco sciolto vengano rimossi.<br />
3 Sconsigliamo detergenti multiuso, poiché questi spesso contengono<br />
polveri abrasive o saponi oleosi.<br />
4 Non utilizzare mai panni in microfibra. Questi potrebbero danneggiare<br />
lo strato di protezione.<br />
5 Le impronte di scarpe e tracce di impatto possono essere facilmente<br />
rimosse. Se i graffi non sono troppo profondi, è sufficiente pulire le<br />
zone colpite, lavarle e asciugarle e trattarle con un detergente e sigillante<br />
per superfici compensate con poliuretano. Quindi la superficie<br />
splenderà di nuovo come nuova.<br />
6 Se i graffi sono più profondi, il pavimento dovrebbe essere facilmente<br />
levigato con un Scotch Brite verde o con una carta vetrata fine (ad es.<br />
1729 sialac di SIA Abrasive), pulito con acqua fredda e infine sigillato<br />
con un sigillante PU (disponibile presso rivenditori di pavimenti o via<br />
Internet). Dopo non utilizzare le parti trattate per 24 ore, e in seguito<br />
il pavimento sarà come nuovo. Funziona sempre, a meno che i graffi<br />
siano così profondi, che hanno intaccato la decorazione.<br />
7 Se i graffi sono così profondi che la decorazione è danneggiata, può<br />
essere necessario sostituire le tavole danneggiate. Nella sezione 6 si<br />
trova una guida per la sostituzione delle tavole <strong>BASICO</strong>.<br />
8 NON INCERATE O LUBRIFICATE IL VOSTRO PAVIM<strong>EN</strong>TO <strong>BASICO</strong>!<br />
La superficie del pavimento <strong>BASICO</strong> è molto impermeabile e non<br />
porosa. Questo impedisce un’infiltrazione di cera o olio, creando un<br />
terreno fertile per l’ingiallimento e l‘accumulo di sporco Questa superficie<br />
densa è responsabile per la protezione contro usura, sporco e<br />
macchie. Utilizzare per la manutenzione, in caso di forte usura, solamente<br />
un sigillante in vinile di alta qualità.<br />
9 Se il vostro pavimento ha subito quantità eccessive di acqua a causa<br />
di un’inondazione, non avere paura - le tavole <strong>BASICO</strong> sono impermeabili!<br />
Rimuovere l‘acqua più velocemente possibile con un Wet-Vac<br />
o con un dispositivo di essiccazione e ventilare la stanza. Un deumidificatore<br />
deve essere acceso immediatamente nella camera, per ridurre<br />
il livello di umidità ad un valore normale.<br />
10 Mettersi in contatto con il proprio partner di distribuzione se il problema<br />
sussiste.<br />
22
<strong>IT</strong><br />
Manutenzione in caso di utilizzo commerciale<br />
Se le tavole vengono impiegate in locali commerciali o industriali, è essenziale<br />
uno speciale trattamento di superficie dopo la posa o una manutenzione<br />
costante. Per applicazioni in:<br />
- Ufficio e amministrazione<br />
- Studi medici e ospedali<br />
- Case di cura<br />
- Scuole e asili<br />
- Centri commerciali, e negozi<br />
- Hotel e settore gastronomico<br />
- Parrucchieri<br />
- Impianti sportivi<br />
Si dovrebbe prima prendere contatto con il partner di distribuzione o il<br />
produttore.<br />
Pronto soccorso per il proprio pavimento <strong>BASICO</strong><br />
1 Rimuovere gomma, colla, pastelli, cera di candele e sostanze simili,<br />
ponendovi del ghiaccio, fino a quando il materiale diventi fragile e si<br />
squami. I residui possono essere rimossi con acqua ragia o detergente<br />
in vinile.<br />
2 Tracce di tacco particolarmente profonde, tracce di rotelle, ecc.:<br />
strofinare con un Scotch Brite verde, che è stato inumidito con un<br />
sigillante per superfici compensate con PU.<br />
3 Per macchie medio-gravi, causate da acqua o liquidi non coloranti:<br />
strofinare con sigillante per superfici compensate in PU.<br />
3 Pulire macchie scure dovute a inchiostro o ad altre sostanze chimiche,<br />
come descritto al punto 2. Se ciò non avesse successo, la tavola<br />
colpita deve essere sostituita come nell’indicazione 6 nella sezione<br />
«Posare <strong>BASICO</strong>».<br />
5 In caso di fori dovuti a fuoco, seguire il promettente procedimento 2<br />
sopra. Se tuttavia questi sono molto profondi, la tavola colpita deve<br />
essere sostituita come nell’indicazione 6 nella sezione.<br />
6 Il pavimento continua ad odorare anche dopo una settimana!<br />
Nessuna paura, il pavimento non contiene sostanze nocive. L‘odore<br />
svanirà con una ventilazione normale. Purtroppo oggi non è possibile<br />
produrre né PVC, né collanti assolutamente inodori. Secondo DIN <strong>EN</strong><br />
linee guida 16000 gli odori svaniranno dopo 28 giorni, nella misura in<br />
cui essi non saranno più fastidiosi - altrimenti si prega di contattare il<br />
vostro distributore.<br />
INDICAZIONE 8: Le vostre tavole <strong>BASICO</strong> sono riciclabili al 100% e possono<br />
essere smaltite presso un centro di riciclaggio. (Numero di codice<br />
rifiuto EU & CH: 17 02 03)! Le tavole possono anche essere smaltite nei<br />
rifiuti domestici.<br />
In caso di domande sul pavimento <strong>BASICO</strong> prego mettersi in contatto<br />
con il partner di distribuzione.<br />
23
<strong>IT</strong><br />
Importanti Indicazioni!<br />
1 Conservare la ricevuta.<br />
2 Annotarsi il tipo e il numero di serie delle tavole <strong>BASICO</strong>. Questi sono<br />
indicati sul lato esterno della scatola accanto al codice a barre.<br />
<strong>BASICO</strong> TIPO:<br />
Numeri di serie:<br />
24
<strong>IT</strong><br />
Garanzie<br />
La collezione <strong>BASICO</strong> 0,3/0,5 offre una GARANZIA COMMERCIALE<br />
DI 5 ANNI.<br />
PER L’IMPIEGO NELLE AB<strong>IT</strong>AZIONI PRIVATE VALE LA<br />
GARANZIA <strong>DE</strong>L PRODUTTORE PER 25 ANNI.<br />
1. Campo di applicazione<br />
Supponendo che il pavimento sia stato mantenuto secondo le istruzioni<br />
riportate nel manuale dell’utente e usato nel contesto della classe di<br />
utilizzo e installato secondo le istruzioni di posa, la garanzia copre esclusivamente<br />
le seguenti aree:<br />
A Difetti di produzione<br />
B Delaminazione<br />
C Decolorazioni e sbiadimenti forti e insoliti, a condizione che le tavo<br />
le non siano state esposte alla luce solare.<br />
2. Sono esclusi dalla garanzia:<br />
A Normale usura, danni causati intenzionalmente o volontariamente:<br />
Danni causati da errata installazione o manutenzione, decomposizione<br />
chimica a cura di detergenti inadatti, sottopavimenti alcalini o<br />
danni derivanti dalla pressione idrostatica, ustioni, crepe, urti, macchie<br />
o perdita di brillantezza a causa di invecchiamento normale o<br />
di influenze esterne.<br />
B Lavoro o costi di manodopera per la rimozione del difetto e posa<br />
del pavimento di ricambio.<br />
C Danni conseguenti<br />
Restrizioni d‘uso, tempo di noleggio in ritardo, ecc., che sono in<br />
connessione con la rimozione o la nuova posa del materiale interessato.<br />
Qualsiasi ulteriore risarcimento danni per danni incidentali<br />
o consequenziali è escluso in modo esplicito.<br />
Non possono essere esclusi danni conseguenti a causa di disposizioni<br />
giuridiche locali, le limitazioni espresse al punto 2 possono eventualmente<br />
essere applicate solo in parte.<br />
Con la presente garanzia vengono conferiti diritti specifici, ma da essi<br />
non può derivare nessuna ulteriore richiesta o diritto.<br />
Queste garanzie possono essere richieste solo da una notifica immediata<br />
del distributore/rivenditore. Una notifica deve allegare una copia della<br />
fattura originale, nonché una relazione di reclamo debitamente compilata<br />
e corredata da immagini, la richiesta di garanzia può essere autorizzata<br />
solo dal partner di distribuzione/riv<br />
25
<strong>EN</strong><br />
Congratulations on purchasing the most<br />
innovative flooring product on the market.<br />
<strong>BASICO</strong> introduces the first glueless free-floating<br />
vinyl plank flooring.<br />
Please read this manual completely<br />
prior to installation.<br />
It has been designed to enhance your<br />
experience of installing & maintaining the<br />
new resilient flooring, <strong>BASICO</strong>.<br />
1 2<br />
8-10 mm<br />
3 4<br />
26
<strong>EN</strong><br />
Introduction<br />
Why is <strong>BASICO</strong> so unique and revolutionary?<br />
<strong>BASICO</strong> is THE flooring for self installation.<br />
No need for adhesives or glue.<br />
Thanks to the flexibility of the <strong>BASICO</strong> the planks can be installed on<br />
uneven subfloors or existing flooring such as wood, concrete, vinyl,<br />
linoleum and even on ceramic tiles. (Caution: Joints must be levelled.)<br />
See section on preparing the subfloor.<br />
You save time and money!<br />
The <strong>BASICO</strong> planks are suitable for warm water floor heating, but not for<br />
AC /DC electric floor heating!<br />
<strong>BASICO</strong> looks and feels like wood. <strong>BASICO</strong> is WATERRESIST<strong>EN</strong>T, therefore<br />
it can be installed on moist areas that are normally not suitable for<br />
traditional wood and laminate flooring, e.g. basements and bathrooms.<br />
<strong>BASICO</strong> has a UV coating for additional wear resistance and durability.<br />
This makes the flooring surface very robust and resistant.<br />
Each <strong>BASICO</strong> plank is fastened with to another plank using the Click<br />
system and is not glued to the subfloor. Floating installation. To shorten a<br />
plank simply scratch and break off.<br />
<strong>BASICO</strong> is low-noise and feels warm under the feet.<br />
Follow the installation instructions in the next section and enjoy your<br />
beautiful new floor only a few hours later.<br />
Installation instructions<br />
1. Required tools<br />
Professional cutter knife, bracket, pencil, hammer, tapping block,<br />
measuring tape and a 8-10 mm spacer.<br />
2. Preparation<br />
Check the products in daylight for material or transport damages prior to<br />
installation. If you notice defects during installation, stop further installation<br />
immediately so that the products can be examined or replaced if<br />
necessary.<br />
Later complaints for visible and haptic defects will not be acknowledged!<br />
The corresponding warranty liability of the manufacturer shall<br />
not be applicable.<br />
There may be differences in structure and colour due to the material.<br />
Colour consistency can be ensured only if the deliveries are made from<br />
the same production run (Charge).<br />
To achieve a consistent look of the floor it is advisable to mix the panels<br />
27
<strong>EN</strong><br />
from different packages during installation. The number of the production<br />
run is printing on each <strong>BASICO</strong> carton at the end of the carton. Example<br />
of production run number: 30.07.2015. If you have more than one<br />
production run number, we recommend that you lay planks from 4 or 5<br />
different cartons with different production run numbers and arbitrarily<br />
mix them during installation. This will ensure a more natural appearance<br />
for the floor.<br />
3. Number of the required planks for your project<br />
Measure the length and width of the room. If the room features bay or<br />
projections, measure these separately. This will give you the number of<br />
square meters of the room. Buy at least 10% more than needed to cover<br />
average error, waste, future needs or replacement parts. With most<br />
installations an excessive amount of 10% is required. However, this can<br />
vary depending on room size and arrangement.<br />
4. Condition of the <strong>BASICO</strong> prior to installation<br />
The <strong>BASICO</strong> MUST be stored horizontally in the packaging in the room<br />
where it is to be laid at least 48 hours prior to installation. Make sure the<br />
room temperature is between 18 and 24° C (as close to the future use<br />
temperature as possible), but never store them directly next to radiators.<br />
Do not remove the planks from the cartons during acclimatization period.<br />
Maintain this temperature during the installation as well.<br />
NOTE 1: During installation of the <strong>BASICO</strong> make sure that the joints are<br />
free from dust, dirt and foreign matter. The cleaner the Click system, the<br />
better is the coupling between the planks. It would be best to store the<br />
<strong>BASICO</strong> planks in the carton until just before installation.<br />
NOTE 2: Please note that long-term continuous temperatures of > 35 ° C<br />
e.g. in conjunction with direct sunlight, and temperatures of
<strong>EN</strong><br />
- subfloor which is not sufficiently solid, is too porous and too rough,<br />
- surface of the subfloor is contaminated, e.g. because of oil, wax,<br />
varnish, paint residues,<br />
- incorrect height of the surface of the subfloor in relation to the<br />
altitude of the adjacent building components,<br />
- unsuitable subfloor temperature,<br />
- unsuitable indoor climate,<br />
- absence of heating protocol for heated floor constructions,<br />
- absence of edge insulation projection/overhang,<br />
- absence of measuring point markings for heated floor constructions,<br />
- absence of joint plan.<br />
(Source: Comment on <strong>EN</strong> 18365 flooring works.)<br />
The subfloor must be flat, with a tolerance of 3 mm over a span of 1,2<br />
m. Any unevenness exceeding 3 mm must be ground off or filled with<br />
self-levelling floor compound. Cavities or bumps in the subfloor prevent<br />
proper coupling of the <strong>BASICO</strong> flooring. If a impact sound insulation is<br />
desirable or necessary, we can only approve underlay mats with a compressive<br />
strength of minimal 400 kPa/m 2 and a thickness of maximum<br />
1,5 mm without a sticky surface.<br />
We cannot approve any other impact sound insulation or underlay mat!<br />
The subfloors must be carefully examined for moisture problems. BASI-<br />
CO is water resistant. But it does NOT seal against water. All moisture<br />
problems need to be removed prior to installation. Fresh concrete floors<br />
must have a CM value of ± 10°C)! (e.g. unheated weekend<br />
homes, garden houses, etc.).<br />
4 When installing on concrete subflooring make sure that it can be<br />
more than 10°C colder than room temperature.<br />
5 Direct sunlight is strictly to be avoided, as this can fade and damage<br />
the flooring.<br />
6 Permanently installed static loads (e.g. heavy elements) are to be<br />
decoupled from the rest-surfaces.<br />
NOTE 3: Note the following important information for floating installation<br />
of the <strong>BASICO</strong> planks on any of the flooring materials listed below:<br />
Wood, parquet, OSB, plywood, MDF, HDF planks<br />
Wood and vinyl feature counter-rotating stretch behaviour. Floating installed<br />
plates must be fixed. You need 0,2 mm thick polyethylene film or<br />
a appropriate underlay mat for de-coupling! In case of wood flooring<br />
the installation should be in longitudinal direction of the planks.<br />
Anhydrite floating screed<br />
Check the floor temperature! Residual moisture < 1,5%, Remove the<br />
sinter layer. A polyethylene film or a appropriate underlay mat is recommended.<br />
Cement screed<br />
Check the floor temperature! Residual moisture
<strong>EN</strong><br />
Dry screed plates<br />
Firmly glue or screw in the subfloor. Undercoat the surface as recommended<br />
by the manufacturer and coat the entire surface with a mineral<br />
floating filler. A polyethylene film or a appropriate underlay mat is recommended.<br />
<strong>BASICO</strong>, linoleum<br />
0,2 mm polyethylene film or a appropriate underlay mat is required!<br />
Tiles<br />
Fill the joints with floor levelling compound. If you lay <strong>BASICO</strong> on an<br />
existing floor with an embossing or joints that are wider than 3 mm, you<br />
must fill them with levelling compound. A polyethylene film or a appropriate<br />
underlay mat is recommended.<br />
Cork<br />
Prime the entire surface and with a mineral floating filler. A polyethylene<br />
film or a appropriate underlay mat is required!<br />
Laminate<br />
Firmly laminate or screw in the subfloor. A polyethylene film or a appropriate<br />
underlay mat is required!<br />
Carpets<br />
The laying on carpets is forbidden, these must be removed and glue<br />
traces completely ground!<br />
6. <strong>BASICO</strong> installation<br />
NOTE 4: Prior to flooring installation, check the wall by starting and<br />
making sure that this is at right angle to the opposite wall. Simply measure<br />
the room from opposite ends of the wall to the opposite wall. If the<br />
measurements differ, you can make adjustments to the first <strong>BASICO</strong> row.<br />
First, lay out a row of loose planks without fixing them to one another<br />
in order to determine whether you need to adjust the length of the first<br />
plank to avoid a short distance of less than 30 cm on the wall opposite<br />
the starting point or measure the length of the space and divide them<br />
by length of a plank. If the remaining piece is less than 30 cm, calculate<br />
the half of the rest of the piece and cut the first plank to this length. The<br />
last plank should have the same length as the first. To cut a plank, take<br />
the measure and mark the plank. Then, use the straightedge and utility<br />
knife, split the plank and break it off.<br />
1. During the installation you should start out at a corner (left) and<br />
from the wall, where the grove away from the wall (Fig. 1). Place the<br />
spacer wedges at the walls, door frames, fixed wall cabinets, kitchen<br />
combinations etc., this gives you an expansion joint of at least 8-10<br />
mm for the subfloor movement or for extending the product. These<br />
can then be covered with an elegant footer thereafter.<br />
2. If you have laid the first row in a straight line, couple the short ends by<br />
inserting the spring into the grooves obliquely above at an angle of<br />
about 15-20 degrees. Lay each successive plank at the short end and<br />
make sure that the row is straight. This is important for a laying the<br />
other tracks.<br />
3 Make sure that the coupling grooves are firmly locked. When using<br />
Click grooves, you will feel and hear the click when coupling the<br />
planks if there is a firm coupling. There should be no visible gaps<br />
between the planks. However, if this should be the case you need to<br />
30
<strong>EN</strong><br />
tap using a tapping block. If the coupling only appears to be firm, you<br />
can immediately pull the planks apart again and re-couple. Make sure<br />
not to separate the planks from each other too quickly - this could tear<br />
or damage the Click grooves.<br />
4 When installing <strong>BASICO</strong> we recommend staggering the rows so that<br />
the connections do not lie in a straight, uniform line at the short end.<br />
We recommend a random staggering method of 3-2 -1 (Figure 2.).<br />
You can of course try other «plank patterns» that match your personal<br />
taste. The installation options for <strong>BASICO</strong> are unlimited – you can use<br />
your own ideas.<br />
5 To begin with the second row of planks, cut the plank to about two<br />
thirds of the length. Measure and mark the plank. Then take the bracket<br />
and the utility knife, tear to the plank and simply break it off.<br />
6 Couple the plank firmly with the first row (long side), again at an angle<br />
of 15-20 degrees. For the next plank, first couple the short side and<br />
hold a piece of the long side away and push into the long side.<br />
NOTE 5: When cutting to length of the <strong>BASICO</strong> you must always make<br />
sure to cut off the short side of the plank with the groove. The remaining<br />
piece can then can be used for the opposite side of the room at the end<br />
of this row (fig. 3) when the arrangement permits.<br />
7 Begin the third row of planks with a plank which is shortened to about<br />
one third of the length. Again, the remaining pieces can be used at<br />
the opposite end of the row, when the layout of the room permits.<br />
8 Continue this pattern for the rows still to be laid. Always place the cut<br />
end of the first plank to the wall (Fig. 4), provided this piece is at least<br />
30 cm long.<br />
9 It is easy to lay on irregular objects. Just cut a sample out of a firm<br />
paper to lay on pipes or irregular objects. Place the sample on the<br />
plank and copy it. Separate along the lines using a utility knife or a<br />
sharp pair of scissors, then lay the plank. Make sure an attach an<br />
expansion joint of at least 8-10 mm to all fixed objects, floor vents and<br />
door frames.<br />
10 The shrinkage joints of the subfloor must be absorbed 1:1.<br />
11 Don‘t lay the entire surface of the apartment, rather separate the rooms<br />
with an expansion joint between the door frames under the doors.<br />
12 Planks with track lengths and width of more than 10 m must be absolutely<br />
interrupted by additional expansion joints. In case of frequent temperature<br />
fluctuations of more than ± 5 ° C this size is reduced to 5-6 m.<br />
NOTE 6: Make sure to have some additional supply of <strong>BASICO</strong> flooring<br />
planks, in case an unpredictable replacement must be made. <strong>BASICO</strong><br />
planks with click binding can be removed and replaced with new ones.<br />
If you need to replace a plank of <strong>BASICO</strong> simply take a utility knife and<br />
cut the bad plank out along the long side of the plank only and lift out of<br />
place. Then take a spare plank and cut the tongue and groove off of the<br />
long side of the replacement plank only. Leave the tongue and groove on<br />
the short side of the plank. Then simply fit into place and lock the two<br />
short ends into place.<br />
Please contact your distributor for any problems or questions.<br />
31
<strong>EN</strong><br />
IMPORTANT NOTE: Room temperature for <strong>BASICO</strong> installation. Please<br />
make sure during <strong>BASICO</strong> installation your thermostat is set on more<br />
than 18 and less than 24° C. The room temperature is important!<br />
7. After installation<br />
Shrinkage joints<br />
Remove the set spacing wedges and start with installing the skirting or<br />
hollow flat rails.<br />
CAUTION: skirting or hollow flat rails must not be fixed to the <strong>BASICO</strong><br />
flooring! Do not fill the expansion joints or if not possible then only with<br />
a soft, elastic filler. Avoid joint fillings made of acrylic. These are hard<br />
and stick to the planks making the shrinkage joints ineffective. Acrylic<br />
sealants are only plasto-elastic as opposed to silicone. Their elasticity<br />
is much lower than the silicone-containing materials. When overloaded,<br />
a permanent deformation will occur in acrylic, while silicone-containing<br />
materials regain their original shape.<br />
Heavy objects / furniture<br />
Heavy objects, furniture, counters, kitchen combinations on the floor<br />
can this block them from levelling off in case of rapid, sever temperature<br />
changes. This can lead to corrugation of the planks, cupping or<br />
opening of the click locks, especially in rough subfloors. Make sure that<br />
the planks can move, «float». Immovable, fixed furniture such as wardrobes,<br />
counters, kitchen combinations should always be mounted on the<br />
subfloor and not on the <strong>BASICO</strong> flooring. Place the planks against these<br />
furniture with a shrinkage joint – never under them.<br />
Floor mats<br />
Use exclusively mats made of vinyl (PVC) or cotton for floor protection<br />
e.g. dirt traps, office chair casters, etc. Polypropylene, polycarbonate,<br />
rubber (rubber mats) or plastic, respectively. Rubber-coated mats are<br />
inappropriate and can result in a chemical reaction, discoloration and<br />
use-surface detachment.<br />
Maintenance<br />
Congratulations! You have just installed <strong>BASICO</strong>. Your new, more resistant<br />
floor is manufactured to the highest quality standards and provide you<br />
with a lifetime of pleasure. Although <strong>BASICO</strong> is a very robust floor, it<br />
needs regular maintenance. Please follow the recommendations in this<br />
manual to retain the fresh look and to protect the factory seal.<br />
Preventive Care:<br />
1 Use protective mats NOT MA<strong>DE</strong> OF RUBBER in front of doors leading<br />
to the outdoors. This will prevent sand and dirt from getting on your<br />
floor. Granular sand is the worst enemy of all floor coverings.<br />
2 Attach floor gliders to all furniture legs (preferably made of Felt) as<br />
used for resistant floors. With the floor gliders the chairs can easily<br />
move across the floor without bumping or scraping. Clean the floor<br />
glides regularly to remove dirt that may have accumulated under the<br />
furniture legs. For office swivel chairs or other rolling furniture you use<br />
wide, non-marking, soft double castors in accordance with DIN <strong>EN</strong><br />
12529. Use floor mats for heavily damaged areas (desks, etc.). Do not<br />
use rubber rollers.<br />
32
<strong>EN</strong><br />
3 To ensure that your floor always looks good, vacuum or dust with a<br />
mop at least twice a week. Do not use microfibers! This can damage<br />
the protective layer. More common in high-wear flooring materials.<br />
Do not use household dust remover, it can make the floor slippery or<br />
damage the surface. Sweep the ground just as often as necessary.<br />
4 Pets whose claws are not cut, can damage the <strong>BASICO</strong> flooring. This<br />
can cause severe scratches on the surface. The same goes for shoes<br />
with high, thin heels that are not equipped with heel protectors, the<br />
same applies to all the sharp edged furniture or objects.<br />
5 Protect the floor against prolonged sun exposure. Use curtains or<br />
blinds during the period of strongest sunlight to prevent direct sunlight<br />
on the <strong>BASICO</strong> floor. Most floor coverings are sensitive to continuous,<br />
strong sunlight. To avoid a non-uniform appearance, you may put the<br />
existing carpet backing at another place from time to time. You should<br />
consider using an air conditioner in buildings that remain empty.<br />
Longterm ambient temperatures below 10°C or over 35°C in conjunction<br />
with a strong, direct sunlight damage your <strong>BASICO</strong> flooring and<br />
can lead to the fading of the decor, cupping, ripple or loosening of the<br />
joints.<br />
NOTE 7: In case of asphalt driveways or paved parking in front of entrances,<br />
there is a risk that asphalt residues can be transferred to the BASI-<br />
CO flooring. This causes a chemical reaction that results in discoloration<br />
of the floor planks in the entrance area. To avoid this, use the floor mats<br />
for the entrance areas. When vacuuming your <strong>BASICO</strong> floor you should<br />
use a nozzle attachment for hard floors.<br />
Regular maintenance:<br />
1 Spilled food stuffs should be removed as soon as possible.<br />
2 Use only a high-quality, liquid for maintenance and cleaner purposes<br />
to remove tough spots or stains on PU coated surfaces. Sweep or<br />
vacuum the <strong>BASICO</strong> floor before cleaning in order to remove loose dirt<br />
and particles.<br />
3 We advise against all-purpose cleaners, as these often contain<br />
abrasive powder or oil soaps.<br />
4 Never use microfiber towels. This can damage the protective layer.<br />
5. Shoe prints and kick traces can be easily removed. If the scratch is<br />
not too deep, it is enough to clean the affected areas, to wash wet and<br />
dry with a cleaning and sealing agent for PU-coated surfaces. Then,<br />
the surface shines like new again.<br />
6 If the scratches are deeper, the bottom should be lightly ground with a<br />
green Scotch Brite or a grinding, sand paper respectively (e.g. 1729<br />
sialac from SIA abrasives), cleaned with clear, cold water and then<br />
sealed using a PU sealing (available at speciality flooring stores or on<br />
the Internet). Do not use the treated area for 24 hours, thereafter the<br />
floor looks like new again. This always works, except when the scratches<br />
are so deep that they have damaged the Decor.<br />
7 Is the scratches are so deep that they have damaged the decor, it may<br />
be necessary to replace damaged floor planks. See Note 6 for instructions<br />
on replacing <strong>BASICO</strong> plans.<br />
33
<strong>EN</strong><br />
8 DO NOT WAX OR OIL THE <strong>BASICO</strong> FLOORING! The surface of<br />
the <strong>BASICO</strong> flooring is very dense and non-porous. Which prevents<br />
penetration of oil or wax, thus creating a breeding ground for yellowing<br />
and dirt accumulation. This dense surface is responsible for the<br />
protection against wear, dirt and stains. Use exclusively a high quality<br />
vinyl seal to refresh in case heavy wear.<br />
9 Has your floor been exposed to flooding of excessive amounts of<br />
water, do not panic – <strong>BASICO</strong> is water resistant! Remove the water as<br />
soon as possible with a wet-vac or a drying device and ventilate the<br />
room. A dehumidifier should be turned on in the room immediately to<br />
reduce the moisture level to a normal level.<br />
10 Please contact your distributor for advice if the problem persists.<br />
Maintenance in commercial applications<br />
A preventive, special surface treatment after installation and regular<br />
maintenance is essential when the planks are installed in commercially or<br />
industrially used premises. For use in:<br />
- Administrations & Office<br />
- Physician practice & hospitals<br />
- Nursing homes<br />
- Schools & Kindergarten<br />
- Department stores & retail shops<br />
- Hotel and Dining<br />
- Hair salons<br />
- Sports facilities<br />
You should contact the distributer or manufacture in advance.<br />
First aid for your <strong>BASICO</strong> floor<br />
1 Remove chewing gum, glue, crayon, candle wax and similar substances<br />
by putting ice on it until the material becomes brittle and flakes<br />
off. The residues can be removed with mineral spirits or vinyl cleaner.<br />
2 Especially deep heel marks, traces of rollers etc.:<br />
rub with a green Scotch Brite which was moistened with sealant for<br />
PU-coated surfaces.<br />
3 For medium to heavy stains caused by water or other non-staining<br />
fluids: rub with sealant for PU-coated surfaces.<br />
4 Dark spots caused by ink or other chemicals, clean as described in 2<br />
above. If this does not work, the affected plank should replaced as<br />
described under Note 6 in the section “installation”.<br />
5 In case of burns that are not too deep the method 2 above is guaranteed<br />
to work. However, if these are very deep, the affected plank<br />
should replaced as described under Note 6 in the section “installation”.<br />
6 The floor smells like vinyl after a week. Do not worry, the floor does<br />
not contain any harmful substances. The odour will subside with regular<br />
ventilation. Unfortunately, today you cannot produce neither VPC<br />
nor adhesives that absolutely odour free. According to DIN <strong>EN</strong> 16000<br />
guidelines the odours should subside after 28 days so far that they are<br />
no longer troublesome,– contact the distributor if this is not the case.<br />
NOTE 8: Your <strong>BASICO</strong> planks are 100% recyclable and can be disposed<br />
of in a recycling centre. (Waste key number EU & CH: 17 02 03)!<br />
34
<strong>EN</strong><br />
However, the planks can be disposed of in normal household waste.<br />
For questions regarding the maintenance of your <strong>BASICO</strong> floor please<br />
contact your distributor.<br />
Important Note!<br />
1 Keep your sales receipt.<br />
2 Write down the type and the production run number of your <strong>BASICO</strong><br />
flooring. These are indicated on the outside of the carton next to the<br />
bar code.<br />
<strong>BASICO</strong>-TYP:<br />
Production run number:<br />
35
<strong>EN</strong><br />
Warranty<br />
The collections <strong>BASICO</strong> 0,3/0,5 offers a 5-YEAR, LIM<strong>IT</strong>ED<br />
COMMERCIAL WARRANTY.<br />
THE MANUFACTURER WARRANTY OF 25 YEARS APPLIES TO<br />
PRIVATE RESI<strong>DE</strong>NTIAL ACCOMODATION.<br />
1. Scope<br />
Provided the floor has been cared for/maintained according to the instructions<br />
in the user manual and used in the context of the specified<br />
use class and installed in accordance with the installation instructions,<br />
the warranty covers exclusively the following areas:<br />
A Manufacturing defects<br />
B Delamination<br />
C Strong, unusual colour variations and discolouration, provided the<br />
planks were not exposed to direct sunlight.<br />
2. The following are excluded from warranty:<br />
A Normal wear and tear, deliberately or wilfully caused damage:<br />
damage due to improper installation or maintenance, chemical<br />
decomposition due to use of unsuitable cleaning agents, alkaline<br />
subfloors or defects due to hydrostatic pressure, burns, cracks,<br />
dents, stains or loss of gloss due to normal aging or external influences.<br />
B Work or labour costs for the removal of the damaged and<br />
installation of replacement planks.<br />
C Consequential damages usage restrictions, late rental date etc.<br />
which are related to the removal or re-installation of the material<br />
concerned. All additional damage compensations for incidental or<br />
consequential damages is expressly excluded.<br />
If due to local legal provisions consequential damages cannot be excluded,<br />
the restrictions listed under item 2 may be only partially applicable.<br />
This warranty grants specific legal rights, no further claims or rights can<br />
be derived thereof.<br />
This warranty can be claimed only through immediate notification by the<br />
distributor / dealer. The notification must be accompanied by a copy of<br />
the original invoice and a completed complaint report with photos, the<br />
warranty claim can only be authorized by the distributor / dealer.<br />
36
<strong>EN</strong><br />
37
<strong>DE</strong><br />
38
<strong>IT</strong><br />
39
© HWZ International AG, 01.06.2016