Anleitung 2_1509_fertig.qxd - Umarex
Anleitung 2_1509_fertig.qxd - Umarex
Anleitung 2_1509_fertig.qxd - Umarex

Erfolgreiche ePaper selbst erstellen
Machen Sie aus Ihren PDF Publikationen ein blätterbares Flipbook mit unserer einzigartigen Google optimierten e-Paper Software.
<strong>Anleitung</strong> 2_<strong>1509</strong>_<strong>fertig</strong>.<strong>qxd</strong> 25.03.2004 15:36 Seite 1<br />
Bedienungsanleitung<br />
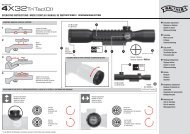
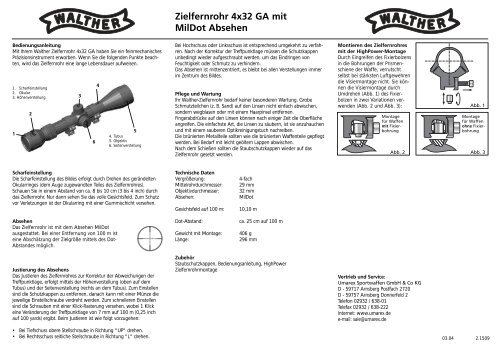
Mit Ihrem Walther Zielfernrohr 4x32 GA haben Sie ein feinmechanisches<br />
Präzisionsinstrument erworben. Wenn Sie die folgenden Punkte beachten,<br />
wird das Zielfernrohr eine lange Lebensdauer aufweisen.<br />
1. Scharfeinstellung<br />
2. Okular<br />
3. Höhenverstellung<br />
1<br />
2<br />
Scharfeinstellung<br />
Die Scharfeinstellung des Bildes erfolgt durch Drehen des gerändelten<br />
Okularringes (dem Auge zugewandten Teiles des Zielfernrohres).<br />
Schauen Sie in einem Abstand von ca. 8 bis 10 cm (3 bis 4 inch) durch<br />
das Zielfernrohr. Nur dann sehen Sie das volle Gesichtsfeld. Zum Schutz<br />
vor Verletzungen ist der Okularring mit einer Gummischicht versehen.<br />
Absehen<br />
Das Zielfernrohr ist mit dem Absehen MilDot<br />
ausgestattet. Bei einer Entfernung von 100 m ist<br />
eine Abschätzung der Zielgröße mittels des Dot-<br />
Abstandes möglich.<br />
3<br />
Justierung des Absehens<br />
Das Justieren des Zielfernrohres zur Korrektur der Abweichungen der<br />
Treffpunktlage, erfolgt mittels der Höhenverstellung (oben auf dem<br />
Tubus) und der Seitenverstellung (rechts an dem Tubus). Zum Einstellen<br />
sind die Schutzkappen zu entfernen, danach kann mit einer Münze die<br />
jeweilige Einstellschraube verdreht werden. Zum schnelleren Einstellen<br />
sind die Schrauben mit einer Klick-Rasterung versehen, wobei 1 Klick<br />
eine Veränderung der Treffpunktlage von 7 mm auf 100 m (0,25 inch<br />
auf 100 yards) ergibt. Beim Justieren ist wie folgt vorzugehen:<br />
Bei Tiefschuss obere Stellschraube in Richtung "UP" drehen.<br />
Bei Rechtsschuss seitliche Stellschraube in Richtung "L" drehen.<br />
6<br />
4<br />
5<br />
4. Tubus<br />
5. Objektiv<br />
6. Seitenverstellung<br />
Zielfernrohr 4x32 GA mit<br />
MilDot Absehen<br />
Bei Hochschuss oder Linksschuss ist entsprechend umgekehrt zu verfahren.<br />
Nach der Korrektur der Treffpunktlage müssen die Schutzkappen<br />
unbedingt wieder aufgeschraubt werden, um das Eindringen von<br />
Feuchtigkeit oder Schmutz zu verhindern.<br />
Das Absehen ist mittenzentriert, es bleibt bei allen Verstellungen immer<br />
im Zentrum des Bildes.<br />
Pflege und Wartung<br />
Ihr Walther-Zielfernrohr bedarf keiner besonderen Wartung. Grobe<br />
Schmutzteilchen (z. B. Sand) auf den Linsen nicht einfach abwischen,<br />
sondern wegblasen oder mit einem Haarpinsel entfernen.<br />
Fingerabdrücke auf den Linsen können nach einiger Zeit die Oberfläche<br />
angreifen. Die einfachste Art, die Linsen zu säubern, ist sie anzuhauchen<br />
und mit einem sauberen Optikreinigungstuch nachreiben.<br />
Die brünierten Metallteile sollten wie die brünierten Waffenteile gepflegt<br />
werden. Bei Bedarf mit leicht geöltem Lappen abwischen.<br />
Nach dem Schießen sollten die Staubschutzkappen wieder auf das<br />
Zielfernrohr gesetzt werden.<br />
Technische Daten<br />
Vergrößerung: 4-fach<br />
Mittelrohrdurchmesser: 29 mm<br />
Objektivdurchmesser: 32 mm<br />
Absehen: MilDot<br />
Gesichtsfeld auf 100 m: 10,10 m<br />
Dot-Abstand: ca. 25 cm auf 100 m<br />
Gewicht mit Montage: 406 g<br />
Länge: 296 mm<br />
Zubehör<br />
Staubschutzkappen, Bedienungsanleitung, HighPower<br />
Zielfernrohrmontage<br />
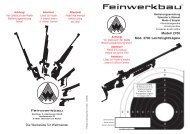
Montieren des Zielfernrohres<br />
mit der HighPower-Montage<br />
Durch Eingreifen des Fixierbolzens<br />
in die Bohrungen der Prismenschiene<br />
der Waffe, verrutscht<br />
selbst bei stärksten Luftgewehren<br />
die Visiermontage nicht. Sie können<br />
die Visiermontage durch<br />
Umdrehen (Abb. 1) des Fixierbolzen<br />
in zwei Variationen verwenden<br />
(Abb. 2 und Abb. 3):<br />
Montage<br />
für Waffen<br />
mit Fixierbohrung<br />
Abb. 2<br />
Vertrieb und Service:<br />
<strong>Umarex</strong> Sportwaffen GmbH & Co KG<br />
D - 59717 Arnsberg Postfach 2720<br />
D - 59757 Arnsberg Donnerfeld 2<br />
Telefon 02932 / 638-01<br />
Telefax 02932 / 638-222<br />
Internet: www.umarex.de<br />
e-mail: sale@umarex.de<br />
Abb. 1<br />
Montage<br />
für Waffen<br />
ohne Fixierbohrung<br />
Abb. 3<br />
03.04 2.<strong>1509</strong>
<strong>Anleitung</strong> 2_<strong>1509</strong>_<strong>fertig</strong>.<strong>qxd</strong> 25.03.2004 15:36 Seite 2<br />
Operation instructions<br />
Your Walther telescopic sight 4 x 32 GA which you have now acquired<br />
is a highly precise optical instrument. Make sure that you adhere<br />
to the following instructions and you will enjoy a long service life of<br />
your scope.<br />
1. focusing<br />
2. ocular<br />
3. elevation adjustment<br />
4. tube<br />
5. objective lens<br />
6. windage adjustment<br />
1<br />
2<br />
Focusing<br />
Focusing of the image is by turning the knurled ocular ring (the part<br />
of the scope you look into with the eye). Keep an eye relief of<br />
approx. 8 to 10 cm (3 to 4 inches) and look through the scope. Only<br />
then will you benefit from the full field of view. To prevent injury, the<br />
ocular ring is coated with rubber.<br />
Reticle<br />
The scope has a reticle of the MilDot type. It is possible<br />
to estimate the size of the target at a distance<br />
of 100 m by means of the dot spaces.<br />
3<br />
Adjustment of the reticle<br />
Adjustment of the scope on order to correct deviations of the point<br />
of impact is by means of the elevation adjustment (on top of the<br />
tube) and the windage adjustment (on the right side of the tube). To<br />
do so, the dust protection caps have to be removed, then a coin can<br />
be used to turn the appropriate adjustment screw.<br />
To facilitate the adjustments, all screws have a click-adjustment.<br />
1 click changes the point of impact by .25 inches on 100 yards (7<br />
mm on 100 m). To change the adjustment, proceed as follows:<br />
6<br />
4<br />
5<br />
Telescopic sight 4 x 32 GA with<br />
centrally illuminated reticle<br />
if point of impact is too low, turn upper adjustment screw<br />
towards "UP"<br />
if point of impacts is too far right, turn side-mounted adjustment<br />
screw towards "L"<br />
If point of impact is too high or too far left, turn the adjustment<br />
screws accordingly. After these adjustments, the protective caps are<br />
to be put back on in order to prevent the penetration of dampness<br />
or dirt. The reticle ist centrally adjusted, it always remains in the centre<br />
of the image during all adjustments.<br />
Care and maintenance<br />
Your Walther telescoping sight does not require any special maintenance.<br />
Do not simply wipe coarse dirt particles (such as sand) off the<br />
lenses but blow it away or use a fine brush to remove it. The simplest<br />
way to clean lenses is to breathe at them and then softly wipe<br />
them down with a clean optical cloth.<br />
The blued metal parts should be given the same treatment as other<br />
blued parts of the weapon. Use a cloth slightly dampened with gun<br />
oil if required.<br />
After shooting, the dust protection caps should be replaced.<br />
Technical data<br />
magnification: 4-fold<br />
tube diameter: 29 mm<br />
objective lens diameter: 32 mm<br />
reticle: MilDot<br />
field of view: 10,10 m on 100 m<br />
dot distance: approx. 25 cm on 100 m<br />
weight including mount 406 g<br />
length: 296 mm<br />
Accessories:<br />
Dust protection caps<br />
Operation instructions<br />
HighPower mount<br />
Mounting of the telescopic<br />
sight with a HighPower mount.<br />
Because of the locking action of<br />
the locking bolt into the locking<br />
bores of the mounting rail the<br />
mount will not move, even on the<br />
most powerful airguns. You may<br />
use two variations (fig. 2 and fig.<br />
3) of the sight mount by turning<br />
(fig. 1) the locking bolt upside<br />
down.<br />
Scope<br />
mounting for<br />
weapons<br />
with locking<br />
bore<br />
fig. 2<br />
Vertrieb und Service:<br />
<strong>Umarex</strong> Sportwaffen GmbH & Co KG<br />
D - 59717 Arnsberg Postfach 2720<br />
D - 59757 Arnsberg Donnerfeld 2<br />
Telefon 02932 / 638-01<br />
Telefax 02932 / 638-222<br />
Internet: www.umarex.de<br />
e-mail: sale@umarex.de<br />
fig. 1<br />
Scope<br />
mounting<br />
for weapons<br />
without<br />
locking bore<br />
fig. 3<br />
03.04 2.<strong>1509</strong>