LEYBOLD DIDACTIC GMBH Gebrauchsanweisung 666 224 ...
LEYBOLD DIDACTIC GMBH Gebrauchsanweisung 666 224 ...
LEYBOLD DIDACTIC GMBH Gebrauchsanweisung 666 224 ...

You also want an ePaper? Increase the reach of your titles
YUMPU automatically turns print PDFs into web optimized ePapers that Google loves.
8/96-Ne-<br />
Physik Chemie ⋅ Biologie Technik <strong>LEYBOLD</strong> <strong>DIDACTIC</strong> <strong>GMBH</strong><br />
Das Hand-Sauerstoffmeßgerät (<strong>666</strong> <strong>224</strong>)) dient zusammen mit<br />
der Sauerstoffelektrode (667 458) zur Messung des absoluten<br />
und relativen Sauerstoffgehalts in Flüssigkeiten und Luft. Die<br />
Temperaturabhängigkeit des Sensors wird mittels des integrierten<br />
Temperaturfühlers automatisch kompensiert. Der Luftdruck<br />
wird ebenfalls automatisch kompensiert mittels eines integrierten<br />
Drucksensors. Die Temperatur- und Luftdruckwerte<br />
können ebenfalls angezeigt werden.<br />
1 Sicherheitshinweis<br />
Gerät und Sensoranschluß vor Feuchtigkeit schützen.<br />
Hinweis als Auflage des EMV-Gesetzes:<br />
Die empfindliche Elektronik des Gerätes kann in Versuchsanordnungen<br />
durch ESD (Entladung elektrostatischer Elektrizität)<br />
beeinträchtigt werden. Deshalb sind elektrostatische<br />
Aufladungen (insbesonder durch die Benutzung in geeigneten<br />
Räumen) zu vermeiden bzw. durch Entladung (an metallischen<br />
Gegenständen) zu beseitigen.<br />
Literatur: Ökologische Untersuchungen mit dem Umweltmeßkoffer<br />
(668 331)<br />
2 Beschreibung, technische Daten<br />
� Anschluß für Sauerstoffelektrode (667 458)<br />
� serieller Datenausgang für Großanzeige und Computer<br />
Anzeigen:<br />
� Einheit der Meßgrößen in hPa, %, mg/l und °C<br />
� Großdisplay mit analoger Tendenzanzeige<br />
Digitale Anzeige des Meßwertes<br />
Anzeige des Ladezustands der Batterie<br />
� Statusanzeige<br />
� Hold-Taste zum Einfrieren des Meßwertes<br />
Bedientasten<br />
� Lauftasten zur Meßbereichsumschaltung bzw. Anzeige der<br />
Minimal- und Maximalwerte<br />
� CAL-Taste (Kalibriertaste)<br />
� ON/OFF-Taste (Ein- und Ausschalttaste)<br />
Sonstiges<br />
� Batteriefach für 9-V-Blockbatterie oder Akku (Batterie im<br />
Lieferumfang enthalten)<br />
� Kurz-<strong>Gebrauchsanweisung</strong> auf der Rückseite des Gerätes<br />
<strong>Gebrauchsanweisung</strong> <strong>666</strong> <strong>224</strong><br />
Instruction Sheet<br />
Hand-Sauerstoffmeßgerät<br />
Hand-held Oxygen Measuring Instrument<br />
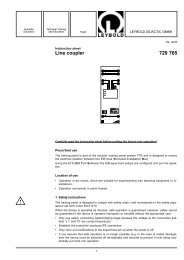
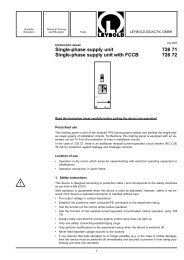
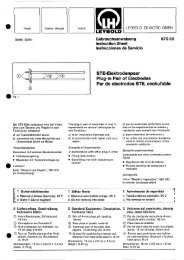
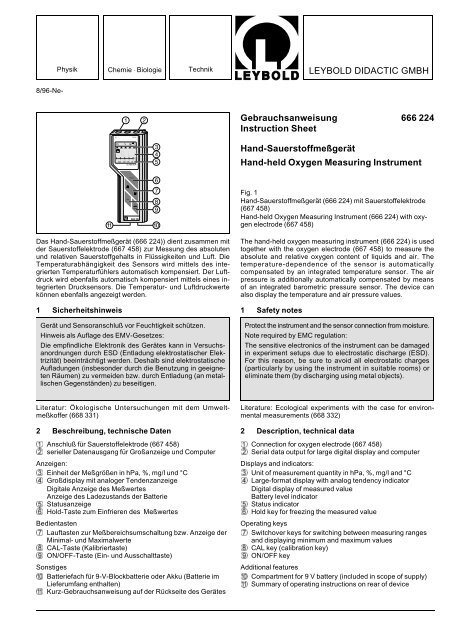
Fig. 1<br />
Hand-Sauerstoffmeßgerät (<strong>666</strong> <strong>224</strong>) mit Sauerstoffelektrode<br />
(667 458)<br />
Hand-held Oxygen Measuring Instrument (<strong>666</strong> <strong>224</strong>) with oxygen<br />
electrode (667 458)<br />
The hand-held oxygen measuring instrument (<strong>666</strong> <strong>224</strong>) is used<br />
together with the oxygen electrode (667 458) to measure the<br />
absolute and relative oxygen content of liquids and air. The<br />
temperature-dependence of the sensor is automatically<br />
compensated by an integrated temperature sensor. The air<br />
pressure is additionally automatically compensated by means<br />
of an integrated barometric pressure sensor. The device can<br />
also display the temperature and air pressure values.<br />
1 Safety notes<br />
Protect the instrument and the sensor connection from moisture.<br />
Note required by EMC regulation:<br />
The sensitive electronics of the instrument can be damaged<br />
in experiment setups due to electrostatic discharge (ESD).<br />
For this reason, be sure to avoid all electrostatic charges<br />
(particularly by using the instrument in suitable rooms) or<br />
eliminate them (by discharging using metal objects).<br />
Literature: Ecological experiments with the case for environmental<br />
measurements (668 332)<br />
2 Description, technical data<br />
� Connection for oxygen electrode (667 458)<br />
� Serial data output for large digital display and computer<br />
Displays and indicators:<br />
� Unit of measurement quantity in hPa, %, mg/l and °C<br />
� Large-format display with analog tendency indicator<br />
Digital display of measured value<br />
Battery level indicator<br />
� Status indicator<br />
� Hold key for freezing the measured value<br />
Operating keys<br />
� Switchover keys for switching between measuring ranges<br />
and displaying minimum and maximum values<br />
� CAL key (calibration key)<br />
� ON/OFF key<br />
Additional features<br />
� Compartment for 9 V battery (included in scope of supply)<br />
� Summary of operating instructions on rear of device
Technische Daten<br />
Meßbereich: 0... 19,99 mg/l Sauerstoffkonzentration<br />
in wäßrigen Lösungen<br />
0...199,9 % Sättigung in Flüssigkeiten<br />
oder Luft<br />
Die Umrechnung in die Sauerstoffsättigungskonzentration erfolgt<br />
nach ISO 5814 (mg/l).<br />
Temperaturmeßbereich:0... 45 °C<br />
Meßgenauigkeit: 0,5 °C<br />
Luftdruck: 800 ... 1100 hPa<br />
Meßgenauigkeit 10 hPa<br />
Eingang: Diodenbuchse, 8-polig<br />
Ausgang: Diodenbuchse, 6-polig, serielle<br />
Schnittstelle (galvanisch getrennt)<br />
und externe Spannungsversorgung<br />
Die Pin-Belegung und das Datenformat<br />
für die serielle Schnittstelle entnehmen<br />
Sie bitte der Gebrauchsanleitung<br />
für das Computeranschlußkabel<br />
(<strong>666</strong> 251).<br />
Spannungsversorgung: 9 V Blockbatterie oder Akku<br />
(automatische Abschaltung nach<br />
30 min)<br />
Abmessung: 21 x 8,5 x 3,7 cm<br />
Gewicht: 233 g<br />
3 Bedienung<br />
Zur Messung zusätzlich erforderlich:<br />
Sauerstoffelektrode mit<br />
integriertem Temperaturfühler: 667 458<br />
Technische Daten:<br />
Meßprinzip: Clark’sches Prinzip<br />
Werkstoff der Kathode: Platin, eingeschmolzen 0,1 mm 2<br />
Werkstoff der Anode: Silberrohr, 200 mm 2<br />
Membran: PTFE-Folie 25 m<br />
Membranaustausch: Wechsel des Membrankopfes<br />
Elektrolyt: stabilisierte Na3PO4-Lösung,<br />
(55,6 g/l Na3PO4 x 12H2O)<br />
Meßbereiche: 0 ... 60 mg/l Sauerstoffkonzentration<br />
in Wasser<br />
0 ... 45 °C Temperatur<br />
Einstellzeit (90%): ca. 10 s<br />
Polarisationsspannung: 800 mV<br />
Nullstrom: 0,1 nA typisch<br />
Meßstrom<br />
bei 02-Sättigung: ca. 100 nA<br />
mind. Anströmgeschwindigkeit:<br />
10 cm/s<br />
Temperturkompensation<br />
automat.: NTC-Widerstand 100 kΩ<br />
Kabellänge: 1,5 m (mit 8-poligen Diodenstecker<br />
Abmessungen: 140 mm lang, 12 mm Ø<br />
2<br />
Technical data<br />
Measuring range: 0... 19.99 mg/l oxygen concentration<br />
in aqueous solutions<br />
0...199.9 % in liquids or air<br />
Conversion to oxygen saturation concentration carried out<br />
according to ISO 5814 (mg/l).<br />
Temperature measuring<br />
range: 0... 45 °C<br />
Measuring accuracy: 0,5 °C<br />
Air pressure: 800 ... 1100 hPa<br />
Measuring accuracy: 10 hPa<br />
Input: DIN socket, 8-pin<br />
Output: DIN socket, 6-pin, serial interface<br />
(electrically isolated) and external<br />
voltage supply.<br />
See the Instruction Sheet for the<br />
computer connection cable (<strong>666</strong> 251)<br />
for pin assignment and data format.<br />
Voltage supply: 9 V battery<br />
(automatic battery cut-out after<br />
30 min)<br />
Dimensions: 21 x 8.5 x 3.7 cm<br />
Weight: 233 g<br />
3 Operation<br />
The following is additionally required for measuring:<br />
Oxygen electrode with<br />
integrated temperature sensor: 667 458<br />
Technical data:<br />
Measuring principle: Clark’s principle<br />
Cathode material: Platinum, heat-sealed, 0.1 mm 2<br />
Anode material: Silver tubing, 200 mm 2<br />
Membrane: PTFE foil 25 m<br />
Membrane replacement:Changing of membrane head<br />
Electrolyte: stabilized Na3PO4 solution,<br />
(55.6 g/l Na3PO4 x 12H2O)<br />
Measuring ranges: 0 ... 60 mg/l oxygen concentration in<br />
water<br />
0 ... 45 °C temperature<br />
Settling time (90%): approx. 10 s<br />
Polarization voltage: 800 mV<br />
Zero current: 0.1 nA typical<br />
Measuring current<br />
at 02 saturation: approx. 100 nA<br />
Minimum flow speed:<br />
10 cm/s<br />
Automatic temperature<br />
compensation: NTC resistor 100 kΩ<br />
Lead length: 1.5 m (with 8-pin DIN plug)<br />
Dimensions: 140 mm long, 12 mm Ø
Im Lieferumfang der Sauerstoffelektrode sind enthalten:<br />
• 1 Elektrode<br />
• 50 ml Sauerstoff-Elektrolyt<br />
• 1 Doppelspießampulle Nullpunkt-Lösung<br />
• 1 Ersatz-Membrankopf<br />
Wartung der Meßzelle:<br />
siehe <strong>Gebrauchsanweisung</strong> zur Sauerstoffelektrode<br />
Die Sauerstoffelektrode an die Eingangsbuchse � anschließen.<br />
• Kalibrierung<br />
Vor der erstmaligen Benutzung des Gerätes und/oder der<br />
Meßzelle muß eine Kalibrierung erfolgen.<br />
Es gibt zwei Kalibriermöglichkeiten:<br />
a. Schnellkalibrierung<br />
Dazu die ON/OFF-Taste und CAL-Taste beim Einschalten<br />
gleichzeitig drücken, die CAL-Taste etwas länger festhalten,<br />
das Gerät geht in den Polarisationsmodus. Im Display<br />
erscheint der Hinweis "POL". "IPOL" erscheint im Display<br />
wenn die Hälfte der Polarisatioszeit abgelaufen ist.<br />
10 minütige Polarisationszeit abwarten, das Gerät springt<br />
in den CAL-Modus und zeigt 0 % an.<br />
0% Vorgabe mit Lauftaste "� " oder "� " überspringen.<br />
Gerät zeigt 100 % an.<br />
Schutzkappe von Elektrode abziehen und 30 Sekunden in<br />
Luft schwenken. Wert mit CAL-Taste bestätigen. Nach<br />
Drücken der CAL-Taste springt das Gerät in den Meßmodus.<br />
b. Kalibrierung<br />
Dazu die ON/OFF-Taste und CAL-Taste beim Einschalten<br />
gleichzeitig drücken, die CAL-Taste etwas länger festhalten,<br />
das Gerät geht in den Polarisationsmodus. Im Display<br />
erscheint der Hinweis "POL". 10 minütige Polarisationszeit<br />
abwarten, das Gerät springt in CAL-Modus und zeigt 0 %<br />
an.<br />
Schutzkappe von Elektrode abziehen und Elektrode in Nullpunktlösung<br />
tauchen. Ca. 1 Minute warten, bis sich Elektrode<br />
auf die Lösung eingestellt hat und mit CAL-Taste bestätigen.<br />
Gerät zeigt 100 % an. Elektrode mit destilliertem Wasser<br />
abspülen und 30 Sekunden in Luft schwenken, Wert mit<br />
CAL-Taste bestätigen. Nach Drücken der CAL-Taste<br />
springt das Gerät in den Meßmodus.<br />
Die Vorgabe des 100%-Wertes kann bei gedrückter HOLD-<br />
Taste über die Lauftasten "� " oder "� " in Schritten von<br />
0,5 verändert werden.<br />
Zur Kalibrierung in Luft für Messungen in Luft:<br />
Durch Drücken von der Lauftasten "� " oder "� " springt<br />
der Wert auf 21%<br />
Durch Drücken der ON/OFF-Taste ist jederzeit ein Abbruch<br />
der Kalibrierung möglich.<br />
Meßprinzip<br />
Als Meßprinzip des Fühlers wird eine sogenannte Clark-Elektrode<br />
verwendet. Dabei wird ausgenutzt, daß molekularer<br />
Sauerstoff als gelöstes Gas an einer Platinelektrode bei<br />
800 mV Polarisationsspannung zu OH - -Ionen reduziert wird.<br />
Der resultierende Polarisationsstrom wird gemessen und direkt<br />
in einen Sauerstoffgehalt der Lösung umgerechnet. Fremdionen<br />
aus der Lösung werden deshalb nicht oxidiert bzw. reduziert,<br />
weil die Elektrode durch eine Teflon-Membran abgedichtet<br />
ist, die lediglich Gase durchläßt. Es stören SO2, Cl2 und H2S<br />
in kleineren Mengen sowie darüber hinaus gelöste Ionen in<br />
größeren Mengen.<br />
Mit dem integrierten Temperaturfühler kann zusätzlich eine<br />
Temperaturmessung durchgeführt werden.<br />
3<br />
Included in scope of supply of the oxygen electrode:<br />
• 1 electrode<br />
• 50 ml oxygen electrolyte<br />
• 1 double-tip ampule zero-point solution<br />
• 1 spare membrane head<br />
Measuring cell maintenance:<br />
See the Instruction Sheet for the oxygen electrode.<br />
Connect the oxygen electrode to input socket �.<br />
• Calibration<br />
Before using the instrument and/or the measuring cell for<br />
the first time, you must calibrate the apparatus.<br />
You can calibrate the instrument in one of two ways:<br />
a. Quick calibration<br />
When switching on the device, press the ON/OFF key and<br />
CAL key simultaneously; hold down the CAL key a bit longer,<br />
until the instrument enters polarization mode. The indicator<br />
"POL" appears in the display. "IPOL" appears in the display<br />
when half the polarization time has elapsed.<br />
Wait for the 10-minute polarization time to expire; the instrument<br />
switches to CAL mode and displays 0 %.<br />
Change the 0% default with switchover key "� " or "� ".<br />
The instrument displays 100 %.<br />
Remove the protective cap from the electrode and wave it<br />
in the air for 30 seconds. Confirm the value with the CAL<br />
key. The device then switches to measuring mode.<br />
b. Standard calibration<br />
When switching on the device, press the ON/OFF key and<br />
CAL key simultaneously; hold down the CAL key a bit longer,<br />
until the instrument enters polarization mode. The indicator<br />
"POL" appears in the display.<br />
Wait for the 10-minute polarization time to expire; the instrument<br />
switches to CAL mode and displays 0 %.<br />
Remove the protective cap from the electrode and immerse<br />
the electrode in the zero-point solution. Wait about one minute,<br />
until the electrode has adapted to the solution, and confirm<br />
this with the CAL key. The instrument displays 100 %. Rinse<br />
off the electrode with distilled water and wave it in the air for<br />
30 seconds. Confirm the value with the CAL key. The device<br />
then switches to measuring mode.<br />
You can change the default value of 100% in steps of 0.5<br />
by holding down the HOLD key and using the switchover<br />
keys "� " or "� ".<br />
Calibrating in air for measurements in the air:<br />
By pressing the switchover keys "� " or "� ", change the<br />
value to 21%<br />
You can abort the calibration at any time by pressing the<br />
ON/OFF key.<br />
Measuring principle<br />
The sensor is based on the measuring principle of the Clark<br />
electrode, which takes advantage of the fact that molecular oxygen<br />
in the form of dissolved gas is reduced to OH - ions at a platinum<br />
electrode with a polarization voltage of 800 mV. The resulting<br />
polarization current is measured and converted directly to an<br />
oxygen content for the solution. External ions from the solution<br />
are not oxidized, or reduced, because the electrode is sealed in<br />
a Teflon membrane which is only permeable to gases. Measuring<br />
can be disturbed by the presence of small quantities of SO2, Cl2<br />
and H2S as well as large quantities of dissolved ions.<br />
The integrated temperature sensor permits additional temperature<br />
measurement.
• Messen<br />
Durch Drücken der ON/OFF-Taste das Gerät einschalten.<br />
Als Funktionstest erscheinen auf dem Display kurzzeitig<br />
(1 Sekunde) alle Anzeigeelemente. Danach geht das Gerät<br />
in den Polarisationsmodus. Im Display erscheint der Hinweis<br />
"POL".<br />
Die Analoganzeige zeigt den Fortlauf der Polarisation an.<br />
Nach Beendigung der Polarisation (ca. 10 Minuten) springt<br />
das Gerät selbständig in den zuletzt verwendeten Meßmodus.<br />
Meßzelle in die Probelösung eintauchen und mit<br />
gleichmäßiger Bewegung kreisend rühren.<br />
Durch Drücken der Lauftasten "� " oder "� " ist ein Überspringen<br />
der Polarisation möglich.<br />
Durch Drücken der Lauftasten "� " oder "� " manuelles<br />
Umschalten der Meßwertanzeige von hPA, %, mg/l und °C.<br />
Durch Drücken der Hold-Taste � wird der Meßwert festgehalten,<br />
ein entsprechender Hinweis erscheint auf dem Display.<br />
Über die Lauftaste " � " erscheint auf dem Display die Anzeige<br />
"Max-Wert" und der entsprechende Meßwert wird angezeigt.<br />
Über die Lauftaste "� " erscheint die Anzeige<br />
"Min-Wert" und der entsprechende Meßwert wird angezeigt<br />
(mit Ausnahme des Wertes des Luftdrucks). Nach erneutem<br />
Drücken der Hold-Taste � wird die Messung fortgesetzt.<br />
Durch Ein/Ausschalten werden die Min/Max-Werte zurückgesetzt.<br />
Alle Einstellungen und Kalibrierwerte bleiben erhalten.<br />
Das Gerät schaltet sich automatisch 30 Minuten nach der<br />
letzten Benutzung aus, außer wenn das Gerät an den PC,<br />
die Großanzeige oder den Data-Logger angeschlossen ist.<br />
• Anschluß an Großanzeige<br />
Der Anschluß des Hand-Sauerstoffmeßgerätes an die<br />
Großanzeige (<strong>666</strong> 250) ist über die eingebaute serielle<br />
Schnittstelle und ein Anschlußkabel, das sich im Lieferumfang<br />
der Großanzeige befindet, möglich. Dadurch kann das<br />
Handmeßgerät als Demonstrationsmeßgerät mit einer<br />
26 mm hohen roten LED-Anzeige benutzt werden, in diesem<br />
Fall erfolgt die Stromversorgung des Handmeßgerätes<br />
über die Großanzeige. Auf der Rückseite der Großanzeige<br />
befindet sich eine Stativklemme zur Befestigung an allen<br />
üblichen Stativaufbauten.<br />
Gleichzeitig bietet die Großanzeige einen Schreiber- (Analog-)<br />
und Druckerausgang (Centronics), wodurch bei Langzeitversuchen<br />
problemlos die Meßwerte zu registrieren sind.<br />
• Meßwerterfassung mit dem Computer<br />
Das Computeranschlußkabel (<strong>666</strong> 251) ermöglicht den direkten<br />
Anschluß des Handmeßgerätes an die serielle<br />
Schnittstelle (9-polig) des Computers. Die zum Lieferumfang<br />
des Computeranschlußkabels gehörende komfortable<br />
Windows-Software macht aus den Handmeßgeräten ein<br />
modernes Meßwerterfassungssystem. Nähere Hinweise<br />
dazu finden Sie in den Software-Informationen, außerdem<br />
ein Versuchsbeispiel mit dem Hand-Sauerstoffmeßgerät,<br />
unter dem Thema: "Photosynthese einer Wasserpflanze ".<br />
4 Batteriewechsel<br />
Bei verbrauchter Batterie erscheint im Display das Batteriesymbol.<br />
Gerät ausschalten. Abdeckung des Batteriefachs � durch<br />
Schieben nach rechts oder links entfernen und die Batterie entnehmen.<br />
Neue Batterie oder einen Akku mit der Batterieanschlußklemme<br />
verbinden. Angeschlossene Batterie ins Batteriefach<br />
schieben und mit der Abdeckung verschließen. Gegebenenfalls<br />
das Gerät ausschalten. Alle Kalibrierdaten bleiben bei<br />
Batteriewechsel erhalten.<br />
Verbrauchte Batterie ordnungsgemäß entsorgen.<br />
4<br />
• Measuring<br />
Switch on the instrument by pressing the ON/OFF key. The<br />
device executes a brief function test (1 second) in which all<br />
display elements light up, before automatically switching to<br />
polarization mode. The indicator "POL" appears in the<br />
display.<br />
The analog indicator shows the course of polarization.<br />
Once polarization is finished (approx. 10 minutes), the<br />
instrument automatically switches to the last measuring<br />
mode used. Immerse the measuring cell in the sample<br />
solution and agitate it with even, circular stirring motions.<br />
By pressing the switchover keys "� " or "� ", you can skip<br />
the polarization.<br />
You can also use the switchover keys "� " or "� " to<br />
manually switch between measured-value display of hPA,<br />
%, mg/l and °C. Pressing the Hold key � "freezes" the<br />
measured value; a corresponding indicator appears in the<br />
display. Pressing the switchover key "� " causes the instrument<br />
to display the message "MAX" along with the<br />
corresponding maximum measured value. Pressing the<br />
switchover key "� " causes the instrument to display the<br />
message "MIN" along with the corresponding minimum<br />
measured value (except for the air-pressure value). Pressing<br />
the Hold key � again continues the measurement. Switching<br />
the device on and off resets the minimum and maximum<br />
values. All settings and calibration values are retained.<br />
The device switches itself off automatically 30 minutes after<br />
the last use, except when the instrument is connected to<br />
the PC, the large digital display or the data logger.<br />
• Connecting the large digital display<br />
The hand-held luxmeter can be connected to the large digital<br />
display (<strong>666</strong> 250) via the built-in serial interface; the connection<br />
cable is included with the display. The large digital<br />
display allows you to use the hand-held meter as a demonstration<br />
measuring instrument with a 26 mm high red<br />
LED display. In this case, the voltage supply for the handheld<br />
meter is supplied via the large digital display. The rear<br />
of the large digital display is fitted with a stand clamp for<br />
mounting in all common stand configurations. At the same<br />
time, the large digital display can be connected to a chart<br />
recorder (via the analog output) or printer (via the Centronics<br />
port), for easy and problem-free long-term experiments.<br />
• Recording measured values via the computer<br />
Using the computer connection cable (<strong>666</strong> 251), you can<br />
connect your hand-held meter directly to the serial interface<br />
(9-pin) of your computer. The user-friendly Windows<br />
software included in the scope of supply of the computer<br />
connection cable turns the hand-held measuring instruments<br />
into a modern measurement data acquisition system.<br />
For more information, see the README file as well as an<br />
experiment example with the hand-held oxygen measuring<br />
instrument, under the topic: "Photosynthesis of an aquatic<br />
plant".<br />
4 Changing the battery<br />
When the battery is low, the battery symbol appears in the display.<br />
Switch off the instrument, and remove the cover of the battery<br />
compartment � by pushing it to the right or the left; then remove<br />
the battery. Attach a new battery to the battery connection<br />
terminals. Slide the connected battery into the battery compartment<br />
and close it with the cover. Switch off the instrument again<br />
if necessary. All calibration data are retained when changing<br />
the battery.<br />
Dispose of the dead battery properly.
5 Fehlersuche<br />
Fehlermeldung E1 (Error 1) erscheint im Display: Temperaturbereich<br />
unter- bzw. überschritten. Eine Messung ist in diesem<br />
Temperaturbereich nicht möglich<br />
Fehlermeldung E2 (Error 2) erscheint im Display: kein Sensor<br />
angeschlossen oder Sensor ist defekt.<br />
Sensor anschließen, prüfen ob genügend Elektrolyt vorhanden<br />
ist und gegebenenfalls nachfüllen, oder Membrankopf austauschen.<br />
(Siehe <strong>Gebrauchsanweisung</strong> zu 667 458).<br />
Fehlermeldung E3 (Error 3) erscheint im Display: Kalibrierung<br />
fehlerhaft.<br />
CAL drücken und Kalibrierung wiederholen.<br />
Zum Betrieb des Gerätes zusätzlich empfehlenswert:<br />
Zubehörset zur Sauerstoffelektrode 667 451<br />
bestehend aus:<br />
5 Ersatz-Membranköpfe<br />
50 ml Sauerstoff-Elektrolyt<br />
6 Doppelspießampullen Nullpunkt-Lösung<br />
empfehlenswertes Verbrauchsmaterial<br />
Zur alternativen Selbstherstellung der Elektrolyt- und Nullpunktlösung:<br />
673 741 Trinatrium-phosphat-12-hydrat, (250 g)<br />
Zur Herstellung der ca. 5%-igen Elektrolytlösung<br />
673 780 Natriumsulfit, (100 g)<br />
Zur Herstellung einer gesättigten Lösung für die Einstellung<br />
des 0%-Wertes<br />
5 Fault-finding<br />
Error message E1 (Error 1) appears in the display: the instrument<br />
is out of the temperature range. You cannot measure in<br />
this temperature range.<br />
Error message E2 (Error 2) appears in the display: no sensor<br />
connected or sensor is defective.<br />
Connect the sensor, check whether there is enough electrolyte<br />
and refill this as necessary, or replace the membrane head.<br />
(see Instruction Sheet for 667 458).<br />
Error message E3 (Error 3) appears in the display: incorrect<br />
calibration.<br />
Press CAL and repeat the calibration<br />
Additionally recommended for using the instrument:<br />
Accessories kit for oxygen electrode 667 451<br />
consisting of<br />
5 spare membrane heads<br />
50 ml oxygen electrolyte<br />
6 double-tip ampules of zero-point solution<br />
Recommended consumables<br />
For alternative self-preparation of electrolyte and zero-point<br />
solution:<br />
673 741 tribasic sodium phosphate dodecahydrate, (250 g)<br />
for preparing the approx. 5% electrolyte solution<br />
673 780 sodium sulfite, (100 g)<br />
for preparing a saturated solution for setting the 0% value<br />
<strong>LEYBOLD</strong> <strong>DIDACTIC</strong> <strong>GMBH</strong> ⋅ Leyboldstrasse 1 ⋅ D-50354 Hürth ⋅ Phone (02233) 604-0 ⋅ Telefax (02233) 604-222 ⋅ Telex 17 223 332 LHPCGN D<br />
© by Leybold Didactic GmbH, Printed in the Federal Republic of Germany<br />
Technical alterations reserved