
Create successful ePaper yourself
Turn your PDF publications into a flip-book with our unique Google optimized e-Paper software.
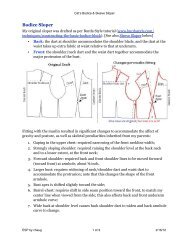
<strong>Sleeve</strong> <strong>Block</strong><br />
These instructions can be used for any sleeve alteration, but I’ve used my shirt block<br />
sleeve for this example. That is, starting with the sleeve for my bodice sloper, then<br />
modifying it for my shirt block.<br />
1. Widen the bicep line at each end by the same amount you dropped the armhole at<br />
the underarm (compared with the bodice block);<br />
2. Lower the cap height by the same amount you extended the shoulder line (compared<br />
with the bodice block).<br />
3. Draw horizontal reference line through the top of the cap point. When you draw the<br />
cap curve, it will be tangent to this line at the top of the cap.<br />
Redraw cap curves to accommodate these changes. In general, the back curve becomes<br />
less curvy (S- or Z-shaped); the front curve more so. As you extend the shoulder, the the<br />
cap height shortens; as you widen the bicep line, the cap curves straighten out.<br />
Redraw cap curve:<br />
Inspiration for using cord is from The Curious Frau: <strong>Drafting</strong> a Basic Fitted <strong>Sleeve</strong> (2).<br />
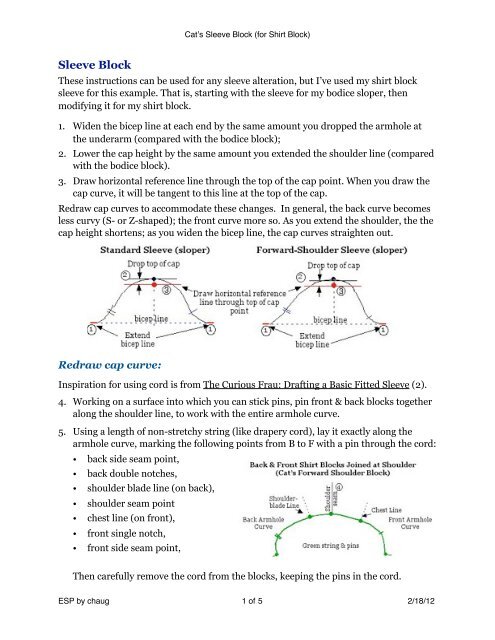
4. Working on a surface into which you can stick pins, pin front & back blocks together<br />
along the shoulder line, to work with the entire armhole curve.<br />
5. Using a length of non-stretchy string (like drapery cord), lay it exactly along the<br />
armhole curve, marking the following points from B to F with a pin through the cord:<br />
• back side seam point,<br />
• back double notches,<br />
• shoulder blade line (on back),<br />
• shoulder seam point<br />
• chest line (on front),<br />
• front single notch,<br />
• front side seam point,<br />
Catʼs <strong>Sleeve</strong> <strong>Block</strong> (for Shirt <strong>Block</strong>)<br />
Then carefully remove the cord from the blocks, keeping the pins in the cord.<br />
ESP by chaug" 1 of 5" 2/18/12
Catʼs <strong>Sleeve</strong> <strong>Block</strong> (for Shirt <strong>Block</strong>)<br />
6. Back Armhole Curve: Starting with the back side seam pin, insert it at the far left<br />
end of the bicep line. Then arrange the cord up toward the top of the cap, carefully<br />
keeping the pins (still in the cord) on their side while I do this, until you like the<br />
shape of the curve, which is:<br />
- mostly straight on the bias from the sideseam to the double notches,<br />
- continues with little curvature to the shoulder blade pin, then<br />
- begins to curve to horizontal as it approaches the top of cap.<br />
7. Insert the pins to secure the curve in place as follows:<br />
- double-notch pins, so that the cord is taught from side seam pin to notch pins (no<br />
ease);<br />
- shoulder blade-line pin so that there is slight ease (⅛” or so) between it and the<br />
notch pins;<br />
- shoulder point pin wherever it lies, hopefully within ⅜” of the top of the cap<br />
shoulder point. The distance it falls short is ease in this section.<br />
8. Draw the curve directly under the cord, marking the position of each pin. Then<br />
carefully remove the pins from the board (but still in the cord), so you can lay the<br />
cord to form the front side of the cap.<br />
9. Front Armhole Curve: Set the front side seam pin in place at the far right end of<br />
the bicep line, then arrange the cord up toward the top of the cap, carefully keeping<br />
the pins (still in the cord) on their side while you do this, until you like the shape of<br />
the curve, which is:<br />
- at first low and flat, barely rising above the bicep line, then beginning a slight<br />
upward curve to the notch,<br />
- continues on a steeper curve to just before the chest-line pin, then<br />
- curving towards horizontal as it approaches the top of cap.<br />
If you have forward shoulder as I do, the front curve will have a definite Z-shape in<br />
order to get the length of cord to fit between the side seam and the top of cap.<br />
ESP by chaug" 2 of 5" 2/18/12
Catʼs <strong>Sleeve</strong> <strong>Block</strong> (for Shirt <strong>Block</strong>)<br />
10. Just as for the back, insert the pins to secure the curve as follows:<br />
- single-notch pin so that the cord is taught between it and the side seam pin (no<br />
ease);<br />
- chest-line pin so that there is slight ease (⅛” or so) between it and the notch pins;<br />
- shoulder point pin wherever it lies, hopefully within ⅜” of the top of the cap<br />
shoulder point. The distance it falls short is ease in this section.<br />
11. Again, just as for the back, draw the curve directly under the cord, marking the<br />
position of each pin. Then carefully remove the pins from the board (but still in the<br />
cord). I keep the pins in the cord in case I need to make future adjustments, until the<br />
block fits.<br />
12. Refine the hand-drawn curves using a French curve to create smooth transitions.<br />
Place dots at the shoulder-blade and chest lines, and a circle at the shoulder point;<br />
mark double-notches on back curve and single notch o front curve, all per pin<br />
positions<br />
Here’s sketches for a standard sleeve cap and a forward shoulder sleeve cap, for both the<br />
bodice sloper and the shirt block for comparison:<br />
ESP by chaug" 3 of 5" 2/18/12
Redraw lower sleeve:<br />
13. Lay your shirt block sleeve cap over your<br />
bodice sleeve sloper, aligning the shoulder<br />
line from top of cap to wrist line.<br />
14. Draw underarm seam lines from lower end<br />
of the back cap curve to the wrist, adjusting<br />
as necessary at the elbow dart. You may<br />
need to adjust the elbow dart legs to meet<br />
the new underarm seam, and to ensure they<br />
are of equal length.<br />
15. Draw underarm seam line from the lower<br />
end of the front cap to the wrist.<br />
16. Extend the shoulder line to the wrist. This<br />
line serves as the grain line.<br />
17. There are two different ways you can do the lower sleeve:<br />
• The elbow dart is used if you want a closer-fitting sleeve from elbow to wrist;<br />
• The wrist dart is used if you want pleats or gathers into a band at the wrist, or a<br />
cuff with a buttoned opening.<br />
Convert to a Wrist Dart<br />
Catʼs <strong>Sleeve</strong> <strong>Block</strong> (for Shirt <strong>Block</strong>)<br />
18. Draw a line from the point of the elbow dart to the wrist line, midway between the<br />
underarm seam and the shoulder/grain line. Cut along this line but leave a bit of<br />
paper at the dart point for a pivot.<br />
19. Pivot to close the elbow dart, thus opening the wrist dart.<br />
20.Smooth-out the underarm seam as necessary for a smooth transition; I use my<br />
French curve for this purpose.<br />
ESP by chaug" 4 of 5" 2/18/12
Finished <strong>Sleeve</strong> <strong>Block</strong>s for Shirt <strong>Block</strong><br />
Since this is a shirt block, I use the wrist dart, as I almost always have a cuff. However, I<br />
show both finished options below.<br />
References<br />
Catʼs <strong>Sleeve</strong> <strong>Block</strong> (for Shirt <strong>Block</strong>)<br />
1. Designing Patterns, A Fresh Approach to Pattern Cutting, by Hilary Campbell,<br />
published by Stanley Thornes (Publishers) Inc.<br />
2. The Curious Frau: <strong>Drafting</strong> a Basic Fitted <strong>Sleeve</strong> (www.curiousfrau.com/patterns/<br />
pattern-drafting/126-drafting-a-basic-fitted-sleeve)<br />
3. Threads Magazine, Volume 137, July 20008: From Sloper to Shirt; and Volume<br />
138, August 2008: Use your Sloper to Finish Your Shirt, both by Kathleen<br />
Cheetham<br />
ESP by chaug" 5 of 5" 2/18/12