Installation Guide - TYPAR Geosynthetics
Installation Guide - TYPAR Geosynthetics
Installation Guide - TYPAR Geosynthetics

You also want an ePaper? Increase the reach of your titles
YUMPU automatically turns print PDFs into web optimized ePapers that Google loves.
<strong>Installation</strong> <strong>Guide</strong><br />
The <strong>TYPAR</strong> GEOCELL GS system consists of a geotextile material in a honeycomb structure into which virgin or native infill materials<br />
may be placed to enhance load support, slope protection and channel reinforcement. The complete system includes GEOCELL panels,<br />
infill materials and some or all of the following components: geotextiles, geogrids, anchoring devices, geomembrane, geocomposite<br />
drainage materials and surface treatments.<br />
<strong>Installation</strong> Method<br />
APPLICATIONS<br />
<strong>Geosynthetics</strong> you can trust<br />
GEOCELL GS<br />
INSTALLATION OF LOAD SUPPORT SYSTEMS<br />
Subgrade Preparation<br />
1. Excavate and shape foundation soils.<br />
2. Ensure foundation soil meets minimum strength requirements<br />
through proof rolling or other conventional method. If<br />
unacceptable foundation soils are encountered, excavate and<br />
replace with suitable quality material.<br />
Separation Layer and Base Materials <strong>Installation</strong><br />
3. When separation between subgrade soil and infill material<br />
is required, place <strong>TYPAR</strong> 3401G AASHTO Class 3 Geotextile<br />
over subgrade.<br />
4. If additional base materials or engineered soils are required<br />
between separation geotextile and <strong>TYPAR</strong> GEOCELL GS,<br />
install the appropriate depth and compact to a minimum 95<br />
percent Standard Proctor.<br />
<strong>TYPAR</strong> GEOCELL GS Panel Placement and Connection<br />
5. Position and expand <strong>TYPAR</strong> GEOCELL GS panels to the appropriate<br />
dimensions. Hold individual panels in their expanded<br />
positions with rebar J hook fixing pins or wooden stakes.<br />
6. Confirm each <strong>TYPAR</strong> GEOCELL GS panel is expanded uniformly<br />
and correctly aligned. Nest panels along each joint to<br />
ensure adjacent <strong>TYPAR</strong> GEOCELL GS panels are flush at joint<br />
and adjoining cells are fully anchored.<br />
Slope Protection Channel Protection Load Support Fixing Pins<br />
Fiberweb Minneapolis<br />
1611 County Road B West #102<br />
Roseville, MN 55113 | USA<br />
Tel: +1 651 330 2920<br />
e.mail: geosales@fiberweb.com | www.typargeosynthetics.com.com<br />
GC20_07.12.12<br />
7. Install rebar fixing pins or wooden stakes along the joining<br />
of each panel every other cell to hold <strong>TYPAR</strong> GEOCELL GS<br />
panels stable during infill. Alternate the installation of rebar<br />
fixing pins or wooden stakes to ensure each panel is stable.<br />
Exposed Aggregate or Engineered Infill<br />
8. Fill <strong>TYPAR</strong> GEOCELL GS with specified aggregate material<br />
progressively from front to back. Do not use an infill material<br />
with particle sizes greater than 3 inches.<br />
9. Overfill cells with aggregate infill material. Limit the drop<br />
height of infill material to 3 feet (1 meter) to avoid displacement<br />
of the cell wall.<br />
10. Overfill cells to a depth of approximately 2 inches (50mm)<br />
and level for exposed aggregate surfaces. Maintain the 2 inch<br />
wear surface over <strong>TYPAR</strong> GEOCELL GS panels to prevent<br />
wear to the cell walls.<br />
11. Compact infill to a minimum of 95 percent Standard Proctor.<br />
Base Stabilization<br />
12. Overfill <strong>TYPAR</strong> GEOCELL GS to a depth of 1 inch and compact<br />
to a minimum of 95 percent Standard Proctor.<br />
13. The wear surface shall consist of asphalt/concrete/paver<br />
stones/other as specified in the contract documents. Install<br />
per engineer’s specifications.
<strong>Geosynthetics</strong> you can trust<br />
GEOCELL GS<br />
INSTALLATION OF SLOPE AND CHANNEL<br />
PROTECTION SYSTEMS<br />
Subgrade Preparation:<br />
Product Selector:<br />
<strong>Installation</strong> <strong>Guide</strong><br />
1. Excavate or fill foundation soils to align top of <strong>TYPAR</strong> GEO-<br />
CELL GS panels flush with or slightly lower than adjacent<br />
surface or final grade.<br />
2. Install <strong>TYPAR</strong> 3401G geotextile underlayer on prepared surfaces.<br />
3. If required, install geomembrane underlayer on prepared<br />
surfaces.<br />
<strong>TYPAR</strong> GEOCELL GS Panel Anchorage<br />
4. Anchorage with Rebar J Hooks (No Crest Trench.)<br />
a. Position collapsed <strong>TYPAR</strong> GEOCELL GS panels at crest of<br />
slope.<br />
b. Drive the rebar J hooks at the crest of the slope to secure the<br />
<strong>TYPAR</strong> GEOCELL GS panels in place and allow expansion of<br />
the cellular confinement system into position.<br />
c. After the <strong>TYPAR</strong> GEOCELL GS panels are expanded as desired,<br />
drive the rebar J hooks with the arm of the hook over<br />
the cell wall and flush with top of panel.<br />
d. Anchor <strong>TYPAR</strong> GEOCELL GS with J hooks in each cell around<br />
the perimeter and every square yard.<br />
Please note that the information above is given as a guide only. All sizes and weights are nominal figures and may vary to what is published. Fiberweb, Inc. cannot be liable<br />
for damage caused by incorrect installation of this product. Final determination of the suitability of any information or material for the use contemplated and the manner of<br />
its use is the sole responsibility of the user and the user must assume all risk and responsibility in connection therewith.<br />
This field guide is provided as an aid to assessing the mechanical stabilisation requirements in commonly encountered site conditions. Fiberweb accepts no responsibility for<br />
any loss or damage resulting from the use of this guide.<br />
The information contained herein is, to the best of our knowledge, accurate in all material respects. However, since the circumstances and conditions in which such information<br />
and the products mentioned herein can be used may vary and are beyond our control, no representation or warranty, express or implied, of any nature whatsoever is or will<br />
be made and no responsibility or liability is or will be accepted by us, any of our affiliates or our or their respective directors, officers, employees or agents in relation to the<br />
accuracy or completeness or use of the information contained herein or any such products and any such liability is expressly disclaimed.<br />
Fiberweb Minneapolis<br />
1611 County Road B West #102<br />
Roseville, MN 55113 | USA<br />
Tel: +1 651 330 2920<br />
e.mail: geosales@fiberweb.com | www.typargeosynthetics.com.com<br />
<strong>TYPAR</strong> GEOCELL GS Placement<br />
10. Place compressed <strong>TYPAR</strong> GEOCELL GS panels at crest of<br />
slope and expand each panel down slope. Ensure each panel<br />
is expanded uniformly to required dimensions.<br />
11. Correctly align outer cells of each layer. Interleaf or overlap<br />
edges of adjacent Panels in each layer to nest connections.<br />
Verify each panel is level and flush with adjacent panel(s).<br />
Infill Material<br />
12. Place infill in expanded cells with suitable material handling<br />
equipment, such as a backhoe, front-end loader, conveyor, or<br />
crane-mounted skip.<br />
13. Limit drop height to a maximum of 3 feet (1 m) to avoid damage<br />
or displacement of the cell walls.<br />
14. Fill <strong>TYPAR</strong> GEOCELL GS panels from crest of slope to toe..<br />
15. Infill material shall be comprised of particle sizes no greater<br />
than 3”, unfrozen, and free-flowing when placed into the<br />
<strong>TYPAR</strong> GEOCELL GS Panels.<br />
16. Compact infill material per engineer’s specification.<br />
17. Ensure the infill material remains flush with the <strong>TYPAR</strong> GEO-<br />
CELL GS cell walls after compaction.<br />
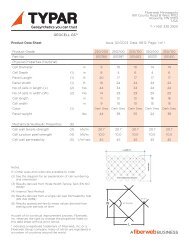
Product Panel Size Cell Diameter Cell Depth Weight Material Application Method<br />
<strong>TYPAR</strong> GEOCELL GS 250/100 16.4’ x 23’ 9.8” 4” 37.5 lbs Non-woven<br />
PP/PE<br />
<strong>TYPAR</strong> GEOCELL GS 250/150 16.4’ x 23’ 9.8” 6” 55 lbs Non-woven<br />
PP/PE<br />
<strong>TYPAR</strong> GEOCELL GS 350/100 16.4’ x 23’ 13.8” 4” 24 lbs Non-woven<br />
PP/PE<br />
<strong>TYPAR</strong> GEOCELL GS 350/150 16.4’ x 23’ 13.8” 6” 37.5 lbs Non-woven<br />
PP/PE<br />
<strong>TYPAR</strong> GEOCELL GS 220/200 20’ x 10’ 8.7” 8” 44 lbs Non-woven<br />
PP/PE<br />
Pedestrian/Light Vehicle<br />
Load Support and Slope<br />
Protection<br />
Light Vehicle Load Support<br />
and Slope Protection<br />
Slope Protection<br />
Slope Protection<br />
Heavy Vehicles Load<br />
Support