Single Car Seat Adaptor - Baby Jogger
Single Car Seat Adaptor - Baby Jogger
Single Car Seat Adaptor - Baby Jogger

You also want an ePaper? Increase the reach of your titles
YUMPU automatically turns print PDFs into web optimized ePapers that Google loves.
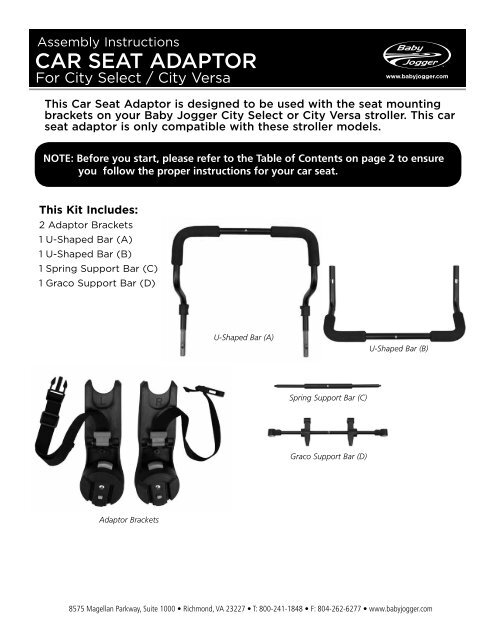
Assembly Instructions<br />
CAr SeAT AdApTor<br />
For City Select / City Versa<br />
This <strong>Car</strong> <strong>Seat</strong> <strong>Adaptor</strong> is designed to be used with the seat mounting<br />
brackets on your <strong>Baby</strong> <strong>Jogger</strong> City Select or City Versa stroller. This car<br />
seat adaptor is only compatible with these stroller models.<br />
NOTE: Before you start, please refer to the Table of Contents on page 2 to ensure<br />
you follow the proper instructions for your car seat.<br />
This Kit Includes:<br />
2 <strong>Adaptor</strong> Brackets<br />
1 U-Shaped Bar (A)<br />
1 U-Shaped Bar (B)<br />
1 Spring Support Bar (C)<br />
1 Graco Support Bar (D)<br />
<strong>Adaptor</strong> Brackets<br />
U-Shaped Bar (A)<br />
Spring Support Bar (C)<br />
Graco Support Bar (D)<br />
www.babyjogger.com<br />
U-Shaped Bar (B)<br />
8575 Magellan Parkway, Suite 1000 • Richmond, VA 23227 • T: 800-241-1848 • F: 804-262-6277 • www.babyjogger.com
2<br />
3<br />
4<br />
5<br />
6<br />
7<br />
Graco<br />
peg perego<br />
Chicco<br />
<strong>Baby</strong> Trend<br />
Britax<br />
evenflo<br />
Safety 1st<br />
Cybex<br />
Maxi Cosi<br />
Table of Contents<br />
8 other Available Accessories
Graco<br />
Uses the 2 <strong>Adaptor</strong> Brackets, U-shaped bar (A), U-shaped bar (B),<br />
Spring support bar (C), and Graco support bar (D)<br />
The car seat adaptor comes fully assembled for use with Graco model car seats. Should you detach the spring support bar (C)<br />
or Graco support bar (D) and need to reassemble, please see “Support Bar Configuration” below for instructions.<br />
<strong>Car</strong> <strong>Seat</strong> <strong>Adaptor</strong> Installation:<br />
CliCk<br />
1 Insert <strong>Adaptor</strong> Brackets into the<br />
corresponding mounting brackets on your<br />
stroller. The <strong>Adaptor</strong> Brackets are secure<br />
when they click into place.<br />
NOTE: The right and left mounting<br />
brackets on your stroller are<br />
determined by standing in front of<br />
and facing the stroller.<br />
3 Insert the U-shaped bar (A) into the openings on the front<br />
of the adaptor brackets.<br />
5 From the rear of the stroller, connect the second U-shaped bar (B)<br />
over the ends of the already installed U-shaped bar (A) until it<br />
clicks into place. You will see only green in the indicator on top of<br />
the bars when the U-shaped bars are locked in place.<br />
Support Bar Configuration:<br />
1 Squeeze spring support bar (C)<br />
and insert into holes on the inside of<br />
U-shapped support bar (B).<br />
Indicator<br />
2 Open the compression<br />
locks on the <strong>Adaptor</strong><br />
Brackets by flipping<br />
the red latches up.<br />
4 Close the compression locks on the adaptor<br />
brackets by flipping the red latches down,<br />
locking the U-shaped bar (A) in place.<br />
CliCk<br />
6 Place car seat on the car seat adaptor and<br />
press down firmly until it clicks into place.<br />
Fasten and properly tighten the <strong>Adaptor</strong><br />
Bracket Safety Belt over the car seat before<br />
operation.<br />
CliCk<br />
2 Align the openings of the Graco support bar (D) with the ends<br />
of U-shaped support bar (B). Slide The Graco support bar onto the<br />
U-shaped bar (B) and snap onto spring support bar (C). You will<br />
hear it click when properly attached.<br />
3
Peg-Perego<br />
Uses the 2 <strong>Adaptor</strong> Brackets, U-shaped bar (A),<br />
U-shaped bar (B), and the Spring support bar (C)<br />
Support Bar Configuration:<br />
4<br />
The car seat adaptor comes fully assembled for use with Graco model car seats. The Graco support bar (D) must be<br />
removed prior to attaching your Peg-Perego car seat to the <strong>Baby</strong> <strong>Jogger</strong> <strong>Car</strong> <strong>Seat</strong> <strong>Adaptor</strong>.<br />
1 Holding the U-shaped bar (B), unsnap Graco support bar (D)<br />
from the Spring support bar (C) and remove.<br />
<strong>Car</strong> <strong>Seat</strong> <strong>Adaptor</strong> Installation:<br />
CliCk<br />
1 Insert <strong>Adaptor</strong> Brackets into the<br />
corresponding mounting brackets on your<br />
stroller. The <strong>Adaptor</strong> Brackets are secure<br />
when they click into place.<br />
NOTE: The right and left mounting<br />
brackets on your stroller are<br />
determined by standing in front of<br />
and facing the stroller.<br />
3 Insert the U-shaped bar (A) into the openings on the front<br />
of the adaptor brackets.<br />
Indicator<br />
5 From the rear of the stroller, connect the second U-shaped bar (B)<br />
over the ends of the already installed U-shaped bar (A) until it<br />
clicks into place. You will see only green in the indicator on top of<br />
the bars when the U-shaped bars are locked in place.<br />
2 Open the compression<br />
locks on the <strong>Adaptor</strong><br />
Brackets by flipping<br />
the red latches up.<br />
4 Close the compression locks on the adaptor<br />
brackets by flipping the red latches down,<br />
locking the U-shaped bar (A) in place.<br />
CliCk<br />
6 Place car seat on the car seat adaptor and<br />
press down firmly until it clicks into place.<br />
Fasten and properly tighten the <strong>Adaptor</strong><br />
Bracket Safety Belt over the car seat before<br />
operation.
Chicco<br />
Uses the 2 <strong>Adaptor</strong> Brackets, U-shaped bar (A), and the U-shaped bar (B)<br />
Support Bar Configuration:<br />
The car seat adaptor comes fully assembled for use with Graco model car seats. The Graco support bar (D) and spring<br />
support bar (C) must be removed prior to attaching your Chicco car seat to the <strong>Baby</strong> <strong>Jogger</strong> <strong>Car</strong> <strong>Seat</strong> <strong>Adaptor</strong>.<br />
1 Holding the U-shaped bar (B), unsnap Graco support bar (D)<br />
from the Spring support bar (C) and remove.<br />
<strong>Car</strong> <strong>Seat</strong> <strong>Adaptor</strong> Installation:<br />
CliCk<br />
1 Insert <strong>Adaptor</strong> Brackets into the<br />
corresponding mounting brackets on your<br />
stroller. The <strong>Adaptor</strong> Brackets are secure<br />
when they click into place.<br />
NOTE: The right and left mounting<br />
brackets on your stroller are<br />
determined by standing in front of<br />
and facing the stroller.<br />
3 Insert the U-shaped bar (A) into the openings on the front<br />
of the adaptor brackets.<br />
Indicator<br />
5 From the rear of the stroller, connect the second U-shaped bar (B)<br />
over the ends of the already installed U-shaped bar (A) until it<br />
clicks into place. You will see only green in the indicator on top of<br />
the bars when the U-shaped bars are locked in place.<br />
2 Squeeze spring support bar (C) and<br />
remove from U-shaped support bar (B).<br />
2 Open the compression<br />
locks on the <strong>Adaptor</strong><br />
Brackets by flipping<br />
the red latches up.<br />
4 Close the compression locks on the adaptor<br />
brackets by flipping the red latches down,<br />
locking the U-shaped bar (A) in place.<br />
CliCk<br />
6 Place car seat on the car seat adaptor and<br />
press down firmly until it clicks into place.<br />
Fasten and properly tighten the <strong>Adaptor</strong><br />
Bracket Safety Belt over the car seat before<br />
operation.<br />
5
<strong>Baby</strong> Trend, Britax, Evenflo, Safety 1st<br />
Uses the 2 <strong>Adaptor</strong> Brackets, U-shaped bar (A), and the U-shaped bar (B)<br />
Support Bar Configuration:<br />
6<br />
The car seat adaptor comes fully assembled for use with Graco model car seats. The Graco support bar (D) and spring<br />
support bar (C) must be removed prior to attaching your car seat to the <strong>Baby</strong> <strong>Jogger</strong> <strong>Car</strong> <strong>Seat</strong> <strong>Adaptor</strong>.<br />
1 Holding the U-shaped bar (B), unsnap Graco support bar (D)<br />
from the Spring support bar (C) and remove.<br />
<strong>Car</strong> <strong>Seat</strong> <strong>Adaptor</strong> Installation:<br />
CliCk<br />
1 Insert <strong>Adaptor</strong> Brackets into the<br />
corresponding mounting brackets on your<br />
stroller. The <strong>Adaptor</strong> Brackets are secure<br />
when they click into place.<br />
NOTE: The right and left mounting<br />
brackets on your stroller are<br />
determined by standing in front of<br />
and facing the stroller.<br />
3 Insert the U-shaped bar (A) into the openings on the front<br />
of the adaptor brackets.<br />
Indicator<br />
5 From the rear of the stroller, connect the second U-shaped bar (B)<br />
over the ends of the already installed U-shaped bar (A) until it<br />
clicks into place. You will see only green in the indicator on top of<br />
the bars when the U-shaped bars are locked in place.<br />
2 Squeeze spring support bar (C) and<br />
remove from U-shaped support bar (B).<br />
2 Open the compression<br />
locks on the <strong>Adaptor</strong><br />
Brackets by flipping<br />
the red latches up.<br />
4 Close the compression locks on the adaptor<br />
brackets by flipping the red latches down,<br />
locking the U-shaped bar (A) in place.<br />
CliCk<br />
6 Place car seat on the car seat adaptor. Fasten and<br />
properly tighten the <strong>Adaptor</strong> Bracket Safety Belt<br />
over the car seat before operation.
<strong>Car</strong> <strong>Seat</strong> <strong>Adaptor</strong> Installation:<br />
CliCk<br />
CliCk<br />
Cybex & Maxi Cosi<br />
Uses the 2 <strong>Adaptor</strong> Brackets<br />
1 Insert <strong>Adaptor</strong> Brackets into the<br />
corresponding mounting brackets on your<br />
stroller. The <strong>Adaptor</strong> Brackets are secure<br />
when they click into place.<br />
NOTE: The right and left mounting<br />
brackets on your stroller are<br />
determined by standing in front of<br />
and facing the stroller.<br />
2 Close the compression locks on the adaptor<br />
brackets by flipping the red latches down.<br />
3 Place car seat on the car seat<br />
adaptor and press down<br />
firmly until it clicks into place.<br />
Fasten and properly tighten<br />
the <strong>Adaptor</strong> Bracket Safety<br />
Belt over the car seat before<br />
operation.<br />
7
8<br />
Second <strong>Seat</strong> Kit<br />
Allows you to convert your single City Select stroller<br />
into a double. This kit comes with the complete<br />
second seat and the second seat mounting brackets.<br />
Bassinet Kit<br />
Allows you to convert your City Select seat into a<br />
Bassinet. The Bassinet Kit contains plush fabric and<br />
support brackets that convert the City Select’s single<br />
seat into a Bassinet in a few simple steps.<br />
Child Tray<br />
Features a cup holder and easy to clean surface.<br />
Belly Bar<br />
Provides child with a soft padded area to hold on to<br />
when the stroller is in use.<br />
Rain Canopy - <strong>Seat</strong><br />
Completely encloses the front and sides of the City<br />
Select seat while providing ventilation in inclement<br />
weather. Made from BPA and PVC Free material.<br />
Rain Canopy - Basket<br />
Nylon covering designed to protect the contents of<br />
the City Select basket from inclement weather.<br />
Rain Canopy - Bassinet<br />
Completely encloses the top and sides of the<br />
City Select Bassinet while providing ventilation in<br />
inclement weather. Made from BPA and PVC Free<br />
material.<br />
Other Available Accessories<br />
<strong>Car</strong>ry Bag<br />
Protects your stroller during transport or storage.<br />
Universal Parent Console<br />
Features a cup holder and additional storage<br />
compartments.<br />
MP3 Console<br />
Plug your MP3 player into the console and play music<br />
for you or your child. Features a large storage<br />
compartment and cup holder.<br />
Glider Board<br />
Attaches to rear axle of any single or double <strong>Baby</strong><br />
<strong>Jogger</strong> stroller to allow your toddler to ride along.<br />
Holds up to 45 lbs.<br />
Foot Muff<br />
For children 6-18 mo. Keeps legs & feet warm in<br />
inclement weather.<br />
Plush Stroller Hand Muff<br />
Keeps your hands warm and dry while pushing your<br />
stroller. Features a soft and plush interior and<br />
weatherproof exterior.<br />
Cooler Bag<br />
Designed to help keep food or drinks cold.<br />
Holds six 12 oz. cans.<br />
For the most up to date information on our list of compatible car seats, please visit the FAQ section<br />
of our website or call <strong>Baby</strong> <strong>Jogger</strong> customer service at 800-241-1848.<br />
<strong>Car</strong> seat models or brands sold internationally are not always confirmed to be compatible with<br />
<strong>Baby</strong> <strong>Jogger</strong>’s car seat adaptors. If you need assistance determining the compatibility of your international<br />
car seat, please visit our website to locate the distributor nearest you.<br />
8575 Magellan Parkway, Suite 1000 • Richmond, VA 23227 • T: 800-241-1848 • F: 804-262-6277 • www.babyjogger.com