

Vacuum Pumps - Apex Engineering Products Corporation
Vacuum Pumps - Apex Engineering Products Corporation
Vacuum Pumps - Apex Engineering Products Corporation

You also want an ePaper? Increase the reach of your titles
YUMPU automatically turns print PDFs into web optimized ePapers that Google loves.
<strong>Vacuum</strong> <strong>Pumps</strong><br />
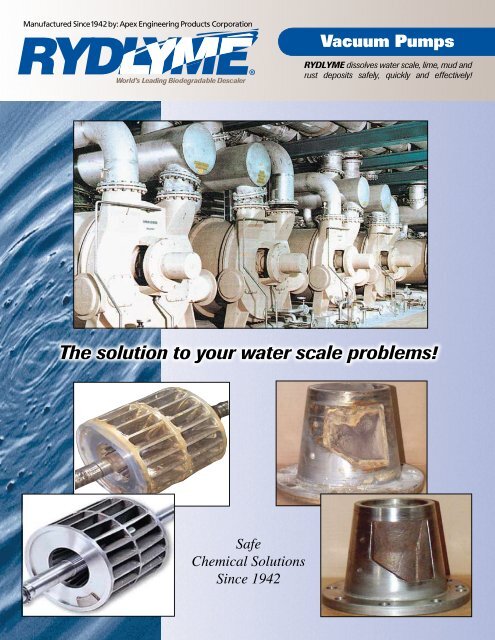
RYDLYME dissolves water scale, lime, mud and<br />
rust deposits safely, quickly and effectively!<br />
The solution to your water scale problems!<br />
Safe<br />
Chemical Solutions<br />
Since 1942
RYDLYME Procedure for Cleaning Nash, SIHI, Somarakis<br />
and Vooner Liquid Ring <strong>Vacuum</strong> <strong>Pumps</strong><br />
When water scale, lime, mud and rust accumulate on the water side of liquid ring compressors or vacuum pumps, this not only drastically<br />
reduces volume and efficiency, but also increases electrical consumption. This information is quantified by measuring the before & after draw<br />
of amperage in your drive motors multiplied by the cost per kw/hr at your facility. By performing regular RYDLYME cleanings, your vacuum<br />
pump will continue running efficiently and avoid potential costly shutdowns. But the benefits don’t stop here; shutdowns caused by scale in<br />
vacuum pumps can result in, but are not limited to, under deposit corrosion, unbalanced rotors, reduced seal water supply and overworked<br />
drive motors!<br />
In order to effectively and safely return operating efficiency to Nash, SIHI, Somarakis, Vooner and other liquid ring vacuum pumps, the<br />
following procedure should be followed:<br />
1. Write down current or “before” amperage readings, cfm at vacuum capacity and<br />
the vacuum in inches of mercury.<br />
2. Take unit out of service.<br />
3. Insert “blank” in flanges of discharge piping (see figure 1) and tighten flange bolts.<br />
4. Remove bottom drain plug and allow all water to drain from pump casing. Replace<br />
bottom plug.<br />
5. Break seal water piping and attach RYDLYME pump discharge hose.<br />
6. Remove top plug, attach return hose and place other end of return hose in RYDLYME<br />
receiver.<br />
7. Add the prescribed quantity of RYDLYME to the receiver (see chart on back page) and<br />
start pump.<br />
8. In some instances additional water may be required to maintain circulation.<br />
Add only enough water to maintain circulation.<br />
9. Tighten pump seal packing to minimize leakage of RYDLYME.<br />
10. After 15 minutes of RYDLYME circulation, turn pump rotor 90 degrees by pulling<br />
on the drive belts or jacking the starter switch.<br />
11. Every 15 minutes thereafter, turn the pump rotor 90 degrees to assure a thorough<br />
cleaning of all interior parts of your pump, including hub, cones and rotor.<br />
12. Continue the circulation of RYDLYME for the recommended time frame.<br />
13. After the recommended circulation time, with intermitent turning of rotor, the<br />
pump should be clean and the rotor should turn freely.<br />
14. Shut off your pump and add a water supply hose into the receiving bucket.<br />
Disconnect your return hose from the pump system and put it in a drain. Turn<br />
on the water supply and the circulation pump, begin flushing out the unit for<br />
20 to 30 minutes or until the discharge runs clear.<br />
15. Shut off circulation pump and disconnect all the RYDLYME hoses.<br />
16. Reconnect the seal water piping.<br />
17. Remove “blank” in flanges of the discharge piping and tighten flange bolts.<br />
18. Return pump or compressor to service.<br />
19. Adjust the seal water rate to manufacturer‘s recommendations.<br />
20. After unit has stabilized, write down current or “after” amperage readings, cfm<br />
at vacuum capacity and vacuum in inches of mercury.<br />
21. Compare “before” readings with the “after” readings. The difference between<br />
the “before” and “after” amperage readings multiplied by the cost<br />
per kw/hr at your facility, will help you determine the short<br />
payback time required to justify future RYDLYME cleanings. RYDLYME<br />
cleanings of your liquid ring vacuum pumps should be performed<br />
on a preventative or predictive maintenance schedule.<br />
www.rydlyme.com<br />
When a Seized Rotor is Encountered<br />
A. Complete steps 1 through 7, then continue with steps B through E.<br />
B. It is best to introduce RYDLYME wherever possible. Start by removing<br />
both plugs from the top of the pump (if scale blocks the passage,<br />
take a screwdriver and poke it through). Then add 100% RYDLYME<br />
into the top ports as well as pumping some into the seal water<br />
passage. Once you have done this, please allow the RYDLYME to<br />
sit for 30 to 45 minutes. This will enable the product to start freeing<br />
up the pump. (Do not put the plugs back in until you start the circulation<br />
process). Be careful of foaming, as foaming could build pressure!<br />
C. After pumping RYDLYME for 10-15 minutes, turn rotor 180 degrees with<br />
wrench and pump another 15 minutes.<br />
D. RYDLYME will dissolve the water scale that causes the seizing and allow the<br />
remaining steps to be accomplished.<br />
E. Should the rotor remain seized after circulating RYDLYME for 10-15 minutes,<br />
disconnect the hose from the plug (discharge hose from pump)<br />
and attach this hose to the opening at the top of the casing. Circulate<br />
RYDLYME into this opening for 10 minutes while periodically testing to<br />
see if the rotor has freed. When rotor is free, proceed according to the<br />
instructions. Now continue with steps 8 through 22.<br />
Figure 1<br />
SAVE $25,000!<br />
To calculate your approximate annual electrical savings,<br />
multiply the difference in the “before” and “after” amperage<br />
readings by 1000. For instance, if your amperage readings<br />
dropped by 25 amps, your approximate annual savings is<br />
$25,000! Please contact our manufacturing facility for our<br />
detailed electrical conservation worksheet to ascertain your<br />
return on investment by using RYDLYME.<br />
RYDLYME<br />
OUT<br />
RYDLYME<br />
IN<br />
RYDLYME<br />
OUT<br />
RYDLYME<br />
IN
RYDLYME Procedure for Cleaning Siemens <strong>Vacuum</strong> <strong>Pumps</strong><br />
In order to effectively and safely return operating efficiency to your Siemens vacuum pump, the following instructions should be<br />
followed. When cleaning Siemens vacuum pumps there are two methods we propose, please utilize one of these techniques. If your pump<br />
has a separator tank, we recommend you drill and tap the side wall of the separator tank three inches from the bottom (these taps should<br />
be no less then one inch). If your pump does not have the separator tank, you will need to drill and tap the top of the blank flange (see<br />
diagrams below). Either method will allow the vacuum pump to be completely flooded with the RYDLYME solution and provide a proper<br />
return point.<br />
Caution: Do not utilize the seal water feed when cleaning a Siemens vacuum pump, Siemens has pressure sensitive packing that can be<br />
compromised if the feed rate is too high.<br />
1. Write down current or “before” amperage readings, cfm at<br />
vacuum capacity, and the vacuum in inches of mercury.<br />
2. Take the unit out of service.<br />
3. Shut the water off to the unit.<br />
4. Remove the “total drain plug” and allow the unit to completely drain.<br />
5. Insert “blanks” on the flange manifold, separator flange, and both the top<br />
and / or side discharge flanges, then tighten bolts.<br />
6. Take a screwdriver and poke it through any deposit that might<br />
be blocking or impeding the flow during the circulation on the<br />
“total drain port.”<br />
7. Hook up one circulation hose to the pump discharge and the other end<br />
to the total drain port.<br />
8. Hook your second hose up to the 1” male fitting on either the separator<br />
tank or the blank flange (depending on your situation), and return<br />
it to the receiver bucket.<br />
9. Add the prescribed quantity of RYDLYME to the receiver bucket (see chart<br />
on back page) and start pumping into the vacuum pump.<br />
10. Once you have introduced the recommended amount of RYDLYME, you will<br />
want to use water as the make up to complete the circulation.<br />
Add only enough water to maintain circulation.<br />
11. During the cleaning process, additional water may be needed to maintain<br />
circulation. It is common to keep the level inside of the receiving bucket 12<br />
inches below the top.<br />
12. After 30 minutes of RYDLYME circulation, it is best to start turning the<br />
rotor 90-degrees every 15 minutes by pulling on the drive belts or<br />
jacking the starter switch. This will assure a thorough cleaning of the hub and<br />
rotor.<br />
13. Continue the RYDLYME circulation for the designated amount of<br />
Tap separator here<br />
With Separator<br />
Circulation hook-up<br />
www.rydlyme.com<br />
time (see chart on back page). After the designated amount of circulation time,<br />
the pump should be clean and the rotor should turn freely. If not, the<br />
pump may have been more fouled than anticipated. In this case<br />
a longer circulation period, more RYDLYME, or both, may be<br />
needed to completely clean the unit.<br />
14. Shut off the circulating pump and disconnect the hose from the receiving<br />
bucket and put it in a drain.<br />
15. Now you are ready to flush the unit.<br />
16. Put a water supply hose into the receiving bucket, turn the circulation<br />
pump on and flush out the unit for 20 to 30 minutes or until the<br />
discharge runs clear.<br />
17. Disconnect all the RYDLYME hoses and the circulation pump.<br />
18. Replace your “total drain plug.”<br />
19. Remove all of the blanks in the flanges and tighten up the flange bolts.<br />
20. Open the seal water valves.<br />
21. Return the pump to service.<br />
22. Adjust the seal water rate to manufacturer‘s recommendations.<br />
23. After the unit has stabilized, write down the current or “after” amperage<br />
readings, cfm at vacuum capacity, and vacuum in inches of mercury.<br />
24. Compare the “before” and “after” readings. The difference between<br />
the “before” and “after” amperage readings multiplied by the cost per kW/hr<br />
at your facility, will help you determine the short payback time<br />
required to justify future RYDLYME cleanings.<br />
25. RYDLYME cleanings of your liquid ring vacuum pumps should be performed<br />
on a preventative or predictive maintenance schedule. Please reference<br />
page two of this brochure to calculate your approximate electrical cost savings<br />
as a result of a RYDLYME cleaning.<br />
Tap blank flange here<br />
Without Separator<br />
Circulation hook-up
Recommended RYDLYME Quantities<br />
Horse NASH SIEMENS SIHI SOMARAKIS VOONER Rydlyme Circulation<br />
Power Quantity Time<br />
10 CL-200, 2BE1/1202 LPH40412, SV0808 LR-3, LP-3 10 gallons 1 hour<br />
SC-3 & 4, & 1203 40517, 45317, & VG-3<br />
L3, H4, 50512, 50518,<br />
MT/AT-124 50523 & LEM250<br />
15 CL-300, 2BE1/1252 LPH55320, 60520, None LR-7, LP-7 10 gallons 1 hour<br />
SC-5, L4, H5 65320, KEH360 & & VG-7<br />
& AT-184 460, LEH360 & 460<br />
25 CL-400, None LPH60527, 65327 SV-1211 & HV-7 None 10 gallons 1 hour<br />
SC-6, SC-7, KEH560 & 760<br />
L5, H6 & K5 LEH560<br />
30 to 45 CL-700, L6, 2BE1/1252 LPH70123, 75320 SV-1414 LR-7, LP-7 15 gallons 2 hours<br />
L7, L8, H7, KEH860 & LEH760 & VG-7<br />
H8, K6, 8 &9<br />
60 CL-1000, None LPH70530, 70540, SV-1818 & LR-10, LP-10 20 gallons 2 hours<br />
CL-1500, H10 75330 & LEH860 SV-2023 & VG-10<br />
& AT1004<br />
80 to 120 CL-2000 & None LPH75340, 80540, SV-2523 LR-20, LP-20 25 gallons 2 hours<br />
CL-2003 80553, 85340 & VG-20<br />
80557<br />
125 to 175 CL-3000 & 3BE1/1303 LPH85353, 90554 SV-3028 LR-30, LP-30 55 gallons 3 hours<br />
AT-2004 & 1304 & VG-30<br />
180 to 225 CL-4000 & None LPH90567, 95354, SV-3633 LR-40, LP-40 60 gallons 3 hours<br />
AT-3004 95367 & VG-40<br />
250 to 325 CL-6000, 2BE1/1353 LPH10054 & 10534 SV-4440, SVP-3434 None 90 gallons 3 hours<br />
904L & 904M & 1355 & SVP-3442<br />
425 to 500 CL-9000, 904P 2BE1/1403 LPH11055 & 11535 SV-5348, SVP-4243 V4L50 120 gallons 3 hours<br />
& 904R & SVP-4252<br />
500 to 700 CL-14000, 2BE1/1405 & None SV-5372, SVP-5152 V460 180 gallons 4 hours<br />
904S, 904T & 2BE3/342 & SVO-5159<br />
Premier 2160<br />
650 Premier 2280 2BE3/350, 352 None None V4R95 330 gallons 4 hours<br />
2BE1/1603 V4S110 & 360 gallons 5 hours<br />
V4T130 360 gallons 5 hours<br />
750 Premier 2370 2BE1/1604 & None None None 440 gallons 5 hours<br />
2BE3/360, 362<br />
825 Premier 2480 2BE1/1655 & None None None 550 gallons 5 hours<br />
2BE3/367<br />
2BE1/1703 600 gallons 6 hours<br />
2BE1/1705 660 gallons 6 hours<br />
2BE3/372 715 gallons 6 hours<br />
1175 Premier 2620 None None None None 990 gallons 7 hours<br />
1241 Shoreline Drive<br />
Aurora, IL 60504<br />
630-820-8888<br />
630-820-8886 fax<br />
www.rydlyme.com<br />
1/09 Printed in U.S.A. ©<strong>Apex</strong> <strong>Engineering</strong> <strong>Products</strong> <strong>Corporation</strong><br />
RYDLYME is registered in the United States Patent and Trademark Office.