


Create successful ePaper yourself
Turn your PDF publications into a flip-book with our unique Google optimized e-Paper software.
V<br />
RESIDENTIAL APPLICATION GUIDE<br />
for VIC/ELITE and SNAP RIB<br />
CONCEALED FASTENER ROOFING SYSTEMS<br />
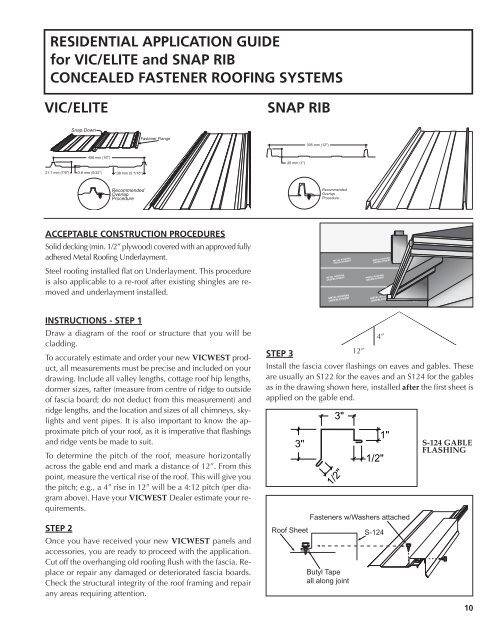
VIC/ELITE SNAP RIB<br />
21.7 mm (7/8")<br />
Snap Down<br />
406 mm (16")<br />
3.8 mm (5/32")<br />
138 mm (5 7/16")<br />
Recommended<br />
Overlap<br />
Procedure<br />
Fastener Flange<br />
ACCEPTABLE CONSTRUCTION PROCEDURES<br />
Solid decking (min. 1/2” plywood) covered with an approved fully<br />
adhered Metal Roofing Underlayment.<br />
Steel roofing installed flat on Underlayment. This procedure<br />
is also applicable to a re-roof after existing shingles are removed<br />
and underlayment installed.<br />
INSTRUCTIONS - STEP 1<br />
Draw a diagram of the roof or structure that you will be<br />
cladding.<br />
To accurately estimate and order your new VICWEST product,<br />
all measurements must be precise and included on your<br />
drawing. Include all valley lengths, cottage roof hip lengths,<br />
dormer sizes, rafter (measure from centre of ridge to outside<br />
of fascia board; do not deduct from this measurement) and<br />
ridge lengths, and the location and sizes of all chimneys, skylights<br />
and vent pipes. It is also important to know the approximate<br />
pitch of your roof, as it is imperative that flashings<br />
and ridge vents be made to suit.<br />
To determine the pitch of the roof, measure horizontally<br />
across the gable end and mark a distance of 12”. From this<br />
point, measure the vertical rise of the roof. This will give you<br />
the pitch; e.g., a 4” rise in 12” will be a 4:12 pitch (per diagram<br />
above). Have your VICWEST Dealer estimate your requirements.<br />
STEP 2<br />
Once you have received your new VICWEST panels and<br />
accessories, you are ready to proceed with the application.<br />
Cut off the overhanging old roofing flush with the fascia. Replace<br />
or repair any damaged or deteriorated fascia boards.<br />
Check the structural integrity of the roof framing and repair<br />
any areas requiring attention.<br />
26 mm (1")<br />
305 mm (12")<br />
Recommended<br />
Overlap<br />
Procedure<br />
STEP 3<br />
12”<br />
Install the fascia cover flashings on eaves and gables. These<br />
are usually an S122 for the eaves and an S124 for the gables<br />
as in the drawing shown here, installed after the first sheet is<br />
applied on the gable end.<br />
3"<br />
3"<br />
Fasteners w/Washers attached<br />
Roof Sheet S-124<br />
Butyl Tape<br />
all along joint<br />
4”<br />
1/2"<br />
1/2" 1"<br />
S-124 GABLE<br />
FLASHING<br />
10