


Create successful ePaper yourself
Turn your PDF publications into a flip-book with our unique Google optimized e-Paper software.
RESIDENTIAL APPLICATION GUIDE<br />
for<br />
ULTRA-VIC<br />
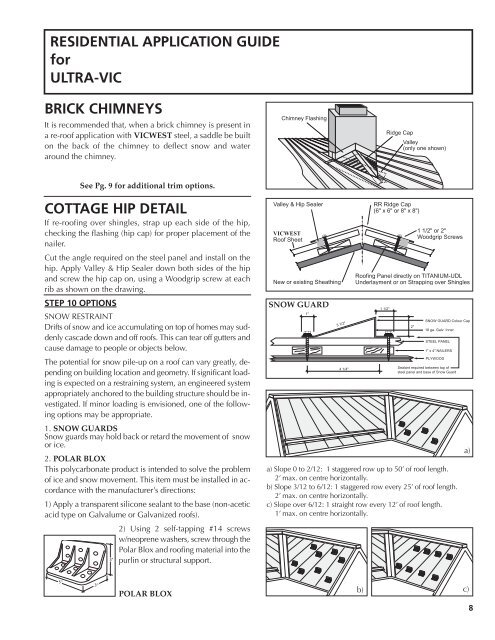
BRICK CHIMNEYS<br />
It is recommended that, when a brick chimney is present in<br />
a re-roof application with VICWEST steel, a saddle be built<br />
on the back of the chimney to deflect snow and water<br />
around the chimney.<br />
See Pg. 9 for additional trim options.<br />
COTTAGE HIP DETAIL<br />
If re-roofing over shingles, strap up each side of the hip,<br />
checking the flashing (hip cap) for proper placement of the<br />
nailer.<br />
Cut the angle required on the steel panel and install on the<br />
hip. Apply Valley & Hip Sealer down both sides of the hip<br />
and screw the hip cap on, using a Woodgrip screw at each<br />
rib as shown on the drawing.<br />
STEP 10 OPTIONS<br />
SNOW RESTRAINT<br />
Drifts of snow and ice accumulating on top of homes may suddenly<br />
cascade down and off roofs. This can tear off gutters and<br />
cause damage to people or objects below.<br />
The potential for snow pile-up on a roof can vary greatly, depending<br />
on building location and geometry. If significant loading<br />
is expected on a restraining system, an engineered system<br />
appropriately anchored to the building structure should be investigated.<br />
If minor loading is envisioned, one of the following<br />
options may be appropriate.<br />
1. SNOW GUARDS<br />
Snow guards may hold back or retard the movement of snow<br />
or ice.<br />
2. POLAR BLOX<br />
This polycarbonate product is intended to solve the problem<br />
of ice and snow movement. This item must be installed in accordance<br />
with the manufacturer’s directions:<br />
1) Apply a transparent silicone sealant to the base (non-acetic<br />
acid type on Galvalume or Galvanized roofs).<br />
2) Using 2 self-tapping #14 screws<br />
w/neoprene washers, screw through the<br />
Polar Blox and roofing material into the<br />
purlin or structural support.<br />
POLAR BLOX<br />
Chimney Flashing<br />
Valley & Hip Sealer<br />
VICWEST<br />
Roof Sheet<br />
New or existing Sheathing<br />
SNOW GUARD<br />
1"<br />
R<br />
3 1/2"<br />
4 1/4"<br />
Ridge Cap<br />
Valley<br />
(only one shown)<br />
RR Ridge Cap<br />
(6" x 6" or 8" x 8")<br />
1 1/2" or 2"<br />
Woodgrip Screws<br />
Roofing Panel directly on TITANIUM-UDL<br />
Underlayment or on Strapping over Shingles<br />
1 1/2"<br />
2"<br />
SNOW GUARD Colour Cap<br />
18 ga. Galv. Inner<br />
STEEL PANEL<br />
1" x 4" NAILERS<br />
PLYWOOD<br />
Sealant required between top of<br />
steel panel and base of Snow Guard<br />
a) Slope 0 to 2/12: 1 staggered row up to 50’ of roof length.<br />
2’ max. on centre horizontally.<br />
b) Slope 3/12 to 6/12: 1 staggered row every 25’ of roof length.<br />
2’ max. on centre horizontally.<br />
c) Slope over 6/12: 1 straight row every 12’ of roof length.<br />
1’ max. on centre horizontally.<br />
b) c)<br />
a)<br />
8