TREPPENLICHTAUTOMAT TA STAIRCASE LIGHT TIME ... - Grothe
TREPPENLICHTAUTOMAT TA STAIRCASE LIGHT TIME ... - Grothe
TREPPENLICHTAUTOMAT TA STAIRCASE LIGHT TIME ... - Grothe

Create successful ePaper yourself
Turn your PDF publications into a flip-book with our unique Google optimized e-Paper software.
09/05<br />
Bedienungs- und Installationsanleitung<br />
Instructions for Operation and Installation<br />
Sehr geehrte Kundin,<br />
sehr geehrter Kunde,<br />
mit Ihrem neuen Treppenlichtzeitschalter der Serie <strong>TA</strong> haben Sie ein<br />
Qualitätsprodukt aus dem Hause GROTHE erworben, das wir für Sie mit größter<br />
Sorgfalt und mit höchstemAnspruch entwickelt und hergestellt haben.<br />
Sollten Sie dennoch während der Garantiezeit einen Fehler feststellen, so setzen Sie<br />
sich bitte mit Ihrem Elektro-Fachbetrieb in Verbindung. GROTHE ersetzt die<br />
defekten Teile oder bessert sie nach. Von dieser Gewährleistung ausgeschlossen<br />
sind Defekte, die durch unsachgemäße Behandlung, nicht bestimmungsgemäßer<br />
Verwendung oder Mißachtung der Bedienungs- und Installationsanleitung<br />
eingetreten sind.<br />
Bitte beachten Sie, dass Einbau und Montage elektrischer Geräte nur durch eine<br />
Elektro-Fachkraft erfolgen dürfen!<br />
Es sind die länderspezifischen Vorschriften für Elektro-Installationen zu<br />
berücksichtigen (z.B. die Norm VDE 0100 und 0160)!<br />
Funktionsweise / Bedienung<br />
Zeiteinstellung: Drehschalter “ A”<br />
auf die gewünschte Zeit einstellen<br />
( max. 12 Minuten, siehe Aufdruck auf Typenschild).<br />
<strong>TA</strong> 220c<br />
Funktionsarten bei Typ <strong>TA</strong>220c (Drehschalter “ B”)<br />
<strong>TA</strong> 210c<br />
t<br />
TLZ /<br />
= Dauer “ein”<br />
= Zeit-Automatik, nachschaltbar<br />
TLZ/<br />
A<br />
TLZ /<br />
TLZ /<br />
= Zeit-Automatik +Ausschalt-Vorwarnung<br />
= Zeit-Automatik + Dauerlicht über Lichttaster<br />
B<br />
TLZ / = Zeit-Automatik +Auschalt-Vorwarnung + Dauerlicht über Lichttaster<br />
Ausschalt-Vorwarnung<br />
Ca. eine halbe Minute vor Ablauf der Zeit beginnt das Licht in kurzem zeitlichen<br />
Abstand mehrmals zu flackern. Sie können dann rechtzeitig vom<br />
nächstgelegenen Lichttaster aus das Licht nachschalten.<br />
Schaltzeit-Verlängerung<br />
Drücken Sie den Lichttaster in weniger als 1 Sekunde mehrmals hintereinander,<br />
so können Sie die Leuchtdauer um die am Treppenlichtautomaten eingestellte<br />
Zeit verlängern (z.B.: 3 mal drücken = 6 Minuten, wenn eingestellte Zeit 2 Minuten<br />
ist). Maximal ist eine 5-fache Verlängerung möglich.<br />
Dauerlicht (über Lichttaster)<br />
Drücken Sie den Lichttaster länger als 1 Sekunde,<br />
so wird das Dauerlicht<br />
eingeschaltet. Dabei flackert das Licht zur Bestätigung einmal. Sie können das<br />
Dauerlicht wieder ausschalten, indem Sie den Lichttaster länger als 2 Sekunden<br />
drücken. Zur Bestätigung flackert das Licht hierbei einmal. Die Dauerlichtfunktion<br />
wird nach ca. 1 Stunde automatisch beendet, falls sie vorher nicht manuell<br />
abgeschaltet wurde.<br />
BM Eingang Bewegungsmelder<br />
Eingang zum Anschluss eines Bewegungsmelders. Bei Detektion einer<br />
Bewegung schaltet sich das Licht ein. Nachdem der Bewegungsmelder keine<br />
Bewegung mehr registriert, bleibt das Licht eingeschaltet, bis die am Treppenlichtzeitschalter<br />
eingestellte Zeit abgelaufen ist.<br />
Installation / weitere Hinweise<br />
Haupt-Schalter derAnlage ausschalten und gegen Wieder-Einschalten sichern!<br />
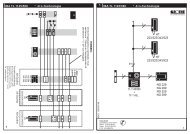
Bilder 1-5 zeigen, welche Schaltungen mit den jeweiligen <strong>TA</strong>-Typen möglich sind!<br />
Die Netzspannung (~230V) ist auch dann anzuschließen, wenn mit der<br />
Steuerspannung 8-230 V über Klemmen C1/C2 angesteuert wird (Bilder 2 und 4)!<br />
Die Umstellung auf 3- oder 4-Leiterschaltung erfolgt bei allen Modellen der Serie<br />
<strong>TA</strong>220c automatisch!<br />
Beachten Sie bitte bei Austausch-Installationen gegen die Vorgänger-Modelle <strong>TA</strong> 22<br />
und <strong>TA</strong>23 Bilder 7 und 8 mit den entsprechenden Hinweisen!<br />
Technische Daten<br />
siehe Typenschilder<br />
<strong>Grothe</strong> GmbH Telefon: (0 22 42) 88 90-0<br />
Löhestraße 22 Telefax: (0 22 42) 88 90-36<br />
53773 Hennef e-mail: info@grothe.de<br />
Internet: www.grothe.de<br />
1<br />
3<br />
4-Leiter-Schaltung, Steuerspannung 230V<br />
<strong>TA</strong> 220c<br />
3-Leiter-Schaltung, Steuerspannung 230V<br />
L<br />
<strong>TA</strong> 220c<br />
5<br />
N<br />
L<br />
N<br />
BM<br />
N L<br />
N L<br />
BM<br />
N L<br />
N L<br />
<strong>TREPPENLICH<strong>TA</strong>UTOMAT</strong> <strong>TA</strong><br />
S<strong>TA</strong>IRCASE <strong>LIGHT</strong> <strong>TIME</strong> SWITCH<br />
X X<br />
X X<br />
Nur<br />
für Ersatz-<br />
Installation!<br />
Replacement<br />
installation only!<br />
4-Leiter-Schaltung mit Bewegungsmelder 1<br />
<strong>TA</strong> 220c<br />
L<br />
N<br />
BM<br />
N L<br />
N L<br />
X X<br />
- Nach Freiwerden des BM (keine Bewegung mehr) leuchtet die Lampe<br />
so lange, bis die eingestellte Zeit abgelaufen ist.<br />
Installation<br />
1<br />
4-Leiter-Schaltung, Steuersp. 8-230V<br />
Austausch-Installation gegen die Vorgängermodelle <strong>TA</strong> 22 / <strong>TA</strong> 23 und <strong>TA</strong> 210 / <strong>TA</strong> 220:<br />
Die Belegung der Klemmen ist gemäß Bild 7/8 zu ändern. Bei Geräteaustausch und Änderung<br />
der bauseitigen Installation farblich richtigeAdern-Kennzeichnung sicherstellen!<br />
7<br />
1 4-Leiter-Schaltung, Austausch <strong>TA</strong>22 / <strong>TA</strong>23<br />
alt/old:<br />
L<br />
N<br />
L L<br />
N<br />
neu/new:<br />
L<br />
N<br />
Typ<br />
<strong>TA</strong> 22<br />
<strong>TA</strong> 23<br />
L 4 3<br />
Typ<br />
<strong>TA</strong> 210<br />
<strong>TA</strong> 220<br />
Typ<br />
<strong>TA</strong> 220c<br />
L<br />
T L*<br />
X<br />
N<br />
N<br />
N<br />
1<br />
BM<br />
2<br />
C1 C2<br />
C1 C2<br />
2<br />
<strong>TA</strong> 220c<br />
L<br />
N<br />
BM<br />
N L<br />
C1 C2<br />
N L<br />
(+) 8-230V~/=<br />
X X<br />
- zusätzliche Ansteuerung mit =/~8-230V über galvanisch<br />
getrennten Eingang<br />
4<br />
3-Leiter-Schaltung, Steuersp. 8-230V<br />
L<br />
<strong>TA</strong> 220c<br />
N<br />
BM<br />
N L<br />
C1 C2<br />
N L<br />
(+) 8-230V~/=<br />
X X<br />
Nur<br />
für Ersatz-<br />
Installation!<br />
Replacement<br />
installation only!<br />
- zusätzliche Ansteuerung mit =/~8-230V über galvanisch<br />
getrennten Eingang<br />
8<br />
alt/old:<br />
L<br />
N<br />
L<br />
N<br />
3-Leiter-Schaltung, Austausch <strong>TA</strong>22 / <strong>TA</strong>23<br />
neu/new:<br />
L<br />
N<br />
Typ<br />
X<br />
<strong>TA</strong> 22 L 3 N<br />
<strong>TA</strong> 23<br />
Typ<br />
<strong>TA</strong> 210<br />
L T N L* C1 C2<br />
<strong>TA</strong> 220<br />
Typ<br />
<strong>TA</strong> 220c<br />
L N<br />
C1 C2<br />
1<br />
2<br />
1<br />
an urmet company
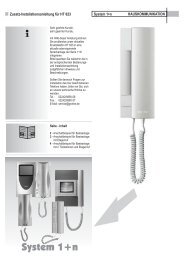
Bedienungs- und Installationsanleitung<br />
Instructions for Operation and Installation<br />
Dear customer,<br />
Your new Staircase Light Time Switch <strong>TA</strong> has been developed and manufactured to<br />
the highest standards using the most advanced components.<br />
In the unlikely event of a fault occuring during the warranty period, please contact<br />
your supplier, who will arrange that GROTHE repairs or replaces any defective parts.<br />
This warranty does not cover any damage caused by improper treatment, handling,<br />
incorrect usage or installation.<br />
We recommend that, if you are uncertain of the correct installation procedure a<br />
suitable qualified electrician should install the product. Please refer to specific<br />
national and local electrical installation regulations.<br />
Functional description / operation<br />
Setting the time: Set the rotary switch “ A”<br />
to the desired time (max. 12 minutes, see<br />
indication on the data plate)<br />
<strong>TA</strong> 220c<br />
<strong>TA</strong> 210c<br />
t<br />
Type <strong>TA</strong>220c functions (rotary switch “ B”):<br />
A<br />
TLZ /<br />
TLZ /<br />
TLZ /<br />
TLZ /<br />
Installation / further advice<br />
Switch off the mains and remove the relevant fuse during installation!<br />
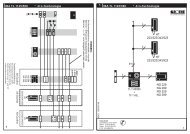
Figures 1-5 show the connections available with each model!<br />
The mains supply voltage (AC 230 V) must be connected even if it is being triggered<br />
with control voltage 8-230 V at terminals C1/C2 (figures 2 and 4)!<br />
Conversion to a 3- or 4-wire-connection at all models <strong>TA</strong> 220c will be performed<br />
automatically!<br />
Replacement installation of the former models <strong>TA</strong> 22 and <strong>TA</strong> 23: please refer to<br />
figures 7 and 8!<br />
See data plates<br />
= Permanent mode “on” / Continuous light<br />
B<br />
= Automatic time switch, time extendable<br />
=Automatic time switch + Early warning switch-off system<br />
=Automatic time switch + Continuous light by means of push<br />
=Automatic time switch + Early warn. switch-off system + Continuous light<br />
Early warning switch-off system<br />
The light will start to flicker several times about 1/2 minute before the light is<br />
switched off. This will enable you to reach the nearest light push in oder to prolong<br />
the period of illumination.<br />
Prolongation of time<br />
By pressing a light push several times within less than 1 second,<br />
the lighting period<br />
will be prolonged by the time set at the time switch (e.g. pressing 3 times =<br />
6 minutes with a set time of 2 minutes). Max. five prolongations are possible.<br />
Continuous light (by means of light push)<br />
By pressing the light push continuously for more than 1 second,<br />
the light will switch<br />
on and remain illuminated. The light flickers once to confirm this mode. By pressing<br />
the light push for more than 2 seconds,<br />
you can switch off the continuous light. To<br />
confirm this mode the light flickers once.The continuous light function will end after<br />
1 hour automatically, if the light hadn´t been switched off with the light push.<br />
BM Connection for Motion Detector<br />
Terminal to connect a motion detector. After the motion is detected, the lamp will<br />
be switched on. After no motion is detected anymore, the lamp stays illuminated<br />
until the preset time at the staircase light time switch will elapse.<br />
Technical Data<br />
<strong>Grothe</strong> GmbH Phone: +49 (0) 22 42-88 90-0<br />
Löhestraße 22 Fax: +49 (0) 22 42-88 90-36<br />
53773 Hennef e-mail: info@grothe.de<br />
Internet: www.grothe.de<br />
TLZ/<br />
1<br />
<strong>TA</strong> 220c<br />
3<br />
L<br />
<strong>TA</strong> 220c<br />
5<br />
N<br />
L<br />
N<br />
BM<br />
N L<br />
N L<br />
BM<br />
N L<br />
N L<br />
<strong>TREPPENLICH<strong>TA</strong>UTOMAT</strong> <strong>TA</strong><br />
S<strong>TA</strong>IRCASE <strong>LIGHT</strong> <strong>TIME</strong> SWITCH<br />
X X<br />
X X<br />
Nur<br />
für Ersatz-<br />
Installation!<br />
Replacement<br />
installation only!<br />
4-wire-connection with movement detector 1<br />
<strong>TA</strong> 220c<br />
71<br />
N<br />
L<br />
N<br />
alt/old:<br />
L<br />
L L<br />
N<br />
neu/new:<br />
L<br />
N<br />
BM<br />
N L<br />
N L<br />
Typ<br />
<strong>TA</strong> 22<br />
<strong>TA</strong> 23<br />
L 4 3<br />
Typ<br />
<strong>TA</strong> 210<br />
<strong>TA</strong> 220<br />
Typ<br />
<strong>TA</strong> 220c<br />
L<br />
T L*<br />
X X<br />
X<br />
N<br />
N<br />
N<br />
1<br />
Installation<br />
4-wire-connection, control voltage 230V 4-wire-connection, contr. volt. 8-230V<br />
2<br />
1<br />
C1 C2<br />
C1 C2<br />
2<br />
<strong>TA</strong> 220c<br />
4<br />
L<br />
<strong>TA</strong> 220c<br />
8<br />
L<br />
N<br />
N<br />
alt/old:<br />
L<br />
N<br />
neu/new:<br />
L<br />
N<br />
BM<br />
N L<br />
C1 C2<br />
N L<br />
(+) 8-230V~/=<br />
- additional triggering with AC/DC 8-230V via<br />
galvanically insulated input<br />
L<br />
N<br />
BM<br />
N L<br />
C1 C2<br />
N L<br />
(+) 8-230V~/=<br />
Typ<br />
X X<br />
3-wire-connection, control voltage 230V 3-wire-connection, contr. volt. 8-230V<br />
BM<br />
- After no motion is detected anymore (BM) , the lamp stays illuminated<br />
until the preset time will elapse.<br />
- additional triggering with AC/DC 8-230V via<br />
galvanically insulated input<br />
X X<br />
Nur<br />
für Ersatz-<br />
Installation!<br />
Replacement<br />
installation only!<br />
Replacement installation of the former models <strong>TA</strong> 22 / <strong>TA</strong> 23 and <strong>TA</strong> 210 / <strong>TA</strong>220:<br />
Change the terminal connections as shown in figures 7/8. When replacing the appliance or<br />
changing the on-site installation, ensure that conductors are marked with the correct colours!<br />
4-wire-connection, replacem. <strong>TA</strong>22 / <strong>TA</strong>23<br />
3-wire-connection, replacem. <strong>TA</strong>22 / <strong>TA</strong>23<br />
X<br />
<strong>TA</strong> 22 L 3 N<br />
<strong>TA</strong> 23<br />
Typ<br />
<strong>TA</strong> 210<br />
L T N L* C1 C2<br />
<strong>TA</strong> 220<br />
Typ<br />
<strong>TA</strong> 220c<br />
L N<br />
C1 C2<br />
1<br />
2<br />
1<br />
an urmet company