

Panel Radiators - Fitch Specialties
Panel Radiators - Fitch Specialties
Panel Radiators - Fitch Specialties

You also want an ePaper? Increase the reach of your titles
YUMPU automatically turns print PDFs into web optimized ePapers that Google loves.
Applications manual<br />
4. Mounting Guidelines<br />
<strong>Panel</strong> Radiator Installation<br />
Model 22 and 33 radiators can be wall or fl oor mounted.<br />
Model 11 radiators can be wall mounted only. All wall<br />
brackets must be secured to studs or other supports of<br />
suffi cient strength for panel radiator weight. <strong>Radiators</strong> with<br />
a length of 71” or less require 2 brackets (1 set); lengths<br />
79” or larger require 2 sets.<br />
Note: Do not attempt to mount radiators to sheet rock or<br />
similar material.<br />
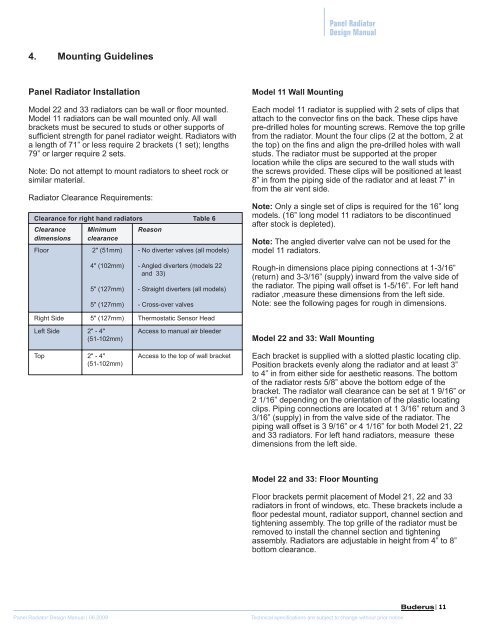
Radiator Clearance Requirements:<br />
Clearance for right hand radiators Table 6<br />
Clearance<br />
dimensions<br />
Minimum<br />
clearance<br />
Floor 2" (51mm)<br />
4" (102mm)<br />
5" (127mm)<br />
5" (127mm)<br />
Reason<br />
- No diverter valves (all models)<br />
- Angled diverters (models 22<br />
and 33)<br />
- Straight diverters (all models)<br />
- Cross-over valves<br />
Right Side 5" (127mm) Thermostatic Sensor Head<br />
Left Side 2" - 4"<br />
(51-102mm)<br />
Top 2" - 4"<br />
(51-102mm)<br />
Access to manual air bleeder<br />
Access to the top of wall bracket<br />
Model 11 Wall Mounting<br />
<strong>Panel</strong> Radiator<br />
Design Manual<br />
Each model 11 radiator is supplied with 2 sets of clips that<br />
attach to the convector fi ns on the back. These clips have<br />
pre-drilled holes for mounting screws. Remove the top grille<br />
from the radiator. Mount the four clips (2 at the bottom, 2 at<br />
the top) on the fi ns and align the pre-drilled holes with wall<br />
studs. The radiator must be supported at the proper<br />
location while the clips are secured to the wall studs with<br />
the screws provided. These clips will be positioned at least<br />
8” in from the piping side of the radiator and at least 7” in<br />
from the air vent side.<br />
Note: Only a single set of clips is required for the 16” long<br />
models. (16” long model 11 radiators to be discontinued<br />
after stock is depleted).<br />
Note: The angled diverter valve can not be used for the<br />
model 11 radiators.<br />
Rough-in dimensions place piping connections at 1-3/16”<br />
(return) and 3-3/16” (supply) inward from the valve side of<br />
the radiator. The piping wall offset is 1-5/16”. For left hand<br />
radiator ,measure these dimensions from the left side.<br />
Note: see the following pages for rough in dimensions.<br />
Model 22 and 33: Wall Mounting<br />
Each bracket is supplied with a slotted plastic locating clip.<br />
Position brackets evenly along the radiator and at least 3”<br />
to 4” in from either side for aesthetic reasons. The bottom<br />
of the radiator rests 5/8” above the bottom edge of the<br />
bracket. The radiator wall clearance can be set at 1 9/16” or<br />
2 1/16” depending on the orientation of the plastic locating<br />
clips. Piping connections are located at 1 3/16” return and 3<br />
3/16” (supply) in from the valve side of the radiator. The<br />
piping wall offset is 3 9/16” or 4 1/16” for both Model 21, 22<br />
and 33 radiators. For left hand radiators, measure these<br />
dimensions from the left side.<br />
Model 22 and 33: Floor Mounting<br />
Floor brackets permit placement of Model 21, 22 and 33<br />
radiators in front of windows, etc. These brackets include a<br />
fl oor pedestal mount, radiator support, channel section and<br />
tightening assembly. The top grille of the radiator must be<br />
removed to install the channel section and tightening<br />
assembly. <strong>Radiators</strong> are adjustable in height from 4” to 8”<br />
bottom clearance.<br />
<strong>Panel</strong> Radiator Design Manual | 06.2009 Technical specifi cations are subject to change without prior notice<br />
| 11