

MANIC FREAK - Schumacher Racing
MANIC FREAK - Schumacher Racing
MANIC FREAK - Schumacher Racing

You also want an ePaper? Increase the reach of your titles
YUMPU automatically turns print PDFs into web optimized ePapers that Google loves.
SChuMAChER 1:8 4WD tWIn-EngInE ‘MAnIC’ MOnStER<br />
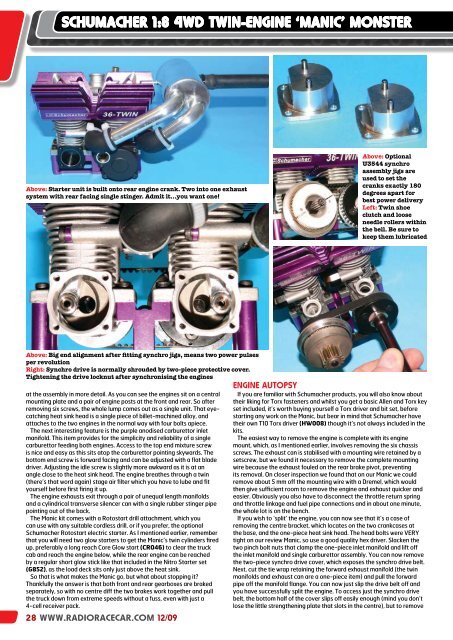
Above: Starter unit is built onto rear engine crank. Two into one exhaust<br />
system with rear facing single stinger. Admit it…you want one!<br />
Above: Big end alignment after fitting synchro jigs, means two power pulses<br />
per revolution<br />
Right: Synchro drive is normally shrouded by two-piece protective cover.<br />
Tightening the drive locknut after synchronising the engines<br />
at the assembly in more detail. As you can see the engines sit on a central<br />
mounting plate and a pair of engine posts at the front and rear. So after<br />
removing six screws, the whole lump comes out as a single unit. That eyecatching<br />
heat sink head is a single piece of billet-machined alloy, and<br />
attaches to the two engines in the normal way with four bolts apiece.<br />
The next interesting feature is the purple anodised carburettor inlet<br />
manifold. This item provides for the simplicity and reliability of a single<br />
carburettor feeding both engines. Access to the top end mixture screw<br />
is nice and easy as this sits atop the carburettor pointing skywards. The<br />
bottom end screw is forward facing and can be adjusted with a flat blade<br />
driver. Adjusting the idle screw is slightly more awkward as it is at an<br />
angle close to the heat sink head. The engine breathes through a twin<br />
(there’s that word again) stage air filter which you have to lube and fit<br />
yourself before first firing it up.<br />
The engine exhausts exit through a pair of unequal length manifolds<br />
and a cylindrical transverse silencer can with a single rubber stinger pipe<br />
pointing out of the back.<br />
The Manic kit comes with a Rotostart drill attachment, which you<br />
can use with any suitable cordless drill, or if you prefer, the optional<br />
<strong>Schumacher</strong> Rotostart electric starter. As I mentioned earlier, remember<br />
that you will need two glow starters to get the Manic’s twin cylinders fired<br />
up, preferably a long reach Core Glow start (CR046) to clear the truck<br />
cab and reach the engine below, while the rear engine can be reached<br />
by a regular short glow stick like that included in the Nitro Starter set<br />
(G852), as the load deck sits only just above the heat sink.<br />
So that is what makes the Manic go, but what about stopping it?<br />
Thankfully the answer is that both front and rear gearboxes are braked<br />
separately, so with no centre diff the two brakes work together and pull<br />
the truck down from extreme speeds without a fuss, even with just a<br />
4-cell receiver pack.<br />
28 WWW.RADIORACECAR.COM 12/09<br />
Above: Optional<br />
U3544 synchro<br />
assembly jigs are<br />
used to set the<br />
cranks exactly 180<br />
degrees apart for<br />
best power delivery<br />
Left: Twin shoe<br />
clutch and loose<br />
needle rollers within<br />
the bell. Be sure to<br />
keep them lubricated<br />
EngInE AutOPSy<br />
If you are familiar with <strong>Schumacher</strong> products, you will also know about<br />
their liking for Torx fasteners and whilst you get a basic Allen and Torx key<br />
set included, it’s worth buying yourself a Torx driver and bit set, before<br />
starting any work on the Manic, but bear in mind that <strong>Schumacher</strong> have<br />
their own T10 Torx driver (HW008) though it’s not always included in the<br />
kits.<br />
The easiest way to remove the engine is complete with its engine<br />
mount, which, as I mentioned earlier, involves removing the six chassis<br />
screws. The exhaust can is stabilised with a mounting wire retained by a<br />
setscrew, but we found it necessary to remove the complete mounting<br />
wire because the exhaust fouled on the rear brake pivot, preventing<br />
its removal. On closer inspection we found that on our Manic we could<br />
remove about 5 mm off the mounting wire with a Dremel, which would<br />
then give sufficient room to remove the engine and exhaust quicker and<br />
easier. Obviously you also have to disconnect the throttle return spring<br />
and throttle linkage and fuel pipe connections and in about one minute,<br />
the whole lot is on the bench.<br />
If you wish to ‘split’ the engine, you can now see that it’s a case of<br />
removing the centre bracket, which locates on the two crankcases at<br />
the base, and the one-piece heat sink head. The head bolts were VERY<br />
tight on our review Manic, so use a good quality hex driver. Slacken the<br />
two pinch bolt nuts that clamp the one-piece inlet manifold and lift off<br />
the inlet manifold and single carburettor assembly. You can now remove<br />
the two-piece synchro drive cover, which exposes the synchro drive belt.<br />
Next, cut the tie wrap retaining the forward exhaust manifold (the twin<br />
manifolds and exhaust can are a one-piece item) and pull the forward<br />
pipe off the manifold flange. You can now just slip the drive belt off and<br />
you have successfully split the engine. To access just the synchro drive<br />
belt, the bottom half of the cover slips off easily enough (mind you don’t<br />
lose the little strengthening plate that slots in the centre), but to remove