Naim Audio HDX Hard Disk Player – Network Setup
Naim Audio HDX Hard Disk Player – Network Setup
Naim Audio HDX Hard Disk Player – Network Setup

Create successful ePaper yourself
Turn your PDF publications into a flip-book with our unique Google optimized e-Paper software.
<strong>Network</strong>ing Basics<br />
<strong>Naim</strong> <strong>Audio</strong> <strong>HDX</strong> <strong>Hard</strong> <strong>Disk</strong> <strong>Player</strong> <strong>–</strong> <strong>Network</strong> <strong>Setup</strong><br />
All devices that connect to a network have an Internet Protocol (IP) address. This address is<br />
used as a unique identifier on the network and allows communication between devices to<br />
be routed correctly. IP is the standard used by all network devices.<br />
A typical home network will use a Modem/Router to connect to the Internet and will have a<br />
number of devices connected directly to the Modem/Router. The Modem/Router acts as a<br />
switch to allow intercommunication between the devices on the home network (LAN) and<br />
allows each of the devices to access the Internet (WAN). The Modem/Router also offers<br />
significant protection to the devices on the LAN side as they cannot be contacted directly by<br />
a computer on the WAN side without the LAN side device initiating the communication. The<br />
<strong>HDX</strong> should never be connected directly to the Internet without a Router in place.<br />
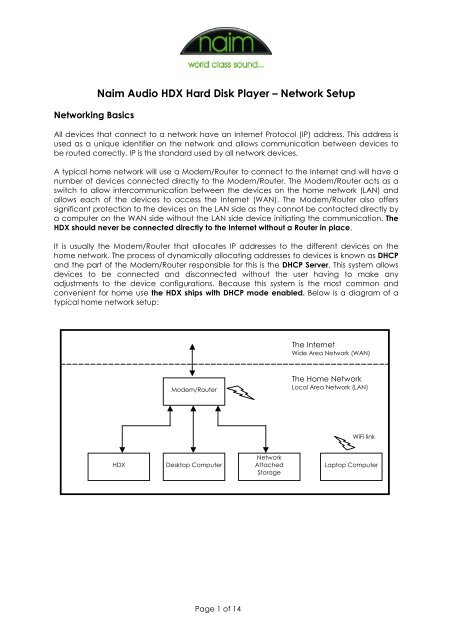
It is usually the Modem/Router that allocates IP addresses to the different devices on the<br />
home network. The process of dynamically allocating addresses to devices is known as DHCP<br />
and the part of the Modem/Router responsible for this is the DHCP Server. This system allows<br />
devices to be connected and disconnected without the user having to make any<br />
adjustments to the device configurations. Because this system is the most common and<br />
convenient for home use the <strong>HDX</strong> ships with DHCP mode enabled. Below is a diagram of a<br />
typical home network setup:<br />
<strong>HDX</strong><br />
Modem/Router<br />
Desktop Computer<br />
Page 1 of 14<br />
<strong>Network</strong><br />
Attached<br />
Storage<br />
The Internet<br />
Wide Area <strong>Network</strong> (WAN)<br />
The Home <strong>Network</strong><br />
Local Area <strong>Network</strong> (LAN)<br />
WiFi link<br />
Laptop Computer
<strong>HDX</strong> <strong>Network</strong> Settings<br />
The <strong>HDX</strong> differs slightly from most other network devices as it has one network socket but two<br />
IP addresses. Inside the <strong>HDX</strong> are two separate network devices. The Main Controller is<br />
responsible for ripping CDs and audio playback and has one IP address. The Front Display<br />
Controller runs the front panel user interface and has a different IP address. The Main<br />
Controller and Front Display Controller communicate with each other inside the <strong>HDX</strong> on a<br />
small internal network, which is exposed on a single network socket. The diagram below<br />
shows how the Main Controller and Front Display Controller are connected inside the <strong>HDX</strong>:<br />
The <strong>HDX</strong> is always shipped from <strong>Naim</strong> <strong>Audio</strong> in DHCP mode, as this is the most common and<br />
preferred addressing mode. It is possible to change from DHCP to Static mode using the <strong>Naim</strong><br />
Set IP Tool included on a CD ROM that ships with the <strong>HDX</strong>, although before doing so the<br />
requirements of static IP addressing should be understood.<br />
DHCP addressing mode<br />
Main Controller<br />
<strong>Network</strong><br />
connection<br />
socket<br />
Front Display Controller<br />
This is the preferred addressing mode and should always be used unless it has been<br />
determined that a static address is absolutely essential for a given installation.<br />
In DHCP mode the <strong>HDX</strong> Main Controller and Front Panel Controller both acquire an IP address<br />
automatically when the <strong>HDX</strong> first starts.<br />
<strong>Naim</strong> <strong>Audio</strong> <strong>HDX</strong> <strong>Hard</strong> <strong>Disk</strong> <strong>Player</strong> <strong>–</strong> <strong>Network</strong> <strong>Setup</strong> 4 September 2008<br />
Page 2 of 14<br />
<strong>HDX</strong>
Static addressing mode<br />
Static addressing mode should only be used in the following situations:<br />
• The <strong>HDX</strong> is being used in a <strong>Naim</strong>Net or NetStreams setup.<br />
• The <strong>HDX</strong> is being used with a ‘hardware VPN’ where the network administrator<br />
allocates static IP addresses to each device.<br />
• The <strong>HDX</strong> is being controlled via Ethernet by a Crestron or AMX control system.<br />
• Port forwarding is used to control the <strong>HDX</strong> from outside the LAN.<br />
• The <strong>HDX</strong> is to be controlled by a web browser and the network does not have a local<br />
DNS server.<br />
Some of the above scenarios are quite specialist. Unless it is has been determined that the<br />
setup conforms to one of the above, DHCP addressing mode should always be used.<br />
To configure an <strong>HDX</strong> in static addressing mode the following settings must be known:<br />
• Server IP address <strong>–</strong> This is the address of the server main controller. This address must<br />
be unique and should not clash with the DHCP server’s address pool (if a DHCP server<br />
is present). E.g. If the Netmask is 255.255.255.0 and the DHCP server allocates<br />
addresses between 192.168.0.2 and 192.168.0.150 then the Server and Front Panel IP<br />
addresses must be set between 192.168.0.151 and 192.168.0.254.<br />
• Front Panel IP address <strong>–</strong> This is the IP address of the Front Display Controller. Usual<br />
practice is to allocate the front panel an adjacent address to the server IP address.<br />
E.g. if the server IP address is 192.168.0.10 then the front panel IP address should be set<br />
to 192.168.0.11.<br />
Four very important rules apply when choosing the addresses for the <strong>HDX</strong>:<br />
o The Front panel IP address MUST be different from the server IP address<br />
o Both Addresses must be unique (must not be the same as any other IP address<br />
in the network)<br />
o Both addresses must not overlap with the DHCP server address pool.<br />
o Both addresses must be on the same range. i.e. if the server is on 192.168.0.10<br />
and the Netmask is 255.255.255.0 the front panel must be on an address<br />
between 192.168.0.1 and 192.168.0.254 (excluding the server’s own IP<br />
address).<br />
• Net Mask <strong>–</strong> This determines the range of IP addresses that can communicate with the<br />
<strong>HDX</strong>. This should be compatible with the other devices on the network. For example<br />
255.255.255.0 is a common Netmask.<br />
• Gateway <strong>–</strong> This is the IP address that the <strong>HDX</strong> will use to access the Internet to perform<br />
CD lookups.<br />
• DNS <strong>–</strong> This is the Domain <strong>Naim</strong> System server that the <strong>HDX</strong> will use to resolve the IP<br />
address of the Internet providers used for CD track information and album artwork.<br />
<strong>Naim</strong> <strong>Audio</strong> <strong>HDX</strong> <strong>Hard</strong> <strong>Disk</strong> <strong>Player</strong> <strong>–</strong> <strong>Network</strong> <strong>Setup</strong> 4 September 2008<br />
Page 3 of 14
Configuring the <strong>HDX</strong> networking settings<br />
When the correct addressing mode and associated settings have been determined the <strong>HDX</strong><br />
can be configured. To do this the <strong>Naim</strong> Set IP Tool must first be installed on a PC running XP or<br />
Vista. The <strong>HDX</strong> network settings are then reconfigured using this tool as described below.<br />
After the <strong>HDX</strong> has been successfully configured it is advisable to make a note of the new<br />
network settings in the back of the user manual for future reference.<br />
Installing the <strong>Naim</strong> IP Tool Application<br />
The <strong>HDX</strong> ships with a CD ROM that contains documentation, the Desktop Client application<br />
and the <strong>Naim</strong> Set IP Tool. Note that the applications on the CD ROM require either Microsoft<br />
Windows XP or Vista to run. The application will not natively run on an Apple Mac computer<br />
although there ways of running Windows on a Mac, which are described in the<br />
troubleshooting section. The following steps describe the installation process using Windows<br />
Vista.<br />
1) Insert the <strong>Naim</strong> CD ROM into the PC drive and locate the folder containing the <strong>Naim</strong><br />
Set IP application installer and double click the <strong>Naim</strong>IPTool.msi installer icon.<br />
<strong>Naim</strong> <strong>Audio</strong> <strong>HDX</strong> <strong>Hard</strong> <strong>Disk</strong> <strong>Player</strong> <strong>–</strong> <strong>Network</strong> <strong>Setup</strong> 4 September 2008<br />
Page 4 of 14
2) The <strong>Naim</strong> Set IP installer will open. Click Next > on the first screen. Then select the<br />
Folder in which to install the application. The default location is shown below and will<br />
be suitable for most typical installations. Click Next > when ready to continue.<br />
3) Press Next > again to confirm then wait while the application installs.<br />
<strong>Naim</strong> <strong>Audio</strong> <strong>HDX</strong> <strong>Hard</strong> <strong>Disk</strong> <strong>Player</strong> <strong>–</strong> <strong>Network</strong> <strong>Setup</strong> 4 September 2008<br />
Page 5 of 14
4) When the installation is complete the following screen will be shown. Press Close to<br />
complete the installation.<br />
<strong>Naim</strong> <strong>Audio</strong> <strong>HDX</strong> <strong>Hard</strong> <strong>Disk</strong> <strong>Player</strong> <strong>–</strong> <strong>Network</strong> <strong>Setup</strong> 4 September 2008<br />
Page 6 of 14
Changing the <strong>HDX</strong> IP address<br />
1) Select the <strong>Naim</strong> Set IP Tool from the Start menu.<br />
2) The Set IP Tool will launch and will start the server discovery process. This process takes<br />
30 seconds and scans the network for any <strong>Naim</strong> <strong>HDX</strong> hard disk players or <strong>Naim</strong><br />
Servers.<br />
3) When the discovery process has finished the application will show the name and IP<br />
address of any <strong>Naim</strong> servers found on the <strong>Network</strong>. In the example below an <strong>HDX</strong><br />
called NS<strong>HDX</strong>D22B has been discovered at IP address 199.199.0.46 and an NS02 at IP<br />
address 199.199.0.253. Select the server that is to have its IP address changed and<br />
click OK.<br />
<strong>Naim</strong> <strong>Audio</strong> <strong>HDX</strong> <strong>Hard</strong> <strong>Disk</strong> <strong>Player</strong> <strong>–</strong> <strong>Network</strong> <strong>Setup</strong> 4 September 2008<br />
Page 7 of 14
4) The application shows the current settings for the selected server. If the current<br />
addressing mode is DHCP then Dynamic address (use DHCP) will be selected (see<br />
step 5). If the current addressing mode is Static then Static address will be selected<br />
and the address details will reflect the current network settings (see step 6).<br />
5) To change the addressing mode to Dynamic select the DHCP option then click<br />
Update. The application will now send the new configuration to the server and the<br />
server will reboot (see step 6).<br />
<strong>Naim</strong> <strong>Audio</strong> <strong>HDX</strong> <strong>Hard</strong> <strong>Disk</strong> <strong>Player</strong> <strong>–</strong> <strong>Network</strong> <strong>Setup</strong> 4 September 2008<br />
Page 8 of 14
6) To change the addressing mode to Static, select the Static option and enter the<br />
required networking settings. Follow the advice in the previous sections to determine what<br />
these settings should be. Click Update when all the settings have been entered. The<br />
application will now send the new configuration to the <strong>HDX</strong> and the <strong>HDX</strong> will reboot.<br />
<strong>Naim</strong> <strong>Audio</strong> <strong>HDX</strong> <strong>Hard</strong> <strong>Disk</strong> <strong>Player</strong> <strong>–</strong> <strong>Network</strong> <strong>Setup</strong> 4 September 2008<br />
Page 9 of 14
7) After the network settings have been changed and the Update button clicked (as<br />
described in step 5 or 6) the following screen will be shown. The server will automatically<br />
shutdown then restart using the new network settings. Check that the message in the Update<br />
Progress window confirms that both the server and front panel configurations were<br />
downloaded successfully. The message displayed should look like the message below. When<br />
it has been confirmed that the configuration was sent successfully click OK to continue.<br />
8) The following message will then be shown. Click Ok then close the Set IP Tool.<br />
<strong>Naim</strong> <strong>Audio</strong> <strong>HDX</strong> <strong>Hard</strong> <strong>Disk</strong> <strong>Player</strong> <strong>–</strong> <strong>Network</strong> <strong>Setup</strong> 4 September 2008<br />
Page 10 of 14
Troubleshooting<br />
The Set IP Tool does not discover the <strong>HDX</strong><br />
It is possible that a firewall running on the computer is blocking the communication between<br />
the Set IP Tool and the <strong>HDX</strong>. If this is suspected to be the case, more detailed information<br />
about how to allow certain applications to communicate through the firewall will be<br />
available from the firewall’s vendor website. This process is usually known as ‘adding<br />
exceptions to a firewall’.<br />
Incorrect static address settings have been entered by accident<br />
Launch the Set IP Tool, re-enter the details and click update. The new configuration will be<br />
sent to the <strong>HDX</strong>. Alternatively return the <strong>HDX</strong> to DHCP mode if the <strong>HDX</strong> was not intended to<br />
be set to static addressing mode.<br />
The front display permanently shows ‘Please Wait…’<br />
The most likely cause is that the <strong>HDX</strong> has been configured in static addressing mode with<br />
incompatible settings. Either return the server to DHCP mode or correct the static address<br />
settings. Here are some examples of incompatible settings<br />
1) Example 1<br />
Server IP = 192.168.0.10<br />
Front panel IP = 192.168.0.10<br />
Netmask = 255.255.255.0<br />
In this example the server and front panel IP addresses are identical. Two devices on a<br />
network must never have the same IP address.<br />
2) Example 2<br />
Server IP = 192.168.0.10<br />
Front panel IP = 192.168.1.11<br />
Netmask = 255.255.255.0<br />
In this example the server IP and front panel IP addresses are on different address<br />
ranges. The IP addresses should be changed so the first three parts of the IP are the<br />
same. E.g. 192.168.0.10 and 192.168.0.11<br />
3) Example 3<br />
Server IP = 192.168.0.10<br />
Front panel IP = 10.15.35.50<br />
Netmask = 255.255.255.0<br />
In this example the server and front panel IP addresses are on completely different<br />
ranges. This can happen if an incorrect configuration is sent to the <strong>HDX</strong> from the<br />
NetStreams Dealer <strong>Setup</strong> application. Either correct the problem using the Set IP Tool<br />
or check the addressees allocated to the <strong>HDX</strong> and front panel by the Dealer <strong>Setup</strong><br />
application.<br />
<strong>Naim</strong> <strong>Audio</strong> <strong>HDX</strong> <strong>Hard</strong> <strong>Disk</strong> <strong>Player</strong> <strong>–</strong> <strong>Network</strong> <strong>Setup</strong> 4 September 2008<br />
Page 11 of 14
CDs do not lookup correctly<br />
This is usually caused by one of three things:<br />
1) There is no Internet connection.<br />
• Check the <strong>HDX</strong> is connected to the network<br />
• If Ethernet Over Mains equipment is used, ensure it is plugged in and switched on.<br />
• Check the Internet connection is working on another machine on the same<br />
network. If there appears to be no Internet connection check the network<br />
switches, cabling and Modem/Router (reboot it if necessary).<br />
2) The Gateway setting is incorrect<br />
• If the <strong>HDX</strong> is in static IP mode check the gateway address is correct.<br />
3) The DNS setting is incorrect<br />
• If the <strong>HDX</strong> is in DHCP mode check the router is configured using the DNS settings<br />
supplied by the Internet provider.<br />
• If the <strong>HDX</strong> is in static IP mode check the DNS setting is correct.<br />
After removing then replacing the network cable, CDs do not lookup and DTC cannot<br />
connect<br />
If the <strong>HDX</strong> is in DHCP mode and the network connection is removed, the <strong>HDX</strong> will revert to an<br />
‘auto IP’ address. The auto IP address is unlikely to be compatible with the network to which it<br />
was previously connected, so, when the <strong>HDX</strong> is reconnected there will be a period of time<br />
before the <strong>HDX</strong> can connect to the network. The <strong>HDX</strong> will eventually change IP address back<br />
to a compatible address but the time it will take to do this will vary depending on network<br />
conditions. The quickest way to recover from this situation is to ensure the network is<br />
connected and reboot the <strong>HDX</strong>.<br />
If the network connection to the <strong>HDX</strong> is regularly lost, for example if the router is routinely<br />
powered off or the network connection to the <strong>HDX</strong> is only made when ripping CDs, either:<br />
1) Reboot the <strong>HDX</strong> every time the network connection is reconnected<br />
2) Configure the <strong>HDX</strong> in static IP addressing mode. Ensure the settings are carefully<br />
chosen as described above.<br />
The front display very occasionally shows ‘Please wait…’<br />
This is likely to be caused by the network’s DHCP server giving a new IP address to the <strong>HDX</strong>.<br />
When the front display controller receives a new IP address it momentarily shows ‘Please<br />
wait…’ while it saves the new address.<br />
The Set IP tool does not work on Apple Mac computers<br />
The Set IP Tool can only be run under Microsoft Windows XP or Vista. There are several ways<br />
that windows programs can be run on a Mac. Two possibilities are:<br />
• Use Boot Camp. This software allows the Mac to run either Windows or the Mac<br />
operating system.<br />
• Use Mac Virtualization software like VMWare Fusion or Parallels. This allows Windows to<br />
be run without rebooting the Mac.<br />
These instructions are for <strong>HDX</strong>. What about the NS01, NS02 and NS03?<br />
The concepts and procedures described above are identical for the NS01, NS02 and NS03.<br />
The one difference is that the NS01 and NS02 do not have a front display so only have one IP<br />
address.<br />
<strong>Naim</strong> <strong>Audio</strong> <strong>HDX</strong> <strong>Hard</strong> <strong>Disk</strong> <strong>Player</strong> <strong>–</strong> <strong>Network</strong> <strong>Setup</strong> 4 September 2008<br />
Page 12 of 14
Glossary<br />
• Auto IP Address <strong>–</strong> The address the <strong>HDX</strong> will revert to if it is in DHCP mode and there is<br />
no DHCP server.<br />
• DHCP addressing mode <strong>–</strong> in this mode the DHCP server automatically allocates the IP<br />
addresses to the <strong>HDX</strong>.<br />
• DHCP address pool <strong>–</strong> The address pool is the range of addresses used by the DHCP<br />
server when allocating IP addresses to devices on the network. The current DHCP pool<br />
settings can usually be determined by checking the Modem/Router configuration.<br />
• DHCP server <strong>–</strong> This allocates the IP addresses to the devices on the network. In a<br />
typical home setup the DHCP server is built into the Modem/Router.<br />
• DNS<strong>–</strong> The Domain <strong>Naim</strong> System is a system of converting a domain name (e.g.<br />
www.naimaudio.com) to an IP address. When accessing the Internet the DNS service<br />
is usually provided by the ISP. The local DNS server in the Mode/Router performs the<br />
same function but on the local network. For example it allows the user to type the <strong>HDX</strong><br />
name into a web browser (e.g. http://NS<strong>HDX</strong>1234/) and it translates the <strong>HDX</strong> name to<br />
the correct IP address.<br />
• Firewall (software) <strong>–</strong> A software firewall runs on a computer and prevents unwanted<br />
intrusions from other computers. Microsoft Windows XP and Vista are both supplied<br />
with software firewalls. Normally Windows will advise if these are not enabled.<br />
Examples of other software firewall vendors are ZoneAlarm, Norton and Eset. It is<br />
recommended to always run a software firewall on any computer connected to the<br />
Internet.<br />
• Firewall (hardware) <strong>–</strong> Most Modem/Routers have a build in firewall, often known as a<br />
hardware firewall. These prevent unwanted intrusions from computers on the Internet<br />
by stopping any incoming communication not initiated from the local network. A<br />
hardware firewall is not a substitute for a software firewall and it is recommended that<br />
both are always used together.<br />
• Gateway <strong>–</strong> This is the IP address that the <strong>HDX</strong> uses to access the Internet. In a home<br />
network this is often the same IP address as the Modem/Router<br />
• IP Address <strong>–</strong> This is the unique address of a device on a network. The <strong>HDX</strong> has two IP<br />
addresses. One for the Main Controller and one for the Front Display Controller.<br />
• ISP <strong>–</strong> The Internet Service Provider is the company that provides the Internet<br />
connection to the home.<br />
• Static addressing mode <strong>–</strong> in this mode the user manually allocates the IP addresses to<br />
the <strong>HDX</strong>. This method is more complicated than DHCP and should only be used if it<br />
has been determined that static addressing mode is necessary.<br />
• LAN <strong>–</strong> The Local Area <strong>Network</strong> is the home network that is ‘behind’ the<br />
Modem/Router.<br />
<strong>Naim</strong> <strong>Audio</strong> <strong>HDX</strong> <strong>Hard</strong> <strong>Disk</strong> <strong>Player</strong> <strong>–</strong> <strong>Network</strong> <strong>Setup</strong> 4 September 2008<br />
Page 13 of 14
• Modem/Router <strong>–</strong> This device has many functions and is usually the hub of a home<br />
network. It’s functions normally include:<br />
o Broadband modem. Connects the home network to the Internet<br />
o Ethernet switch. Allows multiple devices to be connected together to form a<br />
network<br />
o WiFi access point <strong>–</strong> Allows wireless connection of devices to the home network<br />
o Firewall <strong>–</strong> Prevents unwanted intrusions from the Internet<br />
o DHCP server <strong>–</strong> Automatically allocates IP addresses<br />
• Netmask <strong>–</strong> The Netmask determines the range of IP addresses that the <strong>HDX</strong> can<br />
communicate with. It must be compatible with the other devices on the network. For<br />
example if the Netmask 255.255.255.0 and the IP address is 192.168.0.10 only devices<br />
in the range 192.168.0.0 to 192.168.0.255 can be accessed.<br />
• WAN <strong>–</strong> The Wide Area <strong>Network</strong> is the network ‘outside’ the Modem/Router. This is the<br />
network provided by the ISP and enables connection to the Internet.<br />
END OF DOCUMENT<br />
<strong>Naim</strong> <strong>Audio</strong> <strong>HDX</strong> <strong>Hard</strong> <strong>Disk</strong> <strong>Player</strong> <strong>–</strong> <strong>Network</strong> <strong>Setup</strong> 4 September 2008<br />
Page 14 of 14