590503 ROUND ROCK 48 Instructions - Landmann USA
590503 ROUND ROCK 48 Instructions - Landmann USA
590503 ROUND ROCK 48 Instructions - Landmann USA

Create successful ePaper yourself
Turn your PDF publications into a flip-book with our unique Google optimized e-Paper software.
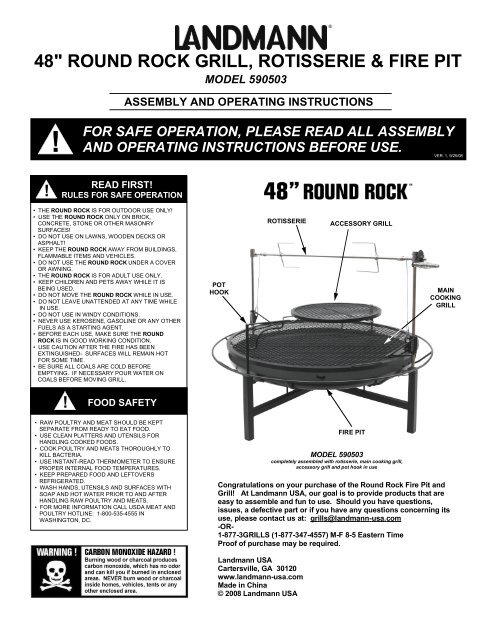
<strong>48</strong>" <strong>ROUND</strong> <strong>ROCK</strong> GRILL, ROTISSERIE & FIRE PIT<br />
!<br />
!<br />
MODEL <strong>590503</strong><br />
ASSEMBLY AND OPERATING INSTRUCTIONS<br />
Page 1<br />
FOR SAFE OPERATION, PLEASE READ ALL ASSEMBLY<br />
AND OPERATING INSTRUCTIONS BEFORE USE.<br />
READ FIRST!<br />
RULES FOR SAFE OPERATION<br />
• THE <strong>ROUND</strong> <strong>ROCK</strong> IS FOR OUTDOOR USE ONLY!<br />
• USE THE <strong>ROUND</strong> <strong>ROCK</strong> ONLY ON BRICK,<br />
CONCRETE, STONE OR OTHER MASONRY<br />
SURFACES!<br />
• DO NOT USE ON LAWNS, WOODEN DECKS OR<br />
ASPHALT!<br />
• KEEP THE <strong>ROUND</strong> <strong>ROCK</strong> AWAY FROM BUILDINGS,<br />
FLAMMABLE ITEMS AND VEHICLES.<br />
• DO NOT USE THE <strong>ROUND</strong> <strong>ROCK</strong> UNDER A COVER<br />
OR AWNING.<br />
• THE <strong>ROUND</strong> <strong>ROCK</strong> IS FOR ADULT USE ONLY.<br />
• KEEP CHILDREN AND PETS AWAY WHILE IT IS<br />
BEING USED.<br />
• DO NOT MOVE THE <strong>ROUND</strong> <strong>ROCK</strong> WHILE IN USE.<br />
• DO NOT LEAVE UNATTENDED AT ANY TIME WHILE<br />
IN USE.<br />
• DO NOT USE IN WINDY CONDITIONS.<br />
• NEVER USE KEROSENE, GASOLINE OR ANY OTHER<br />
FUELS AS A STARTING AGENT.<br />
• BEFORE EACH USE, MAKE SURE THE <strong>ROUND</strong><br />
<strong>ROCK</strong> IS IN GOOD WORKING CONDITION.<br />
• USE CAUTION AFTER THE FIRE HAS BEEN<br />
EXTINGUISHED- SURFACES WILL REMAIN HOT<br />
FOR SOME TIME.<br />
• BE SURE ALL COALS ARE COLD BEFORE<br />
EMPTYING. IF NECESSARY POUR WATER ON<br />
COALS BEFORE MOVING GRILL.<br />
!<br />
FOOD SAFETY<br />
• RAW POULTRY AND MEAT SHOULD BE KEPT<br />
SEPARATE FROM READY TO EAT FOOD.<br />
• USE CLEAN PLATTERS AND UTENSILS FOR<br />
HANDLING COOKED FOODS.<br />
• COOK POULTRY AND MEATS THOROUGHLY TO<br />
KILL BACTERIA.<br />
• USE INSTANT-READ THERMOMETER TO ENSURE<br />
PROPER INTERNAL FOOD TEMPERATURES.<br />
• KEEP PREPARED FOOD AND LEFTOVERS<br />
REFRIGERATED.<br />
• WASH HANDS, UTENSILS AND SURFACES WITH<br />
SOAP AND HOT WATER PRIOR TO AND AFTER<br />
HANDLING RAW POULTRY AND MEATS.<br />
• FOR MORE INFORMATION CALL USDA MEAT AND<br />
POULTRY HOTLINE: 1-800-535-4555 IN<br />
WASHINGTON, DC.<br />
POT<br />
HOOK<br />
Congratulations on your purchase of the Round Rock Fire Pit and<br />
Grill! At <strong>Landmann</strong> <strong>USA</strong>, our goal is to provide products that are<br />
easy to assemble and fun to use. Should you have questions,<br />
issues, a defective part or if you have any questions concerning its<br />
use, please contact us at: grills@landmann-usa.com<br />
-OR-<br />
1-877-3GRILLS (1-877-347-4557) M-F 8-5 Eastern Time<br />
Proof of purchase may be required.<br />
<strong>Landmann</strong> <strong>USA</strong><br />
Cartersville, GA 30120<br />
www.landmann-usa.com<br />
Made in China<br />
© 2008 <strong>Landmann</strong> <strong>USA</strong><br />
®<br />
ROTISSERIE ACCESSORY GRILL<br />
FIRE PIT<br />
MODEL <strong>590503</strong><br />
completely assembled with rotisserie, main cooking grill,<br />
accessory grill and pot hook in use<br />
VER. 1, 9/25/08<br />
MAIN<br />
COOKING<br />
GRILL
Page 2<br />
A.<br />
B.<br />
C.<br />
D.<br />
E.<br />
F.<br />
G.<br />
H.<br />
I.<br />
N.<br />
O.<br />
P.<br />
Q.<br />
S.<br />
T.<br />
U.<br />
Z.<br />
<br />
<strong>48</strong>" <strong>ROUND</strong> <strong>ROCK</strong> GRILL, ROTISSERIE & FIRE PIT<br />
PART LISTING<br />
FIRE PIT PARTS QTY<br />
V.<br />
W.<br />
X.<br />
JJ.<br />
KK.<br />
LL.<br />
MM.<br />
NN.<br />
FIREBOWL . . . . . . . . . . . . . . . . . . . . . . . . . . . . . . . . . . . . . . . . .1<br />
LEG SECTION . . WITH . . . . . V-BRACKET<br />
. . . . . . . . . . . . . . . . . . . . . . . . . . . . . . . . .4<br />
UPPER LEG CONNECTOR . . . . . . . . . . . . . WITH . . . . . SPACER . . . . . . . . . . . . . . . . . . . . . .1<br />
LOWER LEG . CONNECTOR<br />
. . . . . . . . . . . . . . . . . . . . . . . . . . . . . . . . . . . . . . .1<br />
RING / HANDLE . . . SECTION . . . . . . . . . . . . . . . . . . . . . . . . . . . . . . . . . . . . .4<br />
POT HOOK.<br />
. . . . . . . . . . . . . . . . . . . . . . . . . . . . . . . . . . . . . . . . .1<br />
STAINLESS ACCESSORY . . . . . . . . . . . . GRILL . . . . . . ROD . . . . WITH . . . . . COLLAR . . . . . . . . . . . . .1<br />
ACCESSORY . GRILL . . . . . . . . . . . . . . . . . . . . . . . . . . . . . . . . . . . . . . .1<br />
MAIN COOKING . . . . GRILL . . . . . . . . . . . . . . . . . . . . . . . . . . . . . . . . . . . .1<br />
T BOLT (FOR . FIREBOWL . . . . . . . . . . TO . . . LEG . . . . ASSEMBLY)<br />
. . . . . . . . . . . . . . . . . . . . . .1<br />
T BOLT WASHER . . . . . . . . . . . . . . . . . . . . . . . . . . . . . . . . . . . . . . . .1<br />
T BOLT HEXNUT . . . . . . . . . . . . . . . . . . . . . . . . . . . . . . . . . . . . . . . .1<br />
50MM LEG CONNECTOR . . . . . . . . . . . BOLT . . . . . . . . . . . . . . . . . . . . . . . . . . . . .8<br />
20MM RING . / . HANDLE . . . . . . . . AND . . . . TRI-BRACKET . . . . . . . . . . . . . BOLT . . . . . . . . . . . . .20<br />
FLANGED HEXNUT . . . . . . . . . . . . . . . . . . . . . . . . . . . . . . . . . . . . . . . 36<br />
TRI-BRACKET.<br />
. . . . . . . . . . . . . . . . . . . . . . . . . . . . . . . . . . . . . . .2<br />
13MM V-BRACKET . . . . . . BOLT . . . . . . . . . . . . . . . . . . . . . . . . . . . . . . . . . .8<br />
ROTISSERIE PARTS QTY<br />
STAINLESS VERTICAL . . . . . . . . . ROD . . . . . . . . . . . . . . . . . . . . . . . . . . . . . . .2<br />
ADJUSTABLE . . ALUMINUM . . . . . . . . . . BLOCK . . . . . . . . . . . . . . . . . . . . . . . . . . . .2<br />
PRE-ASSEMBLED . . . . . STAINLESS . . . . . . . . . . . ROTISSERIE<br />
. . . . . . . . . . . . . . . . . . . . . . . .1<br />
HANDLE SP<strong>ROCK</strong>ET . . . . . . . . . . . . . . . . . . . . . . . . . . . . . . . . . . . . . . . .1<br />
WIRE HANDLE . . . . . . . . . . . . . . . . . . . . . . . . . . . . . . . . . . . . . . . .1<br />
HANDLE BOLT . . . . . . . . . . . . . . . . . . . . . . . . . . . . . . . . . . . . . . . .1<br />
HANDLE LOCKNUT . . . . . . . . . . . . . . . . . . . . . . . . . . . . . . . . . . . . . . . .1<br />
SET SCREW . AND . . . . HANDLE . . . . . . . . KEY . . . . . . . . . . . . . . . . . . . . . . . . . . .2<br />
When unpacking the Round Rock from the carton,<br />
make sure you find and become familiar with all<br />
parts before discarding the packing materials.<br />
!<br />
FOR OUTDOOR USE ONLY<br />
IF YOU HAVE BROKEN OR<br />
MISSING PARTS, PLEASE<br />
CALL CUSTOMER SERVICE<br />
AT 1-877-347-4557<br />
MODEL <strong>590503</strong><br />
®<br />
LIMITED WARRANTY<br />
<strong>Landmann</strong> <strong>USA</strong> (“<strong>Landmann</strong>”) warrants that this<br />
product shall be free of defects in material and<br />
workmanship to the original purchaser for 90 days.<br />
This limited warranty is made exclusively to the<br />
original customer presenting proof of purchase.<br />
This warranty is limited to non-commercial<br />
residential use only. Any returned goods must be<br />
shipped prepaid.<br />
<strong>Landmann</strong> <strong>USA</strong> ("<strong>Landmann</strong>") warrants the bowl<br />
only due to rust out or burn thru for a ONE (1) year<br />
period from the time of purchase and made<br />
exclusively to the original customer presenting<br />
proof of purchase.<br />
This warranty does not cover normal wear of parts<br />
or damage resulting from any of the following:<br />
negligence, abuse, misuse, alteration, improper<br />
installation, improper maintenance or failure to<br />
perform normal maintenance, or any use contrary to<br />
operating instructions. Furthermore, <strong>Landmann</strong><br />
does not warrant in any way the paint finish of the<br />
product or cover damage or deterioration due to<br />
any normal or severe weather conditions or to any<br />
chemical exposure. These warranties do not cover<br />
surface scratches or heat damage, which is<br />
considered to be normal wear. These warranties<br />
exclude liability for any indirect, incidental<br />
consequential damages or loss of property of any<br />
nature.<br />
Do not return product or any parts to the store or<br />
ship to the manufacturer without written<br />
authorization. Contact Customer Service at<br />
1-877-3GRILLS (1-877-347-4557) or<br />
grills@landmann-usa.com. Any returned products<br />
or parts must be returned postage prepaid.<br />
These warranties are limited to non-commercial<br />
residential use only.<br />
Product repair or replacement as provided under<br />
this warranty is your exclusive remedy. <strong>Landmann</strong><br />
shall not be liable for any incidental or<br />
consequential damages or breach of any express or<br />
implied warranty on this product or any part thereof,<br />
except to the extent prohibited by applicable law.<br />
Some states do not allow the exclusion or limitation<br />
of incidental or consequential damages, or allow<br />
limitation on how long an implied warranty lasts,<br />
therefore, the above limitation or exclusion may not<br />
apply to you. This warranty gives you specific legal<br />
rights, and you may also have other rights, which<br />
vary, from state to state.
A<br />
20MM BOLT FOR<br />
RING / HANDLE<br />
ASSEMBLY<br />
N<br />
50MM BOLT FOR<br />
LEG CONNECTOR<br />
ASSEMBLY<br />
13MM BOLT FOR<br />
V-BRACKET /<br />
LEG ASSEMBLY<br />
<br />
<strong>48</strong>" <strong>ROUND</strong> <strong>ROCK</strong> GRILL, ROTISSERIE & FIRE PIT<br />
PRE-ASSEMBLED<br />
STAINLESS ROTISSERIE<br />
S<br />
Q<br />
W<br />
Z<br />
V<br />
G<br />
I<br />
U<br />
T<br />
X<br />
MODEL <strong>590503</strong><br />
EXPLODED VIEW<br />
D<br />
T<br />
O<br />
H<br />
P<br />
®<br />
NN<br />
W<br />
V<br />
F<br />
U<br />
S<br />
T<br />
C<br />
B<br />
E<br />
JJ<br />
MM<br />
KK<br />
LL<br />
20MM BOLT FOR<br />
TRI-BRACKET<br />
ASSEMBLY<br />
Page 3
Page 4<br />
Q<br />
(8) 50MM<br />
LEG CONNECTOR<br />
BOLT<br />
<br />
<strong>48</strong>" <strong>ROUND</strong> <strong>ROCK</strong> GRILL, ROTISSERIE & FIRE PIT<br />
MODEL <strong>590503</strong><br />
HARDWARE FULL SIZE<br />
Parts are shown here at full-size. The dotted lines show matching parts.<br />
x 8 x 20 x 8 x 1 x 1<br />
NN<br />
(2) SET SCREW<br />
AND HANDLE KEY<br />
S<br />
(20) 20MM<br />
RING / HANDLE<br />
BOLT<br />
x 2<br />
Z<br />
(8) 13MM<br />
V-BRACKET<br />
BOLT<br />
T<br />
(36) FLANGED<br />
HEXNUT<br />
LL<br />
(1) HANDLE<br />
BOLT<br />
MM<br />
(1) LOCKNUT<br />
®<br />
N<br />
(1) T BOLT<br />
O<br />
(1) WASHER<br />
x 36 x 1 x 1<br />
P<br />
(1) HEXNUT<br />
x 1
F<br />
(1) POT HOOK<br />
U<br />
(2) TRI-BRACKET<br />
<br />
<strong>48</strong>" <strong>ROUND</strong> <strong>ROCK</strong> GRILL, ROTISSERIE & FIRE PIT<br />
A<br />
(1) FIREBOWL<br />
G<br />
(1) STAINLESS STEEL<br />
ACCESSORY GRILL<br />
ROD WITH COLLAR<br />
X<br />
(1) PRE-ASSEMBLED<br />
STAINLESS ROTISSERIE<br />
MODEL <strong>590503</strong><br />
PART LISTINGS<br />
B<br />
(4) LEG SECTION<br />
WITH V-BRACKET<br />
H<br />
(1) ACCESSORY GRILL<br />
JJ<br />
(1) HANDLE SP<strong>ROCK</strong>ET<br />
I<br />
®<br />
(1) MAIN COOKING<br />
GRILL<br />
KK<br />
C<br />
(1) UPPER LEG<br />
CONNECTOR<br />
WITH SPACER<br />
(1) WIRE HANDLE<br />
E<br />
(4) RING / HANDLE<br />
SECTION<br />
V<br />
D<br />
(1) LOWER LEG<br />
CONNECTOR<br />
W<br />
Page 5<br />
(2) STAINLESS STEEL<br />
VERTICAL ROD WITH<br />
ADJUSTABLE ALUMINUM<br />
BLOCK
Page 6<br />
STEP 1: ASSEMBLE THE LEGS<br />
Arrange the (4) leg sections [ B ] as shown. Use the<br />
(2) leg connectors [ C, D ] and (8) leg connector bolts<br />
[ Q ] and hexnuts [ T ] to assemble the legs. The<br />
upper leg connector with spacer has to be assembled<br />
on top. Adjust legs so they are approximately 90°<br />
from one another. Tighten all bolts securely.<br />
STEP 2: INSTALL THE RING SECTIONS TO<br />
THE FIREBOWL<br />
Place (1) ring section [ E ] to the underside of the<br />
firebowl [ A ] and use (4) bolts [ S ] and hexnuts [ T ]<br />
to assemble, only finger tighten the bolts. Install<br />
the remaining (3) ring sections [ E ], making sure<br />
the ring sections fit together to form a continuous<br />
ring. When all ring sections are assembled, tighten<br />
all bolts securely.<br />
STEP 3: ASSEMBLE FIREBOWL TO LEGS<br />
Carefully place the firebowl onto the center of the<br />
legs. Move the firebowl as little as possible to align<br />
the leg v-brackets with the firebowl. Use (2) 13MM<br />
bolts [ Z ] and hexnuts [ T ] per v-bracket. Finger<br />
tighten each bolt until all bolts are assembled.<br />
Assemble the remaining (3) leg v-brackets with the<br />
firebowl. Next assemble the center hardware using<br />
(1) T bolt [ N ], washer [ O ] and hexnut [ P ] to fasten<br />
the center of the firebowl to the legs. Before<br />
proceeding to the next step make sure all bolts are<br />
tightened securely.<br />
<br />
<strong>48</strong>" <strong>ROUND</strong> <strong>ROCK</strong> GRILL, ROTISSERIE & FIRE PIT<br />
Additional tools needed to assemble the<br />
Round Rock are a Phillips screwdriver and<br />
an adjustable wrench.<br />
CAUTION! Handle parts with care, some parts are<br />
sharp or have sharp edges.<br />
CAUTION! The firebowl support pins on the legs will<br />
scratch the underside of the firebowl if moved<br />
excessively!<br />
MODEL <strong>590503</strong><br />
ASSEMBLY INSTRUCTIONS<br />
S<br />
E<br />
FIREBOWL WITH<br />
RING / HANDLE<br />
SECTIONS<br />
ASSEMBLED<br />
V-BRACKET<br />
SUPPORT<br />
PINS<br />
ASSEMBLED<br />
LEGS<br />
T<br />
D<br />
T<br />
®<br />
Q<br />
SPACER<br />
O P<br />
N<br />
C<br />
E<br />
V-BRACKET<br />
T<br />
B<br />
A<br />
Z
<strong>48</strong>" <strong>ROUND</strong> <strong>ROCK</strong> GRILL, ROTISSERIE & FIRE PIT<br />
STEP 4: ASSEMBLE TRI-BRACKETS AND INSTALL<br />
THE MAIN COOKING GRILL<br />
First, match and assemble the (2) tri-brackets [ U ] to the<br />
threaded backplates on the main cooking grill [ I ] and<br />
assemble with (2) 20MM bolts [ S ] and hexnuts [ T ] per<br />
tri-bracket.<br />
IMPORTANT! It is important to only loosely finger tighten<br />
the bolts at this time. The bolts will be tightened in STEP 8.<br />
Next, carefully place the main cooking grill onto the<br />
firebowl. Using the handles, rotate the main cooking grill<br />
until the tri-bracket holes match with any two leg holes. See<br />
INSET A.<br />
STEP 5: ASSEMBLE VERTICAL RODS<br />
Place the (2) stainless steel vertical rods [ V ] with<br />
adjustable aluminum blocks [ W ] thru the tri-bracket rings<br />
and the leg until the rod hits the bottom of the leg. Wiggle<br />
or adjust each rod [ V ] so it drops into the seat on the leg<br />
bottom. When the rod finds the seat, the rod will drop 1/2"<br />
and the rod will no longer pivot. Rotate the rods [ V ] so the<br />
the adjustable aluminum blocks [ W ] face the same way.<br />
The adjustable aluminum blocks [ W ] hold the stainless<br />
rotisserie [ X ] and can be adjusted to any height preference<br />
on the rod. If adjustment is needed, use the set screw key<br />
to loosen the two set screws to move and tighten to secure.<br />
Make sure both aluminum blocks are the same height. See<br />
INSET B.<br />
IMPORTANT! Before use, spray or wipe vegetable oil onto<br />
the vertical rod surfaces so the main cooking grill<br />
tri-brackets can move easily up and down the rod.<br />
MODEL <strong>590503</strong><br />
ASSEMBLY INSTRUCTIONS<br />
U<br />
S<br />
BACKPLATE<br />
T<br />
INSET A<br />
W<br />
V<br />
®<br />
U<br />
HANDLE<br />
LEG HOLE<br />
LEG<br />
SET SCREWS<br />
V<br />
W<br />
I<br />
INSET B<br />
V<br />
Page 7<br />
U
Page 8<br />
<br />
<strong>48</strong>" <strong>ROUND</strong> <strong>ROCK</strong> GRILL, ROTISSERIE & FIRE PIT<br />
STEP 6: ASSEMBLE ROTISSERIE HANDLE<br />
Insert the handle bolt [ LL ] into the wire handle [ KK ], then<br />
insert the handle bolt [ LL ] in the handle sprocket [ JJ ]<br />
hole. Assemble using (1) locknut [ MM ].<br />
Next, slide the assembled handle onto the rotisserie rod<br />
until there is about 1/4" - 3/8" of rod coming thru the collar.<br />
Use key to tighten the set screw securely.<br />
STEP 7: ASSEMBLE THE ROTISSERIE AND MAIN<br />
COOKING GRILL HEIGHT ADJUSTMENT CABLES<br />
Place the assembled stainless rotisserie onto the adjustable<br />
blocks [ W ]. Adjust the end collar if necessary so the<br />
rotisserie turns freely and easily. See INSET C.<br />
Unwind the stainless cables and attach the clip hooks to the<br />
tri-bracket eyes on the main cooking grill. Next, turn the<br />
handle slowly to make sure the cables are the same length.<br />
If they are not, lock the handle in place with the key. See<br />
INSET D on the next page on how to lock the handle.<br />
Loosen the set screw on the collar that has the longer cable<br />
(has slack), turn the collar until tight and tighten the set<br />
screw. Both cables should be the same length.<br />
When the main cooking grill height is adjusted, make sure<br />
the wire wraps on the rod between the collar and the<br />
adjustable aluminum block.<br />
MODEL <strong>590503</strong><br />
ASSEMBLY INSTRUCTIONS<br />
ROD<br />
END<br />
END<br />
COLLAR<br />
INSET C<br />
W<br />
END<br />
COLLAR<br />
W<br />
X<br />
MAKE SURE THE WIRE<br />
WRAPS HERE<br />
(SHADED AREA)<br />
®<br />
MM<br />
TRI-BRACKET<br />
EYE<br />
JJ<br />
CLIP<br />
HOOK<br />
KK<br />
LL<br />
MAKE SURE THE WIRE<br />
WRAPS HERE<br />
(SHADED AREA)<br />
W
<strong>48</strong>" <strong>ROUND</strong> <strong>ROCK</strong> GRILL, ROTISSERIE & FIRE PIT<br />
STEP 8: TRI-BRACKET SELF-ADJUSTMENT<br />
Raise the main cooking grill around five inches by turning<br />
the rotisserie handle. The tri-brackets [ U ] will self-adjust<br />
to the vertical rods [ V ]. Lock the grill in place by placing a<br />
key in a handle sprocket notch and the adjustable<br />
aluminum block [ W ]. See INSET D. Tighten the tri-bracket<br />
bolts securely at this time. See INSET E.<br />
After tightening the tri-bracket bolts, remove the handle key<br />
and turn the handle moving the main cooking grill up and<br />
down the vertical rods. The movement should be smooth<br />
without binding. If the grill binds, make sure the vertical<br />
rods [ V ] have a good coating of vegetable oil. If the grill<br />
still binds, repeat STEP 8.<br />
NOTE:<br />
If the main cooking grill is taken off the vertical<br />
rods, the grill must match the rods and / or leg holes the<br />
tri-brackets were set to when the grill is put back on.<br />
STEP 9: ASSEMBLY OF ACCESSORY GRILL<br />
AND POT HOOK<br />
Place the accessory grill rod [ G ] into an unused leg hole<br />
making sure the accessory grill rod [ G ] drops into the seat<br />
on the leg bottom. Slide the accessory grill [ H ] onto the<br />
rod [ G ]. The accessory grill will stop at the collar. Adjust<br />
the collar for the desired accessory grill height.<br />
Place the pot hook [ F ] into the unused leg hole. Make sure<br />
the rod drops into the seat on the leg bottom. The<br />
accessory grill and pot hook can be pivoted 360°.<br />
MODEL <strong>590503</strong><br />
ASSEMBLY INSTRUCTIONS<br />
U<br />
V<br />
NN<br />
W<br />
INSET D<br />
COLLAR<br />
G<br />
H<br />
®<br />
KEY LOCKS<br />
HANDLE<br />
IN PLACE<br />
NOTCHES<br />
TIGHTEN THE<br />
TRI-BRACKET<br />
BOLTS<br />
INSET E<br />
Page 9<br />
V<br />
U<br />
RAISE THE<br />
MAIN COOKING<br />
GRILL 5"<br />
F
Page 10<br />
<br />
<strong>48</strong>" <strong>ROUND</strong> <strong>ROCK</strong> GRILL, ROTISSERIE & FIRE PIT<br />
MODEL <strong>590503</strong><br />
! IMPORTANT!<br />
FIRST USE PREPARATION AND CURE PROCESS<br />
Prior to the first use, follow the 3 steps to cure the finish as well as rid the Round Rock of paint odor.<br />
FIRST USE CURE PROCESS EVERY USE<br />
STEP 1: OIL ALL GRILL AND INTERIOR SURFACES<br />
Lightly coat all grill surfaces (top and bottom) and the<br />
interior surfaces of the firebowl with vegetable oil using a<br />
rag or use vegetable oil spray. Do not oil the handles.<br />
STEP 2: START A FIRE<br />
Start your first fire with 10-15 lbs of charcoal in the firebowl.<br />
After the coals have ashed over, carefully spread them<br />
around the firebowl.<br />
STEP 3: MAINTAIN THE FIRE<br />
Maintain the fire for 1 hour. After 1 hour, allow the Round<br />
Rock to cool gradually. Do not dump the charcoal out or<br />
pour water on the coals. Allow the coals to burn out and<br />
cool down without disturbance. After the Round Rock has<br />
cooled completely, the ashes may be discarded if necessary<br />
and the Round Rock is ready for use.<br />
IMPORTANT! Note that it is important not to scrape or rub<br />
any surface during the cure process.<br />
APPLY VEGETABLE OIL<br />
TO THE VERTICAL ROD<br />
SURFACES PRIOR TO<br />
EVERY USE.<br />
APPLY VEGETABLE OIL<br />
TO ALL INTERIOR SURFACES<br />
OF THE FIREBOWL FOR THE<br />
CURE PROCESS ONLY.<br />
®<br />
OIL GRILL AND ROD SURFACES BEFORE EVERY USE<br />
Before each use, it is important to wipe or spray vegetable oil<br />
on ALL grill top surfaces and the stainless vertical rod surfaces.<br />
The vegetable oil helps keep food from sticking to the grill and<br />
keeps height adjustment of the main cooking grill moving<br />
smoothly.<br />
APPLY VEGETABLE OIL<br />
TO THE VERTICAL ROD<br />
SURFACES PRIOR TO<br />
EVERY USE.<br />
APPLY VEGETABLE OIL<br />
TO ALL GRILL SURFACES<br />
TOP AND BOTTOM<br />
(EXCEPT HANDLES)<br />
FOR THE CURE PROCESS.<br />
THEN JUST APPLY<br />
VEGETABLE OIL TO THE TOP<br />
GRILLING SURFACES PRIOR<br />
TO EVERY USE.
OPERATING<br />
OPERATING<br />
INSTRUCTIONS<br />
INSTRUCTIONS<br />
The Round Rock can be used as a:<br />
GRILL -OR- ROTISSERIE -OR- GRILL & ROTISSERIE -OR- FIRE PIT<br />
Please read all steps before using.<br />
ROTISSERIE<br />
GRILL<br />
The food is cooked on the stainless steel rotisserie. The food is cooked on the main cooking grill or the<br />
accessory grill.<br />
1. Adjust the aluminum blocks to the desired rotisserie height.<br />
2. OPTIONAL: The main cooking grill cable assemblies may be removed<br />
if desired for a freely turning rotisserie. If the cable assemblies are left<br />
assembled to the main cooking grill, the rotisserie will pull the large<br />
cooking grill with it.<br />
3. It is recommended that the meat be pierced by the stainless rotisserie rod<br />
for the best hold. Remove the rotisserie rod from the aluminum blocks.<br />
Using the set screw key, loosen set screws and remove one stainless<br />
skewer, one cable assembly collar and end collar from the rod.<br />
4. Pierce the meat with the rotisserie rod and push the meat to the fixed<br />
skewer. The skewer should pierce the meat.<br />
5. Reinstall and position the stainless skewer so it pierces the other side of<br />
the meat and gives additional hold. Tighten set screw.<br />
6. Reinstall and position the cable assembly collar to the rod. Connect the<br />
clip hook to the large cooking grill if desired. Tighten set screw.<br />
7. Reinstall and position the end collar. Tighten set screw.<br />
8. Add wood or charcoal to the firebowl for desired type of fire. Do not use<br />
wood more than 24" in length. Don't allow the wood to overhang the<br />
sides of the firebowl. Don't overload the firebowl.<br />
9. Light wood or charcoal and wait for desired temperature.<br />
10. Rotate and cook food to desired preference.<br />
ROTISSERIE<br />
& GRILL<br />
GRILL<br />
<br />
<strong>48</strong>" <strong>ROUND</strong> <strong>ROCK</strong> GRILL, ROTISSERIE & FIRE PIT<br />
MODEL <strong>590503</strong><br />
1. For best results, make sure the main cooking grill is<br />
attached to the adjustable cable assemblies that are<br />
fastened to the rotisserie rod.<br />
2. IMPORTANT! Before grilling, spray or wipe vegetable oil<br />
on ALL grill top surfaces before each use. Do not skip<br />
this step.<br />
3. Raise the main cooking grill using the rotisserie rod<br />
handle so there is access to the firebowl.<br />
4. Add wood or charcoal to the firebowl for desired type of<br />
fire. Do not use wood more than 24" in length. Don't<br />
allow the wood to overhang the sides of the firebowl.<br />
Don't overload the firebowl.<br />
5. Light wood or charcoal and wait for desired temperature.<br />
6. Adjust the main cooking grill to the desired height by<br />
turning the rotisserie rod handle. Lock the grill in<br />
position by placing the handle key into the aluminum<br />
block and handle sprocket.<br />
7. Add food to grill(s) and cook to desired preference.<br />
Tip<br />
The accessory grill can be used to grill food at a<br />
different height from the main cooking grill or it can be<br />
use to hold food until its ready to be served. The swing<br />
feature allows the accessory grill to be removed from<br />
the fire without having to remove the food.<br />
FIRE PIT<br />
®<br />
The Round Rock is used as a fire pit.<br />
Page 11<br />
1. Remove all parts of the rotisserie assembly, including<br />
vertical rotisserie rods, stainless steel rotisserie and<br />
main cooking grill. Remove accessory grill and pot hook<br />
if desired.<br />
2. Add wood or charcoal to the firebowl for desired type of<br />
fire. Do not use wood more than 24" in length. Don't<br />
allow the wood to overhang the sides of the firebowl.<br />
Don't overload the firebowl.<br />
3. Light wood or charcoal.<br />
ROTISSERIE<br />
FIRE PIT