

Nikon D50 Quick Start Guide - MFCameras - Free Online Camera ...
Nikon D50 Quick Start Guide - MFCameras - Free Online Camera ...
Nikon D50 Quick Start Guide - MFCameras - Free Online Camera ...

You also want an ePaper? Increase the reach of your titles
YUMPU automatically turns print PDFs into web optimized ePapers that Google loves.
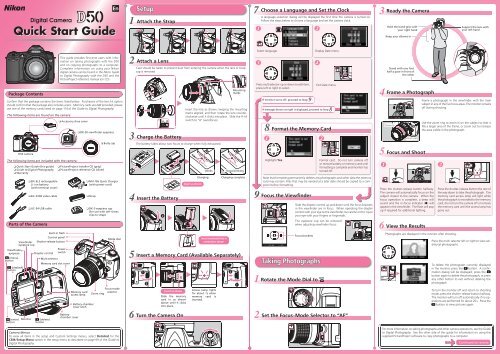
Package Contents<br />
The following items are found on the camera:<br />
The following items are included with the camera:<br />
❏ EN-EL3 rechargeable<br />
Li-ion battery<br />
(with terminal cover)<br />
❏ EG-D100 video cable<br />
❏ UC-E4 USB cable<br />
Parts of the <strong>Camera</strong><br />
This guide provides fi rst-time users with information<br />
on taking photographs with the <strong>D50</strong><br />
and on copying photographs to a computer.<br />
Complete information on using your <strong>Nikon</strong><br />
digital camera can be found in the <strong>Nikon</strong> <strong>Guide</strong><br />
to Digital Photography with the <strong>D50</strong> and the<br />
PictureProject reference manual (on CD).<br />
Confi rm that the package contains the items listed below. Purchasers of the lens kit option<br />
should confi rm that the package also includes a lens. Memory cards are not provided; please<br />
use one of the memory cards listed on page 114 of the <strong>Guide</strong> to Digital Photography.<br />
❏ <strong>Quick</strong> <strong>Start</strong> <strong>Guide</strong> (this guide)<br />
❏ <strong>Guide</strong> to Digital Photography<br />
❏ Warranty<br />
Viewfi nder<br />
eyepiece<br />
(menu)<br />
button<br />
(enter)<br />
button<br />
<strong>D50</strong> camera<br />
Viewfi nder<br />
eyepiece cup<br />
Monitor<br />
Digital <strong>Camera</strong><br />
<strong>Quick</strong> <strong>Start</strong> <strong>Guide</strong><br />
(playback)<br />
button<br />
Shutter-release button<br />
Diopter control<br />
Control panel<br />
❏ Accessory shoe cover<br />
Power<br />
switch<br />
Multi selector<br />
Memory card slot cover<br />
(delete)<br />
button<br />
Built-in fl ash<br />
❏ DK-20 viewfi nder eyepiece<br />
❏ PictureProject installer CD (gray)<br />
❏ PictureProject reference CD (silver)<br />
Memory card<br />
access lamp<br />
Batterychamber<br />
cover<br />
❏ MH-18a <strong>Quick</strong> Charger<br />
(with power cord)<br />
❏ Strap<br />
Battery-chamber<br />
cover latch<br />
❏ Body cap<br />
En<br />
❏ DK-5 eyepiece cap<br />
(for use with self-timer;<br />
clips to strap)<br />
Mode dial<br />
Focus-mode<br />
selector<br />
Zoom ring<br />
<strong>Camera</strong> Menus<br />
To view all items in the setup and Custom Settings menus, select Detailed for the<br />
CSM/Setup Menu option in the setup menu as described on page 69 of the <strong>Guide</strong> to<br />
Digital Photography.<br />
Setup<br />
Attach the Strap<br />
Attach a Lens<br />
Care should be taken to prevent dust from entering the camera when the lens or body<br />
cap is removed.<br />
Charge the Battery<br />
Insert the Battery<br />
<br />
<br />
Turn the <strong>Camera</strong> On<br />
Insert the lens as shown, keeping the mounting<br />
marks aligned, and then rotate the lens counterclockwise<br />
until it clicks into place. Slide the A-M<br />
switch to “A” (autofocus).<br />
The battery takes about two hours to charge when fully exhausted.<br />
Insert as shown<br />
Charging<br />
Blinks<br />
Insert terminals fi rst in<br />
orientation shown<br />
Mounting<br />
marks<br />
Stops blinking<br />
Charging complete<br />
Insert a Memory Card (Available Separately)<br />
<br />
Face<br />
up<br />
<br />
Insert as shown<br />
Slide the memory<br />
card in as shown<br />
above until it clicks<br />
into place.<br />
Access lamp lights<br />
for about 1 s when<br />
memory card is<br />
inserted.<br />
<br />
Choose a Language and Set the Clock<br />
A language-selection dialog will be displayed the fi rst time the camera is turned on.<br />
Follow the steps below to choose a language and set the camera clock.<br />
1 2<br />
Select language.<br />
3<br />
Press multi selector up or down to edit item,<br />
press left to right to select.<br />
If monitor turns off, proceed to Step<br />
Format the Memory Card<br />
1 2<br />
Highlight Yes. Format card. Do not turn camera off<br />
or remove battery or memory card until<br />
formatting is complete and monitor has<br />
turned off.<br />
Focus the Viewfi nder<br />
Taking Photographs<br />
Rotate the Mode Dial to<br />
Display Date menu.<br />
Exit Date menu.<br />
If message shown at right is displayed, proceed to Step<br />
Slide the diopter control up and down until the focus brackets<br />
in the viewfi nder are in focus. When operating the diopter<br />
control with your eye to the viewfi nder, be careful not to injure<br />
your eye with your fi ngers or fi ngernails.<br />
The eyepiece cup can be removed<br />
when adjusting viewfi nder focus.<br />
Set the Focus-Mode Selector to “AF”<br />
4<br />
Note that formatting permanently deletes any photographs and other data the memory<br />
card may contain. Files that may be needed at a later date should be copied to a computer<br />
before formatting.<br />
Focus brackets<br />
.<br />
.<br />
Ready the <strong>Camera</strong><br />
Hold the hand-grip with<br />
your right hand<br />
Keep your elbows in<br />
Stand with one foot<br />
half a pace in front of<br />
the other<br />
Frame a Photograph<br />
Zoom in<br />
Zoom out<br />
Focus and Shoot<br />
1 2<br />
Press the shutter-release button halfway.<br />
The camera will automatically focus on the<br />
subject closest to the camera. When the<br />
focus operation is complete, a beep will<br />
sound and the in-focus indicator (●) will<br />
appear in the viewfi nder. The fl ash will pop<br />
up if required for additional lighting.<br />
View the Results<br />
Support the lens with<br />
your left hand<br />
Frame a photograph in the viewfi nder with the main<br />
subject in any of the fi ve focus areas. The monitor remains<br />
off during shooting.<br />
Use the zoom ring to zoom in on the subject so that it<br />
fi lls a larger area of the frame, or zoom out to increase<br />
the area visible in the photograph.<br />
Photographs are displayed in the monitor after shooting.<br />
Press the shutter-release button the rest of<br />
the way down to take the photograph. The<br />
memory card access lamp will light while<br />
the photograph is recorded to the memory<br />
card; do not turn the camera off or remove<br />
the memory card until the access lamp has<br />
gone out.<br />
Press the multi selector left or right to view additional<br />
photographs.<br />
To delete the photograph currently displayed<br />
in the monitor, press the button. A confi rmation<br />
dialog will be displayed; press the<br />
button again to delete the photograph, or press<br />
any other button to exit without deleting the<br />
photograph.<br />
To turn the monitor off and return to shooting<br />
mode, press the shutter-release button halfway.<br />
The monitor will turn off automatically if no operations<br />
are performed for about 20 s. Press the<br />
button to view pictures again.<br />
For more information on taking photographs and other camera operations, see the <strong>Guide</strong><br />
to Digital Photography. See the other side of this guide for information on using the<br />
supplied PictureProject software to copy photographs to a computer.<br />
Continued on reverse
Turn the computer on and insert the PictureProject installer CD into the CD-ROM drive.<br />
The Install Center program will launch automatically. Depending on the region of purchase,<br />
a “Select Region” dialog may be displayed; select a region and click Next.<br />
A language-selection dialog will be displayed. Select a language and click Next.<br />
Click Easy Install to begin installation of:<br />
<strong>Nikon</strong> Mass Storage camera drivers (Windows 98 SE<br />
only)<br />
Drivers for D1-series cameras<br />
Apple <strong>Quick</strong>Time 6<br />
<strong>Nikon</strong> Fotoshare (Europe only)<br />
PictureProject<br />
Microsoft DirectX 9<br />
Remove the PictureProject installer CD from the CD-ROM drive.<br />
This completes installation of PictureProject. Proceed to “Viewing Photographs on a Computer.”<br />
Installing PictureProject (Macintosh)<br />
Follow the on-screen instructions to install the<br />
Installing PictureProject drivers for D1-series cameras.<br />
Viewing Photographs on a Computer<br />
This section describes how to install PictureProject and copy photographs to a computer.<br />
PictureProject can also be used to view, edit, and organize photographs. See the PictureProject<br />
Reference Manual (on CD) for more information.<br />
PictureProject<br />
Before Installing PictureProject<br />
PictureProject requires Mac OS X version 10.1.5 or later or a pre-installed version of Windows<br />
XP Home Edition, Windows XP Professional, Windows 2000 Professional, Windows Millennium<br />
Edition (Me), or Windows 98 Second Edition (SE). Turn off any virus-protection software and<br />
exit all other applications before beginning installation.<br />
<strong>Nikon</strong> View / <strong>Nikon</strong> Capture<br />
Uninstall <strong>Nikon</strong> View before installing PictureProject. For information on using PictureProject<br />
Important<br />
with <strong>Nikon</strong> Capture, see the PictureProject Reference Manual (on CD).<br />
Important<br />
Important<br />
View and organize photographs.<br />
Collection list<br />
Group photos into collections and<br />
collections into folders.<br />
Picture list<br />
Windows XP / Windows 2000 / Mac OS X<br />
Use an account with administrator privileges when installing or uninstalling<br />
PictureProject.<br />
Before Connecting the <strong>Camera</strong><br />
Be sure that PictureProject is installed. If the Windows hardware wizard is displayed<br />
when the camera is connected, click Cancel to exit the wizard.<br />
Installing PictureProject (Windows)<br />
The illustrations in this section are intended as a guide only. The dialogs and messages displayed<br />
during installation may differ in some respects from those shown here.<br />
If the “Select Region” or “Select Language” Dialog Is Not Displayed<br />
Open “My Computer” by selecting My Computer from the <strong>Start</strong> menu (Windows<br />
XP) or by double-clicking the My Computer icon on the desktop (other versions of<br />
Windows) and then double-click the CD (PictureProject) icon.<br />
Edit<br />
View the photos in the current collection<br />
or folder.<br />
Retouch photos using a variety<br />
of tools, including cropping and<br />
brightness and hue adjustment.<br />
Windows 98 SE<br />
The dialog shown at right will be displayed. Follow the on-screen<br />
instructions to install the Mass Storage drivers.<br />
Arrange photos in a variety of<br />
layouts.<br />
Other tasks that can be performed with PictureProject include printing photographs,<br />
sending photos by e-mail, viewing slide shows, and copying photographs to CD or<br />
DVD (requires Windows or Mac OS X version 10.2.8 or later).<br />
Click Yes.<br />
The <strong>Nikon</strong> FotoShare setup program will start (Europe<br />
only). Follow the on-screen instructions to<br />
install <strong>Nikon</strong> FotoShare.<br />
Read the license agreement…<br />
…and click Yes to accept and proceed with installation.<br />
Click Next to install PictureProject to the location<br />
shown, or click Browse… to choose a different<br />
folder.<br />
Click Yes.<br />
Click Yes.<br />
Click Finish.<br />
DirectX 9<br />
If DirectX 9 is not already installed, the dialog shown<br />
at right will be displayed. Follow the on-screen<br />
instructions to install DirectX 9.<br />
Click Yes or Finish to restart the computer.<br />
Displayed if DirectX 9 is not<br />
installed in Step<br />
Displayed if DirectX 9 is<br />
installed in Step<br />
After the computer restarts, the PictureProject Import Assistant will be displayed. The<br />
Import Assistant is used to catalog existing images for display in PictureProject.<br />
1 Click Import to catalog the images in the “Import from” folder in PictureProject.<br />
The time needed to catalog the images is proportional to the number of images in<br />
the folder.<br />
2 Click OK to close the Import Assistant when import is complete.<br />
To proceed without cataloging existing images, click Close. Existing images can be<br />
cataloged manually at any time; see the PictureProject Reference Manual (on CD) for<br />
details.<br />
The illustrations in this section are intended as a guide only. The dialogs and messages displayed<br />
during installation may differ in some respects from those shown here.<br />
Turn the computer on and insert the PictureProject installer CD into the CD-ROM drive.<br />
Double-click the PictureProject installer CD icon on the desktop, then double-click the<br />
Welcome icon. Depending on the region of purchase, a “Select Region” dialog may be<br />
displayed; select a region and click Next. A language-selection dialog will be displayed.<br />
Select a language and click Next.<br />
Click Easy Install to begin installation of:<br />
<strong>Nikon</strong> Fotoshare (Europe only)<br />
The dialog shown at right will be<br />
displayed. Click OK.<br />
PictureProject<br />
Apple <strong>Quick</strong>Time 6<br />
Enter the administrator name and password…<br />
…and click OK.<br />
Read the license agreement…<br />
…and click Accept to accept and view the ReadMe fi le.<br />
Take a few moments to read this fi le, which may contain<br />
important information that could not be included in this<br />
guide. Click Continue… to proceed with installation.<br />
Click Install.<br />
Click Yes.<br />
Click Yes.<br />
Click Quit.<br />
Apple <strong>Quick</strong>Time 6<br />
If an earlier version of <strong>Quick</strong>Time is installed, the<br />
<strong>Quick</strong>Time 6 installer will start. Follow the onscreen<br />
instructions to complete installation. When<br />
the dialog shown at right is displayed, click Continue.<br />
Do not complete the “Registered To,” “Organization,”<br />
and “Registration Number” fi elds.<br />
Click Restart to restart the computer.<br />
Import button<br />
Close button<br />
Displayed if<br />
<strong>Quick</strong>Time 6 is<br />
not installed in<br />
Step<br />
Windows<br />
“Import<br />
from” folder<br />
Close button<br />
Macintosh<br />
“Import from”<br />
folder<br />
Import button<br />
Displayed if<br />
<strong>Quick</strong>Time 6<br />
is installed in<br />
Step<br />
When the computer restarts, log in to the account used to install PictureProject. To install<br />
<strong>Nikon</strong> FotoShare (Europe only), open the “FotoShare” folder on the PictureProject installer<br />
CD and drag the <strong>Nikon</strong> FotoShare icon to the “Applications” folder on the hard disk.<br />
Continued in next column<br />
The illustrations in this section are from Windows XP.<br />
1 Turn<br />
2 Turn<br />
3 The<br />
Use a Reliable Power Source<br />
<strong>Nikon</strong> recommends using the optional EH-5 AC adapter to power the camera for extended<br />
periods. Do not use another make or model of AC adapter.<br />
the camera off and connect the supplied USB cable as shown below. Do not use<br />
force or attempt to insert the connectors at an angle. Connect the camera directly to the<br />
computer; do not connect the cable via a USB hub or keyboard.<br />
the camera on. PictureProject will automatically detect the camera and the<br />
PictureProject Transfer window will be displayed in the computer monitor. Click Transfer<br />
to copy all photographs from the camera memory card to the computer.<br />
Windows XP<br />
The dialog shown at right will be displayed when the<br />
camera is turned on. Select Copy pictures to a folder<br />
on my computer using PictureProject and click OK.<br />
To bypass this dialog in future, check Always do the<br />
selected action.<br />
photographs will be displayed in PictureProject when transfer is complete.<br />
PictureProject periodically checks for updates<br />
when the computer is connected to the Internet.<br />
If an update is detected when PictureProject<br />
starts, an update dialog will be displayed. Follow<br />
the on-screen instructions to update to the<br />
latest version of PictureProject.<br />
Disconnecting the <strong>Camera</strong><br />
Before turning the camera off and disconnecting the USB cable, remove the camera from<br />
the system as described below.<br />
Windows XP Home Edition/Professional: Click the “Safely<br />
Remove Hardware” ( ) icon in the taskbar and select<br />
Safely remove USB Mass Storage Device from the<br />
menu that appears.<br />
Windows 2000 Professional: Click the “Unplug or Eject<br />
Hardware” ( ) icon in the taskbar and select Stop USB<br />
Mass Storage Device from the menu that appears.<br />
Windows Millennium Edition (Me): Click the “Unplug or<br />
Eject Hardware” ( ) icon in the taskbar and select Stop<br />
USB Disk from the menu that appears.<br />
Windows 98 Second Edition (SE): In My Computer, right<br />
click on the removable disk corresponding to the camera<br />
and select Eject from the menu that appears.<br />
Macintosh: Drag the camera volume (“NIKON <strong>D50</strong>”) into<br />
the Trash.<br />
Transfer button<br />
SB5D01(11)<br />
6MBA4711-01