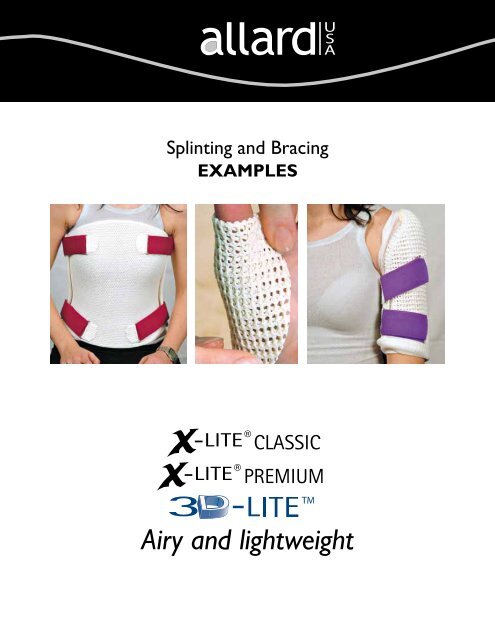
Airy and lightweight - Allard USA
Airy and lightweight - Allard USA
Airy and lightweight - Allard USA

Create successful ePaper yourself
Turn your PDF publications into a flip-book with our unique Google optimized e-Paper software.
Splinting <strong>and</strong> Bracing<br />
ExamplEs<br />
CLASSIC<br />
PREMIUM<br />
<strong>Airy</strong> <strong>and</strong> <strong>lightweight</strong>
X-lite ® ClaSSiC<br />
ClaSSiC is the original X-lite ®<br />
material. the large mesh openings<br />
are great for larger anatomy <strong>and</strong><br />
when the injury requires maximum<br />
aeration, i.e., burns.<br />
GEnEral information<br />
these examples are offered as fabrication ideas only. there are many different ways to make a tlSo, wrist<br />
splint, Casting etc. always make sure that the orthosis that you have constructed has the stability required<br />
to acheive your treatment goals. always check that all edges on the brace are smooth.<br />
CaUtion: take appropriate precautions to prevent burns when using hot water <strong>and</strong> heat guns.<br />
X-lite ® is the only low temperature thermoplastic,<br />
which starts as a 100% natural cotton mesh which is then<br />
impregnated with a non-toxic resin base, making it totally<br />
biodegradable. 3D-lite is produced in the same way,<br />
but uses a polyester mesh as the base.<br />
eXCellent Ventilation<br />
the cotton mesh base provides ”natural” opening for<br />
heat or fluids to escape.<br />
<strong>lightweight</strong><br />
with the copolymer added only to the cotton mesh<br />
itself, X-lite ® offers the lightest weight casting <strong>and</strong><br />
splinting materials available.<br />
teChnologY<br />
proDUCt options<br />
X-lite ® PReMiUM<br />
PReMiUM is made of the same cotton<br />
mesh but thinner <strong>and</strong> with smaller<br />
openings. this makes Premium<br />
ideal for pediatrics <strong>and</strong> small adult<br />
anatomy, particularly h<strong>and</strong> splinting.<br />
non-toXiC<br />
the polymer in X-lite ® is fully reacted, which means<br />
that it does not contain any of the residues in unreacted<br />
form <strong>and</strong> therefore will not release such residues when<br />
applied or worn.<br />
BioDegRaDeaBle<br />
This is an important benefit for those of us who are<br />
concerned about the future of our environment. the<br />
Microbial ecology laboratory, University of liege,<br />
Belgium, studied X-lite ® <strong>and</strong> stated: ”…we are pleased<br />
to conclude: Runlite X-lite ® thermoplastic Products<br />
are in full conformity with the French <strong>and</strong> U.S. st<strong>and</strong>ards<br />
for biodegradability”.<br />
X-RaY tRanSlUCent<br />
X-lite ® <strong>and</strong> 3D-lite are completely translucent to xray<br />
<strong>and</strong> will not show at all on the negative, unless using<br />
more than three layers.<br />
2<br />
3D-lite<br />
3D-lite is the newest material in<br />
the range of products. this unique<br />
three dimensional material is perfectly<br />
suited for larger applications,<br />
such as spinal braces.
tEmpEratUrE anD workinG timE<br />
woRking/Setting tiMe<br />
iMPoRtant: water temperature must be approx. 70°C (160°F)<br />
heating time working time Cooling time load bearing time<br />
Classic Splint 1 minute 45 - 60 seconds 60 - 75 seconds<br />
Premium Splint 1 minute 30 - 45 seconds 45 - 60 seconds<br />
Classic cast 2 minute 2 - 3 minutes 4 - 15 minutes 15 - 20 minutes<br />
Premium Cast 2 minutes 60 - 90 seconds 3 - 5 minutes<br />
3D-lite<br />
2 minutes 2 - 3 minutes 4 - 15 minutes 10 - 20 minutes<br />
Edging material 10 - 15 seconds 15 - 20 seconds 5 - 10 seconds<br />
Thermoplastic hook 15 - 20 seconds 20 - 30 seconds 15 - 20 seconds<br />
strEtCh anD riGiDity<br />
X-lite ® ClaSSiC anD PReMiUM StRetCh<br />
Minimum Moderate Maximum<br />
3D-lite StRetCh<br />
3<br />
oPtiMUM StRength<br />
oPtiMUM aeRation<br />
Minimum Maximum Flip layeres so holes do not align the holes as you lay the<br />
perfectly align.<br />
layers together.
tlso fabrication Examples<br />
• 1 sheet of 3D-LITE material<br />
• Pattern<br />
• Buckles (4 pcs)<br />
• 2.5 cm (1”) wide X-lite ® PRePaRation<br />
edging<br />
material<br />
• Hook/loop straps for closure<br />
(4 pcs)<br />
• Compression Torso Stockinette<br />
3. immerse material into water <strong>and</strong> then cut<br />
with sharp scissors.<br />
6. trim any excess material while still soft,<br />
leaving 5 cm (2”) overlap.<br />
1. try pattern onto patient <strong>and</strong> make necessary<br />
adjustments.<br />
4<br />
2. Draw pattern onto material<br />
4. Prepare buckles (see page 18) 5. immerse sheet into water until soft <strong>and</strong> remove<br />
excess water on a towel. Mold onto patient. Repeat<br />
the same procedure for the back section.<br />
7. Check overlap for good fit.<br />
9. Press edges together <strong>and</strong> cool to seal. 10. Cover edges with material of your own<br />
preference or use X-lite ® edging material.<br />
See page 17 for further information.<br />
12. take buckles out from water <strong>and</strong> fold. 13. Press material firmly together.<br />
8. heat small sections of edge in water bath or<br />
with heat gun <strong>and</strong> press edges together.<br />
11. immerse the prepared buckles into water.<br />
14. heat the brace where the buckle should<br />
be placed.
15. Press heated buckles into place. Repeat<br />
procedure with remaining buckles<br />
18. Secure straps <strong>and</strong> trim excess.<br />
16. Check straps for proper length.<br />
19. Final brace - check for proper fit.<br />
5<br />
17. Fasten straps with stapler or other suitable<br />
method.<br />
Extreme caution should be taken when using the<br />
heat gun as the material will be extremely hot.
tibia fracture Brace fabrication Examples<br />
PRePaRation<br />
• 3 sheets X-LITE ® Classic 45x50 cm<br />
(18”x20”)<br />
• 5 sheets X-LITE ® Classic 2.5 cm (1”)<br />
• Pattern<br />
• Felt Padding<br />
• Aquaplast (or similar) for foot piece<br />
• Buckles (4 pcs)<br />
• Ankle rivets (2 pcs)<br />
• Straps (2 pcs)<br />
• Compression stockinette<br />
• Elastic b<strong>and</strong>age<br />
3. hold the three sheets together <strong>and</strong> immerse<br />
in water for a few seconds to adhere<br />
together.<br />
6. Cut the foot piece reinforcement <strong>and</strong> stirrup<br />
from the aquaplast or similar material.<br />
9. heat edges one by one in water bath.<br />
12. Place the buckles <strong>and</strong> rivets in their position<br />
on the brace <strong>and</strong> press them into place.<br />
1. try pattern on patient <strong>and</strong> make necessary<br />
adjustments.<br />
6<br />
2. Prepare the three sheets of X-lite ® - the<br />
middle sheet should be flipped in the opposite<br />
direction for increased rigidity.<br />
4. Draw pattern onto material. 5. heat areas to cut in water to soften <strong>and</strong> then cut.<br />
7. Prepare the buckles (see page 18)<br />
<strong>and</strong> the ankle rivets (see page 19).<br />
10. hold a rolling pin at a slight angle <strong>and</strong> press<br />
firmly on the covered edges ONLY to create a<br />
smooth finish.<br />
13a. Prepare the patient by adding extra padding<br />
material over the malleoli.<br />
8. Soften 2.5 cm (1”) X-lite® in the water <strong>and</strong> apply around edge<br />
of brace. at the end of one strip, overlap the next to ensure edges<br />
don’t pull apart when moulding.<br />
11. immerse all the buckles <strong>and</strong> posts into<br />
water.<br />
13b. Before applying the brace onto patient,<br />
apply enough talcum powder to posterior<br />
overlap edges to prevent from sticking together.
14. immerse brace into water. Mold onto<br />
patient’s leg wrapping laterally to medially.<br />
17. immerse foot piece reinforcement <strong>and</strong><br />
stirrup into water - remove when sufficiently<br />
softened.<br />
20. when the stirrup has cooled - use a sharp<br />
knife to remove the material covering the<br />
holes.<br />
23. Foot piece completed.<br />
25. attach the straps to the underlying side,<br />
using heavy duty staples or other suitable<br />
method.<br />
7<br />
15. wrap elastic b<strong>and</strong>age<br />
around the brace<br />
on the leg, wrapping<br />
laterally to medially.<br />
Straighten the leg <strong>and</strong><br />
shape around the patella<br />
to ensure patient<br />
will be able to extend<br />
knee when brace is<br />
completed.<br />
18. Place the foot piece reinforcement onto<br />
the stirrup in the heel area. Put talcum powder<br />
onto the ends to avoid sticking together.<br />
21. Place the uprights of the stirrup onto the<br />
rivets <strong>and</strong> secure with the locking cap.<br />
24. Position the straps <strong>and</strong> trim to appropriate<br />
length.<br />
16. Check fit in st<strong>and</strong>ing position.<br />
19. Place the foot piece under the foot <strong>and</strong><br />
bring the stirrup side up. Press the top of the<br />
stirrup firmly against the exposed rivets to get<br />
a good protruding mould.<br />
22. to avoid pressure over the malleoli, add<br />
self-adhesive felt padding.
humeral fracture Brace fabrication Examples<br />
• 3 sheets X-LITE ® Classic or<br />
Premium 45 X 50 cm (18” x 20”)<br />
• 4 - 6 sheets X-LITE ® PRePaRation<br />
Classic or<br />
Premium 2,5 cm (1”)<br />
• Compression stockinette<br />
• Felt Padding<br />
• Straps (2pcs)<br />
• Elastic b<strong>and</strong>age<br />
3. hold the three sheets together <strong>and</strong> immerse in<br />
water for a few seconds to adhere together.<br />
6.Using 2,5 cm (1”) X-lite ® , heat these strips<br />
in the water <strong>and</strong> apply around edge of brace.<br />
at the end of one strip, overlap the next to<br />
ensure edges don’t pull apart when moulding.<br />
8. hold a rolling pin at a slight angle <strong>and</strong> press<br />
firmly on the covered edges ONLY to create a<br />
smooth finish.<br />
11. Mold the brace onto the patient wrapping<br />
from anterior - posterior - medial.<br />
1. try pattern on patient <strong>and</strong> make necessary<br />
adjustments.<br />
8<br />
2. Prepare the three sheets of X-lite - the<br />
middle sheet should be in the opposite<br />
direction for increased rigidity.<br />
4. Draw pattern onto material. 5. heat areas to cut in water to soften <strong>and</strong><br />
then cut.<br />
7. heat edges one by one in water bath.<br />
9. Put the buckles into place (for more information<br />
about buckles - see page 18).<br />
after placing the buckles - immerse the brace<br />
into water to make it soft.<br />
10. Before applying the brace onto patient,<br />
apply enough talcum powder to overlap edges<br />
to prevent sticking together.<br />
12. with h<strong>and</strong> supported, help<br />
patient lean toward the fracture<br />
side, allowing the fracture<br />
site to hang vertically while<br />
maintaining<br />
fracture alignment.
13. Use elastic b<strong>and</strong>age to wrap around<br />
the brace on the arm, wrapping laterally to<br />
medially.<br />
16. Position the straps <strong>and</strong> trim to appropriate<br />
length.<br />
19. Finished brace.<br />
14. add self-adhesive felt padding to avoid<br />
pressure on the humeral head.<br />
17. attach the straps to the underlying side,<br />
using heavy duty staples or other suitable<br />
method.<br />
X-lite ® Premium<br />
humeral Fracture Brace<br />
9<br />
15. Felt padding in place.<br />
18. Cut straps to correct length.<br />
X-lite ® Classic<br />
humeral Fracture Brace
wrist splint fabrication Examples<br />
PRePaRation<br />
x-litE ® Classic<br />
• 2 sheets size 20 x 37.5 cm (8” x 15”)<br />
• 2 sheets size 2.5 cm (1”)<br />
• 10 cm (4”) X-LITE ® edging material 2,5<br />
cm (1”) (for thumb part)<br />
• Thermoplastic hook<br />
• Stockinette<br />
• Straps<br />
x-litE ® premium<br />
• 2 sheets size 20 x 37.5 cm (8” x 15”)<br />
• 1 sheet cut into 2.5 cm (1”) strips<br />
• 10 cm (4”) X-lite Edging material 2,5<br />
cm (1”) (for thumb part)<br />
• Thermoplastic hook<br />
• Stockinette<br />
• Straps<br />
1. the stockinette is optional depending on<br />
therapist preference or patient medical needs.<br />
3. Draw pattern onto material. heat areas to<br />
cut in water to soften <strong>and</strong> then cut.<br />
5. Heat edges one by one in water bath. Using a rolling pin compress only the covered edges firmly to<br />
create a smooth finish.<br />
7. adjustments can easily be made by immersing<br />
sections to be modified into water.<br />
10. Cut re-inforcement to proper length.<br />
8. Start molding on the patient again until<br />
satisfied.<br />
11. add edging material on the the thumb area<br />
of the brace for extra smoothness <strong>and</strong> comfort.<br />
See page 17 for more instructions.<br />
10<br />
2. hold the two sheets together <strong>and</strong> immerse<br />
in water for a few seconds to adhere together.<br />
4. Using 2.5 cm (1”) X-lite, heat these strips in the water<br />
<strong>and</strong> apply around edge of brace. at the end of one strip,<br />
overlap the next to ensure edges don’t pull apart when<br />
moulding,<br />
6. immerse brace into water until soft <strong>and</strong><br />
then remove excess water on a towel. Mould<br />
onto patient.<br />
9. extra re-inforcement can be added by using<br />
strips from left over material. immerse into<br />
water <strong>and</strong> apply on brace where added rigidity<br />
is required.<br />
12. To fit contours make small cuts into material<br />
<strong>and</strong> fold. if edging material becomes dry,<br />
immerse into water to re-soften.
13. Make sure the edging material is well secured<br />
into material.<br />
16. Press the Thermoplastic hook firmly into<br />
the brace.<br />
14. Use heat gun to soften the area on the<br />
splint were the thermoplastic hook is to be<br />
applied.<br />
17. attach the straps to the hook <strong>and</strong> trim to<br />
appropriate length.<br />
x-litE ® options<br />
these instructions offer a few splint variations. the versatility of X-lite ® allows you to<br />
modify to meet your specific therapeutic needs. Any of the instructions included can be<br />
modified, for examples:<br />
• Use of stockinette is optional. X-LITE ® may be applied directly to the skin if desired.<br />
• Edges may be finished using<br />
a) X-lite ® edging material<br />
b) X-lite ® classic available in 2.5 cm (1”)<br />
c) Cut X-lite ® Premium by width <strong>and</strong> length desired<br />
Using a rolling pin to smooth the material is only required when optimal smoothness is<br />
needed.<br />
Use of pattern is optional.<br />
11<br />
15. Use heat gun to soften the thermoplastic<br />
hook (8-10 sec.).<br />
18. Finished brace with all straps in place.<br />
Extreme caution should be taken when using the<br />
heat gun as the material will be extremely hot.
thumb orthosis fabrication Examples<br />
PRePaRation<br />
• X-LITE ® of suitable width <strong>and</strong><br />
length to cover affected anatomy.<br />
• X-LITE ® edging Material<br />
• Strap<br />
• Thermoplastic hook<br />
3. immerse the edging material into water.<br />
apply the edging material around the orthosis.<br />
6. To fit contours make small cuts into material<br />
<strong>and</strong> fold. if edging material becomes dry,<br />
immerse into water to re-soften.<br />
7. Press the edging material well into the<br />
X-lite ® <strong>and</strong> let cool.<br />
1. Cut X-lite ® to the shape of your pattern<br />
<strong>and</strong> immerse into water.<br />
4. Cut off excess material <strong>and</strong> fold to the<br />
inside. if needed immerse shortly into water.<br />
12<br />
2. if necessary cover thumb area with stockinette.<br />
Mold thumb orthosis on patient.<br />
5. Repeat the edging procedure <strong>and</strong> apply<br />
around the thumb area.
Use tongs to immerse <strong>and</strong> remove the roll<br />
from the water heater.<br />
Circular leg cast<br />
PRePaRation<br />
• Approx. 3 rolls X-LITE ® Classic<br />
10 cm (4”)<br />
• Approx. 1 roll X-LITE ® Classic<br />
7.5 cm (3”)<br />
• Stockinette<br />
• Foam padding<br />
2. Cover the leg with stockinette <strong>and</strong> foam<br />
padding.<br />
Circular arm cast<br />
PRePaRation<br />
• Approx. 2 rolls X-LITE ® Classic<br />
7,5 cm (3”)<br />
• Stockinette<br />
• Foam padding<br />
2. Cover the arm with stockinette <strong>and</strong> foam<br />
padding.<br />
Place the roll on a towel to allow it to drain.<br />
hold the roll by the label <strong>and</strong> gently shake to<br />
remove any exxcess water.<br />
3. Apply the first roll of 10 cm (4”) roll. Start<br />
approx. 2 cm (1”) below the knee. work your<br />
way downwards. Make sure you have at least<br />
two layers or more, especially were load will<br />
be applied (heel area <strong>and</strong> achilles tendon).<br />
3. Start with applying the wrist part into the<br />
palm area. twist the roll half way when you<br />
pass the thumb area. work your way upwards<br />
towards the elbow.<br />
13<br />
Cast roll preparation<br />
Remove outer wrap. Pull to start separation of Xlite<br />
® from plastic film. Most practitioners find it is<br />
easiest to keep the plastic film on top as the cast roll<br />
is applied to the patient.<br />
1. Prepare the toe-part from a 7,5 cm (3”) roll<br />
<strong>and</strong> put into water heater.<br />
4. go back <strong>and</strong> forth under the foot <strong>and</strong> heel,<br />
to avoid pressure over the instep. Finally put<br />
the toe cover in place.<br />
1. Prepare the wrist part from a 7.5 cm (3”)<br />
roll as shown above.<br />
4. Finish by pulling back the stockinette for<br />
a 2 cm (1”) overlap. Smoothen the cast with<br />
water.
attaching thermoplastic hook<br />
PRePaRation<br />
• X-LITE ® thermoplastic hook<br />
• Strap in suitable length<br />
3. apply dry heat for a few seconds to the<br />
spot on the splint where the hook is to be<br />
attached.<br />
Edging<br />
PRePaRation<br />
• X-LITE ® edging material of<br />
suitable width <strong>and</strong> colour.<br />
3. apply the edging material onto the orthosis.<br />
Extreme caution should be taken when using the<br />
heat gun as the material will be extremely hot.<br />
1. Cut off a suitable piece of the thermoplastic<br />
hook material.<br />
4. Press the Thermoplastic hook firmly into<br />
the orthosis <strong>and</strong> let cool.<br />
1. Cut X-lite ® edging Material to desired<br />
width <strong>and</strong> length.<br />
4. For curved areas of the splint, make small<br />
slits into the unattached half of the tape. this<br />
will make it easier to fold the tape to the<br />
underside.<br />
14<br />
2. apply dry heat to back side until sticky.<br />
5. attach the Velcro loop strap.<br />
2. immerse into water until soft.<br />
5. Fold <strong>and</strong> press. if the material has cooled<br />
down too quickly, immerse into water again<br />
<strong>and</strong> then press to the underside.
PRePaRation<br />
• Left over material of X-LITE ®<br />
Classic or Premium<br />
• Velcro in appropriate size<br />
attaching Velcro to x-litE ®<br />
1. Cut out X-lite ® Classic or Premium in<br />
appropriate length <strong>and</strong> width.<br />
3. Use a heat gun (or immerse to water) <strong>and</strong> fold up the three edges around the Velcro.<br />
5. heat the back side with a heat gun until<br />
sticky.<br />
7. Press against the orthosis <strong>and</strong> let cool.<br />
15<br />
2. there should be enough material to fold<br />
around three edges of the Velcro.<br />
Extreme caution should be taken when using the<br />
heat gun as the material will be extremely hot.
attaching straps - 1<br />
PRePaRation<br />
• Left over X-LITE ® Classic or<br />
Premium material<br />
• Velcro in appropriate size<br />
1. Cut out X-lite ® Classic or Premium in<br />
appro priate length <strong>and</strong> width.<br />
5. Use a heat gun to get material sticky. 6. Press onto orthosis.<br />
Extreme caution should be taken when using the<br />
heat gun as the material will be extremely hot.<br />
3. Use a heat gun to make the X-lite ® material<br />
sticky.<br />
16<br />
2. Cut a small hole in the Velcro strap to reinforce<br />
attachment.<br />
4. Fold the heated X-lite ® material <strong>and</strong> press<br />
firmly together
PRePaRation<br />
• Velcro strap<br />
• X-LITE ® edging material<br />
5. Place the strap on the edging material <strong>and</strong><br />
fold all the edges around.<br />
6. Use a heat gun to heat up the edging<br />
material <strong>and</strong> also spot heat onto the orthosis<br />
where the strap is to be applied.<br />
1. Cut a hole into the strap material to<br />
reinforce attachment.<br />
17<br />
attaching straps - 2<br />
2. take a suitable piece of edging material. 3. immerse edging material into water, for a<br />
few seconds.<br />
7. Press the strap with the edging material<br />
into the orthosis <strong>and</strong> let cool.<br />
Extreme caution should be taken when using the<br />
heat gun as the material will be extremely hot.
making Buckles<br />
PRePaRation<br />
• Left over pieces of material<br />
from X-lite ® Classic or Premium<br />
• Buckles in appropriate width<br />
1. Cut out lengths of appropriate width of<br />
X-lite ® Classic or Premium material.<br />
3. immerse into water until soft. 4. take out from water <strong>and</strong> fold.<br />
18<br />
2. Put the X-lite ® material through the<br />
buckles.<br />
5. Press together. these buckles can be prepared<br />
in advance <strong>and</strong> stored for later use.
PRePaRation<br />
• Left over pieces of X-LITE ®<br />
Classic or Premium material.<br />
• T-nuts (male <strong>and</strong> female part)<br />
• Edging material<br />
3. Make sure it is pressed through all the<br />
layers of material. Press firmly.<br />
6. immerse both parts into water quickly.<br />
8. then take the X-lite ® edging material out<br />
from the water.<br />
1. Cut out suitable pieces of X-lite ® Classic<br />
or Premium material. Use two layers of<br />
material, immerse into water <strong>and</strong> then fold to<br />
obtain four layers of material.<br />
19<br />
making posts<br />
2. Press the t-nut through the holes in the<br />
material.<br />
4. Cut off material to form a square. 5. take a piece of X-lite edging material that<br />
fits the size of the square.<br />
7. First remove the X-lite ® with the t-nut from the water <strong>and</strong> press the material <strong>and</strong> the t-nut<br />
together firmly.<br />
9. Press the edging material on to the back<br />
side of t-nut to make a solid backing.<br />
10. trim the edges.
www.allardint.com<br />
Tel +46 42 25 27 00<br />
Fax +46 42 25 27 25<br />
ALLARD INTERNATIONAL<br />
c/o Camp Sc<strong>and</strong>inavia AB<br />
Karbingatan 38<br />
SE-254 67 Helsingborg SWEDEN<br />
mail.sweden@camp.se