Instructions Victoria S95/S96: - George Weil Craft Supplies
Instructions Victoria S95/S96: - George Weil Craft Supplies
Instructions Victoria S95/S96: - George Weil Craft Supplies

You also want an ePaper? Increase the reach of your titles
YUMPU automatically turns print PDFs into web optimized ePapers that Google loves.
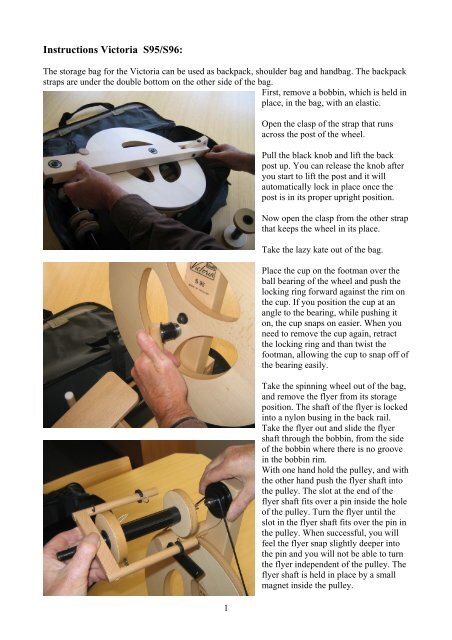
<strong>Instructions</strong> <strong>Victoria</strong> <strong>S95</strong>/<strong>S96</strong>:<br />
The storage bag for the <strong>Victoria</strong> can be used as backpack, shoulder bag and handbag. The backpack<br />
straps are under the double bottom on the other side of the bag.<br />
First, remove a bobbin, which is held in<br />
place, in the bag, with an elastic.<br />
1<br />
Open the clasp of the strap that runs<br />
across the post of the wheel.<br />
Pull the black knob and lift the back<br />
post up. You can release the knob after<br />
you start to lift the post and it will<br />
automatically lock in place once the<br />
post is in its proper upright position.<br />
Now open the clasp from the other strap<br />
that keeps the wheel in its place.<br />
Take the lazy kate out of the bag.<br />
Place the cup on the footman over the<br />
ball bearing of the wheel and push the<br />
locking ring forward against the rim on<br />
the cup. If you position the cup at an<br />
angle to the bearing, while pushing it<br />
on, the cup snaps on easier. When you<br />
need to remove the cup again, retract<br />
the locking ring and than twist the<br />
footman, allowing the cup to snap off of<br />
the bearing easily.<br />
Take the spinning wheel out of the bag,<br />
and remove the flyer from its storage<br />
position. The shaft of the flyer is locked<br />
into a nylon busing in the back rail.<br />
Take the flyer out and slide the flyer<br />
shaft through the bobbin, from the side<br />
of the bobbin where there is no groove<br />
in the bobbin rim.<br />
With one hand hold the pulley, and with<br />
the other hand push the flyer shaft into<br />
the pulley. The slot at the end of the<br />
flyer shaft fits over a pin inside the hole<br />
of the pulley. Turn the flyer until the<br />
slot in the flyer shaft fits over the pin in<br />
the pulley. When successful, you will<br />
feel the flyer snap slightly deeper into<br />
the pin and you will not be able to turn<br />
the flyer independent of the pulley. The<br />
flyer shaft is held in place by a small<br />
magnet inside the pulley.
Place the brake band in the groove of the bobbin and guide it around the hook.<br />
Turning the black knob tightens the brake band around the bobbin end. You can see the brake<br />
tension increase when the spring expands.<br />
If you need to, you can adjust the friction of the knob by turning the screw that holds the knob.<br />
By applying brake tension on the bobbin, you can control the tension on the yarn. The flyer turns<br />
because it is connected to the pulley, which causes the twist in the yarn. Since the yarn connects the<br />
bobbin to the flyer, the bobbin will turn. The result is that you feel a pull on the yarn, and by<br />
tightening the brake, you will increase this pull. When the bobbin fills up, it will pull with a higher<br />
torque on the brake. If you want to keep the same amount of pull on the yarn, you will need to<br />
increase the brake tension. This also means that you will need more power to treadle as the bobbin<br />
fills up. We suggest not to over fill the bobbin.<br />
You can spin on the <strong>Victoria</strong> with one or two feet. Many people treadle with both feet, resulting in<br />
lighter and smoother operation. If you use one foot, you have greater flexibility to position the<br />
wheel away from you, or at a slight angle.<br />
The main thing is to relax, and position yourself comfortably. You can spin well with a good<br />
distance between your hands and the flyer orifice. The flyer and flyer orifice are angled upwards, in<br />
the direction where you will naturally position your hands during spinning, but having the yarn<br />
enter the flyer orifice at an angle is not a problem.<br />
2<br />
Put the drive band in one of the three<br />
grooves of the pulley. The largest<br />
diameter has a 1:6 ratio, and you will get<br />
fewer twists per inch with the same<br />
treadling speed compared to a higher<br />
ratio.<br />
With the drive band on the smaller pulley<br />
diameters (ratio’s 1:9 and 1:13), you will<br />
get more twists per inch, or you can spin<br />
more yarn length in the same time. The<br />
higher the ratio the more power the<br />
treadling needs. This is where double<br />
treadling helps.<br />
Guide a starter thread through the orifice, around the hook and through the yarn guide slide. It does<br />
not matter which side of the flyer you use. Attach the thread to the loop in the bobbin.<br />
You can move the yarn guide slide as shown on the picture.<br />
Toward yourself: Away from yourself:
The orifice has a removable nylon bushing inserted that gives you the choice between an 8 mm<br />
(5/16") or 12 mm (1/2") orifice. The smaller diameter orifice is beneficial while spinning finer<br />
yarns.<br />
3<br />
If the yarn guide becomes too easy to slide on<br />
the flyer arms, you can use a pair of pliers to<br />
tighten the guide, pushing it together where<br />
the metal wire enters the plastic part.<br />
Because it is a spring wire, you have to<br />
squeeze so far that it does not spring back<br />
completely to the old position.<br />
If you tighten it too much, it is hard to open it<br />
again, so the best way is to squeeze it a bit<br />
more each time, and re-test.<br />
The lazy kate has an extra hole in the middle.<br />
An axle for a third bobbin will fit in this hole.<br />
We supply a bobbin together with an axle,<br />
cap and instructions as a kit.<br />
For storage in the bag, the bobbin in the<br />
middle has to be taken off and placed near<br />
the flyer. The picture show you the tric to<br />
store the lazy kate in the bag: While you are<br />
folding the wheel, you have to turn the lazy<br />
kate inward, so that the third axle comes<br />
down between main wheel and brake knob.
If it happens that some play arises in the locking<br />
system of the post, it can be repaired by adjusting<br />
the buffer. Release the screw of the buffer and turn<br />
it to a position so that it pushes the bottom of the<br />
post slightly backwards. The locking knob should<br />
fall inside just when the post hits the buffer. Fasten<br />
the screw after the buffer is turned into its proper<br />
position.<br />
Putting the <strong>Victoria</strong> back into the bag:<br />
After taking the bobbin off the flyer, place the flyer<br />
in the nylon bushing on the back rail. Make sure<br />
the hooks on the flyer are facing up. Place the drive<br />
band behind the pulley to prevent it from being<br />
under tension unnecessarily. The space behind the<br />
pulley is also the right place to locate the brake<br />
band when the flyer, with bobbin, is disconnected.<br />
Position the spinning wheel into the bag, with the<br />
rubber feet in the appropriate gaps of the base<br />
plate. At this time, re-position the lazy kate.<br />
Take the cup of the footman off of the ball bearing.<br />
Attach the security strap over the cross piece, just before the post of the wheel.<br />
Fold the wheel by first pulling the black knob out of it’s locking position and then attach the other<br />
security strap across the back post.<br />
Finally put the bobbin in place, with the elastic around the bobbins’groove, where the brake band<br />
rest during normal operation.<br />
When treadling the wheel without actually spinning yarn, you can experience an irritating sound.<br />
This is the result of vibrations of the bobbin, due to the fact that there is no yarn pulling on the<br />
bobbin.<br />
Important:<br />
During longer periods when you are not spinning, we recommend that you take the drive band out<br />
of the pulley groove, and position the drive band in front or behind the pulley on the shaft.<br />
Take care that no dirt accumulates in the hole of the pulley.<br />
At the bottom of this hole is the locking magnet, which holds the flyer shaft in place. If some metal<br />
parts do get into this hole, use a pair of tweezers to clear.<br />
4